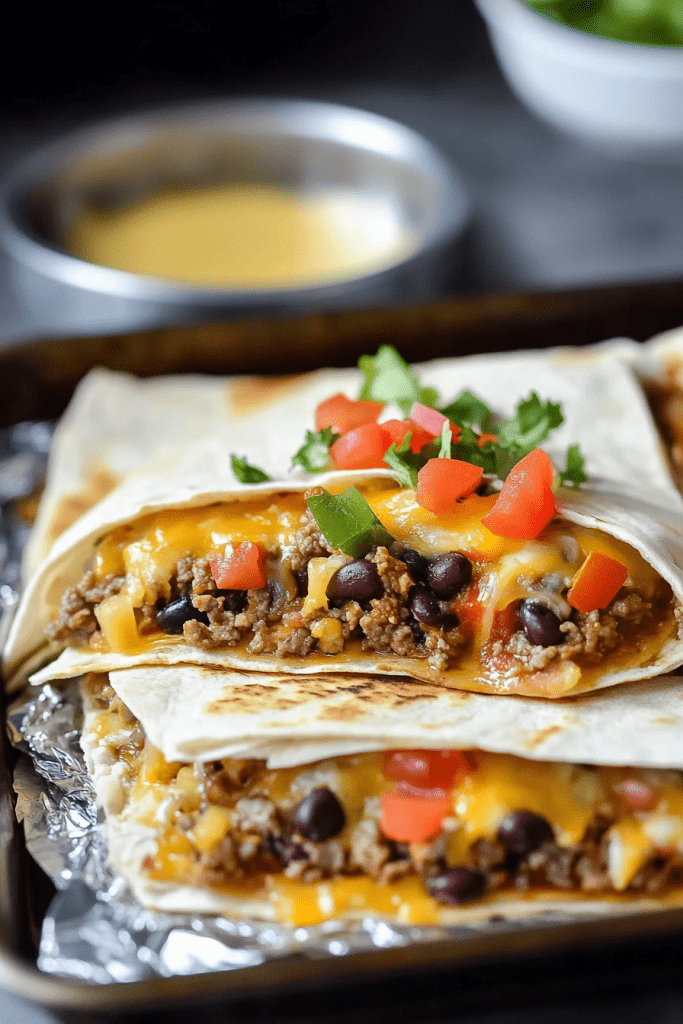
Loaded Sheet Pan Quesadillas are the ultimate solution for feeding a crowd or indulging in a hearty, comforting meal. Packed with savory ground beef, tender vegetables, black beans, and melted cheese, these quesadillas combine bold, Tex-Mex flavors with the convenience of oven baking. By assembling everything in a single sheet pan, you get perfectly crispy edges and a gooey, cheesy center without the hassle of flipping individual quesadillas on the stovetop.
This recipe is perfect for parties, game-day snacks, or a fun family dinner. Serve it with your favorite toppings like guacamole, sour cream, salsa, or pico de gallo to customize every bite. Plus, leftovers are just as good—reheat them for a quick meal that tastes fresh and delicious.
Why You’ll Love This Recipe
• Crowd-Pleaser: Makes a large batch, perfect for gatherings or meal prep.
• Bold Flavors: A savory mix of taco-seasoned beef, beans, veggies, and cheese.
• Easy to Customize: Add your favorite toppings or swap ingredients to suit your taste.
Ingredients
For the Quesadilla Filling
• 2 tablespoons olive oil
• 1 pound lean ground beef
• 1 yellow onion, chopped
• 1 red bell pepper, chopped
• 1 (15-ounce) can black beans, drained and rinsed
• 1 (5-ounce) can mild green chiles
• 3 tablespoons taco seasoning (adjust to taste)
• ½ teaspoon kosher salt (plus more to taste)
• ½ teaspoon ground black pepper
• ¼ cup water
For Assembly
• Nonstick cooking spray
• 10 medium (10-inch) flour tortillas
• 16 ounces grated cheddar or Mexican blend cheese
Optional Toppings
• Guacamole
• Sour cream
• Salsa or pico de gallo
• Fresh cilantro
Instructions
Step 1: Preheat the Oven
1. Preheat your oven to 350˚F (175˚C). Position a rack in the center of the oven.
Step 2: Prepare the Filling
1. Heat olive oil in a large skillet over medium heat.
2. Add the ground beef and cook, breaking it into small pieces, until browned, about 4-5 minutes.
3. Stir in the chopped onion, red pepper, black beans, and green chiles. Cook for an additional 5-6 minutes, until the vegetables are softened but not browned.
4. Add taco seasoning, salt, pepper, and ¼ cup of water. Stir well and cook for 3-4 more minutes, until the water evaporates and the flavors meld. Remove from heat and adjust seasoning as needed.
Step 3: Assemble the Quesadilla
1. Spray a quarter sheet pan (9 x 13-inch) with nonstick cooking spray.
2. Lay 2 tortillas in the center of the pan, slightly overlapping. Arrange 6 more tortillas around the edges of the pan, overlapping them and leaving half of each tortilla hanging over the edges.
3. Sprinkle ⅓ of the grated cheese evenly over the base layer of tortillas. Spread the cooked filling evenly over the cheese layer. Top with the remaining cheese.
4. Place 2 more tortillas in the center to cover the filling. Fold the overhanging edges of the bottom tortillas over the top layer, creating a sealed “lid.” Patch any gaps with extra tortilla pieces if needed.
5. Lightly spray the top with cooking spray. Place a second, slightly smaller baking sheet or dish on top, lined with foil to prevent sticking, to weigh down the quesadilla.
Step 4: Bake the Quesadilla
1. Bake in the preheated oven for 20 minutes.
2. Remove the top baking sheet and foil, increase the oven temperature to 400˚F (200˚C), and bake for an additional 10-15 minutes, until the top is golden brown and crispy.
Step 5: Slice and Serve
1. Let the quesadilla rest for at least 10 minutes before slicing. Use a sharp knife to cut through the top tortilla and a bench scraper or pizza cutter to finish slicing into rectangles.
2. Serve warm with your favorite toppings like guacamole, sour cream, salsa, or fresh cilantro.
Tips
• Customize the Filling: Add corn, jalapeños, or shredded chicken for variety.
• Crispy Tortillas: Use cooking spray or a light brush of oil to achieve a perfectly crispy crust.
• Make It Vegetarian: Omit the ground beef and double the beans and veggies for a meatless version.
• Reheating Leftovers: Reheat slices in a 350˚F oven for 8-10 minutes to restore their crispy texture.
Storage Options
• Refrigeration: Store leftover quesadilla slices in an airtight container in the refrigerator for up to 4-5 days.
• Freezing: Wrap individual slices in foil or plastic wrap, then place them in a freezer-safe container for up to 2 months. Reheat in the oven or toaster oven for best results.
Loaded Sheet Pan Quesadillas offer a simple and delicious way to enjoy a crowd-pleasing dish without the hassle of individual preparation. With bold flavors, a crispy texture, and endless topping possibilities, this recipe is sure to become a family favorite!