These Strawberry Heart Hand Pies are a delightful, charming treat that brings a burst of summer sweetness and a touch of whimsy to your dessert table. Imagine a tender, flaky pie crust cut into adorable heart shapes, each one filled with luscious strawberry jam that sparkles with natural fruit flavor. The pies are not only visually appealing with their romantic heart silhouettes but also offer an irresistible combination of textures—the crispness of the golden, baked crust paired with the smooth, jammy center. Enhanced by a glossy vanilla glaze, these hand pies exude both elegance and comfort, making them perfect for a special occasion or an everyday indulgence. Their delicate appearance and vibrant taste make them ideal for sharing with loved ones, and they’re sure to be a hit at parties, brunches, or any gathering where a little extra sweetness is welcome. The process of crafting these little pies is as enjoyable as it is rewarding. With a few simple ingredients and some creative love, you can transform premade pie crusts into heart-shaped masterpieces that capture the spirit of homemade baking. Whether you’re a seasoned baker or trying your hand at pastry for the first time, these Strawberry Heart Hand Pies offer a fun and accessible way to impress your family and friends.
The beauty of these hand pies lies in their versatility and ease of customization. By using premade pie crusts (or your own homemade pie dough), you can quickly roll out the dough on a lightly floured surface and cut out perfect hearts using a cookie cutter. The strawberry jam—rich in flavor yet balanced in sweetness—forms the heart of the filling, while the egg wash ensures a shiny, golden finish as the pies bake to perfection. Once out of the oven, a silky vanilla glaze is drizzled over the pies, adding an extra layer of sweetness and a sophisticated touch to these humble treats. The recipe invites you to be creative: you might experiment with different types of jam or even incorporate a hint of lemon zest into the filling for an extra burst of brightness. The hands-on process of assembling the pies, from cutting the hearts to crimping the edges with a fork, makes this recipe a joyful activity that can be enjoyed with friends or family. Perfect for celebrations such as Valentine’s Day or simply as a delightful weekend treat, these hand pies combine the fun of crafting with the pleasure of savoring a truly delectable dessert.
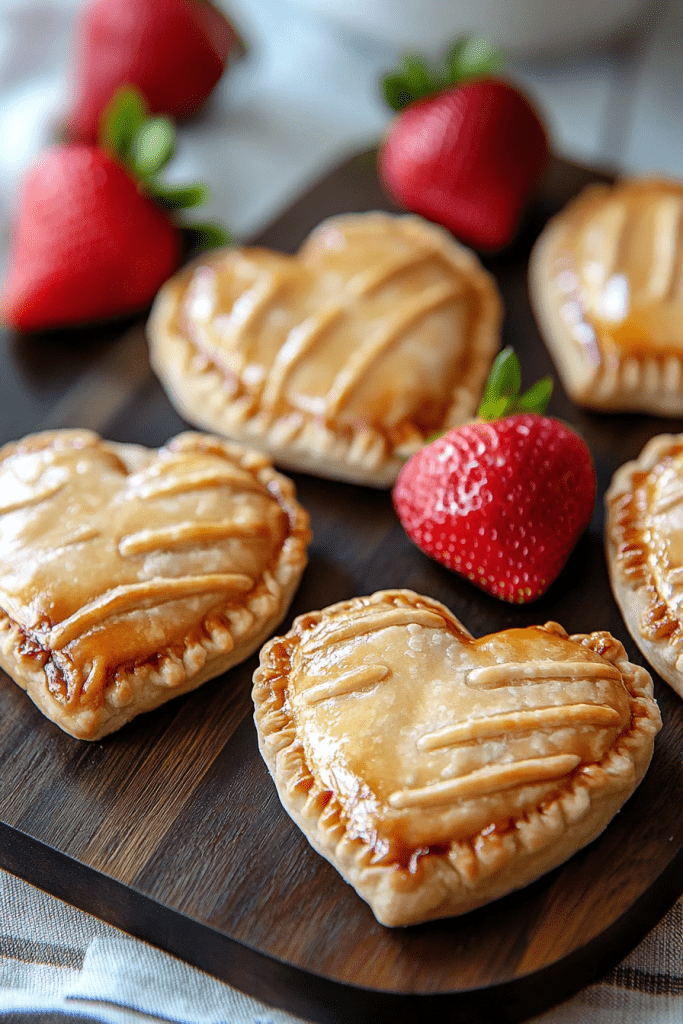
Why You’ll Love This Recipe:
• Adorable Presentation: The heart shape makes these pies perfect for any occasion that calls for a little romance or fun.
• Deliciously Sweet Filling: The rich strawberry jam provides a natural sweetness that bursts with flavor in every bite.
• Crispy and Flaky Crust: A golden, tender crust that contrasts beautifully with the smooth filling.
• Elegant Vanilla Glaze: A smooth, shiny glaze adds a touch of sophistication and extra sweetness.
• Easy to Customize: Experiment with different jams or add a hint of citrus for a unique twist on a classic flavor.
Ingredients
• All-purpose flour (for dusting)
• 2 premade 9-inch pie crusts or your favorite homemade pie dough
• ¾ cup strawberry jam
For the Egg Wash:
• 1 large egg
• 1 tablespoon water
For the Vanilla Glaze:
• 1 cup powdered sugar
• 2 tablespoons milk
• 1 teaspoon vanilla extract
Instructions
1. Preheat the Oven and Prepare Baking Sheets:
• Preheat your oven to 400°F (200°C).
• Line two baking sheets with parchment paper and set them aside. This ensures that your hand pies will bake evenly without sticking to the pan.
2. Prepare the Egg Wash:
• In a small bowl, whisk together 1 large egg and 1 tablespoon of water until fully combined.
• Set the egg wash aside; you will use it later to brush over the pies for a beautiful, glossy finish.
3. Roll Out the Dough:
• Lightly dust your work surface with all-purpose flour to prevent sticking.
• Roll out the two premade pie crusts (or your homemade pie dough) on the floured surface. If using homemade dough, roll it to approximately a 13-inch diameter to ensure you have enough surface area.
• Work carefully to achieve an even thickness that will result in a uniform bake.
4. Cut the Dough into Heart Shapes:
• Using a 3.5-inch heart-shaped cookie cutter, cut out 24 pieces from the rolled dough. Typically, each pie crust will yield about 8 heart-shaped cut-outs.
• Gather any remaining dough scraps, gently roll them out again on the floured surface, and cut additional heart shapes as needed. You will require 12 cut-outs for the bottom crusts and 12 for the tops of the pies.
5. Vent the Top Crusts:
• Take the 12 heart-shaped pieces that will serve as the top crusts and use a fork to prick small vents in each one. These vents are important as they allow steam to escape during baking, preventing the pies from puffing up or bursting.
6. Assemble the Hand Pies:
• Arrange the 12 bottom crust heart shapes on your work surface.
• Spoon about 1 tablespoon of strawberry jam into the center of each bottom crust. The jam should be evenly distributed, leaving enough room at the edges for a proper seal.
• Carefully place a vented top crust heart over each jam-filled bottom crust.
• Use a fork to gently crimp the edges of the two pieces together, ensuring a secure seal that will keep the filling inside during baking.
7. Apply the Egg Wash:
• Lightly brush the tops of each assembled hand pie with the prepared egg wash using a pastry brush. This will help the pies develop a gorgeous, golden-brown sheen as they bake.
8. Bake the Hand Pies:
• Using a flat spatula, transfer the assembled hand pies to the parchment-lined baking sheets. Arrange them in a single layer with a little space between each pie to allow for even baking.
• Place the baking sheets in the preheated oven and bake for approximately 20 minutes, or until the pies are golden brown and the crust appears crisp and fully baked.
9. Cool the Pies:
• Once baked, remove the hand pies from the oven and transfer them to a wire cooling rack.
• Allow the pies to cool completely before proceeding to the glazing step. Cooling is essential to prevent the glaze from melting off immediately upon application.
10. Prepare the Vanilla Glaze:
• In a medium bowl, combine 1 cup of powdered sugar, 2 tablespoons of milk, and 1 teaspoon of vanilla extract.
• Whisk the ingredients together until the mixture is smooth and forms a thick but pourable glaze. Adjust the consistency if needed by adding a little more milk or powdered sugar.
11. Glaze the Pies:
• Using a spoon or a piping bag, drizzle the vanilla glaze generously over the cooled hand pies. Ensure that the glaze covers the top of each pie for a beautiful, finished look.
• Allow the glaze to set for approximately two hours before serving, so that it firms up slightly and provides a perfect, glossy finish.
Tips
• Flouring the Surface: Be sure to dust your work surface well with all-purpose flour to prevent the dough from sticking while rolling it out. This will make the process smoother and help maintain the dough’s delicate texture.
• Reusing Scraps: Don’t let any dough go to waste! Gather up the scraps and gently roll them out again to cut more heart shapes. This maximizes your yield and ensures you have enough pieces for both the bottom and top crusts.
• Consistent Filling: When spooning the strawberry jam onto the bottom crusts, try to use a consistent amount (about 1 tablespoon per pie) to ensure each hand pie has an even balance of filling to crust.
• Sealing the Edges: After placing the top crust over the filling, use a fork to press the edges firmly. This not only seals the pie but also adds a decorative element to the final product.
• Egg Wash Application: A light, even brush of egg wash is key to achieving a shiny, golden finish on the crust. Be careful not to use too much, as an overly thick layer can cause the crust to become overly dark.
• Glaze Consistency: If your vanilla glaze is too thick, add a few drops of milk until it reaches a pourable consistency. Conversely, if it’s too thin, gradually whisk in a little more powdered sugar.
• Glazing Time: Patience is key when glazing these pies. Allow the glaze to set for at least two hours to achieve the best texture and appearance before serving.
Storage Options
• Room Temperature:
• Once fully glazed and set, these hand pies can be stored in an airtight container at room temperature for up to 1 day. However, for optimal crispness of the crust, it is best to enjoy them fresh.
• Refrigeration:
• If you need to store the pies for a longer period, place them in an airtight container and refrigerate for up to 2 days. Before serving, let them come to room temperature to allow the flavors and textures to return to their optimal state.
• Freezing:
• These hand pies can be frozen, though the crust may lose some of its crispness upon thawing. To freeze, arrange the cooled hand pies on a baking sheet in a single layer and freeze until solid. Then, transfer them to a freezer-safe container or resealable bag. They can be stored in the freezer for up to 1 month. To serve, thaw overnight in the refrigerator and then reheat in an oven at 350°F (175°C) for 10 minutes to help restore some crispness.
• Reheating:
• For a quick refresh, reheat individual hand pies in a preheated oven at 350°F (175°C) for about 5 minutes. Avoid using the microwave, as it may make the crust soggy.