")
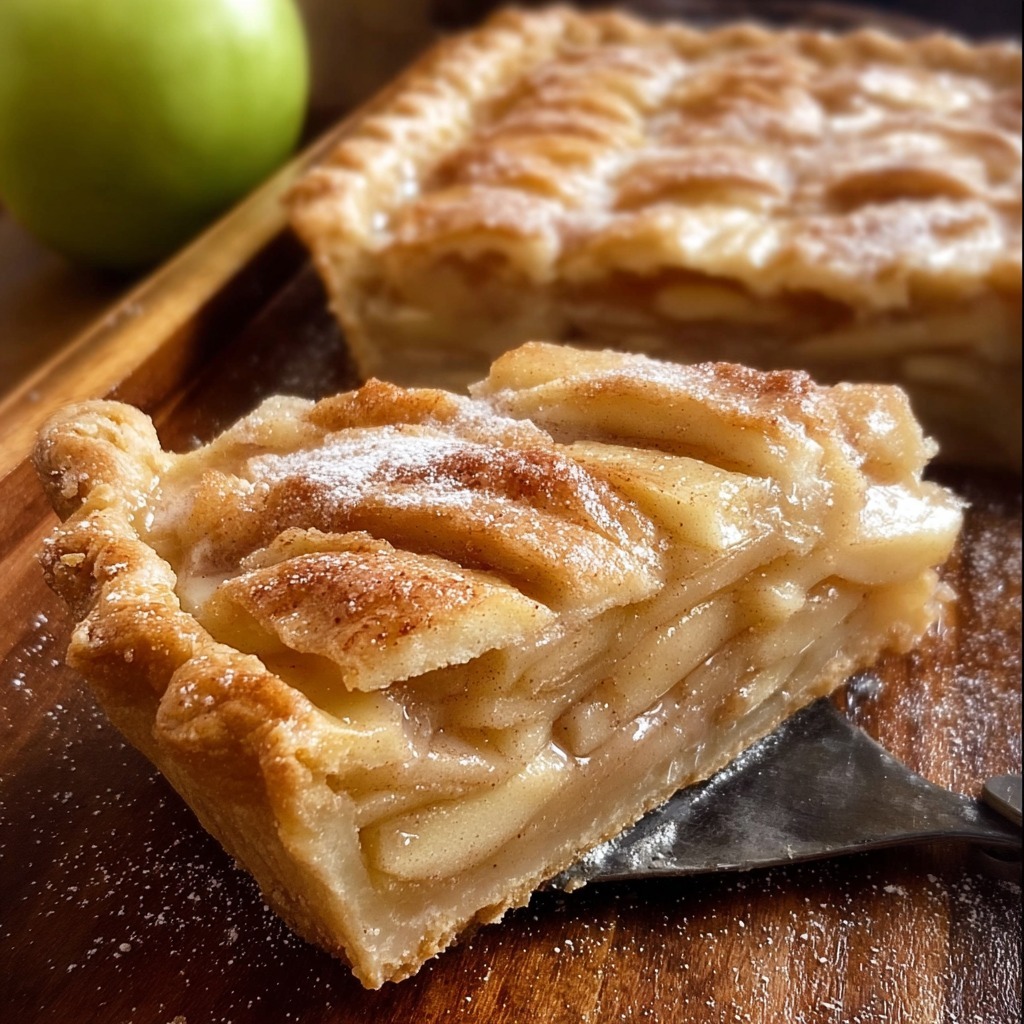
Chicago-Style Bakery Apple Slices are a legendary Midwestern treat, a glorious hybrid of a buttery sugar cookie, a spiced apple pie, and a crumbly streusel topping, all baked into one irresistible, portable slab. This recipe captures the essence of classic corner-bakery indulgence, featuring a unique shortbread-like crust that doubles as its own crumb topping. The magic begins with a single dough, rich with cold butter and brown sugar, which is divided: two-thirds are pressed into a pan to form a sturdy, sweet foundation, while the remainder is reserved to become the iconic craggy, golden crumble on top. This ingenious method ensures perfect textural harmony and consistent flavor in every layer. The heart of the slice is a generous mound of tart apples—like Granny Smith—tossed with warm cinnamon and nutmeg, whose juices thicken with cornstarch as they bake, creating a lush, cohesive filling that holds its shape when cut.
The true brilliance of this recipe lies in its structural integrity and nostalgic flavor profile. Unlike a loose fruit pie, these slices are designed to be picked up and eaten out of hand, thanks to the sturdy crust and the thick, jammy apple layer that sets perfectly as it cools. The optional vanilla glaze, drizzled in classic bakery-crosshatch fashion, adds a final touch of sweetness and a professional finish that makes them utterly unmistakable. As they cool, the flavors meld, and the texture firms up, yielding a perfectly neat square that offers a symphony of contrasts: tender-yet-crisp crumble, soft spiced apples, and a firm, buttery base. It’s a recipe that delivers the deep satisfaction of apple pie with the convenience and shareable joy of a bar cookie, making it a guaranteed showstopper for potlucks, bake sales, or any autumn gathering.
Why You’ll Love This Recipe:
- Iconic Bakery-Style Texture & Flavor: Perfectly captures the beloved texture of a firm, handheld apple slice with a buttery crust and spiced filling.
- One Dough, Two Layers: The same simple dough forms both the perfect base and the crumbly topping, simplifying the process without sacrificing complexity.
- Portable & Shareable: Neat, sturdy squares are ideal for packing in lunches, taking to gatherings, or gifting.
- Make-Ahead Friendly: Tastes even better the next day and holds its texture beautifully, making it perfect for preparing ahead.
- Crowd-Pleasing Comfort: A universally adored dessert that combines the best elements of apple pie and a crumble bar.
Ingredients:
For the Crust & Crumble Topping:
2 ½ cups (312g) all-purpose flour, spooned and leveled
¾ cup (150g) granulated sugar
¾ cup (150g) packed light brown sugar
1 teaspoon baking powder
½ teaspoon fine sea salt
1 cup (2 sticks / 226g) cold unsalted butter, cubed
1 large egg, lightly beaten
1 teaspoon pure vanilla extract
For the Apple Filling:
6 cups (about 700g) peeled, cored, and thinly sliced apples (Granny Smith or a mix with Honeycrisp)
½ cup (100g) granulated sugar
¼ cup (50g) packed light brown sugar
2 tablespoons (18g) cornstarch
1 ½ teaspoons ground cinnamon
¼ teaspoon ground nutmeg
1 tablespoon fresh lemon juice
1 teaspoon pure vanilla extract
For the Classic Glaze (Optional):
1 cup (120g) powdered sugar, sifted
2–3 tablespoons milk or cream
½ teaspoon pure vanilla extract
Instructions:
Step 1: Preheat and Prepare Pan
Preheat your oven to 350°F (175°C). Line a 9×13-inch metal baking pan with parchment paper, leaving an overhang on the two long sides for easy removal. Grease any exposed parts of the pan.
Step 2: Make the Cookie Dough Base
In a large bowl, whisk together the flour, both sugars, baking powder, and salt. Using a pastry cutter, two forks, or your fingertips, cut in the cold butter cubes until the mixture resembles coarse, pea-sized crumbs. Stir in the beaten egg and vanilla extract with a fork until a soft, crumbly dough comes together. It will be moist but not sticky.
Step 3: Press the Crust
Transfer about two-thirds (roughly 3 ½ cups) of the dough mixture into the prepared pan. Press it very firmly and evenly into the bottom to form a solid crust layer. Use the bottom of a measuring cup to help compact it.
Step 4: Prepare the Apple Filling
In another large bowl, combine the sliced apples, both sugars, cornstarch, cinnamon, nutmeg, lemon juice, and vanilla. Toss vigorously until the apples are evenly and thoroughly coated. Let the mixture sit for 5 minutes, then toss again.
Step 5: Assemble the Slices
Spread the apple mixture evenly over the pressed crust, leaving behind any excess liquid that hasn’t been absorbed (this prevents a soggy crust). Take the remaining one-third of the dough and crumble it evenly with your fingers over the top of the apples, creating a varied, pebbly texture.
Step 6: Bake
Bake in the preheated oven for 45 to 55 minutes, or until the topping is deep golden brown and the filling is visibly bubbling thickly around the edges.
Step 7: Cool Completely (Crucial Step)
Place the pan on a wire rack and allow it to cool completely, for at least 2 hours and preferably 3-4 hours. This is essential for the filling to set and the bars to be sliced cleanly.
Step 8: Glaze and Slice
Once completely cool, lift the entire slab out of the pan using the parchment paper. For the glaze, whisk the powdered sugar, 2 tablespoons of milk, and vanilla until smooth. Add more milk, a teaspoon at a time, until a thick but pourable consistency is reached. Drizzle in lines over the slab. Let the glaze set for 15 minutes, then use a sharp knife to cut into squares or rectangles.
Tips:
- Apple Choice is Key: Use firm, tart apples like Granny Smith for structure and flavor. Mixing in 1-2 Honeycrisp or Braeburn apples adds pleasant sweetness and complexity.
- Press the Crust Firmly: A well-compacted crust is the foundation. It should feel solid when pressed; this prevents crumbling when sliced.
- Slice Apples Thinly and Evenly: Aim for ¼-inch thick slices for even cooking and a cohesive filling.
- Don’t Skip the Cooling Time: Slicing while warm will result in a messy, runny filling. Patience is required for perfect bakery-style squares.
- Thicken the Filling: If your apples are very juicy, you can increase the cornstarch by ½ tablespoon to ensure a firm set.
Storage Options:
- Room Temperature: Store glazed or unglazed slices in a single layer in an airtight container at cool room temperature for up to 2 days.
- Refrigerator: For longer storage, keep in the refrigerator for up to 5 days. The texture remains excellent.
- Freezing: Freeze unglazed, fully cooled slices on a parchment-lined tray until solid, then transfer to a freezer bag or container. Freeze for up to 3 months. Thaw overnight in the refrigerator and glaze before serving, if desired.
- Make-Ahead: The entire slab can be baked, cooled, and stored (unglazed) at room temperature for 1 day or refrigerated for 2 days before glazing and serving.
Chicago-Style Bakery Apple Slices are a masterpiece of nostalgic baking. They deliver the soul-warming comfort of homemade apple pie in a uniquely sturdy, shareable, and utterly delicious form that is sure to become a cherished recipe in your collection.