")
The Classic Vanilla Butter Cookie is the epitome of timeless baking, a delicate and sophisticated treat that has graced cookie tins and dessert tables for generations. These cookies are celebrated for their sublime, melt-in-your-mouth texture that comes from a high ratio of quality butter to flour, creating a crumbly, tender bite that simply dissolves on the tongue. Their flavor is a pure and simple celebration of butter and vanilla, unadulterated by overwhelming spices or mix-ins, making them the perfect canvas for creative decoration or a humble companion to a cup of afternoon tea. The process of piping these cookies into elegant swirls or rosettes is a ritual in itself, transforming simple ingredients into edible works of art that are as beautiful as they are delicious.
While they may appear elegant and complex, these butter cookies are surprisingly accessible for bakers of all skill levels. The recipe relies on foundational creaming and piping techniques, offering a wonderful opportunity to hone one’s baking skills. The key to their perfect texture lies in the patience required for chilling the dough, which ensures the cookies hold their intricate shape during baking and achieve that signature lightness. Whether left plain, dipped in rich chocolate, or adorned with colorful sprinkles, these cookies are incredibly versatile. They are the quintessential holiday cookie, a lovely addition to a wedding or baby shower dessert spread, or simply a rewarding project for a quiet weekend, promising a result that is both impressive and deeply satisfying to create from scratch.
Why You’ll Love This Recipe:
- Perfect Texture: Experience the quintessential shortbread-like texture—crisp on the outside, tender and crumbly on the inside, literally melting in your mouth with every bite.
- Elegant and Versatile: Their simple, buttery flavor makes them the perfect base for endless decoration. Dip them in chocolate, drizzle with icing, or leave them classic and plain.
- The Art of Baking: Piping these cookies is a joyful and therapeutic process, resulting in stunning, professionally-looking treats that are sure to impress.
- Make-Ahead Friendly: The dough can be made days in advance and stored in the refrigerator or freezer, allowing you to bake fresh cookies whenever the mood strikes.
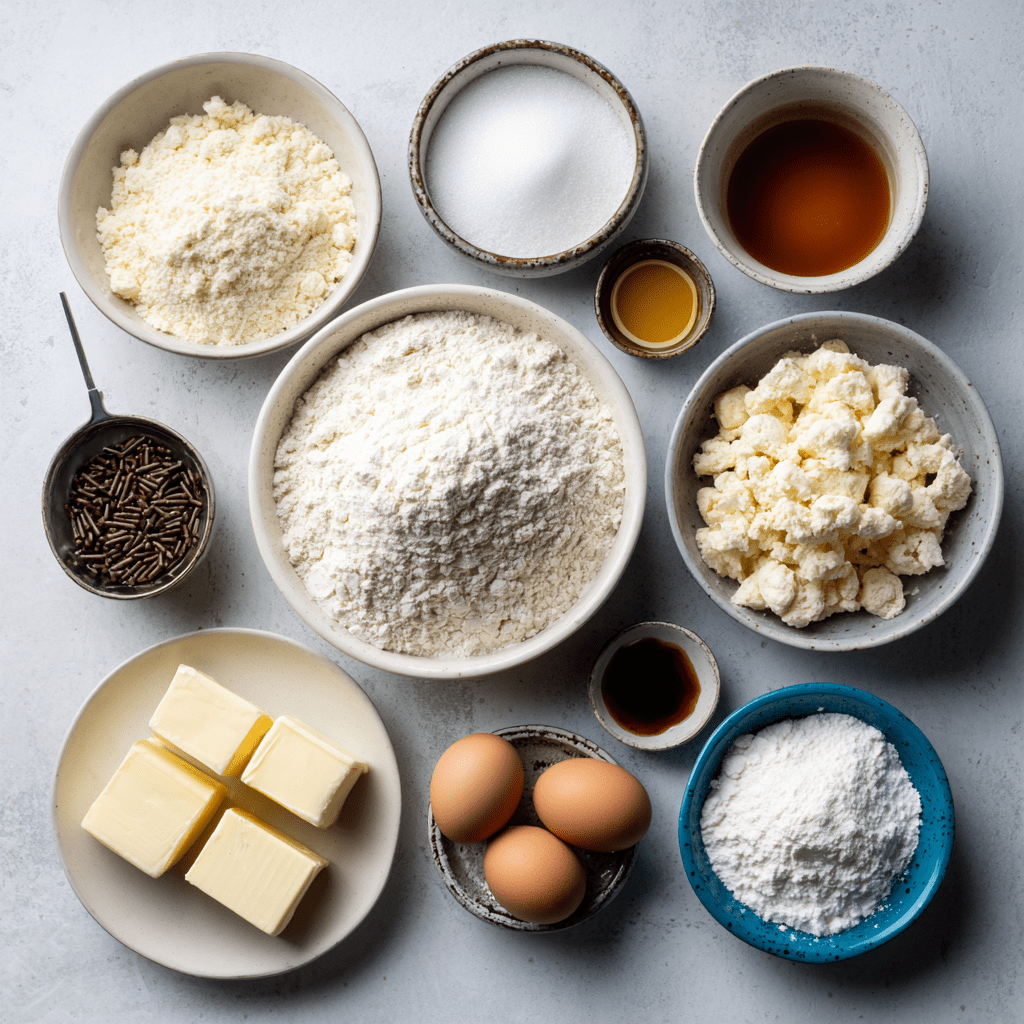
Ingredients:
- 2¼ cups all-purpose flour (spooned and leveled for accuracy)
- ¼ teaspoon salt (to enhance the flavor of the butter)
- 1 cup unsalted butter, softened to room temperature (this is the star of the show)
- ¾ cup granulated sugar (for sweetness and structure)
- 2 teaspoons pure vanilla extract (for aromatic warmth)
- 1 large egg, room temperature (to bind the ingredients)
- 2-3 teaspoons milk (if needed, to adjust the dough consistency)
- white chocolate chips, optional (for decorating)
- semi-sweet chocolate chips, optional (for decorating)
- coconut oil, optional (to thin melted chocolate for dipping)
- assorted sprinkles (for a festive finish)
Instructions:
Step 1: Combine Dry Ingredients
- In a medium-sized bowl, place the 2¼ cups of all-purpose flour and the ¼ teaspoon of salt. Use a whisk to combine them thoroughly for about 30 seconds. This aerates the flour and ensures the salt is evenly distributed, which will create a consistent texture in your finished cookies. Set this bowl aside.
Step 2: Cream Butter and Sugar
- In the bowl of a stand mixer fitted with the paddle attachment, or in a large bowl using a hand mixer, combine the softened, unsalted butter and the granulated sugar. Beat on medium speed for approximately 2 minutes. The mixture is ready when it becomes noticeably paler in color, has a fluffy texture, and is smooth, with the sugar granules mostly dissolved into the butter.
Step 3: Incorporate Wet Ingredients
- To the creamed butter and sugar, add the 2 teaspoons of vanilla extract and the single room-temperature egg. Beat on medium speed for one full minute, pausing to scrape down the sides and bottom of the bowl with a rubber spatula to ensure everything is perfectly combined. The mixture may look slightly curdled at this point, which is completely normal and will resolve once the flour is added.
Step 4: Add Dry Ingredients
- Reduce the mixer speed to low. Gradually add the reserved flour and salt mixture to the wet ingredients. Mix only until the flour streaks have just disappeared and the dough begins to clump around the paddle. It is crucial not to overmix at this stage, as overworking the dough can develop the gluten in the flour and lead to tough cookies.
Step 5: Evaluate Dough Consistency
- This is the most critical step for successful piping. Assess the dough’s texture. It should be soft but firm enough to hold a shape. To test it, fit a piping bag with a large open star tip (such as an Ateco 826 or 827) and fill it with a portion of the dough. If the dough pipes easily and holds a defined swirl, it is perfect. If it feels too stiff and difficult to squeeze, add one teaspoon of milk and mix it in by hand. Re-test and continue adding milk one teaspoon at a time only until the dough becomes pipeable.
Step 6: Pipe and Chill
- Line your cookie sheets with parchment paper. Pipe the dough into 1.5 to 2-inch swirls, spacing them about 2½ inches apart on the sheets to allow for slight spreading. Once a sheet is full, place it, uncovered, in the refrigerator for 30-40 minutes. This chilling period is non-negotiable, as it solidifies the butter and ensures the cookies will maintain their beautiful piped shape in the oven.
Step 7: Bake to Perfection
- While the cookies are chilling, preheat your oven to 350°F (175°C). Bake the chilled cookies one sheet at a time in the center of the preheated oven for 12-15 minutes. They are done when the edges are set and have a very light golden brown color. The centers may still seem soft, but they will firm up as they cool.
Step 8: Cool Completely
- Remove the baking sheet from the oven and let the cookies rest on the hot sheet for exactly 5 minutes. This allows them to set up enough to be moved without breaking. Then, using a spatula, carefully transfer them to wire cooling racks to cool completely before any decoration is attempted.
Step 9: Decorate (Optional)
- If you wish to decorate, place your optional chocolate chips in a microwave-safe bowl with a small amount of coconut oil (about 1 teaspoon per cup of chips). Heat in 20-second increments, stirring thoroughly each time, until smooth and fluid. Dip the completely cooled cookies into the chocolate or drizzle it over the top, then immediately add sprinkles before the chocolate sets.
Tips:
- Butter Temperature is Key: Your butter should be softened to the point where you can easily make an indentation with your finger, but it should not be shiny or melty. True room-temperature butter is essential for proper creaming and aeration.
- Avoid Overmixing: Once the flour is added, mix only until the dough comes together. Overmixed dough will be tough and may not pipe well.
- Consistent Piping: For evenly baked cookies, try to pipe them all to the same size and thickness. If your hand gets tired while piping, simply place the filled piping bag in the refrigerator for a few minutes to re-firm the dough.
- Chilling is Mandatory: Do not skip or shorten the chilling time. It is the secret to cookies that are both beautifully shaped and perfectly textured.
Storage Options:
- Airtight Container at Room Temperature: Store fully cooled, undecorated cookies in an airtight container at room temperature for up to 1 week.
- Freezing Dough: The piped, unbaked cookie shapes can be frozen solid on a baking sheet, then transferred to a freezer bag. Bake directly from frozen, adding 1-2 minutes to the baking time.
- Freezing Baked Cookies: Fully baked and cooled cookies can be frozen in an airtight container for up to 3 months. Thaw at room temperature.
- Decorated Cookies: Cookies dipped in chocolate should be stored in a single layer or with parchment between layers in a cool, dry place.
Classic Vanilla Butter Cookies are more than just a confection; they are a baking tradition. Their delicate texture, rich buttery flavor, and elegant appearance make them a perennial favorite that never goes out of style. Enjoy the process of creating, baking, and sharing these little pieces of edible artistry