A poisoned colon can affect our quality of life and generate other pains, such as diabetes or frequent headaches. Purifying it brings benefits to the whole organism.
Many people do not know this , but it is estimated that 90% of diseases and weight problems are linked to a dirty colon.
This organ plays an important role in our health because it is responsible for expelling all the toxins and waste that our body does not need and which, in the long term, can cause serious health problems.
The juice we offer combines the benefits of beetroot, carrots and red apple to make an ideal drink for cleansing the intestine:
Ingredients :
6 kale leaves
3 carrots
2 red apples cut into pieces
1 beet
Half a peeled lemon
2.5 cm piece of ginger
Do not forget to peel and wash the carrots, beet and lemon.
Make sure your fruits and vegetables are organic.
Instructions :
Pour one to two cups of water into your blender.
Add all the ingredients and mix everything.
Using a strainer, filter the mixture to collect the juice.
Mix again with a spoon.
You can add a few ice cubes to your juice to refresh it.
To store this juice, use a glass jar and put it in a refrigerator.
Warnings :
– Lemon is not recommended if you suffer from ulcer or heartburn or citrus allergy
– It is also not recommended if you are taking antacid medicines, or medicines to treat blood or heart problems.
– Beets are prohibited if you are on anticoagulant treatment or if you suffer from kidney disease.
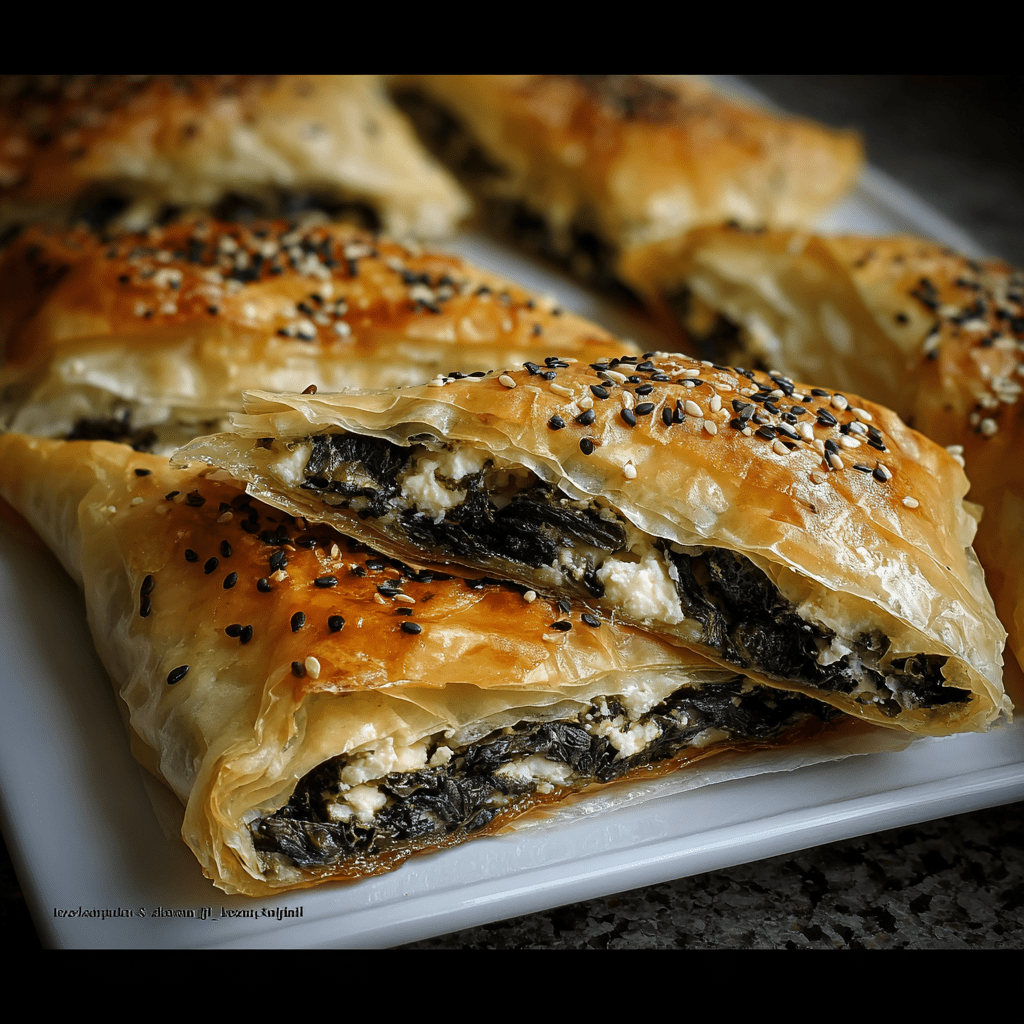
Spanakopita is a classic Greek pastry that’s beautifully flaky, buttery, and filled with a deliciously savory spinach and feta mixture. Traditionally, it’s baked in large trays and cut into squares or triangles, but this version uses filo dough rolled and cut into neat little triangles — perfect for parties, snacks, or even a light meal with a salad on the side. What makes spanakopita so irresistible is the combination of crisp, golden filo with the creamy, salty tang of feta and the earthy richness of cooked spinach.
This recipe is easy enough for home cooks who might be intimidated by filo dough, but still tastes authentic and impressive enough for serving guests. With a few pantry staples like milk, oil, and eggs, plus that classic spinach-feta filling, you’ll have flaky, savory pastries that are bound to be a hit. The triangles bake up in just 15 minutes, making them an excellent choice for a last-minute appetizer or snack.
Why You’ll Love This Recipe:
• Flaky, golden filo pastry with a savory spinach-feta filling.
• Quick to assemble and bake — ready in just about 30 minutes.
• Perfect finger food for parties, family gatherings, or everyday snacking.
• Customizable — add fresh herbs like dill or parsley for extra flavor.
Ingredients:
1 egg
125 ml (½ cup) milk
125 ml (⅗ cup) vegetable oil
2 teaspoons water
1 teaspoon salt
Cooked spinach
Feta cheese
Salt and pepper, to taste
3 rolls of filo dough
1 egg yolk (for brushing)
Optional: poppy seeds for topping
Instructions:
Preheat oven to 180°C (356°F).
In a bowl, whisk together the egg, milk, oil, water, and salt.
Lay out one sheet of filo dough, brush lightly with the egg mixture, and repeat until you have 3 layers.
Spread the cooked spinach and feta mixture evenly over the filo stack. Season with salt and pepper.
Roll from one end to the other into a strip, then cut into triangles.
Place triangles on a parchment-lined baking sheet. Brush with egg yolk and sprinkle with poppy seeds if desired.
Bake for 15 minutes, or until golden and crispy.
Tips:
Work quickly with filo dough, as it dries out fast. Keep unused sheets covered with a damp towel.
Add a handful of fresh dill, parsley, or green onions to the spinach-feta mix for extra flavor.
Make them ahead of time and refrigerate unbaked triangles, then bake when ready to serve.
Storage and Reheating:
Store baked spanakopita in an airtight container in the refrigerator for up to 3 days.
Reheat in the oven at 350°F until warm and crisp again.
Not ideal for freezing after baking, but you can freeze the unbaked triangles and bake directly from frozen, adding 5–7 minutes to the bake time.
Would you like me to also expand this into a larger tray-style version of spanakopita (cut into squares), so you have both variations handy?
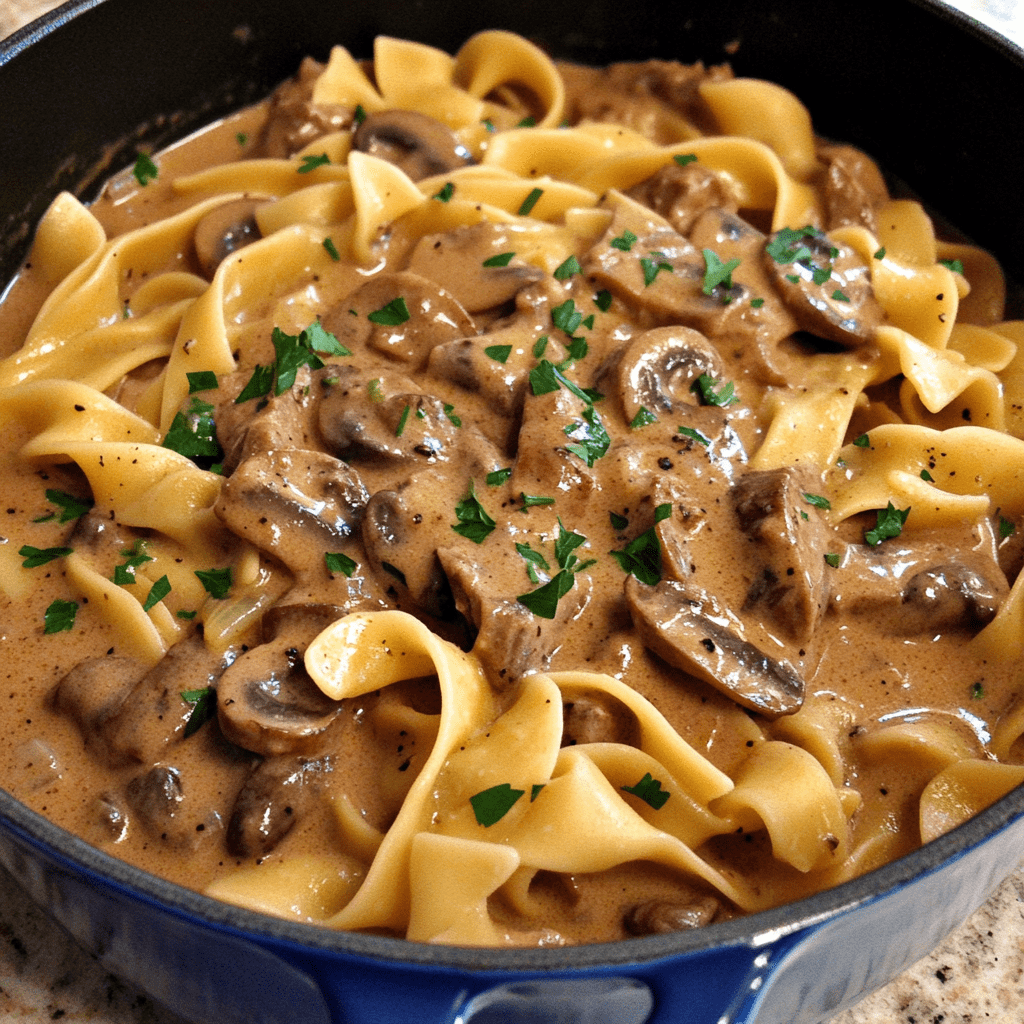
This Classic Beef Stroganoff is a creamy and savory dish that brings together tender slices of beef, earthy mushrooms, and a rich sour cream sauce. Served over egg noodles, it’s the perfect comfort meal with flavors that are satisfying and well-balanced. The Worcestershire sauce and Dijon mustard add a subtle depth, while the sour cream provides a touch of tanginess that enhances the beef and mushroom flavors.
This dish is ideal for weeknight dinners but delicious enough to serve to guests. With fresh parsley as a garnish, this stroganoff is both delicious and visually appealing.
Why You’ll Love This Recipe:
• Comforting and Hearty: The creamy sauce and tender beef make it a warm, satisfying meal.
• Easy Preparation: Straightforward ingredients and steps for a no-fuss meal.
• Classic Flavors: A traditional stroganoff with flavors that everyone loves.
• Kosher salt and freshly ground black pepper, to taste
• Chopped fresh parsley, for garnish
Instructions:
Step 1: Cook the Egg Noodles
• Bring a large pot of salted water to a boil, then add the egg noodles and cook according to package instructions. Drain well and set aside.
Step 2: Brown the Beef
• In a Dutch oven or large skillet, melt 1 tablespoon of butter over medium-high heat. Add the beef in batches, browning on both sides. Avoid overcrowding to ensure even browning. Remove the beef from the skillet and set aside, covering it to keep warm.
Step 3: Sauté Onions and Mushrooms
• Add the remaining tablespoon of butter to the pan. Once melted, add the chopped onion and mushrooms, cooking for 4-5 minutes over medium-high heat until the onions are soft and the mushrooms are browned.
Step 4: Add Garlic and Flour
• Reduce the heat to low, add the minced garlic, and cook for about 1 minute. Sprinkle the flour over the mixture and cook, stirring constantly, for 2 minutes to remove the raw flour taste.
Step 5: Make the Sauce
• Slowly stir in the beef broth, Worcestershire sauce, and Dijon mustard. Simmer the mixture for about 10 minutes, or until it thickens to a sauce-like consistency.
Step 6: Finish with Sour Cream
• Remove the skillet from the heat, then stir in the sour cream. Season the sauce with salt and freshly ground black pepper to taste.
Step 7: Combine and Serve
• Add the cooked egg noodles and browned beef back to the skillet, stirring gently to coat everything in the sauce. Warm over low heat for 1-2 minutes to combine the flavors.
• Garnish with chopped fresh parsley and serve immediately.
Storage Options:
• Refrigerator: Store leftovers in an airtight container for up to 3 days. Reheat on the stovetop over low heat.
• Freezer: Beef Stroganoff can be frozen, but the texture of the sour cream may change. To freeze, cool completely and store in a freezer-safe container for up to 2 months. Thaw in the fridge overnight and reheat gently.
Tips:
• Tender Meat: Petite shoulder or sirloin are great choices for tender meat slices in this recipe.
• Keep the Sauce Creamy: Avoid boiling the sauce after adding sour cream to maintain a smooth texture.
• Add Extra Depth: A splash of red wine can be added to the sauce for extra flavor if desired.
This Classic Beef Stroganoff is a delicious, comforting meal that’s full of rich flavors and creamy goodness. It’s sure to be a favorite!
Homemade Crunch Wrap Supremes are a delightful way to recreate a fast-food favorite in the comfort of your own kitchen. With their crispy layers, seasoned beef, creamy cheese, and fresh veggies, they offer the perfect combination of flavors and textures. The crunch of the toasted corn tortilla encased in a soft flour tortilla makes every bite a satisfying experience.
Perfect for casual dinners, game nights, or even a fun DIY meal assembly with friends and family, this recipe allows you to customize fillings to suit your taste. With fresh ingredients and easy preparation, you’ll have a meal that feels indulgent yet is made entirely at home.
Why You’ll Love This Recipe
• Customizable: Adjust fillings to your preference—add beans, extra veggies, or your favorite cheese.
• Family-Friendly: Everyone can assemble their own crunch wrap, making it a fun activity for all ages.
• Budget-Friendly: Uses simple, affordable ingredients to create a meal that tastes gourmet.
Ingredients
• 12 large “burrito size” flour tortillas
• 6 corn tortillas
• 1 lb ground beef
• 1 package taco seasoning (your choice)
• 1 jar taco cheese (nacho cheese sauce)
• 1 container sour cream
• 3-4 tomatoes, diced
• 1 bag/head iceberg lettuce, shredded
Note: Quantities for fillings are estimates. Adjust based on personal preference.
Instructions
Step 1: Prepare the Corn Tortillas
1. Preheat your oven to 400°F (200°C).
2. Spread out 6 corn tortillas on a baking sheet. Bake until crispy, about 7 minutes, checking every 2–3 minutes after the 5-minute mark to avoid burning.
3. Remove from the oven and set aside. Reduce oven temperature to “warm.”
Step 2: Shape the Flour Tortillas
1. Use one of the corn tortillas as a guide to cut 6 smaller circles out of 6 of the flour tortillas. These will be used to seal the crunch wraps. Reserve the scraps for making tortilla chips or discard.
Step 3: Cook the Beef
1. In a large skillet over medium heat, cook the ground beef until browned, breaking it into crumbles.
2. Drain any excess fat. Stir in taco seasoning and prepare according to the package instructions. Set aside.
Step 4: Assemble the Crunch Wraps
1. Lay one large flour tortilla flat. In the center, spread a layer of taco cheese.
2. Add a scoop of seasoned ground beef on top of the cheese.
3. Place a crispy corn tortilla on top of the beef.
4. Spread a layer of sour cream over the corn tortilla, then add diced tomatoes, shredded lettuce, and any additional toppings you like.
5. Top the layers with one of the smaller flour tortilla circles. Fold the edges of the large tortilla over the center, working in sections, until it forms a sealed wrap.
Step 5: Cook the Crunch Wraps
1. Heat a non-stick skillet over medium heat. Place the assembled crunch wrap seam-side down and cook for 2–3 minutes until golden and sealed.
2. Flip and cook the other side for an additional 2–3 minutes. Repeat with the remaining wraps.
Step 6: Serve and Enjoy
1. Serve the crunch wraps warm with additional taco cheese, sour cream, or salsa for dipping.
Tips for Success
• Tortilla Size: Ensure the flour tortillas are large enough to fold over the fillings completely.
• Extra Crispiness: Brush the outside of the crunch wraps with a little oil before cooking for extra crispiness.
• Leftovers: Store leftover fillings separately and assemble fresh crunch wraps as needed.
Storage Options
• Refrigeration: Store assembled but uncooked crunch wraps in the fridge for up to 2 days. Cook just before serving.
• Freezing: Wrap individually in foil and freeze for up to 1 month. Reheat in a skillet or oven.
Homemade Crunch Wrap Supremes are a crowd-pleaser that’s as fun to make as it is to eat. Whether you stick to the classic recipe or add your own twist, these wraps are sure to become a household favorite! 🌮✨
Introduction: Imagine the cozy morning light streaming through your window as you savor the aroma of Cranberry Orange Scones baking in the oven. This recipe melds the tangy essence of cranberries with the vibrant kick of fresh orange zest, tucked into rich, flaky scones. Whether you’re settling into a slow morning or hosting a friendly tea gathering, these scones are sure to enchant.
Why You’ll Love This Recipe:
Fruit-Filled Flavor: The zest of orange and tart cranberries create a lively taste sensation.
Irresistible Texture: These scones boast a crispy exterior with a soft, fluffy heart.
Quick and Easy: From start to finish, these scones take just about 30 minutes to make.
Ingredients:
2 cups all-purpose flour
1/4 cup granulated sugar
1 tablespoon baking powder
1/2 teaspoon salt
1/2 cup (1 stick) cold unsalted butter, cut into pieces
1/2 cup dried cranberries
Zest of 1 orange
1/2 cup heavy cream, plus a bit more for brushing
1 large egg
1 teaspoon vanilla extract
Detailed Instructions:
Oven Prep: Heat your oven to 400°F (200°C). Ready a baking sheet with parchment or a light greasing.
Dry Mix: In a sizable bowl, whisk together the flour, sugar, baking powder, and salt.
Butter Incorporation: Distribute the butter pieces into the dry mix, using a pastry blender or your fingers, until it looks like coarse crumbs.
Add Flavors: Stir the dried cranberries and orange zest into the mix.
Wet Ingredients: In another bowl, mix the heavy cream, egg, and vanilla together.
Dough Formation: Carefully fold the wet mixture into the dry, stirring just enough to come together into a rough dough.
Shape the Dough: On a floured surface, knead the dough gently and shape it into a circle about 1 inch thick.
Cut the Dough: Slice the dough into wedges or rounds and arrange them on your baking sheet.
Top Off: Brush the scone tops with a bit more cream to achieve a golden hue.
Baking Time: Bake for 15-18 minutes, or until the scones turn golden brown. Check with a toothpick for doneness.
Cooling: Allow the scones to cool briefly on the pan, then move to a cooling rack. Enjoy them warm or at room temperature, maybe with some clotted cream, jam, or butter.
Storage Options:
At Room Temperature: Keep the scones in a sealed container for up to 2 days.
In the Refrigerator: They can stay fresh in the fridge for about a week.
For Freezing: First freeze them on a tray, then store in a freezer bag for up to 3 months. Warm them in the oven or microwave when you’re ready to enjoy.
Follow this straightforward guide to create and relish these charming Cranberry Orange Scones!
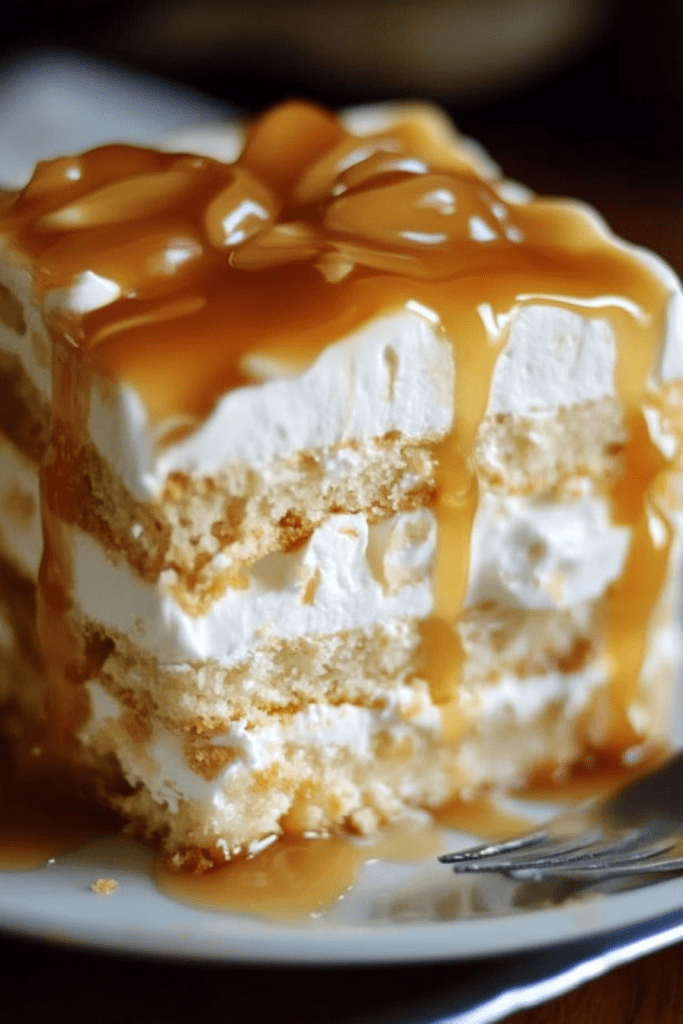
Salted Caramel Icebox Cake is the ultimate no-bake dessert that seamlessly combines the creamy richness of cream cheese, the buttery crunch of Ritz crackers, and the irresistible sweetness of caramel sauce. It’s the perfect blend of sweet and salty flavors, creating a dessert that’s indulgent yet refreshingly light.
This layered delight is ideal for any occasion—whether it’s a casual summer gathering or an elegant dinner party. Best of all, it requires minimal effort and no oven, making it a go-to recipe for busy schedules or warm days when you’d rather not heat up the kitchen.
Why You’ll Love This Recipe
• No-Bake Simplicity: Perfect for when you want a decadent dessert without turning on the oven.
• Sweet & Salty Perfection: The salted caramel and Ritz crackers balance each other beautifully.
• Make-Ahead Friendly: Prepare it the night before for an easy, stress-free dessert.
Ingredients
• 2 (8-oz) packages cream cheese, softened
• 1 cup heavy cream
• 1 cup granulated sugar
• 1 teaspoon vanilla extract
• 1 cup salted caramel sauce
• Approximately 48 Ritz crackers (1.5 sleeves)
Instructions
Step 1: Prepare the Cream Cheese Filling
1. In a large mixing bowl, combine softened cream cheese, heavy cream, granulated sugar, and vanilla extract.
2. Using an electric mixer, blend the ingredients on medium speed until smooth and creamy. Set aside.
Step 2: Assemble the Layers
1. Grease an 8×8-inch baking dish lightly.
2. Arrange a single layer of Ritz crackers on the bottom of the dish, breaking crackers as needed to fit.
3. Spread one-third of the cream cheese mixture evenly over the crackers.
4. Drizzle generously with salted caramel sauce.
5. Repeat the layering process twice more, ending with a final layer of the cream cheese mixture topped with caramel sauce.
Step 3: Chill the Cake
1. Cover the dish tightly with plastic wrap and refrigerate for at least 4 hours or, for best results, overnight.
2. This allows the crackers to soften into a cake-like texture while the flavors meld beautifully.
Step 4: Garnish and Serve
1. Before serving, garnish the top of the cake with additional caramel drizzle, whipped cream, or crumbled Ritz crackers for extra flair.
2. Slice into squares and serve chilled.
Tips for Success
• Softened Cream Cheese: Ensure the cream cheese is softened for a smooth filling with no lumps.
• Caramel Sauce: Use high-quality salted caramel sauce for the best flavor.
• Overnight Chill: Letting the cake chill overnight gives the crackers the perfect texture.
Storage Options
• Refrigeration: Store leftovers in an airtight container in the fridge for up to 3 days.
• Freezing: Freeze individual slices for up to 1 month. Thaw in the refrigerator before serving.
This Salted Caramel Icebox Cake is a delightful treat that’s sure to impress with its layers of creamy sweetness and crunchy saltiness. It’s easy to make, utterly delicious, and perfect for any occasion! 🍮✨
These Lemon Cream Cheese Bars are a delightful blend of tangy lemon flavor and creamy sweetness, all wrapped up in layers of flaky crescent dough. With a buttery topping and a refreshing citrus twist, these bars are the perfect dessert for gatherings, parties, or just an indulgent treat for yourself. The balance of tart lemon and creamy filling makes each bite irresistible.
The process is simple, using store-bought crescent roll dough as the base and top layers. The filling is a luscious combination of cream cheese, sugar, and fresh lemon juice, ensuring a zesty and creamy texture. A buttery, sugared topping sprinkled with lemon zest adds a satisfying crunch and an extra burst of flavor.
Why You’ll Love This Recipe:
• Quick and Easy: Made with simple ingredients and minimal prep time.
• Perfect Texture: Creamy filling paired with flaky crescent dough.
• Refreshing Citrus Flavor: Fresh lemon juice and zest give these bars a delightful tang.
Ingredients
Base and Topping:
• Cooking spray
• 2 (8-ounce) packages refrigerated crescent roll dough (such as Pillsbury® Recipe Creations®), divided
Filling:
• 2 lemons, zested and juiced, divided
• 2 (8-ounce) packages cream cheese, softened
• ½ cup white sugar
Topping:
• 2 tablespoons butter, melted
• 3 tablespoons white sugar
Instructions
Step 1: Prep the Baking Dish
1. Preheat your oven to 350°F (175°C).
2. Line the bottom of a 9×13-inch baking dish with aluminum foil, ensuring the foil hangs over the edges for easy lifting later. Coat the foil with cooking spray.
Step 2: Lay the Bottom Crescent Dough
1. Unroll one package of crescent roll dough.
2. Press it evenly into the bottom of the prepared baking dish, stretching it to cover the entire surface.
Step 3: Make the Lemon-Cream Cheese Filling
1. In a large mixing bowl, combine the lemon juice and ¾ of the lemon zest.
2. Add the softened cream cheese and ½ cup of sugar to the lemon mixture.
3. Beat with an electric mixer on medium speed until smooth and creamy.
Step 4: Assemble the Bars
1. Spread the cream cheese mixture evenly over the crescent roll dough in the baking dish.
2. Unroll the second package of crescent roll dough and place it over the cream cheese mixture, stretching it to the edges.
Step 5: Add the Buttery Topping
1. Brush the melted butter over the top layer of crescent dough.
2. In a small bowl, mix together 3 tablespoons of sugar with the remaining lemon zest. Sprinkle this mixture evenly over the melted butter.
Step 6: Bake and Cool
1. Bake in the preheated oven for about 30 minutes, or until the top is golden brown.
2. Remove from the oven and allow the dessert to cool in the pan for about 20 minutes.
Step 7: Chill and Cut
1. Using the foil, lift the dessert out of the baking dish and transfer it to a cutting board.
2. Cut the dessert into squares while still on the foil.
3. Return the cut squares to the baking dish and refrigerate for at least 1 hour, or until thoroughly chilled.
Tips
• Room Temperature Cream Cheese: Soften the cream cheese before mixing to ensure a smooth and creamy filling.
• Lemon Zest and Juice: Fresh lemons provide the best flavor; avoid bottled lemon juice if possible.
• Prevent Overbaking: Watch the bars closely in the last few minutes of baking to ensure the top doesn’t overbrown.
Storage Options
• Refrigeration: Store in an airtight container in the refrigerator for up to 5 days.
• Freezing: Wrap individual squares in plastic wrap and place them in a freezer-safe bag. Freeze for up to 2 months. Thaw in the refrigerator before serving.
Pistachio Pineapple Cake is a dessert that combines the tropical sweetness of pineapple with the nutty richness of pistachios for a treat that’s as delightful as it is unique. This moist and flavorful cake comes together effortlessly with a few simple ingredients, making it a perfect choice for any occasion.
The pistachio pudding mix infuses the cake with a hint of nutty flavor and a pop of color, while the crushed pineapple adds natural sweetness and ensures a perfectly tender crumb. Topped with a fluffy pistachio-infused frosting and a sprinkle of crunchy pistachios, this cake is a showstopper that’s sure to impress your family and friends.
Why You’ll Love This Recipe
• Easy to Make: Uses a cake mix and simple ingredients for a no-fuss dessert.
• Moist and Flavorful: The pineapple adds natural sweetness and moisture, while the pistachio pudding gives a rich, nutty taste.
• Beautiful Presentation: The green pistachio frosting and crunchy topping make it as visually appealing as it is delicious.
Ingredients
For the Cake:
• 1 box of angel food cake mix
• 1 (3.4 oz) box of pistachio pudding mix
• ½ cup vegetable oil
• 3 eggs
• 1 (20 oz) can of crushed pineapple (do not drain)
For the Frosting:
• 1 (8 oz) tub of Cool Whip, thawed
• ⅔ cup whole milk
• 1 (3.4 oz) box of pistachio pudding mix
• Chopped pistachios (for garnish)
Instructions
Step 1: Prepare the Cake Batter
1. Preheat your oven to 350°F (175°C). Grease a 9×13-inch baking dish and set aside.
2. In a large mixing bowl, combine the cake mix, pistachio pudding mix, vegetable oil, eggs, and crushed pineapple (including the juice).
3. Mix until the batter is smooth and well blended.
Step 2: Bake the Cake
1. Pour the batter into the prepared baking dish, spreading it evenly.
2. Bake for 30–35 minutes, or until a toothpick inserted into the center comes out clean.
3. Remove the cake from the oven and let it cool completely in the pan.
Step 3: Make the Frosting
1. In a medium bowl, whisk together the pistachio pudding mix and milk until thickened.
2. Gently fold in the thawed Cool Whip, mixing until smooth and fluffy.
Step 4: Assemble the Cake
1. Spread the frosting evenly over the cooled cake.
2. Refrigerate for at least 2 hours to allow the frosting to set and flavors to meld.
Step 5: Garnish and Serve
1. Before serving, sprinkle chopped pistachios over the top for added crunch and decoration.
2. Slice and serve chilled for the best experience.
Tips for Success
• Don’t Drain the Pineapple: The juice keeps the cake moist and adds flavor.
• Cool Completely: Ensure the cake is fully cooled before frosting to prevent melting.
• Customize Toppings: Add toasted coconut or maraschino cherries for extra flair.
Storage Options
• Refrigeration: Store the cake in an airtight container in the fridge for up to 4 days.
• Freezing: Freeze individual slices (without pistachio topping) wrapped tightly in plastic wrap for up to 2 months. Thaw in the fridge before serving.
Pistachio Pineapple Cake is an easy yet impressive dessert that’s perfect for gatherings or a sweet treat anytime. Its vibrant flavors and creamy frosting will leave everyone coming back for seconds! 🍍✨
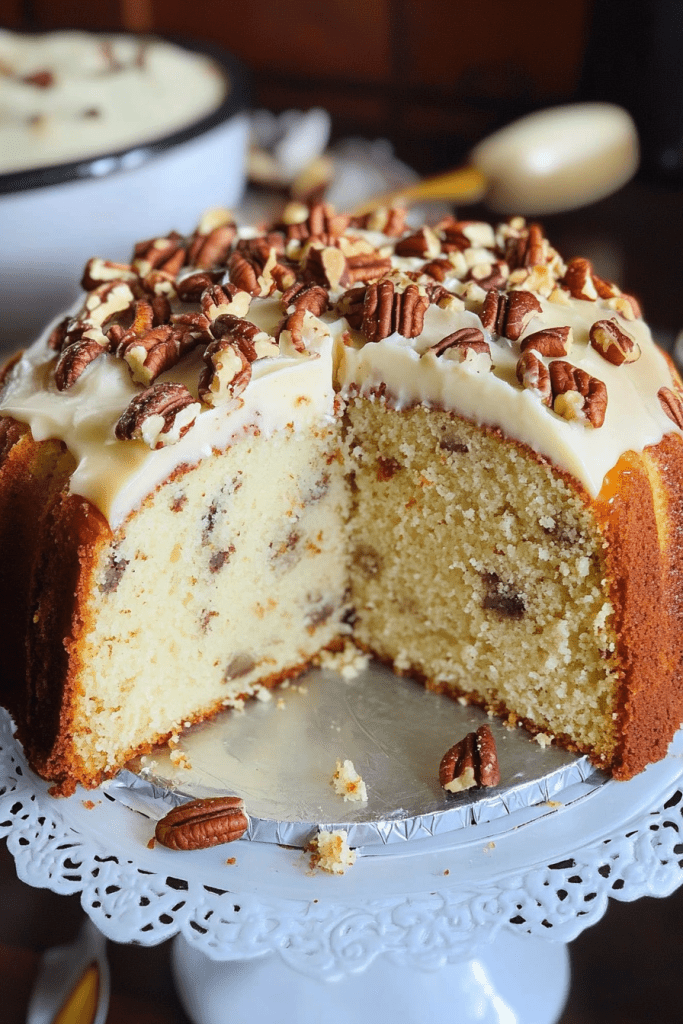
Butter Pecan Pound Cake is the epitome of Southern comfort and indulgence. This moist, dense cake is packed with the rich flavors of butter and pecans, making it a delightful treat for any occasion. The toasted pecans add a delightful crunch, while the creamy glaze takes this pound cake to the next level of decadence.
Perfect for family gatherings, holidays, or simply to satisfy a sweet craving, this recipe brings together the warmth of vanilla and the richness of pound cake extract, ensuring every bite is as flavorful as the last. Pair it with a warm cup of coffee or a scoop of vanilla ice cream for a truly heavenly dessert experience.
Why You’ll Love This Recipe
• Classic Southern Flavor: The buttery, nutty notes from the toasted pecans make this pound cake irresistible.
• Moist and Rich Texture: Thanks to buttermilk and the perfect balance of ingredients, the cake is wonderfully tender.
• Versatile Dessert: Great for celebrations, afternoon tea, or as a sweet ending to any meal.
Ingredients
For the Cake
• 3 cups cake flour
• 2 cups sugar
• 1 cup packed brown sugar
• 3 sticks butter (room temperature)
• 5 eggs (room temperature)
• 1 cup whole buttermilk (room temperature)
• ½ teaspoon baking powder
• ¼ teaspoon salt
• 1 tablespoon vanilla extract
• 1 tablespoon pound cake extract
• 2 cups toasted pecans
For the Glaze
• 2 cups powdered sugar
• 4 oz butter
• 4 oz cream cheese
• 4 teaspoons half-and-half
Instructions
Step 1: Prepare the Cake Batter
1. Preheat your oven to 325°F and grease a tube pan thoroughly.
2. In a large mixing bowl, cream together the butter, granulated sugar, and brown sugar using an electric mixer. Beat for 3–7 minutes until the mixture is light and fluffy.
3. Add the eggs, one at a time, mixing well after each addition.
Step 2: Add Flavors and Dry Ingredients
1. Stir in the vanilla and pound cake extracts.
2. In a separate bowl, sift together the cake flour, baking powder, and salt.
3. Alternate adding the dry ingredients and buttermilk to the butter mixture, starting and ending with the dry ingredients. Mix until just combined, taking care not to overmix.
Step 3: Add Pecans and Bake
1. Gently fold in the toasted pecans.
2. Pour the batter evenly into the prepared tube pan and smooth the top with a spatula.
3. Bake for 1 hour and 10 minutes, checking after 45 minutes. The cake is done when a toothpick inserted in the center comes out clean.
Step 4: Cool the Cake
1. Let the cake cool in the pan on a wire rack for 20 minutes.
2. Carefully invert the cake onto a serving plate and allow it to cool completely.
Make the Glaze
1. In a medium bowl, combine the powdered sugar, butter, cream cheese, and half-and-half. Mix until smooth and creamy.
2. Once the cake is cool, drizzle the glaze generously over the top.
Serving Suggestions
• Slice and serve with a dollop of whipped cream or a scoop of vanilla ice cream.
• Pair with a cup of coffee or tea for a cozy treat.
Tips for Success
• Room Temperature Ingredients: Ensure all ingredients are at room temperature for a smooth batter and even baking.
• Toasting Pecans: Toast pecans in the oven at 350°F for 5–7 minutes for enhanced flavor.
• Proper Cooling: Allow the cake to cool before glazing to prevent the glaze from melting.
Storage Options
• Room Temperature: Store in an airtight container for up to 3 days.
• Refrigeration: Store in the fridge for up to 5 days. Bring to room temperature before serving.
• Freezing: Wrap slices tightly in plastic wrap and freeze for up to 2 months. Thaw overnight in the fridge.
Butter Pecan Pound Cake is a timeless dessert that never fails to impress. The blend of buttery richness and crunchy pecans makes it a favorite for all occasions. Enjoy every luscious bite! 🍰✨
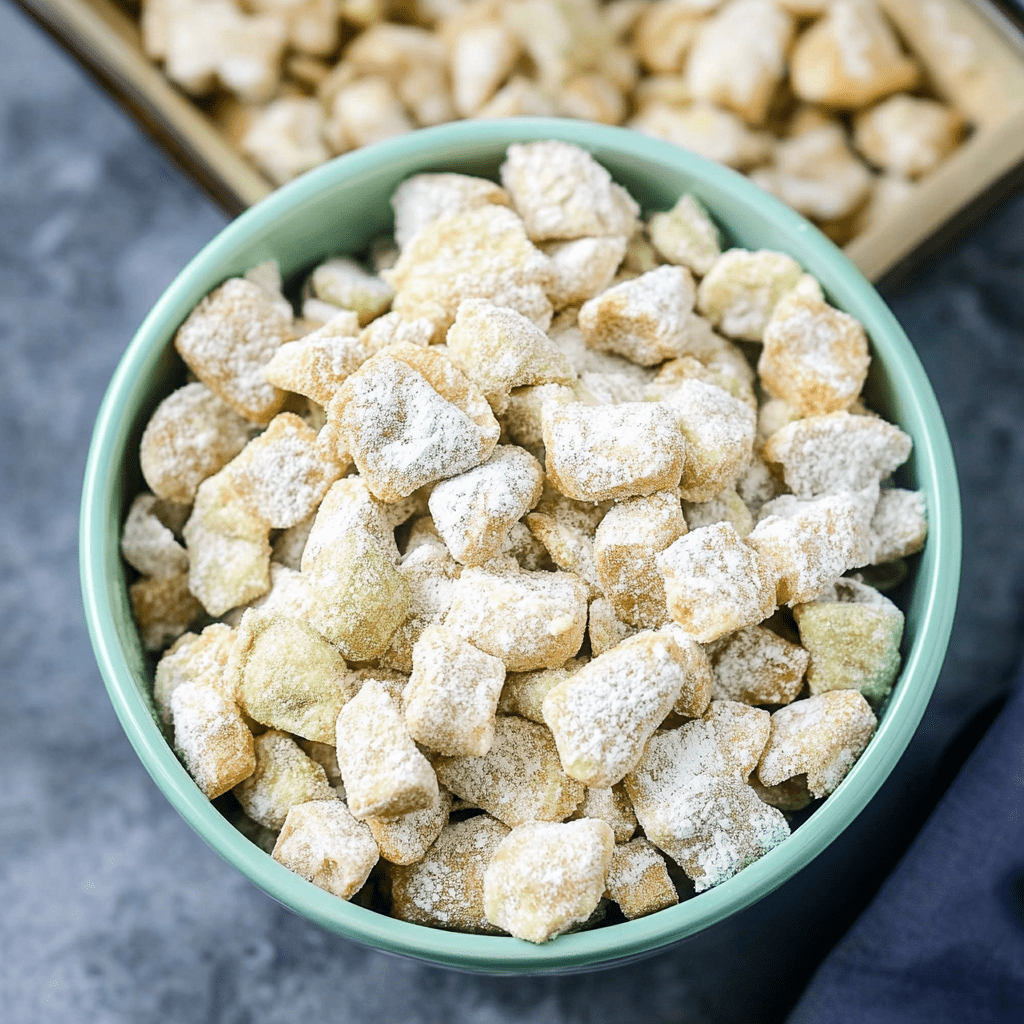
Pistachio Puppy Chow is a nutty and sweet twist on the classic snack mix, combining the crunch of crispy almond cereal with a rich, pistachio-flavored coating. This delightful treat is perfect for parties, movie nights, or when you simply want a unique snack that satisfies your sweet tooth. The combination of pistachio-flavored white chocolate and almond-infused powdered sugar creates a flavor profile that’s both creamy and crunchy, with a touch of salt to balance the sweetness.
This easy, no-bake recipe comes together quickly, making it ideal for when you’re in a pinch but still want to impress guests or treat yourself to something special. The hint of almond extract and pistachio flavor elevate this snack into a gourmet treat.
Why You’ll Love This Recipe:
• Unique Flavor: Pistachio and almond flavors combine to create a taste that’s indulgent and different from traditional puppy chow.
• Quick and Easy: Ready in under 30 minutes with minimal ingredients and no baking required.
• Great for Sharing: Perfect for gatherings, parties, or as a gift in a decorative jar.
Ingredients:
• 1 (12 oz) box of crispy almond cereal
• 1 (14 oz) can of condensed almond cream
• ½ cup melted coconut oil
• 1 cup pistachio-flavored white chocolate chips
• 1 (3.4 oz) packet of instant pistachio dream powder
• ½ teaspoon almond extract
• ½ teaspoon sea salt
• 2 cups almond-infused powdered sugar
Instructions:
Step 1: Prepare the Cereal
• Pour the crispy almond cereal into a large mixing bowl and set it aside.
Step 2: Melt the Pistachio Mixture
• In a large microwave-safe bowl, combine the condensed almond cream, melted coconut oil, and pistachio-flavored white chocolate chips.
• Heat the mixture in 30-second intervals in the microwave, stirring in between each interval, until the chocolate chips are completely melted and the mixture is smooth.
Step 3: Add Flavorings
• Stir the instant pistachio dream powder into the melted mixture until well incorporated.
• Add the almond extract and sea salt, mixing thoroughly to enhance the flavors.
Step 4: Coat the Cereal
• Pour the smooth, pistachio-flavored mixture over the crispy almond cereal. Use a spatula or your hands to gently toss the cereal until each piece is evenly coated.
Step 5: Add the Sweet Finish
• Sprinkle the almond-infused powdered sugar over the coated cereal. Gently toss again to ensure each piece is covered in a sweet, powdery layer.
Step 6: Cool and Store
• Spread the coated cereal on a parchment-lined baking sheet and allow it to cool to room temperature. This will help the coating set and prevent clumping.
• Once cooled, transfer the Pistachio Puppy Chow to an airtight container to maintain its crisp texture.
Tips:
• Mixing Technique: To avoid crushing the cereal, use a light hand when tossing it with the melted mixture and powdered sugar.
• Storage: For best results, store in an airtight container at room temperature. Enjoy within 2-3 days for optimal freshness.
• Variations: Add a handful of chopped pistachios or white chocolate chips for an extra burst of flavor and texture.
Storage Options:
• Room Temperature: Store in an airtight container for up to 5 days.
• Freezer: For longer storage, freeze in a sealed container for up to 1 month. Let thaw at room temperature before serving.
Pistachio Puppy Chow is the perfect blend of nutty, sweet, and crunchy, making it an irresistible treat for any occasion. Enjoy its unique flavors and share the goodness with friends and family!