Cherry Cheese Coffee Cake

0

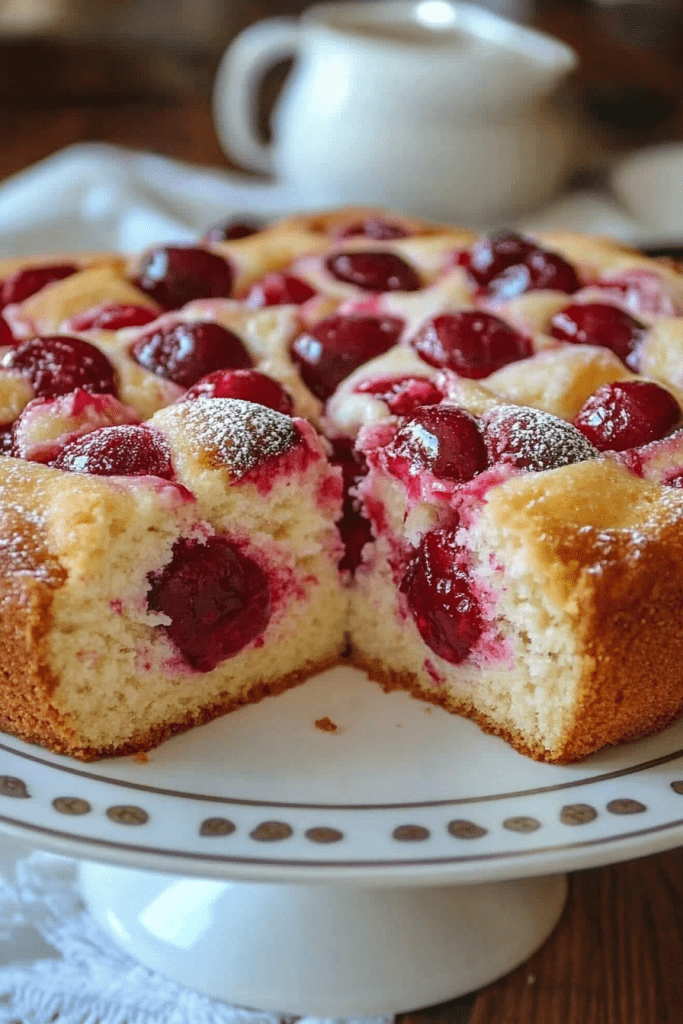
Cherry Cheese Coffee Cake is a beautiful and delicious pastry that’s perfect for breakfast, brunch, or a sweet treat with your afternoon coffee. This coffee cake combines flaky crescent dough, a creamy cheesecake filling, and tangy cherry pie filling, all topped with a light glaze. The combination of textures and flavors creates a dessert that’s as stunning to look at as it is delightful to eat.

This versatile recipe can be adapted with your favorite fruit pie filling, and it’s simple enough to whip up for family or guests. The crescent dough makes preparation easy, while the finished product has a bakery-quality appearance and taste.

Why You’ll Love This Recipe

Easy to Make: Crescent roll dough simplifies the process while delivering a flaky, buttery base.

Versatile: Swap out the cherry filling for your favorite fruit or pie filling.

Show-Stopping Presentation: The decorative dough strips make this coffee cake look as good as it tastes.

Ingredients

For the Coffee Cake:

• 2 packages (8 oz each) refrigerated crescent rolls

• 1 package (8 oz) cream cheese, softened

• ¼ cup powdered sugar

• 1 large egg

• ½ teaspoon vanilla or almond extract

• 1 can (21 oz) cherry pie filling (or any fruit pie filling)

For the Glaze:

• ½ cup powdered sugar

• 2–3 teaspoons milk

Instructions

Step 1: Prep the Oven and Dough

1. Preheat your oven to 350°F (175°C).

2. Unroll the crescent dough and separate it into 16 triangles. Set 4 triangles aside for decoration.

Step 2: Form the Base

1. On a baking sheet, arrange the remaining 12 triangles into a circle with the longer points facing inward. Leave about a 3-inch hole in the center.

2. Use a rolling pin to roll the dough into a 14-inch circle, pressing the seams together to form a continuous base.

Step 3: Make the Filling

1. In a medium bowl, mix the cream cheese, powdered sugar, egg, and vanilla extract until smooth and creamy.

2. Spread the filling evenly over the prepared dough base, leaving about ½ inch of dough uncovered at the edges.

Step 4: Add the Cherry Filling

1. Spoon the cherry pie filling over the cream cheese layer, spreading it evenly but leaving some of the cream cheese visible for a layered look.

Step 5: Create the Decorative Topping

1. Use a pizza cutter or sharp knife to cut the 4 reserved dough triangles into thirds, starting at the wider end.

2. Arrange these strips evenly over the filling, pressing the ends to seal at the center and the outer edges of the coffee cake.

Step 6: Bake the Coffee Cake

1. Bake in the preheated oven for 25–30 minutes, or until the dough is golden brown and the filling is set.

Step 7: Prepare the Glaze

1. In a small bowl, mix the powdered sugar and milk until smooth. Adjust the milk to achieve your desired consistency—it should be pourable but not too runny.

Step 8: Glaze and Serve

1. Drizzle the glaze over the warm coffee cake for a sweet finish.

2. Allow to cool slightly before slicing and serving.

Tips

Cream Cheese Consistency: Ensure the cream cheese is softened to avoid lumps in the filling.

Customize the Filling: Try blueberry, apple, or strawberry pie filling for a new twist on this recipe.

Seal the Dough: Pressing the seams firmly ensures the filling doesn’t leak during baking.

Storage Options

Refrigeration: Store leftovers in an airtight container in the refrigerator for up to 3 days. Reheat slices in the oven or microwave before serving.

Freezing: Freeze unglazed coffee cake in an airtight container for up to 2 months. Thaw overnight in the refrigerator, then glaze before serving.

Cherry Cheese Coffee Cake is a delightful, crowd-pleasing dessert that’s perfect for any occasion. Its balance of creamy, tangy, and sweet flavors is sure to leave everyone asking for seconds!

Italian Chicken Pasta

0

Italian Chicken Pasta is a hearty and flavorful dish that combines tender chicken, perfectly cooked spaghetti, and a creamy, savory sauce. This dish is bursting with classic Italian flavors like garlic, Parmesan, and Italian seasoning, complemented by the fresh sweetness of tomatoes and a hint of spice from red pepper flakes. Perfect for a weeknight dinner or a cozy family meal, this pasta recipe is both comforting and elegant.

The golden-browned chicken and silky cream sauce make this dish a restaurant-quality meal that’s surprisingly easy to prepare at home. Serve it with a crisp green salad or garlic bread for a complete Italian feast.

Why You’ll Love This Recipe

Rich and Creamy: The velvety Parmesan cream sauce coats the pasta beautifully.

Classic Italian Flavors: Garlic, Italian seasoning, and fresh tomatoes make this dish aromatic and flavorful.

Family-Friendly: A crowd-pleaser that’s easy to adapt with your favorite vegetables or pasta.

Ingredients

For the Chicken:

• 5 boneless, skinless chicken breast cutlets

• ½ cup flour

• 1 teaspoon salt

• ¼ teaspoon pepper

• 1 teaspoon garlic powder

• 2 teaspoons Italian seasoning

• 2 tablespoons oil

For the Pasta:

• 12 oz spaghetti noodles

For the Sauce:

• 4 tablespoons butter

• 1 onion, chopped

• 4 teaspoons minced garlic

• 2 small tomatoes, diced

• 1 tablespoon flour

• 1 cup heavy whipping cream

• ½ cup Parmesan cheese, grated

• 1 teaspoon Italian seasoning

• ½ teaspoon salt

• ¼ teaspoon red pepper flakes

Instructions

Step 1: Cook the Pasta

1. Bring a large pot of salted water to a boil. Cook the spaghetti noodles according to package instructions until al dente.

2. Drain the pasta and set it aside.

Step 2: Prepare the Chicken

1. In a large Ziploc bag, combine the flour, salt, pepper, garlic powder, and Italian seasoning. Shake to mix.

2. Add the chicken cutlets to the bag and shake until they are evenly coated with the flour mixture.

Step 3: Cook the Chicken

1. Heat the oil in a large skillet over medium-high heat.

2. Add the coated chicken to the skillet and cook for 4-5 minutes on each side, or until golden brown and cooked through.

3. Remove the chicken from the skillet and set it aside.

Step 4: Make the Sauce

1. In the same skillet, reduce the heat to medium and melt the butter.

2. Add the chopped onion and sauté until softened, about 3-4 minutes.

3. Stir in the minced garlic and diced tomatoes, cooking for an additional 30 seconds.

4. Sprinkle the flour over the onion mixture and stir to combine.

5. Add the red pepper flakes and Italian seasoning, stirring well.

6. Gradually whisk in the heavy whipping cream and Parmesan cheese.

7. Cook, stirring frequently, until the sauce thickens, about 3-5 minutes.

Step 5: Combine and Serve

1. Add the cooked spaghetti to the skillet, tossing to coat the pasta evenly with the sauce.

2. Return the chicken to the skillet, nestling it into the pasta and sauce.

3. Cook for 1-2 minutes to warm the chicken through.

4. Serve immediately, garnished with extra Parmesan cheese or fresh parsley if desired.

Tips

Customize the Protein: Substitute chicken with shrimp or leave it out for a vegetarian version.

Fresh Parmesan: Grating Parmesan cheese fresh from the block ensures a smooth, creamy sauce.

Thicker Sauce: Let the sauce simmer a bit longer if you prefer a thicker consistency.

Storage Options

Refrigeration: Store leftovers in an airtight container in the refrigerator for up to 3 days. Reheat gently on the stovetop or microwave, adding a splash of cream or milk to loosen the sauce if needed.

Freezing: Freeze the cooked chicken and sauce separately for up to 2 months. Thaw overnight in the refrigerator and reheat before tossing with freshly cooked pasta.

Italian Chicken Pasta is a delightful combination of creamy indulgence and comforting flavors. This easy-to-make recipe is sure to become a staple in your home!

Chicken Crescent Roll Ups

0

Chicken Crescent Roll Ups are a quick and delicious dish perfect for a family dinner, party appetizer, or snack. These flaky crescent rolls are stuffed with a creamy, cheesy chicken filling and baked to golden perfection. With just a handful of ingredients and minimal prep time, this recipe is a lifesaver for busy weeknights or last-minute gatherings.

The combination of tender chicken, melty cheddar, and the subtle kick of garlic and onion powders makes each bite irresistibly flavorful. Brushed with butter for a golden crust and garnished with fresh parsley, these roll ups are as pleasing to the eye as they are to the palate.

Why You’ll Love This Recipe

Quick and Easy: Minimal prep and simple ingredients make this dish ideal for busy days.

Family-Friendly: Kids and adults alike will love the cheesy, savory filling.

Versatile: Great as a main dish, appetizer, or even a potluck contribution.

Ingredients

• 1 can (8 oz) refrigerated crescent roll dough

• 2 cups cooked chicken, shredded

• 1 cup shredded cheddar cheese

• ¼ cup cream cheese, softened

• 2 tablespoons milk

• ¼ teaspoon garlic powder

• ¼ teaspoon onion powder

• Salt and pepper, to taste

• 1 tablespoon melted butter (optional, for brushing)

• Fresh parsley, chopped (optional, for garnish)

Instructions

Step 1: Prep the Oven and Baking Sheet

1. Preheat your oven to 375°F (190°C).

2. Line a baking sheet with parchment paper or lightly grease it to prevent sticking.

Step 2: Mix the Filling

1. In a medium-sized bowl, combine the shredded chicken, shredded cheddar cheese, cream cheese, milk, garlic powder, and onion powder.

2. Mix thoroughly until the ingredients are evenly incorporated.

3. Season the mixture with salt and pepper to your liking.

Step 3: Prepare the Crescent Dough

1. Unroll the crescent roll dough and separate it into individual triangles.

2. Lay the triangles flat on a clean surface for easy assembly.

Step 4: Assemble the Roll Ups

1. Spoon a generous amount of the chicken mixture onto the wide end of each crescent triangle.

2. Carefully roll the dough towards the narrow tip, enclosing the filling as neatly as possible.

Step 5: Bake the Roll Ups

1. Place the assembled roll ups onto the prepared baking sheet, leaving a bit of space between each one.

2. If desired, brush the tops with melted butter for a golden, shiny finish.

3. Bake for 12-15 minutes, or until the crescent rolls are golden brown and cooked through.

Step 6: Garnish and Serve

1. Remove the roll ups from the oven and let them cool slightly.

2. Sprinkle with freshly chopped parsley for a touch of color and freshness, if desired.

Tips

Use Rotisserie Chicken: Save time by using pre-cooked rotisserie chicken for the filling.

Experiment with Cheeses: Swap out cheddar for mozzarella, Monterey Jack, or a blend for a different flavor profile.

Sealing the Dough: Pinch the edges of the dough to ensure the filling doesn’t leak during baking.

Customize the Filling: Add cooked bacon bits, diced jalapeños, or chopped spinach for extra flavor.

Storage Options

Refrigeration: Store leftovers in an airtight container in the refrigerator for up to 3 days. Reheat in the oven at 350°F (175°C) until warm.

Freezing: Assemble the roll ups but do not bake them. Freeze on a tray, then transfer to a freezer-safe bag or container. Bake from frozen, adding 5-7 minutes to the baking time.

Chicken Crescent Roll Ups are a versatile, comforting dish that’s sure to please everyone at the table. Serve them with a side salad or dipping sauces for an extra-special treat!

Chicken Bacon Spinach Penne

0

This Chicken Bacon Spinach Penne is a rich and creamy pasta dish that brings together the best of comfort food and fresh ingredients. Juicy, seasoned chicken, crispy bacon, and tender spinach are tossed with perfectly cooked penne pasta in a homemade Alfredo-style sauce. The combination of garlic, Parmesan, and a touch of chicken broth gives the dish a deep, savory flavor, while cherry tomatoes add a pop of freshness. This meal is perfect for busy weeknights yet elegant enough for a special dinner.

One of the best things about this recipe is how easily it comes together. The bacon and chicken provide a smoky, meaty contrast to the creamy sauce, while the spinach and tomatoes add color and a hint of sweetness. The sauce clings beautifully to the pasta, making every bite full of flavor. Whether you’re looking for a quick dinner or a comforting meal to share with family and friends, this dish is sure to impress. Serve it with a side of garlic bread or a crisp salad for a complete and satisfying meal.

Why You’ll Love This Recipe

Rich and Creamy: A luxurious Parmesan cream sauce coats every bite.

Loaded with Flavor: Bacon, garlic, and chicken add a depth of flavor.

Quick and Easy: Comes together in about 30 minutes, perfect for busy nights.

Ingredients

• 8 ounces penne pasta

• 2 boneless, skinless chicken breasts, cut into bite-sized pieces

• 6 slices bacon, cooked and crumbled

• 2 cups fresh spinach, chopped

• 3 cloves garlic, minced

• 1 cup cherry tomatoes, halved

• 1 cup grated Parmesan cheese

• 1 cup heavy cream

• ½ cup chicken broth

• 2 tablespoons unsalted butter

• Salt and black pepper to taste

• Fresh basil or parsley for garnish (optional)

Instructions

Step 1: Cook the Pasta

1. Bring a large pot of salted water to a boil.

2. Cook the penne according to package instructions until al dente.

3. Drain and set aside.

Step 2: Cook the Chicken

1. Heat a skillet over medium-high heat.

2. Season the chicken with salt and black pepper.

3. Cook for about 5–7 minutes, or until no longer pink in the center.

4. Remove from the skillet and set aside.

Step 3: Cook the Bacon

1. In the same skillet, cook the bacon over medium heat until crispy.

2. Remove, crumble, and set aside.

Step 4: Sauté the Garlic and Spinach

1. Remove excess bacon grease, leaving about 1 tablespoon in the skillet.

2. Add the minced garlic and sauté for 1 minute until fragrant.

3. Stir in the chopped spinach and cook until wilted.

Step 5: Add the Cherry Tomatoes

1. Add the halved cherry tomatoes and cook for 2–3 minutes, until slightly softened.

Step 6: Make the Sauce

1. Pour in the heavy cream and chicken broth.

2. Bring the mixture to a gentle simmer, then reduce the heat to low.

3. Stir in the grated Parmesan cheese, allowing it to melt into the sauce.

4. Add the butter and stir until the sauce is smooth and creamy.

Step 7: Combine Everything

1. Add the cooked pasta, chicken, and crumbled bacon to the skillet.

2. Toss everything together, ensuring the pasta is evenly coated in the sauce.

Step 8: Adjust Seasoning and Serve

1. Taste and adjust with salt and black pepper as needed.

2. Garnish with fresh basil or parsley if desired.

3. Serve hot and enjoy!

Tips

Use Freshly Grated Parmesan: Pre-shredded cheese doesn’t melt as well and can make the sauce grainy.

Don’t Overcook the Spinach: It should be wilted but still vibrant.

Make It Spicy: Add red pepper flakes for a little heat.

Storage

Refrigerator: Store leftovers in an airtight container for up to 3 days.

Reheating: Warm gently over low heat with a splash of milk or cream to restore the sauce’s texture.

Freezing: Not recommended, as the cream sauce may separate upon thawing.

This creamy, flavorful Chicken Bacon Spinach Penne is sure to become a favorite in your household!

Beef and Barley Soup

0

Beef and Barley Soup is a classic, comforting dish that’s hearty, nutritious, and packed with rich flavors. Tender pieces of beef, pearl barley, and a medley of vegetables come together in a savory broth, creating a soup that’s both satisfying and nourishing. This slow-cooked soup is perfect for cold days, as it warms you from the inside out with each flavorful bite. The beef base and bay leaf add depth, while the carrots, celery, and mushrooms bring natural sweetness and earthy flavors.

The best part of this recipe is that it’s made in a crockpot, making it a set-it-and-forget-it meal. With minimal prep, you can leave it to cook and develop its flavors over time, resulting in tender beef and perfectly cooked barley. Serve this soup with crusty bread or a simple salad for a well-rounded meal.

Why You’ll Love This Recipe:

Hearty and Nutritious: Full of protein from the beef, fiber from the barley, and vitamins from the vegetables.

Easy and Convenient: The crockpot does most of the work, allowing you to go about your day while it cooks.

Perfect for Cold Days: A warming and filling soup that’s ideal for chilly weather.

Ingredients:

• 1 pound boneless chuck roast, trimmed and cut into 1/2-inch pieces

• 1 1/2 cups carrots, thinly sliced

• 1 1/2 cups celery, thinly sliced

• 2/3 cup onion, chopped

• 1 package pre-sliced mushrooms (8-ounce)

• 2 tablespoons beef base (not broth, a concentrated base that makes beef broth)

• 8-10 cups water

• 1 large bay leaf

• 3/4 cup pearl barley

• Salt and pepper, to taste

Instructions:

Step 1: Brown the Beef

• In a non-stick frying pan, brown the beef over medium-high heat until each piece is browned, stirring frequently to ensure even cooking. Browning the beef adds flavor and helps seal in juices.

Step 2: Add Ingredients to Crockpot

• Remove the browned beef from the pan and place it in the crockpot. Add the sliced carrots, celery, chopped onion, mushrooms, beef base, and water to the crockpot. Stir in the garlic and bay leaf, making sure everything is well combined.

Step 3: Start Cooking

• Cover and cook on high heat for one hour to start the cooking process. This will allow the flavors to begin melding and the vegetables to soften slightly.

Step 4: Add the Barley and Continue Cooking

• After the first hour, add the pearl barley to the crockpot. Stir to incorporate, then reduce the heat to low and continue cooking until the vegetables and beef are tender, about 2-3 hours. The barley will absorb the flavors of the broth as it cooks, giving the soup a hearty texture.

Step 5: Season and Serve

• Once the beef and vegetables are tender, discard the bay leaf. Taste the soup and season with salt and pepper as needed. Ladle the soup into bowls and serve hot.

Storage Options:

Refrigerator: Store leftovers in an airtight container in the fridge for up to 4 days. Reheat on the stovetop or in the microwave.

Freezer: Freeze the soup in a freezer-safe container for up to 3 months. Thaw in the refrigerator overnight and reheat before serving.

Tips:

Adjust the Consistency: If you prefer a thicker soup, add less water initially, as the barley will absorb some of the liquid.

Add More Vegetables: For added nutrition, add chopped potatoes, parsnips, or spinach.

Serving Suggestions: Serve with crusty bread or a side salad for a complete meal.

This Beef and Barley Soup is a hearty, warming dish that’s perfect for any time you crave a comforting, nutritious meal. With its tender beef, soft vegetables, and flavorful broth, it’s sure to become a favorite!

Hawaiian Style Teriyaki Chicken

0

Hawaiian Style Teriyaki Chicken is a delicious and versatile dish that brings together the sweet and savory flavors of soy sauce, pineapple, and brown sugar. This tender, juicy chicken is infused with fresh ginger and garlic for a mouthwatering aroma and flavor. It’s perfect for backyard BBQs, weeknight dinners, or meal prep, and its adaptability allows you to prepare it in several ways—from grilling to stir-frying, baking, or slow cooking.

The hallmark of this recipe is the marinade, which strikes a balance between the saltiness of soy sauce, the sweetness of brown sugar, and the tangy brightness of pineapple juice. The chicken soaks in this flavorful mix for maximum tenderness and taste, making every bite a tropical delight.

Why You’ll Love This Recipe

Authentic Island Flavor: Sweet, tangy, and savory, this dish captures the essence of Hawaiian cuisine.

Customizable Cooking Methods: Whether grilled, baked, or stir-fried, this recipe adapts to your preferred cooking style.

Tender and Juicy: The marinade not only enhances flavor but ensures the chicken stays moist and delicious.

Ingredients

• 3 pounds boneless, skinless chicken thighs

• 1 cup soy sauce

• 1 cup pineapple juice (or pineapple chunks with juice)

• 1 cup brown sugar, packed

• 5 cloves garlic, mashed

• 1 tablespoon fresh ginger, minced

Instructions

Step 1: Prepare the Marinade

1. In a large bowl, mix together the soy sauce and pineapple juice.

2. Add the brown sugar and stir until completely dissolved.

3. Stir in the minced ginger and mashed garlic.

Step 2: Marinate the Chicken

1. Add the chicken thighs to the marinade, ensuring they are fully submerged.

2. Cover and refrigerate for at least 24 hours. For best results, marinate for up to 3 days.

Step 3: Cook the Chicken

Grilling Method:

1. Heat a grill to medium-high heat. Grill the chicken thighs until golden brown and slightly charred, about 5-7 minutes per side.

2. Transfer the grilled chicken to a pot on the grill and add a little fresh teriyaki sauce. Allow the chicken to steam for a few minutes to enhance its tenderness and juiciness.

Stir-Fry Method:

1. Cut the marinated chicken into bite-sized pieces.

2. Heat a large wok or skillet over medium-high heat with a drizzle of sesame oil.

3. Sauté the chicken until browned on the outside, then pour in the marinade.

4. Simmer until the sauce thickens and the chicken is fully cooked.

Stovetop Method:

1. Heat a large skillet over medium-high heat.

2. Sear the whole chicken thighs on each side until golden brown.

3. Add the marinade to the skillet and simmer until the sauce reduces and the chicken is cooked through.

Baking Method:

1. Preheat the oven to 350°F (175°C).

2. Place the chicken thighs in a baking dish and pour 1-2 cups of the marinade over them.

3. Bake for 35-40 minutes, brushing with additional sauce halfway through.

Slow Cooker or Instant Pot Method:

1. Add the marinated chicken to the slow cooker or Instant Pot and cook until tender (about 6 hours on low in a slow cooker or 10-15 minutes under pressure in an Instant Pot).

2. Simmer the sauce separately on the stovetop until thickened, then serve over the cooked chicken.

Step 4: Serve and Enjoy

1. Serve the teriyaki chicken with steamed rice, grilled vegetables, or a fresh salad. Garnish with green onions or sesame seeds for extra flavor.

Tips

Fresh Pineapple Chunks: Adding pineapple chunks to the marinade boosts the tropical flavor and creates a sweeter sauce.

Marinate Longer for Maximum Flavor: While 24 hours is the minimum, longer marinating results in even more flavorful chicken.

Digital Thermometer: Chicken is cooked through when it reaches an internal temperature of 165°F (75°C).

Storage Options

Refrigeration: Store leftovers in an airtight container in the refrigerator for up to 3 days.

Freezing: Freeze cooked chicken in an airtight container for up to 2 months. Thaw overnight in the refrigerator and reheat gently.

Hawaiian Style Teriyaki Chicken brings a taste of the tropics to your table, offering bold flavors and a versatile preparation. It’s a recipe you’ll want to make again and again!

Swedish Meatball Noodle Bake

0

Swedish Meatball Noodle Bake combines the creamy, comforting flavors of classic Swedish meatballs with the hearty satisfaction of a noodle casserole. This dish is a crowd-pleaser, featuring tender meatballs nestled in a rich, creamy sauce with egg noodles, all topped with melty Swiss cheese. It’s the ultimate cozy dinner for family gatherings or weeknight meals.

What makes this dish so special is the combination of savory meatballs infused with warm spices like nutmeg, paired with a velvety sauce made from beef broth, cream, and Worcestershire sauce. The casserole is baked to golden perfection, creating a meal that’s as satisfying as it is delicious.

Why You’ll Love This Recipe

Perfect Comfort Food: Creamy sauce, tender noodles, and flavorful meatballs make this dish irresistibly cozy.

One-Dish Wonder: Everything bakes together for an easy, family-friendly dinner.

Rich and Flavorful: Swiss cheese and the spiced meatballs add depth and richness to every bite.

Ingredients

For the Meatballs:

• 2 tablespoons olive oil

• 1 pound ground beef

• 1 large egg, beaten

• ½ cup breadcrumbs

• ½ onion, grated

• ½ teaspoon garlic powder

• ¼ teaspoon ground nutmeg

• 1 teaspoon Kosher salt

• ½ teaspoon freshly ground black pepper

For the Casserole:

• 2 ½ cups egg noodles

• 1 cup beef broth

• 1 tablespoon Worcestershire sauce

• 1 pint heavy cream

• 1 ½ cups Swiss cheese, grated

• Fresh parsley, chopped, for serving

• Kosher salt and freshly ground black pepper, to taste

Instructions

Step 1: Prepare the Oven and Baking Dish

1. Preheat your oven to 375°F (190°C).

2. Lightly grease a 9 x 13-inch baking dish with nonstick spray and set it aside.

Step 2: Make the Meatballs

1. In a large bowl, combine the ground beef, breadcrumbs, beaten egg, grated onion, garlic powder, nutmeg, salt, and pepper. Mix gently until just combined.

2. Scoop about 1 ½ tablespoons of the mixture and roll into balls. Repeat with the remaining mixture to form the meatballs.

Step 3: Brown the Meatballs

1. Heat olive oil in a large skillet over medium-high heat.

2. Add the meatballs and cook, turning occasionally, until browned on all sides. Transfer the browned meatballs to a plate and set aside.

Step 4: Cook the Noodles

1. While the meatballs are browning, bring a large pot of salted water to a boil.

2. Cook the egg noodles for two minutes less than the package instructions, then drain and set aside.

Step 5: Make the Sauce

1. In the same skillet used for the meatballs, add the beef broth, heavy cream, and Worcestershire sauce.

2. Scrape up any browned bits from the bottom of the skillet and bring the mixture to a simmer.

3. Cook for about 10 minutes, or until the sauce thickens slightly. Season with salt and pepper to taste.

Step 6: Assemble the Casserole

1. Add the cooked noodles to the prepared baking dish and spread them out evenly.

2. Arrange the browned meatballs over the noodles.

3. Pour the sauce evenly over the pasta and meatballs, ensuring everything is well-coated.

4. Sprinkle the grated Swiss cheese evenly over the top.

Step 7: Bake the Casserole

1. Place the dish in the preheated oven and bake for about 20 minutes, or until the cheese is melted and bubbly.

2. Remove from the oven and let the casserole rest for 5 minutes before serving.

Step 8: Garnish and Serve

1. Sprinkle the casserole with freshly chopped parsley for a pop of color and flavor.

2. Serve warm and enjoy!

Tips

Even-Sized Meatballs: Use a small cookie scoop to ensure uniform meatballs for even cooking.

Grate Fresh Nutmeg: Freshly grated nutmeg provides a deeper, more aromatic flavor.

Prevent Overcooked Noodles: Undercooking the noodles slightly ensures they won’t become mushy during baking.

Storage Options

Refrigeration: Store leftovers in an airtight container in the refrigerator for up to 3 days. Reheat in the oven or microwave.

Freezing: Assemble the casserole without baking and freeze for up to 2 months. When ready to bake, thaw overnight in the fridge and bake as directed, adding an extra 10 minutes if needed.

Swedish Meatball Noodle Bake is the perfect dish for cozy nights, offering hearty flavors and creamy textures that the whole family will love. It’s comfort food at its finest!

Homemade Cranberry Orange Bread

0

Homemade Cranberry Orange Bread is a delightful treat bursting with the fresh, tangy flavors of cranberries and orange. This moist, sweet loaf combines the tartness of fresh cranberries with the zesty brightness of orange zest and juice, making it perfect for breakfast, a snack, or even dessert. Topped with a luscious orange glaze, each slice is a celebration of festive flavors and comforting textures.

What makes this bread truly special is its balance of sweet and tart elements, paired with its tender crumb. The vibrant cranberries provide bursts of tartness in every bite, while the orange zest and juice add a refreshing citrusy aroma. Whether you’re baking this for the holidays or as a year-round favorite, it’s guaranteed to impress with its stunning presentation and irresistible flavor.

Why You’ll Love This Recipe

Flavor Explosion: A perfect blend of sweet orange and tart cranberries in every bite.

Moist and Tender: Buttermilk and oil ensure the bread stays soft and moist.

Simple Elegance: Beautifully glazed and studded with cranberries, it’s as eye-catching as it is delicious.

Ingredients

For the Bread:

• 2 cups all-purpose flour

• 1 teaspoon baking powder

• ½ teaspoon salt

• 1 cup granulated sugar

• 1 tablespoon orange zest

• ½ cup buttermilk

• ½ cup canola oil (or other neutral oil)

• ½ cup orange juice

• 2 large eggs

• 1 teaspoon pure vanilla extract

• 1 ½ cups fresh cranberries

For the Glaze:

• 1 cup powdered sugar

• 2–3 tablespoons orange juice

Instructions

To Make the Bread

1. Prepare the Oven and Pan

Preheat your oven to 350°F (175°C). Grease a 9 x 5-inch loaf pan and set it aside.

2. Mix the Dry Ingredients

In a medium bowl, whisk together the flour, baking powder, and salt until well combined.

3. Infuse the Sugar with Orange Zest

In a small bowl, combine the granulated sugar and orange zest. Use a spoon to mix until the sugar turns a light orange color, releasing the zest’s oils.

4. Combine the Wet Ingredients

In a large mixing bowl, whisk together the buttermilk, oil, orange juice, eggs, and vanilla extract until smooth.

5. Create the Batter

Add the flour mixture and the orange zest-sugar mixture to the wet ingredients. Gently whisk until just combined. Avoid overmixing to keep the bread tender.

6. Fold in the Cranberries

Using a wooden spoon or spatula, gently fold in the fresh cranberries, distributing them evenly throughout the batter.

7. Bake the Bread

Pour the batter into the prepared loaf pan. Bake in the preheated oven for 65–75 minutes, or until a toothpick inserted into the center comes out with just a few crumbs. If the top begins to brown too quickly, loosely tent with aluminum foil during the last 20 minutes of baking.

8. Cool the Bread

Remove the bread from the oven and let it cool in the pan for 10–15 minutes. Then transfer it to a cooling rack to cool completely before glazing.

To Make the Glaze

1. Prepare the Glaze

In a medium bowl, whisk together the powdered sugar and 2–3 tablespoons of orange juice. Adjust the juice amount to achieve your desired glaze consistency—it should be smooth and pourable.

2. Glaze the Bread

Once the bread has cooled completely, drizzle the glaze over the top, letting it drip down the sides for a decorative finish.

3. Serve

Slice the glazed bread and serve.

Tips

Use Fresh Cranberries: Fresh cranberries provide the perfect burst of tartness. If using frozen cranberries, do not thaw them before adding to the batter.

Zest Smartly: Use a microplane for the zest, avoiding the bitter white pith.

Buttermilk Substitute: If you don’t have buttermilk, make a substitute by mixing ½ cup of milk with 1 tablespoon of vinegar or lemon juice and letting it sit for 5 minutes.

Prevent Sinking Cranberries: Toss the cranberries in a little flour before folding them into the batter to prevent them from sinking to the bottom.

Storage Options

Room Temperature: Store the bread in an airtight container at room temperature for up to 3 days.

Refrigeration: Extend freshness by storing the bread in the refrigerator for up to 5 days.

Freezing: Wrap the loaf or individual slices tightly in plastic wrap, then aluminum foil, and freeze for up to 2 months. Thaw at room temperature and glaze after defrosting.

Homemade Cranberry Orange Bread is a vibrant, zesty treat that’s sure to brighten up any occasion. Whether for a holiday brunch or an afternoon snack, it’s a slice of joy in every bite!

Buttery Pecan Snowball Cookies

0

Buttery Pecan Snowball Cookies are a timeless holiday favorite that bring warmth and sweetness to your dessert table. These delicate, melt-in-your-mouth cookies are packed with finely chopped pecans, giving them a rich, nutty flavor that’s perfectly balanced by their light powdered sugar coating. They’re a delight to make, share, and savor, especially during festive occasions.

What makes these cookies so special is their simple yet elegant appearance—rolled in powdered sugar, they resemble fluffy snowballs. With a buttery base and a satisfying crunch from the pecans, these cookies are as pleasing to the eye as they are to the palate. They’re perfect for gifting, holiday gatherings, or simply enjoying with a cup of tea or coffee.

Why You’ll Love This Recipe

Melt-in-Your-Mouth Texture: Each bite is soft, tender, and buttery.

Nutty Perfection: The finely chopped pecans add depth and a satisfying crunch.

Simple and Elegant: These cookies are easy to make yet look sophisticated.

Ingredients

Yield: About 24 cookies

• 1 cup unsalted butter, softened

• ½ cup powdered sugar

• 1 teaspoon vanilla extract

• 2 ¼ cups all-purpose flour

• ¼ teaspoon salt

• 1 cup finely chopped pecans

• Additional powdered sugar for rolling

Instructions

Step 1: Preheat the Oven

1. Preheat your oven to 350°F (175°C).

2. Prepare an ungreased baking sheet for the cookies.

Step 2: Cream the Butter and Sugar

1. In a large mixing bowl, cream together the softened butter and ½ cup of powdered sugar until the mixture is light and fluffy.

2. Add the vanilla extract and mix until well incorporated.

Step 3: Combine the Dry Ingredients

1. In a separate bowl, whisk together the flour and salt.

2. Gradually add the dry mixture to the butter mixture, mixing until just combined.

Step 4: Add the Pecans

1. Gently fold in the finely chopped pecans. The dough will be slightly crumbly but should hold together when pressed.

Step 5: Shape the Cookies

1. Scoop about a tablespoon of dough and roll it into a 1-inch ball.

2. Place the dough balls on the prepared baking sheet, leaving a little space between each one.

Step 6: Bake the Cookies

1. Bake in the preheated oven for 12-15 minutes, or until the cookies are set but not browned.

Step 7: Coat in Powdered Sugar

1. Let the cookies cool for about 5 minutes. While still warm, roll each cookie in powdered sugar, ensuring they are evenly coated.

2. Transfer the cookies to a wire rack to cool completely.

Step 8: Second Sugar Coating

1. Once the cookies have cooled, roll them in powdered sugar a second time to create a thick, snowy coating.

Step 9: Serve and Enjoy

1. Arrange the cookies on a platter and serve.

Tips

Chop Pecans Finely: This helps the dough hold together better and ensures every bite has a perfect balance of nuts.

Use Room Temperature Butter: Softened butter mixes more evenly with the sugar, creating a smoother dough.

Handle Dough Gently: Overmixing can make the cookies tough. Mix just until the ingredients come together.

Storage Options

Room Temperature: Store the cookies in an airtight container for up to 1 week.

Freezing: Freeze unbaked dough balls on a baking sheet, then transfer to a freezer-safe bag. Bake directly from frozen, adding a minute or two to the baking time.

Baked Cookies: Freeze fully baked cookies for up to 2 months. Thaw at room temperature and roll in powdered sugar again if needed.

Buttery Pecan Snowball Cookies are a nostalgic, crowd-pleasing treat that will become a staple in your holiday baking repertoire. Their delicate sweetness and festive appearance make them a joy to share and savor.

Poor Man’s Prime Rib

0

Poor Man’s Prime Rib is a simple and affordable way to enjoy the flavors of a classic prime rib roast without breaking the bank. Using a beef eye of round roast, this recipe replicates the tender, juicy, and flavorful experience of prime rib with minimal ingredients and effort. Its perfectly seasoned crust and rosy interior make it an excellent centerpiece for any special occasion or a satisfying Sunday dinner.

The method is straightforward yet effective, relying on precise cooking times and residual heat to achieve a perfectly cooked roast. This budget-friendly dish doesn’t skimp on flavor and is sure to impress your family or guests.

Why You’ll Love This Recipe

Budget-Friendly: Enjoy the luxury of prime rib flavors without the high cost.

Minimal Ingredients: Requires just a few pantry staples for seasoning.

Foolproof Method: The simple cooking technique ensures tender, juicy results.

Ingredients

• 3-pound beef eye of round roast

• 1 teaspoon garlic powder

• 1 teaspoon onion powder

• Salt and pepper, to taste

Instructions

Step 1: Preheat the Oven

1. Preheat your oven to 500°F (260°C).

Step 2: Season the Roast

1. Pat the roast dry with paper towels to help the seasoning adhere.

2. Generously season the roast with salt, pepper, garlic powder, and onion powder, ensuring all sides are evenly coated.

Step 3: Place in the Pan

1. Place the seasoned roast in a roasting pan or baking dish.

2. Do not cover the pan or add any liquid.

Step 4: Start Roasting

1. Place the roast in the preheated oven.

2. Immediately reduce the oven temperature to 475°F (245°C).

3. Roast for 21 minutes (7 minutes per pound).

Step 5: Let the Roast Sit

1. Turn off the oven and allow the roast to sit inside for 2 ½ hours.

2. Do not open the oven door during this time, as maintaining the heat is crucial for the cooking process.

Step 6: Check and Serve

1. After 2 ½ hours, remove the roast from the oven.

2. Use a meat thermometer to ensure the internal temperature has reached at least 145°F (65°C) for medium-rare. Adjust to your preferred doneness level if necessary.

3. Let the roast rest for 10-15 minutes before carving to allow the juices to redistribute.

4. Slice thinly and serve with your favorite sides.

Tips

Accurate Timing: Be precise with the roasting and resting times for the best results.

Meat Thermometer: Use a meat thermometer to confirm the internal temperature for your desired level of doneness.

Season Generously: Don’t skimp on the seasoning; it enhances the roast’s flavor.

Rest Before Slicing: Allow the roast to rest before carving to retain its juices.

Storage Options

Refrigerator: Store leftover slices in an airtight container for up to 3 days. Reheat gently in a low oven or microwave to avoid overcooking.

Freezing: Wrap the sliced roast tightly in aluminum foil or place in a freezer-safe bag. Freeze for up to 2 months. Thaw in the refrigerator before reheating.

Poor Man’s Prime Rib is a smart and satisfying way to enjoy a high-end dish on a budget. With its simple preparation and delicious results, it’s sure to become a favorite in your recipe collection!