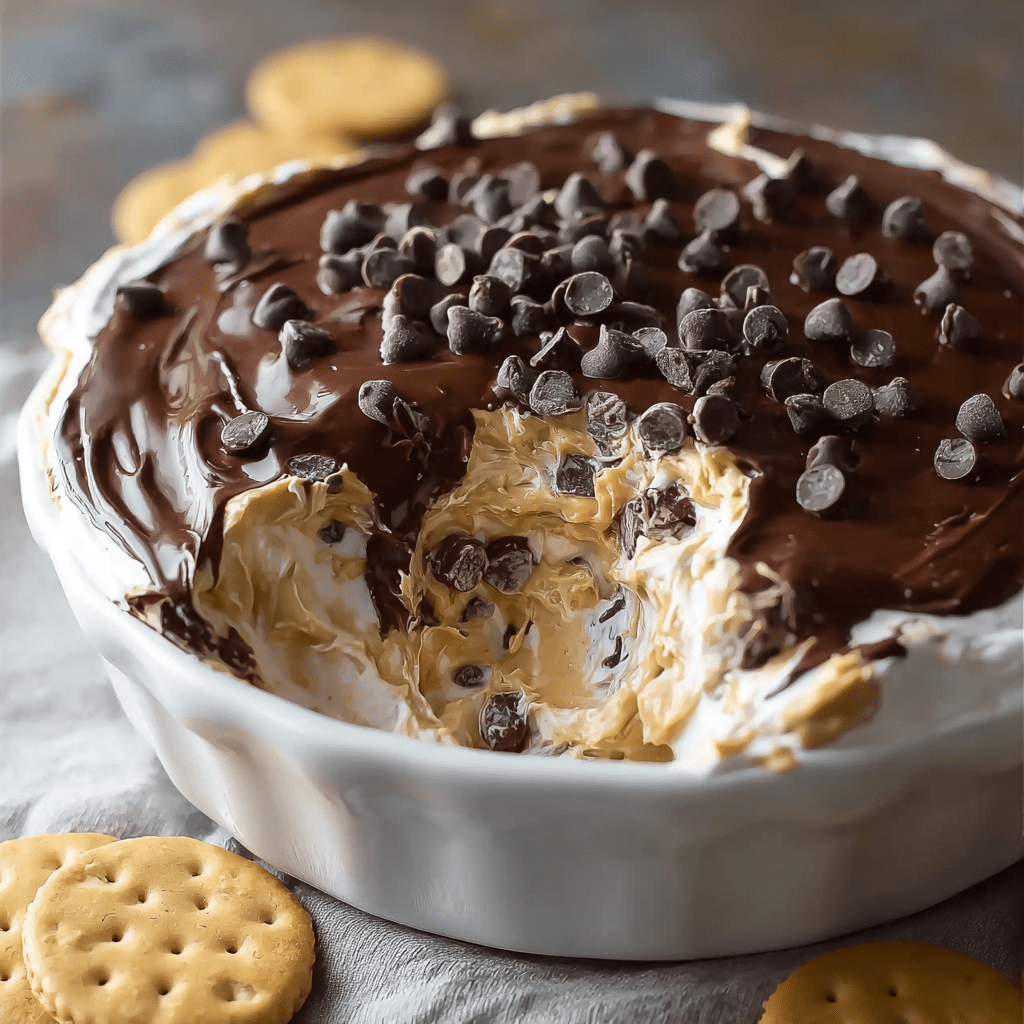
Cuban Picadillo

0

Cuban Picadillo is a rich, savory-sweet ground beef dish that’s brimming with bold Latin flavors and comforting textures. A traditional staple in Cuban kitchens, picadillo takes humble ingredients—ground beef, onions, bell pepper, and garlic—and elevates them with an irresistible mix of spices, briny olives, and sweet raisins. This combination of sweet, salty, and tangy elements makes Cuban picadillo incredibly unique and memorable. It’s a dish that feels hearty and homey while being deeply aromatic and satisfying.

Traditionally served over fluffy white rice, picadillo is incredibly versatile—you can use it as a filling for empanadas, tacos, or stuffed peppers, or enjoy it with fried plantains for an authentic Cuban-style meal. The fire-roasted tomatoes and olive brine infuse the beef with layers of depth, while the raisins add just a touch of sweetness to balance the acidity and spice. Whether you’re cooking for family, entertaining guests, or meal prepping for the week, Cuban Picadillo delivers bold flavor and serious comfort.

Why You’ll Love This Recipe

• Sweet, salty, tangy, and savory—all in one dish

• Perfect over rice, in tacos, or as an empanada filling

• One-pan recipe for easy cooking and cleanup

• Classic Cuban flavors that are comforting and bold

Ingredients

• 1 lb ground beef

• 1 medium yellow onion, chopped

• 1 red bell pepper, chopped

• 4 cloves garlic, minced

• 2 teaspoons ground cumin

• ½ teaspoon dried oregano

• ½ teaspoon dried marjoram

• 1 (15-ounce) can fire-roasted tomatoes (undrained)

• 2 tablespoons tomato paste

• ½ cup chopped Spanish green olives

• ½ cup olive brine (from the green olives)

• 1 bay leaf

• ½ cup raisins, chopped

• Salt and black pepper, to taste

Instructions

Step 1: Brown the Beef and Vegetables

In a large skillet over medium heat, add the ground beef.

Cook for 2–3 minutes, breaking it apart with a spoon.

Add the chopped onion and cook for another 2–3 minutes until slightly softened.

Add the red bell pepper and continue cooking until the onions are translucent and the beef is browned and fully cooked. Drain off any excess grease if needed.

Step 2: Add Aromatics and Spices

Stir in the minced garlic, ground cumin, oregano, and marjoram.

Cook for 1 minute, stirring constantly, to bloom the spices and release their aroma.

Step 3: Simmer with Tomatoes and Flavorings

Add the undrained can of fire-roasted tomatoes and tomato paste to the skillet.

Stir to combine, then add the chopped green olives, olive brine, bay leaf, and chopped raisins.

Mix thoroughly and bring to a gentle simmer.

Step 4: Simmer and Finish

Cover the skillet and let the picadillo simmer for 20–25 minutes, stirring occasionally to prevent sticking.

Once the mixture has thickened and the flavors have melded, remove the bay leaf.

Season with salt and black pepper to taste.

Step 5: Serve

Serve the picadillo hot over steamed white rice, or use it to fill empanadas, tacos, or stuffed peppers.

Garnish with fresh parsley or cilantro if desired.

Tips for Success

Use fire-roasted tomatoes for added depth: They give the dish a slight smokiness that complements the briny olives and sweet raisins.

Chop the raisins: This helps them blend seamlessly into the mixture and avoids large bites of sweetness.

Adjust the sweetness: If you prefer less sweetness, use fewer raisins or replace them with chopped dried apricots or none at all.

Use high-quality olives: Spanish green olives (manzanilla) add an essential salty note that defines this dish.

Let it sit: Like many stews, Cuban picadillo tastes even better the next day as the flavors deepen.

Storage Options

Refrigerator: Store cooled leftovers in an airtight container for up to 4 days. Reheat gently on the stovetop or in the microwave.

Freezer: Picadillo freezes beautifully. Store in a freezer-safe container or bag for up to 3 months. Thaw overnight in the fridge before reheating.

Meal prep tip: Make a double batch and portion it with rice into containers for ready-to-go lunches or dinners throughout the week.

Cuban Picadillo is a dish that celebrates the beauty of flavor contrast and simplicity. With its deep seasoning, rich tomato base, and signature sweet-salty balance, it’s a dish you’ll return to again and again—especially when you need something both comforting and full of personality.

Cheesy Ham & Potato Bake

0

Cheesy Ham & Potato Bake is the kind of satisfying, no-fuss comfort food that’s made for cozy evenings and family-style meals. Loaded with tender potatoes, savory ham, and plenty of gooey cheddar cheese, this dish brings together pantry staples and turns them into a creamy, hearty casserole. Whether you’re using leftover holiday ham or grabbing diced ham from the deli, it’s a fantastic way to turn simple ingredients into a rich and flavorful meal. A quick boil on the potatoes ensures a soft, perfectly baked texture, while the creamy sauce infused with garlic, sour cream, and mushroom soup wraps everything in indulgent goodness.

This casserole is an excellent make-ahead option, ideal for busy weeknights, potlucks, or Sunday dinners. You can even customize it with your favorite cheeses, throw in some frozen peas or broccoli for a veggie boost, or top it with breadcrumbs for a crispy, golden finish. Best of all, it reheats beautifully, making it just as good the next day—if there are any leftovers to begin with!

Why You’ll Love This Recipe

• Perfect for using up leftover ham

• Creamy, cheesy, and deeply comforting

• Simple ingredients, big flavor

• Great for feeding a family or a crowd

Ingredients

• 6 medium potatoes, peeled and cubed

• 2 cups cooked ham, diced

• 1 small onion, finely chopped

• 2 cups shredded cheddar cheese

• 1 can (10.75 oz) condensed cream of mushroom soup

• ½ cup sour cream

• ¼ cup milk

• ½ teaspoon garlic powder

• ¼ teaspoon paprika

• Salt and pepper, to taste

• ¼ cup breadcrumbs (optional, for topping)

Directions

Step 1: Preheat the Oven

Preheat your oven to 375°F (190°C). Grease a 9×13-inch baking dish with butter or nonstick spray and set aside.

Step 2: Boil the Potatoes

Place the peeled and cubed potatoes into a large pot of salted water.

Bring to a boil and cook for 10–15 minutes, or until just tender when pierced with a fork.

Drain the potatoes thoroughly and let them sit for a few minutes to release steam. This helps prevent a watery casserole.

Step 3: Make the Cheesy Filling

In a large mixing bowl, combine the diced ham, finely chopped onion, shredded cheddar cheese, condensed cream of mushroom soup, sour cream, milk, garlic powder, paprika, and a pinch of salt and pepper.

Mix until everything is evenly incorporated into a thick, creamy mixture.

Step 4: Add the Potatoes

Gently fold the cooked potatoes into the mixture. Stir slowly to avoid breaking up the potatoes too much, keeping them in nice, chunky pieces for texture.

Step 5: Assemble the Casserole

Transfer the ham and potato mixture into the prepared baking dish.

Spread it evenly with a spatula. If using breadcrumbs, sprinkle them evenly over the top for a crispy golden crust.

Step 6: Bake

Bake the casserole in the preheated oven for 30–35 minutes, or until the top is golden brown and the sauce is bubbling around the edges.

If the top isn’t browning enough for your liking, you can broil it for the last 2–3 minutes—just watch it closely.

Step 7: Cool and Serve

Let the casserole sit for 5–10 minutes after baking to allow the sauce to thicken slightly.

Scoop into generous portions and serve warm. Garnish with chopped parsley or green onions for added color and freshness, if desired.

Tips for Success

Don’t overcook the potatoes when boiling: They’ll continue cooking in the oven, so just cook until fork-tender.

Shred your own cheese: Pre-shredded cheese often contains anti-caking agents that can prevent smooth melting.

Customize it: Add frozen peas, cooked broccoli, sautéed mushrooms, or even a dash of hot sauce for extra flavor.

Breadcrumb tip: For extra crispiness, toss breadcrumbs in melted butter before sprinkling them on top.

Storage Options

Refrigerator: Store leftovers in an airtight container for up to 4 days. Reheat in the oven or microwave until warmed through.

Freezer: Let the casserole cool completely, then wrap tightly with foil or transfer to a freezer-safe container. Freeze for up to 2 months. Thaw overnight in the fridge before reheating.

Make-ahead tip: Assemble the casserole (without baking), cover tightly, and refrigerate up to 24 hours in advance. Bake when ready, adding 5–10 extra minutes to the cook time if cold.

Cheesy Ham & Potato Bake is the definition of homestyle comfort food. It’s rich, hearty, and loaded with flavor in every bite. Whether you’re looking to feed a hungry family or bring something satisfying to the table with minimal prep, this casserole is a reliable and delicious go-to.

Wild Game Pepperoni Sticks

0

Wild Game Pepperoni Sticks are a bold, savory snack that combines the rustic flavor of wild meat—like venison or elk—with a smoky, peppery spice blend that’s perfect for curing and storing. Ideal for hunters, outdoor enthusiasts, or anyone who enjoys DIY charcuterie, this recipe captures the rich flavor of game meat and transforms it into a convenient, high-protein snack. These pepperoni sticks are perfect for road trips, camping, or charcuterie boards, and they store well for long periods when properly cured.

What sets these sticks apart is their simplicity and versatility. The spices—paprika, black pepper, garlic, fennel, and red pepper flakes—give the meat a classic, Italian-style pepperoni flavor with a slight heat and depth. Using curing salt ensures the meat is safe for longer drying and storage, while hog casings help achieve that traditional look and texture. Whether you’re new to meat curing or a seasoned home charcutier, this recipe is approachable, rewarding, and deeply satisfying.

Why You’ll Love This Recipe

• Great way to use wild game meat

• Rich, spicy, and slightly smoky flavor

• Long shelf life when properly cured

• Ideal for snacking, packing, or sharing

Ingredients

• 2½ lbs wild game meat (venison, elk, etc.), finely ground

• 2 tablespoons paprika

• 1 tablespoon black pepper

• 1 tablespoon garlic powder

• 1 tablespoon onion powder

• 1 teaspoon cayenne pepper

• 1 teaspoon fennel seeds

• 1 teaspoon crushed red pepper flakes

• 1 teaspoon salt

• ½ teaspoon curing salt (such as Prague Powder #1)

• Sausage casings (hog casings, soaked and rinsed)

Directions

Step 1: Prepare the Meat

Place the finely ground wild game meat in a large mixing bowl. If your meat is very lean, consider adding a small amount of pork fat (about 10–15%) to improve texture and moisture retention.

Step 2: Add the Seasonings

Sprinkle paprika, black pepper, garlic powder, onion powder, cayenne, fennel seeds, crushed red pepper flakes, and salt evenly over the ground meat.

Using clean hands or a stand mixer with a paddle attachment, mix thoroughly until all the spices are fully integrated.

Step 3: Add the Curing Salt

Dissolve the curing salt into a tablespoon or two of cold water to distribute it more evenly.

Add the dissolved curing salt to the meat mixture and continue mixing until the blend is uniform and sticky to the touch—this helps with binding during curing.

Step 4: Prepare the Casings

Rinse the hog casings under cold running water, then soak them in warm water for at least 30 minutes.

After soaking, flush the casings with water one more time to remove any residual salt and check for any damage or holes.

Step 5: Stuff the Casings

Fit your sausage stuffer with the appropriate nozzle and carefully slide the casing onto it.

Fill the casings slowly with the meat mixture, keeping it firm but not overstuffed to avoid bursting.

Twist or tie off the ends and create links if desired. Prick any visible air bubbles with a sterilized pin.

Step 6: Cure the Pepperoni Sticks

Hang the filled casings in a well-ventilated, cool room (ideally 50–60°F / 10–15°C with about 70% humidity).

Let the pepperoni cure for 3–5 days, depending on your desired firmness. Check daily to monitor texture and aroma.

If your environment is dry or the sticks are small, they may cure faster.

Step 7: Serve and Store

Once cured, cut into sticks or coins and enjoy immediately.

Store in the refrigerator for up to 1 week, or vacuum seal and freeze for up to 3 months.

You can also store cured sticks in a cool pantry if fully dried and properly preserved.

Tips for Success

Use cold meat and equipment: This helps with emulsification and prevents fat smearing.

Use a reliable curing salt: Prague Powder #1 is designed for short-term cured meats like pepperoni.

Let the flavors meld: After curing, refrigerate the sticks for 24 hours before eating to let the seasoning intensify.

Don’t skip the casing rinse: Properly cleaned casings improve texture and prevent off-flavors.

Monitor curing conditions: Avoid humid or overly dry environments—this affects safety and texture.

Storage Options

Refrigerator: Store in an airtight container for up to 7 days.

Freezer: Wrap tightly in plastic or vacuum seal for up to 3 months.

Room temperature: Only store at room temp if you’ve fully cured and dried the sticks, and conditions are safe (cool and dry).

Wild Game Pepperoni Sticks offer an authentic, satisfying way to enjoy your harvest all year long. With the right balance of spice and traditional technique, they make a practical and delicious snack that pays homage to the craft of old-school meat preservation.

BLT Pasta Salad

0

BLT Pasta Salad is a fresh and flavorful twist on the classic BLT sandwich, turning it into a vibrant and satisfying side dish or light meal. This salad brings together the crispy, savory essence of bacon with the cool crunch of Romaine lettuce, sweet juiciness of tomatoes, and the tender bite of pasta—all tied together with a creamy, tangy dressing. Whether you’re heading to a summer barbecue, prepping lunches for the week, or looking for a quick dinner option, this dish is as easy to make as it is crowd-pleasing.

What makes this pasta salad stand out is its perfect balance of textures and flavors. The farfalle pasta acts as a hearty base, absorbing the flavors of the dressing without getting soggy. The crispy bacon and fresh vegetables bring contrast and brightness, while the homemade dressing—featuring Ranch, mayo, sour cream, and apple cider vinegar—delivers that classic creamy tang. It’s a no-fuss recipe that feels indulgent but still light, and it can be prepped in advance for convenience. Serve it chilled or at room temperature—it’s delicious either way.

Why You’ll Love This Recipe

• A fun, creamy twist on the classic BLT sandwich

• Quick to prepare and perfect for potlucks or lunch

• Great make-ahead option for busy days

• Balanced, refreshing, and full of texture

Ingredients

For the Salad

2 cups uncooked farfalle pasta

4 cups chopped or torn Romaine lettuce

1½ cups chopped tomatoes

4 slices bacon, cooked until crispy and chopped

½ cup chopped red onion

For the Dressing

¼ cup Ranch dressing

¼ cup sour cream

¼ cup mayonnaise

¼ teaspoon ground black pepper

1 tablespoon apple cider vinegar

Instructions

Step 1: Cook the Pasta

Bring a pot of salted water to a boil.

Cook the farfalle pasta according to package directions until al dente.

Drain the pasta and rinse under cold water to cool it down and stop the cooking process. Set aside to drain fully.

Step 2: Prepare the Salad Ingredients

While the pasta is cooking, wash and chop the Romaine lettuce, tomatoes, and red onion.

Cook the bacon in a skillet over medium heat until crispy. Transfer to a paper towel-lined plate to drain, then chop into bite-size pieces.

Step 3: Make the Dressing

In a small bowl, combine Ranch dressing, sour cream, mayonnaise, ground black pepper, and apple cider vinegar.

Whisk until smooth and well-blended. Taste and adjust seasoning if needed.

Step 4: Assemble the Salad

In a large salad bowl, combine the cooled pasta, Romaine lettuce, chopped tomatoes, red onion, and bacon.

Drizzle the dressing over the salad and gently toss everything together to coat the ingredients evenly.

Step 5: Chill and Serve

Refrigerate the salad until ready to serve, or serve immediately if preferred.

Toss again just before serving to redistribute the dressing, especially if made ahead.

Tips for Success

Cool the pasta completely: This prevents it from wilting the lettuce or absorbing too much dressing too quickly.

Use Roma tomatoes or grape tomatoes: They hold their shape well and offer a nice pop of sweetness.

Add lettuce just before serving: For maximum crunch, stir in the Romaine at the last minute if making ahead.

Customize it: Add avocado, shredded cheese, or grilled chicken to make it a full meal.

Double the dressing if desired: Especially if the salad will sit for a while—pasta and lettuce can soak up the moisture.

Storage Options

Refrigerator: Store leftovers in an airtight container for up to 2 days. For best results, keep the lettuce separate and stir it in just before serving.

Not freezer-friendly: The texture of the lettuce and creamy dressing won’t hold up well after freezing and thawing.

Make-ahead tip: You can cook the pasta, prep the veggies, and mix the dressing up to a day in advance. Store separately and toss together before serving.

BLT Pasta Salad is the kind of dish you’ll want to bring to every gathering—it’s refreshing, easy, and always a hit. With its creamy dressing, crisp veggies, and smoky bacon, it has all the flavors you love from a BLT sandwich, but in a cool and satisfying pasta form. Whether it’s a casual picnic or a weeknight dinner, this salad has you covered.

Chicken and Dressing Casserole

0

Chicken and Dressing Casserole is the epitome of Southern comfort food—a hearty, soul-warming dish that brings together tender chicken, a rich and creamy sauce, and a buttery, herb-infused stuffing topping. This casserole is the kind of recipe you turn to when you want something cozy, filling, and family-approved. It uses simple, classic ingredients like canned soup, chicken broth, and stuffing mix, yet it tastes like it’s been simmering all day in Grandma’s kitchen.

Perfect for weeknight dinners, potlucks, or even holiday gatherings, this dish is incredibly versatile and easy to prepare. You can use rotisserie chicken to save time, and with two layers—creamy chicken on the bottom and golden, slightly crispy dressing on top—it’s a full meal baked into one comforting casserole. The sautéed onions and celery add depth and texture, while poultry seasoning and sage give it that nostalgic Thanksgiving-like flavor, even in the middle of the week.

Why You’ll Love This Recipe

• All-in-one comfort food that’s both creamy and savory

• Great use for leftover chicken or rotisserie chicken

• Simple pantry ingredients with big flavor

• Perfect for feeding a crowd or prepping ahead

Ingredients

For the Casserole:

3 cups cooked chicken breast or rotisserie chicken, shredded or cubed

1 medium onion, diced

2 stalks celery, diced

½ cup butter, divided

1 (10.5 oz) can cream of chicken soup

1 (10.5 oz) can cream of mushroom soup

1½ cups chicken broth, divided

1 teaspoon poultry seasoning

½ teaspoon black pepper

½ teaspoon sage (optional)

1 package (about 6 oz or 3 cups) stuffing mix

2 large eggs, beaten

Instructions

Step 1: Preheat and Prep

Preheat your oven to 350°F (175°C).

Grease a 9×13-inch baking dish with butter or nonstick spray and set aside.

Step 2: Sauté the Vegetables

In a skillet over medium heat, melt ¼ cup of butter.

Add the diced onion and celery. Sauté for 5–7 minutes until the vegetables are softened and fragrant.

Remove from heat and set aside to cool slightly.

Step 3: Prepare the Chicken Mixture

In a large mixing bowl, combine the shredded chicken, cream of chicken soup, cream of mushroom soup, and ½ cup of chicken broth.

Stir in poultry seasoning, black pepper, and sage if using.

Add the sautéed onion and celery and stir until fully incorporated.

Step 4: Prepare the Stuffing Mixture

In a separate bowl, combine the dry stuffing mix with 1 cup of chicken broth and the remaining ¼ cup of melted butter.

Add the beaten eggs and stir until the stuffing is well-moistened. It should be soft but not soggy.

Let the mixture sit for a few minutes to allow the bread to absorb the liquid.

Step 5: Assemble the Casserole

Spread the chicken mixture evenly in the bottom of the prepared baking dish.

Spoon the stuffing mixture on top of the chicken, gently spreading it to cover the surface in an even layer.

Step 6: Bake the Casserole

Cover the baking dish with foil and place it in the preheated oven.

Bake for 30 minutes, then remove the foil and continue baking for another 10–15 minutes, or until the top is golden brown and slightly crisp.

Step 7: Serve and Enjoy

Remove the casserole from the oven and let it rest for 5–10 minutes before serving.

Garnish with chopped fresh parsley for a pop of color, if desired.

Serve warm, preferably with a side of green beans or a simple salad to complete the meal.

Tips for Success

Use rotisserie chicken to save time: It adds flavor and cuts down on prep. Leftover roasted or poached chicken also works well.

Stuffing mix varies: Some brands include seasoning, so you may want to reduce or omit added sage or poultry seasoning if yours is highly seasoned.

Don’t skip the eggs in the stuffing: They help bind the topping so it holds together as it bakes.

Let it rest before slicing: This helps the layers firm up, making it easier to serve neatly.

Make it ahead: Assemble the casserole up to a day in advance and refrigerate. Let it come to room temperature before baking, or add 10–15 minutes to the bake time.

Storage Options

This casserole stores and reheats beautifully, making it ideal for leftovers or meal prep.

Refrigerator: Store leftovers in an airtight container for up to 4 days. Reheat individual portions in the microwave or larger portions in the oven at 350°F until heated through.

Freezer: Cool completely, then wrap tightly and freeze for up to 2 months. Thaw in the refrigerator overnight and reheat in the oven, covered with foil, until hot.

Make-Ahead Tip: Assemble the full casserole without baking and refrigerate it overnight. Bake as instructed when ready, adding 5–10 minutes to compensate for the cold start.

Hearty, flavorful, and incredibly satisfying, this Chicken and Dressing Casserole hits all the right notes. It brings together the best parts of a traditional holiday meal in a dish that’s simple enough to enjoy any night of the week. Whether served to family or brought to a potluck, it’s bound to become a go-to recipe in your comfort food collection.

Slow Cooker Creamy Potato Bacon Soup

0

Slow Cooker Creamy Potato Bacon Soup is the kind of soul-warming comfort food that turns a chilly evening into something cozy and satisfying. It’s everything you want in a hearty soup: creamy, savory, and filled with the smoky richness of bacon. This dish brings together simple pantry staples—potatoes, broth, onion, and cream—and transforms them into a thick, velvety soup with the help of your slow cooker. It’s perfect for busy weekdays, lazy weekends, or anytime you need a fuss-free meal that feels like a warm hug in a bowl.

What makes this soup extra special is the slow cooking process, which allows the flavors to deepen and the potatoes to become tender and naturally thicken the base. The bacon and onion are sautéed before going into the pot, giving the soup a deep, savory foundation that plays beautifully against the creamy dairy finish. A touch of dill weed and white pepper adds subtle complexity without overpowering the classic flavor. Topped with extra crispy bacon or shredded cheese, this soup easily becomes the star of the dinner table. Pair it with warm bread, and you’ve got comfort food perfection.

Why You’ll Love This Recipe

• Creamy, savory, and full of flavor

• Hands-off slow cooker recipe—perfect for busy days

• Smoky bacon and tender potatoes in every bite

• Easy to prepare and even better the next day

Ingredients

6 slices bacon, cut into ½-inch pieces

1 onion, finely chopped

2 (10.5 oz) cans condensed chicken broth

2 cups water

5 large potatoes, peeled and diced

½ teaspoon salt

½ teaspoon dried dill weed

½ teaspoon ground white pepper

½ cup all-purpose flour

2 cups half-and-half cream

1 (12 oz) can evaporated milk

How To Make Slow Cooker Creamy Potato Bacon Soup

Step 1: Cook Bacon and Onion

In a large, deep skillet, cook the chopped bacon over medium-high heat until it’s crispy and golden brown.

Add the finely chopped onion and continue to cook until the onion is soft and translucent, about 3–4 minutes.

Drain off excess grease and transfer the bacon and onion mixture to the slow cooker.

Step 2: Load the Slow Cooker

Add the diced potatoes, chicken broth, water, salt, dill weed, and white pepper to the slow cooker.

Stir everything together to combine evenly.

Cover the slow cooker with the lid and cook on Low for 6 to 7 hours, or until the potatoes are tender. Stir occasionally if you’re nearby to help the soup cook evenly.

Step 3: Thicken the Soup

In a small mixing bowl, whisk together the flour and half-and-half cream until smooth and lump-free.

Pour the flour mixture and the evaporated milk into the slow cooker.

Stir well to incorporate the thickening mixture into the soup.

Cover again and continue cooking on Low for 30 minutes, or until the soup is thickened and creamy.

Step 4: Serve and Enjoy

Once the soup is done, taste and adjust seasoning if needed. Add more salt or pepper to your liking.

Serve hot, garnished with extra bacon bits, shredded cheese, or chopped green onions if desired.

Tips for Success

Use starchy potatoes: Russets work best for creating a creamy texture as they break down slightly during cooking.

Don’t skip the flour mixture: This is key to achieving the velvety consistency—just be sure to whisk it thoroughly to avoid lumps.

Stir gently: Especially after adding the dairy, to avoid breaking up the potatoes too much.

Want extra richness? Substitute heavy cream for some of the half-and-half.

Double the bacon: If you’re a bacon lover, cook a few extra slices for garnish—crispy bacon on top adds the perfect finish.

Storage Options

This soup stores and reheats wonderfully, making it great for leftovers or meal prep.

Refrigerator: Store in an airtight container for up to 4 days. Reheat gently on the stovetop over medium-low heat or in the microwave.

Freezer: You can freeze the soup, but keep in mind that cream-based soups may separate upon thawing. If you do freeze it, reheat slowly while stirring often to restore texture.

Make-Ahead Tip: Prepare everything except the dairy and thickener in advance. Refrigerate the slow cooker base overnight, then cook and add the cream and flour mix fresh for best results.

Creamy, filling, and full of flavor, this Slow Cooker Potato Bacon Soup is comfort food at its finest. It’s a guaranteed hit whether you’re feeding a crowd, meal prepping for the week, or just looking for something warm to curl up with on a quiet night.

Strawberries and Cream Sweet Rolls

0

Strawberries and Cream Sweet Rolls are the perfect blend of comforting homemade pastry and fresh, fruity flavor. Think of them as a bright, summery twist on classic cinnamon rolls—featuring a soft, buttery dough swirled with a jammy strawberry filling and finished with a silky cream cheese glaze. These rolls offer the nostalgic feel of a morning bakery visit, but with the satisfaction of knowing you made them from scratch. Each bite is packed with tender dough, vibrant berries, and the tangy-sweet touch of cream cheese icing that melts into the warm rolls.

These sweet rolls are ideal for weekend brunches, holiday mornings, or as a show-stopping dessert for gatherings. What makes this recipe extra special is the homemade strawberry filling—it’s fresh, slightly tart, and thickened just enough to stay nestled within each spiral. The dough is soft and pillowy, and though it takes some time to rise and roll, the process is straightforward and rewarding. Once baked and topped with glaze, these sweet rolls are irresistible warm from the oven or even at room temperature. If you’re looking for a treat that feels both indulgent and homemade with love, Strawberries and Cream Sweet Rolls are it.

Why You’ll Love This Recipe

• Fresh strawberries provide a naturally sweet, fruity center

• Cream cheese glaze adds a luscious, tangy finish

• Soft, homemade dough with a tender crumb

• Perfect for brunch, special occasions, or make-ahead treats

Ingredients

For the Dough

3½ cups all-purpose flour (plus more for kneading)

1 packet (2¼ teaspoons) active dry yeast

1 cup warm milk (110°F/43°C)

¼ cup granulated sugar

1 large egg

¼ cup unsalted butter, melted

½ teaspoon salt

For the Strawberry Filling

1½ cups fresh strawberries, chopped

¼ cup granulated sugar

2 teaspoons cornstarch

1 teaspoon lemon juice

For the Cream Cheese Glaze

4 oz (113g) cream cheese, softened

2 tablespoons unsalted butter, softened

1 cup powdered sugar

1 teaspoon vanilla extract

2–3 tablespoons milk (as needed for consistency)

Instructions

Prepare the Dough

In a large mixing bowl, combine warm milk and yeast. Let sit for 5–10 minutes until the mixture becomes foamy, indicating the yeast is active.

Add sugar, egg, melted butter, and salt to the yeast mixture. Stir to combine.

Gradually add in the flour, about 1 cup at a time, mixing until a soft dough forms.

Turn the dough out onto a lightly floured surface and knead for 6–8 minutes until the dough is smooth and elastic.

Place the kneaded dough into a greased bowl, cover with a clean kitchen towel or plastic wrap, and let rise in a warm place for about 1 hour, or until doubled in size.

Make the Strawberry Filling

While the dough is rising, place the chopped strawberries, sugar, cornstarch, and lemon juice in a small saucepan over medium heat.

Cook for 5–7 minutes, stirring frequently, until the mixture thickens and becomes glossy.

Remove from heat and allow the filling to cool completely before spreading on the dough.

Roll and Assemble

Once the dough has risen, punch it down and transfer it to a floured surface.

Roll it out into a large rectangle, approximately 10×16 inches, with the long side facing you.

Spread the cooled strawberry filling evenly across the surface, leaving a ½-inch border around the edges.

Starting from the long edge, roll the dough tightly into a log, seam-side down.

Use a sharp knife or unflavored dental floss to slice the log into 9 to 12 equal rolls.

Place the rolls in a greased 9×13-inch baking dish or similar sized pan, spacing them slightly apart.

Cover loosely and let them rise for another 30 minutes until slightly puffed.

Bake the Rolls

Preheat your oven to 350°F (175°C).

Bake the rolls for 22–25 minutes, or until golden brown on top and cooked through in the center.

Remove from the oven and allow them to cool slightly while you prepare the glaze.

Make the Cream Cheese Glaze

In a medium mixing bowl, beat the softened cream cheese and butter together until smooth and creamy.

Add the powdered sugar and vanilla extract, mixing until well incorporated.

Add milk one tablespoon at a time, beating after each addition, until the glaze reaches your desired consistency—thick but spreadable.

Glaze and Serve

Once the rolls have cooled slightly (but are still warm), spread the cream cheese glaze generously over the tops.

Serve warm for the best texture and flavor, but leftovers are still delicious at room temperature.

Tips for Success

Don’t rush the rise: Allow the dough to rise fully each time to ensure fluffy, tender rolls.

Cool the filling before spreading: A hot filling can melt the dough and make rolling difficult.

Use floss to cut the rolls: This helps keep the spirals intact and prevents squishing.

Watch the baking time: Depending on your oven, rolls may brown quickly—tent with foil if needed.

Add a touch of extra flavor: A sprinkle of cinnamon in the filling or a lemon zest in the glaze can add dimension.

Storage Options

Room Temperature: Store leftover rolls in an airtight container for up to 2 days.

Refrigerator: Store in the fridge for up to 4 days. Reheat individual rolls in the microwave for 10–15 seconds before serving.

Freezer: Freeze unglazed rolls tightly wrapped for up to 2 months. Thaw overnight in the fridge and warm before glazing.

Make-Ahead Tip: Prepare and assemble the rolls the night before, then refrigerate before the second rise. In the morning, let them come to room temperature and rise for 30 minutes before baking.

Strawberries and Cream Sweet Rolls offer the best of both worlds: the satisfaction of a homemade baked good and the fresh, juicy burst of strawberries in every bite. With their soft dough, fruity filling, and creamy glaze, they’re a perfect treat to enjoy for breakfast, brunch, or dessert.

Hunan Chicken

0

Hunan Chicken is a bold and fiery stir-fry dish rooted in the flavors of Chinese Hunan cuisine, which is known for its heat, garlic-forward profile, and balance of savory and tangy elements. This version brings together tender velveted chicken, a colorful medley of stir-fried vegetables, and a deeply flavorful sauce that clings to every bite. It’s spicy, slightly sweet, and full of umami from ingredients like soy sauce, oyster sauce, and chili paste. The result is a restaurant-style dish that’s surprisingly easy to recreate at home.

What makes Hunan Chicken so satisfying is the contrast between the crisp-tender vegetables and the silky chicken, which is marinated and coated with cornstarch to give it that velvety texture you often find in Chinese takeout. The sauce is layered with complexity—from the heat of chili paste to the brightness of vinegar and ginger, all mellowed with a touch of honey. It’s versatile enough to serve over steamed white rice, brown rice, or even noodles. Whether you’re looking to impress dinner guests or just want a flavorful weeknight meal, Hunan Chicken delivers in both taste and texture.

Why You’ll Love This Recipe

• Spicy, tangy, and full of umami

• Velvety chicken that’s tender and juicy

• Loaded with colorful, crisp vegetables

• Better than takeout and easy to make at home

Ingredients

Velvet Chicken

1¼ lb boneless, skinless chicken breasts, thinly sliced

2 tablespoons low-sodium soy sauce

1 tablespoon cold water

1 tablespoon cornstarch

1 tablespoon vegetable oil

Hunan Sauce

3 tablespoons low-sodium soy sauce

2 tablespoons oyster sauce

1 tablespoon rice vinegar

1 tablespoon Shaoxing wine (or dry sherry)

1 tablespoon honey

1 tablespoon grated fresh ginger or ginger paste

2 cloves garlic, minced

2 teaspoons chili paste or sambal oelek

Vegetables for Stir-Fry

1 tablespoon vegetable oil (more as needed)

2 cups broccoli florets

½ yellow onion, chopped

1 rib celery, thinly sliced

1 red bell pepper, diced

1 large carrot, peeled and chopped

Instructions

Step 1: Marinate the Chicken

In a medium bowl, combine the thinly sliced chicken with soy sauce and cold water. Let it sit for 10 minutes to absorb the seasoning.

Stir in the cornstarch and vegetable oil until the chicken is evenly coated. Let the mixture rest for an additional 20 minutes—this process tenderizes the meat and creates a silky texture when cooked.

Step 2: Mix the Sauce

In a small bowl, whisk together the soy sauce, oyster sauce, rice vinegar, Shaoxing wine, honey, grated ginger, garlic, and chili paste.

Set the sauce aside so the flavors can meld while you prepare the rest of the dish.

Step 3: Cook the Chicken

Heat 1 tablespoon of vegetable oil in a large skillet or wok over medium-high heat.

Using tongs, remove the chicken from the marinade and place it in the skillet in a single layer. Avoid overcrowding the pan—work in batches if needed.

Cook for 2–3 minutes until the bottom side is browned, then flip and cook for another 2–3 minutes, or until fully cooked through.

Transfer the cooked chicken to a plate and cover loosely to keep warm.

Step 4: Stir-Fry the Vegetables

In the same skillet, add another tablespoon of oil over medium-high heat.

Add the broccoli florets and stir-fry for 1–2 minutes until they begin to turn bright green.

Add the chopped onion, celery, red bell pepper, and carrot to the skillet. Stir-fry for another 2–3 minutes until the vegetables are just tender but still have a bit of crunch.

Transfer the vegetables to the same plate as the chicken and cover to keep warm.

Step 5: Cook the Sauce

Reduce the heat to medium. Whisk the sauce once more to make sure the cornstarch (if any has settled) is fully mixed in.

Pour the sauce into the skillet and cook, whisking frequently, until it starts to bubble and thicken—about 1–2 minutes.

Step 6: Combine and Finish

Return the cooked chicken and vegetables to the skillet with the thickened sauce.

Toss everything together until evenly coated and heated through.

Serve immediately over steamed white or brown rice. For extra heat, drizzle with more chili paste or add crushed red pepper flakes on top.

Tips for Success

Velveting matters: The combination of cornstarch and oil gives the chicken that classic silky, tender texture you expect from stir-fry dishes.

Don’t overcrowd the pan: Cook the chicken in batches to ensure even browning and avoid steaming the meat.

Prep all ingredients ahead: Stir-fry moves fast, so have everything chopped, measured, and ready before you turn on the heat.

Customize the spice: Use more or less chili paste depending on your heat preference. Sambal oelek offers a clean heat, while other chili pastes like doubanjiang add more complexity.

Swap vegetables if needed: Snow peas, mushrooms, baby corn, or zucchini also work well.

Storage Options

Hunan Chicken keeps well and is perfect for leftovers.

Refrigerator: Store in an airtight container for up to 4 days. Keep the rice separate for best texture when reheating.

Freezer: Freeze cooked chicken and vegetables with sauce in a freezer-safe container for up to 2 months. Thaw overnight in the fridge before reheating.

Reheating: Warm gently in a skillet over medium heat, adding a splash of water or broth to loosen the sauce. Microwave reheating also works, though the vegetables may lose some of their crispness.

Hunan Chicken is a go-to stir-fry for when you want something fast, flavorful, and full of bold character. It’s a dish that satisfies takeout cravings while giving you complete control over ingredients and spice level. Once you make it at home, you might just find yourself skipping the delivery menu altogether.

Broccoli Cauliflower Salad

0

Broccoli Cauliflower Salad is a crunchy, creamy, and utterly satisfying dish that brings together fresh vegetables, sharp cheddar, crispy bacon, and a tangy-sweet dressing. It’s the perfect side dish when you want something that feels hearty but still fresh. Unlike leafy salads that wilt over time, this one holds up beautifully—making it ideal for potlucks, holiday dinners, or meal prep. The mix of raw broccoli and cauliflower gives the salad plenty of texture, while the almonds, red onion, and cheddar add layers of flavor and crunch. Toss it all with a quick three-ingredient dressing, and you’ve got a crowd-pleasing favorite that’s as easy to make as it is to love.

One of the best things about this salad is its versatility. You can make it ahead of time, and it just gets better as it chills in the fridge. The dressing, made from mayo, sugar, and vinegar, hits that perfect balance of creamy and tangy, enhancing the natural sweetness of the cauliflower and mellowing the bite of raw broccoli. Add the smoky crunch of bacon and the richness of cheddar, and every bite delivers contrast and flavor. Whether you’re serving it at a summer BBQ, packing it in a lunchbox, or rounding out a holiday spread, Broccoli Cauliflower Salad fits the occasion beautifully.

Why You’ll Love This Recipe

• No cooking required for the veggies

• Crunchy, creamy, and full of flavor

• Perfect for make-ahead meals or gatherings

• Easy to customize with your favorite mix-ins

Ingredients

Dressing

1 cup mayonnaise

1½ tablespoons granulated sugar

3 tablespoons apple cider vinegar (or red wine vinegar)

Broccoli Cauliflower Salad

3 cups broccoli florets, cut into bite-size pieces

3 cups cauliflower florets, cut into bite-size pieces

⅔ cup sliced almonds

⅓ cup finely chopped red onion

1 cup finely cubed cheddar cheese

10 slices crispy cooked bacon, coarsely chopped

Salt, to taste

Freshly ground black pepper, to taste

Instructions

Step 1: Prepare the Dressing

In a small mixing bowl, whisk together the mayonnaise, sugar, and apple cider vinegar until smooth and creamy.

Taste and adjust the sweetness or acidity if needed—add a bit more vinegar for tang, or sugar for extra sweetness.

Set aside while you prep the rest of the salad.

Step 2: Assemble the Salad Ingredients

In a large mixing bowl, combine the bite-size broccoli and cauliflower florets.

Add in the sliced almonds, chopped red onion, cubed cheddar cheese, and chopped crispy bacon.

Toss the ingredients gently to distribute everything evenly.

Step 3: Dress and Toss

Pour the prepared dressing over the broccoli-cauliflower mixture.

Toss everything well until all the ingredients are evenly coated with the creamy dressing.

Add salt and freshly ground black pepper to taste.

Step 4: Chill and Serve

Cover the salad and refrigerate for at least 30 minutes before serving. This resting time helps the flavors meld and slightly softens the vegetables for better texture.

Just before serving, give the salad a gentle toss again. Garnish with extra almonds or bacon bits if desired.

Tips for Success

Chop vegetables evenly: Bite-size pieces make the salad easier to eat and allow the dressing to coat everything more thoroughly.

Use sharp cheddar: The stronger the cheese, the better the flavor. Mild cheddar can get lost among the other bold ingredients.

Cook bacon until crispy: This adds the best texture contrast. Soft bacon can become chewy in the dressing.

Toast the almonds: While optional, lightly toasting the almonds enhances their flavor and adds a deeper crunch.

Let it rest: Don’t skip the chilling step—it improves both the texture and taste of the salad.

Storage Options

Broccoli Cauliflower Salad is an excellent make-ahead dish and keeps well for several days.

Refrigerator: Store in an airtight container for up to 3 days. The vegetables will remain crunchy, and the flavors will deepen over time.

Avoid freezing: The mayonnaise-based dressing and fresh vegetables don’t freeze well, as the texture will change dramatically upon thawing.

Make-ahead tip: You can chop all the ingredients and make the dressing a day in advance. Store them separately and combine shortly before serving for maximum freshness.

Whether you’re looking to jazz up your weekly meal prep or bring a standout dish to your next get-together, this Broccoli Cauliflower Salad delivers flavor, crunch, and convenience. It’s simple, satisfying, and incredibly versatile—exactly what you want in a no-fuss, craveable salad.

Ramen Noodle Salad

0

Ramen Noodle Salad is the kind of vibrant, crunchy side dish that turns heads at any gathering. With its satisfying texture and bold, tangy dressing, this salad is a refreshing take on slaw that’s anything but ordinary. It combines crunchy coleslaw mix and matchstick carrots with toasted almonds and broken ramen noodles for a dish that’s light yet incredibly satisfying. What makes it truly stand out is the homemade dressing—a flavorful blend of olive oil, rice vinegar, honey, garlic, ginger, and sesame oil—that infuses every bite with sweet, savory, and slightly nutty notes.

This salad is a go-to for potlucks, picnics, and barbecues because it’s not only easy to make but also holds up well over time. The dry ramen noodles soften slightly as they soak in the dressing, creating a pleasant chewiness that contrasts with the crisp vegetables and toasted almonds. It’s delicious as-is, but it also plays well with additions like shredded chicken, mandarin oranges, or edamame for a heartier main dish. With minimal prep and maximum flavor, this Ramen Noodle Salad is sure to become a favorite in your rotation.

Why You’ll Love This Recipe

• Bold, tangy-sweet dressing with a hint of sesame

• Crunchy textures from cabbage, carrots, and toasted ramen

• Easy to make ahead and great for feeding a crowd

• Customizable with proteins or extra veggies

Ingredients

Ramen Salad

14 ounces coleslaw mix

2 (3-ounce) packages dry ramen noodles, broken into small pieces (seasoning packets discarded)

1 cup matchstick carrots

½ cup sliced green onions

1 cup slivered almonds, toasted

Ramen Salad Dressing

½ cup olive oil

¼ cup rice vinegar

2 tablespoons honey

2 cloves garlic, minced

1 tablespoon grated fresh ginger

1 teaspoon sesame oil

Salt and pepper, to taste

Instructions

Step 1: Make the Dressing

In a mason jar or small bowl, combine the olive oil, rice vinegar, honey, minced garlic, grated ginger, and sesame oil.

Seal the jar and shake well until the dressing is emulsified and the honey is fully dissolved.

Taste and season with salt and freshly ground black pepper as desired.

Step 2: Toast the Almonds

Preheat a small skillet over medium heat.

Add the slivered almonds and toast for 3–5 minutes, stirring often, until golden and fragrant.

Transfer the almonds to a plate to cool while you prepare the salad.

Step 3: Prepare the Salad Base

In a large mixing bowl, combine the coleslaw mix, matchstick carrots, and sliced green onions.

Break the dry ramen noodles into small, bite-sized pieces using your hands or a rolling pin, and add them to the bowl.

Add the cooled, toasted almonds to the salad as well.

Step 4: Dress the Salad

Pour the prepared dressing over the salad ingredients.

Toss everything together gently but thoroughly to ensure all the veggies, noodles, and almonds are coated with the dressing.

Step 5: Let It Rest and Serve

Let the salad sit for 10–15 minutes before serving to allow the flavors to meld and the ramen to soften slightly.

Serve as a refreshing side dish or top with grilled chicken, shrimp, or tofu for a more filling meal.

Tips for Success

Use fresh ingredients: Crisp coleslaw mix and fresh carrots add the most crunch and flavor.

Toast the almonds: This quick step enhances the nuttiness and gives the salad extra depth.

Break the ramen into uneven chunks: Varying sizes provide an enjoyable texture contrast.

Let the salad sit briefly: This softens the noodles slightly without making them soggy, giving the salad a more cohesive texture.

Add protein for a full meal: Shredded rotisserie chicken, grilled steak strips, or even crispy tofu can turn this into a complete main dish.

Storage Options

Ramen Noodle Salad can be made ahead, but keep a few tips in mind:

If making ahead: Combine all dry ingredients and keep the dressing separate. Toss together just before serving to maintain the crunch.

Refrigerator: Store leftovers in an airtight container for up to 2 days. The noodles will continue to soften, but the flavors will still be great.

Not freezer-friendly: This salad relies on the crunch of fresh vegetables and dry noodles, which don’t hold up after freezing.

Meal prep tip: Portion out individual servings in containers and keep the dressing on the side to mix just before eating.

With its bright flavors, addictive crunch, and beautiful presentation, Ramen Noodle Salad is a versatile dish that can easily go from casual lunch to party table centerpiece. Once you try it, it’s likely to become a regular in your recipe lineup—both for its simplicity and its crave-worthy taste.