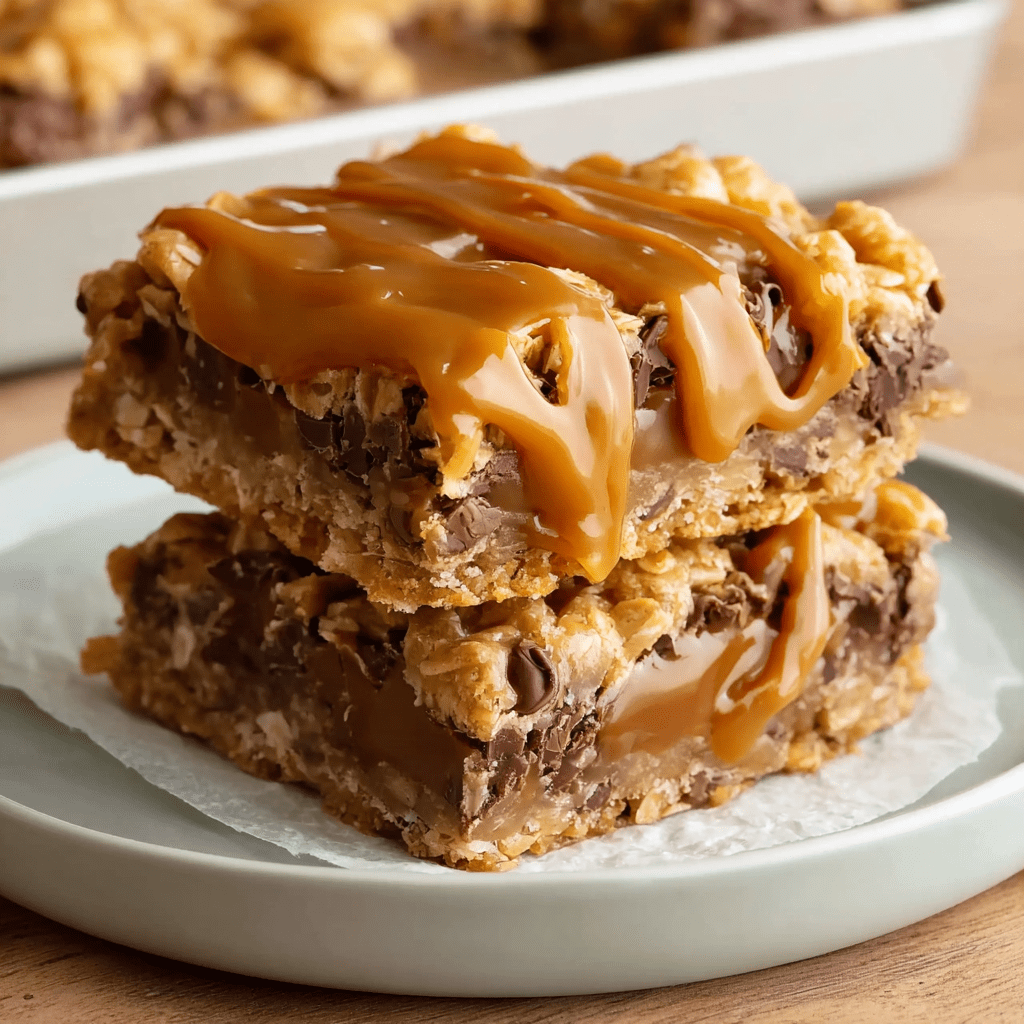
Applesauce Muffins

0

Applesauce Muffins are a comforting and moist treat, perfect for breakfast or a midday snack. These muffins are packed with warm spices like cinnamon, nutmeg, and allspice, which give them a cozy, fall-inspired flavor. The applesauce adds natural sweetness and moisture, creating a soft and fluffy texture, while the rolled oats and chopped walnuts provide a delightful crunch. Whether you enjoy them with your morning coffee or as an afternoon snack, these muffins are a satisfying and flavorful choice that’s easy to make and sure to become a family favorite.

The blend of wholesome ingredients and the touch of sweetness from brown sugar make these muffins both satisfying and nourishing. The oats and walnuts add a bit of texture, while the applesauce keeps the muffins light and tender. With a slight crust on the top and a soft, fluffy interior, they strike the perfect balance. This recipe is simple enough for beginners and versatile enough to suit various occasions. Plus, the warm spices and the natural sweetness from applesauce make each bite feel like a comforting hug.

Why You’ll Love This Recipe

  • Moist and Flavorful: The applesauce ensures the muffins are incredibly moist, while the warm spices provide a cozy, aromatic flavor.
  • Nutritious and Filling: With the addition of oats and walnuts, these muffins are packed with fiber and healthy fats.
  • Easy to Make: The recipe is simple, with minimal prep time, making it perfect for a quick and delicious homemade treat.

Ingredients

  • 2 cups all-purpose flour
  • 2 teaspoons ground cinnamon
  • ½ teaspoon ground nutmeg
  • ¼ teaspoon allspice
  • 1 teaspoon baking powder
  • ½ teaspoon baking soda
  • ¼ teaspoon salt
  • 2 large eggs
  • 1 ⅓ cups all-natural unsweetened applesauce
  • ½ cup vegetable oil
  • ½ cup brown sugar
  • ½ cup rolled oats
  • ½ cup chopped walnuts

Instructions

  1. Preheat the Oven:
    • Preheat your oven to 425°F (220°C). Line a 12-count muffin tin with baking cups.
  2. Mix Dry Ingredients:
    • In a medium bowl, whisk together the flour, cinnamon, nutmeg, allspice, baking powder, baking soda, and salt.
  3. Mix Wet Ingredients:
    • In a large bowl, beat the eggs. Add the applesauce, vegetable oil, and brown sugar. Stir until the mixture is smooth and well combined.
  4. Combine Wet and Dry Ingredients:
    • Gradually add the dry ingredients to the wet ingredients, stirring a few times until the mixture is just combined.
    • Fold in the rolled oats and chopped walnuts, stirring just until everything is incorporated.
  5. Fill Muffin Cups:
    • Spoon the batter into the muffin cups, filling them almost all the way up.
  6. Bake:
    • Bake for 5 minutes at 425°F (220°C), then reduce the temperature to 350°F (175°C) and bake for an additional 11–15 minutes, or until a toothpick inserted into the center of the muffins comes out clean.
  7. Cool:
    • Let the muffins cool for 5 minutes in the tin before transferring them to a wire rack to cool completely.

Tips for Success

  • Don’t Overmix the Batter: Stir the ingredients until just combined. Overmixing can make the muffins dense.
  • Add-ins: Feel free to add raisins, dried cranberries, or even a sprinkle of sugar on top for extra flavor.
  • Check Doneness: Since oven temperatures vary, make sure to check the muffins with a toothpick to ensure they are fully cooked.

Storage Options

  • Room Temperature: Store in an airtight container at room temperature for up to 3 days.
  • Refrigeration: For longer freshness, store in the fridge for up to 1 week.
  • Freezing: Freeze muffins in a sealed container or plastic bag for up to 2 months. Thaw at room temperature or microwave for a warm treat.

These Applesauce Muffins are a delicious and wholesome treat that everyone will love. The applesauce keeps them moist and tender, while the warm spices and crunchy walnuts make each bite extra special. Whether for breakfast, a snack, or a dessert, they are sure to be a hit!

Homemade Hamburger Peppers and Onion Gyros

0

Homemade Hamburger Peppers and Onion Gyros are a delicious and unique twist on the traditional gyro. This recipe combines seasoned ground beef with colorful, tender peppers and onions, all wrapped in warm pita bread and topped with creamy sour cream and crumbled blue cheese for a rich, tangy finish. The use of Rotel green chiles and diced tomatoes adds a flavorful kick to the filling, making each bite bursting with flavor. Whether you’re preparing this for a weeknight dinner or a weekend meal, these gyros are a satisfying and easy-to-make choice.

The combination of lean ground beef, fresh vegetables, and flavorful seasonings creates a hearty filling that is both satisfying and full of vibrant, bold flavors. The pitas are softened and warmed slightly, making them the perfect vessel for this tasty mixture. Wrapping the gyros in aluminum foil makes them easy to eat and perfect for serving on the go or enjoying as a handheld meal. The sour cream and blue cheese add a creamy, tangy contrast to the savory filling, making this gyro a standout dish. Perfect for anyone looking to try something different, this gyro recipe is sure to impress!

Why You’ll Love This Recipe

  • Hearty and Flavorful: The combination of ground beef, peppers, and onions creates a filling, savory meal that’s packed with flavor.
  • Quick and Easy: This dish comes together in just a few simple steps, making it perfect for busy weeknights or casual get-togethers.
  • Customizable: The toppings, including sour cream and blue cheese, can be adjusted to suit your personal preferences.
  • Portable: The foil wrap makes these gyros easy to eat on the go, or they can be served at the table for a fun and casual meal.

Ingredients

  • 1 ½ pounds lean ground beef
  • Salt and pepper to taste
  • 3 tsp olive oil
  • 1 cup chopped green pepper
  • 1 cup chopped red pepper
  • 1 cup chopped onion
  • 1 can Rotel green chiles with diced tomatoes (your choice of Hot or Mild)
  • 4 pita breads, softened and warmed slightly
  • ½ cup sour cream
  • ¼ cup blue cheese crumbles

Instructions

  1. Warm the Pitas:
    • Slightly warm the pitas in the microwave to make them soft and easy to work with.
  2. Cook the Ground Beef and Vegetables:
    • In a skillet, crumble the ground beef over medium heat.
    • Add the olive oil, green pepper, red pepper, and chopped onion.
    • Cook until the meat is no longer pink and the vegetables have softened, about 8–10 minutes.
  3. Add Rotel and Season:
    • Stir in the can of Rotel with diced tomatoes and green chiles. Mix well.
    • Season the mixture with salt and pepper to taste.
  4. Assemble the Gyros:
    • Lay out four sheets of aluminum foil.
    • Place one pita on each sheet.
    • Divide the meat and vegetable mixture evenly between the pitas, placing about ¼ of the filling on each one.
  5. Wrap and Serve:
    • Using the aluminum foil, roll the pita and meat mixture together into a wrap.
    • Top each gyro with a spoonful of sour cream and sprinkle with blue cheese crumbles, if desired.
    • Serve immediately.

Tips for Success

  • Customize the Heat: Choose mild or hot Rotel depending on your preference for spice.
  • Add Extra Veggies: Feel free to add other veggies like mushrooms or zucchini to the filling for extra flavor.
  • Make Ahead: You can prepare the filling ahead of time and store it in the refrigerator for up to 3 days. Just warm it up before assembling the gyros.

Storage Options

  • Refrigerate: Leftover gyros can be stored in an airtight container in the refrigerator for up to 2 days. Reheat the filling before serving in a new pita.
  • Freeze: Freeze the filling for up to 1 month. Thaw in the refrigerator overnight and reheat before assembling the gyros.

These Homemade Hamburger Peppers and Onion Gyros are the perfect fusion of comfort food and international flavors, offering a satisfying and flavorful meal that’s easy to make and even easier to enjoy. Whether for a quick weeknight dinner or a casual gathering, these gyros are sure to become a family favorite!

Garlic Chicken Stir Fry

0

Garlic Chicken Stir Fry is a quick, flavorful, and healthy dish that’s packed with tender chicken, vibrant vegetables, and a savory garlic sauce. The stir-fry technique allows the ingredients to retain their fresh textures and natural flavors while absorbing the aromatic sauce, making it a delicious and well-balanced meal. The combination of crisp broccoli, savory mushrooms, and sweet bell pepper, paired with tender chicken pieces, creates a satisfying dish that can be enjoyed on its own or served over rice for a complete meal.

What makes this stir fry stand out is its garlic-infused sauce, which features a delicate balance of soy sauce, sesame oil, and sugar, bringing depth and richness to the dish. The cornstarch thickens the sauce, ensuring it perfectly coats the chicken and vegetables without being too runny. With minimal prep and cooking time, this recipe is perfect for busy weeknights when you want something quick yet flavorful. Whether you’re feeding your family or looking for a simple dinner for one, this Garlic Chicken Stir Fry is sure to be a hit!

Why You’ll Love This Recipe

  • Quick and Easy: This dish comes together in less than 30 minutes, making it perfect for busy nights.
  • Packed with Flavor: The savory garlic sauce, combined with tender chicken and fresh vegetables, offers a delicious and satisfying meal.
  • Healthy and Customizable: It’s a nutritious option that you can easily customize by adding or substituting vegetables based on your preferences.

Ingredients

  • 1 lb. boneless skinless chicken breast, cut into cubes
  • 1 tbsp + 1 tsp olive oil, divided
  • 1 yellow bell pepper, sliced
  • 1 cup sliced mushrooms
  • 2–3 cups broccoli florets
  • 4 cloves garlic, minced
  • Salt and pepper, to taste
  • 1 tbsp soy sauce
  • ¾ cup chicken broth
  • 1 ½ tsp sugar
  • 2 tsp sesame oil
  • 2 tsp cornstarch

Instructions

  1. Cook the Vegetables:
    • Heat 1 tbsp of olive oil in a skillet over medium-high heat.
    • Add the broccoli, sliced mushrooms, and yellow bell pepper. Cook for 5–6 minutes, or until the vegetables begin to become tender.
    • Remove the vegetables from the skillet, cover them, and set aside.
  2. Cook the Chicken:
    • In the same skillet, add 1 tsp of olive oil and heat over medium-high heat.
    • Add the cubed chicken breast and cook until no longer pink in the center and fully cooked through.
    • Season the chicken with salt and pepper to taste.
  3. Combine Chicken and Vegetables:
    • Once the chicken is cooked, add the vegetables back into the skillet and mix well.
  4. Prepare the Sauce:
    • In a small bowl, combine the soy sauce, sugar, chicken broth, sesame oil, and cornstarch. Stir well until the mixture is smooth.
  5. Add the Sauce:
    • Pour the sauce over the chicken and vegetable mixture in the skillet. Stir to coat everything evenly.
    • Cook for 2–3 minutes until the sauce thickens and everything is well-coated.
  6. Serve:
    • Serve the Garlic Chicken Stir Fry over white rice if desired, and enjoy!

Tips for Success

  • Don’t Overcook the Vegetables: The vegetables should be tender but still have a slight crunch. Keep an eye on them while cooking to avoid overcooking.
  • Adjust Sauce Consistency: If the sauce is too thick, you can add a little more chicken broth. If it’s too thin, let it cook for another minute or two to thicken further.

Storage Options

  • Refrigerate: Store leftovers in an airtight container in the refrigerator for up to 3 days.
  • Reheat: Reheat in the microwave or in a skillet over low heat, adding a splash of water or broth if needed to prevent it from drying out.

This Garlic Chicken Stir Fry is a flavorful and healthy dish that is quick to make, easy to customize, and perfect for busy weeknights. It’s packed with savory garlic and delicious vegetables, making it a satisfying meal for the whole family!

Peanut Clusters

0

Peanut Clusters are the perfect combination of smooth, creamy chocolate and crunchy roasted peanuts, offering a delightful balance of flavors and textures. These bite-sized treats are indulgent yet simple to make, whether you use a slow cooker for a hands-off approach or the microwave for a quick and easy option. With just four ingredients—chocolate chips, peanut butter chips, coconut oil, and peanuts—these treats come together effortlessly and can be enjoyed any time you’re craving something sweet. The result is a crunchy, melt-in-your-mouth confection that is sure to please everyone.

This recipe is incredibly versatile and can be adapted depending on your preferences. The semi-sweet chocolate chips provide a rich and smooth chocolate base, while the peanut butter chips add an extra layer of peanut flavor, making these clusters extra delicious. You can also customize the amount of sea salt you sprinkle on top for an added touch of contrast, giving the candy a sweet and salty flavor that’s irresistible. Whether you’re making these for a holiday gift, a party snack, or simply to enjoy at home, peanut clusters are guaranteed to be a hit.

Why You’ll Love This Recipe

  • Quick and Easy: Whether using a slow cooker or microwave, this recipe comes together in no time.
  • Rich Chocolate and Peanut Flavor: The combination of semi-sweet chocolate, peanut butter chips, and roasted peanuts delivers a perfect balance of sweetness and saltiness.
  • Customizable: Add a sprinkle of sea salt or even drizzle extra chocolate on top for added flavor and decoration.

Ingredients

  • 1 1/2 cups semi-sweet chocolate chips (I use Ghirardelli)
  • 1 10-ounce bag peanut butter chips
  • 1 1/2 tablespoons coconut oil or shortening
  • 2 cups salted or unsalted roasted peanuts

Instructions

Crock-Pot Method:

  1. Prepare the Crock-Pot:
    • Place chocolate chips, peanut butter chips, and coconut oil in a covered crockpot on low. Layer paper towels under the lid to catch any condensation.
  2. Melt the Chocolate:
    • Stir the mixture every 20 minutes until completely melted and smooth.
  3. Add the Peanuts:
    • Once the chocolate mixture is smooth, stir in the peanuts.
  4. Form the Clusters:
    • Drop rounded spoonfuls of the mixture onto a wax paper-lined baking sheet.
    • If desired, sprinkle with sea salt.
    • Let the peanut clusters set and firm up at room temperature.
  5. Storage:
    • Store in airtight containers at room temperature for up to 2 weeks, or refrigerate for up to a month.

Microwave Method:

  1. Prepare the Chocolate Mixture:
    • Add chocolate chips, peanut butter chips, and coconut oil to a microwave-safe bowl.
  2. Melt the Chocolate:
    • Microwave at 50% power for 1–1 1/2 minutes. Remove and stir. Continue heating at 15–30 second intervals, stirring between each interval, until the chocolate is completely melted and smooth.
  3. Add the Peanuts:
    • Stir in the peanuts until evenly coated with the chocolate mixture.
  4. Form the Clusters:
    • Drop rounded spoonfuls of the mixture onto a wax paper-lined baking sheet.
    • If desired, sprinkle with sea salt.
    • Allow to set at room temperature.
  5. Storage:
    • Store in airtight containers at room temperature for up to 2 weeks, or in the refrigerator for up to a month.

Tips for Success

  • Use Quality Chips: High-quality chocolate and peanut butter chips, like Ghirardelli, will result in smoother and richer clusters.
  • Ensure Even Melting: If using the microwave, be sure to stir the mixture thoroughly between intervals to ensure even melting and prevent overheating.
  • Customize with Add-Ins: Feel free to add a handful of mini marshmallows, chopped nuts, or dried fruit to the clusters for a different twist.

Storage Options

  • Room Temperature: Store peanut clusters in an airtight container for up to 2 weeks at room temperature.
  • Refrigeration: For longer freshness, store in the refrigerator for up to 1 month.

Peanut Clusters are the perfect homemade candy for satisfying your sweet tooth, and they make a great gift or treat to share. Whether you choose the slow cooker method or the microwave method, these chocolate-peanut confections are quick, easy, and sure to be a hit every time.

Sausage & Potato Foil Packet

0

Sausage & Potato Foil Packet is a simple, flavorful, and easy-to-make meal that’s perfect for busy nights or outdoor cooking. This dish combines hearty sausage, tender potatoes, and a variety of aromatic herbs and spices, all sealed up in a foil packet and baked to perfection. The beauty of this recipe lies in its versatility and convenience. The foil packets lock in all the flavors, allowing the ingredients to cook together, creating a deliciously savory and satisfying meal with minimal cleanup. Plus, it’s a great way to enjoy a complete dinner with protein, vegetables, and starch all in one neat package.

The combination of sausage and potatoes is a classic pairing, and when seasoned with Italian seasoning, basil, parsley, and paprika, the flavors are elevated to a whole new level. The addition of butter gives the dish a rich, velvety finish that adds to the comforting texture of the potatoes. While carrots are optional, they bring a touch of sweetness and additional color to the dish, making it even more satisfying. Whether you’re cooking in the oven or over a campfire, this dish is sure to please.

Why You’ll Love This Recipe

  • Easy to Make: The prep is simple, and everything is cooked in one packet, making cleanup a breeze.
  • Versatile: You can customize the ingredients to fit your tastes, adding more vegetables or adjusting the seasonings.
  • Flavorful: The sausage and seasoning mix infuse the potatoes and vegetables with savory, aromatic flavors, creating a complete and hearty meal.

Ingredients

  • 1 package sausage (14 ounces), sliced
  • 3 cups potatoes, diced or sliced
  • 1 onion, sliced
  • 2 tbsp olive oil
  • 1 tsp Italian seasoning
  • 1 tsp dried basil
  • 1 tsp dried parsley
  • 1 tsp paprika
  • 1/2 tsp garlic powder
  • 1/4 tsp dried thyme
  • 4 tbsp unsalted butter, divided into portions
  • 2 cups carrots (optional), sliced

Instructions

  1. Preheat the Oven:
    • Preheat your oven to 400°F (200°C).
  2. Prepare the Ingredients:
    • In a large bowl, combine the sliced sausage, diced potatoes, sliced onion, and optional carrots. Drizzle with olive oil and toss to coat evenly.
  3. Season the Mixture:
    • In a small bowl, mix together the Italian seasoning, dried basil, parsley, paprika, garlic powder, and thyme. Sprinkle the seasoning mixture over the sausage and potato mixture, then toss gently to combine.
  4. Prepare the Foil Packets:
    • Cut 4 sheets of foil, each about 12 inches long. Divide the sausage and vegetable mixture evenly between the sheets, placing it in the center of each. Add a few cubes of butter to each packet for richness and flavor.
  5. Seal the Packets:
    • Fold the sides of the foil up over the mixture and seal tightly, creating a packet. Arrange the packets on a baking sheet.
  6. Bake:
    • Bake in the preheated oven for 25–30 minutes. Check one packet by carefully opening it to see if the potatoes are tender. If they are not fully cooked, reseal the packet and bake for an additional 5–10 minutes.
  7. Serve:
    • Open the packets and transfer the contents to serving plates. Garnish with fresh parsley, if desired. Serve immediately and enjoy!

Tips for Success

  • Even Sizing: Ensure that the sausage and vegetables are cut into even sizes for consistent cooking.
  • Check for Doneness: The key to a perfect foil packet meal is ensuring the potatoes are tender. If necessary, add extra time in the oven.
  • Customize the Seasonings: Feel free to adjust the herbs and spices based on your personal preferences. You can even add a bit of cheese or hot sauce for an extra kick.

Storage Options

  • Refrigerate: Store any leftovers in an airtight container in the refrigerator for up to 3 days.
  • Reheat: Reheat the leftover foil packet meal in the oven or microwave until heated through.

This Sausage & Potato Foil Packet meal is not only easy to make but also packed with flavor and perfect for feeding a crowd or just enjoying a simple, comforting dinner at home. The foil packet method ensures that everything stays juicy and tender, making each bite a satisfying treat.

Double Strawberry Cake

0

Double Strawberry Cake is a luscious, fruity dessert that brings together the delicate sweetness of strawberries in both the cake and frosting layers. This cake features a moist, tender texture thanks to the combination of white cake mix, a bit of flour for structure, and a generous amount of strawberry puree. The strawberry Jello powder enhances the cake with a burst of flavor and color, ensuring a vibrant, strawberry-packed treat in every bite. Topped with a rich, creamy strawberry-infused frosting made with cream cheese and butter, this cake becomes an irresistible indulgence that’s perfect for any occasion, from birthdays to casual get-togethers.

What truly sets this cake apart is its double dose of strawberries. The fresh strawberry puree in the cake batter gives the cake a moist, flavorful base, while the strawberry cream cheese frosting adds a tangy sweetness that perfectly complements the cake. The frosting is smooth and creamy, with just the right amount of sweetness, and is chilled before being spread onto the cooled cake, making it easy to work with. Whether served on its own or garnished with fresh strawberries or white chocolate shavings, this cake is a showstopper that’s sure to impress.

Why You’ll Love This Recipe

  • Double the Strawberry Flavor: Strawberry puree is incorporated into both the cake and frosting, providing an intense strawberry experience in every bite.
  • Perfectly Moist: The combination of cake mix and strawberry puree creates a soft, moist texture that melts in your mouth.
  • Cream Cheese Frosting: The frosting is rich, tangy, and perfectly complements the sweetness of the cake.
  • Versatile and Easy: Simple to prepare and adaptable for any occasion—ideal for casual gatherings or festive events.

Ingredients

For the Cake:

  • 1 box white cake mix (14.25 ounces)
  • 3 1/2 tablespoons all-purpose flour
  • 1 box strawberry Jello (3 ounces)
  • 1/2 cup water
  • 3/4 cup vegetable oil
  • 4 eggs
  • 1 teaspoon vanilla extract
  • 1 cup strawberry puree (from fresh or frozen berries)

For the Frosting:

  • 1 package cream cheese (8 ounces), room temperature
  • 1/2 cup butter (1 stick), room temperature
  • 1 cup strawberry puree (for frosting)
  • 4-5 cups powdered sugar (adjust for desired consistency)

Instructions

  1. Preheat Oven:
    • Preheat the oven to 350°F (175°C).
    • Grease and flour a 9×13-inch baking dish.
  2. Prepare the Cake:
    • In a large bowl, mix together the white cake mix, flour, and strawberry Jello powder.
    • Add water, vegetable oil, eggs, vanilla extract, and strawberry puree. Mix until smooth and fully combined.
    • Pour the batter into the prepared baking dish and spread it out evenly.
    • Bake for 35-40 minutes, or until a toothpick inserted into the center comes out clean.
    • Allow the cake to cool completely in the baking dish.
  3. Prepare the Frosting:
    • In a large mixing bowl, beat the cream cheese and butter together until smooth and creamy.
    • Add 1 cup of strawberry puree and mix well.
    • Gradually add powdered sugar, a little at a time, until the frosting reaches your desired consistency.
    • Chill the frosting in the refrigerator until ready to use.
  4. Assemble the Cake:
    • Once the cake has completely cooled, spread the chilled strawberry cream cheese frosting evenly over the top.
    • Slice the cake and serve.
  5. Optional Garnishes:
    • Garnish with fresh strawberries, a sprinkle of Jello powder, or white chocolate shavings for added decoration and flavor.

Tips for Success

  • Cool the Cake Completely: Allow the cake to cool fully before applying the frosting to prevent it from melting.
  • Frosting Consistency: If the frosting is too thick, add a little more strawberry puree or a touch of milk to loosen it. If too thin, gradually add more powdered sugar.
  • Extra Flavor: For an extra punch of strawberry flavor, you can drizzle some strawberry syrup or jam over the cake before serving.

Storage Options

  • Refrigerate: Store leftover cake in an airtight container in the refrigerator for up to 3-4 days.
  • Freeze: To freeze, wrap the cake (or individual slices) tightly in plastic wrap and store in a freezer-safe container for up to 1 month. Thaw in the refrigerator before serving.

This Double Strawberry Cake is a perfect dessert for strawberry lovers, offering layers of rich flavor and a beautifully creamy frosting that enhances every bite. With its vibrant color and irresistible taste, it’s sure to be a favorite at any gathering!

Brownie Muffins

0

Brownie Muffins are the perfect fusion of two beloved desserts—moist, chocolatey brownies and individually portioned muffins. These indulgent treats are rich, fudgy, and packed with deep chocolate flavor, making them an ideal pick-me-up or dessert for any occasion. Whether you’re serving them for a brunch, packing them in a lunchbox, or simply enjoying one with your afternoon coffee, these brownie muffins never disappoint. What sets them apart from typical muffins is their gooey center, crisp edges, and shiny tops—just like a perfect pan of brownies, but in portable form.

The recipe uses quality semisweet chocolate chips, real butter, and a mix of brown and granulated sugars to create a balanced sweetness and a soft, melt-in-your-mouth crumb. Dutch-processed cocoa powder adds depth and intensity, giving these muffins a bold chocolate punch that’s irresistible to true chocolate lovers. A little flour helps bind everything together, and the eggs give the muffins structure without making them cakey. The optional addition of extra chocolate chips or chopped nuts gives each bite added texture and richness. Baked to perfection in a muffin tin, these brownie muffins are a simple yet satisfying dessert that looks as good as it tastes.

Why You’ll Love This Recipe

  • Deep Chocolate Flavor: Made with real chocolate chips and Dutch cocoa for a rich, indulgent taste.
  • Perfectly Portioned: Muffin form makes them easy to serve, pack, or share—no cutting or mess.
  • Fudgy Center, Crisp Top: Combines the best textures of a brownie in every individual muffin.
  • Customizable: Add chocolate chips, walnuts, or even a peanut butter swirl for variety.

Ingredients

  • 100 g (½ cup) semisweet chocolate chips (quality chocolate recommended)
  • 113 g (1 stick) unsalted butter
  • 2 eggs, room temperature
  • 100 g (½ cup) granulated sugar
  • 100 g (½ cup) brown sugar
  • 25 g (⅓ cup) unsweetened Dutch-processed cocoa powder
  • 60 g (½ cup) all-purpose flour
  • ⅓ teaspoon salt

Instructions

  1. Prep:
    • Preheat the oven to 350°F (175°C).
    • Grease a muffin pan using nonstick spray, melted butter, or coconut oil to prevent sticking.
  2. Melt Chocolate and Butter:
    • In a small saucepan or microwave-safe bowl, melt the chocolate chips and butter together. Stir until smooth and set aside to cool slightly.
  3. Mix Dry Ingredients:
    • In a large bowl, combine the flour, cocoa powder, salt, granulated sugar, and brown sugar.
  4. Combine Wet and Dry:
    • Add the eggs to the cooled chocolate-butter mixture and whisk well.
    • Pour the wet mixture into the dry ingredients. Stir until just combined and smooth.
    • If using, fold in extra chocolate chips or chopped nuts.
  5. Fill and Bake:
    • Fill each muffin cup about ¾ full with the batter to allow room for rising.
    • Bake for 18–22 minutes, or until the tops are set and a toothpick inserted into the center comes out with moist crumbs (not wet batter).
  6. Cool and Serve:
    • Let the brownie muffins cool in the pan for 5 minutes before transferring to a wire rack.
    • Serve slightly warm or at room temperature.

Tips for Success

  • Don’t Overbake: For a fudgy center, remove the muffins when the toothpick shows moist crumbs.
  • Use Quality Chocolate: The better the chocolate, the richer the flavor.
  • Room Temperature Eggs: Helps with better mixing and a smoother texture.

Storage Options

  • Room Temperature: Store in an airtight container for up to 3 days.
  • Refrigerate: Keeps well in the fridge for up to 5 days. Warm slightly before serving for gooey texture.
  • Freeze: Freeze in a sealed container for up to 2 months. Thaw and reheat as desired.

These brownie muffins are everything you love about brownies—but with the ease and convenience of muffins. Rich, indulgent, and customizable, they’ll satisfy any chocolate craving in just one perfect bite.

Blueberry Cream Cheese Coffee Cake

0

Blueberry Cream Cheese Coffee Cake is the perfect balance of tender cake, creamy filling, fresh fruit, and buttery streusel. This beautiful, multi-layered dessert is as pleasing to look at as it is to eat. The base is a moist and fluffy sour cream coffee cake, providing a rich foundation that perfectly complements the tangy cream cheese filling. Bursts of juicy blueberries are layered throughout the cake and on top, adding natural sweetness and vibrant color. The crowning touch is a buttery streusel crumble, baked until golden and crisp, providing texture and sweetness with every bite.

This cake is more than just a treat—it’s a showstopper for brunch, a comforting afternoon snack with coffee, or even a satisfying dessert. What makes it extra special is the careful layering of flavors and textures: first the moist cake, then a smooth cream cheese blend, followed by pockets of blueberries, and finally a golden-brown streusel topping. Each slice offers a delightful contrast of creamy, crumbly, and fruity sensations. Despite its impressive appearance, the recipe is easy to follow and rewarding to make. Whether you’re baking for guests or just indulging yourself, this coffee cake is sure to become a favorite go-to for any special occasion or slow weekend morning.

Why You’ll Love This Recipe

  • Rich and Creamy Layers: The cream cheese filling and sour cream base make for an indulgent, moist texture.
  • Fresh Blueberries in Every Bite: The distribution of blueberries throughout ensures fruity flavor in each layer.
  • Perfect for Any Time of Day: Ideal as a breakfast cake, dessert, or afternoon coffee companion.
  • Streusel Topping: A sweet, buttery crumble that adds a satisfying texture and visual appeal.

Ingredients

Cream Cheese Layer:

  • ¼ cup granulated sugar
  • 8 oz. cream cheese, softened
  • 1 egg white
  • ½ teaspoon pure vanilla extract
  • 1¼ cup fresh blueberries

Cake Base:

  • 1½ cups all-purpose flour
  • ½ teaspoon baking powder
  • ½ teaspoon baking soda
  • ¼ teaspoon salt
  • 5.5 tablespoons unsalted butter, softened
  • ½ cup granulated sugar
  • 1 whole egg + 1 egg yolk
  • ¾ cup sour cream
  • 1 teaspoon pure vanilla extract

Streusel Topping:

  • 1/3 cup granulated sugar
  • ½ cup all-purpose flour
  • 3 tablespoons unsalted butter, chilled and diced

Instructions

  1. Preheat the Oven:
    • Preheat your oven to 350°F (175°C).
    • Grease a 9-inch springform pan and line the bottom with parchment paper. Set aside.
  2. Make the Cream Cheese Layer:
    • In a mixing bowl, beat together cream cheese, sugar, and vanilla until smooth.
    • Add the egg white and blend on low speed until just combined. Set aside.
  3. Prepare the Cake Base:
    • In one bowl, sift together flour, baking powder, baking soda, and salt.
    • In another bowl, cream the softened butter and sugar using an electric mixer.
    • Add the egg, egg yolk, and vanilla, mixing until smooth.
    • Alternate adding the dry ingredients and sour cream to the butter mixture until fully blended.
    • Pour the batter into the prepared pan and spread evenly.
    • Sprinkle 1/3 cup blueberries over the batter.
  4. Add the Cream Cheese Layer:
    • Gently spread the cream cheese mixture over the blueberries.
    • Top with the remaining blueberries, spreading them evenly.
  5. Make the Streusel Topping:
    • Combine sugar, flour, and cold diced butter in a bowl.
    • Use a fork or pastry blender to cut the butter into the dry ingredients until coarse crumbs form.
    • Sprinkle the streusel evenly over the top of the cake.
  6. Bake the Cake:
    • Bake for 40–45 minutes or until a toothpick inserted into the center comes out clean.
    • If the cake browns too quickly, cover loosely with foil for the remaining time.
  7. Cool and Serve:
    • Let the cake cool on a wire rack.
    • Run a thin knife around the edge of the pan before releasing the springform sides.

Tips for Success

  • Room Temperature Ingredients: Make sure the butter and cream cheese are softened for smooth mixing.
  • Even Layers: Spread each layer evenly for consistent baking and presentation.
  • Use Fresh Berries: Fresh blueberries are best, but if using frozen, do not thaw before adding to the batter.

Storage Options

  • Refrigerate: Store in an airtight container in the refrigerator for up to 4 days.
  • Freeze: You can freeze slices tightly wrapped in plastic wrap and foil for up to 1 month. Thaw in the fridge before serving.

This Blueberry Cream Cheese Coffee Cake is an indulgent yet refreshing cake that will leave a lasting impression. It’s a well-balanced treat with layers of flavor and texture that feel bakery-worthy—yet it’s easy enough to make right at home.

Candied Jalapeños

0

Candied Jalapeños are a delightful treat that strikes an exquisite balance between spicy and sweet, making them a versatile condiment that can elevate many dishes. This recipe transforms the bold heat of jalapeños into a moreish snack or topping through a process of candying with sugar and apple cider vinegar, complemented by hints of turmeric, ginger, and optional chili powder for added depth. The result is jalapeños that retain a bit of their natural kick but are enveloped in a glossy, sweet coating that tames their fieriness. Ideal for adding to sandwiches, burgers, or even as a unique addition to cheese boards, these candied jalapeños are sure to be a conversation starter.

The process involves slicing the jalapeños into uniform rounds that are then simmered in a homemade syrup made from sugar and vinegar, enhanced with the warm tones of turmeric and ginger. This mixture not only imparts a bright, tangy flavor but also softens the peppers just enough to meld their textures and flavors beautifully. After a brief simmer, the jalapeños are jarred along with the syrup, allowing them to marinate and further develop in flavor. The peppers become infused with the sweet and tangy liquid, turning into a preserve that can add a burst of flavor to any dish. The option to preserve them through canning extends their shelf life, making this a wonderful make-ahead condiment that can be enjoyed for months.

Why You’ll Love This Recipe

  • Unique Flavor Combination: The blend of sweet and spicy is tantalizing and can enhance a wide variety of dishes.
  • Simple Ingredients, Big Impact: With just a few ingredients, this recipe delivers a gourmet-style condiment that’s easy to make at home.
  • Long Shelf Life: Properly canned, these jalapeños can last for a year, providing a delicious addition to meals over time.

Ingredients

  • 1/2 pound jalapeño peppers (about 10-12 average-sized jalapeños)
  • 1 cup sugar
  • 1/2 cup apple cider vinegar
  • 1 teaspoon chili powder (optional)
  • ½ teaspoon turmeric powder
  • ½ teaspoon ground ginger

Instructions

  1. Prepare the Jalapeños:
    • Slice the jalapeño peppers into ¼-inch round slices.
  2. Make the Syrup:
    • In a saucepan, combine the sugar, vinegar, chili powder, turmeric, and ginger. Bring to a boil, then reduce to a simmer until the sugar dissolves and becomes syrupy.
  3. Candy the Peppers:
    • Add the jalapeño slices to the syrup, stirring to coat evenly. Simmer for about 4 minutes until the jalapeños darken slightly and become tender.
  4. Jar the Jalapeños:
    • Transfer the candied jalapeños and the remaining syrup into cleaned jars.
  5. Preserve (Optional):
    • For long-term storage, process the jars in a boiling water bath as detailed in the jarring instructions provided.
  6. Store:
    • Seal and store the jars in the refrigerator for up to 3 months, or follow the canning instructions for longer storage. Allow the flavors to develop for at least one week before enjoying.

Tips for Success

  • Even Slicing: Keep the jalapeño slices uniform for even cooking and candying.
  • Adjust Spiciness: Modify the amount of chili powder or omit it depending on your heat preference.
  • Check Seals: After canning, ensure the jars are properly sealed to extend shelf life.

Storage Options

  • Refrigerated Storage: Keep in the refrigerator for up to 3 months.
  • Canned Storage: If processed in a water bath, store the jars in a cool, dry place for up to a year. Refrigerate after opening.

Candied Jalapeños are not just a condiment; they are a burst of flavor that can bring a new dimension to your culinary creations. Whether used as a topping, a side, or a secret ingredient, they offer a delightful surprise to the palate that combines the best of sweet and spicy worlds.

Stuffed Tater Tots

0

Stuffed Tater Tots are a delightful twist on the classic snack, offering a savory and crispy exterior filled with melty cheese and optional bacon bits. These homemade tots are crafted from scratch using freshly grated russet potatoes and a blend of seasonings that enhance their natural flavors. Perfect as a snack, appetizer, or side dish, these tots are sure to please everyone, especially when paired with your favorite dipping sauces. The addition of cheese and bacon inside each tot turns these ordinary potato bites into an extraordinary treat, bursting with flavor in every bite.

Making these Stuffed Tater Tots involves a few simple steps that result in a delicious payoff. First, the potatoes are grated and thoroughly dried to ensure the tots achieve the desired crispiness when fried. The grated potatoes are then mixed with a blend of spices, flour, and an egg to bind everything together, creating a moldable mixture that’s easy to shape. The real fun begins when you stuff each tot with cheese, and optionally bacon, giving them a gooey, flavorful center that contrasts beautifully with the crispy exterior. After a quick chill in the refrigerator to firm them up, the tots are fried until golden and crispy. Garnished with fresh herbs, these tots are not only tasty but also visually appealing.

Why You’ll Love This Recipe

  • Crispy and Flavorful: Each bite offers a crunchy texture on the outside with a soft, cheesy center.
  • Customizable: Easily switch up the fillings with different types of cheese or add-ins like cooked bacon bits or herbs.
  • Perfect for Sharing: Great for gatherings, these tots are a crowd-pleaser and pair well with a variety of dipping sauces.

Ingredients

  • 3 large russet potatoes, peeled and grated
  • ½ teaspoon salt
  • ½ teaspoon black pepper
  • ½ teaspoon garlic powder
  • ½ teaspoon onion powder
  • ¼ cup all-purpose flour (or breadcrumbs)
  • 1 egg, beaten
  • ½ cup shredded cheddar cheese (or mozzarella)
  • ¼ cup cooked bacon bits (optional)
  • 1 tablespoon chopped chives or parsley (optional)
  • Oil for frying

Instructions

  1. Prepare the Potatoes:
    • Grate the potatoes and use a clean kitchen towel to squeeze out excess moisture. This step is crucial for achieving the perfect texture.
  2. Mix the Base:
    • In a large bowl, combine the grated potatoes, salt, pepper, garlic powder, onion powder, flour, and beaten egg. Mix until everything is well incorporated.
  3. Shape and Stuff:
    • Take a small portion of the potato mixture, flatten it in your palm, and place a bit of cheese (and bacon, if using) in the center. Carefully enclose the filling by shaping the mixture into a small tot.
  4. Chill:
    • Place the shaped tots on a tray and refrigerate for about 15 minutes to firm them up, which helps them maintain their shape during frying.
  5. Fry to Perfection:
    • Heat oil in a deep fryer or large skillet to 350°F (175°C). Fry the tots in batches to avoid overcrowding, until they are golden brown and crispy, about 3-4 minutes per side. Drain on paper towels.
  6. Serve and Enjoy:
    • Sprinkle the hot tots with chopped chives or parsley for a fresh touch and serve with ketchup, ranch dressing, or your favorite dipping sauce.

Tips for Success

  • Dry the Potatoes Well: Ensure the grated potatoes are as dry as possible to prevent soggy tots.
  • Consistent Size: Keep the tots uniform in size for even cooking.
  • Hot Oil: Make sure the oil is at the right temperature before frying to get the best results.

Storage Options

  • Refrigerate: Keep any leftover tots in an airtight container in the refrigerator for up to 3 days.
  • Reheat: Warm them in the oven or toaster oven at 350°F (175°C) until crispy and heated through.

These Stuffed Tater Tots are a fun and delicious way to upgrade your snack time or mealtime with a homemade touch that’s sure to impress. Whether serving them at a party or enjoying them at home, these tots are a fantastic treat that combines the comforting flavors of potatoes and cheese with a delightful crunch.