Ragtag Candies

0

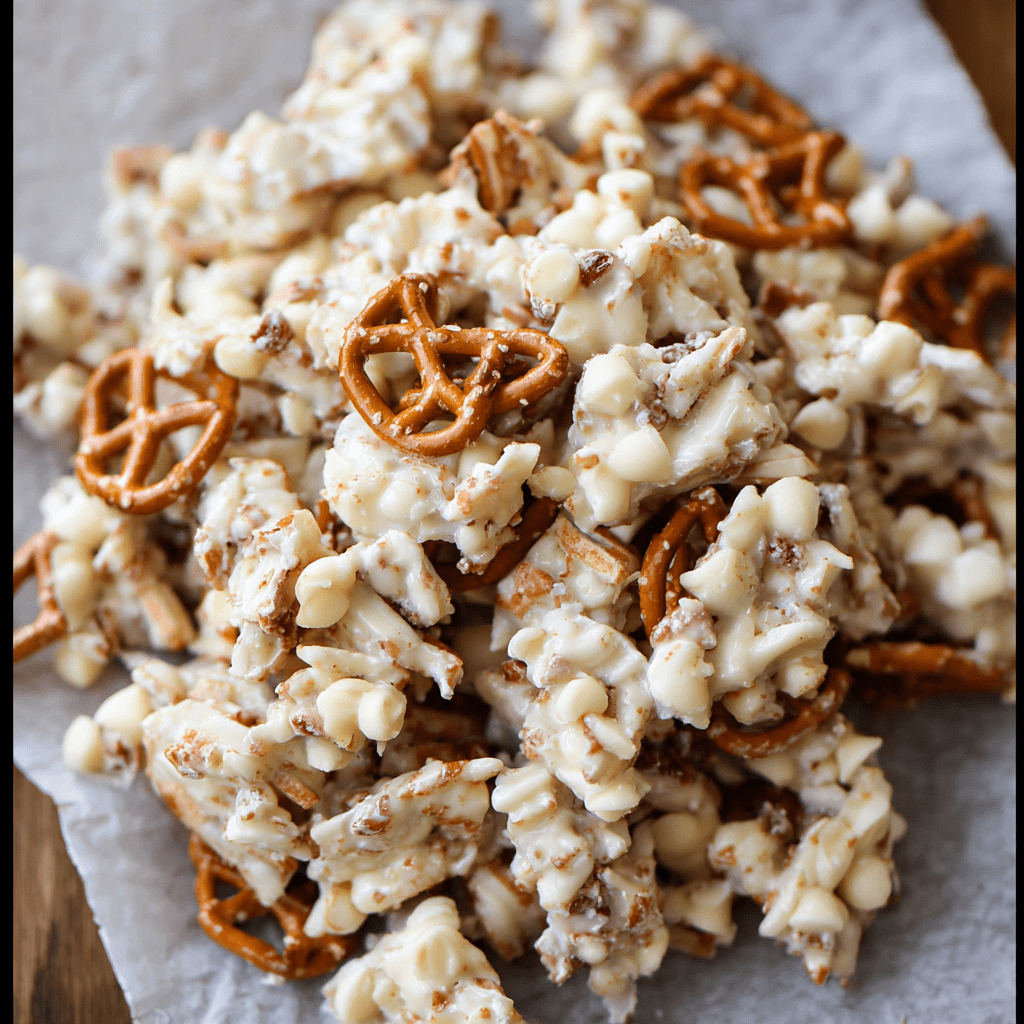
Ragtag Candies are the ultimate no-fuss, crowd-pleasing treat, a delightful concoction that celebrates the beautiful harmony of contrasting textures and flavors. This recipe is a masterclass in simplicity, transforming a handful of commonplace pantry staples into an addictive snack that is simultaneously sweet, salty, crunchy, and creamy. Unlike finicky tempered chocolates or precise baked goods, this recipe is forgiving and fast, making it the perfect project for novice cooks, busy parents, or anyone seeking a quick and satisfying culinary win. The name itself evokes a charming, thrown-together quality, but the final product is a perfectly balanced cluster that feels both whimsical and thoughtfully crafted. It’s the kind of treat that disappears from a party platter in minutes and sparks requests for the recipe from every guest.

The true genius of Ragtag Candies lies in their versatility and universal appeal. They require no special equipment beyond a microwave and a bowl, and the entire process from start to finish can be completed in well under thirty minutes. This makes them an ideal last-minute gift, a fun activity to do with children, or a simple solution for potlucks and bake sales. The combination of crisp cereal, salty pretzels, and rich peanuts bound together by sweet white chocolate creates a symphony in every bite, satisfying multiple cravings at once. They are unpretentious, deeply satisfying, and proof that the most beloved recipes often come not from complex techniques, but from a clever and delicious combination of simple, high-quality ingredients.

Why You’ll Love This Recipe:

  • Textural Paradise: Experience the incredible contrast of crunchy cereal, crispy pretzels, and firm peanuts all smoothed together by creamy, melted white chocolate.
  • Effortlessly Simple: With no baking required and a simple melting method, this is one of the easiest candy recipes you will ever make, with virtually no room for error.
  • Infinitely Customizable: The ingredient list is a template. Swap out the peanuts for almonds, the pretzels for popcorn, or add dried fruit—the possibilities are endless.
  • Perfect for Any Occasion: Whether it’s a holiday gift, a school event, a movie night snack, or a party favor, these candies are always a hit with both kids and adults.

Ingredients:

  • 1 (12 oz) bag white chocolate chips (high-quality chips melt better and provide a superior coating)
  • 4 cups rice krispie cereal (this provides the classic light, airy crunch)
  • 3 cups pretzel sticks, slightly crushed (they add a crucial salty, sturdy crunch)
  • 1 ½ cups roasted, salted peanuts (the salty, savory element that balances the sweet chocolate)

Instructions:

Step 1: Prepare the Baking Sheet

  • Begin by lining a standard-sized baking sheet with parchment paper or a silicone baking mat. This is a critical step, as it prevents the candies from sticking and allows for easy removal once set. Set the prepared sheet aside while you work on the other components.

Step 2: Combine the Dry Ingredients

  • Take a large mixing bowl—larger than you think you need to allow for easy stirring later. Add the 4 cups of Rice Krispie cereal, the 3 cups of slightly crushed pretzel sticks, and the 1 ½ cups of roasted peanuts. Use a spoon or your hands to toss these dry ingredients together gently, ensuring they are evenly distributed throughout the mixture. This ensures every cluster will have a bit of everything.

Step 3: Melt the White Chocolate

  • Pour the entire 12-ounce bag of white chocolate chips into a medium, microwave-safe bowl. Microwave on high for 30 seconds. Remove the bowl (it may be warm) and stir thoroughly. Return it to the microwave for another 30 seconds and stir again. At this point, the chocolate should be nearly melted. Continue heating in 15-second increments, stirring vigorously after each, until the chocolate is completely smooth and fluid. Be careful not to overheat, as white chocolate is prone to seizing and becoming grainy.

Step 4: Combine Chocolate and Dry Mix

  • Pour the smoothly melted white chocolate directly over the cereal, pretzel, and peanut mixture in the large bowl. Using a sturdy spatula, begin to fold and stir the ingredients together. Work quickly but gently, turning the mixture from the bottom up to ensure every component gets a thorough and even coating of the luxurious white chocolate.

Step 5: Form the Candy Sheet

  • Immediately transfer the coated mixture onto your waiting parchment-lined baking sheet. Use the spatula or your hands (lightly greased with cooking spray to prevent sticking) to press the mixture down into a relatively even layer. You can make it as thick or as thin as you prefer, but a uniform thickness of about an inch will help it set consistently.

Step 6: Allow to Set

  • Leave the baking sheet in a cool, dry area to allow the white chocolate to fully harden. This process can take 1 to 2 hours at room temperature. For a faster set, you can place the entire sheet in the refrigerator for about 20-30 minutes. The candy is ready when the chocolate is firm to the touch and no longer glossy or soft.

Step 7: Break and Store

  • Once the large slab is completely set, lift the parchment paper to remove it from the baking sheet. Then, using your hands, break the slab into rustic, irregularly-sized pieces—this “ragged” look is part of their charm! Alternatively, you can use a knife to cut them into neater squares if desired.

Tips:

  • Prevent Seizing: Ensure all your bowls and utensils are completely dry. Even a small drop of water can cause the white chocolate to seize and become clumpy.
  • Customization is Key: Feel free to create your own signature mix. Try using milk or dark chocolate chips instead. Add in ½ cup of mini M&M’s for color, or swap the peanuts for other nuts like pecans or almonds. A sprinkle of flaky sea salt over the top before it sets elevates the sweet-and-salty profile.
  • Crushing Pretzels: To crush the pretzel sticks, place them in a zip-top bag and use a rolling pin or the bottom of a heavy pan to break them into small, bite-sized pieces. You want a variety of sizes for the best texture.
  • Working Quickly: White chocolate begins to set as it cools, so it’s important to work with efficiency once it’s melted. Have your dry mix ready to go before you even start melting the chocolate.

Storage Options:

  • Airtight Container: Store the completely set Ragtag Candy pieces in an airtight container at room temperature. They will stay fresh and maintain their crisp texture for up to 1 week. Do not refrigerate for long-term storage, as this can introduce moisture and make the cereal stale.
  • Single Layer: For the best results, place a sheet of parchment paper between layers in the container to prevent the pieces from sticking together.
  • Gifting: These candies package beautifully in cellophane bags tied with a ribbon or in decorative tins, making for a wonderfully homemade and thoughtful gift.

Ragtag Candies are a testament to the idea that the whole can be greater than the sum of its parts. This effortlessly simple recipe yields a treat that is irresistibly crunchy, perfectly balanced between sweet and salty, and guaranteed to bring joy to anyone who tries it. Enjoy the process of creating these delightful clusters and the even greater pleasure of sharing them!

Homemade Creamy Irish Cream Liqueur

0

Homemade Creamy Irish Cream Liqueur is a decadent and surprisingly simple creation that far surpasses anything you can find on a store shelf. This luxurious drink combines the smooth, oaky warmth of Irish whiskey with the rich, velvety embrace of cream and sweetened condensed milk, elevated by hints of chocolate, coffee, and vanilla. The beauty of crafting it yourself lies in the ability to control the quality of every ingredient and tailor the flavor profile to your exact preference, resulting in a liqueur that is uniquely and personally yours. It’s an enchanting project for a cozy afternoon, transforming your kitchen into a personal distillery and promising a reward that is both impressive and deeply satisfying.
Beyond its incredible taste, this homemade liqueur makes for a thoughtful and heartfelt gift. Bottled elegantly, it conveys a level of care and personal touch that a purchased item simply cannot match. The process itself is remarkably straightforward, requiring no cooking and taking mere minutes from start to finish. Unlike many complex liqueurs, this recipe is accessible to anyone with a blender, demystifying the art of cordial making. Its versatility is another key asset; enjoy it neat over ice, as the star ingredient in a Baileys-laced coffee, or drizzled over ice cream for an indulgent dessert. This recipe isn’t just about making a drink; it’s about creating an experience, a jar of liquid comfort ready to be shared and savored.

Why You’ll Love This Recipe:

  • Unbeatable Freshness: The flavor of freshly made Irish cream, with its vibrant notes of real cream and whiskey, is profoundly superior to the stabilized, store-bought versions.
  • Incredibly Simple Process: With no cooking required and a process that is essentially “dump and blend,” you can have a professional-quality liqueur ready in under 10 minutes of active work.
  • Fully Customizable: You are the master of your blend. Adjust the whiskey for strength, the coffee for depth, or the chocolate for richness to create your perfect bottle.
  • Perfect for Gifting: Beautifully bottled, this liqueur becomes a cherished homemade present for holidays, hostess gifts, or any special occasion, showing you went the extra mile.

Ingredients:

For One Batch (Makes About 3 Bottles):

  • 1 cup (240 ml) heavy cream (use a high-quality, fresh cream for best results)
  • 1 (14 oz / 400 g) can sweetened condensed milk (this provides the signature sweetness and body)
  • 1 ½ cups (360 ml) Irish whiskey (such as Jameson; a smooth, blended whiskey works perfectly)
  • 2 tablespoons chocolate syrup (or 2 teaspoons cocoa powder mixed with 1 tablespoon sugar)
  • 2 teaspoons instant coffee or espresso powder (enhances the chocolate and adds a robust backbone)
  • 1 teaspoon pure vanilla extract (use the real thing for the best flavor)
  • ½ teaspoon almond extract (optional, for a subtle, nutty flavor that complements the other notes)

Instructions:

Step 1: Prepare Your Equipment

  • Before you begin, it is crucial to ensure all your equipment is impeccably clean and completely dry. Any residual moisture or contaminants can affect the liqueur’s shelf life. Gather glass bottles or jars with airtight seals. Sterilize them by washing in hot, soapy water and rinsing thoroughly, or by running them through a dishwasher cycle. Having a funnel and a blender at the ready will make the process seamless.

Step 2: Blend the Ingredients

  • Place your blender jar on the base. To it, add the heavy cream, the entire can of sweetened condensed milk, the Irish whiskey, chocolate syrup, instant coffee, vanilla extract, and the optional almond extract. Secure the lid tightly. Begin blending on the lowest speed possible for 20–30 seconds. The goal is to simply combine the ingredients until the mixture is smooth and homogenous, not to whip it. Over-blending can incorporate too much air, cause excessive frothing, or in a worst-case scenario, start to separate the cream.

Step 3: Taste and Adjust

  • Once blended, stop the motor and use a spoon to taste your creation. This is your moment to perfect the recipe. If you desire a more pronounced coffee kick, add another half teaspoon of instant coffee and blend for just 5 more seconds to incorporate. If you want it richer and more chocolate-forward, add another tablespoon of chocolate syrup. Remember that the flavors will continue to meld and mellow slightly as they chill, so adjustments should be subtle.

Step 4: Bottle the Liqueur

  • Set your sterilized bottles on a stable surface. Using a clean funnel, carefully pour the creamy liqueur from the blender into the bottles. Leave a small amount of headspace at the top to allow for easy shaking later. Wipe the rims of the bottles clean with a damp cloth to ensure a perfect seal, then cap or stopper them tightly immediately.

Step 5: Chill and Serve

  • Place the sealed bottles in the refrigerator for a minimum of 2 hours before you plan to serve or taste. This chilling period is essential for the flavors to marry and develop a harmonious profile, and it allows the liqueur to become thoroughly cold. The ingredients may separate slightly upon standing; this is completely normal. Simply shake the bottle gently for 10-15 seconds before each use to re-emulsify the mixture and restore its creamy consistency. Serve chilled in a small liqueur glass, over ice, or in your favorite coffee.

Tips:

  • Whiskey Wisdom: While a good-quality Irish whiskey is recommended, you don’t need to use a top-shelf, aged single pot still whiskey. A reliable, smooth blended whiskey like Jameson, Tullamore D.E.W., or Bushmills is ideal and cost-effective.
  • Preventing Crystallization: If you use the cocoa powder and sugar alternative instead of chocolate syrup, ensure you blend it for the full 30 seconds to ensure the sugar and cocoa are fully dissolved into the liquid.
  • Dairy-Free Adaptation: For a dairy-free version, you can experiment with full-fat canned coconut milk (well-shaken) in place of the heavy cream and a vegan sweetened condensed coconut milk alternative. The flavor profile will be different but still delicious.
  • Spice It Up: For a festive twist, consider adding a tiny pinch of cinnamon or a drop of orange extract during the blending process to create a seasonal variation.

Storage Options:

  • Refrigerator: Due to the fresh dairy content, this liqueur MUST be stored in the refrigerator at all times. When stored in a tightly sealed bottle, it will keep for up to 2 months. Always check for any off smells or signs of spoilage before consuming if it has been stored for a long period.
  • Freezing: Freezing is not recommended, as it can cause the emulsion to break and the texture to become grainy upon thawing.
  • For Gifting: When gifting, be sure to attach a tag with the name of the liqueur, the date it was made, and clear storage instructions: “Keep Refrigerated” and “Shake Well Before Use.”

Homemade Creamy Irish Cream Liqueur is more than just a delightful spirit; it is a testament to the joy of creating something beautiful and delicious with your own hands. Its rich, complex, and comforting flavor is a true celebration in a glass, perfect for quiet moments of reflection or for sharing laughter with good company. Sláinte

Christmas Red Jam

0

Christmas Red Jam is a festive, jewel-toned spread that captures the essence of the holiday season in every spoonful. This vibrant jam combines the tart brilliance of cranberries with the sweet, sunny flavor of strawberries, creating a complex fruit profile that’s perfectly balanced by warm winter spices. The slow cooker method is the secret to its deep, developed flavor—the long, gentle cooking allows the fruits to break down completely while the spices meld together into a harmonious background note that enhances rather than overwhelms the fruit. What makes this jam truly special is how the cranberries’ natural pectin provides the perfect set without any additional thickeners, resulting in a spreadable consistency that’s neither too firm nor too runny. The deep ruby color makes it as beautiful on a holiday cheese board as it is slathered on morning toast, embodying the visual and flavorful spirit of Christmas.

The magic of this jam lies in its patient, hands-off preparation and the chemical reaction that occurs during the slow cooking process. The initial high heat helps the fruits release their juices, which then combine with the brown sugar to create a rich syrup that slowly concentrates over the cooking time. The spices—cinnamon, nutmeg, cloves, and ginger—bloom in this hot environment, releasing their essential oils and infusing the entire mixture with warmth and complexity. The instruction not to stir or open the lid is crucial, as it maintains a consistent temperature and allows the natural pectin in the cranberries to work its thickening magic without interruption. The final blending step can be adjusted to your preference: pulse briefly for a chunkier jam with fruit pieces, or blend longer for a perfectly smooth spread. As the jam cools, the pectin continues to set, resulting in the ideal spreading consistency that makes this such a versatile condiment for everything from breakfast to dessert.

Why You’ll Love This Recipe:
Festive Flavor: The perfect balance of tart, sweet, and warm spices
Natural Thickening: Cranberries provide pectin for perfect set without additives
Slow Cooker Simplicity: Hands-off cooking develops deep flavor effortlessly
Versatile Uses: Perfect for gifts, breakfast, cheese boards, or dessert toppings

Ingredients:
• 6 cups (24 oz) fresh cranberries
• 16 oz fresh strawberries, hulled and halved
• 2 cups packed brown sugar
• 1½ teaspoons ground cinnamon
• 1 teaspoon ground nutmeg
• ½ teaspoon ground cloves
• ¼ teaspoon ground ginger

Instructions:

Step 1: Combine Ingredients
• Place cranberries, strawberries, brown sugar, cinnamon, nutmeg, cloves, and ginger in the slow cooker.
• Stir thoroughly until fruits are evenly coated with sugar and spices.

Step 2: Slow Cook
• Cover and cook on HIGH for 4 hours without opening the lid or stirring.
• The mixture will become bubbly and the fruits will break down completely.

Step 3: Blend to Desired Consistency
• Carefully transfer the hot mixture to a blender (or use an immersion blender directly in the slow cooker).
• Pulse until you achieve your preferred texture—less for chunkier jam, more for smoother spread.

Step 4: Cool and Thicken
• Allow the jam to cool completely at room temperature, during which it will thicken significantly.
• Transfer to clean jars or airtight containers for storage.

Tips:
Don’t Peek: Resisting the urge to stir ensures proper thickening and flavor development
Texture Control: Blend less for rustic jam with fruit pieces, more for smooth spread
Sugar Adjustment: Taste after cooking and add more sugar if desired while jam is still warm
Gift Giving: Package in decorative jars for beautiful homemade holiday gifts

Storage Options:
Refrigerator: Store in airtight containers for up to 3 weeks
Freezing: Freeze for up to 6 months in freezer-safe containers
Canning: Process in a water bath canner for 10 minutes for shelf-stable storage

Christmas Red Jam is the ultimate holiday condiment that brings festive cheer to every meal. Its beautiful color, warm spices, and perfect sweet-tart balance make it a versatile addition to your seasonal cooking and gift-giving traditions.

Crispy Parmesan Roasted Potatoes

0

Crispy Parmesan Roasted Potatoes are a revelation in side dish simplicity, transforming humble baby potatoes into golden, cheesy perfection with an irresistible crunch. These potatoes achieve their spectacular texture through a clever technique: roasting them cut-side down on a hot baking sheet, which creates a beautifully browned, crispy crust that contrasts wonderfully with the fluffy, tender interiors. The Parmesan cheese and Italian seasoning form a savory, aromatic coating that caramelizes in the oven, creating a flavorful crust that adheres perfectly to each potato half. What makes these potatoes truly exceptional is how the Parmesan melts into a delicate, lacy crispness around the edges while the seasonings infuse every bite with garlicky, herbal notes. This dish proves that with the right method, ordinary ingredients can become extraordinary with minimal effort.

The success of these potatoes lies in understanding the science of roasting. Starting with dry potatoes ensures proper crisping, while the initial coating of oil helps conduct heat evenly and promotes browning. The Parmesan cheese serves double duty—it adds its distinctive salty, nutty flavor while also contributing to the Maillard reaction that creates that beautiful golden crust. Placing the potatoes cut-side down is the secret to achieving maximum surface contact with the hot pan, which is essential for developing that satisfying crunch. The high oven temperature quickly sears the exterior while slowly cooking the interiors to creamy perfection. These potatoes are incredibly versatile, equally at home alongside a weeknight roast chicken as they are gracing a holiday dinner table. The final garnish of fresh parsley adds a burst of color and freshness that cuts through the richness, making each bite perfectly balanced.

Why You’ll Love This Recipe:
Perfect Texture: Incredibly crispy exterior with a fluffy, tender interior
Savory Flavor: Parmesan and Italian seasoning create a deliciously seasoned crust
Easy Preparation: Simple technique with spectacular results
Versatile Side: Complements everything from casual meals to fancy dinners

Ingredients:
• 1½ lbs baby potatoes, halved lengthwise
• 2 tablespoons olive oil
• ½ teaspoon garlic powder
• ½ teaspoon onion powder
• 1 teaspoon Italian seasoning
• ½ teaspoon salt
• ¼ teaspoon black pepper
• ⅓ cup grated Parmesan cheese, plus extra for garnish
• Fresh parsley, chopped, for garnish

Instructions:

Step 1: Preheat and Prepare
• Preheat oven to 400°F (200°C). Line a baking sheet with parchment paper or lightly grease it.

Step 2: Create Seasoning Mix
• In a small bowl, combine garlic powder, onion powder, Italian seasoning, salt, black pepper, and grated Parmesan cheese.

Step 3: Coat Potatoes
• In a large bowl, toss the halved potatoes with olive oil until evenly coated.
• Sprinkle the Parmesan seasoning mixture over the potatoes and toss again until all pieces are well coated.

Step 4: Arrange for Maximum Crispiness
• Place the potatoes cut-side down on the prepared baking sheet, pressing gently to ensure full surface contact.
• Make sure the potatoes aren’t crowded to allow for proper air circulation.

Step 5: Roast to Perfection
• Roast for 35-40 minutes, or until the bottoms are deeply golden and crispy, and the centers are fork-tender.
• For extra crispiness, you can broil for the final 1-2 minutes (watch carefully).

Step 6: Serve
• Remove from oven and let cool slightly.
• Garnish with additional Parmesan cheese and fresh parsley before serving.

Tips:
Uniform Sizing: Choose similarly sized potatoes for even cooking
Dry Potatoes: Pat potatoes dry before coating for better crisping
Don’t Crowd: Leave space between potatoes for proper air circulation
Press Firmly: Ensuring good pan contact is key to crispy bottoms

Storage Options:
Refrigerator: Store in an airtight container for up to 4 days
Reheating: Re-crisp in air fryer or oven at 400°F for 5-7 minutes
Freezing: Not recommended as texture will become mealy

Crispy Parmesan Roasted Potatoes are the ultimate side dish that consistently delivers spectacular results with minimal effort. Their perfect combination of crispy texture and savory flavor makes them a guaranteed crowd-pleaser that will become a regular in your recipe rotation.

Pineapple Chicken

0

Pineapple Chicken is a vibrant, sweet-and-savory stir-fry that brings tropical flair to your dinner table with its colorful presentation and irresistible flavor combination. This recipe features tender pieces of chicken coated in a crispy cornstarch crust, then tossed with crisp bell peppers, sweet pineapple chunks, and a glossy, perfectly balanced sauce. The sauce is the true star—a harmonious blend of pineapple juice, soy sauce, brown sugar, and rice vinegar that thickens to a luxurious consistency while coating every ingredient in a sweet-tangy glaze. What makes this dish exceptional is its textural contrast: the crispy chicken, the crunchy vegetables, and the juicy pineapple create a symphony of textures that keeps every bite interesting. The fresh ginger and garlic provide an aromatic foundation that elevates the entire dish beyond typical takeout versions.

The technique behind this Pineapple Chicken ensures each component shines while coming together in a cohesive final dish. Coating the chicken in cornstarch before frying creates a delicate, crispy exterior that later soaks up the sauce without becoming soggy. Cooking the components in stages—chicken first, then vegetables, then sauce—prevents overcrowding and ensures everything cooks to perfection. The vegetables maintain a pleasant crunch that contrasts beautifully with the tender chicken and soft pineapple. The sauce thickens at the end, allowing you to control the consistency and ensure it clings perfectly to each ingredient. This method may seem involved, but it’s what separates mediocre stir-fry from restaurant-quality results. Served over steamed rice, this Pineapple Chicken delivers a taste of the tropics with the satisfying comfort of a well-executed stir-fry.

Why You’ll Love This Recipe:
Perfect Flavor Balance: Sweet pineapple and savory soy sauce create an irresistible combination
Textural Variety: Crispy chicken, crunchy vegetables, and juicy pineapple
Vibrant Presentation: Colorful peppers and pineapple make this dish visually appealing
Better Than Takeout: Fresh ingredients and controlled sweetness surpass restaurant versions

Ingredients:

Sauce:
• ¾ cup pineapple juice
• 2 tablespoons low-sodium soy sauce
• 2 tablespoons brown sugar
• 2 tablespoons ketchup
• 1 tablespoon rice vinegar
• 2 teaspoons cornstarch

Chicken and Vegetables:
• 1½ lbs. boneless, skinless chicken breasts or thighs, cut into bite-size pieces
• ⅓ cup cornstarch
• ½ teaspoon kosher salt
• ¼ teaspoon fresh ground black pepper
• 3-4 tablespoons vegetable oil, divided
• 1 medium onion, chopped
• 1 yellow bell pepper, chopped
• 1 red bell pepper, chopped
• 1 cup fresh or canned pineapple chunks
• 2 cloves garlic, minced
• 1 tablespoon grated ginger or ginger paste
• 2 green onions, thinly sliced

Instructions:

Step 1: Prepare Sauce
• In a medium bowl, whisk together pineapple juice, soy sauce, brown sugar, ketchup, rice vinegar, and cornstarch until smooth. Set aside.

Step 2: Coat and Cook Chicken
• In a large zip-top bag, combine cornstarch, salt, and pepper. Add chicken pieces and shake to coat evenly.
• Heat 2-3 tablespoons oil in a large skillet over medium heat. Working in batches, cook chicken until golden brown and cooked through, about 4-5 minutes per side. Transfer to a paper towel-lined plate.

Step 3: Cook Vegetables and Pineapple
• Heat 1 tablespoon oil in the same skillet over medium-high heat. Add onion and cook for 2 minutes.
• Add bell peppers and pineapple chunks, cooking for 2-3 minutes until slightly softened but still crisp. Transfer to a plate.

Step 4: Create and Thicken Sauce
• Reduce heat to low and add 1 teaspoon oil to the skillet. Add garlic and ginger, cooking for 1 minute until fragrant.
• Whisk the sauce mixture again and add to the skillet. Cook, stirring constantly, until the sauce thickens and becomes glossy.

Step 5: Combine and Serve
• Return chicken, vegetables, and pineapple to the skillet. Toss gently to coat with the sauce and heat through.
• Garnish with sliced green onions and serve immediately over steamed rice.

Tips:
Dry Chicken: Pat chicken pieces dry before coating for better browning
Don’t Crowd the Pan: Cook chicken in batches to ensure proper crisping
Fresh Pineapple: Use fresh pineapple when available for superior flavor and texture
Sauce Consistency: If sauce becomes too thick, thin with a tablespoon of water or additional pineapple juice

Storage Options:
Refrigerator: Store in an airtight container for up to 3 days
Reheating: Reheat gently on stovetop to maintain texture
Freezing: Not recommended as the crispy coating will become soft upon thawing

Pineapple Chicken is the ultimate sweet-and-savory dish that brings restaurant-quality flavors to your home kitchen. Its perfect balance of textures and vibrant colors make it a meal that’s as pleasing to the eye as it is to the palate, guaranteed to become a family favorite.

Creamed Spinach Pasta

0

Creamed Spinach Pasta is the ultimate comfort food fusion, marrying the rich, velvety texture of classic creamed spinach with the satisfying heartiness of pasta. This recipe transforms simple ingredients into an elegant yet approachable dish where tender pasta coils are enveloped in a luxuriously smooth béchamel-based sauce, generously studded with vibrant spinach. The sauce begins with a traditional roux—butter and flour cooked to golden perfection—which then becomes the foundation for a creamy milk base elevated by the warm, aromatic notes of nutmeg and a subtle kick of cayenne. The spinach, whether fresh or frozen, wilts into the sauce, contributing its distinctive earthy flavor and beautiful green hue. This dish represents the perfect balance between sophistication and comfort, offering restaurant-quality results with home-kitchen simplicity.

What makes this pasta exceptional is its technical precision and thoughtful layering of flavors. The initial step of cooking the pasta just shy of al dente ensures it reaches perfect texture when finished in the sauce, while the reserved starchy pasta water becomes a crucial ingredient for adjusting the sauce’s consistency. The roux must be cooked long enough to eliminate the raw flour taste but not so long that it browns, maintaining the sauce’s pale, creamy color. The addition of nutmeg—a classic partner to spinach—enhances the vegetable’s natural sweetness without dominating, while the cayenne provides just enough warmth to complement the richness without registering as spicy. As the pasta finishes cooking in the sauce, it absorbs the creamy goodness while releasing starch that further thickens and binds everything together. The result is a cohesive dish where sauce and pasta become one, each element enhancing the other in a perfect marriage of texture and flavor.

Why You’ll Love This Recipe:
Creamy Comfort: Luxurious, velvety sauce that clings perfectly to every noodle
Elegant Simplicity: Sophisticated enough for company but easy enough for weeknights
Versatile Base: Easily adapted with additional proteins or vegetables
Perfect Texture: The ideal balance between creamy sauce and al dente pasta

Ingredients:
• ½ lb dried pasta (spaghetti, rotelle, fusilli, campanelle, or rigatoni)
• 4 tablespoons unsalted butter
• 1 small white onion, finely diced
• 2 cloves garlic, minced
• 3 tablespoons all-purpose flour
• 2 cups whole milk
• ½ teaspoon ground nutmeg
• ⅛ teaspoon cayenne powder
• 250 grams frozen spinach, thawed and thoroughly drained (or 8 cups fresh spinach)
• Kosher salt and freshly cracked black pepper, to taste
• 1-1½ cups reserved pasta water

Instructions:

Step 1: Cook Pasta
• Bring a large pot of generously salted water to a rolling boil. Add pasta and cook for 1-2 minutes less than package directions for al dente (approximately 7-8 minutes).
• Reserve 1-1½ cups of starchy pasta water before draining. Set pasta aside.

Step 2: Create Flavor Base
• In a large skillet, melt butter over medium heat. Add diced onion and sauté until soft and translucent, 4-5 minutes.
• Add garlic and cook until fragrant, about 1 minute.

Step 3: Make the Roux
• Sprinkle flour over the onion mixture and cook, stirring constantly, for 1-2 minutes until the raw flour smell disappears but the mixture hasn’t browned.

Step 4: Develop the Sauce
• Gradually whisk in milk, ensuring no lumps form. Add nutmeg and cayenne. Season with salt and pepper.
• Bring to a gentle simmer and cook, stirring often, for 1 minute until slightly thickened.

Step 5: Incorporate Spinach
• Stir in the drained spinach and mix until evenly combined and heated through.

Step 6: Combine Pasta and Sauce
• Add the cooked pasta to the skillet, tossing to coat in the sauce.
• If the sauce is too thick, gradually add reserved pasta water until desired consistency is reached.

Step 7: Final Adjustments
• Taste and adjust seasoning with additional salt and pepper if needed.
• Serve immediately while hot.

Tips:
Thoroughly Drain Spinach: Squeeze frozen spinach firmly to remove excess water and prevent a watery sauce
Pasta Water Gold: The starchy pasta water helps emulsify the sauce and helps it cling to noodles
Don’t Overcook Pasta: Remember it will cook further when combined with the sauce
Fresh Spinach Option: If using fresh spinach, add it after the milk has thickened and stir until wilted

Storage Options:
Refrigerator: Store in an airtight container for up to 3 days
Reheating: Gently reheat on stove with a splash of milk or water to refresh sauce consistency
Freezing: Not recommended as the dairy-based sauce may separate upon thawing

Creamed Spinach Pasta is the ultimate comfort dish that transforms humble ingredients into something truly special. Its creamy elegance and satisfying heartiness make it equally suited for a quick family dinner or an impressive meal for guests.

Ham and Cheese Chaffles

0

Ham and Cheese Chaffles are a brilliant low-carb creation that transforms simple ingredients into crispy, savory waffles perfect for any meal. These chaffles—a portmanteau of “cheese” and “waffles”—combine the satisfying crunch of a traditional waffle with the hearty flavor of ham and cheese, all while containing minimal carbohydrates. The magic lies in the combination of eggs and cheese, which creates a sturdy yet tender structure that holds up beautifully in the waffle iron. With the addition of diced ham and a touch of baking powder for lift, these chaffles emerge golden brown with a delightful contrast of crispy edges and a soft, flavorful interior. They’re incredibly versatile, serving as the perfect base for breakfast sandwiches, a bread substitute for lunch, or even as a quick snack when you need something both satisfying and keto-friendly.

What makes these chaffles so exceptional is their simplicity and adaptability. The basic formula requires just five ingredients and comes together in minutes, making them an ideal solution for busy mornings or quick meals. The cheese not only adds flavor but also helps create that characteristic crispy exterior when it melts and caramelizes in the hot waffle iron. The small amount of almond flour provides just enough structure to prevent the chaffles from being too eggy while keeping them firmly in low-carb territory. Unlike traditional waffles that can become soggy, these maintain their crisp texture even when cooled, making them perfect for meal prep. Whether you’re following a specific diet or simply looking for a delicious, protein-packed alternative to bread, these ham and cheese chaffles deliver on both flavor and function with every bite.

Why You’ll Love This Recipe:
Low-Carb/Keto Friendly: Minimal carbs with no flour or grains
Quick & Easy: Ready in under 10 minutes with just 5 ingredients
Versatile: Perfect for breakfast, lunch, or as a bread substitute
Crispy Texture: Golden brown exterior with a tender interior

Ingredients:
• 2 large eggs
• ¾ cup shredded cheese (cheddar and mozzarella blend recommended)
• ¼ cup almond flour
• ½ teaspoon baking powder
• ¾ cup chopped ham
• Optional: pinch of garlic powder or onion powder for extra flavor

Instructions:

Step 1: Prepare Batter
• In a medium mixing bowl, beat the eggs until well combined and slightly frothy.
• Add the shredded cheese, almond flour, baking powder, and chopped ham. Stir until all ingredients are fully incorporated.

Step 2: Preheat Waffle Maker
• Heat your waffle maker according to manufacturer’s directions. For most mini waffle makers, this takes 2-3 minutes.
• Lightly grease the waffle plates if recommended by the manufacturer.

Step 3: Cook Chaffles
• Spoon approximately 2 tablespoons of batter onto the center of the preheated waffle maker for a mini waffle maker, or adjust amount for standard size.
• Close the lid and cook for 3-4 minutes, or until steam stops escaping and the chaffle is golden brown and crisp.

Step 4: Serve
• Carefully remove the chaffle with a fork or tongs. Repeat with remaining batter.
• Serve immediately while hot and crisp.

Tips:
Don’t Overfill: Use about 2 tablespoons for mini waffle makers to prevent overflow
Cheese Blend: A mix of melting cheeses like cheddar and mozzarella works best
Customize: Add herbs, spices, or different meats to vary the flavor
Crispier Chaffles: Cook for an additional 30-60 seconds for extra crispness

Storage Options:
Refrigerator: Store in airtight container for up to 5 days
Freezing: Freeze between parchment paper for up to 3 months
Reheating: Re-crisp in toaster, air fryer, or oven for best texture

Ham and Cheese Chaffles are the ultimate low-carb comfort food that proves you don’t need bread to enjoy the satisfaction of a crispy, savory waffle. Their incredible versatility and easy preparation make them a game-changer for anyone following a keto or low-carb lifestyle.

Lemon Cream Cheese Pound Cake

0

Lemon Cream Cheese Pound Cake is an extraordinary dessert that elevates the classic pound cake to new heights of flavor and texture. This recipe achieves an incredibly moist, tender crumb by incorporating cream cheese into the traditional butter-sugar-egg-flour foundation, while fresh lemon zest and lemon oil provide a bright, citrusy aroma that permeates every bite. The unique method of beating the butter, cream cheese, and sugar for an extended period creates an exceptionally light and airy structure, while the careful folding of whipped egg whites at the final stage ensures a delicate, almost cloud-like texture that sets this cake apart from denser traditional pound cakes. The optional poppy seeds add a subtle crunch and visual appeal, making this cake as beautiful to behold as it is delightful to eat.

What makes this pound cake truly exceptional is the precision of its technique and the quality of its ingredients. The extended creaming time—a full 5 to 8 minutes—is crucial for incorporating air into the batter, which gives the cake its characteristic lightness. Separating the eggs and folding in whipped whites at the end is a professional baker’s trick that provides additional lift without making the cake dry or crumbly. Using cake flour instead of all-purpose flour results in a more tender crumb with less gluten development, while the combination of lemon zest and lemon oil ensures the citrus flavor shines through both in aroma and taste. The simple lemon glaze adds a final burst of brightness and a professional finish that makes this cake suitable for any occasion, from casual family gatherings to elegant celebrations. This is the kind of recipe that will make you feel like a master baker, with results that consistently impress and satisfy.

Why You’ll Love This Recipe:
Exceptional Texture: Incredibly moist and tender with a delicate, fine crumb
Bright Lemon Flavor: The perfect balance of tangy and sweet citrus notes
Cream Cheese Richness: Adds depth and moisture without being heavy
Elegant Presentation: Beautiful enough for special occasions

Ingredients:

Cake:
• 2 cups (8 oz) cake flour
• ½ teaspoon salt
• 8 oz unsalted butter, room temperature
• 8 oz cream cheese, softened
• 2 cups (14 oz) granulated sugar
• 6 large eggs, separated, room temperature
• 2 teaspoons lemon zest AND 1 teaspoon lemon oil OR 2 tablespoons lemon zest
• 1½ teaspoons poppy seeds (optional)

Glaze:
• 1 teaspoon butter
• ⅔ cup powdered sugar
• 5-6 teaspoons fresh lemon juice

Instructions:

Step 1: Prepare Pan and Oven
• Preheat oven to 325°F (163°C). Spray a light-colored tube pan or 10-inch Bundt pan with flour-based baking spray.

Step 2: Mix Dry Ingredients
• Whisk together cake flour and salt. If using poppy seeds, add them to the flour mixture. Set aside.

Step 3: Cream Butter and Sugar
• In a stand mixer fitted with the paddle attachment, beat butter, cream cheese, and sugar on medium-high speed for 5-8 minutes until very light and fluffy, scraping down the bowl occasionally.

Step 4: Add Egg Yolks and Flavor
• Add egg yolks one at a time, beating well after each addition. Continue beating for 2 minutes until mixture is pale and creamy.
• Beat in lemon zest and lemon oil (if using), scraping down the sides of the bowl.

Step 5: Incorporate Flour
• With mixer on low speed, gradually add the flour mixture, mixing just until combined. Do not overmix.

Step 6: Fold in Egg Whites
• In a clean bowl, beat egg whites until soft peaks form.
• Gently fold the beaten egg whites into the batter until no white streaks remain.

Step 7: Bake
• Pour batter into prepared pan and smooth the top.
• Bake for 60-80 minutes, until a long skewer inserted in center comes out clean or with moist crumbs (internal temperature should reach 210°F/99°C).
• Cool in pan for 10 minutes, then invert onto a wire rack to cool completely.

Step 8: Prepare Glaze
• Melt butter in a microwave-safe measuring cup. Add powdered sugar and stir to coat.
• Add lemon juice one teaspoon at a time, stirring until glaze reaches desired consistency.
• Drizzle over completely cooled cake.

Tips:
Room Temperature Ingredients: Essential for proper emulsification and volume
Proper Creaming: Don’t rush the 5-8 minute creaming time—this creates the cake’s structure
Gentle Folding: Fold egg whites gently to maintain air bubbles for a light texture
Cool Completely: Allow cake to cool fully before glazing to prevent the glaze from melting

Storage Options:
Room Temperature: Store covered at room temperature for up to 3 days
Refrigerator: Keep in refrigerator for up to 1 week
Freezing: Wrap tightly and freeze for up to 3 months

Lemon Cream Cheese Pound Cake is a masterpiece of baking that balances rich, creamy flavors with bright citrus notes in a texture so tender it practically melts in your mouth. This cake is sure to become a treasured recipe that you’ll return to again and again for both everyday treats and special occasions.

Ground Beef Lo Mein

0

Ground Beef Lo Mein brings the authentic taste of Chinese takeout to your kitchen with a hearty, satisfying twist. This recipe transforms humble ground beef into a flavorful foundation for a vibrant stir-fry, combining tender lo mein noodles with crisp vegetables in a savory-sweet sauce that clings to every strand. The magic begins with properly browned beef that provides rich, meaty depth, followed by the aromatic punch of fresh garlic and ginger that forms the flavor backbone of the dish. What makes this lo mein exceptional is its perfect balance of textures—the chewiness of the noodles, the tenderness of the beef, and the crispness of the fresh vegetables create a symphony in every bite. The sauce, a masterful blend of soy, oyster, and hoisin sauces with a hint of brown sugar, delivers that unmistakable restaurant-quality flavor that will have everyone reaching for seconds.

The technique behind this lo mein is what elevates it from simple stir-fry to something truly special. Cooking the components in stages ensures each ingredient reaches its ideal texture without becoming overcooked or mushy. Starting with browning the beef properly develops fond—those caramelized bits at the bottom of the pan—that later dissolves into the sauce, adding incredible depth. The vegetables are stir-fried just until they lose their raw edge but maintain a pleasant crunch, providing textural contrast to the soft noodles and beef. The final toss of everything together allows the noodles to soak up the sauce while picking up flavors from the beef and vegetables. This method may use more pans than a typical one-pot meal, but the superior results are well worth the extra dishwashing. Whether you’re craving takeout on a busy weeknight or want to impress guests with your stir-fry skills, this Ground Beef Lo Mein delivers restaurant-quality results with approachable, home-cooked simplicity.

Why You’ll Love This Recipe:
Takeout Taste at Home: Captures authentic Chinese restaurant flavors
Budget-Friendly: Uses affordable ground beef instead of pricier cuts
Quick & Easy: Ready in 30 minutes for busy weeknights
Versatile: Easily adapt with your favorite vegetables or proteins

Ingredients:
• 8 oz lo mein noodles or spaghetti
• 1 lb ground beef (80/20 works well)
• 1 tbsp vegetable oil
• 1 cup shredded carrots
• 2 cups shredded green cabbage
• 1 red bell pepper, thinly sliced
• 3 green onions, chopped (white and green parts separated)
• 3 cloves garlic, minced
• 1 tsp fresh ginger, grated
• ¼ cup low-sodium soy sauce
• 2 tbsp oyster sauce
• 1 tbsp hoisin sauce
• 1 tbsp brown sugar
• ½ tsp toasted sesame oil
• ¼ cup beef broth or water
• ¼ tsp black pepper
• Sesame seeds for garnish (optional)

Instructions:

Step 1: Cook Noodles
• Bring a large pot of water to a boil. Cook lo mein noodles according to package directions until al dente.
• Drain and rinse under cold water to stop cooking. Set aside.

Step 2: Brown Beef
• Heat vegetable oil in a large skillet or wok over medium-high heat.
• Add ground beef, breaking it up with a spoon, and cook until well-browned. Drain excess grease if necessary.

Step 3: Add Aromatics
• Add garlic, ginger, and the white parts of green onions to the beef.
• Sauté for 1-2 minutes until fragrant.

Step 4: Cook Vegetables
• Add shredded carrots, cabbage, and bell pepper to the skillet.
• Stir-fry for 3-4 minutes until vegetables are slightly softened but still crisp.

Step 5: Prepare Sauce
• In a small bowl, whisk together soy sauce, oyster sauce, hoisin sauce, brown sugar, sesame oil, beef broth, and black pepper.

Step 6: Combine Everything
• Add cooked noodles to the skillet with beef and vegetables.
• Pour sauce over everything and toss well to coat evenly.
• Cook for 2-3 minutes, tossing constantly, until heated through.

Step 7: Finish and Serve
• Remove from heat and garnish with green onion tops and sesame seeds if using.
• Serve immediately.

Tips:
Don’t Overcook Noodles: Cook to al dente as they’ll soften more when combined with sauce
High Heat Cooking: Maintain medium-high heat for proper stir-frying and caramelization
Prep Everything First: Have all ingredients chopped and measured before starting to cook
Customize Vegetables: Add mushrooms, snow peas, or bean sprouts for variation

Storage Options:
Refrigerator: Store in airtight container for up to 4 days
Reheating: Reheat in skillet over medium heat with a splash of water or broth
Freezing: Freeze for up to 3 months (texture may soften slightly upon thawing)

Ground Beef Lo Mein is the ultimate comfort food that satisfies your Chinese takeout cravings while being kinder to your wallet and schedule. Its perfect balance of savory, sweet, and umami flavors makes it a weeknight winner that will become a regular in your dinner rotation.

Air Fryer Brownie

0

This Air Fryer Brownie is a revolutionary single-serving dessert that delivers all the rich, chocolatey satisfaction of a traditional brownie in just minutes with minimal cleanup. Using a simple ramekin and common keto-friendly ingredients, this recipe creates an incredibly fudgy, decadent treat with a crackly top and molten chocolate chips throughout. The combination of almond flour and monk fruit sweetener provides a perfect brownie texture without the carbs, while the single egg white gives structure without making the brownie cakey. What makes this recipe so brilliant is its adaptability—cook for 6 minutes for a molten, fudgy center or 8 minutes for a more traditional, set brownie texture. This is the ultimate solution for when a chocolate craving strikes but you don’t want to make an entire batch of brownies or heat up your kitchen with the oven.

The magic of this brownie lies in its simplicity and the air fryer’s intense, direct heat that creates a bakery-quality result in a fraction of the time. Melting the butter directly in the ramekin not only saves dishes but ensures the ingredients combine smoothly into that characteristic glossy brownie batter texture. The thick batter, similar to boxed brownie mix, yields that perfect dense, fudgy crumb that brownie lovers crave. The air fryer’s rapid air circulation creates a delicate crust on top while keeping the interior wonderfully moist. This single-serving approach means you can enjoy a fresh, warm brownie anytime without temptation lurking in the kitchen, and the recipe easily doubles if you want to share. Whether you’re following a low-carb lifestyle or simply want a quick chocolate fix, this air fryer brownie delivers impressive results with astonishing ease.

Why You’ll Love This Recipe:
Single Serving Perfect: No leftovers to tempt you, fresh brownie anytime
Keto/Low-Carb Friendly: Uses almond flour and sugar-free sweetener
Quick & Easy: Ready in under 10 minutes start to finish
Customizable Doneness: Choose between fudgy or fully set texture

Ingredients:
• 1 tablespoon butter
• 3 tablespoons almond flour
• 1½ tablespoons monk fruit sweetener (or preferred granulated sweetener)
• 1 tablespoon unsweetened cocoa powder
• ½ teaspoon baking powder
• Pinch of salt
• 1 large egg white
• 2 tablespoons sugar-free chocolate chips

Instructions:

Step 1: Prepare Batter
• Place butter in a 6-ounce ramekin and microwave for 20-30 seconds until melted.
• Add almond flour, monk fruit sweetener, cocoa powder, baking powder, salt, and egg white directly to the ramekin with the melted butter.
• Stir until just combined and the batter is smooth and glossy. Be careful not to overmix.
• Gently fold in sugar-free chocolate chips.

Step 2: Preheat Air Fryer
• Preheat air fryer to 325°F (163°C) for 3 minutes.

Step 3: Cook Brownie
• Place the ramekin in the preheated air fryer basket.
• Cook for 6 minutes for a fudgy center with slightly underdone middle, or 8 minutes for a fully set brownie.

Step 4: Rest and Serve
• Carefully remove the ramekin from the air fryer (it will be hot).
• Let the brownie rest for 1 minute before eating directly from the ramekin.

Tips:
Don’t Overmix: Stir just until ingredients combine for the best texture
Ramekin Size Matters: Use a 6-ounce ramekin for proper cooking
Sweetener Options: Any granulated sugar alternative will work
Add Nuts: Stir in 1 tablespoon of chopped walnuts or pecans with the chocolate chips

Storage Options:
Best Fresh: This brownie is ideal eaten immediately after cooking
Short-Term: Store covered at room temperature for up to 2 days
Reheating: Warm in air fryer at 300°F for 1-2 minutes to refresh

The Air Fryer Brownie is a game-changing dessert that proves you don’t need to make a full batch to enjoy a rich, chocolatey treat. Its incredible ease and perfect single-serving size make it the ultimate solution for satisfying chocolate cravings in minutes.