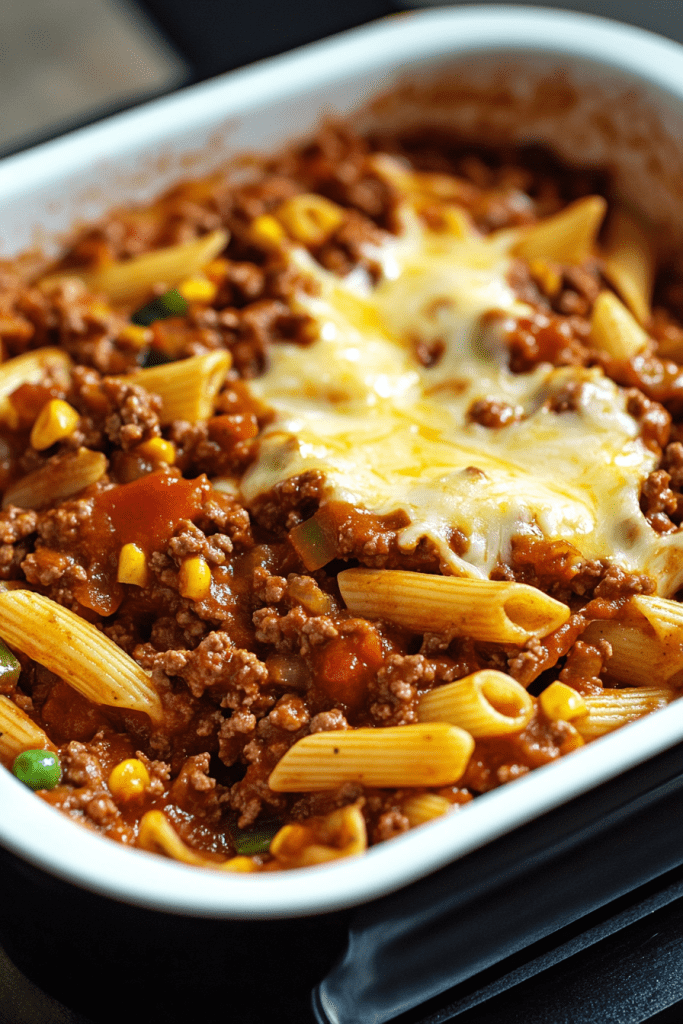
Slow Cooker Baked Ziti

0

Slow Cooker Baked Ziti is a comforting Italian-American dish that brings together layers of pasta, savory meat sauce, creamy ricotta cheese, and gooey melted mozzarella. This easy-to-make recipe is perfect for busy days when you want a hearty meal waiting for you at home. It’s a crowd-pleaser that satisfies with every cheesy, flavorful bite.

Why You’ll Love This Recipe:
This Slow Cooker Baked Ziti simplifies the traditional baked ziti by utilizing the convenience of a slow cooker. It allows the flavors to meld together slowly, resulting in a rich, comforting dish that’s perfect for family dinners or potluck gatherings. The layering technique ensures each bite is packed with deliciousness, from the tender pasta to the cheesy, meaty goodness.

Ingredients:

  • 1 lb Ground Beef (or ground turkey/chicken)
  • 16 oz Dried Ziti
  • 2 jars Pasta Sauce (marinara or tomato basil)
  • 15 oz Ricotta Cheese
  • 1 cup Shredded Mozzarella Cheese
  • 2 cups Shredded Parmesan Cheese
  • 2 Eggs
  • 15 oz Tomato Sauce
  • 1/3 cup Fresh Basil, chopped
  • Salt and Pepper, to taste
  • Cooking Spray (for greasing)

Step-by-Step Directions:

Step 1: Prepare The Ingredients

Cook The Ground Beef:
Brown the ground beef in a skillet over medium heat until fully cooked, breaking it into small pieces as it cooks. Drain any excess fat and set aside.

Make The Cheese Mixture:
In a medium-sized bowl, combine the ricotta cheese, eggs, and chopped basil. Mix until well combined.

Prepare The Sauce:
In a separate bowl, mix together the tomato sauce and pasta sauce to combine well.

Step 2: Assemble The Ziti In The Slow Cooker

Grease The Slow Cooker:
Lightly spray the inside of your slow cooker with cooking spray to prevent sticking.

Layer The Ingredients:

  1. Spread about 2⅓ cups of the sauce mixture evenly over the bottom of the slow cooker.
  2. Add a layer of dried ziti (about a third of the pasta), spreading it evenly over the sauce.
  3. Spread a layer of the ricotta cheese mixture over the ziti.
  4. Sprinkle half of the shredded Parmesan cheese over the ricotta layer.
  5. Evenly distribute the cooked ground beef over the Parmesan layer.
  6. Repeat the layering process until all ingredients are used, ending with a layer of sauce on top.

Step 3: Cooking The Ziti

Cook:
Cover the slow cooker with a lid and set it to high heat. Cook for 2-3 hours, or until the pasta is tender and the flavors have melded together.

Add Mozzarella:
About 10-15 minutes before serving, sprinkle the shredded mozzarella over the top of the ziti. Cover again and let the cheese melt.

Step 4: Serve and Enjoy

Serve:
Once the mozzarella is fully melted, scoop the ziti into bowls or onto plates. Garnish with additional fresh basil if desired.

Enjoy the warm, comforting flavors of this slow-cooked Italian classic.

Tips:

  • Customize with your favorite additions such as spinach, mushrooms, or extra herbs.
  • Ensure the slow cooker is well-greased to prevent sticking during cooking.
  • Leftovers can be stored in an airtight container in the refrigerator for up to 3 days. Reheat in the microwave or oven for a quick and delicious meal.

Storage Options:
Store any leftover Slow Cooker Baked Ziti in an airtight container in the refrigerator for up to 3 days. Reheat portions in the microwave or oven until heated through before serving.


This format maintains clarity and ease of following along, ensuring the recipe is both detailed and straightforward for anyone looking to recreate it.

Mini Pizza Sliders

0

Enjoy the flavors of pizza in a bite-sized form with these delicious pizza sliders. Perfect for parties, gatherings, or a fun family meal, these sliders combine savory meat patties, tangy sauce, gooey cheese, and your favorite pizza toppings, all baked to perfection. They’re easy to assemble and even easier to devour, making them a crowd-pleasing favorite.

Why You’ll Love This Recipe:

These pizza sliders are not only tasty but also versatile. You can customize them with your preferred toppings, whether it’s classic pepperoni, mushrooms, bell peppers, or any other favorite pizza fixings. They’re quick to prepare, making them ideal for busy weeknights or whenever you’re craving a pizza-inspired treat without the hassle of making a traditional pizza crust.

Ingredients:

For the meat patties:

• 1 lb (450g) ground beef or ground turkey

• 1 small onion, finely diced

• 2 garlic cloves, minced

• 1 tablespoon Italian seasoning

• Salt and pepper, to taste

• 1 tablespoon olive oil (for cooking)

For the sliders:

• 8 small burger buns or slider rolls (you can also use sliced bread or mini bagels)

• 1/2 cup pizza sauce or marinara sauce

• 1 cup sliced pepperoni or any toppings of choice (such as mushrooms, bell peppers, etc.)

• 2 cups shredded mozzarella cheese (or a blend of mozzarella and cheddar)

• 1/4 cup grated Parmesan cheese (optional)

• Fresh basil or parsley for garnish (optional)

Instructions:

1. Prepare the meat patties: In a mixing bowl, combine the ground meat with diced onions, minced garlic, Italian seasoning, salt, and pepper. Mix thoroughly to distribute the seasoning. Shape the mixture into small, round patties, roughly the size of your buns.

2. Cook the patties: Heat a skillet over medium-high heat with olive oil. Cook the patties for about 3-4 minutes on each side, until browned and fully cooked through. Set aside on a plate lined with paper towels to drain excess oil.

3. Assemble the sliders: Preheat your oven to 375°F (190°C). Place the bottom half of each bun (or bread slice) on a baking sheet. Spread a spoonful of pizza or marinara sauce on each bun. Add a layer of pepperoni or other toppings, followed by one cooked meat patty.

4. Add the cheese: Top each patty with shredded mozzarella cheese. For extra flavor, sprinkle grated Parmesan cheese on top. Place the top halves of the buns on each slider.

5. Bake: Place the sliders in the preheated oven and bake for 10-12 minutes, until the cheese is fully melted and bubbly. For a crispier top, turn on the broiler for the last 2-3 minutes.

6. Serve: Remove from the oven and let cool for a minute before serving. Garnish with fresh basil or parsley if desired, and serve with extra pizza sauce for dipping.

Tips:

• Customize with your favorite pizza toppings such as olives, onions, or even pineapple for a Hawaiian twist.

• Ensure patties are fully cooked through by checking with a meat thermometer (internal temperature should reach 160°F or 71°C).

• Leftovers can be stored in an airtight container in the refrigerator for up to 3 days. Reheat in the oven or microwave for a quick snack or meal.

Storage Options:

Store any leftover pizza sliders in an airtight container in the refrigerator for up to 3 days. Reheat in the oven or microwave until heated through before serving.

This format ensures clarity and consistency, making it easy to follow and replicate for future recipes.

Homemade Nougat with Mixed Nuts and Dried Fruits

0

Indulge in the sweet delight of homemade nougat, filled with a mix of crunchy nuts and chewy dried fruits. This recipe brings together the richness of sugar syrup, the lightness of whipped egg whites, and the wholesome goodness of nuts and fruits for a treat that’s perfect for any occasion.

Why You’ll Love This Recipe:

  • Customizable Flavors: You can personalize this nougat with your favorite nuts and dried fruits, creating a unique blend of textures and flavors.
  • Homemade Goodness: Making nougat from scratch allows you to control the ingredients, ensuring a fresh and wholesome treat.
  • Impressive Results: Serve these homemade nougat bars as a thoughtful gift or enjoy them as a delightful snack at home.

Ingredients:

  • 2 cups granulated sugar
  • 1 cup honey
  • 1/2 cup water
  • 2 large egg whites
  • 1/4 teaspoon salt
  • 1 teaspoon vanilla extract
  • 2 cups mixed nuts (almonds, pistachios, hazelnuts, etc.)
  • 1 1/2 cups mixed dried fruits (cranberries, apricots, raisins, etc.)
  • Rice paper or parchment paper (optional, for lining)

Instructions:

  • Prepare the Pan:
    Line an 8×8-inch square baking pan with rice paper or parchment paper. If using parchment, lightly grease it with a bit of oil or non-stick spray.
  • Toast the Nuts:
    Preheat the oven to 350°F (175°C).
    Spread the mixed nuts on a baking sheet and toast them in the oven for about 8-10 minutes, until they are lightly browned and fragrant. Let them cool and chop if desired.
  • Cook the Sugar Syrup:
    In a medium saucepan, combine the sugar, honey, and water.
    Cook over medium heat, stirring until the sugar dissolves, then stop stirring and let it cook until the syrup reaches 300°F (150°C) on a candy thermometer.
  • Whip the Egg Whites:
    While the syrup is cooking, place the egg whites in a large mixing bowl. Add the salt.
    Beat the egg whites on medium speed until soft peaks form.
    When the sugar syrup reaches 300°F (150°C), slowly pour it in a thin stream into the egg whites while continuing to beat on low speed.
  • Add the Flavorings and Nuts:
    Continue to beat the mixture until it thickens and becomes glossy, about 5 minutes.
    Add the vanilla extract and fold in the toasted nuts and dried fruits until evenly distributed.
  • Shape and Cool:
    Quickly pour the nougat mixture into the prepared pan. Use a spatula to smooth the top.
    If using rice paper, place another sheet on top of the nougat and press gently.
    Let the nougat cool completely at room temperature, about 2 hours or until firm.
  • Cut and Serve:
    Once set, remove the nougat from the pan. If using parchment, peel it off carefully.
    Cut the nougat into squares or bars with a sharp knife.
    Store the nougat in an airtight container at room temperature.

Tips:

  • Precision in Temperature: Use a candy thermometer to ensure the sugar syrup reaches the correct temperature for the best texture in your nougat.
  • Mixing Technique: Fold in the nuts and fruits gently to avoid deflating the whipped egg whites, which help create the nougat’s light and airy texture.
  • Storage: Store the nougat in an airtight container at room temperature to maintain its freshness and texture.

This format provides a clear, step-by-step guide to making homemade nougat with mixed nuts and dried fruits.

Classic Meatloaf

0

Savor the comforting flavors of Classic Meatloaf, where tender ground beef blends with savory vegetables and oats for a hearty dish that’s perfect for family dinners. This recipe ensures moistness and flavor in every slice, complemented by a hint of tangy ketchup glaze.

Why You’ll Love This Recipe:

  • Moist and Flavorful: The combination of vegetables, oats, and seasonings keeps the meatloaf juicy and packed with flavor.
  • Easy Preparation: Simple steps and common ingredients make this recipe accessible for any cook.
  • Versatile: Serve it fresh out of the oven or enjoy leftovers in sandwiches the next day.

Ingredients:

  • 2 teaspoons canola oil
  • 1 cup finely chopped white mushrooms
  • 1 cup finely chopped onion
  • 1 carrot, peeled and finely chopped
  • 1 stalk celery, finely chopped
  • 1 pound lean ground beef (7% or less fat)
  • 1/2 cup quick cooking or old-fashioned oats (not instant)
  • 2 large egg whites (or 1 whole egg)
  • 3 tablespoons ketchup (plus more for brushing on top)
  • 1 tablespoon Worcestershire sauce
  • 1 teaspoon dried thyme leaves (not ground thyme)
  • 1 teaspoon salt
  • 1/4 teaspoon black pepper
  • 1/2 teaspoon garlic powder (or 1 teaspoon minced fresh garlic)

Instructions:

  1. Prepare the Oven and Pan: Preheat your oven to 350°F (175°C). Spray a loaf pan with cooking spray to prevent sticking. Alternatively, use a baking sheet lined with parchment paper or foil for a different shape.
  2. Cook the Vegetables: Heat canola oil in a large nonstick skillet over medium heat. Add mushrooms, onion, carrot, and celery. Cook, stirring frequently, for about 5 minutes until the onion is translucent and vegetables are softened.
  3. Combine Ingredients: Transfer cooked vegetables to a large mixing bowl. Add ground beef, oats, egg whites (or whole egg), ketchup, Worcestershire sauce, dried thyme, salt, pepper, and garlic powder (or minced garlic). Mix thoroughly using your hands until well combined, being careful not to overmix.
  4. Shape and Bake: Press the meat mixture into the prepared loaf pan, ensuring it’s firmly packed. Alternatively, shape it into a loaf shape on the baking sheet. Optional: Brush additional ketchup on top for a glaze.
  5. Bake: Place the meatloaf in the preheated oven and bake for 30 minutes. After 30 minutes, apply more ketchup glaze if desired. Continue baking for an additional 30 to 45 minutes, or until the internal temperature reaches 160°F (71°C) measured with an instant-read thermometer.
  6. Rest and Serve: Remove the meatloaf from the oven and let it rest for 5 minutes before slicing. This allows juices to redistribute, enhancing moisture. Serve warm, sliced into 8 portions, alongside mashed potatoes, vegetables, or a salad.

Storage Tips:

  • Refrigeration: Store leftovers in an airtight container in the refrigerator for up to 3 days. Reheat slices in the oven or microwave before serving.
  • Freezing: Wrap cooled meatloaf tightly in plastic wrap and foil. Label with the date and freeze for up to 3 months. Thaw overnight in the refrigerator before reheating.

Classic Meatloaf is a timeless dish that brings warmth and satisfaction to any mealtime. Its blend of hearty ingredients and savory flavors makes it a staple in many households, perfect for both casual dinners and special occasions.

Creamy Broccoli Pasta Bake

0

Indulge in the comforting flavors of Creamy Broccoli Pasta Bake, where tender pasta, vibrant broccoli, and a rich cheese sauce come together in a satisfying casserole. This dish is perfect for a family dinner or a potluck, offering a balance of creamy goodness and wholesome ingredients.

Why You’ll Love This Recipe:

  • Creamy and Cheesy: The combination of Parmesan and mozzarella cheeses creates a luscious, cheesy sauce that coats every bite.
  • Nutritious Addition: Broccoli adds color, texture, and nutritional value to the dish, making it a wholesome meal.
  • Easy to Prepare: With simple ingredients and straightforward instructions, this pasta bake is perfect for busy weeknights.

Ingredients:

  • 12 oz pasta (penne or fusilli recommended)
  • 4 cups broccoli florets
  • 2 tbsp olive oil
  • 1 medium onion, finely chopped
  • 3 cloves garlic, minced
  • 2 tbsp all-purpose flour
  • 2 cups milk
  • 1 cup heavy cream
  • 1 tsp dried basil
  • 1 tsp dried oregano
  • 1 cup grated Parmesan cheese
  • 2 cups shredded mozzarella cheese
  • Salt and pepper to taste
  • 1/2 cup breadcrumbs
  • 2 tbsp melted butter

Instructions:

  1. Preheat the oven to 375°F (190°C).
  2. Cook Pasta and Broccoli: Cook the pasta according to package instructions until al dente. During the last 2 minutes of cooking, add the broccoli florets to the boiling water with the pasta. Drain and set aside.
  3. Prepare the Sauce: In a large skillet, heat olive oil over medium heat. Add chopped onion and cook until translucent, about 5 minutes. Add minced garlic and cook for another minute until fragrant.
  4. Make the Roux: Sprinkle flour over the onions and garlic, stirring continuously for 2 minutes to create a roux.
  5. Add Milk and Cream: Slowly whisk in milk and heavy cream, ensuring there are no lumps. Cook and stir until the sauce thickens, about 5-7 minutes.
  6. Season the Sauce: Add dried basil, dried oregano, salt, and pepper to taste. Stir in grated Parmesan cheese until melted and the sauce is well combined.
  7. Combine Pasta and Sauce: Mix the cooked pasta and broccoli with the sauce in the skillet, ensuring everything is evenly coated.
  8. Assemble the Casserole: Transfer the pasta mixture into a greased baking dish. Sprinkle shredded mozzarella cheese evenly over the top.
  9. Add Breadcrumb Topping: In a small bowl, combine breadcrumbs with melted butter. Sprinkle this mixture evenly over the mozzarella cheese.
  10. Bake: Place the baking dish in the preheated oven and bake for 20-25 minutes, or until the top is golden brown and the casserole is bubbly.
  11. Serve: Allow the Creamy Broccoli Pasta Bake to cool for a few minutes before serving. Enjoy this comforting dish warm with a side salad or garlic bread.

Storage Tips:

  • Refrigeration: Store any leftovers in an airtight container in the refrigerator for up to 3 days. Reheat in the oven or microwave before serving.
  • Freezing: If you plan to freeze the pasta bake, do so before baking. Cover tightly with plastic wrap and aluminum foil, label with the date, and freeze for up to 3 months. Thaw overnight in the refrigerator before baking as directed.

This Creamy Broccoli Pasta Bake is a versatile and satisfying dish that’s sure to become a family favorite. Its creamy texture, combined with the crunch of breadcrumbs and cheesy goodness, makes it a comforting choice for any occasion.

Italian Crescent Roll Sandwich Bake

0

Delight in the savory flavors of the Italian Crescent Ring, where layers of deli meats, cheeses, and tangy peppers are wrapped in flaky crescent dough. This crowd-pleasing dish combines the convenience of crescent rolls with the hearty goodness of an Italian-inspired filling, perfect for casual gatherings or as a hearty appetizer.

Why You’ll Love This Recipe:

  • Easy Assembly: Using pre-made crescent rolls simplifies preparation without compromising on taste.
  • Versatile: Serve it as a main dish for brunch or slice into smaller portions for a party appetizer.
  • Hearty and Flavorful: The combination of meats, cheeses, and peppers offers a satisfying blend of textures and tastes.

Ingredients:

  • 2 cans of refrigerated crescent rolls
  • 1/2 pound sliced ham
  • 1/2 pound sliced salami
  • 1/2 pound sliced provolone cheese
  • 1/2 cup sliced pepperoni
  • 1/2 cup banana pepper rings, drained
  • 1/2 cup roasted red peppers, drained and sliced
  • 1 tablespoon Italian seasoning
  • 1/4 cup grated Parmesan cheese
  • 1/4 cup olive oil
  • Optional: lettuce and tomato slices for serving

Directions:

  1. Preheat your oven to 375°F (190°C).
  2. Prepare the Crescent Base: Unroll one can of crescent rolls and press the dough into the bottom of a greased 9×13-inch baking dish, ensuring to seal the seams and pressing slightly up the sides of the dish.
  3. Layer the Meats and Cheese: Arrange half of the ham, salami, and provolone cheese on top of the crescent dough.
  4. Add Peppers and Pepperoni: Evenly spread the pepperoni, banana pepper rings, and roasted red peppers over the layer of meats and cheese.
  5. Seasoning: Sprinkle the Italian seasoning evenly over the top of the pepperoni and peppers.
  6. Add Remaining Meats and Cheese: Layer the remaining ham, salami, and provolone cheese on top of the pepper mix.
  7. Top with Crescent Dough: Unroll the second can of crescent rolls and lay it over the layers, pressing gently to seal the edges and seams.
  8. Prepare for Baking: Brush the top layer of crescent dough with olive oil and sprinkle with Parmesan cheese.
  9. Bake: Place the prepared dish in the preheated oven and bake for 25-30 minutes, or until the crust is golden brown and the cheese is bubbly.
  10. Cool and Serve: Allow the Italian Crescent Ring to cool slightly before cutting into squares to serve. Optionally, serve with fresh lettuce and tomato slices on the side for added freshness.

Storage Options:

  • Refrigeration: Store any leftovers in an airtight container in the refrigerator for up to 3 days. Reheat in the oven or microwave before serving.
  • Freezing: To freeze, wrap the cooled Italian Crescent Ring tightly in plastic wrap and then aluminum foil. Label with the date and freeze for up to 1 month. Thaw overnight in the refrigerator before reheating.

Tips for Success:

  • Sealing the Edges: When pressing the crescent dough into the baking dish and sealing the edges, ensure there are no gaps to prevent the filling from leaking during baking.
  • Layering: Evenly distribute the meats, cheeses, and peppers to ensure each bite has a balanced flavor profile.
  • Baking Time: Keep an eye on the Italian Crescent Ring towards the end of baking to avoid over-browning. Adjust baking time as needed based on your oven’s performance.

Enjoy the Italian Crescent Ring warm from the oven, or let it cool to room temperature for a delightful addition to any gathering. Its flavorful layers and buttery crust make it a surefire hit with family and friends alike.

Copycat Pasta Fagioli Soup

0

Delve into the rich, heartwarming flavors of this Copycat Pasta Fagioli Soup. It’s a hearty mix of beans, vegetables, and spinach pasta, simmered in a flavorful broth, perfect for a cozy meal. Whether you’re serving it alongside crusty bread or a fresh salad, this soup is bound to become a favorite.

Why You’ll Love This Recipe:

  • Hearty and Nutritious: Packed with vegetables, beans, and pasta, it’s a filling, wholesome meal in a bowl.
  • Simple Ingredients: All pantry staples and fresh veggies make this an easy and quick recipe to prepare.
  • Perfect for Leftovers: The flavors deepen when stored, making it even tastier the next day.

Ingredients:

  • 2 celery stalks, chopped
  • 1 onion, chopped
  • 2 medium tomatoes, peeled and chopped
  • 1 can of cannellini beans (with liquid)
  • 1 tbsp olive oil
  • 3 garlic cloves, minced
  • 2 tsp dried parsley
  • 1 tsp Italian seasoning
  • ¼ tsp crushed red pepper flakes
  • 8 ounces of tomato sauce
  • 14 ½ ounces chicken broth
  • Salt and pepper to taste
  • 1 cup uncooked spinach pasta
  • Grated parmesan cheese for garnish (optional)

How to Make Copycat Pasta Fagioli Soup:

Step 1: Heat the Olive Oil

  • In a large saucepan or Dutch oven, heat 1 tablespoon of olive oil over medium heat.

Step 2: Cook the Vegetables

  • Add Celery and Onion: Toss in the chopped celery and onion, cooking until the onions are translucent—about 5-7 minutes.
  • Add Garlic: Stir in the minced garlic and cook for another minute, being careful not to burn the garlic.

Step 3: Add Seasonings and Liquids

  • Seasonings: Add dried parsley, Italian seasoning, and crushed red pepper flakes to the sautéed vegetables. Let them cook for 2-3 minutes to enhance the flavors.
  • Tomatoes and Broth: Add the peeled and chopped tomatoes, tomato sauce, and chicken broth. Stir to combine, and bring the mixture to a simmer.

Step 4: Simmer the Soup

  • Let the soup simmer for about 15 minutes, allowing the flavors to meld.

Step 5: Add the Pasta

  • Pasta: Stir in the uncooked spinach pasta and let it cook in the soup for 12-15 minutes, or until al dente.

Step 6: Add Beans

  • Beans: Add the can of cannellini beans, including their liquid, to the soup. Stir well to combine and let the soup simmer for another 5 minutes.

Step 7: Taste and Adjust

  • Taste the soup and adjust the seasoning with salt and pepper as needed.

Serving Suggestions:

  • Breadsticks or Crusty Bread: Serve the soup with warm breadsticks or a slice of crusty bread to soak up the delicious broth.
  • Salad or Roasted Vegetables: Pair with a light salad or roasted vegetables for a complete, well-rounded meal.

For added richness, sprinkle grated parmesan cheese on top before serving.

Pro Tip:

If you plan on having leftovers, cook the pasta separately and add it to each bowl before ladling the soup on top. This prevents the pasta from becoming mushy when stored in the fridge.

Storage Options:

Refrigerator:

  • Store any leftover soup in an airtight container in the fridge for up to 3 days. When reheating, you may need to add a little water or broth to thin it out as the pasta may absorb some of the liquid.

Freezer:

  • This soup freezes well. Transfer to a freezer-safe container, leaving space for expansion, and freeze for up to 3 months. Thaw overnight in the refrigerator before reheating.

Enjoy!

Cornmeal Pancakes Recipe

0

These cornmeal pancakes bring a delightful mix of crispiness and fluffiness, perfect for a savory snack or a sweet breakfast. Infused with the earthy taste of cornmeal and a soft bite from the buttermilk, these pancakes are a true Southern comfort food. They can be enjoyed on their own with syrup or paired with greens for a complete meal.

Why You’ll Love This Recipe:

  • Crunchy Yet Soft: The combination of cornmeal and self-rising flour creates pancakes with a crispy edge and a soft, tender inside.
  • Versatile: You can enjoy them sweet with syrup, or savory by soaking up juice from greens. Add fresh corn kernels for an even more authentic summer treat!
  • Quick and Easy: With minimal ingredients and a simple process, you’ll have a batch of hot pancakes ready in no time.
  • Customizable: These pancakes can be made into thicker cornbread-style pancakes or kept thinner for a more traditional feel.

Ingredients:

  • 1 cup self-rising flour
  • 1 cup cornmeal
  • 2 teaspoons baking powder
  • 1/2 teaspoon salt
  • 1 tablespoon sugar (optional)
  • 2 eggs
  • 3/4 cup buttermilk
  • 1/3 cup water
  • 1/4 cup cooking oil (vegetable, canola, or melted bacon fat)
  • 1 tablespoon fat (butter, oil, or a combination) for frying

Optional Additions:

  • 1 cup fresh corn kernels (when in season)

Preparation:

Step 1: Prepare the Cooking Surface

  • Set Up for Draining: Line a baking sheet with paper towels and place a rack on top. This will be used for draining the pancakes once they are cooked to keep them crisp.

Step 2: Mix the Dry Ingredients

  • Combine Dry Ingredients: In a large mixing bowl, whisk together the self-rising flour, cornmeal, baking powder, salt, and sugar (if using). This ensures the leavening agents and flavors are evenly distributed throughout the batter.

Step 3: Mix the Wet Ingredients

  • Mix Liquids: Pour the buttermilk into a measuring cup, then add the water and oil. Stir to ensure they are well blended.
  • Add Eggs: Crack the eggs into the liquid mixture, whisking until smooth and fully combined.

Step 4: Combine Wet and Dry Ingredients

  • Create the Batter: Gradually pour the wet mixture into the dry ingredients. Use a whisk to gently mix the batter until just combined. Be careful not to overmix—small lumps are okay. If you’re adding fresh corn kernels, fold them in at this point. The batter should be thick but pourable.

Step 5: Heat the Skillet

  • Heat the Pan: Heat a cast-iron skillet or griddle over medium to medium-high heat. Add the tablespoon of fat (oil or butter) and allow it to melt, swirling it around to coat the bottom of the pan evenly.

Step 6: Cook the Pancakes

  • Portion the Batter: Using a 1/8-cup measuring tool, pour small amounts of batter into the hot skillet, forming little circles.
  • Cook the Pancakes: Let the pancakes cook until golden and crispy on the bottom, about 2-3 minutes. Bubbles should start to form on the surface. Flip the pancakes and cook the other side until golden and crispy as well.
  • Drain the Pancakes: Remove the pancakes from the skillet and place them on the prepared rack to drain. This helps maintain their crispiness. Continue with the remaining batter.

Step 7: Serve

  • Serve Hot: These cornmeal pancakes are best served immediately while still warm and crispy. Enjoy them with a drizzle of syrup for a sweet breakfast or dip them in savory greens to soak up the flavorful juices.

Variations and Cornbread Pancake Option:

  • Add Fresh Corn: During corn season, you can enhance the pancakes by adding about 1 cup of fresh corn kernels removed from the cob. This adds bursts of juicy sweetness and texture to the pancakes. You’ll need one large ear of corn for this.
  • Make Cornbread Pancakes: For a thicker, heartier version, turn this recipe into a cornbread-style pancake. Reduce the water, and only add just enough buttermilk to achieve a thicker batter consistency.
  • Cooking Tip: Pour the thickened batter into a well-oiled, hot 8-inch cast-iron skillet over medium-high heat. Once the bottom is browned (about 10-15 minutes), flip the pancake carefully using a metal spatula and cook the other side until browned.
  • Baking Option: Alternatively, bake the cornbread pancake in a 425°F (220°C) preheated oven for 15-20 minutes until golden. No flipping required!

Storage Options:

Room Temperature:
Cornmeal pancakes are best enjoyed fresh, but if you have leftovers, you can keep them at room temperature for up to 2 hours before storing.

Refrigerator:
To store leftovers, place the pancakes in an airtight container or wrap them in foil, and refrigerate for up to 3 days. Reheat in a hot skillet or oven to restore their crispy edges.

Freezer:
Freeze the pancakes by placing them in a single layer on a baking sheet and freezing until solid. Then transfer them to a freezer-safe bag or container for up to 2 months. To reheat, bake them directly from frozen in a 375°F (190°C) oven for 10-15 minutes, or until heated through.

Helpful Tips:

  • Prevent Sticking: Spray your measuring cup with a little non-stick spray before portioning out the batter to ensure it slides out easily.
  • For Uniform Pancakes: If you don’t have a 1/8-cup measuring cup, you can use a ladle or eyeball it to get the right size for evenly cooked pancakes.
  • Crispier Pancakes: Using a mixture of butter and oil when frying gives the pancakes a nice golden crust without the butter burning.

Enjoy these golden cornmeal pancakes any time of the day! Whether you’re having them for breakfast with syrup or dipping them in greens, they’re bound to bring warmth and comfort to your table.

Baked Potato Chicken and Broccoli Casserole

0

Indulge in this hearty Loaded Chicken and Broccoli Stuffed Potatoes Casserole, where tender baked potatoes are filled with a savory mix of chicken, broccoli, and a creamy cheese sauce. This cozy dish is perfect for a comforting weeknight dinner or a crowd-pleasing side at family gatherings. Combining the satisfying flavors of a baked potato with cheesy goodness and nutritious ingredients, this casserole hits the mark for both flavor and comfort.

Why You’ll Love This Recipe:

  • Comforting and Satisfying: Creamy cheese, tender chicken, and hearty potatoes come together in a dish that is the ultimate comfort food.
  • Nutritious Ingredients: Broccoli adds a dose of vitamins and minerals, while the chicken provides lean protein, making this casserole both delicious and wholesome.
  • Customizable: You can easily swap out or add ingredients to suit your taste or what you have on hand, like adding bacon, different cheeses, or other vegetables.
  • Easy to Prepare: With minimal prep and simple steps, this recipe comes together effortlessly, especially if you use leftover or rotisserie chicken.

Ingredients:

  • 4 large russet potatoes, washed and scrubbed
  • 2 cups cooked chicken, diced or shredded
  • 2 cups broccoli florets, blanched
  • 1 1/2 cups shredded cheddar cheese
  • 1 cup sour cream
  • 1/2 cup milk
  • 2 tablespoons unsalted butter
  • 2 tablespoons all-purpose flour
  • 2 cloves garlic, minced
  • Salt and pepper, to taste
  • Chopped fresh chives or green onions, for garnish (optional)

Step-by-Step Instructions

Step 1: Preheat and Prepare

  • Preheat the Oven: Preheat your oven to 375°F (190°C). Ensuring the oven is ready when you begin will help everything bake evenly.
  • Grease the Baking Dish: Grease a 9×13-inch baking dish with butter or non-stick cooking spray to prevent sticking and make clean-up easier.

Step 2: Bake the Potatoes

  • Bake the Potatoes: Place the washed and scrubbed potatoes directly on the oven rack. Bake for 45-60 minutes, or until the potatoes are tender when pierced with a fork. The time may vary based on the size of the potatoes, so check them after about 45 minutes. Once they’re done, remove the potatoes from the oven and let them cool slightly before handling.

Step 3: Prepare the Cheese Sauce

  • Melt the Butter: In a medium saucepan over medium heat, melt 2 tablespoons of unsalted butter.
  • Cook the Garlic: Add the minced garlic to the melted butter and sauté for about 1 minute until it becomes fragrant. Be careful not to let the garlic brown, as it can become bitter.
  • Make the Roux: Stir in 2 tablespoons of all-purpose flour into the butter and garlic mixture. Cook for about 1 minute, stirring continuously, to form a roux that will thicken the sauce.
  • Add the Milk: Gradually whisk in 1/2 cup of milk, ensuring you stir constantly to prevent lumps from forming. Continue whisking until the mixture thickens and becomes smooth.
  • Add Cheese and Sour Cream: Once the sauce has thickened, remove the saucepan from the heat. Stir in 1 cup of shredded cheddar cheese and 1 cup of sour cream until the cheese is fully melted and the sauce is creamy. Season with salt and pepper to taste.

Step 4: Assemble the Casserole

  • Prepare the Potato Shells: Once the baked potatoes have cooled slightly, cut them in half lengthwise. Using a spoon, carefully scoop out the flesh of the potatoes, leaving a thin layer attached to the skins to maintain the shape. Set the potato shells aside in your greased baking dish.
  • Mix the Filling: Dice the scooped-out potato flesh and place it in a large mixing bowl. Add the cooked chicken, blanched broccoli florets, and the prepared cheese sauce to the bowl. Gently toss all the ingredients together until everything is well coated with the sauce.

Step 5: Fill the Potato Shells

  • Fill the Shells: Spoon the chicken, broccoli, and potato mixture back into the hollowed-out potato shells. Divide the mixture evenly between the potato halves, ensuring each shell is generously filled.
  • Top with Cheese: Sprinkle the remaining 1/2 cup of shredded cheddar cheese over the top of the filled potatoes to create a cheesy, golden crust as it bakes.

Step 6: Bake the Casserole

  • Bake: Place the baking dish in the preheated oven and bake for 20-25 minutes, or until the cheese on top is melted, bubbly, and slightly golden. The filling should be heated through, and the potatoes should be hot and ready to eat.
  • Cool and Garnish: Once baked, remove the casserole from the oven and allow it to cool for a few minutes before serving. For a finishing touch, garnish the stuffed potatoes with chopped fresh chives or green onions for a pop of color and extra flavor.

Storage Options:

Room Temperature:
You can leave the casserole at room temperature for up to 2 hours before refrigerating or freezing the leftovers.

Refrigerator:
Store any leftover stuffed potatoes in an airtight container in the refrigerator for up to 3 days. When reheating, place them in a preheated oven at 350°F (175°C) for about 10-15 minutes or until heated through, or you can microwave them in 30-second intervals until warmed.

Freezer:
To freeze the casserole, let the stuffed potatoes cool completely, then wrap each one tightly in plastic wrap and place them in a freezer-safe bag or container. They can be frozen for up to 2 months. When ready to serve, thaw the potatoes in the refrigerator overnight and reheat in the oven at 350°F (175°C) for 20-25 minutes until heated through.

Tips for Best Results:

  • Blanch the Broccoli: Blanching the broccoli florets before mixing them into the casserole helps retain their vibrant green color and crisp-tender texture.
  • Choose the Right Potatoes: Russet potatoes are ideal for this recipe because of their size and ability to hold their shape after baking.
  • Make it Ahead: You can prepare the casserole ahead of time and store it in the refrigerator for up to 1 day before baking. This makes it a great option for meal prep or entertaining.
  • Get Creative with Toppings: Add a sprinkle of bacon bits, extra cheese, or even a dollop of sour cream before serving for extra indulgence.

Enjoy this Loaded Chicken and Broccoli Stuffed Potatoes Casserole as a comforting, wholesome dish that brings together the best of baked potatoes and casserole comfort in one satisfying meal!

Grandma’s Ground Beef Casserole

0

This comforting ground beef casserole is a hearty and easy-to-make dish that combines rich beef, creamy soups, and melted cheese. It’s a perfect meal for family dinners or cozy gatherings, bringing together simple ingredients for a flavorful and filling bake. The casserole’s cheesy, potato-filled goodness will keep everyone coming back for more.

Why You’ll Love This Recipe:

  • Family Favorite: A classic casserole that’s both satisfying and easy to prepare.
  • One-Pan Wonder: Everything comes together in one dish for minimal cleanup.
  • Customizable: You can easily swap ingredients to suit your tastes or dietary needs.

Ingredients You’ll Need:

  • Ground beef: 1 to 1.5 pounds – Provides a rich, savory base for the casserole.
  • Condensed cream of mushroom soup: 1 tin (10.5 ounces) – Adds a creamy, earthy flavor.
  • Condensed cream of cheddar cheese soup: 1 tin (10.5 ounces) – Gives the dish a cheesy, tangy element that melts beautifully into the mixture.
  • Frozen potato cubes: 3 cups – Creates a hearty, filling texture.
  • Cheddar cheese, shredded: 1 cup – Adds a gooey, cheesy topping.
  • Salt and pepper: To taste – Essential for seasoning.

Ingredient Tips and Substitutions:

  • Meat Alternatives: You can substitute the ground beef with ground turkey or chicken for a lighter version. For a vegetarian option, use plant-based ground meat or crumbled tofu.
  • Cheese Substitutes: Swap cheddar cheese with Colby Jack, mozzarella, or any cheese that melts well for a different flavor.
    • Add Extra Veggies: Stir in diced bell peppers, peas, or corn to give the dish added color and nutrition.
  • Gluten-Free Version: Use gluten-free condensed soups to make this dish gluten-free.
  • Creamier Option: If you want an even creamier dish, add 1/2 cup of sour cream or Greek yogurt to the mixture.

Instructions: How to Make Grandma’s Ground Beef Casserole

Step 1: Preheat the Oven
Preheat your oven to 350°F (175°C). Grease a 9×13-inch casserole dish with cooking spray or a little oil to prevent the casserole from sticking during baking.

Step 2: Cook the Ground Beef
In a large skillet, cook 1 to 1.5 pounds of ground beef over medium heat until it’s fully browned. As the beef cooks, break it apart with a spatula to crumble it. Once browned, drain any excess fat to keep the dish from becoming too greasy. Transfer the cooked beef to a large mixing bowl.

Step 3: Mix the Ingredients
Add one 10.5-ounce tin of condensed cream of mushroom soup and one 10.5-ounce tin of condensed cream of cheddar cheese soup to the bowl with the ground beef. Stir until the soups are well combined with the beef, creating a rich and creamy mixture.

Step 4: Add the Potatoes and Cheese
To the beef and soup mixture, stir in 3 cups of frozen cubed potatoes and 1/2 cup of shredded cheddar cheese. Season with salt and pepper to taste. Mix everything together until the potatoes and cheese are evenly distributed throughout the beef mixture.

Step 5: Assemble the Casserole
Transfer the beef and potato mixture to the greased casserole dish. Spread it out evenly so that the mixture fills the entire dish. Sprinkle the remaining 1/2 cup of shredded cheddar cheese over the top, which will create a delicious cheesy crust as the casserole bakes.

Step 6: Bake the Casserole
Cover the casserole dish with aluminum foil and place it in the preheated oven. Bake for 30 minutes covered, allowing the flavors to meld and the potatoes to soften. After 30 minutes, remove the foil and continue baking for an additional 30 minutes, or until the top is golden brown and the potatoes are tender when pierced with a fork.

Step 7: Rest and Serve
Once the casserole is finished baking, remove it from the oven and let it rest for about 5 minutes. This allows the flavors to fully develop and makes it easier to serve. Slice and enjoy!

Serving Suggestions:

This hearty ground beef casserole pairs well with a variety of sides to complete your meal:

  • Crisp Green Salad: A mixed green salad with a tangy vinaigrette is the perfect contrast to the richness of the casserole.
  • Roasted or Steamed Vegetables: Roasted broccoli, steamed carrots, or sautéed green beans make for great, fresh sides.
  • Crusty Bread: Serve with warm, crusty bread to soak up any extra sauce and enhance the comfort food vibes.
  • Pickled Vegetables: Add a side of pickled beets, onions, or cucumbers for a tangy bite that cuts through the creaminess.

Storage Options:

  • Refrigeration: Store any leftovers in an airtight container in the refrigerator for up to 3 days. To reheat, simply warm individual portions in the microwave or reheat the entire dish in the oven at 350°F for about 15 minutes until heated through.
  • Freezing: If you want to make this dish ahead of time, freeze the unbaked casserole. Cover it tightly with plastic wrap and aluminum foil, and freeze for up to 3 months. To bake from frozen, simply remove the plastic wrap, cover with foil, and bake at 350°F for about 1 hour and 30 minutes. Remove the foil in the last 30 minutes of baking to allow the top to brown.

Final Thoughts:

Grandma’s Ground Beef Casserole is the perfect combination of creamy, cheesy, and hearty comfort food. Whether you make it for a family dinner, potluck, or a cozy night in, this casserole is sure to become a go-to recipe in your household. With its easy preparation and rich flavor, it’s bound to win over anyone who takes a bite!