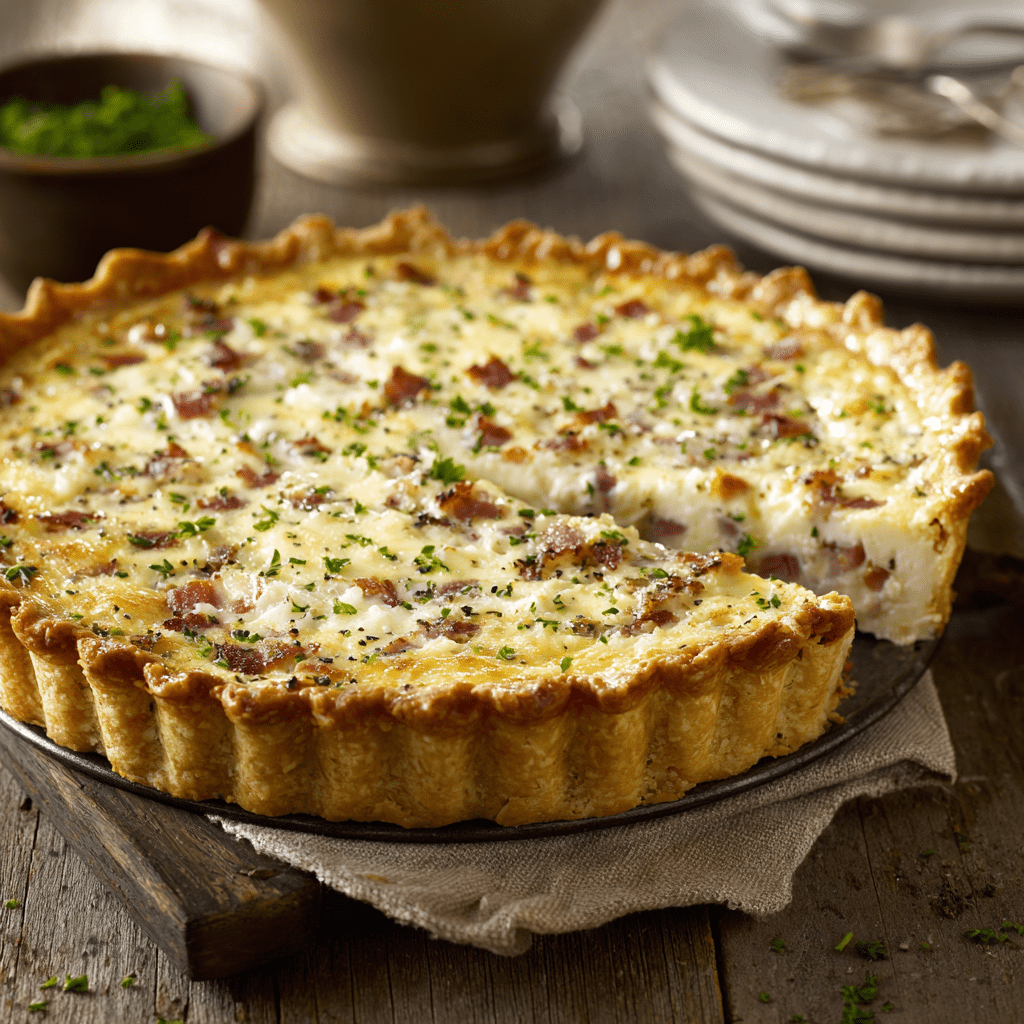
Marry Me Chicken Soup

0

Marry Me Chicken Soup transforms the iconic, proposal-worthy flavors of the famous Marry Me Chicken dish into a comforting, spoonable soup that is perfect for any occasion. This recipe takes all the essential elements—tender chicken, savory sun-dried tomatoes, garlic, and a creamy, Parmesan-infused broth—and simmers them together with pasta and fresh spinach to create a deeply satisfying and complete meal in a bowl. It’s the ultimate comfort food with a touch of elegance, offering the same irresistibly creamy and flavorful experience that made the original dish so beloved, but in a cozy, heartwarming format that is ideal for a chilly evening or when you need a culinary hug.

The genius of this soup lies in its layered building of flavors. By first browning the chicken, you create a fond—those delicious browned bits at the bottom of the pot—that forms a rich foundation for the broth. The sun-dried tomatoes and red pepper flakes provide a sweet, tangy, and subtly spicy backbone, which is then deepened by the umami of tomato paste and chicken broth. Finally, the addition of heavy cream and freshly grated Parmesan cheese at the very end creates a luxuriously smooth and velvety broth that clings to every piece of pasta and spinach leaf. It’s a robust, restaurant-quality soup that is surprisingly straightforward to make, promising to warm you from the inside out and quite possibly win over anyone’s heart.

Why You’ll Love This Recipe:

• All the Famous Flavor: Captures the legendary taste of the viral Marry Me Chicken in a comforting, easy-to-eat soup form.
• Complete Meal in One Pot: Packed with protein, carbs, and vegetables, this soup is a hearty and balanced dinner on its own.
• Creamy & Dreamy Texture: The combination of heavy cream and Parmesan creates an unbelievably rich and silky broth that is utterly addictive.
• Impressive Yet Simple: This soup looks and tastes like you spent all day in the kitchen, but it comes together in under an hour with simple steps.

Ingredients:

  • 2 tablespoons olive oil, divided
  • 1½ lbs boneless, skinless chicken breasts, cut into 1-inch bite-sized pieces
  • 1 small yellow onion, finely chopped
  • 3 cloves garlic, minced
  • ⅔ cup julienne-cut sun-dried tomatoes, drained (if oil-packed)
  • 1 teaspoon Italian seasoning
  • ¼ teaspoon red pepper flakes (adjust to taste)
  • 6 cups low-sodium chicken broth
  • 3 tablespoons tomato paste
  • 1½ cups uncooked medium shell pasta (or other small shape like orecchiette)
  • 1 cup heavy cream (or half-and-half for a slightly lighter version)
  • ⅔ cup freshly grated Parmesan cheese, plus more for garnish
  • 3-4 cups fresh baby spinach
  • salt, to taste
  • freshly ground black pepper, to taste
  • Fresh basil or parsley, for garnish (optional)

Instructions:

Step 1: Brown the Chicken
• In a large Dutch oven or heavy-bottomed pot, heat 1½ tablespoons of the olive oil over medium heat. Pat the chicken pieces dry and season generously with salt and pepper. Add the chicken to the hot pot in a single layer, working in batches if necessary to avoid steaming. Cook for 3-4 minutes per side, until golden brown and cooked through. Remove the chicken to a clean plate and set aside. Do not clean the pot.

Step 2: Sauté the Aromatics
• If the pot seems dry, add the remaining ½ tablespoon of olive oil. Add the chopped onion and cook for 4-5 minutes, stirring occasionally, until softened and translucent.

Step 3: Build the Flavor Base
• Reduce the heat to low. Add the minced garlic, sun-dried tomatoes, Italian seasoning, and red pepper flakes. Cook for 1 minute, stirring constantly, until the garlic is fragrant. This toasts the spices and releases their oils.

Step 4: Create the Broth
• Add the tomato paste and stir for 30 seconds to cook off its raw flavor. Pour in the chicken broth, using a wooden spoon to scrape up all the browned bits (the fond) from the bottom of the pot. This is crucial for flavor. Increase the heat to high and bring the broth to a boil.

Step 5: Cook the Pasta
• Once boiling, stir in the uncooked shell pasta. Reduce the heat to a gentle simmer and cook according to package directions for al dente, usually about 8-10 minutes, or until the pasta is just tender but still has a slight bite.

Step 6: Combine and Warm Through
• Once the pasta is cooked, stir the browned chicken pieces (and any accumulated juices) back into the pot. Let it warm through for 1-2 minutes.

Step 7: Finish with Cream, Cheese, and Spinach
• Crucial step: Remove the Dutch oven from the heat entirely. This prevents the dairy from curdling. Stir in the heavy cream and the grated Parmesan cheese until the cheese is fully melted and the broth is smooth and creamy. Finally, add the fresh baby spinach and stir until it has just wilted, which will take only a minute in the hot soup.

Step 8: Season and Serve
• Taste the soup and season with additional salt and freshly ground black pepper as needed. The amount of salt required will depend on the saltiness of your broth and Parmesan. Ladle into bowls and garnish with more grated Parmesan and a sprinkle of fresh basil or parsley if desired.

Tips:

• Grate Your Own Parmesan: Pre-grated Parmesan often contains anti-caking agents that can make your soup grainy instead of smooth. For the best melting and texture, grate a block of Parmesan cheese yourself.
• Don’t Skip the Fond: Those browned bits left after cooking the chicken are packed with flavor. Deglazing the pot with the broth ensures you capture every bit of it.
• Pasta Note: If you plan on having leftovers, consider cooking the pasta separately and adding it to each bowl when serving. This prevents the pasta from absorbing all the broth and becoming mushy as the soup sits.
• Cream Curdling: Taking the pot off the heat before adding the cream and cheese is the best way to ensure a silky, non-curdled soup.

Storage Options:

• Refrigerator: Store leftovers in an airtight container in the refrigerator for up to 3 days. The pasta will continue to absorb liquid, so you may need to add a splash of broth or water when reheating.
• Reheating: Gently reheat on the stovetop over low heat, stirring frequently. Do not boil, as this can cause the cream to separate.
• Freezing: This soup does not freeze well due to the dairy content. The cream and cheese are likely to separate and become grainy upon thawing.

Marry Me Chicken Soup is a soul-warming, flavor-packed masterpiece that is guaranteed to become an instant classic in your home. It’s the perfect bowl of comfort, romance, and deliciousness that lives up to its legendary name. Enjoy

Slow Cooker Apricot Dijon Spiral Ham

0

Slow Cooker Apricot Dijon Spiral Ham is the ultimate solution for a spectacular, fuss-free holiday centerpiece or a special Sunday dinner. This recipe takes the convenience of a pre-sliced spiral ham and elevates it to extraordinary heights with a sweet, tangy, and deeply flavorful glaze that slowly caramelizes as it cooks. The slow cooker is the perfect vessel for this task, gently reheating the ham without ever risking dryness, while simultaneously allowing the flavors of the glaze to penetrate every single slice. The result is an incredibly juicy, tender ham that is bursting with a complex flavor profile, making it appear as though you spent hours laboring over the oven.

The genius of this dish lies in the balance of its simple glaze. Sweet apricot preserves and brown sugar meld perfectly with the sharp, tangy punch of Dijon mustard and apple cider vinegar, creating a sauce that is neither cloyingly sweet nor overly pungent. The addition of warm ground cloves and black pepper adds a subtle, spicy depth that complements the smoky saltiness of the ham beautifully. As the ham slow cooks, this glaze reduces into a sticky, glossy coating that seals in the ham’s natural juices and forms a delectable crust on the edges of each spiral slice. This method guarantees a moist, flavorful ham with minimal effort and maximum reward, freeing up your oven for all the other essential dishes.

Why You’ll Love This Recipe:

• Effortless Elegance: Achieve a stunning, gourmet-quality ham without any of the stress or oven-space juggling typical of a big meal.
• Perfectly Moist & Tender: The slow cooker gently reheats the ham, ensuring it remains incredibly juicy and never dries out.
• Complex, Balanced Glaze: The combination of apricot, Dijon, and spice creates a sophisticated sweet-and-savory glaze that will have everyone asking for the recipe.
• Set It and Forget It: After a quick five-minute prep, the slow cooker does all the work, allowing you to focus on other things or simply relax.

Ingredients:

  • 1 spiral-cut ham (8–10 pounds)
  • 1 cup apricot preserves
  • 1/2 cup Dijon mustard
  • 1/2 cup packed brown sugar (light or dark)
  • 1/4 cup apple cider vinegar
  • 1 teaspoon ground cloves
  • 1/2 teaspoon freshly ground black pepper

Instructions:

Step 1: Position the Ham in the Slow Cooker
• Unwrap the spiral-cut ham and place it cut-side down into the bowl of a large (6-quart or larger) slow cooker. The pre-sliced spirals should be facing upwards. Ensuring the ham is flat and stable prevents it from shifting during cooking.

Step 2: Prepare the Glaze
• In a medium bowl, combine the apricot preserves, Dijon mustard, packed brown sugar, apple cider vinegar, ground cloves, and black pepper. Whisk vigorously until all the ingredients are completely smooth and well incorporated into a thick, homogenous glaze.

Step 3: Apply the Glaze
• Using a spoon or a silicone brush, pour and spread the apricot Dijon glaze evenly over the entire surface of the ham. Take care to get the glaze in between the slices where possible, as this will flavor the ham from the inside out.

Step 4: Slow Cook to Perfection
• Place the lid securely on the slow cooker. Set the appliance to the LOW heat setting. Cook for 4–5 hours. Every hour, carefully remove the lid and use a baster or a spoon to collect the juices from the bottom of the pot and redistribute them over the top of the ham. This basting process builds layers of flavor and creates a beautiful caramelized finish.

Step 5: Check for Doneness
• The ham is done when it is thoroughly heated. A meat thermometer inserted into the thickest part of the ham (without touching the bone) should read at least 140°F (60°C). The edges will be beautifully caramelized.

Step 6: Rest and Serve
• Using sturdy tongs and a large carving fork (or two large forks), carefully transfer the hot ham to a large serving platter. It will be very tender. Allow it to rest for 10-15 minutes before serving. This allows the juices to redistribute throughout the meat. Skim any excess fat from the glaze remaining in the slow cooker, then drizzle this reduced, flavorful sauce over the sliced ham when serving.

Tips:

• No Need for Liquid: Do not add any water or broth to the slow cooker. The ham will release its own juices as it cooks, which will mix with the glaze to create the basting liquid and eventual serving sauce.
• Glaze Adaptations: Feel free to experiment with the glaze. Orange marmalade can be used in place of apricot preserves for a different citrus note. A tablespoon of soy sauce can also be added for a touch of umami depth.
• Pre-Trimming: Some hams have a thick layer of external fat. If yours does, you can trim it down to about a 1/4-inch layer to allow the glaze to better penetrate the meat.
• Crisping the Top (Optional): For an extra-textural finish, place the glazed ham under a broiler for 2-3 minutes after it’s done in the slow cooker. Watch it closely to prevent burning.

Storage Options:

• Refrigerator: Store any leftover ham in an airtight container for up to 4 days. The glaze and ham should be stored together.
• Freezer: Leftover ham freezes excellently. Portion it into freezer-safe bags or containers, ensuring it’s covered with some of the glaze, and freeze for up to 2 months. Thaw in the refrigerator overnight before reheating.
• Reheating: Reheat slices in a covered skillet with a splash of water over low heat, or in the microwave covered with a damp paper towel to retain moisture.

Slow Cooker Apricot Dijon Spiral Ham is a guaranteed showstopper that simplifies your cooking process without compromising on flavor or presentation. It is the ultimate trick for a stress-free, deliciously impressive meal that celebrates the art of effortless cooking. Enjoy

Decadently Rich Fudgy Brownies

0

Decadently Rich Fudgy Brownies are the ultimate chocolate indulgence, a dessert that defines what a perfect homemade brownie should be. These brownies feature an intensely chocolatey, dense, and moist interior with a delicate, paper-thin crackly crust on top. The recipe achieves this coveted fudgy texture through a precise balance of melted butter, cocoa powder, and a higher fat-to-flour ratio, ensuring a rich, melt-in-your-mouth experience that is far superior to any boxed mix. Each bite is a deep, complex symphony of chocolate, punctuated by pockets of melted chocolate chips that provide bursts of extra flavor and texture.

This particular recipe is elevated by two secret ingredients: instant coffee and sea salt. The instant coffee doesn’t impart a coffee flavor but acts as a flavor enhancer, deepening and amplifying the richness of the chocolate without being detectable. The sea salt, both in the batter and likely sprinkled on top, cuts through the sweetness and highlights the cocoa’s natural bitterness, creating a more sophisticated and balanced dessert. Unlike cakey brownies, these are unapologetically rich and dense, designed for the true chocolate lover who believes a brownie should be an intense and satisfying experience, best enjoyed with a cold glass of milk.

Why You’ll Love This Recipe:

• Perfect Fudgy Texture: These brownies are the epitome of fudgy—dense, moist, and incredibly rich, with that signature shiny, crackly top.
• Deep Chocolate Flavor: Using both high-quality cocoa powder and semisweet chocolate chips creates a multi-layered, intense chocolate experience.
• Elevated with Secret Ingredients: A hint of instant coffee and sea salt work behind the scenes to amplify the chocolate flavor and balance the sweetness.
• Simple to Make: The recipe uses a straightforward mixing method with no need for a mixer for the dry ingredients, making it easy to whip up any time a chocolate craving strikes.

Ingredients:

  • 1 cup all-purpose flour
  • ¾ teaspoon sea salt, plus more for sprinkling
  • 2 teaspoons instant coffee or espresso powder
  • ¾ cup unsweetened baking cocoa (natural or Dutch-process)
  • 3 large eggs, at room temperature
  • 1½ cups granulated sugar
  • 2 teaspoons vanilla extract
  • 1 cup (2 sticks) unsalted butter, melted and slightly cooled
  • 1 cup semisweet chocolate chips, plus more for the top

Instructions:

Step 1: Prepare the Pan and Oven
• Preheat your oven to 350°F (175°C). Take an 8×8-inch metal baking pan and generously butter the bottom and sides. Line the pan with a strip of parchment paper, leaving an overhang on two opposite sides. This “sling” will make it incredibly easy to lift the entire batch of brownies out for clean slicing later. Butter the parchment paper as well.

Step 2: Combine the Dry Ingredients
• In a medium bowl, sift together the all-purpose flour, ¾ teaspoon sea salt, instant coffee powder, and unsweetened cocoa powder. Sifting is crucial here to eliminate any lumps in the cocoa and to ensure the ingredients are evenly distributed for a uniform texture.

Step 3: Whisk the Wet Ingredients
• In a separate large bowl, combine the eggs, granulated sugar, and vanilla extract. Using a handheld electric mixer fitted with the whisk attachment, beat on medium-low speed for exactly 1 minute. The goal is to combine them until they are pale and slightly thickened, but not to incorporate too much air. With the mixer running on low speed, slowly drizzle in the slightly cooled melted butter until the mixture is smooth and glossy.

Step 4: Combine Wet and Dry Mixtures
• Switch to a sturdy spatula or spoon. Add the sifted dry ingredients to the wet ingredients. Gently fold and stir the mixture just until the last traces of flour disappear. Do not overmix; overmixing will develop gluten in the flour and lead to cakey, tough brownies. The batter will be very thick and shiny.

Step 5: Add Chocolate Chips
• Fold in the 1 cup of semisweet chocolate chips until they are evenly distributed throughout the thick batter.

Step 6: Transfer to Pan and Bake
• Spread the thick batter into the prepared parchment-lined pan. Use an offset spatula or the back of your spoon to push the batter into an even layer, ensuring it reaches all corners. For an extra bakery-style touch, sprinkle a few additional chocolate chips and a pinch of flaky sea salt over the top.

Step 7: Bake to Fudgy Perfection
• Place the pan in the preheated oven and bake for 30-35 minutes. The brownies are done when the edges look set and have pulled away slightly from the pan, and the center appears set but still has a slight, subtle jiggle. To test, insert a toothpick into the center; it should come out with a few moist crumbs and maybe a streak of wet batter, but not clean. A clean toothpick means they are overbaked.

Step 8: Cool Completely
• This is the hardest but most important step: allow the brownies to cool completely in the pan placed on a wire rack for at least 2 hours, or preferably until room temperature. This cooling period allows them to finish setting up, ensuring their signature fudgy texture. Once cool, use the parchment paper sling to lift the entire block out onto a cutting board before slicing into squares.

Tips:

• Do Not Overbake: The key to fudgy, not cakey, brownies is slightly underbaking them. Trust the jiggle test and the moist crumbs on the toothpick.
• Quality of Cocoa: The flavor of your brownies hinges on the quality of your cocoa powder. Use a brand you love for the best results.
• Room Temperature Eggs: Using room temperature eggs allows them to emulsify better with the butter and sugar, creating a smoother, more cohesive batter.
• Metal Pan vs. Glass: A metal pan is recommended as it heats up quickly and promotes those crisp edges. If using a glass dish, you may need to add a few minutes to the baking time.

Storage Options:

• Room Temperature: Keep leftover brownies in an airtight container at room temperature for up to 4 days. They often taste even better the next day as the flavors continue to meld.
• Freezer: These brownies freeze exceptionally well. Wrap individual squares tightly in plastic wrap and place them in a freezer-safe bag or container. Freeze for up to 3 months. Thaw at room temperature for an hour or pop them in the microwave for a quick warm treat.

Decadently Rich Fudgy Brownies are the holy grail of chocolate desserts—simple in their ingredients yet profound in their impact. They promise and deliver an uncompromisingly rich, fudgy, and deeply satisfying experience that will make you never return to a boxed mix again. Enjoy!

Pizza Dip

0

If you love pizza (and who doesn’t?), then this Pizza Dip is about to become your new favorite party appetizer. It’s everything you adore about a cheesy, gooey pizza but in dip form — perfect for scooping up with breadsticks, toasted baguette slices, or even crunchy veggies. With a creamy base made from cream cheese and sour cream, a rich layer of pizza sauce, and plenty of melty mozzarella and Parmesan, this dip is basically pizza without the crust.

What makes it even better? The toppings! Pepperoni and crispy bacon give it that classic pizza flavor we all crave, while fresh herbs sprinkled on top add the perfect finishing touch. Whether you’re hosting a game day party, a family gathering, or just treating yourself on a Friday night, this dip is guaranteed to disappear fast. Serve it straight from the oven and watch as everyone dives in for seconds (and thirds).

Why You’ll Love This Recipe:

• All the flavors of pizza in a fun, shareable dip.

• Perfect for parties, game nights, or family snacking.

• Super versatile — add your favorite pizza toppings!

• Easy to make ahead and bake just before serving.

Ingredients:

  • 8 ounces cream cheese, softened
  • 2 cups mozzarella cheese, divided
  • ½ cup sour cream
  • ½ teaspoon dried basil
  • ½ teaspoon dried oregano
  • ½ teaspoon kosher salt
  • ½ teaspoon freshly ground black pepper
  • ⅛ teaspoon red pepper flakes
  • 1 cup pizza sauce or marinara sauce
  • ¼ cup grated Parmesan cheese
  • 15–20 pepperoni slices or ¼ cup mini pepperoni
  • 3 slices crispy cooked bacon, chopped

Instructions:

  1. Preheat oven to 375°F (190°C).
  2. In a mixing bowl, use an electric mixer to blend cream cheese, ¾ cup mozzarella, sour cream, basil, oregano, salt, pepper, and red pepper flakes until smooth. Spread into the bottom of a 9-inch pie dish or baking pan.
  3. Spread pizza sauce evenly over the cream cheese layer. Top with Parmesan, remaining mozzarella, pepperoni, and bacon.
  4. Bake for 20–25 minutes, until the cheese is fully melted and bubbly.
  5. Let cool for 3–5 minutes, garnish with fresh parsley or basil, and serve with toasted French bread, breadsticks, or rolls.

Tips:

  • Add your favorite toppings: mushrooms, olives, sausage, or green peppers.
  • For a lighter version, use light cream cheese and reduced-fat mozzarella.
  • Want extra gooeyness? Sprinkle an extra handful of mozzarella on top before baking.

Storage and Reheating:

  • Store leftovers in an airtight container in the fridge for up to 3 days.
  • Reheat in the oven at 350°F until warmed through or microwave in short bursts.
  • Not freezer-friendly — the cream cheese base doesn’t thaw well.

Chicken Alfredo Bake

0

There’s just something about a baked pasta dish that feels like pure comfort food — warm, cheesy, and made to share. This Chicken Alfredo Bake takes everything you love about classic fettuccine alfredo and turns it into a hearty, oven-baked casserole that’s perfect for weeknight dinners or even a cozy Sunday meal. It’s creamy, cheesy, and full of tender chicken, all wrapped up with pasta that’s cooked just right. The best part? It’s baked under a gooey layer of mozzarella and Parmesan that turns golden and bubbly in the oven.

This recipe is not only delicious but also a crowd-pleaser. It’s rich enough to feel indulgent but still simple enough to make on a busy evening. You can even make it ahead and pop it into the oven when you’re ready, which makes it perfect for entertaining or meal prepping. Pair it with a crisp green salad and garlic bread, and you’ve got yourself a meal that rivals any Italian restaurant.

Why You’ll Love This Recipe:

• Creamy, cheesy, and comforting — the ultimate pasta bake.

• Easy to make with pantry staples and leftover chicken.

• Perfect for family dinners, potlucks, or meal prep.

• Freezer-friendly and great for make-ahead meals.

Ingredients:

  • 12 ounces cavatappi or penne pasta
  • 5 tablespoons butter
  • 3 garlic cloves, minced
  • 1 teaspoon Italian seasoning
  • 2 cups heavy cream
  • ½ teaspoon salt
  • ½ teaspoon freshly ground black pepper
  • 2 cups grated Parmesan, divided
  • 4 ounces cream cheese, cut into small cubes
  • 2 ½ cups diced cooked chicken breast or thighs
  • 2 cups shredded mozzarella cheese
  • Chopped fresh parsley, for garnish

Instructions:

  1. Preheat the oven to 350°F (175°C). Grease a 9×13-inch casserole dish.
  2. In a large skillet, melt the butter over medium-low heat. Add garlic and Italian seasoning; cook for 1 minute, stirring constantly. Stir in the heavy cream and simmer gently until slightly thickened (do not boil).
  3. Meanwhile, cook the pasta in a large pot of salted boiling water until al dente. Drain well.
  4. Whisk salt and black pepper into the cream mixture. Reduce heat to low and whisk in 1 ½ cups Parmesan a little at a time until smooth. Add cream cheese and stir until melted and creamy.
  5. In the prepared baking dish, combine cooked pasta, Alfredo sauce, and chicken. Mix well, spread evenly, and top with mozzarella and remaining Parmesan.
  6. Bake uncovered for 20–25 minutes, until the cheese is melted and bubbling. Garnish with parsley before serving.

Tips:

  • Swap chicken for cooked shrimp or even rotisserie chicken for an easy shortcut.
  • Add steamed broccoli or spinach to sneak in extra veggies.
  • Use half-and-half instead of heavy cream for a lighter version.

Storage and Reheating:

  • Store leftovers in an airtight container in the refrigerator for up to 4 days.
  • Reheat in the oven at 325°F, covered with foil, until warmed through, or microwave in 30-second bursts.
  • Freeze unbaked casserole (tightly wrapped) for up to 2 months. Thaw overnight in the fridge and bake as directed.

Pumpkin Cream Cheese Swirl Muffins

0

These pumpkin cream cheese swirl muffins are the perfect cozy treat to welcome in fall (or to make any time you’re craving those warm, spiced flavors). They’re moist, fluffy, and full of rich pumpkin spice, with a sweet, creamy swirl of cheesecake-like filling that makes each bite extra special. The combination of tender pumpkin muffin and tangy cream cheese topping feels indulgent, yet they’re surprisingly easy to make — no mixer required for the muffin batter!

Whether you serve them warm from the oven with a cup of coffee or pack them up for a fall picnic, these muffins are guaranteed to disappear fast. They also make a great addition to a holiday breakfast spread or bake sale lineup, thanks to their beautiful swirled tops that look as good as they taste. And here’s the best part: they freeze well, so you can always have a stash on hand for those pumpkin cravings that pop up year-round.

Why You’ll Love This Recipe:

• Moist, tender pumpkin muffins with warm spices.

• Rich, tangy cream cheese swirl that tastes like cheesecake.

• Easy to make with simple pantry ingredients.

• Freezer-friendly for make-ahead treats.

Ingredients:

Muffin:

  • 1 ¾ cups all-purpose flour
  • 1 tablespoon pumpkin spice
  • 1 teaspoon baking soda
  • ½ teaspoon salt
  • 1 (15 oz) can pumpkin puree
  • 1 cup granulated sugar
  • ½ cup packed brown sugar
  • 2 large eggs
  • ½ cup vegetable oil (or melted, cooled butter)
  • 1 tablespoon vanilla extract

Cream Cheese Swirl:

  • 8 oz cream cheese, room temperature
  • ¼ cup granulated sugar
  • 1 large egg yolk, room temperature
  • 2 teaspoons vanilla extract

Instructions:

  1. Preheat oven to 375°F (190°C). Line a muffin pan with paper baking cups and set aside.
  2. In a medium bowl, whisk together flour, pumpkin spice, baking soda, and salt. Set aside.
  3. In a large bowl, whisk pumpkin puree, granulated sugar, and brown sugar. Beat in eggs, vegetable oil, and vanilla until smooth.
  4. Slowly whisk the dry ingredients into the wet mixture just until no lumps remain. Fill muffin cups about ¾ full.
  5. In another medium bowl, beat cream cheese until smooth. Add sugar, egg yolk, and vanilla, and beat until fully combined.
  6. Spoon about 1 tablespoon of cream cheese mixture on top of each muffin. Use a toothpick to gently swirl it into the batter (or leave as a dollop if you prefer).
  7. Bake for 18–20 minutes, or until a toothpick inserted in the pumpkin portion comes out with just a few moist crumbs.
  8. Cool for 10 minutes in the pan before serving, or let cool completely before storing.

Tips:

  • For extra flavor, sprinkle a little cinnamon sugar on top before baking.
  • Be careful not to over-swirl the cream cheese; a few swirls create the prettiest marbled effect.
  • You can substitute homemade pumpkin puree — just make sure it’s thick and not watery.

Storage and Reheating:

  • Store muffins in an airtight container in the refrigerator for up to 5 days.
  • Freeze cooled muffins for up to 2 months; thaw overnight in the fridge.
  • To reheat, warm in the microwave for 10–15 seconds to bring back that fresh-from-the-oven texture.

Cinnamon Donut Bread

0

If you’ve ever wished you could have the cozy warmth of a cinnamon sugar donut in sliceable form, this cinnamon donut bread is here to make your dreams come true. Soft, tender, and filled with that nostalgic bakery aroma, this bread is perfect for breakfast, dessert, or as an anytime treat with your favorite cup of coffee or tea. The buttery crumb melts in your mouth, while the cinnamon-sugar topping creates a sweet, slightly crunchy crust that makes every bite irresistible.

This recipe is also wonderfully easy — no yeast, no fancy techniques, just a simple batter that bakes up into a loaf of pure comfort. It’s a great make-ahead option, and the flavors get even better the next day as the cinnamon works its magic. Whether you’re baking for a lazy weekend morning, a brunch gathering, or just to treat yourself, this bread is sure to disappear fast.

Why You’ll Love This Recipe:

• Brings all the flavors of a cinnamon sugar donut into an easy loaf.

• Perfectly tender crumb with a sweet, crunchy topping.

• No yeast or rising time required — quick to prepare.

• Stays moist and delicious for days.

Ingredients:

  • ½ cup unsalted butter, softened
  • 1 cup granulated sugar
  • 2 large eggs
  • 1 tsp vanilla extract
  • 1 cup whole milk
  • 2 cups all-purpose flour
  • 1 tbsp baking powder
  • ½ tsp salt
  • 1 tbsp ground cinnamon

Topping

  • ¼ cup granulated sugar
  • 1 tsp ground cinnamon

Instructions:

  1. Preheat oven to 350°F (175°C) and grease a standard loaf pan.
  2. In a large mixing bowl, cream together butter and 1 cup sugar until light and fluffy.
  3. Add eggs one at a time, beating well after each. Stir in vanilla extract.
  4. Gradually mix in milk until well combined.
  5. In a separate bowl, whisk together flour, baking powder, salt, and 1 tbsp cinnamon.
  6. Add dry ingredients to the wet mixture, stirring just until combined — do not overmix.
  7. Pour batter into prepared loaf pan and smooth the top.
  8. Mix ¼ cup sugar and 1 tsp cinnamon in a small bowl, then sprinkle evenly over the batter.
  9. Bake for 50–60 minutes, or until a toothpick inserted in the center comes out clean.
  10. Cool in the pan for 10 minutes, then transfer to a wire rack to cool completely.

Tips:

  • For an extra indulgent touch, brush the loaf with melted butter before adding the cinnamon sugar topping.
  • Try adding a handful of chopped nuts or a swirl of cinnamon sugar inside the batter for variety.
  • This recipe also works great as muffins — adjust baking time to 18–22 minutes.

Storage and Reheating:

  • Store in an airtight container at room temperature for up to 3 days or in the refrigerator for up to 5 days.
  • Warm slices in the microwave for 10–15 seconds to bring back that fresh-from-the-oven softness.

Sweet and Sour Chicken

0

Sweet and sour chicken is one of those timeless takeout classics that you can now easily recreate in your own kitchen — and dare I say, even better than the restaurant version. The chicken is tender, coated in a light crispy layer, and tossed with a glossy sauce that’s the perfect balance of tangy, savory, and sweet. Each bite delivers a mix of flavors from juicy pineapple, crunchy bell peppers, and just the right amount of garlic kick. It’s colorful, vibrant, and guaranteed to brighten up your dinner table.

This homemade version keeps things fresh and flavorful by using real pineapple juice and crisp vegetables. No mystery ingredients, just good, wholesome flavors that come together in less than 30 minutes. You can serve it over fluffy white rice or toss it with noodles for an extra comforting meal. It’s also easy to adjust the spice level by adding more or less red pepper flakes, making it family-friendly and customizable to your taste.

Why You’ll Love This Recipe:

• Fresh and vibrant with a perfect sweet-tangy balance.

• Quicker and healthier than takeout.

• Full of tender chicken, juicy pineapple, and crisp veggies.

• Works great over rice or noodles.

Ingredients:

Sauce Ingredients

  • ¼ cup fresh pineapple juice
  • 2 cloves garlic, minced
  • 2 tablespoons water
  • 2 tablespoons apple cider vinegar
  • 1 tablespoon low sodium soy sauce
  • 2 tablespoons brown sugar
  • 2 tablespoons ketchup
  • 1 tablespoon cornstarch

Sweet and Sour Chicken

  • 1¼ lbs. boneless skinless chicken breasts or boneless skinless chicken thighs, cut into bite-size pieces
  • ⅓ cup cornstarch
  • 2–3 tablespoons vegetable or canola oil
  • 1 medium onion, large dice
  • 1 green bell pepper, seeded and large diced
  • 1 red bell pepper, seeded and large diced
  • 1½ cups fresh pineapple chunks
  • 2 pinches red pepper flakes
  • Salt and pepper to taste
  • Optional: cooked rice or Chinese noodles

Instructions:

  1. In a small saucepan, combine pineapple juice, garlic, water, vinegar, soy sauce, brown sugar, ketchup, and 1 tablespoon cornstarch. Simmer on low heat until thickened, whisking frequently. Cover and remove from heat.
  2. Place chicken and ⅓ cup cornstarch in a large Ziploc bag. Shake until coated.
  3. Heat vegetable oil in a large skillet over medium-high heat. Add chicken, shaking off excess cornstarch. Cook until browned on all sides and cooked through, about 4–5 minutes. Remove chicken to a plate.
  4. Add 1 tablespoon oil to the skillet over medium-high heat. Add onion and cook for 1–2 minutes. Stir in bell peppers and cook for another 2–3 minutes.
  5. Reduce heat to low. Add chicken back to the skillet with peppers and onions. Pour in the sauce, then add pineapple, red pepper flakes, and salt to taste. Stir to combine and heat through.
  6. Serve over rice or noodles.

Tips:

  • Use fresh pineapple juice for the best flavor, but canned works in a pinch.
  • For extra crisp chicken, fry in batches to avoid overcrowding.
  • Add a touch more brown sugar if you prefer a sweeter sauce.

Storage and Reheating:

  • Store leftovers in an airtight container in the refrigerator for up to 3 days.
  • Reheat gently in a skillet over low heat, adding a splash of water to loosen the sauce. Avoid microwaving too long to prevent the chicken from drying out.

Air Fryer Zucchini with Parmesan

0

There’s something magical about zucchini when you give it the perfect treatment — lightly seasoned, kissed with olive oil, sprinkled generously with Parmesan, and cooked just right in the air fryer. It transforms from a simple vegetable into a snack-worthy, golden, cheesy bite that you’ll find yourself popping like popcorn. Whether you’re serving it as a side for dinner or just need a quick and healthy munch, this recipe is a winner. Plus, it’s one of those dishes that look like you fussed over them when in reality, the air fryer did most of the work.

What I love most is how the Parmesan crisps up while the zucchini stays tender inside. The Italian seasoning brings a subtle herbiness, while the salt and pepper keep things balanced. It’s the kind of easy, no-fuss recipe you can throw together in minutes, making it a perfect weeknight hero or an appetizer for last-minute guests. You don’t even need breading — just fresh zucchini, good cheese, and a little seasoning magic.

Why You’ll Love This Recipe:

• Crispy Parmesan coating without deep frying.

• Ready in under 15 minutes from start to finish.

• Perfect for snacks, sides, or party platters.

• Uses minimal oil for a healthier bite.

Ingredients:

  • 3 medium zucchini, about 4 cups, cubed
  • Spray olive oil
  • 1 teaspoon Italian seasoning
  • Salt and pepper to taste
  • 3 heaping tablespoons grated Parmesan

Instructions:

  1. Quarter the zucchini into small cubes. Spray with olive oil and season with Italian seasoning, salt, and pepper to taste.
  2. Toss gently until the zucchini is evenly coated with oil. Add Parmesan and toss again, stopping once evenly distributed.
  3. Preheat the air fryer to 390°F (200°C) for 3 minutes.
  4. Carefully place a liner in the basket, then spread zucchini in an even layer.
  5. Cook for 4 minutes, toss, then cook for another 4–5 minutes until Parmesan begins to brown and zucchini is tender.

Tips:

  • For extra flavor, add a pinch of garlic powder before air frying.
  • Use freshly grated Parmesan for the best melt and crisp.
  • Don’t overcrowd the basket — cook in batches for maximum crispiness.

Storage and Reheating:

  • Store leftovers in an airtight container in the refrigerator for up to 2 days.
  • Reheat in the air fryer at 350°F (175°C) for 3–4 minutes to restore crispiness. Avoid microwaving to prevent sogginess.

Creamy Shrimp and Zucchini Skillet

0

Sometimes dinner needs to feel a little special without actually being a big production. That’s exactly where this Creamy Shrimp and Zucchini Skillet comes in. It’s one of those dishes that looks like you fussed — juicy shrimp, tender zucchini, rich cream sauce — but the truth is, you’ll have it on the table in under 30 minutes. The Cajun seasoning adds just the right amount of kick, the roasted peppers bring a smoky-sweet pop, and the Parmesan ties it all together into something luxurious.

This is the kind of recipe that works just as well for a Tuesday night as it does for date night at home. Serve it with crusty bread to mop up the sauce, or toss it with pasta for a heartier plate. You’ll love how simple it is, how few dishes it uses, and how everyone at the table will swear you’ve been cooking for hours. Spoiler alert — you haven’t.

Why You’ll Love This Recipe

  • Creamy, savory sauce with a hint of spice from Cajun seasoning.
  • Ready in about 25 minutes — perfect for busy weeknights.
  • Uses simple, fresh ingredients with big flavor pay-off.
  • Flexible: serve over pasta, rice, or with crusty bread.
  • Minimal cleanup thanks to the one-skillet method.

Ingredients

  • 1½ lbs. small peeled and deveined shrimp
  • 1 tbsp. olive oil
  • 2 tbsp. butter, divided
  • 1 tsp. Cajun seasoning
  • 1½ lbs. zucchini, cubed
  • ½ cup white wine (for deglazing)
  • 8 oz. roasted bell peppers, chopped
  • 3 garlic cloves, minced
  • ½ cup heavy cream (or half & half)
  • ½ cup grated Parmesan
  • 2 tbsp. chopped parsley
  • Salt and pepper, to taste

Step-by-Step Instructions

Cook the shrimp

Heat a large skillet over medium-high heat. Add olive oil, 1 tablespoon butter, shrimp, and Cajun seasoning. Cook for 4–5 minutes, stirring occasionally, until shrimp are pink and cooked through. Transfer shrimp to a plate and set aside.

Cook zucchini & deglaze

In the same skillet, add remaining butter, zucchini, and white wine. Stir and cook for 5–6 minutes, until wine evaporates and zucchini softens slightly.

Add flavor

Stir in roasted bell peppers and garlic. Cook for 3–4 minutes, seasoning with salt and pepper as needed.

Finish the sauce

Return shrimp to the skillet. Add cream, Parmesan, and parsley. Stir gently and cook for 3–4 minutes until sauce thickens slightly and everything is heated through.


Tips & Substitutions

  • Swap zucchini for yellow squash or a mix for more color.
  • Use chicken broth instead of wine for a non-alcoholic version.
  • Add red pepper flakes for extra heat.
  • For a lower-carb version, skip pasta and serve over cauliflower rice.

Storage & Reheating

  • Store leftovers in an airtight container in the fridge for up to 2 days.
  • Reheat gently on the stovetop over low heat, adding a splash of cream or broth to loosen the sauce.
  • Not freezer-friendly — the cream sauce may separate after thawing.