Southern Roasted Cabbage Steaks with Garlic Bacon Butter

0

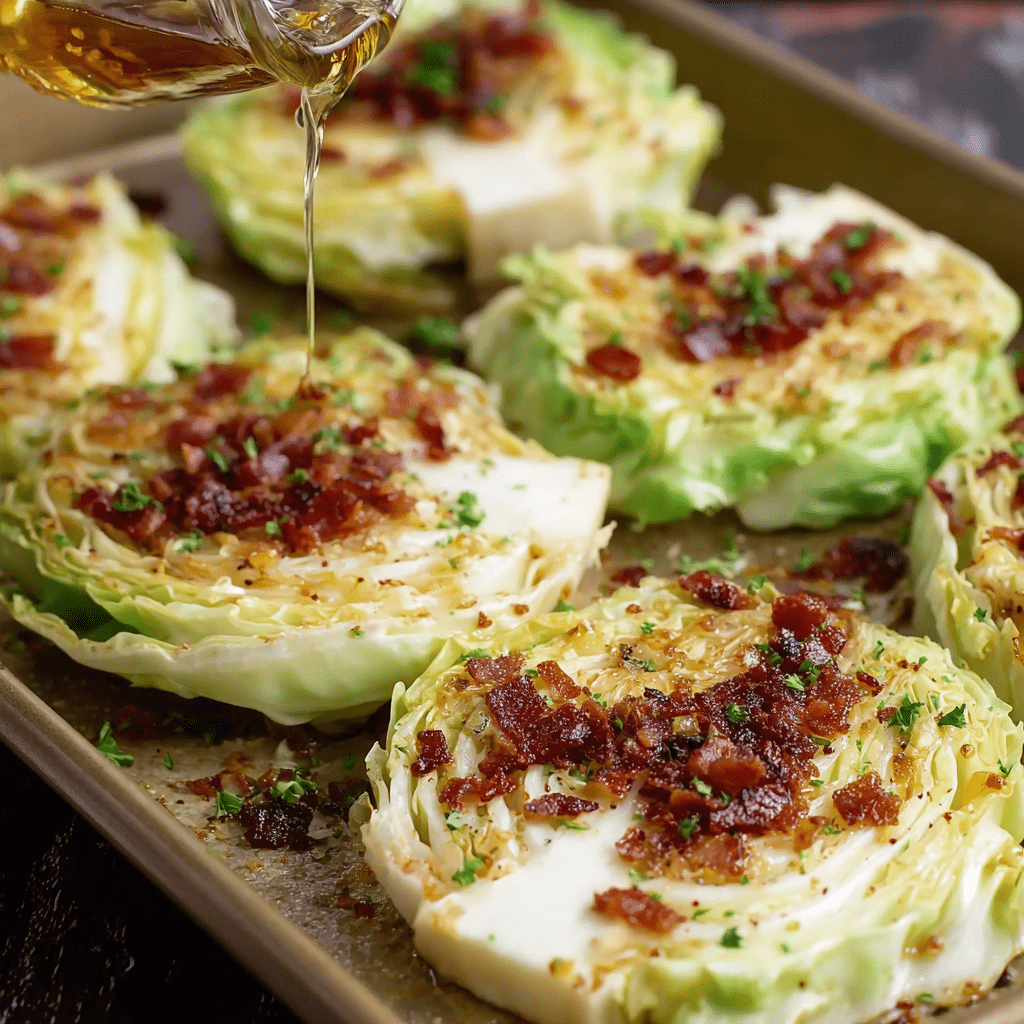
Southern Roasted Cabbage Steaks with Garlic Bacon Butter are a revelation—a stunning, deeply flavorful dish that transforms humble cabbage into a caramelized, savory, utterly irresistible centerpiece. This recipe is a celebration of Southern ingenuity, where thick slices of cabbage are roasted until the edges are beautifully charred and crispy while the interiors become tender and sweet, then lavished with a rich, smoky garlic bacon butter that seeps into every layer. The magic begins with slicing the cabbage into generous “steaks,” creating flat, sturdy rounds that hold their shape beautifully during roasting. A compound butter of melted butter, minced garlic, onion powder, smoked paprika, and crispy bacon bits is then spooned over each steak, working its way into the natural crevices of the cabbage. As it roasts at high heat, the butter melts and caramelizes, the bacon adds a salty, smoky crunch, and the cabbage transforms, developing a deep, nutty sweetness that is simply addictive.

The brilliance of this recipe lies in its simplicity and the spectacular results it delivers with minimal effort. Roasting at a high temperature is the secret to achieving those coveted crispy edges and tender centers without any fuss. The combination of smoky paprika, rich butter, and salty bacon elevates the cabbage from a humble side to a dish worthy of a special occasion. Served as a vegetarian main or alongside roasted meats, these cabbage steaks are guaranteed to convert even the most skeptical cabbage critics. They’re proof that sometimes the most extraordinary dishes come from the most ordinary ingredients, treated with a little creativity and a lot of love.

Why You’ll Love This Recipe:

  • Caramelized, Crispy, and Tender: High-heat roasting creates perfectly charred edges and sweet, tender centers.
  • Rich, Smoky, Garlicky Flavor: The butter mixture, infused with garlic, smoked paprika, and bacon, is absolutely irresistible.
  • Surprisingly Simple: Just slice, season, and roast—no complicated techniques required.
  • Visually Stunning: Cabbage steaks make a beautiful, impressive presentation on any plate.
  • Versatile Side or Main: Serve as a hearty vegetarian main or alongside roasted meats.

Ingredients:

For the Cabbage Steaks:*
1 green cabbage (about 2 to 2½ lbs)
Olive oil for greasing pan (if not using parchment)

For the Garlic Bacon Butter:*
6 tablespoons unsalted butter, melted
3 cloves garlic, minced
1 teaspoon onion powder
1 teaspoon smoked paprika
½ teaspoon kosher salt, plus more to taste
¼ teaspoon freshly ground black pepper
½ cup crispy cooked bacon bits (about 6 slices)

For Garnish:*
2 tablespoons fresh parsley, chopped (optional)

Instructions:

Step 1: Preheat Oven and Prepare Pan
Preheat your oven to 425°F (220°C). Line a large, rimmed baking sheet with parchment paper or lightly grease it with olive oil.

Step 2: Prepare the Cabbage
Remove any damaged or wilted outer leaves from the cabbage. Trim the base so the cabbage sits flat on the cutting board. Using a sharp knife, carefully slice the cabbage into ¾ to 1-inch thick rounds, cutting from the top down through the stem. You should get 4 to 6 steaks, depending on the size of the cabbage. Arrange them on the prepared baking sheet with a little space between each.

Step 3: Make the Garlic Bacon Butter
In a small bowl, combine the melted butter, minced garlic, onion powder, smoked paprika, salt, pepper, and bacon bits. Stir until well mixed.

Step 4: Coat the Cabbage Steaks
Spoon the butter mixture evenly over each cabbage steak, using the back of the spoon to spread it and gently work it into the layers where possible.

Step 5: Roast
Roast for 20 to 25 minutes, rotating the pan halfway through if needed for even browning. The cabbage steaks are done when the edges are deeply browned and crisp, and the centers are tender when pierced with a fork.

Step 6: Serve
Remove from the oven and taste; add a pinch more salt if desired. Spoon any pan juices back over the cabbage steaks. Garnish with fresh parsley if using. Serve warm.

Tips:

  • Slice Evenly: Aim for uniform thickness to ensure even cooking.
  • Don’t Skimp on the Butter: The butter mixture is key to flavor and caramelization. Make sure each steak gets a generous coating.
  • Use a Sharp Knife: Cabbage can be tough; a sharp, sturdy knife makes slicing easier and safer.
  • Watch the Browning: Ovens vary. Keep an eye on the edges to prevent burning; tent with foil if browning too quickly.
  • Add Parmesan: For an extra layer of flavor, sprinkle freshly grated Parmesan over the steaks during the last 5 minutes of roasting.

Storage Options:

  • Refrigerator: Store leftovers in an airtight container in the refrigerator for up to 4 days.
  • Reheating: Reheat in a 375°F (190°C) oven or air fryer for 5-7 minutes to restore crispness. The microwave will make them soft.
  • Not for Freezing: The texture of roasted cabbage becomes watery upon thawing.
  • Make-Ahead: The cabbage steaks are best enjoyed fresh from the oven, but you can prep the butter mixture a day in advance.

Southern Roasted Cabbage Steaks with Garlic Bacon Butter are a testament to the magic of simple ingredients and smart cooking. With their caramelized edges, tender centers, and irresistible smoky, garlicky flavor, they’re a dish that will have everyone asking for the recipe.

Brown Sugar Kielbasa Bites

0

Brown Sugar Kielbasa Bites are the ultimate party appetizer—a sweet, savory, and gloriously sticky bite-sized treat that combines smoky, hearty kielbasa sausage with a caramelized, tangy-sweet glaze that is absolutely irresistible. This recipe is a celebration of bold, crowd-pleasing flavors, transforming simple sliced sausage into a glistening, caramel-coated masterpiece with minimal effort. The magic begins with a simple yet brilliant glaze: brown sugar provides deep, molasses-like sweetness, while ketchup adds tangy tomato richness, Dijon mustard contributes a subtle sharpness, and soy sauce brings an umami depth that balances the sweetness perfectly. A touch of apple cider vinegar brightens the mixture, and garlic powder and black pepper round out the savory notes. As the kielbasa bakes, this glaze transforms, thickening and caramelizing into a sticky, glossy coating that clings to every piece of sausage, creating a perfect balance of textures and flavors.

The brilliance of this recipe lies in its incredible ease and the guaranteed wow factor it delivers. With just a handful of pantry ingredients and a short bake time, you can create an appetizer that looks and tastes like it came from a gourmet caterer. The kielbasa emerges from the oven tender and juicy, each piece coated in a beautiful, lacquered glaze that is both sweet and savory. Served warm with toothpicks for easy grabbing and a sprinkle of fresh parsley for color, these bites are guaranteed to be the first thing to disappear from any party platter. They’re the perfect addition to game-day spreads, holiday gatherings, or any occasion that calls for delicious, finger-friendly food.

Why You’ll Love This Recipe:

  • Perfect Sweet and Savory Balance: The caramelized brown sugar glaze is perfectly complemented by tangy ketchup, savory soy sauce, and spicy Dijon.
  • Incredibly Easy to Make: Just whisk, toss, and bake—minimal effort for maximum flavor.
  • Crowd-Pleasing Party Favorite: A guaranteed hit at any gathering, from game day to holiday parties.
  • Versatile and Adaptable: Easily double the recipe for a crowd, or use different sausages like smoked sausage or chorizo.
  • Sticky, Glazed, and Irresistible: The caramelized coating is absolutely addictive.

Ingredients:

For the Kielbasa and Glaze:*
14 oz (400g) kielbasa sausage, sliced into ½-inch rounds
½ cup packed light brown sugar
¼ cup ketchup
1 tablespoon Dijon mustard
1 tablespoon soy sauce (low-sodium recommended)
1 tablespoon apple cider vinegar
½ teaspoon garlic powder
¼ teaspoon freshly ground black pepper

For Garnish and Serving:*
Chopped fresh parsley (optional)
Toothpicks, for serving

Instructions:

Step 1: Preheat Oven and Prepare Dish*
Preheat your oven to 375°F (190°C). Lightly grease a small baking dish (about 8×8 inches or similar) or line it with parchment paper for easy cleanup.

Step 2: Make the Glaze*
In a medium bowl, whisk together the brown sugar, ketchup, Dijon mustard, soy sauce, apple cider vinegar, garlic powder, and black pepper until the sugar is mostly dissolved and the mixture is smooth.

Step 3: Coat the Kielbasa*
Add the sliced kielbasa to the bowl with the glaze. Toss well until every piece is evenly coated.

Step 4: Arrange in Baking Dish*
Spread the coated kielbasa pieces in a single layer in the prepared baking dish. Pour any remaining glaze from the bowl over the top.

Step 5: Bake*
Bake for 20-25 minutes, stirring once halfway through. The bites are done when the sausage is heated through and the glaze is thick, sticky, and caramelized around the edges.

Step 6: Serve*
Let the bites cool in the dish for 5 minutes. Transfer to a serving plate, insert toothpicks for easy grabbing, and sprinkle with chopped parsley if desired. Serve warm.

Tips:

  • Don’t Overcrowd: Use a dish that allows the bites to sit in a single layer for even caramelization.
  • Stir Halfway: Stirring ensures all sides get coated in the thickening glaze.
  • Make it Spicy: Add a pinch of cayenne pepper or red pepper flakes to the glaze for a kick of heat.
  • Use Quality Sausage: Good-quality kielbasa or smoked sausage makes a difference. Look for one with a nice smoky flavor.
  • Double the Recipe: These disappear fast! Double the ingredients and use a 9×13-inch baking dish for a crowd.

Storage Options:

  • Refrigerator: Store leftovers in an airtight container in the refrigerator for up to 4 days.
  • Reheating: Reheat gently in a 350°F (175°C) oven or air fryer for 5-7 minutes until warmed through. The microwave works but may soften the glaze.
  • Freezing: These bites freeze well. Cool completely, transfer to a freezer-safe container, and freeze for up to 2 months. Thaw in the refrigerator and reheat in the oven.
  • Make-Ahead: You can prepare the glaze and slice the kielbasa a day in advance. Store separately in the refrigerator, then combine and bake just before serving.

Brown Sugar Kielbasa Bites are the ultimate proof that the best appetizers are often the simplest. With their sticky, sweet, and savory glaze and hearty, smoky sausage, they’re an irresistible bite that will have everyone coming back for more.

11 Things We’re Washing Way Too Often (and It’s Not Helping Anyone)

0

I’ll be the first to admit — I love the smell of fresh laundry. There’s just something about pulling a warm towel out of the dryer that makes me feel like I’ve got my life together. But somewhere along the way, many of us (myself included) decided clean meant wash it constantly.

Here’s the problem: over-washing is like inviting trouble in for tea. It wears out your stuff faster, wastes water and energy, and sometimes even makes things less healthy — dry skin, dull hair, you name it. And honestly? It’s just more work for us.

So let’s put the laundry basket down for a minute, take a deep breath, and talk about the things we’re all guilty of washing way more than we need to — and how often they actually need it.

1. Bath Towels — 3 or 4 Showers, Not 1

Unless you’re tossing your towel in a damp heap on the floor (which, I get it, sometimes happens), you don’t need to wash it every single time you use it. Hang it up so it can dry properly, and it’ll stay fresh for three or four showers. Over-washing just beats up the fabric and makes it less absorbent. Bonus: fewer loads of laundry for you.

2. Jeans — 6 to 10 Wears (Seriously)

This one makes my mom clutch her pearls, but jeans are tougher than they look. Wash them too often and you’ll end up with faded, shapeless denim. Spot clean when needed, air them out, and aim for every 6–10 wears. When you do wash them, flip them inside out, use cold water, and skip the dryer if you can. Your jeans will thank you by lasting years longer.

3. Bras — Every 2 or 3 Wears

If you’re tossing your bra in the hamper after a single wear, you’re just wearing out the elastic for no reason. Let them rest between uses — they’ll bounce back (literally) better. Hand wash if you can, or use a lingerie bag on gentle. Always air dry. The dryer is basically a bra assassin.

4. Bedsheets — Weekly Is Fine

Fresh sheets feel amazing, I know. But unless you’re dealing with allergies or you’ve been sweating like crazy, once a week is perfect. More than that is just punishing yourself with laundry. If you want to keep them fresher longer, use a mattress protector and pillow covers.

5. Hair — You Probably Don’t Need to Wash Every Day

Daily shampooing can strip away all those natural oils your hair wants to keep. Most of us do fine washing every two or three days. If your roots get oily in between, try a little dry shampoo or even just rinse with water. Your hair will actually be healthier and shinier.

6. Hands — Clean, But Not Cracked

Of course you should wash after the bathroom, before eating, and when they’re dirty. But scrubbing every half hour “just in case” will leave your skin raw and dry. In between proper washes, hand sanitizer is fine. And don’t forget lotion — happy skin is healthy skin.

7. Face — Twice a Day Is Plenty

Morning and night. That’s all most skin types need. Over-washing strips away natural oils and can make your skin cranky. Use a gentle cleanser, follow up with moisturizer, and only add a third wash if you’ve been sweating or wearing heavy makeup.

8. Dishes — Quit Pre-Rinsing Everything

Your dishwasher is smarter than you think. Just scrape off the big food chunks and let it do its job. Pre-rinsing wastes water and can even make the machine less effective. Think of it like this: you’re paying for it — let it work.

9. Fruits & Veggies — Rinse, Don’t Overdo It

Definitely wash produce before eating, but skip the soap and the scrubbing frenzy. Just a rinse under running water (or a soft brush for firmer stuff) does the trick. And don’t wash them until you’re ready to eat — otherwise they can spoil faster.

10. Cars — Every Two Weeks (Unless Nature Attacks)

Washing too often can actually scratch your paint. Every couple of weeks is fine — more if it’s covered in salt, bird droppings, or tree sap. Use gentle soap and a soft cloth, and consider waxing every now and then to keep it shiny.

11. Pets — Every Few Months, Not Weekly

Unless your pup has rolled in something questionable, most pets only need a bath every couple of months. Too much washing dries out their skin and coat. Regular brushing keeps them clean in between, and when it is bath time, use pet shampoo and rinse thoroughly.

Bottom Line: Clean Enough Is Perfect Enough

This isn’t about lowering standards — it’s about saving your stuff, your skin, and your sanity. Washing less means less laundry, fewer ruined clothes, and more time for the things you actually enjoy.

Life’s too short to spend it all in the laundry room.

Don’t Toss Those Eggshells Just Yet—Your Garden Might Be Begging for Them

0

You ever crack a few eggs in the morning, toss the shells in the trash, and not think twice about it? Yeah, same. It’s one of those automatic kitchen habits—crack, cook, toss, move on.

But here’s the thing… those fragile little shells? They’re doing way more than just holding your breakfast together.

Lately, more home gardeners—especially the ones who swear by simple, no-fuss methods—have been quietly bringing eggshells back into the spotlight. Not in a complicated way. Not in a “turn your backyard into a science lab” kind of way.

Just… a mesh bag. Hanging in the garden.

Sounds almost too simple, right? That’s kind of the charm.

Wait—Why a Mesh Bag Though?

You might be wondering, why not just toss the shells directly into the soil?

You can. Plenty of people do. But hanging them in a mesh bag adds a layer of practicality that’s easy to overlook.

For one, it keeps things contained. No shells scattered everywhere, no guessing where you last sprinkled them. It’s tidy. Controlled. Low effort.

And honestly? It becomes a little visual cue. You walk by, see the bag, and it nudges you—hey, maybe check the plants, water a bit, pull a weed or two. Funny how small things can build better habits.

The Real Reason Gardeners Keep Doing This

Let’s talk about what actually happens when you reuse eggshells this way. Because it’s not just a cute eco trick—it does pull its weight.

1. A Slow, Steady Calcium Boost

Eggshells are mostly calcium carbonate. As they break down (slowly, not overnight), they feed the soil in a quiet, steady way.

That calcium helps strengthen plant cell walls—basically giving your plants a bit more backbone. You might notice sturdier stems, healthier growth, and fewer issues like blossom end rot on tomatoes.

Not dramatic. But noticeable over time.

2. A Surprisingly Effective Pest Barrier

This one gets talked about a lot—and for good reason.

When shells are crushed, their edges stay slightly sharp. Not enough to hurt you, but enough to make soft-bodied pests like slugs and snails think twice.

It’s not a perfect shield. Let’s be real—nature always finds a way. But it does reduce damage, especially when combined with other simple garden habits.

And no chemicals. That’s always a win.

3. Your Compost Will Thank You

If you compost (or even if you’re thinking about starting), eggshells are like that quiet helper in the background.

They add minerals—especially calcium—that support microbial activity. And those microbes? They’re the real workers breaking everything down.

More active compost means richer, better soil down the line. It’s a slow payoff, but a solid one.

4. Helping Balance the Soil (Gently)

Here’s where things get interesting.

Eggshells can help nudge acidic soil toward a more balanced pH. Not dramatically, not instantly—but gradually.

If your soil leans acidic, this can make it more comfortable for a wider range of plants. Think of it like adjusting seasoning—not dumping salt, just a light sprinkle over time.

5. Less Waste, Less Guilt

Let’s be honest—this might be the easiest benefit to appreciate.

Instead of tossing shells into the trash, you’re giving them a second life. It’s small. It won’t change the planet overnight.

But those small habits? They add up. And they feel good, too.

6. Birds Might Drop By (And Stay a While)

This one’s kind of underrated.

Birds are drawn to calcium, especially during nesting season. Eggshells can attract them—and if they stick around, they’ll likely snack on insects you don’t want in your garden.

So you’re not just feeding plants… you’re quietly inviting in a little natural pest control team.

Okay, But It’s Not Magic

Let’s clear something up.

Eggshells won’t fix everything. They won’t turn poor soil into a perfect garden overnight. And if they’re not crushed well, they can take a long time to break down.

Some gardeners even skip the hanging step altogether and mix them directly into the soil—which works too.

So think of this as a helpful addition, not a miracle solution.

How to Do It Without Overthinking

You don’t need a system. No fancy tools. Just keep it simple:

  1. Rinse your eggshells (quick rinse is fine)
  2. Let them dry out completely
  3. Crush them lightly (no need for powder)
  4. Toss them into a breathable mesh bag
  5. Hang it somewhere in your garden

That’s it.

You can add to it over time—every breakfast contributes. Kind of satisfying, actually.

A Small Habit That Sticks

Here’s the funny part.

Most people don’t stick with gardening hacks because they’re complicated. They fall off because they’re annoying to keep up with.

This one? It’s easy. Almost forgettable. And that’s why it works.

You’re not changing your whole routine—you’re just not throwing something away.

And somehow, that small shift turns into healthier soil, fewer pests, and a garden that feels just a bit more alive.

Not bad for something you almost tossed in the trash, right?

Honey Butter Skillet Corn

0

Honey Butter Skillet Corn is the ultimate side dish—a gloriously simple, sweet, and creamy celebration of corn that transforms a humble bag of frozen kernels into something truly spectacular in under 15 minutes. This recipe is a masterclass in the power of a few quality ingredients, where sweet corn is sautéed in a luscious combination of butter and honey until it’s tender, slightly caramelized, and absolutely irresistible. The magic begins as the butter melts and mingles with the honey, creating a sweet, glossy coating that clings to every kernel. As the corn sautés, it develops a subtle, golden-brown char in spots, adding a hint of caramelized depth. The final touch—a handful of cream cheese pieces stirred in at the end—melts into a rich, creamy sauce that envelops the corn, transforming it into a decadent, velvety side dish that’s pure comfort on a plate.

The brilliance of this recipe lies in its incredible ease and the universally beloved flavor it delivers. It requires no thawing, no complicated steps, and just a single skillet, making it the perfect last-minute addition to any meal. The balance of sweet honey, rich butter, and tangy cream cheese is simply perfect, and a simple seasoning of salt and pepper allows the corn’s natural sweetness to shine. This Honey Butter Skillet Corn is the ideal companion to everything from grilled meats and fried chicken to holiday roasts and weeknight tacos. It’s a dish that will have everyone at the table reaching for seconds, and it’s guaranteed to become a staple in your recipe rotation.

Why You’ll Love This Recipe:

  • Incredibly Quick and Easy: Ready in under 15 minutes with just a handful of ingredients.
  • Perfectly Sweet and Creamy: The combination of honey, butter, and cream cheese is simply irresistible.
  • Uses Frozen Corn: A convenient pantry staple transforms into a spectacular side dish.
  • Versatile Side Dish: Pairs beautifully with chicken, pork, steak, or fish.
  • Crowd-Pleasing Favorite: A guaranteed hit with both kids and adults.

Ingredients:

For the Corn:*
1 (16 oz) bag frozen corn kernels (no need to thaw)
2 tablespoons unsalted butter
2 tablespoons honey
2 oz cream cheese, cut into small pieces
¼ teaspoon kosher salt
¼ teaspoon freshly ground black pepper

Instructions:

Step 1: Heat the Butter and Honey*
Place a large skillet over medium-high heat. Add the butter and honey. Cook, stirring occasionally, until the butter is melted and the mixture is well combined and bubbly.

Step 2: Add the Corn*
Add the frozen corn kernels to the skillet. Sauté for 5-8 minutes, stirring occasionally, until the corn is heated through and beginning to caramelize slightly in spots.

Step 3: Add Cream Cheese and Season*
Reduce the heat to medium-low. Add the cream cheese pieces, salt, and pepper. Continue to cook and stir for another 3-5 minutes, until the cream cheese is fully melted and the corn is coated in a creamy, luscious sauce.

Step 4: Serve*
Taste and adjust seasoning if needed. Serve immediately.

Tips:

  • No Need to Thaw: Cooking the corn directly from frozen helps it retain its texture and prevents it from becoming mushy.
  • Cut Cream Cheese into Small Pieces: Smaller pieces will melt more quickly and evenly into the sauce.
  • Don’t Overcook: Cook just until the cream cheese is melted and the corn is hot. Overcooking can make the corn tough.
  • Add Fresh Herbs: Stir in a tablespoon of fresh chopped chives or parsley just before serving for a pop of color and freshness.
  • Make it Spicy: Add a pinch of cayenne pepper or red pepper flakes with the salt and pepper for a little heat.

Storage Options:

  • Refrigerator: Store leftovers in an airtight container in the refrigerator for up to 4 days.
  • Reheating: Reheat gently in a skillet over medium-low heat, stirring occasionally. You can also reheat in the microwave.
  • Not for Freezing: The creamy sauce may separate upon thawing.
  • Make-Ahead: This dish is best made fresh, but you can prepare it a few hours in advance and reheat gently before serving.

Honey Butter Skillet Corn is the perfect example of how simple ingredients, treated with care, can create something truly memorable. Sweet, creamy, and utterly delicious, it’s a side dish that will earn a permanent place at your table.

Creamed Peas on Toast

0

Creamed Peas on Toast is the ultimate expression of simple, soul-soothing comfort—a humble, elegant dish that transforms a handful of pantry staples into a warm, creamy, and deeply satisfying meal. This recipe is a celebration of the beauty of simplicity, where sweet, vibrant peas are enveloped in a luscious, velvety cream sauce and served atop a slice of perfectly toasted bread. The magic begins with a classic roux: butter and shallot are sautéed until soft, then a touch of flour is stirred in to create a foundation for the sauce. Warm milk is gradually whisked in, transforming the mixture into a smooth, silky béchamel that coats the back of a spoon. Frozen peas are stirred in at the last moment, their bright color and sweet pop providing a perfect contrast to the rich, creamy sauce. A whisper of nutmeg and a squeeze of fresh lemon juice elevate the dish, adding warmth and brightness that balance the richness beautifully.

The brilliance of this recipe lies in its incredible versatility and the profound comfort it delivers with minimal effort. It’s a dish that can be enjoyed for breakfast, a light lunch, or a quick, comforting dinner. The creamy peas can be spooned over any bread you love—crusty sourdough, hearty whole wheat, or a simple slice of white toast—and the optional garnish of fresh herbs adds a final touch of color and freshness. Creamed Peas on Toast is a reminder that the most satisfying meals are often the simplest, and that a few quality ingredients, treated with care, can create something truly special.

Why You’ll Love This Recipe:

  • Warm, Creamy, and Deeply Comforting: The velvety sauce and sweet peas are pure comfort in a bowl.
  • Incredibly Quick and Easy: Ready in under 15 minutes with simple, pantry-friendly ingredients.
  • Versatile and Adaptable: Perfect for breakfast, lunch, or a light dinner. Serve on any bread you like.
  • Bright, Fresh Flavor: Lemon juice and fresh herbs elevate the dish and balance the richness.
  • A Nostalgic Classic: A beloved, old-fashioned dish that never goes out of style.

Ingredients:

For the Creamed Peas:*
2 tablespoons unsalted butter
1 small shallot or ¼ cup finely chopped onion
2 cloves garlic, minced
2 tablespoons all-purpose flour
1 cup whole milk or 2% milk
1 cup frozen peas (no need to thaw)
¼ teaspoon salt
¼ teaspoon freshly ground black pepper
Pinch of ground nutmeg (optional but recommended)
1 teaspoon fresh lemon juice

For Serving:*
2 slices of your favorite bread (sourdough, whole wheat, or white)
Butter, for spreading on toast (optional)
Fresh herbs like parsley, chives, or mint, chopped (optional garnish)

Instructions:

Step 1: Prepare the Toast*
Toast the bread slices to your desired level of doneness. If desired, spread a thin layer of butter on the warm toast. Set aside on serving plates.

Step 2: Sauté the Aromatics*
In a medium saucepan or skillet, melt the butter over medium heat. Add the shallot (or onion) and cook, stirring occasionally, for 2-3 minutes until softened. Add the minced garlic and cook for 30 seconds until fragrant.

Step 3: Make the Roux*
Sprinkle the flour over the shallot and garlic. Stir constantly and cook for 1 minute to eliminate the raw flour taste.

Step 4: Whisk in the Milk*
Gradually pour in the milk while whisking constantly to prevent lumps from forming. Continue to cook, whisking frequently, for 2-3 minutes until the sauce thickens slightly and coats the back of a spoon.

Step 5: Add the Peas and Season*
Stir in the frozen peas and cook for 2-3 minutes until they are heated through. Season with salt, pepper, and a pinch of nutmeg (if using). Stir in the fresh lemon juice. Taste and adjust seasoning as needed.

Step 6: Assemble and Serve*
Spoon the creamy peas generously over the prepared toast. Garnish with fresh herbs if desired. Serve immediately.

Tips:

  • Frozen Peas are Perfect: Frozen peas are sweeter and more consistent than many fresh peas. There’s no need to thaw them first.
  • Don’t Skip the Lemon Juice: A small squeeze of lemon juice brightens the entire dish and balances the richness of the cream sauce.
  • Adjust the Sauce Thickness: If the sauce becomes too thick, add a splash more milk. If too thin, let it simmer an extra minute or two.
  • Customize Your Toast: Try it on a thick slice of crusty sourdough, a buttery brioche, or even a toasted English muffin.
  • Add Protein: For a heartier meal, top with a poached egg, crispy bacon, or flaked smoked salmon.

Storage Options:

  • Refrigerator: Store leftover creamed peas (without the toast) in an airtight container in the refrigerator for up to 3 days.
  • Reheating: Reheat gently in a small saucepan over low heat, stirring occasionally. Add a splash of milk if the sauce has thickened too much.
  • Not for Freezing: The cream sauce may separate and become grainy upon thawing.
  • Make-Ahead: The creamed peas are best made fresh, but you can prepare the sauce (through Step 4) in advance and stir in the peas and lemon juice just before serving.

Creamed Peas on Toast is a simple, timeless dish that delivers immense comfort and satisfaction. With its creamy sauce, sweet peas, and perfect toasted bread, it’s a meal that warms both body and soul.

Italian Meatballs

0

Italian Meatballs are the ultimate expression of comfort and tradition—tender, juicy, and bursting with herbaceous, savory flavor, these are the meatballs that dreams are made of. This recipe is a masterful blend of pork sausage and ground beef, creating a rich, complex base that is both succulent and deeply satisfying. The magic begins with breadcrumbs soaked in milk, a simple step that ensures the meatballs remain incredibly moist and tender, never dense or dry. Fresh parsley, minced onion, garlic, and a generous helping of grated Parmigiano-Reggiano add layers of authentic Italian flavor, while a touch of Worcestershire sauce provides a subtle, savory depth. The mixture is gently combined—handled just enough to incorporate the ingredients, but not so much as to toughen the meat—then rolled into generous, 2-inch balls ready for browning.

The brilliance of this recipe lies in its perfect balance and the foolproof techniques that guarantee restaurant-quality results. Browning the meatballs in a skillet creates a beautiful, caramelized crust that locks in juices and adds incredible flavor, but they can also be baked for a hands-off approach. However they’re cooked, the result is the same: a meatball that is tender, flavorful, and utterly irresistible. Served with a creamy garlic pasta, nestled in a pot of simmering marinara, or piled high on a sub roll with melted cheese, these Italian Meatballs are a versatile masterpiece. They’re the kind of dish that brings family and friends together, filling the kitchen with an aroma that promises warmth, love, and a truly memorable meal.

Why You’ll Love This Recipe:

  • Incredibly Tender and Juicy: The combination of pork, beef, and milk-soaked breadcrumbs guarantees a perfect texture.
  • Authentic, Herb-Infused Flavor: Fresh parsley, garlic, onion, and Parmigiano create a depth of flavor that’s unmistakably Italian.
  • Versatile Serving Options: Perfect with pasta, in subs, on their own, or simmered in your favorite sauce.
  • Foolproof Technique: Simple steps and gentle handling ensure success every time.
  • Freezer-Friendly: Make a double batch and freeze some for easy future meals.

Ingredients:

For the Meatballs:*
1 lb pork sausage (casings removed)
1 lb ground beef (80/20 recommended)
⅔ cup Italian breadcrumbs
½ cup whole milk, for soaking
½ cup freshly grated Parmigiano-Reggiano cheese
2 large eggs
⅓ cup fresh parsley, finely chopped
⅓ cup yellow onion, minced
3 cloves garlic, minced
1 teaspoon Italian seasoning
1 tablespoon Worcestershire sauce
½ teaspoon garlic powder
1 teaspoon kosher salt
¼ teaspoon freshly ground black pepper

For Cooking:*
2-3 tablespoons olive oil, for browning (if pan-frying)

Instructions:

Step 1: Soak the Breadcrumbs*
In a small bowl, combine the Italian breadcrumbs with the milk. Let them soak for 1-2 minutes until the milk is absorbed and the breadcrumbs are soft and pasty.

Step 2: Combine the Ingredients*
In a large mixing bowl, combine the soaked breadcrumbs, pork sausage, ground beef, grated Parmigiano-Reggiano, eggs, parsley, minced onion, minced garlic, Italian seasoning, Worcestershire sauce, garlic powder, salt, and pepper.

Step 3: Mix Gently*
Using your hands, gently mix all the ingredients together just until combined. Be careful not to overmix, as this can result in tough meatballs.

Step 4: Form the Meatballs*
Roll the mixture into 2-inch balls (about the size of a golf ball) and place them on a baking sheet or plate. You should get approximately 16-20 meatballs.

Step 5: Cook the Meatballs*

To Pan-Fry: Heat 2-3 tablespoons of olive oil in a large skillet over medium heat. Working in batches to avoid overcrowding, add the meatballs and brown on all sides, turning occasionally, until cooked through (about 10-12 minutes total). An internal temperature of 160°F (71°C) indicates doneness.

To Bake: Preheat oven to 375°F (190°C). Place the meatballs on a parchment-lined baking sheet, spacing them slightly apart. Bake for 20-25 minutes, until golden brown and cooked through.

Step 6: Serve*
Serve the meatballs hot with your favorite pasta and sauce, on a sub roll, or as desired.

Tips:

  • Soak the Breadcrumbs: This step is crucial for moist meatballs. Don’t skip it!
  • Don’t Overmix: Mix just until the ingredients are combined. Overworking the meat will make the meatballs tough.
  • Uniform Size: Roll meatballs to a similar size for even cooking.
  • Test for Doneness: Use an instant-read thermometer to ensure they reach 160°F (71°C).
  • Simmer in Sauce: For extra flavor, after browning, simmer the meatballs in your favorite marinara sauce for 20-30 minutes.

Storage Options:

  • Refrigerator: Store cooked meatballs in an airtight container in the refrigerator for up to 4 days.
  • Reheating: Reheat gently in a saucepan with a little sauce or broth, or in the microwave.
  • Freezing: These meatballs freeze beautifully. Cool completely, arrange in a single layer on a baking sheet, and freeze until solid. Transfer to a freezer bag and freeze for up to 3 months. Thaw in the refrigerator before reheating.
  • Make-Ahead: You can prepare the meatball mixture up to 24 hours in advance and keep it covered in the refrigerator. Form and cook just before serving.

Italian Meatballs are a timeless classic for good reason—they’re the perfect combination of savory, tender, and comforting. Whether served with pasta, on a sandwich, or as a standalone appetizer, they’re guaranteed to be a hit.

Strawberry Mousse

0

Strawberry Mousse is the epitome of elegant, light, and refreshing desserts—a cloud-like, airy creation that captures the pure, sweet essence of ripe strawberries in every luscious spoonful. This recipe is a masterclass in simplicity and balance, transforming just a handful of ingredients into a dessert that feels both indulgent and ethereally light. The magic begins with fresh, pureed strawberries, their vibrant color and bright, tangy sweetness forming the fruity heart of the mousse. This puree is then incorporated into a luxuriously smooth base of whipped cream cheese and powdered monk fruit sweetener, creating a creamy, tangy canvas that perfectly complements the fruit. The final, crucial step is the gentle folding of softly whipped heavy cream, which aerates the mixture, transforming it into a silky, mousse-like texture that is simultaneously rich and featherlight.

The brilliance of this recipe lies in its incredible versatility and the way it delivers a sophisticated dessert with minimal effort and no baking required. Whether you’re following a low-carb lifestyle or simply looking for a lighter, more refreshing treat, this mousse adapts beautifully. The use of powdered monk fruit sweetener keeps it guilt-free without sacrificing any of the sweetness, while the cream cheese provides a subtle tang that prevents the dessert from being cloying. Chilled for at least two hours, the mousse sets to a perfect, spoonable consistency, ready to be served in elegant glasses, topped with a fresh strawberry or a sprig of mint. It’s the perfect ending to a spring or summer meal, a dessert that is as beautiful to look at as it is delicious to eat.

Why You’ll Love This Recipe:

  • Light, Airy, and Luxuriously Creamy: The perfect balance of rich and refreshing.
  • Bright, Fresh Strawberry Flavor: Pureed fresh strawberries provide vibrant color and authentic taste.
  • No-Bake and Effortless: Comes together in minutes with simple mixing and folding.
  • Keto-Friendly and Low-Carb: Uses powdered monk fruit sweetener for a guilt-free indulgence.
  • Elegant and Impressive: Beautiful served in individual glasses, perfect for dinner parties or special occasions.

Ingredients:

For the Strawberry Puree:*
¾ cup pureed fresh strawberries (about 8-12 medium strawberries)

For the Mousse Base:*
8 oz (226g) full-fat cream cheese, softened to room temperature
1 cup powdered monk fruit sweetener (or other powdered low-carb sweetener)
2 teaspoons pure vanilla extract

For the Whipped Cream:*
1 cup heavy whipping cream

Instructions:

Step 1: Prepare the Strawberry Puree*
Wash and hull the fresh strawberries. Add them to a high-speed blender or food processor and blend until completely smooth. Set aside.

Step 2: Whip the Heavy Cream*
In a medium mixing bowl, using a hand mixer or a stand mixer with the whisk attachment, whip the heavy cream on medium-high speed until soft peaks form, about 2-3 minutes. Be careful not to overwhip. Set aside in the refrigerator.

Step 3: Whip the Cream Cheese Base*
In a separate large mixing bowl, beat the softened cream cheese with an electric mixer until light, fluffy, and completely smooth, about 2 minutes. Add the powdered monk fruit sweetener, the pureed strawberries, and the vanilla extract. Beat again for 2-3 minutes until everything is well combined and smooth.

Step 4: Fold in the Whipped Cream*
Remove the bowl of whipped cream from the refrigerator. Using a large, flexible spatula, gently fold about one-third of the whipped cream into the strawberry-cream cheese mixture to lighten it. Then, carefully fold in the remaining whipped cream until no white streaks remain. Be gentle to maintain the airy volume.

Step 5: Chill and Serve*
Spoon the strawberry mousse into individual serving glasses or ramekins. Cover and refrigerate for at least 2 hours, or until fully chilled and set. Serve cold.

Tips:

  • Use Room Temperature Cream Cheese: This is essential for a smooth, lump-free base. Let it sit out for at least an hour before starting.
  • Don’t Overwhip the Cream: Whip just to soft peaks. Overwhipped cream can become grainy and difficult to fold.
  • Fold Gently: Use a gentle folding motion to incorporate the whipped cream, preserving as much air as possible for a light mousse.
  • Chill Time is Essential: The mousse needs time to set and for the flavors to meld. Don’t rush it.
  • Customize the Sweetness: Taste the mixture before folding in the whipped cream and adjust the sweetener to your preference.

Storage Options:

  • Refrigerator: Store covered in the refrigerator for up to 3 days.
  • Not for Freezing: The texture of the mousse will become icy and grainy upon thawing.
  • Make-Ahead: This mousse is perfect for making a day in advance. Prepare, cover, and refrigerate until ready to serve.

Strawberry Mousse is a celebration of fresh, simple ingredients transformed into something truly elegant and delicious. With its light, airy texture and bright, fruity flavor, it’s the perfect sweet ending to any meal.

Beef Pizza Roll-Ups

0

Beef Pizza Roll-Ups are the ultimate handheld pizza fantasy—a fun, flavorful, and impossibly satisfying twist on traditional pizza that transforms simple ingredients into golden, spiraled bites of pure comfort. This recipe is a brilliant fusion of a classic pizza and a savory cinnamon roll, taking refrigerated pizza dough and filling it with a rich, seasoned ground beef mixture, gooey mozzarella cheese, and tangy marinara sauce, then rolling and slicing it into perfect, pull-apart pinwheels. The magic begins with perfectly browned ground beef, seasoned with Italian herbs and bound with a generous scoop of marinara, creating a savory, meaty filling that’s bursting with flavor. This mixture is spread over a rectangle of pizza dough, blanketed with a generous layer of shredded mozzarella, then rolled tightly into a log and sliced into individual rounds. As they bake, the dough puffs into a golden, flaky crust, the cheese melts into glorious, stretchy pockets, and the edges become irresistibly crisp.

The brilliance of this recipe lies in its incredible ease and the sheer joy of its presentation. Using refrigerated pizza dough streamlines the process, making these roll-ups achievable any night of the week. Each slice reveals a beautiful spiral of dough wrapped around the savory, cheesy filling, making them as fun to look at as they are to eat. Served with a side of warm marinara sauce for dipping, these Beef Pizza Roll-Ups are the perfect party appetizer, game-day snack, or a creative weeknight dinner that will have everyone at the table reaching for more. They’re a testament to the fact that the simplest ideas—pizza, rolled up—can be the most delicious.

Why You’ll Love This Recipe:

  • All the Pizza Flavor, in Fun, Dippable Form: Savory beef, tangy marinara, and melted mozzarella in a perfect, handheld spiral.
  • Incredibly Easy and Quick: Uses convenient refrigerated pizza dough for a meal that comes together in under 30 minutes.
  • Perfect for Sharing: A crowd-pleasing appetizer or main that’s ideal for parties, game day, or family dinners.
  • Customizable to Your Taste: Easily swap the beef for Italian sausage, add pepperoni, or use different cheeses.
  • Kid-Friendly and Fun: The spiral shape and dipping sauce make these a guaranteed hit with kids.

Ingredients:

For the Filling:*
1 pound lean ground beef (or regular)
1 cup thick marinara or pizza sauce, divided
1 teaspoon Italian seasoning
1½ cups shredded mozzarella cheese

For the Dough and Assembly:*
1 tube (13-14 ounces) refrigerated pizza dough
All-purpose flour, for dusting

Instructions:

Step 1: Preheat Oven and Prepare Pan
Preheat your oven to 375°F (190°C). Lightly grease a 9×13-inch baking dish or line a baking sheet with parchment paper.

Step 2: Cook the Beef
In a skillet over medium heat, cook the ground beef, breaking it up with a spoon, until fully browned and no longer pink, about 5-7 minutes. Carefully drain any excess grease. Stir in the Italian seasoning and ½ cup of the marinara sauce. Remove from heat and let the mixture cool slightly.

Step 3: Prepare the Dough*
Unroll the refrigerated pizza dough onto a lightly floured surface. Using your hands or a rolling pin, gently stretch or roll it into a large rectangle, about 10×14 inches, keeping the thickness even.

Step 4: Add the Filling*
Spread the seasoned beef mixture evenly over the dough, leaving about a ½-inch border around all edges. Sprinkle the shredded mozzarella cheese evenly over the beef.

Step 5: Roll and Slice*
Starting from one long side, carefully roll the dough up tightly into a log shape. Pinch the seam firmly to seal. Using a sharp knife, slice the log into 1½-inch thick rounds.

Step 6: Arrange and Bake*
Place the rolls cut-side up in the prepared baking dish or on the baking sheet, leaving a little space between each. Bake for 18-22 minutes, until the rolls are puffed, golden brown, and the cheese is melted and bubbly.

Step 7: Serve*
While the roll-ups bake, warm the remaining ½ cup of marinara sauce. Remove the roll-ups from the oven and let them cool slightly. Serve warm with the warm marinara sauce on the side for dipping.

Tips:

  • Drain the Beef Well: Removing excess fat prevents the filling from making the dough soggy.
  • Don’t Overfill: Stick to the recommended amounts to ensure the rolls seal properly and don’t burst open.
  • Seal the Seam Tightly: Pinch the seam well to prevent the rolls from unraveling during baking.
  • Slice with a Sharp Knife: Use a sharp knife to get clean slices without squishing the rolls.
  • Customize Your Fillings: Add chopped pepperoni, cooked Italian sausage, sautéed mushrooms, or a sprinkle of Parmesan.

Storage Options:

  • Refrigerator: Store leftover roll-ups in an airtight container in the refrigerator for up to 4 days.
  • Reheating: Reheat in a 350°F (175°C) oven or air fryer for 5-7 minutes to restore crispness. The microwave will make them soft.
  • Freezing: Assemble the unbaked roll-ups, place on a parchment-lined tray, and freeze until solid. Transfer to a freezer bag and freeze for up to 2 months. Bake from frozen, adding 5-10 minutes to the bake time.
  • Make-Ahead: You can cook the filling and assemble the rolls (through Step 5) up to 8 hours in advance. Cover and refrigerate until ready to bake.

Beef Pizza Roll-Ups are a fun, delicious, and incredibly easy way to enjoy all the flavors of pizza in a whole new form. With their golden, flaky crust and savory, cheesy center, they’re guaranteed to be a hit at any table.

Stove Top vs. Homemade Stuffing: Which One Really Belongs on Your Holiday Table?

0

When the holidays start creeping up—and honestly, does it feel like you blink and suddenly there are pumpkins and turkeys everywhere?—there’s one side dish that never fails to get my family talking. Stuffing. Or is it dressing? Depends who you ask, and trust me, that debate can get almost as lively as a family game night (but that’s a whole other story for another time).

Whether you’re serving it alongside Thanksgiving turkey or a cozy Sunday roast, stuffing always seems to stir up a little nostalgia—and maybe a tiny bit of strong opinion. But here’s the real question on everyone’s mind: do you tear open a box of Stove Top, or do you roll up your sleeves and make it from scratch?

I know people who wouldn’t dream of touching anything but homemade—hand-cut bread cubes, fresh herbs, the whole deal. Then there are those (and I’ve been there some years!) who swear by the “open box, add butter, done” approach. Both sides have their arguments, and honestly, in this house, we’ve tried them all over the years.

So let’s pull up a chair and have a real conversation about the pros, cons, and all those little real-life factors that’ll help you pick the perfect stuffing for your table this year.

The Case for Stove Top: Sometimes the Box Has Your Back

1. It’s Ridiculously Easy (and Honestly, That’s a Gift)

Look, not all of us are starring in a holiday cooking marathon. Most years, I’m juggling too many pans, last-minute grocery runs, a house full of relatives, and the occasional kitchen disaster (one year I actually forgot to thaw the turkey—ask me how that went). When things get chaotic, Stove Top stuffing is a genuine lifesaver.

Here’s how it works: boil some water, toss in butter, stir in the mix, fluff, and you’re done in five minutes flat. It’s basically the culinary equivalent of a neighbor popping over to lend a hand. When you’ve got four other sides on the stove and you’re crossing your fingers that your pie doesn’t turn into soup, boxed stuffing is the friend you didn’t know you needed.

2. Predictable Taste (and Sometimes That’s Exactly What We Want)

Let’s talk comfort. There’s something special about a dish that tastes exactly like you remember—no surprises, just soft, savory, buttery goodness. So many of us grew up with Stove Top on our holiday tables. Maybe it’s not fancy, but it’s wrapped up in warm, fuzzy memories, like that worn-out blanket you keep for chilly evenings.

And honestly, sometimes that feeling—salty, simple, familiar—is exactly what we need in the middle of the holiday hustle.

3. Long Shelf Life = A Pantry Hero

Can I share a little secret? I always keep a box tucked behind the pasta for emergencies (those who know, know). Even when it’s not Thanksgiving, that box is ready to rescue a plain rotisserie chicken, add some life to a weeknight meal, or become the backbone of a “clean out the fridge” Sunday supper.

No chopping, no drying, no prepping. It just sits there quietly, waiting to swoop in and save dinner when you’re out of ideas and energy.

The Case for Homemade: Stuffing With Soul

1. Flavor Freedom: You’re in Charge

Oh, let’s talk about the joys of homemade stuffing! When you make it yourself, you’re the boss. Sourdough cubes soaked in turkey drippings, caramelized onions, crispy pancetta? Go for it. Feeling Southern? Try cornbread, rosemary, maybe some apples. (One year I even threw in chopped figs and pecans. Best accident ever.)

Homemade stuffing is your kitchen canvas. Add whatever catches your fancy—herbs, garlic, sausage, cranberries, nuts. It’s all about your family’s favorites, old traditions, or whatever looks good at the market that week.

2. Texture, Texture, Texture

Texture matters, people. Maybe you like your stuffing soft and almost custardy, or maybe you live for those crispy, golden edges with just a hint of crunch (my family’s split, so I make both—call me a peacekeeper).

With homemade, you get to choose. Want it crusty? Bake it uncovered a little longer. Want it moist? Add a splash more broth and cover it with foil. It’s like picking out the perfect pair of slippers—soft or structured, the choice is all yours.

3. You Know What’s In It (And What’s Not)

This one hits close to home. With allergies and dietary preferences popping up more and more (hello, gluten-free kids and vegan cousins), I love knowing exactly what’s going onto every plate.

Making it from scratch means you’re in control—no mysterious “seasoning blends” or preservatives. You can adjust for food allergies, special diets, or just plain peace of mind. Homemade stuffing bends to your needs without losing any of that homey goodness.

So… Which Stuffing Deserves the Spotlight?

Brace yourself—there’s no clear winner here, and honestly, that’s exactly how I like it.

Let’s be real: not every holiday dinner looks like those glossy magazine spreads. Sometimes you’re running on empty, or the crowd around your table has more food quirks than you can count. And sometimes, all you want is the comfort of what you know—no frills, no fuss, just that taste of childhood and togetherness on your fork.

If reaching for a box of stuffing gives you one less thing to worry about, then absolutely do it. And if you want to go the homemade route, especially when you’ve got a little extra time or that dog-eared recipe from your grandmother, don’t hold back—it might just be the star of the show.

Think about:

  • Your schedule: Are you cooking for the whole crew or just bringing one dish to a potluck?
  • Your crowd: Is your family full of traditionalists (they want what they grew up with) or more adventurous eaters looking for something new?
  • Your energy: Seriously—how much do you have left at this point in the season? (Spoiler: some years my answer is “none whatsoever.”)

Here’s a little trick from my house to yours: you don’t have to pick just one. Put out both! Who says you can’t have a little of each? It’s not breaking the rules—it’s making everyone feel at home, and that’s the real win.

A Side Note on Stuffing Safety (Because Aunt Linda Asked)

Quick PSA—because I can practically hear my sister’s voice in my head: if you’re putting stuffing inside your turkey, not just in a baking dish, make sure the center hits 165°F. Otherwise, you’re asking for food safety trouble—and nobody wants a side of that at the holiday table. Don’t risk it!

Stuffing Through the Seasons

Stuffing isn’t just a holiday treat in this house. Oh no. I’ve tossed it into baked chicken casseroles and served it alongside pork chops on chilly March evenings. Get creative year-round! Use leftover challah or brioche, or mix things up with chorizo and roasted poblanos for a fun twist. The sky’s the limit—don’t save all the comfort for November.

Once you stop thinking of stuffing as a “once-a-year” thing, I promise it’ll become one of your favorite little kitchen tricks that makes any meal feel special.

Final Thoughts: More Than Just Bread and Broth

At the end of the day, stuffing is about so much more than breadcrumbs or a box mix. It’s tradition, it’s memory, it’s comfort served up family-style. Whether you’re passing Stove Top with a wink across the table or sharing your “secret” homemade recipe, what matters most is the care behind every spoonful.

Gather your people, say grace, tell old stories—just cherish the moment. Because whether your stuffing comes from a box or your backyard herb garden, it’s meant to fill your belly and your heart with something a little special.

And really, isn’t that the whole point of the season?