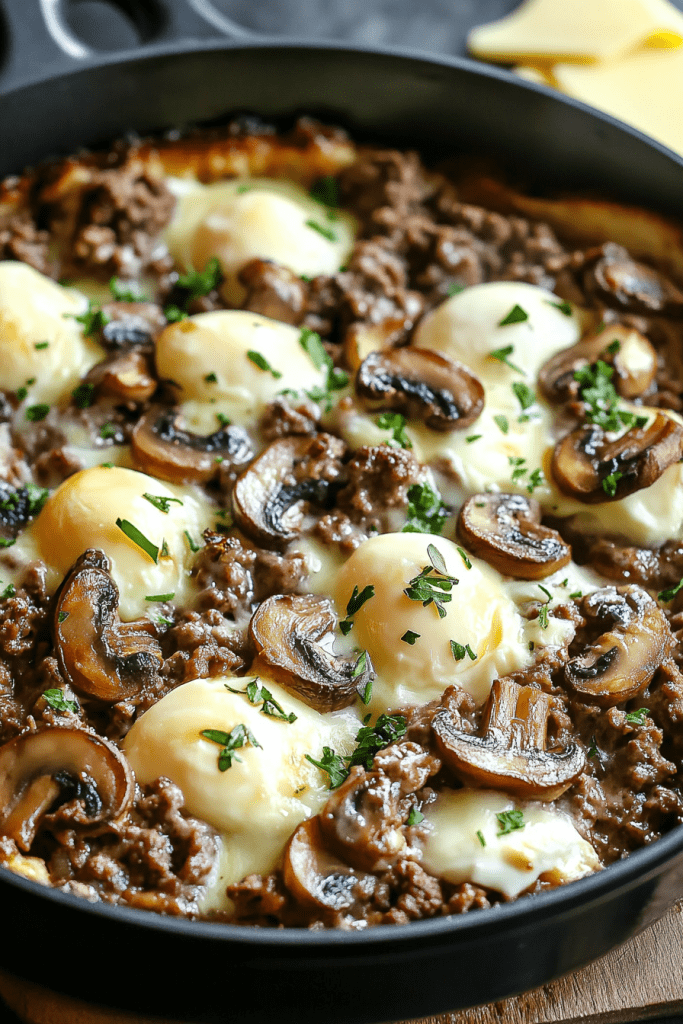
Saffron Seafood Linguine

0

Dive into a plate of Saffron Seafood Linguine, where shrimp, squid, and clams mingle with a creamy saffron-infused sauce. This dish is an elegant choice for festive dining or a special dinner that elevates the everyday.

Why You’ll Love This Dish:

  • Rich Taste Profile: Saffron and seafood unite for a sophisticated flavor that’s both intricate and inviting.
  • Elegant Presentation: Impress guests with a dish that looks as good as it tastes, perfect for special occasions.
  • Flexible Ingredients: Tailor the seafood selection to suit your taste or what’s available locally.
  • Complete Meal: This recipe offers a fulfilling blend of protein and pasta, all in one pot.

Ingredients:
Shrimp Stock:

  • Shells from shrimp
  • 1 liter water
  • 1/4 lemon
  • 1/4 red bell pepper
  • 1 bay leaf
  • Thyme sprigs
  • 3 garlic cloves

Linguine:

  • 380 g linguine
  • 3 liters water
  • 1 tablespoon salt

Sauce:

  • 1 tablespoon onion, finely chopped
  • 1/2 clove garlic, minced
  • 20 g butter
  • A drizzle of oil
  • A squeeze of lemon juice
  • 8 saffron threads
  • 200 ml fish or shrimp stock
  • 100 g shrimp, peeled
  • 100 g squid rings
  • 400 g clams
  • 4 tablespoons heavy cream

Garnish:

  • Parsley leaves
  • Lemon slices

Instructions:

Making Shrimp Stock:

  • Combine shrimp shells, water, lemon, bell pepper, bay leaf, thyme, and garlic in a pot.
  • Boil, then simmer until the volume is reduced by half.
  • Cool and strain.

Cooking Pasta:

  • Boil linguine in salted water for 8 minutes.
  • In a separate pan, melt butter with oil, sauté onion and garlic.
  • Add lemon juice, saffron threads, and shrimp stock, simmer for 5 minutes.
  • Introduce clams, squid, and shrimp, mix in drained pasta and heavy cream.
  • Cook over low heat until pasta is perfectly al dente, about 4-6 minutes.

Plating:

  • Serve the linguine garnished with parsley and slices of lemon.

Good to Know:

  • Cleaning Clams: Soak clams in salted water for 30 minutes to expel sand, then rinse well.

Storing the Dish:

  • Refrigerator: Store in an airtight container for up to 3 days.
  • Freezer: Ideally, enjoy fresh, but freezing is possible. Thaw and reheat gently for best results.

Prepare to be enchanted by this Saffron Seafood Linguine, a dish bursting with the flavors of the ocean and elegantly accented by saffron’s unique aroma.

Raspberry Chocolate Cheesecake Delight

0

Step into a world of decadent flavors with our Raspberry Chocolate Cheesecake Delight. This dessert is a perfect harmony of tart raspberries and luxurious chocolate, crafted to make any occasion feel special. Enjoy the sumptuous taste and stunning presentation that this recipe offers.

Why You’ll Adore This Dessert:

  • Rich and Refreshing: The iconic pairing of chocolate and raspberry dances on your palate, offering both richness and a refreshing zing.
  • Creamy and Crunchy: Each mouthful combines smooth, creamy filling with a crisp crust, delighting your taste senses with varied textures.
  • A Feast for the Eyes: Not only tasty, this cheesecake is a visual treat, sure to captivate and impress at any event.
  • Perfect for Any Occasion: Whether it’s a cozy family dinner or a grand affair, this cheesecake adapts beautifully to your decorative desires.

Ingredients:
Crust:

  • 1 ½ cups graham cracker crumbs
  • ¼ cup granulated sugar
  • ½ cup unsalted butter, melted

Cheesecake Filling:

  • 3 packages of cream cheese (8 oz each), softened
  • 1 cup granulated sugar
  • 3 large eggs
  • 1 teaspoon vanilla extract
  • 1 cup sour cream
  • 1 ½ cups fresh raspberries (extra for topping)
  • ½ cup semi-sweet chocolate chips

Chocolate Ganache:

  • ½ cup heavy cream
  • 1 cup semi-sweet chocolate chips

Topping:

  • Fresh raspberries
  • Optional: Powdered sugar

Instructions:

Oven Preparation:

  • Preheat your oven to 325°F (165°C). Grease a 9-inch springform pan and set aside.

Creating the Crust:

  • Mix graham cracker crumbs, sugar, and melted butter in a medium bowl until well combined.
  • Firmly press the mixture into the bottom of your springform pan to form a solid base.
  • Bake for 10 minutes, then allow to cool as you prepare the filling.

Making the Cheesecake Filling:

  • Beat the cream cheese in a large bowl with an electric mixer until smooth.
  • Gradually mix in the sugar.
  • Add eggs one at a time, mixing gently after each addition.
  • Blend in vanilla extract and sour cream until smooth.
  • Carefully fold in raspberries and chocolate chips without crushing the berries.

Baking the Cheesecake:

  • Pour the filling over the crust in your pan.
  • Bake for about 55-65 minutes, or until the center is just set but slightly jiggly.
  • Turn off the oven, open the door slightly, and let the cheesecake cool inside for an hour.
  • Remove, cool to room temperature, then chill in the refrigerator for at least 4 hours, preferably overnight.

Preparing the Chocolate Ganache:

  • Heat the heavy cream in a small saucepan until it simmers.
  • Pour over chocolate chips in a heatproof bowl, wait a minute, then stir until smooth.
  • Let the ganache cool a bit before topping the cheesecake with it.

Finishing Touches:

  • Once the ganache is set, decorate with fresh raspberries.
  • Optionally, sprinkle with powdered sugar for extra flair.
  • Serve chilled.

Storing the Cheesecake:

  • Refrigerator: Keep covered for up to 5 days.
  • Freezer: Wrap well without ganache and freeze for up to 2 months. Thaw in the fridge and add ganache and raspberries before serving.

Savor the layers of taste and texture in this exquisite Raspberry Chocolate Cheesecake Delight, crafted for both elegance and enjoyment.

Cinnamon Toast Crunch Cheesecake Pops

0

Dive into the delightful world of Cinnamon Toast Crunch Cheesecake Pops! These treats blend the nostalgic, sugary crunch of Cinnamon Toast Crunch cereal with the smooth, creamy luxury of cheesecake, crafted into a fun, poppable form. Ideal for gatherings, celebrations, or a creative kitchen project with kids, these cheesecake pops offer a whimsical twist on dessert that’s both satisfying and unique.

Why You’ll Love This Recipe:

  • Distinctive and Delicious: The beloved flavor of Cinnamon Toast Crunch gives these cheesecake pops an irresistible edge over traditional desserts.
  • Engaging and Enjoyable: From crushing cereal to mixing and freezing, the process is interactive and fun for bakers of all ages.
  • Perfectly Portioned: Each pop is a self-contained treat on a stick, making them super convenient for serving at events or for a quick snack.

Ingredients:

  • 2 cups of Cinnamon Toast Crunch cereal, finely ground
  • 2 cups of graham cracker crumbs
  • 1/2 cup of unsalted butter, melted
  • 16 oz of cream cheese, softened
  • 1 cup of granulated sugar
  • 1 teaspoon of vanilla extract
  • 2 large eggs
  • 1/2 cup of sour cream
  • Popsicle sticks

Detailed Instructions:

  1. Prepare the Crust: Start by grinding the Cinnamon Toast Crunch cereal in a food processor until it’s finely ground. In a mixing bowl, stir together the ground cereal, graham cracker crumbs, and melted butter until the mixture is uniformly moistened. Firmly press this mixture into the bottom of a parchment-lined 9×13-inch baking pan. Refrigerate this crust base while you prepare the cheesecake filling.
  2. Make the Filling: Using a large mixing bowl, beat the softened cream cheese together with the granulated sugar until the mixture is smooth and creamy. Add in the vanilla extract. Incorporate the eggs one at a time, ensuring each one is fully blended into the mixture before adding the next. Stir in the sour cream until the filling is thoroughly combined and smooth.
  3. Assemble and Bake: Pour the cheesecake filling over the prepared crust, smoothing the top to ensure an even layer. Bake in a preheated oven at 325°F (163°C) for about 35-40 minutes. The cheesecake should be set in the center and lightly golden around the edges. Remove from the oven and allow it to cool completely at room temperature.
  4. Create the Pops: After the cheesecake has cooled, cut it into small squares suitable for pops. Insert a popsicle stick into each square, then place them on a baking sheet lined with parchment paper.
  5. Freeze: Transfer the sheet with the cheesecake pops into the freezer and freeze for at least 2 hours, or until the pops are firm and fully set.

Storage Options:

  • Refrigerator: If not serving immediately, store any remaining unfrozen cheesecake pops in a covered container in the refrigerator. They will keep for up to 5 days.
  • Freezer: For longer storage, place the frozen cheesecake pops in an airtight container in the freezer. They can be stored for up to one month. For optimal freshness, wrap each pop individually in plastic wrap.

Crafting these Cinnamon Toast Crunch Cheesecake Pops is a delightful way to merge the worlds of cereal and cheesecake into one spectacular treat. Whether you’re making them for a party or as a special treat for the family, these pops are sure to bring a smile to everyone’s face. Enjoy the creamy texture, the crunchy crust, and the overall joy that comes with each bite of these fun-filled pops.

Creamy Beef and Mushroom Pasta

0

Step into a world of comforting flavors with this Creamy Beef and Mushroom Pasta. This dish, prepared in a slow cooker, merges the tenderness of beef with the earthy tones of mushrooms, enveloped in a creamy sauce. It’s an effortless yet sumptuous meal that promises to make any day feel special.

Why You’ll Love This Recipe:

  • Rich and Fulfilling: A deeply satisfying dish that fills you with warmth and flavor.
  • Simple Preparation: Just set your ingredients in the slow cooker and let it handle the rest.
  • Flexible and Adaptable: Perfect with any type of pasta and customizable with your preferred herbs.

Ingredients:

  • 1 pound beef stew meat, cut into bite-sized pieces
  • 1 small onion, diced
  • 4 cloves garlic, minced
  • 1 can (10.5 oz) cream of mushroom soup
  • 1 cup beef broth
  • 1 cup heavy cream
  • 1 teaspoon dried basil
  • 1 teaspoon dried oregano
  • Salt and pepper, to taste
  • 8 ounces pasta (penne or your choice of shape)
  • 1 cup grated Parmesan cheese
  • Fresh parsley, chopped (optional, for garnish)

Detailed Instructions:

  1. Set Up the Beef: In the slow cooker, combine the beef stew meat, diced onion, and minced garlic.
  2. Create the Sauce: In a bowl, mix the cream of mushroom soup, beef broth, heavy cream, basil, and oregano. Pour this over the beef, coating it thoroughly.
  3. Slow Cooking: Adjust the slow cooker to low and cook for 6-8 hours, until the beef is tender and flavorful.
  4. Pasta Time: About half an hour before serving, boil the pasta as directed until al dente. Drain and set aside.
  5. Combine Ingredients: Add the pasta to the slow cooker. Mix in the Parmesan cheese and season with salt and pepper. Stir well to coat the pasta in the creamy sauce.
  6. Final Cooking Stage: Keep cooking on low for another 10-15 minutes, letting the pasta soak up the sauce.
  7. Ready to Serve: Dish out the creamy pasta steaming hot, garnished with fresh parsley if you like.

Storage Options:

  • Refrigerator: Keep leftovers in a sealed container in the fridge for up to 3 days.
  • Reheating: Gently reheat on the stove, adding a little beef broth or cream if needed to loosen the sauce.

Delight in the ease and richness of this slow-cooked Creamy Beef and Mushroom Pasta, a true comfort food masterpiece.

Chicken Alfredo Garlic Bread Pizza

0

Dive into this mouthwatering fusion of garlic bread and chicken Alfredo pizza for a delightful twist on classic flavors. This recipe transforms a simple loaf of French or Italian bread into a crispy, garlicky pizza base, smothered in a creamy, homemade Alfredo sauce and topped with succulent chicken and melted cheeses. It’s the perfect quick dinner that combines the comfort of garlic bread with the indulgence of creamy Alfredo.

Why You’ll Love This Recipe:

  • Quick & Convenient: Utilizes simple ingredients for a quick-prep meal that’s great for busy evenings.
  • Family-Friendly: Loved by adults and kids alike, making it a perfect choice for family dinners.
  • Versatile: Easily adaptable with different toppings to suit everyone’s taste.

Ingredients:

For the Garlic Bread Base:

  • 1 large loaf of French bread or Italian bread, halved lengthwise
  • 4 tablespoons unsalted butter, melted
  • 3 cloves garlic, minced
  • 1 teaspoon dried parsley
  • 1 teaspoon dried oregano

For the Alfredo Sauce:

  • 2 tablespoons unsalted butter
  • 2 cloves garlic, minced
  • 1 cup heavy cream
  • 1 cup grated Parmesan cheese
  • Salt and pepper to taste

For the Toppings:

  • 1 1/2 cups cooked chicken breast, shredded or diced
  • 1 cup shredded mozzarella cheese
  • 1/2 cup shredded Parmesan cheese
  • Fresh parsley, chopped (optional, for garnish)

Instructions:

Prepare the Garlic Bread Base:

  • Preheat your oven to 400°F (200°C). Place the bread halves on a baking sheet.
  • In a small bowl, mix the melted butter, minced garlic, dried parsley, and dried oregano. Brush the mixture evenly over the cut sides of the bread.
  • Bake the bread for about 10 minutes, or until it begins to turn golden and crispy.

Make the Alfredo Sauce:

  • In a medium saucepan, melt the butter over medium heat. Add the minced garlic and sauté for about 1 minute, or until fragrant.
  • Stir in the heavy cream and bring the mixture to a simmer. Reduce the heat to low and gradually add the grated Parmesan cheese, stirring constantly until the sauce is smooth and thickened. Season with salt and pepper to taste.

Assemble the Pizza:

  • Spread the Alfredo sauce evenly over the toasted garlic bread halves.
  • Top with the cooked chicken, followed by the shredded mozzarella and Parmesan cheeses.

Bake:

  • Return the assembled pizzas to the oven and bake for another 10-15 minutes, or until the cheese is melted and bubbly.

Serve:

  • Remove from the oven and let cool slightly. Garnish with chopped fresh parsley if desired. Slice and serve.

Storage Options:
Store leftovers in an airtight container in the refrigerator for up to 3 days. Reheat in the oven or microwave until heated through.

Enjoy this luscious Chicken Alfredo Garlic Bread Pizza as a delightful merger of two beloved dishes, perfect for any night of the week!

Blender Cinnamon Roll Cheesecake Bars

0

Blender Cinnamon Roll Cheesecake Bars are the ultimate fusion of two classic desserts: rich, creamy cheesecake and the warm, spiced flavors of cinnamon rolls. These bars are as decadent as they are easy to make, thanks to the simplicity of blending the filling and layering it with a buttery graham cracker crust and a cinnamon swirl. Perfect for holidays, potlucks, or an indulgent treat, these bars will become a go-to favorite for anyone who loves comforting flavors with a hint of sophistication.

The graham cracker crust provides a buttery, slightly crunchy base that complements the silky cheesecake filling. The cinnamon swirl, with its caramel-like richness, weaves through each layer, creating a delightful marbled effect that tastes as good as it looks.

Why You’ll Love This Recipe

Easy to Make: Blending the filling makes preparation quick and mess-free.

Perfect Combination: The creaminess of cheesecake meets the spiced sweetness of cinnamon rolls.

Versatile: Great for dessert tables, gifting, or as a special treat for yourself.

Crowd-Pleaser: A surefire hit with family and friends.

Ingredients

For the Crust:

• 1.5 cups graham cracker crumbs

• 1/4 cup brown sugar

• 6 tablespoons butter, melted

• 1 teaspoon cinnamon

For the Cheesecake Filling:

• 16 ounces cream cheese, softened (two 8 oz packages)

• 1/2 cup sour cream, at room temperature

• 2/3 cup sugar

• 2 large eggs, at room temperature

• 1 tablespoon vanilla extract

For the Cinnamon Swirl:

• 6 tablespoons butter, melted

• 1 cup dark brown sugar

• 1 teaspoon cinnamon

• 1/4 cup flour

Instructions

Prepare the Crust:

1. Preheat your oven to 350°F (175°C).

2. In a medium bowl, combine the graham cracker crumbs, brown sugar, melted butter, and cinnamon. Mix until the mixture resembles wet sand.

3. Press the mixture firmly into the bottom of an 8×8-inch baking dish lined with parchment paper.

4. Bake the crust for 8 minutes. Remove from the oven and let it cool completely.

Make the Cheesecake Filling:

1. Reduce the oven temperature to 325°F (165°C).

2. In a blender or food processor, combine the cream cheese, sugar, and vanilla extract. Blend until smooth.

3. Add the sour cream and blend again until fully incorporated.

4. Add the eggs one at a time, blending after each addition until the mixture is creamy and smooth.

Assemble the Cheesecake:

1. Pour half of the cheesecake filling over the cooled crust, spreading it evenly with a spatula.

2. Prepare the cinnamon swirl by mixing the melted butter, brown sugar, cinnamon, and flour in a small bowl until smooth.

3. Dot the first cheesecake layer with spoonfuls of the cinnamon mixture. Use a knife or skewer to gently swirl the cinnamon mixture into the cheesecake.

4. Pour the remaining cheesecake filling over the swirled layer, smoothing it out. Repeat the cinnamon swirl process on top.

Bake:

1. Bake the cheesecake at 325°F for 35-40 minutes, or until the center is set but still slightly jiggly when gently shaken.

2. Remove the cheesecake from the oven and allow it to cool to room temperature.

Chill:

1. Refrigerate the cheesecake for at least two hours to firm up before slicing into bars. For cleaner cuts, wipe the knife with a damp cloth between slices.

Tips

Room Temperature Ingredients: Ensure the cream cheese, sour cream, and eggs are at room temperature for a smoother filling.

Cinnamon Mixture: For a more pronounced swirl, use a skewer or toothpick to create intricate designs.

Parchment Paper: Line the baking dish with parchment paper for easy removal and slicing.

Serving Suggestions: Top with a drizzle of cream cheese glaze or whipped cream for added decadence.

Storage Options

Refrigerator: Store in an airtight container for up to 5 days.

Freezer: Freeze individual bars wrapped in plastic wrap for up to 3 months. Thaw overnight in the refrigerator before serving.

Blender Cinnamon Roll Cheesecake Bars are a show-stopping dessert that combines the best of two beloved classics. They’re easy to make, irresistibly delicious, and sure to impress at any gathering!

Chicken Cordon Bleu Casserole

0

Chicken Cordon Bleu Casserole is a delightful twist on the classic dish, offering the same rich flavors in a comforting, easy-to-prepare format. Tender chicken is stuffed with ham and Swiss cheese, covered in a creamy sauce, and topped with golden breadcrumbs for a deliciously satisfying meal. Using a slow cooker ensures the chicken stays moist and tender, making this a perfect hands-off recipe for busy days.

This casserole is ideal for family dinners or entertaining guests, combining elegant flavors with the convenience of one-pot cooking. Serve it with a side of vegetables, rice, or mashed potatoes to complete the meal.

Why You’ll Love This Recipe

Classic Flavors: Enjoy the rich, savory taste of traditional Chicken Cordon Bleu in a simpler form.

Easy to Make: The slow cooker does most of the work, allowing you to focus on other tasks.

Comforting and Delicious: Creamy sauce and crispy breadcrumbs make every bite irresistible.

Perfect for Any Occasion: Great for weeknight meals or special gatherings.

Ingredients

• 4 boneless, skinless chicken breasts

• 4 slices of ham

• 4 slices of Swiss cheese

• 1 can (10.5 oz) condensed cream of chicken soup

• 1 cup of milk

• 1 cup of seasoned breadcrumbs

• 1/4 cup of melted butter

• Salt and pepper to taste

Instructions

Prepare the Chicken:

1. Place each chicken breast between two sheets of plastic wrap or parchment paper.

2. Pound the chicken breasts to an even thickness using a meat mallet to ensure uniform cooking.

Assemble the Chicken Rolls:

1. Lay one slice of ham and one slice of Swiss cheese on top of each chicken breast.

2. Roll up the chicken tightly, securing the rolls with toothpicks if needed.

Arrange in Slow Cooker:

1. Place the prepared chicken rolls seam-side down in the bottom of your slow cooker.

Mix the Sauce:

1. In a medium bowl, whisk together the condensed cream of chicken soup and milk until smooth.

2. Pour this creamy mixture evenly over the chicken rolls in the slow cooker.

Add the Topping:

1. In a small bowl, mix the seasoned breadcrumbs with the melted butter until evenly coated.

2. Sprinkle the breadcrumb mixture over the chicken and sauce.

Cook:

1. Cover the slow cooker with its lid.

2. Set it to cook on low for 4-5 hours, or until the chicken is fully cooked and tender (internal temperature of 165°F or 74°C).

Final Touches:

1. Carefully remove the toothpicks from the chicken rolls before serving.

2. Taste and season the dish with salt and pepper if desired.

Tips

Customize the Filling: Add a layer of Dijon mustard inside the rolls for extra flavor.

Breadcrumb Alternatives: Use crushed crackers or panko for a different texture.

Thicker Sauce: Stir in a bit of cornstarch mixed with water at the end of cooking if the sauce is too thin.

Check for Doneness: Use a meat thermometer to ensure the chicken is fully cooked.

Storage Options

Refrigerator: Store leftovers in an airtight container for up to 3 days. Reheat in the oven or microwave until heated through.

Freezer: Freeze individual portions in freezer-safe containers for up to 3 months. Thaw overnight in the refrigerator before reheating.

Chicken Cordon Bleu Casserole brings the elegance of a classic dish to your table with minimal effort. Its creamy sauce, tender chicken, and crispy topping make it a comforting and satisfying meal that everyone will love.

Cinnamon Sugar Bread

0

Cinnamon Sugar Bread is a delightful treat that combines the comforting flavors of cinnamon and sugar with a tender, buttery crumb. Perfect for breakfast, as an afternoon snack, or a dessert, this bread is sure to fill your home with the warm, inviting aroma of cinnamon as it bakes. The layers of cinnamon sugar create a beautifully marbled loaf that’s as stunning to slice as it is to eat.

This easy-to-make recipe uses pantry staples and comes together with minimal effort. The buttermilk ensures a moist texture, while the cinnamon sugar mixture adds a sweet and slightly crunchy topping. Whether enjoyed fresh out of the oven or toasted with butter the next day, this bread is a guaranteed crowd-pleaser.

Why You’ll Love This Recipe

Warm and Cozy Flavors: The perfect blend of cinnamon and sugar adds a comforting sweetness.

Moist and Tender: Buttermilk creates a soft texture that stays fresh for days.

Easy to Make: Straightforward steps make this recipe approachable for any skill level.

Versatile Treat: Great for breakfast, snacks, or dessert.

Ingredients

For the Bread:

• 2 cups granulated sugar

• 1 cup unsalted butter, softened

• 2 large eggs

• 2 cups buttermilk

• 4 cups all-purpose flour

• 2 teaspoons baking soda

For the Cinnamon Sugar Mixture:

• 2/3 cup granulated sugar

• 3 teaspoons ground cinnamon

Instructions

Cinnamon Sugar Preparation:

1. In a small mixing bowl, combine the granulated sugar and ground cinnamon.

2. Mix thoroughly to create a uniform blend and set aside for later use.

Batter Preparation:

1. In a large mixing bowl, cream together the softened butter, granulated sugar, and eggs using a hand or stand mixer. Mix until the texture is light and smooth.

2. Gradually incorporate the buttermilk, followed by the all-purpose flour and baking soda. Mix just until combined, ensuring a consistent and lump-free batter.

Loaf Pan Layering:

1. Grease two loaf pans thoroughly or line them with parchment paper for easy removal.

2. Evenly divide and pour half of the prepared batter into the two pans. Smooth the surface with a spatula.

3. Generously sprinkle the cinnamon sugar mixture over the batter in both pans, reserving about 1/4 of the mixture for the top layer.

Final Layering:

1. Pour the remaining batter into the pans, spreading it evenly over the cinnamon sugar layer.

2. Sprinkle the reserved cinnamon sugar mixture over the top of each loaf, creating a sweet, crunchy topping.

Baking:

1. Preheat your oven to 350°F (175°C).

2. Place the loaf pans on the center rack and bake for 45-50 minutes.

3. Check for doneness by inserting a skewer or toothpick into the center of each loaf. If it comes out clean, the bread is ready.

Cooling:

1. Remove the loaf pans from the oven and allow the bread to cool for at least 20 minutes.

2. Carefully remove the loaves from the pans and place them on a wire rack to cool completely before slicing.

Tips

Even Layers: Use a spatula to smooth each layer for consistent marbling.

Substitute for Buttermilk: If you don’t have buttermilk, make a substitute by mixing 2 cups of milk with 2 tablespoons of lemon juice or vinegar. Let it sit for 5 minutes before using.

Storage: Wrap the cooled bread in plastic wrap or aluminum foil to keep it moist and fresh.

Storage Options

Room Temperature: Store in an airtight container or wrap in foil for up to 3 days.

Refrigerator: Extend freshness by refrigerating for up to a week. Bring to room temperature or warm before serving.

Freezer: Freeze individual slices or whole loaves in freezer-safe bags for up to 3 months. Thaw overnight in the refrigerator or reheat directly in the oven.

Cinnamon Sugar Bread is a simple yet delightful recipe that’s perfect for any time of day. With its tender crumb and warm cinnamon sugar layers, this bread will quickly become a household favorite.

Crab Stuffed Cheddar Bay Biscuits with Lemon Butter

0

Crab-Stuffed Cheddar Bay Biscuits are a decadent twist on the classic cheddar biscuit, filled with a rich, savory crab mixture and topped with a tangy lemon butter glaze. These golden, flaky biscuits are perfect for special occasions, family dinners, or as an indulgent appetizer that will impress your guests.

The combination of lump crab meat, parmesan cheese, and buttery biscuit dough makes every bite a luxurious treat. The lemon butter brushed on top adds a bright, zesty finish that balances the rich flavors. This recipe is simple enough to make at home but delivers restaurant-quality results that everyone will love.

Why You’ll Love This Recipe

Decadent Filling: The crab stuffing is creamy, flavorful, and perfectly complements the cheddar biscuits.

Homemade Elegance: These biscuits feel fancy but are easy to prepare.

Versatile: Ideal as a starter, side dish, or even the star of your meal.

Ingredients

For the Biscuits

• 1 package Cheddar Bay Biscuit Mix

• 1 tsp garlic powder

• 1 tsp Italian seasoning

For the Crab Filling

• 1 pound lump crab meat (fully cooked)

• ¼ tsp paprika

• ½ tsp onion powder

• ½ cup + extra mayonnaise (if needed)

• 1 tbsp mustard

• ½ sleeve Ritz crackers, crushed

• 1 cup grated parmesan cheese

For the Lemon Butter Glaze

• 2 tbsp melted butter

• 1 tsp fresh lemon juice

Instructions

Prepare the Biscuit Dough

1. Prepare the Cheddar Bay Biscuit Mix according to the package directions, adding garlic powder and Italian seasoning to the dough for extra flavor. Set aside.

Preheat and Prepare Muffin Tins

1. Preheat your oven to 375°F (190°C).

2. Spray two muffin tins with nonstick cooking spray to prevent sticking.

Make the Crab Filling

1. In a medium mixing bowl, combine the lump crab meat, paprika, onion powder, mustard, mayonnaise, and crushed Ritz crackers.

2. Add the grated parmesan cheese and stir until well combined.

3. Adjust the consistency with a little more mayonnaise if the mixture feels too dry.

Assemble the Stuffed Biscuits

1. Dust your hands with flour to prevent sticking. Scoop a small amount of biscuit dough and flatten it into a cup shape.

2. Place a scoop of the crab filling into the center of the dough.

3. Cover the filling with a small piece of biscuit dough, sealing the edges around the crab mixture to enclose it.

4. Place each stuffed biscuit into the prepared muffin tin.

Bake the Biscuits

1. Bake the biscuits in the preheated oven for 12-15 minutes, or until the tops are golden brown and the biscuits are cooked through.

Brush with Lemon Butter

1. In a small bowl, mix the melted butter with the fresh lemon juice.

2. Brush the lemon butter mixture over the hot biscuits as soon as they come out of the oven.

Serve and Enjoy

1. Serve the biscuits warm, garnished with a sprinkle of parsley or a wedge of lemon if desired.

Tips

Use Fresh Crab: Lump crab meat works best, but canned crab can be a budget-friendly substitute. Just ensure it’s well-drained.

Prevent Overstuffing: Use just enough crab filling to avoid it spilling out during baking.

Add Extra Cheese: Sprinkle a little shredded cheddar on top before baking for an even cheesier finish.

Make Ahead: Prepare the crab filling and biscuit dough separately, then assemble and bake when ready to serve.

Storage Options

Refrigeration: Store leftover biscuits in an airtight container in the refrigerator for up to 3 days. Reheat in the oven at 350°F (175°C) to maintain their texture.

Freezing: Freeze unbaked stuffed biscuits on a baking sheet until solid, then transfer to a freezer-safe container. Bake from frozen, adding 5-7 minutes to the baking time.

These Crab-Stuffed Cheddar Bay Biscuits with Lemon Butter are a showstopping addition to any table, combining the indulgence of a seafood feast with the comfort of warm, cheesy biscuits. Perfect for impressing your guests or treating yourself to a gourmet experience!

Berry Cream Cheese Truffles

0

Berry Cream Cheese Truffles are the perfect blend of tangy, creamy, and sweet. These bite-sized delights feature a luscious cream cheese filling with a surprise burst of berry compote in the center, all wrapped in a smooth chocolate coating. Whether for special occasions, as a gift, or just as a decadent treat, these truffles will impress with their vibrant flavors and elegant presentation.

The berry filling adds a fresh, fruity twist to the creamy base, while the chocolate coating provides a satisfying crunch. With sprinkles or crushed nuts on top, these truffles are as beautiful as they are delicious.

Why You’ll Love This Recipe

Burst of Berry Flavor: A tangy and fruity surprise awaits in the center.

Creamy Texture: The cream cheese filling is rich and smooth.

Customizable: Choose your favorite berries and decorations to make these truffles your own.

Perfect for Any Occasion: Elegant enough for parties yet simple enough for a casual treat.

Ingredients

For the Filling:

• 1 cup (150g) mixed berries (fresh or frozen)

• 1/4 cup (50g) granulated sugar

• 1 tablespoon lemon juice

• 1 tablespoon cornstarch

• 1 tablespoon water

For the Cream Cheese Mixture:

• 8 oz (225g) cream cheese, softened

• 1/4 cup (60g) unsalted butter, softened

• 1 cup (125g) powdered sugar

• 1 teaspoon vanilla extract

For the Coating:

• White chocolate or candy melts, for dipping

• Sprinkles or crushed nuts, for decoration

Instructions

Prepare the Berry Filling:

1. Cook the Berries:

• Combine the mixed berries, sugar, and lemon juice in a medium saucepan.

• Cook over medium heat, stirring occasionally, until the berries break down and the mixture becomes saucy (about 5-7 minutes).

2. Thicken the Filling:

• In a small bowl, mix the cornstarch and water to create a slurry.

• Stir the slurry into the berry mixture, cooking until thickened (1-2 minutes).

• Remove from heat and let the filling cool completely.

Make the Cream Cheese Mixture:

1. Combine Ingredients:

• In a mixing bowl, beat the cream cheese and butter with an electric mixer until smooth and creamy.

• Gradually add the powdered sugar and vanilla extract, mixing until well combined.

Assemble the Truffles:

1. Form the Truffles:

• Scoop about 1 tablespoon of the cream cheese mixture and flatten it slightly in your hand.

• Add a small dollop of the cooled berry filling in the center.

• Carefully seal the edges of the cream cheese mixture around the berry filling and roll into a ball.

• Place the truffles on a parchment-lined tray.

2. Chill the Truffles:

• Refrigerate the truffles for at least 1 hour to firm up.

Coat the Truffles:

1. Melt the Chocolate:

• Melt the white chocolate or candy melts according to the package instructions.

2. Dip the Truffles:

• Using a fork or dipping tool, submerge each truffle into the melted chocolate, ensuring it’s fully coated.

• Let any excess chocolate drip off before placing the truffle back onto the parchment-lined tray.

3. Decorate:

• While the chocolate is still wet, sprinkle the truffles with nuts, sprinkles, or other decorations.

Final Preparation:

1. Chill Again:

• Place the coated truffles in the refrigerator until the chocolate sets and the truffles are firm.

Serve:

1. Enjoy:

• Serve the truffles chilled as a delightful dessert or gift.

Tips

Berry Choices: Use strawberries, raspberries, blueberries, or a mix for a unique flavor.

Coating Alternatives: Dark or milk chocolate can be used instead of white chocolate.

Storage: Store truffles in an airtight container in the refrigerator for up to 5 days.

Freezing: Freeze uncoated truffles for up to 1 month. Dip in chocolate after thawing for the best results.

Berry Cream Cheese Truffles are the perfect indulgence, offering a balance of creamy richness and fruity brightness in every bite. Share them with friends or savor them yourself—they’re irresistible either way!