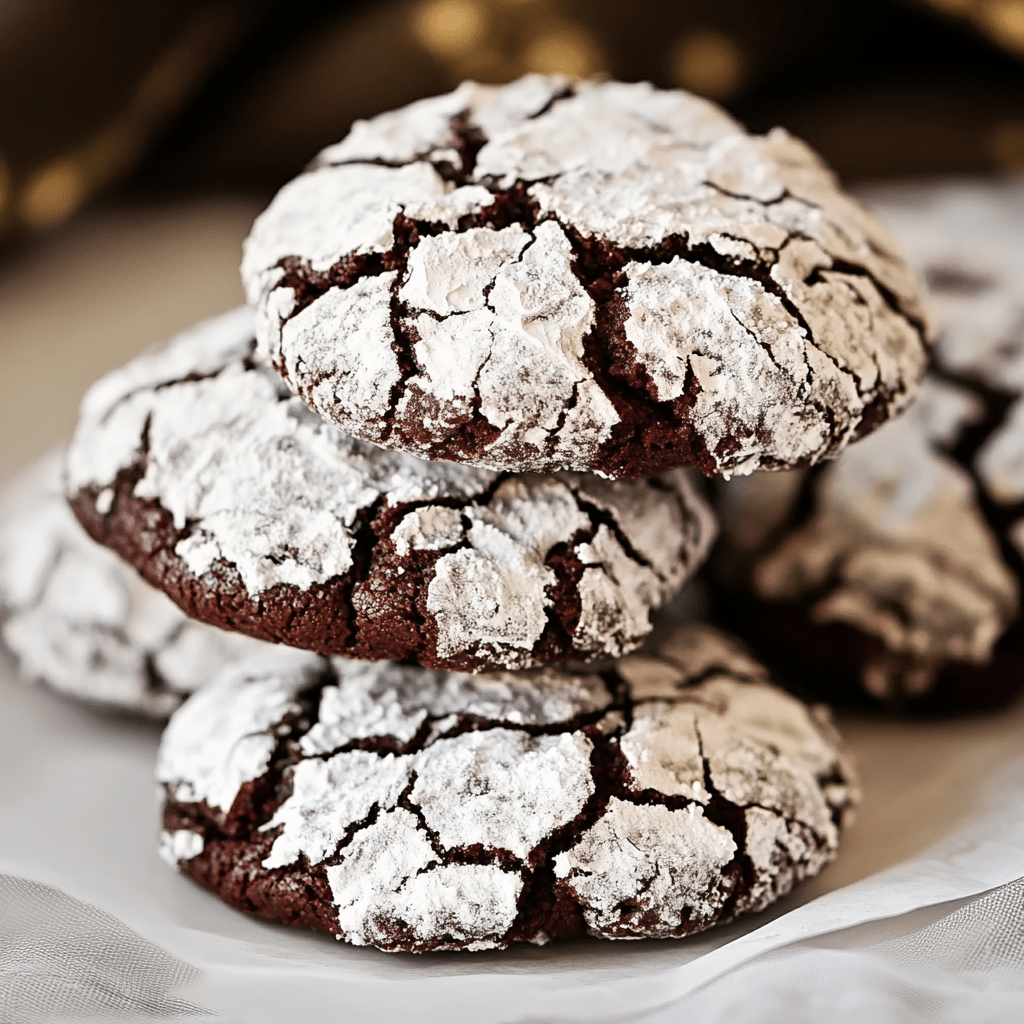
Easy Chocolate Cobbler

0

Easy Chocolate Cobbler is the perfect dessert for those who crave rich, gooey chocolate flavors with minimal effort. This simple yet indulgent recipe creates a dessert with two distinct layers: a fudgy, molten chocolate base and a tender, golden-brown cake topping. The magic happens in the oven, where the batter transforms into a decadent cobbler with a luscious sauce hiding beneath the surface. It’s a treat that feels both nostalgic and luxurious, making it an excellent choice for weeknight dinners, family gatherings, or special occasions.

One of the best parts of this dessert is its simplicity. With a handful of pantry staples and a single baking dish, you can create a show-stopping dessert that tastes like it came straight from a bakery. The warm, chocolatey goodness pairs perfectly with a scoop of vanilla ice cream or a dollop of whipped cream, elevating it to an unforgettable treat. Whether you’re hosting friends or enjoying a cozy night at home, this Easy Chocolate Cobbler will satisfy your sweet tooth and leave you reaching for seconds.

Why You’ll Love This Recipe

Easy to Make: No fancy equipment or techniques required.

Rich and Gooey: The perfect combination of chocolate sauce and tender cake.

Crowd-Pleaser: A favorite for family gatherings or potluck dinners.

Ingredients

• 8 tbsp butter

• 2¼ cups granulated sugar, divided

• 1½ cups self-rising flour

• 1 tsp vanilla extract

• ¾ cup milk

• 6 tbsp cocoa powder

• 2 cups boiling water

Instructions

Step 1: Preheat the Oven

1. Preheat your oven to 350°F (175°C).

Step 2: Melt the Butter

1. Place the butter in a 9×13-inch glass baking dish.

2. Put the dish in the preheated oven for about 5 minutes, or until the butter is fully melted.

Step 3: Prepare the Batter

1. In a medium bowl, combine 1¼ cups of sugar, self-rising flour, vanilla extract, and milk.

2. Stir until the mixture is smooth and well combined.

Step 4: Assemble the Cobbler

1. Once the butter is melted, remove the baking dish from the oven.

2. Pour the batter over the melted butter. Do not stir.

Step 5: Add the Cocoa Mixture

1. In a separate bowl, mix the remaining 1 cup of sugar with the cocoa powder.

2. Sprinkle this mixture evenly over the batter in the baking dish. Do not stir.

Step 6: Add Boiling Water

1. Gently pour the boiling water over the cocoa mixture in the baking dish. Do not stir.

Step 7: Bake the Cobbler

1. Place the dish in the preheated oven.

2. Bake for 40–45 minutes, or until the top is golden brown and the cobbler has set.

Step 8: Serve

1. Let the cobbler cool slightly before serving.

2. Serve warm with a scoop of vanilla ice cream for the perfect finishing touch.

Tips

Self-Rising Flour Substitute: If you don’t have self-rising flour, combine 1½ cups of all-purpose flour with 2¼ tsp baking powder and ¼ tsp salt.

Customize: Add a pinch of cinnamon or espresso powder to the cocoa mixture for a unique twist.

Don’t Stir: Resist the urge to mix the layers to ensure the cobbler forms properly.

Storage Options

Refrigerator: Store leftovers in an airtight container for up to 3 days. Reheat in the microwave before serving.

Freezer: Freeze individual portions in airtight containers for up to 1 month. Thaw in the refrigerator and reheat before enjoying.

Easy Chocolate Cobbler is the perfect dessert for chocolate lovers. With its gooey chocolate sauce and tender cake topping, it’s an irresistible treat that will have everyone coming back for seconds!

Chicken Alfredo Garlic Bread Casserole

0

Chicken Alfredo Garlic Bread Casserole combines the best of two favorites: rich, creamy Alfredo sauce and cheesy garlic bread. This dish is hearty, indulgent, and perfect for family dinners or entertaining. The crispy garlic bread base soaks up the flavorful sauce, while the chicken and melted cheese provide a satisfying topping.

Why You’ll Love This Recipe

Comfort Food at Its Best: Creamy, cheesy, and full of flavor.

Quick and Easy: Uses store-bought garlic bread and rotisserie chicken for convenience.

Perfect for Sharing: A great dish for gatherings or potlucks.

Ingredients

• 1 loaf store-bought garlic bread

• 4 tbsp butter

• 1 tbsp olive oil

• 2 cups heavy cream

• ¾ tsp salt

• ¼ tsp black pepper

• ⅛ tsp cayenne pepper

• ½ tsp dried basil

• ½ tsp dried oregano

• ½ tsp fresh lemon zest

• 1½ cups chopped rotisserie chicken or leftover chicken

• 2 egg yolks

• 3 cups shredded mozzarella cheese, divided

• 1 cup grated Parmesan cheese

Instructions

Step 1: Bake the Garlic Bread

1. Preheat the oven to 375°F (190°C).

2. Place the garlic bread on a parchment-lined baking sheet and bake for 15 minutes.

Step 2: Prepare the Bread for Topping

1. Remove the bread from the oven and evenly spread 1½ cups of shredded mozzarella cheese over it. Set aside.

Step 3: Make the Alfredo Sauce

1. In a medium saucepan, melt the butter and olive oil over medium heat.

2. Stir in the heavy cream, salt, black pepper, cayenne pepper, basil, and oregano. Bring to a gentle simmer.

3. In a small bowl, whisk the egg yolks with ¼ cup of the hot cream sauce to temper the yolks.

4. Gradually add the tempered yolks back into the saucepan, whisking to combine.

5. Simmer until the sauce thickens slightly, then stir in the grated Parmesan cheese until fully melted.

6. Add the fresh lemon zest and mix well.

Step 4: Assemble the Casserole

1. Spread the chopped rotisserie chicken evenly over the garlic bread base.

2. Spoon the Alfredo sauce over the chicken, ensuring even coverage.

3. Top with the remaining 1½ cups of shredded mozzarella cheese.

Step 5: Bake the Casserole

1. Return the assembled casserole to the oven.

2. Bake for another 15 minutes, or until the cheese is melted and golden brown.

Step 6: Serve

1. Remove the casserole from the oven and let it rest for 5 minutes.

2. Cut into pieces and serve hot.

Tips

Add Veggies: Include sautéed spinach, mushrooms, or broccoli for added nutrition.

Cheese Variations: Swap mozzarella with provolone or a blend of Italian cheeses.

Spice It Up: Add red pepper flakes for a hint of heat.

Make Ahead: Prepare the casserole in advance, refrigerate, and bake when ready to serve.

Storage Options

Refrigerator: Store leftovers in an airtight container for up to 3 days. Reheat in the oven for the best texture.

Freezer: Freeze portions of the baked casserole for up to 1 month. Thaw in the refrigerator overnight and reheat before serving.

Chicken Alfredo Garlic Bread Casserole is a comforting and indulgent dish that’s sure to be a hit with family and friends. With its creamy Alfredo sauce, tender chicken, and crispy garlic bread base, every bite is a flavor-packed delight!

German Chocolate Pie

0

German Chocolate Pie is a decadent dessert that combines a rich, velvety chocolate filling with a sweet and nutty coconut-pecan topping, all nestled in a buttery, flaky crust. This pie is perfect for chocolate lovers and an excellent choice for holidays, special occasions, or any time you’re craving a show-stopping dessert.

Each bite delivers a luxurious blend of textures and flavors: smooth chocolate custard, chewy coconut, crunchy pecans, and a crisp pie crust.

Why You’ll Love This Recipe

Decadent and Rich: Perfectly balances chocolate and sweetness.

Beautiful Presentation: The layered pie is as visually appealing as it is delicious.

Crowd-Pleaser: A guaranteed hit for gatherings and celebrations.

Ingredients

For the Crust:

• 1¼ cups all-purpose flour

• ½ tsp salt

• ½ cup cold unsalted butter, cubed

• 3–4 tbsp ice water

For the Chocolate Filling:

• 1¼ cups granulated sugar

• 2 tbsp cornstarch

• ¼ tsp salt

• 1½ cups whole milk

• ½ cup heavy cream

• 4 large egg yolks

• 4 oz semisweet chocolate, chopped

• 1 oz unsweetened chocolate, chopped

• 2 tbsp unsalted butter

• 1 tsp vanilla extract

For the Coconut-Pecan Topping:

• ½ cup granulated sugar

• ½ cup brown sugar, packed

• ½ cup unsalted butter

• 3 large egg yolks

• 1 cup evaporated milk

• 1 tsp vanilla extract

• 1⅓ cups sweetened shredded coconut

• 1 cup chopped pecans

Instructions

Step 1: Prepare the Crust

1. In a large bowl, combine flour and salt. Use a pastry cutter or your fingers to cut in the cold butter until the mixture resembles coarse crumbs.

2. Gradually add ice water, 1 tablespoon at a time, until the dough begins to come together.

3. Form the dough into a disk, wrap it in plastic wrap, and refrigerate for at least 30 minutes.

4. Preheat oven to 375°F (190°C). Roll out the dough on a floured surface and fit it into a 9-inch pie pan. Trim and crimp the edges.

5. Line the crust with parchment paper and fill with pie weights or dried beans. Bake for 15 minutes.

6. Remove weights and parchment, then bake for an additional 10 minutes until golden. Cool completely.

Step 2: Prepare the Chocolate Filling

1. In a medium saucepan, whisk sugar, cornstarch, and salt. Gradually whisk in milk and heavy cream.

2. Cook over medium heat, stirring constantly, until thickened and boiling. Boil for 1 minute and remove from heat.

3. In a bowl, whisk the egg yolks. Gradually add ½ cup of the hot milk mixture to temper the eggs, then pour the egg mixture back into the saucepan.

4. Cook over medium heat, stirring constantly, until thickened and gently boiling. Remove from heat and stir in chopped chocolates, butter, and vanilla until smooth.

5. Pour the chocolate filling into the cooled crust. Cover with plastic wrap pressed directly on the surface and refrigerate for 4 hours.

Step 3: Prepare the Coconut-Pecan Topping

1. In a medium saucepan, combine granulated sugar, brown sugar, butter, egg yolks, and evaporated milk. Cook over medium heat, stirring constantly, until thickened, about 10–12 minutes.

2. Remove from heat and stir in vanilla extract, shredded coconut, and chopped pecans. Let cool slightly.

Step 4: Assemble the Pie

1. Once the chocolate filling is set, spread the coconut-pecan topping evenly over the top.

2. Chill the pie for 30 minutes to allow the topping to set.

Step 5: Serve

1. Slice the pie and serve chilled. Garnish with additional pecans or a drizzle of chocolate, if desired.

Tips

Prevent a Soggy Crust: Ensure the crust is fully baked and cooled before adding the filling.

Tempering Eggs: Gradually whisking hot liquid into the yolks prevents curdling.

Extra Garnish: Top with a dollop of whipped cream or chocolate shavings for added elegance.

Make Ahead: Prepare the pie a day in advance and store it in the refrigerator.

Storage Options

Refrigerator: Store leftovers in an airtight container for up to 3 days.

Freezer: Freeze the pie (without the topping) for up to 2 months. Add the topping after thawing.

German Chocolate Pie is a luxurious dessert that’s rich, creamy, and packed with flavor. It’s the perfect indulgence for any chocolate lover!

Beef and Rice Casserole

0

Beef and Rice Casserole is a hearty, comforting dish that combines savory ground beef, tender rice, and a creamy, cheesy sauce. Perfect for family dinners, this recipe is easy to prepare and bakes to golden perfection in one dish, making cleanup a breeze.

The blend of cream soups and spices adds depth to the casserole, while the melted cheddar cheese topping provides a satisfying finish. Serve it with a side of steamed vegetables or a fresh salad for a complete meal.

Why You’ll Love This Recipe

One-Pan Wonder: Simple to prepare and minimizes cleanup.

Comforting and Filling: Packed with flavors and textures that everyone will enjoy.

Customizable: Add vegetables or spices to make it your own.

Ingredients

• 1 lb ground beef

• 1 onion, chopped

• 1 cup long-grain white rice, uncooked

• 1 can (10.5 oz) cream of mushroom soup

• 1 can (10.5 oz) cream of chicken soup

• 2 cups water

• 1 tsp garlic powder

• 1 tsp paprika

• Salt and pepper, to taste

• 1 cup shredded cheddar cheese

Instructions

Step 1: Preheat the Oven

1. Preheat your oven to 350°F (175°C).

Step 2: Cook the Beef and Onion

1. In a large skillet over medium heat, cook the ground beef and chopped onion until the meat is browned and the onion is translucent.

2. Drain any excess grease and remove the skillet from heat.

Step 3: Mix the Casserole Ingredients

1. Add the uncooked rice, cream of mushroom soup, cream of chicken soup, water, garlic powder, paprika, salt, and pepper to the skillet.

2. Mix thoroughly to combine all ingredients.

Step 4: Assemble the Casserole

1. Transfer the beef and rice mixture into a 9×13-inch baking dish.

2. Cover the dish tightly with aluminum foil to keep in moisture.

Step 5: Bake the Casserole

1. Place the covered baking dish in the preheated oven.

2. Bake for 1 hour, or until the rice is tender and the flavors are melded.

Step 6: Add the Cheese Topping

1. Remove the foil from the casserole dish.

2. Sprinkle the shredded cheddar cheese evenly over the top.

3. Return the dish to the oven and bake for an additional 15 minutes, or until the cheese is melted and bubbly.

Step 7: Serve

1. Remove the casserole from the oven and let it cool slightly before serving.

2. Serve warm, optionally garnished with fresh parsley or green onions.

Tips

Add Vegetables: Stir in frozen peas, corn, or chopped bell peppers for added nutrients and flavor.

Cheese Options: Swap cheddar for mozzarella or a Mexican cheese blend for a different flavor profile.

Make Ahead: Assemble the casserole up to a day in advance, refrigerate, and bake when ready to serve.

Leftovers: Reheat leftovers in the oven or microwave, adding a splash of water if needed to prevent dryness.

Storage Options

Refrigerator: Store leftovers in an airtight container for up to 3 days.

Freezer: Freeze the baked casserole in individual portions for up to 2 months. Thaw in the refrigerator overnight and reheat before serving.

Beef and Rice Casserole is a comforting, satisfying meal that’s easy to make and perfect for busy weeknights or casual gatherings. With its creamy texture and savory flavors, it’s sure to become a family favorite!

Honey Garlic Shrimp

0

Honey Garlic Shrimp is a quick and flavorful dish that balances the sweetness of honey with the savory umami of soy sauce and the aromatic kick of garlic and ginger. This dish is perfect for busy weeknights or a light, healthy meal, pairing wonderfully with rice and steamed vegetables.

The shrimp soak up the marinade, creating a caramelized glaze as they cook, while optional green onions add a pop of color and freshness to the dish.

Why You’ll Love This Recipe

Quick and Easy: Ready in under 30 minutes, with minimal prep.

Flavorful and Versatile: Sweet, savory, and perfectly balanced.

Healthy: Packed with lean protein and pairs beautifully with veggies or rice.

Ingredients

• ⅓ cup honey

• ¼ cup soy sauce (reduced sodium recommended)

• 1 tbsp minced garlic

• Optional: 1 tsp minced fresh ginger

• 1 lb medium uncooked shrimp, peeled and deveined

• 2 tsp olive oil

• Optional: chopped green onion for garnish

Instructions

Step 1: Prepare the Marinade

1. In a medium bowl, whisk together honey, soy sauce, garlic, and ginger (if using).

Step 2: Marinate the Shrimp

1. Place the shrimp in a large zip-top bag or airtight container.

2. Pour half of the marinade over the shrimp, ensuring they are evenly coated.

3. Seal and refrigerate for at least 15 minutes or up to 8–12 hours for deeper flavor.

4. Cover and refrigerate the remaining marinade to use during cooking.

Step 3: Cook the Shrimp

1. Heat olive oil in a large skillet over medium-high heat.

2. Remove shrimp from the marinade, discarding the used marinade.

3. Place shrimp in the skillet and cook on one side until pink, about 45 seconds.

4. Flip the shrimp and pour the reserved marinade into the skillet.

Step 4: Finish Cooking

1. Cook the shrimp for another 1–2 minutes, or until fully cooked and opaque. The marinade should thicken slightly to form a sauce.

Step 5: Serve

1. Transfer the shrimp to a serving dish and drizzle with the cooked marinade sauce.

2. Garnish with chopped green onion, if desired.

Serving Suggestions

• Serve over brown or white rice to soak up the flavorful sauce.

• Pair with steamed broccoli, snap peas, or roasted vegetables for a balanced meal.

• For a low-carb option, serve over cauliflower rice or zucchini noodles.

Tips

Avoid Overcooking: Shrimp cook quickly; remove them from heat as soon as they turn pink and opaque.

Customize Flavors: Add a pinch of red pepper flakes for spice or sesame oil for depth.

Use Fresh or Frozen Shrimp: If using frozen shrimp, thaw completely and pat dry before marinating.

Storage Options

Refrigerator: Store leftovers in an airtight container for up to 3 days. Reheat gently in a skillet over low heat.

Freezer: Store cooked shrimp in a freezer-safe container for up to 2 months. Thaw in the refrigerator before reheating.

Honey Garlic Shrimp is a delicious, versatile recipe that’s easy to prepare and packed with flavor. It’s perfect for a quick dinner or an elegant meal to impress your guests!

Peach Dumplings Recipe

0

Peach Dumplings are a warm, comforting dessert that combines soft, sweet peaches with buttery crescent dough, a rich cinnamon-sugar sauce, and a hint of citrus. The result is a perfectly balanced treat, crispy on the outside and tender on the inside, making it the ideal dessert for any occasion.

Paired with a scoop of vanilla ice cream, these dumplings are a guaranteed crowd-pleaser, offering both simplicity and indulgence in every bite.

Why You’ll Love This Recipe

Quick and Easy: Minimal ingredients and preparation make this a hassle-free dessert.

Classic Flavors: The combination of peaches, cinnamon, and sugar is timeless.

Perfectly Decadent: Rich buttery sauce and flaky dough make this dish extra special.

Ingredients

• 2 (15 oz) cans of peaches, drained

• 2 (8 oz) tubes refrigerated crescent roll dough

• 1 cup (2 sticks) butter

• ⅔ cup granulated sugar

• ⅔ cup brown sugar

• 3 tsp cinnamon

• 1 ½ cups Sprite or citrus soda

• Vanilla ice cream, for serving

Instructions

Step 1: Preheat the Oven and Prepare the Dish

1. Preheat your oven to 350°F (175°C).

2. Grease a 9×13-inch baking dish thoroughly to prevent sticking.

Step 2: Prepare the Crescent Rolls

1. Open the crescent roll tubes and separate the dough into triangles.

2. Place one or two peach slices at the wide end of each triangle, depending on the size of the peaches.

3. Sprinkle a pinch of cinnamon over the peaches.

4. Roll the dough tightly around the peaches, starting from the wide end and securing the edges.

Step 3: Assemble the Dumplings

1. Place the rolled dumplings into the prepared baking dish, leaving a little space between them.

2. Repeat until all the peaches and dough are used.

Step 4: Make the Cinnamon-Sugar Sauce

1. In a microwave-safe bowl or saucepan, melt the butter until fully liquefied.

2. Stir in the granulated sugar, brown sugar, and remaining cinnamon until smooth and well combined.

Step 5: Add the Sauce and Soda

1. Using a large spoon, pour the butter mixture evenly over the dumplings, ensuring each is coated.

2. Carefully pour the Sprite or citrus soda around the dumplings, avoiding the tops to ensure a crispy crust forms.

Step 6: Bake

1. Bake in the preheated oven for 30–35 minutes, or until the dumplings are golden brown on top and the sauce is bubbling.

Step 7: Serve

1. Serve the dumplings warm.

2. Top with a scoop of vanilla ice cream for the perfect finishing touch.

Tips

Use Fresh Peaches: Substitute canned peaches with fresh slices for a more robust flavor, but blanch and peel them first for best results.

Flavor Boost: Add a dash of nutmeg or a splash of vanilla extract to the sauce for extra depth.

Keep the Crust Crispy: Avoid pouring soda over the tops of the dumplings to ensure a crispy exterior.

Make Ahead: Assemble the dumplings in the dish and refrigerate for up to 4 hours before baking.

Storage Options

Refrigerator: Store leftovers in an airtight container for up to 3 days. Reheat in the oven or microwave before serving.

Freezer: Freeze the baked dumplings (without ice cream) for up to 1 month. Thaw in the refrigerator and reheat in the oven.

Peach Dumplings are a delightful dessert that’s easy to make and hard to resist. Whether for a family dinner or a holiday gathering, this warm and comforting dish will leave everyone asking for seconds!

Peanut Butter Butterfinger Balls Recipe

0

Peanut Butter Butterfinger Balls are a decadent no-bake treat that combines the creamy richness of peanut butter, the crunch of crushed Butterfinger candy, and a smooth chocolate coating. These bite-sized delights are perfect for parties, holiday gatherings, or as a sweet indulgence to satisfy your cravings.

The contrast of textures and flavors, with the creamy peanut butter base and crispy candy bits, makes these treats irresistible. Easy to make and fun to garnish, they’re a guaranteed crowd-pleaser.

Why You’ll Love This Recipe

Quick and Easy: No baking required and ready in under an hour.

Rich and Decadent: A perfect balance of creamy, crunchy, and chocolatey flavors.

Customizable: Adjust sweetness or use your favorite candy for a personalized twist.

Ingredients

• 1 cup creamy peanut butter

• ¼ cup salted butter, softened

• 1 tsp pure vanilla extract

• 1 cup powdered sugar

• ¾ cup graham cracker crumbs

• ½ cup crushed Butterfinger candy (6 fun-size bars), plus 1-2 extra crushed candies for optional garnish

• 10 oz chocolate-flavored almond bark, divided (8 oz and 2 oz)

Instructions

Step 1: Mix Peanut Butter Base

1. In a medium-sized mixing bowl, add the peanut butter, softened butter, and vanilla extract.

2. Beat with a handheld mixer on medium-high speed until smooth and creamy.

Step 2: Combine Dry Ingredients

1. Lower the mixer speed to medium-low.

2. Gradually add the powdered sugar, graham cracker crumbs, and ½ cup crushed Butterfingers. Mix until well combined.

Step 3: Prepare for Chilling

1. Line a baking sheet with parchment paper.

2. Use a 1-tablespoon cookie scoop to portion the Butterfinger mixture. Roll each scoop into a smooth ball and place it on the lined baking sheet.

3. Chill the balls in the refrigerator for at least 30 minutes.

Step 4: Melt Chocolate

1. Place 8 ounces of almond bark in a microwave-safe shallow bowl.

2. Heat in the microwave at full power for 45 seconds. Stir and continue heating in 30-second intervals until completely melted and smooth.

Step 5: Coat the Balls

1. Remove the chilled Butterfinger balls from the refrigerator.

2. Roll each ball, one at a time, in the melted almond bark until fully coated.

3. Use a fork or spoon to lift the coated balls out of the chocolate and let the excess drip off. Place the coated balls back on the parchment-lined baking sheet.

Step 6: Drizzle and Garnish

1. Melt the remaining 2 ounces of almond bark in a small microwave-safe bowl, heating in 30-second intervals until smooth.

2. Drizzle the melted almond bark over the coated balls using a fork, candy-drizzling spoon, or a piping bag with a tiny slit.

3. Sprinkle the tops with extra crushed Butterfinger candy for garnish.

Step 7: Final Chilling

1. Return the coated and garnished balls to the refrigerator and chill until the chocolate is firm, about 15–20 minutes.

2. Keep refrigerated until ready to serve.

Tips

Smooth Rolling: Chill the mixture briefly if it becomes sticky while rolling the balls.

Candy Substitutions: Swap Butterfinger candy with your favorite candy for a unique variation.

Decorative Touch: Use colored sprinkles or a different drizzle pattern for festive occasions.

Double Boiler Option: If you prefer not to use a microwave, melt the almond bark in a double boiler for a consistent texture.

Storage Options

Refrigerator: Store in an airtight container in the refrigerator for up to 1 week.

Freezer: Freeze in a freezer-safe container for up to 3 months. Thaw in the refrigerator before serving.

Peanut Butter Butterfinger Balls are a delightful no-bake dessert that’s as fun to make as it is to eat. Perfect for any occasion, these sweet treats will disappear as soon as they hit the table!

Easy Skillet Steak Fajitas

0

Steak fajitas are a quick, flavorful, and versatile dish that combines tender, seasoned steak with sautéed bell peppers and onions. Served in warm tortillas with your favorite toppings, these fajitas are perfect for weeknight dinners or casual gatherings.

This one-skillet meal is easy to prepare, requires minimal cleanup, and offers a restaurant-quality experience at home. Customize with your favorite toppings for a meal that everyone will enjoy!

Why You’ll Love This Recipe

Quick and Easy: Ready in under 30 minutes with simple ingredients.

Flavorful: The combination of cumin, chili powder, and fresh garlic adds bold flavors.

Customizable: Top with your favorite toppings for a personalized fajita experience.

Ingredients

• 1 pound flank steak, sliced into thin strips

• 1 red bell pepper, sliced

• 1 green bell pepper, sliced

• 1 onion, sliced

• 2 tablespoons vegetable oil, divided

• 2 cloves garlic, minced

• 1 teaspoon ground cumin

• 1 teaspoon chili powder

• ½ teaspoon salt

• ¼ teaspoon black pepper

• Flour tortillas

• Optional toppings: shredded cheese, guacamole, sour cream, salsa

Instructions

Step 1: Cook the Steak

1. Heat 1 tablespoon of vegetable oil in a large skillet over medium-high heat.

2. Add the sliced steak to the skillet and cook until browned and cooked to your preferred doneness, about 3-4 minutes per side.

3. Remove the steak from the skillet and set aside.

Step 2: Sauté the Vegetables

1. Add the remaining tablespoon of vegetable oil to the same skillet.

2. Add the sliced red and green bell peppers and onion to the skillet.

3. Cook until the vegetables are softened and slightly charred, about 5-7 minutes.

Step 3: Add Spices

1. Stir in the minced garlic, ground cumin, chili powder, salt, and black pepper.

2. Cook for 1-2 minutes until the spices are fragrant and well combined with the vegetables.

Step 4: Combine Steak and Vegetables

1. Return the cooked steak to the skillet with the sautéed vegetables.

2. Stir to combine and heat through, about 1-2 minutes.

Step 5: Warm the Tortillas

1. Warm the flour tortillas in the microwave or in a separate skillet over low heat.

Step 6: Serve and Enjoy

1. Serve the steak and vegetable mixture on the warm tortillas.

2. Top with shredded cheese, guacamole, sour cream, salsa, or any other desired toppings.

Tips

Steak Doneness: Adjust cooking time for steak based on your preference (medium-rare, medium, etc.).

Prep Ahead: Slice the vegetables and steak in advance to save time.

Add Heat: Include sliced jalapeños or a pinch of cayenne pepper for a spicier dish.

Tortilla Alternatives: Use corn tortillas or lettuce wraps for a gluten-free option.

Storage Options

Refrigerator: Store leftover steak and vegetables in an airtight container for up to 3 days. Reheat in a skillet over medium heat before serving.

Freezer: Freeze the cooked steak and vegetables in a freezer-safe container for up to 2 months. Thaw overnight in the refrigerator and reheat before serving.

Easy Skillet Steak Fajitas are a delicious, quick meal that’s perfect for busy nights or entertaining. With vibrant vegetables, tender steak, and customizable toppings, this recipe is sure to become a family favorite!

Baked Broccoli Cheese Balls

0

Baked Broccoli Cheese Balls are a delicious, bite-sized snack that’s perfect for any occasion. Packed with the wholesome goodness of broccoli and the cheesy delight of cheddar and Parmesan, these golden-brown morsels are a hit with both kids and adults. They make a wonderful appetizer, side dish, or even a healthy snack option for on-the-go munching.

What makes this recipe a standout is its simplicity and versatility. With just a few basic ingredients and a straightforward preparation method, you can create a dish that’s as nutritious as it is indulgent. Baking instead of frying ensures a healthier take on this cheesy favorite, while still delivering that satisfying crunch and melt-in-your-mouth texture.

Why You’ll Love This Recipe

Healthy and Tasty: A great way to sneak in veggies while indulging in cheesy goodness.

Easy to Prepare: Minimal prep work and no frying mess.

Crowd-Pleaser: Perfect for parties, picnics, or a quick snack.

Ingredients

• 2 cups broccoli florets, finely chopped

• 1 cup breadcrumbs

• 1 ½ cups shredded cheddar cheese

• ⅓ cup grated Parmesan cheese

• 2 eggs

• 2 tablespoons all-purpose flour

• ½ teaspoon garlic powder

• ½ teaspoon onion powder

• Salt and pepper, to taste

• Cooking spray, for greasing

Instructions

Step 1: Preheat the Oven

1. Preheat your oven to 400°F (200°C).

2. Line a baking sheet with parchment paper or lightly grease it with cooking spray.

Step 2: Prepare the Broccoli

1. Steam the broccoli florets until tender-crisp, about 3-5 minutes.

2. Allow the steamed broccoli to cool slightly, then finely chop it into small pieces.

Step 3: Combine the Ingredients

1. In a large mixing bowl, combine the chopped broccoli, breadcrumbs, shredded cheddar cheese, grated Parmesan, eggs, flour, garlic powder, and onion powder.

2. Season with salt and pepper to taste.

3. Mix the ingredients thoroughly until they form a cohesive mixture.

Step 4: Shape the Balls

1. Using your hands, form the mixture into small balls, approximately 1 inch in diameter.

2. Place the balls on the prepared baking sheet, leaving a small gap between each one.

Step 5: Bake to Perfection

1. Bake the broccoli cheese balls in the preheated oven for 20-25 minutes, or until they turn golden brown and are firm to the touch.

2. Turn the balls halfway through baking for even browning.

Step 6: Serve and Enjoy

1. Allow the cheese balls to cool slightly before serving to prevent burns.

2. Serve warm with your favorite dipping sauces, such as ranch, marinara, or a spicy aioli.

Tips

Customize the Flavor: Add a pinch of paprika or chili flakes for a spicy kick, or fresh herbs like parsley or thyme for extra flavor.

Breadcrumb Options: Use panko breadcrumbs for a crispier texture or gluten-free breadcrumbs for a gluten-free version.

Even Sizing: Use a small cookie scoop to ensure evenly sized balls for uniform baking.

Make Ahead: Prepare the mixture and shape the balls ahead of time, then refrigerate until ready to bake.

Storage Options

Refrigerator: Store leftovers in an airtight container in the refrigerator for up to 3 days. Reheat in the oven at 350°F (175°C) for 10 minutes to regain crispness.

Freezer: Freeze the unbaked balls on a baking sheet until solid, then transfer them to a freezer-safe bag. Bake from frozen, adding an additional 5-7 minutes to the cooking time.

Baked Broccoli Cheese Balls are an irresistible snack that’s easy to make and sure to please everyone. Whether you’re hosting a party or looking for a healthy finger food, this recipe is bound to be a crowd favorite!

Creamy Parmesan Chicken

0

Creamy Parmesan Chicken is a luscious, comforting dish that brings together the rich flavors of Parmesan cheese and the creamy texture of mayonnaise to create a delightful topping for tender, juicy chicken breasts. It’s a simple yet elegant recipe that’s perfect for weeknight dinners or when you’re hosting guests and want to impress without spending hours in the kitchen.

This dish is as versatile as it is delicious. With a handful of pantry staples, you can whip up a flavorful, protein-packed meal that pairs beautifully with sides like roasted vegetables, mashed potatoes, or a crisp green salad. The creamy Parmesan topping locks in the chicken’s moisture, ensuring every bite is tender and satisfying.

Why You’ll Love This Recipe

Rich and Creamy: The Parmesan-mayo mixture creates a luscious, flavorful crust.

Quick and Easy: With minimal prep, this dish is oven-ready in minutes.

Versatile: Pairs well with a variety of sides, making it a perfect meal for any occasion.

Ingredients

• 4 boneless, skinless chicken breasts

• 1 cup mayonnaise

• ½ cup shredded Parmesan cheese

• 1 teaspoon salt

• ½ teaspoon black pepper

• 1 teaspoon minced garlic

• 1 teaspoon garlic powder

Instructions

Step 1: Preheat the Oven

1. Preheat your oven to 375°F (190°C).

2. Spray a baking dish with non-stick baking spray to prevent sticking and ensure easy cleanup.

Step 2: Prepare the Creamy Mixture

1. In a small bowl, combine the mayonnaise, shredded Parmesan cheese, salt, black pepper, minced garlic, and garlic powder.

2. Mix thoroughly until the ingredients are well combined and form a smooth, creamy mixture.

Step 3: Prepare the Chicken

1. Place the chicken breasts in the prepared baking dish, ensuring they are arranged in a single layer.

2. Evenly spread the mayonnaise mixture over the top of each chicken breast, covering them completely.

Step 4: Bake the Chicken

1. Transfer the baking dish to the preheated oven.

2. Bake for about 45 minutes, or until the chicken is cooked through and the internal temperature reaches 165°F (74°C). The creamy topping should be golden brown and bubbly.

Step 5: Serve and Enjoy

1. Remove the chicken from the oven and let it rest for 5 minutes before serving.

2. Serve warm with your favorite side dishes.

Tips

Check for Doneness: Use a meat thermometer to ensure the chicken reaches an internal temperature of 165°F (74°C).

Even Cooking: Pound thicker chicken breasts to an even thickness for more uniform cooking.

Cheese Alternatives: Substitute part of the Parmesan with mozzarella or Gruyère for a different flavor profile.

Garlic Upgrade: For extra garlic flavor, roast the minced garlic before mixing it into the topping.

Storage Options

Refrigerator: Store leftover chicken in an airtight container for up to 3 days. Reheat in the oven at 325°F (160°C) until warmed through to retain the creamy topping’s texture.

Freezing: Freeze cooked chicken for up to 2 months. Thaw in the refrigerator overnight before reheating.

Creamy Parmesan Chicken is a no-fuss recipe that delivers big on flavor and texture. Its rich, cheesy topping and tender, juicy chicken make it a go-to option for any occasion, ensuring it becomes a family favorite in no time!