Chicken Bubble Biscuit Bake Casserole is a hearty, comforting dish that combines tender chicken, crispy bacon, and fluffy biscuits in a creamy, cheesy sauce. This casserole is perfect for feeding a crowd or satisfying a family craving for a warm, filling meal. The blend of savory chicken, tangy ranch seasoning, and gooey cheese creates a flavor-packed dinner that’s both easy to prepare and deeply satisfying.
The biscuits bake into soft, pillowy pockets that absorb the creamy sauce, making every bite rich and flavorful. Whether you’re looking for a quick weeknight meal or a dish to share at a potluck, this casserole delivers deliciousness with minimal effort.
Why You’ll Love This Recipe
• Quick and Easy: Uses convenient ingredients like canned biscuits and cream of chicken soup.
• Crowd-Pleaser: Loaded with cheesy, creamy, and savory flavors that everyone will love.
• One-Dish Wonder: Combines everything you need for a satisfying meal in one baking dish.
Ingredients (Serves 8)
• 2 cups shredded cheddar cheese, divided
• 3 cups shredded cooked chicken
• 2 tablespoons ranch seasoning mix
• 2 cans cream of chicken soup
• ¼ cup cooked bacon, crumbled
• 1½ cups sour cream
• 12 ounces refrigerated biscuits (about 1 can of 12 oz)
Instructions
Step 1: Preheat the Oven
1. Preheat your oven to 350°F (175°C).
2. Grease a 9×13-inch baking dish generously to prevent sticking.
Step 2: Prepare the Mixture
1. In a large mixing bowl, combine the sour cream, cream of chicken soup, shredded chicken, ranch seasoning mix, 1 cup of shredded cheddar cheese, and crumbled bacon.
2. Stir until all ingredients are well incorporated.
Step 3: Cut the Biscuits
1. Slice the refrigerated biscuits into fourths.
2. Gently fold the biscuit pieces into the chicken mixture, ensuring they are evenly coated but not overworked.
Step 4: Assemble the Casserole
1. Spread the biscuit and chicken mixture evenly into the prepared baking dish.
2. Sprinkle the remaining 1 cup of cheddar cheese over the top.
Step 5: Bake
1. Place the casserole in the preheated oven and bake for 25–35 minutes, or until the biscuits are cooked through and golden brown, and the cheese is melted and bubbly.
Step 6: Serve
1. Remove the casserole from the oven and let it cool for a few minutes before serving.
2. Serve warm and enjoy this creamy, cheesy comfort food!
Tips
• Use Rotisserie Chicken: Save time by using pre-cooked rotisserie chicken for easy shredding.
• Customize the Flavor: Add chopped green onions, diced jalapeños, or extra spices for a flavor boost.
• Check Doneness: Ensure the biscuits are fully cooked by inserting a knife into the center. If it comes out clean, it’s ready!
Storage Options
• Refrigeration: Store leftovers in an airtight container in the fridge for up to 3 days. Reheat in the oven or microwave.
• Freezing: Freeze the baked casserole in individual portions for up to 2 months. Thaw overnight in the fridge before reheating.
Chicken Bubble Biscuit Bake Casserole is a deliciously satisfying dish that’s perfect for any occasion. Its creamy texture, cheesy topping, and soft, flavorful biscuits make it a guaranteed hit with family and friends. Try it for dinner tonight and enjoy a comforting, crowd-pleasing favorite!
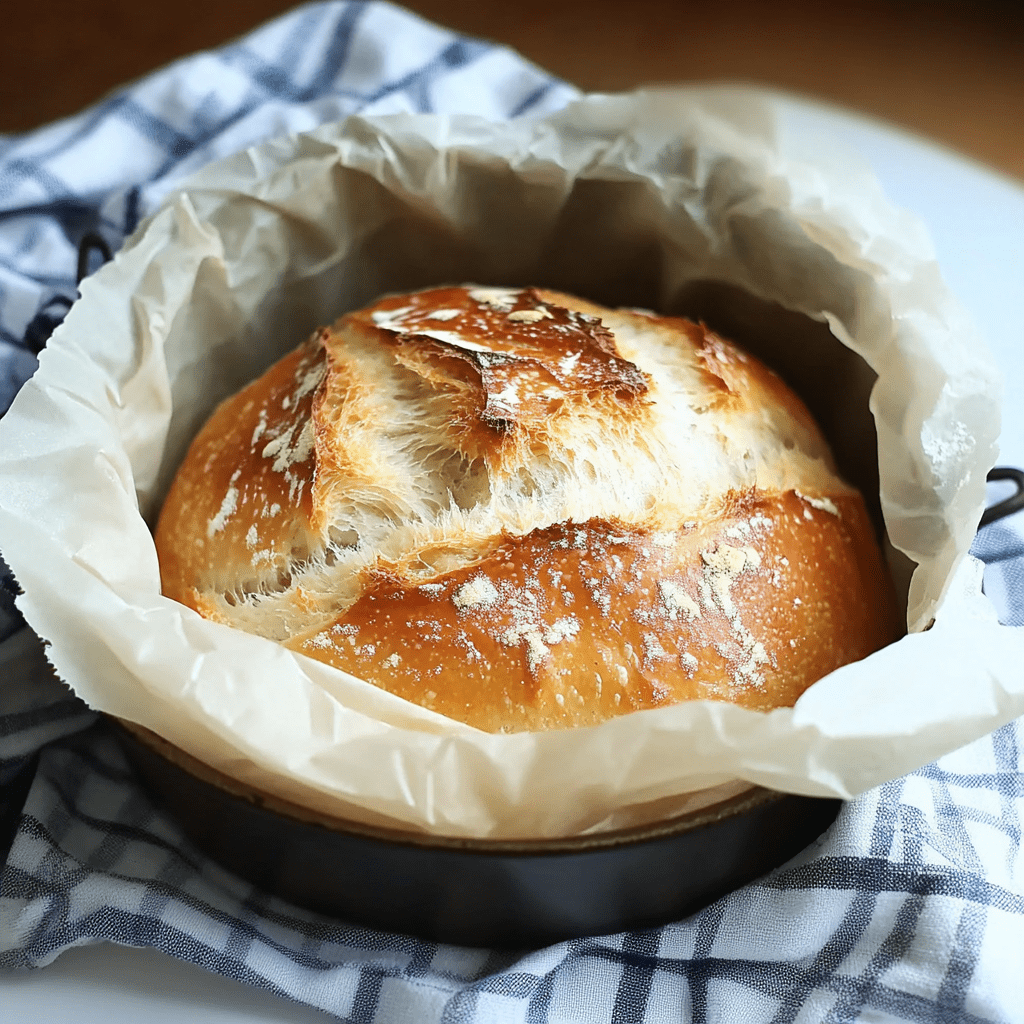
No Knead Bread is a simple yet transformative way to bake artisan-quality bread at home without the need for intensive labor or special skills. This recipe relies on a slow rise, allowing time and minimal ingredients to do the heavy lifting, resulting in a loaf with a golden, crispy crust and a soft, airy interior. Whether you’re a seasoned baker or a beginner, this method guarantees impressive results without the intimidation of traditional bread-making techniques.
The beauty of no knead bread lies in its versatility. With just a few pantry staples, you can create a loaf that’s perfect for sandwiches, soups, or as a standalone snack with butter or olive oil. The slow fermentation process enhances the flavor, giving the bread a slight tang that pairs beautifully with the satisfying crunch of the crust. It’s a recipe that transforms humble ingredients into something truly extraordinary.
Why You’ll Love This Recipe
• Effortless: No kneading required—just mix, let it rise, and bake.
• Artisan-Quality: Achieve a bakery-style crust and crumb at home.
• Versatile: A delicious loaf for any occasion or pairing.
Ingredients
• 3 cups bread flour or all-purpose flour
• ½ teaspoon instant yeast
• 1½ teaspoons sea salt
• 1½ cups warm water (110°F)
Instructions
Step 1: Mix the Dough
1. In a large mixing bowl, whisk together the flour, instant yeast, and sea salt.
2. Gradually pour in the warm water while stirring with a wooden spoon.
3. Mix until a sticky, loose dough forms.
4. Cover the bowl tightly with plastic wrap and allow the dough to rise at room temperature for 12–18 hours.
Step 2: Shape the Dough
1. Turn the dough out onto a well-floured piece of parchment paper.
2. Lightly sprinkle flour over the top of the dough to make it easier to handle.
3. Using the parchment paper to assist, shape the dough into a rough ball. Avoid kneading the dough.
4. Cover with plastic wrap, a damp tea towel, or an inverted bowl, and let it rise for 1 hour.
Step 3: Preheat the Dutch Oven
1. Place a large Dutch oven (at least 3½ quarts) with the lid on into your oven.
2. Preheat the oven to 450°F (232°C).
Step 4: Bake the Bread
1. Once the dough is ready, carefully remove the Dutch oven from the oven (it will be very hot).
2. Use the parchment paper to lift the dough and place it into the Dutch oven. Cover with the lid.
3. Bake covered for 30 minutes.
4. Remove the lid and bake for an additional 10–15 minutes, or until the crust is golden brown.
Step 5: Cool the Bread
1. Lift the bread out of the Dutch oven using the parchment paper and transfer it to a cooling rack.
2. Allow the loaf to cool for 1–2 hours before slicing for the best texture and flavor.
Tips
• Water Temperature: Use a thermometer to ensure the water is around 110°F to activate the yeast without overheating.
• Experiment with Flour: Try using whole wheat or rye flour for a deeper flavor and heartier texture.
• Check the Crust: For an extra crispy crust, leave the bread in the oven for a few minutes with the door slightly ajar after baking.
Storage Options
• Room Temperature: Store in a bread bag or wrap in foil for up to 3 days.
• Freezing: Slice the bread, wrap tightly in foil or a freezer-safe bag, and freeze for up to 2 months. Thaw and reheat in the oven for best results.
This No Knead Bread recipe is a game-changer for home bakers, offering a no-fuss way to create a rustic, bakery-worthy loaf. Its incredible flavor, crunchy crust, and pillowy crumb make it a must-try for anyone who loves fresh, homemade bread. Share it with family and friends, and savor the satisfaction of baking something so simple yet so special.
These Orange Creamily Truffles are a decadent, citrusy treat that captures the nostalgic flavors of a classic creamily in a luxurious bite-sized dessert. With their silky white chocolate base infused with fresh orange zest and a hint of orange extract, these truffles are as delightful to look at as they are to eat. The powdered sugar coating adds a soft sweetness and a refined finish, making them perfect for any special occasion or as an elegant homemade gift.
The blend of creamy white chocolate and bright orange flavors creates a delightful balance that’s both rich and refreshing. While the preparation requires some patience, the result is well worth the effort for a dessert that’s both unique and unforgettable.
Why You’ll Love This Recipe
• Elegant and Unique: These truffles are a step up from everyday desserts and make a great impression.
• Citrusy and Sweet: The fresh orange zest and extract provide a refreshing balance to the creamy white chocolate.
• Great for Gifting: Beautifully packaged, these truffles make an exceptional homemade gift.
Ingredients
• 1 cup finely chopped high-quality white chocolate
• ¼ cup unsalted butter
• 2 tablespoons freshly grated orange zest
• 3 tablespoons heavy whipping cream
• ½ teaspoon pure orange extract
• Optional: oil-based orange food coloring
• ½ cup confectioners’ sugar, divided
Instructions
Step 1: Preparation
1. Place the chopped white chocolate in a small, sealable container.
2. Set up a strainer and spatula nearby for later use.
Step 2: Infuse the Butter
1. In a small saucepan over medium heat, combine the unsalted butter and orange zest.
2. Stir continuously and bring to a boil. Maintain the boil for one minute, ensuring constant agitation.
Step 3: Add the Cream
1. Gradually stir the heavy whipping cream into the saucepan.
2. Cook and stir for another 1–2 minutes, until bubbles begin to form along the edges of the pan.
3. Remove the saucepan from the heat.
Step 4: Strain and Combine
1. Position the strainer over the container holding the white chocolate.
2. Pour the hot orange butter mixture through the strainer, using the spatula to press the orange zest against the mesh to extract maximum flavor.
3. Discard the solids left in the strainer.
Step 5: Melt the Mixture
1. Let the mixture sit for one minute to soften the chocolate.
2. Add the orange extract and orange food coloring, if using.
3. Whisk until smooth, leaving a few unmelted chocolate pieces for texture.
Step 6: Chill the Mixture
1. Seal the container and place it in the freezer for about one hour, or until the mixture is firm enough to handle.
Step 7: Prepare the Sugar Coating
1. Place ¼ cup of confectioners’ sugar in a sealable container and the remaining ¼ cup in a small bowl.
Step 8: Form the Truffles
1. Scoop out 1 tablespoon of the chilled mixture using a spoon or cookie scoop.
2. Roll into a ball between your palms, then roll the ball in the powdered sugar from the bowl.
3. Place the coated truffle in the container with the sugar. Repeat until all the mixture is used.
Step 9: Final Coating
1. Seal the container and gently shake it to evenly coat the truffles with the remaining powdered sugar.
Step 10: Chill Again
1. Return the truffles to the freezer for an additional hour, or until they are firm and ready to serve.
Tips
• Use High-Quality White Chocolate: For the best flavor and texture, choose high-quality white chocolate.
• Don’t Skip the Chilling Steps: Chilling ensures the truffles are easy to shape and hold their form.
• Customize the Flavor: Add a pinch of sea salt or a drizzle of dark chocolate for a flavor twist.
Storage Options
• Refrigeration: Store truffles in an airtight container in the fridge for up to 1 week.
• Freezing: Freeze truffles for up to 2 months. Thaw in the fridge before serving.
These Orange Creamsicle Truffles are an indulgent yet refreshing treat, perfect for sharing or savoring. Their bright citrus flavor and creamy texture make them a standout dessert that will delight your taste buds with every bite. Enjoy!
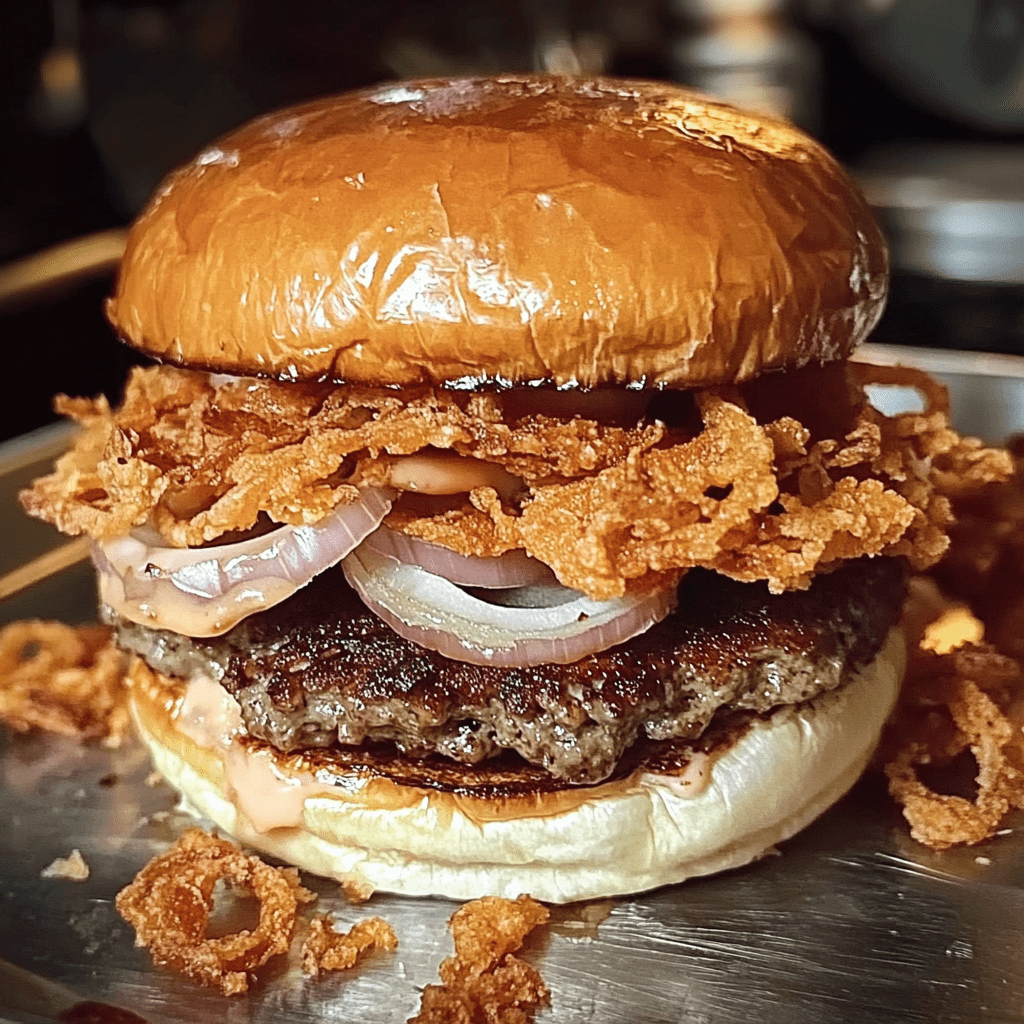
There’s nothing like the classic taste of a juicy, crispy-edged smashed cheeseburger to satisfy your burger cravings. By pressing the beef into a thin patty and searing it in a hot skillet, you create golden-brown, flavor-packed edges. Topped with melty American cheese and sweet caramelized onions, these burgers offer the perfect balance of texture and taste.
Why You’ll Love This Recipe
• Ultra Crispy Edges: The “smashing” technique caramelizes the beef for an irresistible crust.
• Easy & Fast: Simple ingredients and quick cook time make this a go-to for busy nights.
• Classic Flavor Combo: Onions, American cheese, and a soft bun—everything you love in one bite.
Ingredients
• ¼ teaspoon canola oil
• 5 ounces freshly ground beef, divided into two 2 ½-ounce balls
• Kosher salt and freshly ground black pepper
• 1 medium onion, thinly sliced (about 1 cup)
• 2 slices American cheese
• 2 soft hamburger buns
• Mustard, pickles, and other condiments (optional)
Step-by-Step Instructions
1. Prep the Skillet and Ingredients
1. Lightly coat a large cast iron skillet with the canola oil by wiping it around the skillet using a paper towel.
2. Heat the skillet over high heat until it starts to lightly smoke.
2. Smash and Season the Burgers
1. Place each ground beef ball in the hot skillet.
2. Immediately press down firmly on each ball with the back side of a spatula to form a thin patty.
3. Season generously with kosher salt and freshly ground black pepper.
3. Cook the Burgers
1. Scatter the thinly sliced onions evenly over the cooking patties.
2. Press down gently so the onions adhere to the surface of the meat.
3. Allow the burgers to cook undisturbed for about 2 minutes, until the undersides form a crispy, browned crust.
4. Flip and Finish Cooking
1. Using a stiff spatula, carefully flip each burger, scraping up any browned bits from the skillet.
2. Cook for another minute or so, letting the onions soften and caramelize.
5. Add Cheese and Steam the Buns
1. Place a slice of American cheese on each patty.
2. Invert the top bun over the cheese to steam and absorb flavor from the onions and cheese.
6. Assemble and Serve
1. Place the bottom halves of the buns on a serving plate.
2. Add condiments like mustard, pickles, or any other favorites on the bottom buns.
7. Final Assembly
1. Using a spatula, carefully lift each burger patty, along with its onions and the top bun, and place it onto the prepared bottom bun.
2. Repeat for the second burger.
8. Serve Immediately
• These smashed cheeseburgers are best enjoyed right off the skillet while they’re still hot and the cheese is perfectly melted.
Tips
• Use Freshly Ground Beef: Fresher meat yields juicier, more flavorful patties.
• Don’t Over-Smash: Press firmly once; over-smashing can push out juices and dry the burger.
• High Heat: A hot skillet is key for creating those crispy edges.
• Customize: Feel free to experiment with different cheeses or toppings like sautéed mushrooms or jalapeños.
Storage
• Refrigeration: Store leftover patties and onions in an airtight container for up to 2 days. Reheat in a hot skillet to revive some of the crispiness.
• Freezing: Smashed burgers are best served fresh, but you can freeze the uncooked ground beef patties for up to 3 months. Thaw in the fridge before cooking.
Enjoy the perfect balance of tender meat, melted cheese, and sweet onions—these smashed cheeseburgers will quickly become a favorite in your household!
This flavorful herb and garlic marinade is perfect for infusing meats with rich, savory notes and a hint of tang. The combination of soy sauce, olive oil, Worcestershire sauce, and herbs creates a balanced blend that tenderizes your protein and enhances its natural flavor. Perfect for steak, chicken, or pork, this marinade is sure to elevate your next meal.
Why You’ll Love This Recipe
• Simple Ingredients: Uses pantry staples to create complex flavors.
• Versatile: Works well with a variety of meats and even hearty vegetables.
• Easy Preparation: A quick whirl in the blender and your marinade is ready to go.
Ingredients
• 1/3 cup soy sauce
• 1/2 cup olive oil
• 1/3 cup fresh lemon juice
• 1/4 cup Worcestershire sauce
• 1 1/2 tablespoons garlic powder
• 3 tablespoons dried basil
• 1 1/2 tablespoons dried parsley flakes
• 1 teaspoon ground white pepper
• 1/4 teaspoon hot pepper sauce (or more to taste)
• 1 teaspoon dried minced garlic
Instructions
Step 1: Combine Ingredients
1. In a blender, add the soy sauce, olive oil, lemon juice, and Worcestershire sauce.
2. Add the garlic powder, dried basil, dried parsley, ground white pepper, and dried minced garlic.
3. For extra heat and flavor, add the hot pepper sauce to taste.
Step 2: Blend Until Smooth
1. Blend the mixture on high speed for about 30 seconds, or until all ingredients are well combined and smooth.
Step 3: Marinate the Meat
1. Place your choice of meat (steak, chicken, pork) in a resealable plastic bag or a shallow dish.
2. Pour the blended marinade over the meat, ensuring it is evenly coated.
3. Seal the bag or cover the dish and refrigerate for at least 2 hours, or up to overnight for a deeper flavor infusion.
Step 4: Cook and Enjoy
1. Remove the meat from the marinade and cook as desired—grill, pan-sear, bake, or broil.
2. Discard any remaining marinade that has come into contact with raw meat.
3. Enjoy your savory, herb-infused dish!
Tips
• Adjust the Heat: Add more hot pepper sauce for extra spiciness or omit it for a milder taste.
• Fresh Herbs: While dried herbs are convenient, you can experiment with fresh basil or parsley for a brighter flavor.
• Marinating Time: Longer marinating times increase flavor penetration, but don’t exceed 24 hours to maintain the best texture.
Storage Options
• Refrigeration: Store unused marinade in a sealed container in the refrigerator for up to 3 days.
• Freezing: Freeze the marinade separately (without raw meat) for up to 1 month. Thaw in the fridge before use.
This savory herb and garlic marinade transforms simple cuts of meat into gourmet-quality meals. It’s a must-try for your next cookout, family dinner, or meal prep session!
This creamy, savory dip is the ultimate crowd-pleaser, guaranteed to impress family and friends at any gathering. With a rich blend of cream cheese, sour cream, cheddar, and smoky bacon, it’s no surprise that it lives up to its name. Whether you’re serving it at a casual game night, a potluck party, or a special holiday feast, this dip delivers a delightful flavor experience every single time. Its versatility makes it perfect for various occasions and adaptable to countless pairings, ensuring that everyone finds something to love.
The result of this recipe is a creamy, gooey dip that emerges from the oven bubbling and golden, permeating the room with an irresistible aroma. Scooping it up with bread, crackers, or vegetables offers that classic combination of creamy-meets-crunchy. But beyond its comforting familiarity, it’s a blank canvas for culinary creativity. You can easily tailor this dip to meet different dietary needs or personal preferences, experiment with heat levels, or add an unexpected crunch. The possibilities are limited only by your imagination, ensuring that no matter how many times you serve it, it never gets old.
Why You’ll Love This Recipe
• Incredibly Creamy: The combination of cream cheese and sour cream guarantees a velvety texture that’s deeply satisfying.
• Full of Flavor: Smoky bacon, sharp cheddar, and fresh green onions blend together to create layers of savory goodness.
• Easy to Make: With just a few simple steps and readily available ingredients, this dip comes together quickly—perfect for last-minute gatherings.
• Versatile: The base recipe is delicious as-is, but also highly adaptable, allowing for endless variations to keep your guests intrigued.
Ingredients
• 8 ounces of softened cream cheese
• 2 cups of light sour cream
• 1 ½ cups of shredded cheddar cheese
• 6 slices of cooked and crumbled bacon
• ½ cup of sliced green onions
Note: Using light sour cream helps keep the dip a bit lighter, but you can opt for full-fat sour cream if you prefer a richer result. The cheddar is a classic choice, but feel free to try other cheeses to customize the flavor profile.
Step-by-Step Instructions
Step 1: Preheat the Oven
Set your oven to 400º F (205º C). Preheating ensures that once the dip goes in, it begins baking at the ideal temperature, promoting even cooking and optimal caramelization of the cheese.
Step 2: Mix the Ingredients
In a mixing bowl, combine the softened cream cheese, sour cream, shredded cheddar cheese, crumbled bacon, and sliced green onions. Stir until all the ingredients are well-incorporated. The mixture should appear creamy and uniform, with all elements evenly distributed. If the cream cheese isn’t fully softened, you can microwave it in short intervals until it’s manageable, just be careful not to melt it entirely.
Step 3: Transfer to a Baking Dish
Spoon the mixture into a 1-quart baking dish. A shallow dish helps the dip heat evenly and gives it that lovely bubbling surface layer as it bakes. Smooth out the top with a spatula for even cooking and a polished look.
Step 4: Bake to Perfection
Place the baking dish in the preheated oven and bake for about 25-30 minutes. You’ll know it’s done when the cheese is visibly melted, and small bubbles appear around the edges. The top may become lightly golden, which adds both flavor and visual appeal. Keep an eye on it during the last few minutes to prevent over-browning.
Step 5: Serve Hot
Once finished, remove the dip from the oven and let it cool for a minute or two before serving. This allows the cheeses to settle just enough that it’s not scalding hot. Transfer the dip to a serving table and surround it with an assortment of dippers. Enjoy it while it’s still warm and gooey for the best possible flavor and texture.
Variations and Substitutions
Spicy Twist: If you’re a fan of heat, try adding finely diced jalapeños, a spoonful of hot sauce, or a pinch of cayenne pepper. Incorporating pickled jalapeños offers a tangy, spicy accent, while a chipotle hot sauce brings smoky heat that complements the bacon nicely.
Herb Infusion: Add freshly chopped herbs such as parsley, dill, or chives. These aromatic herbs introduce bright, fresh notes to cut through the richness of the cheese and bacon, resulting in a more balanced flavor profile.
Extra Crunch: Before baking, top the dip with a layer of crushed pretzels, crispy fried onions, or toasted nuts. The crunchy topping will contrast delightfully with the creamy interior, making every bite more interesting.
Lactose-Free Option: Substitute lactose-free cream cheese and sour cream if you’re sensitive to dairy. Many brands now offer lactose-free versions that taste just as good as their conventional counterparts.
Vegetarian Version: If you want to skip the bacon, you can omit it entirely or use a vegetarian bacon alternative. Consider adding roasted red peppers, sun-dried tomatoes, or olives for an extra burst of flavor. Smoked paprika can also lend a similar smoky depth that bacon would have provided.
Cheese Alternatives: Experiment with different cheeses. A blend of sharp cheddar and pepper jack will add a hint of spice, while gouda or smoked cheddar imparts a more robust, savory complexity.
Serving Suggestions and Pairings
Breads: Slices of a warm baguette, sourdough toast points, or even garlic bread are all fantastic choices. Their subtle flavors and sturdy textures can handle a generous scoop of dip.
Crackers: Offer a variety—some light and crispy, others heartier and seeded. The neutral flavors of most crackers let the dip shine and add a pleasant crunch.
Vegetables: For a lighter twist, serve with an assortment of fresh, crisp vegetables such as carrot sticks, celery, bell pepper strips, and cucumber slices. The refreshing qualities of vegetables provide a nice contrast to the richness of the dip.
Chips: Potato chips, tortilla chips, or pita chips work beautifully. The salty, crunchy profile of chips complements the savory, creamy dip perfectly.
Tips for Success
• Soften the Cream Cheese: Ensure your cream cheese is at room temperature so it mixes smoothly with the other ingredients. If it’s too cold, you may end up with lumps.
• Adjust Seasonings: Taste the mixture before baking and adjust salt and pepper as needed. The bacon and cheese already contribute savory elements, so go easy on additional salt at first.
• Watch the Oven: Keep an eye on the dip in the last few minutes of baking. Overbaking can lead to a slightly greasy, separated dip. Pull it out when it’s bubbly and just starting to brown.
• Make Ahead: You can prepare the mixture up to a day in advance and refrigerate it. When you’re ready to serve, simply bake as directed. It’s a great make-ahead option for busy hosts.
Storage and Reheating
If you have any leftovers (which can be rare, given how delicious this dip is), transfer them to an airtight container and store in the refrigerator for up to 3 days. To reheat, place in the microwave or gently warm in the oven until it’s heated through and creamy again. You may need to stir occasionally to ensure an even texture.
Final Thoughts
“The Best Dip in the World” earns its name by hitting all the right notes: creamy, savory, cheesy, and wholly satisfying. It’s the kind of dish that draws people to the appetizer table and keeps them coming back for more. Whether you’re serving it at a big party or a quiet family gathering, it’s guaranteed to bring smiles, compliments, and quite possibly requests for the recipe.
In addition to its incredible taste and texture, this dip is a fantastic jumping-off point for culinary creativity. With all the suggested variations, you can tailor it to your personal taste, dietary requirements, or simply to match the theme of your event. The next time you need a show-stopping appetizer that’s both simple and unforgettable, reach for this recipe. It’s destined to become a beloved staple in your cooking repertoire.
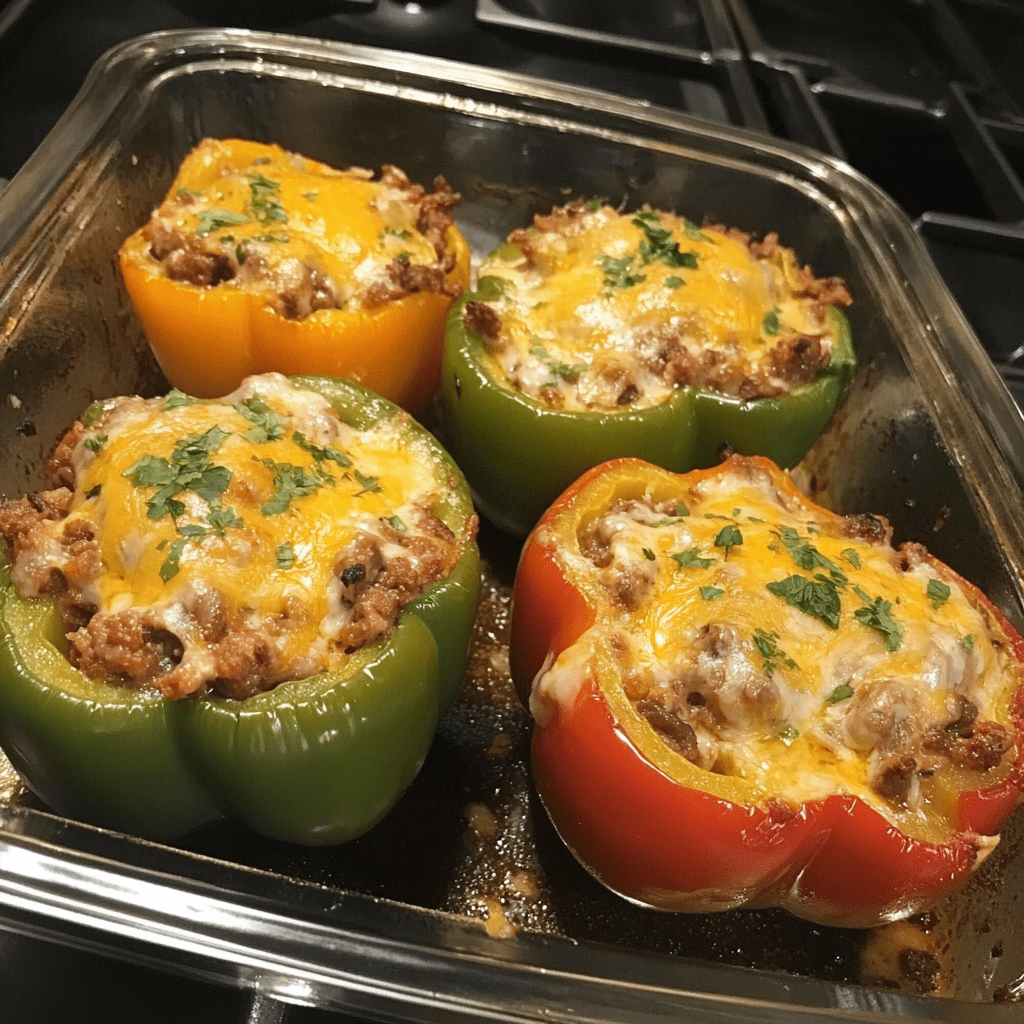
These Homestyle Stuffed Bell Peppers are a comforting classic that brings together tender peppers, savory ground beef, Spanish-flavored rice, and melted cheese in each delicious bite. Perfect for a family dinner, this dish is sure to become a favorite in your household. Serve it with a fresh salad or crusty bread to complete the meal.
Why You’ll Love This Recipe
• Comforting Classic: Brings back fond memories of family dinners and home cooking.
• Hearty and Flavorful: Savory beef, seasoned rice, and tangy tomatoes create a rich, satisfying flavor.
• Easy to Prepare: Straightforward steps and common ingredients make this dish accessible for all home cooks.
Ingredients
• 6 large bell peppers, tops removed and seeded
• 1 lb ground beef
• 1 onion, finely diced
• 1 box (6 7/8 oz) Spanish-flavored Rice-a-Roni
• 1 can (16 oz) tomato sauce
• 1 tsp sugar
• 1 can (14 ½ oz) diced tomatoes, undrained
• 1 cup shredded cheddar or American cheese
Instructions
Step 1: Preheat the Oven
1. Preheat your oven to 350°F (175°C).
2. Prepare Baking Dish: Lightly grease a baking dish large enough to hold the peppers upright.
Step 2: Prepare the Peppers
1. Wash and Slice: Rinse the bell peppers. Cut the tops off and remove seeds and membranes.
2. Set Aside: Keep the prepared pepper shells upright on a plate.
Step 3: Cook the Beef
1. Brown the Beef: In a large skillet over medium heat, add the ground beef and diced onion.
2. Sauté: Cook, breaking up the beef, until it’s no longer pink and the onions are tender (7–10 minutes).
3. Drain: Remove any excess grease.
Step 4: Make the Rice Mixture
1. Prepare Rice-a-Roni: Cook according to package directions. Typically, sauté the rice in butter, add water and seasoning, and simmer until tender.
2. Add Tomato Sauce: Stir in the can of tomato sauce.
3. Balance Flavors: Mix in 1 teaspoon of sugar to cut the tomato’s acidity.
4. Add Diced Tomatoes: Stir in the undrained can of diced tomatoes. Combine well.
Step 5: Combine the Beef and Rice
1. Mix Together: Add the cooked beef and onions to the rice mixture. Stir until well combined.
Step 6: Stuff the Peppers
1. Fill the Peppers: Spoon the beef and rice mixture into each pepper cavity, pressing down gently to fill them completely.
2. Arrange in Dish: Place the stuffed peppers upright in the prepared baking dish.
Step 7: Bake the Peppers
1. Cover and Bake: Cover the baking dish with foil and bake for about 40 minutes.
2. Check Tenderness: Test the peppers with a fork; they should be tender but still hold their shape.
Step 8: Add Cheese and Finish Baking
1. Remove Foil: Carefully take the foil off the baking dish.
2. Top with Cheese: Sprinkle the shredded cheese over the top of each pepper.
3. Bake Again: Return the peppers to the oven for 10–15 minutes, or until the cheese is melted and bubbly.
Step 9: Cool and Serve
1. Rest: Let the peppers rest a few minutes after removing them from the oven.
2. Serve Hot: Plate and enjoy with a side salad or crusty bread.
Tips
• Pepper Choice: Red, yellow, or orange peppers are sweeter, while green peppers have a more robust, slightly bitter flavor.
• Cheese Options: Try mixing in other cheeses like Monterey Jack or a Mexican blend for added flavor.
• Make Ahead: Prepare the filling in advance and stuff the peppers when ready to bake.
Storage Options
• Refrigeration: Store leftover stuffed peppers in an airtight container for up to 3 days. Reheat in the oven or microwave until warmed through.
• Freezing: Wrap individual cooled peppers in foil, then place in a freezer-safe bag. Freeze for up to 2 months. Thaw overnight in the refrigerator before reheating.
These Homestyle Stuffed Bell Peppers bring together comforting flavors and a cozy presentation that everyone will love, making them a welcome addition to your dinner table.
Ever found yourself staring at a carton of milk or a package of chicken, wondering whether it’s still safe to eat even though the expiration date has passed? You’re not alone. Food expiration dates can often seem like a perplexing enigma, leading many of us to toss out perfectly good food simply because the date on the package has passed. Understanding these dates is not just about avoiding waste—it’s also about making informed choices to keep both your budget and your environment in check.
The Mystery Behind Food Expiration Dates
Food expiration dates are a common sight on virtually every food product we purchase. They come in various forms—“Best if Used By,” “Use By,” and “Sell By”—and often leave consumers confused and wasteful. My own experience with food dates began with an embarrassing moment at a family dinner. I had purchased a bottle of milk just days before, but it had already reached its “Best if Used By” date. Despite the milk looking and smelling perfectly fine, I hesitated to use it. This led to a late-night research spree to decipher the true meaning behind these labels, which ultimately taught me valuable lessons about food quality, safety, and waste reduction.
Decoding Food Date Labels
To make sense of food expiration dates, it’s essential to understand what each term actually signifies:
Best if Used By: This label indicates the period during which the product is expected to be at its best flavor and quality. After this date, the food may not taste as fresh, but it does not necessarily mean it’s unsafe to eat.
Use By: This is the manufacturer’s estimate of the last date for peak quality. This date is particularly important for perishable items such as dairy and meats. Consuming the food after this date might affect its quality, but it’s often still safe if properly stored.
Sell By: This label is primarily a guide for retailers on how long to display the product. It’s not a safety date. Food items can often be consumed after this date if they have been stored correctly.
Finger pointing at the expiry date on canned food
Tackling the Issue of Food Waste
The issue of food waste is staggering. According to the USDA, approximately 30% of food in America is wasted annually, partly due to misunderstandings about expiration dates. By discarding food based solely on these dates, we are not only contributing to the strain on our budgets but also exacerbating environmental problems. Reducing food waste starts with understanding that these dates are guidelines for quality rather than strict safety deadlines.
Shelf Life Beyond Expiration Dates
Let’s take a closer look at some common foods and their shelf lives beyond their expiration dates:
Eggs: Eggs can remain safe for consumption up to three to five weeks after the purchase date. An easy test for freshness is the water test: Place the eggs in a bowl of water. Fresh eggs will sink and lay flat on the bottom. Eggs that float have gone bad and should be discarded.
Chicken and Meat: These items are typically safe for a day or two beyond the “Sell By” date if they have been continuously refrigerated. If you’re not planning to cook them soon, freezing is a good option. Properly frozen meats can be stored indefinitely, though their quality may deteriorate over time.
Milk: Milk often remains fresh about a week past the “Best if Used By” date, provided it still smells and looks normal. If milk develops a sour smell or curdles, it should be discarded.
Rice and Pasta: These dry goods have a remarkably long shelf life. If stored in an airtight container in a cool, dry place, they can last for years. Look for any signs of spoilage, such as unusual odors or pests.
Canned Foods: Canned goods can be safe to eat long after their expiration date, as long as the can is not damaged, bulging, or rusted. The food inside should be checked for any off smells or odd colors.
Frozen Foods: Frozen foods remain safe indefinitely at 0°F (-18°C). However, the quality may decrease over time, affecting texture and flavor. Always check for freezer burn, which appears as grayish-brown leathery spots on the food, indicating a loss of moisture.
Spotting Spoilage
While many foods remain safe past their labeled dates, it’s crucial to use your senses to detect spoilage. Signs of spoilage include:
Visible Mold: Mold growth on food is a clear indicator that it should be discarded.
Unpleasant Smells: A sour or off smell is a strong sign that the food has gone bad.
Odd Textures: Slimy, mushy, or otherwise abnormal textures can indicate spoilage.
Bad Tastes: If the food tastes off or unusual, it’s best not to consume it.
Preventing Waste Through Proper Storage
Proper food storage can greatly extend the life of your food and help prevent waste. Here are some tips:
Refrigerator Temperature: Keep your refrigerator below 40°F (4°C) to slow bacterial growth and keep food fresh.
Freezer Temperature: Your freezer should be at 0°F (-18°C). This ensures that frozen foods stay safe and retain their quality.
Airtight Containers: Use airtight containers to protect food from moisture and pests. Proper packaging helps maintain freshness and prevent contamination.
In Summary
Food expiration dates are more about quality than safety. By understanding the meaning behind various date labels, you can make better decisions about the edibility of your food. Proper storage and regular checks for spoilage are key to reducing food waste and ensuring that your meals remain both safe and delicious.
So next time you’re about to toss out that carton of milk or package of meat because the date has passed, remember that these dates are guidelines, not guarantees. Trust your senses and knowledge to determine the true quality of your food, and you’ll find that you can enjoy both better-tasting meals and contribute to a more sustainable environment.
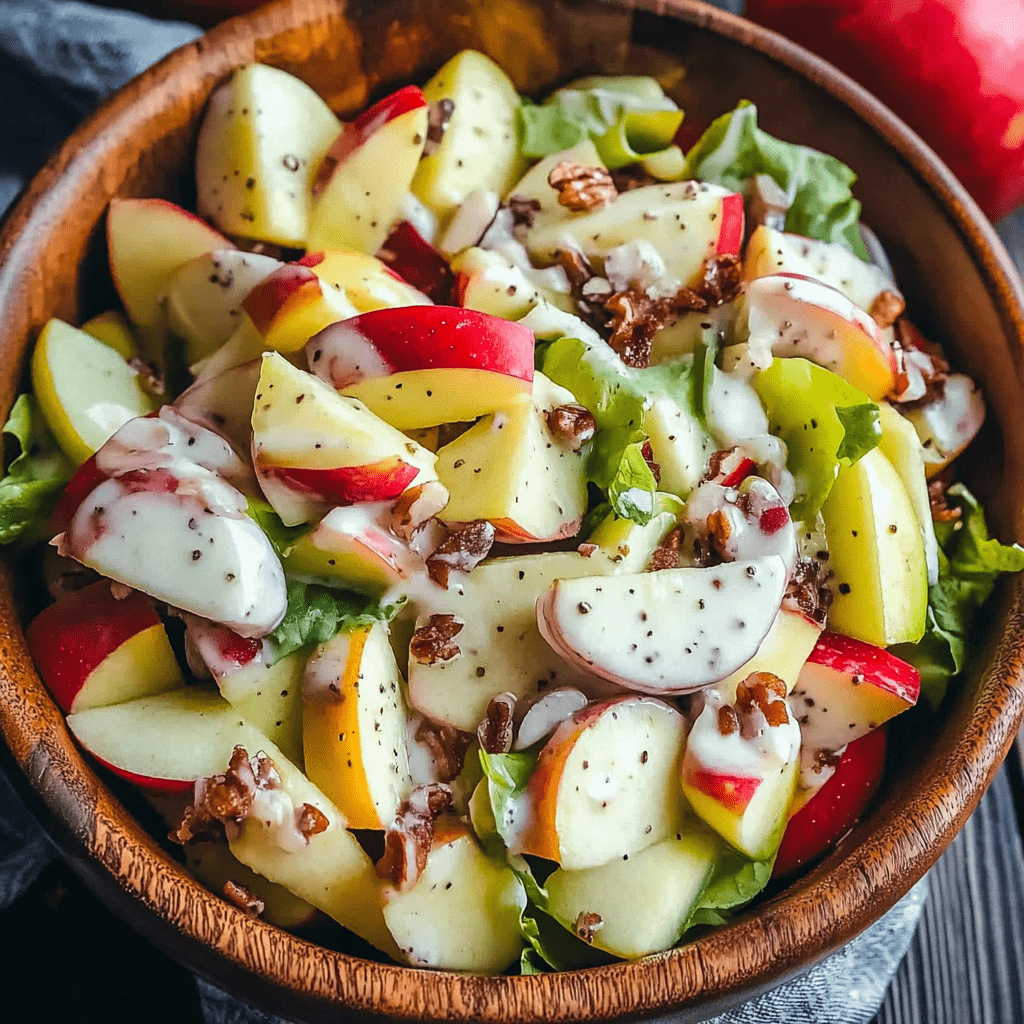
This apple salad is a delightful blend of sweet Honeycrisp apples, crisp celery, juicy red grapes, and crunchy pecans, all tossed in a creamy, sweet dressing. Enhanced with lemon juice to keep the apples bright and fresh, and accented with dried cranberries for a touch of tartness, this salad is a perfect side dish that brings a refreshing crunch to any meal. Whether served at a summer picnic or as a festive fall side, this apple salad is sure to be a hit with its vibrant flavors and satisfying textures.
Why You’ll Love This Recipe
• Fresh and Flavorful: Utilizes fresh fruits and a vibrant dressing to create a dish that’s both refreshing and rich in flavors.
• Perfect Texture Balance: Combines the crunch of apples and pecans with the creaminess of the dressing for a satisfying mouthfeel.
• Versatile: Excellent as a side dish, light lunch, or a complement to grilled meats, making it perfect for various dining occasions.
Ingredients
• For the Salad:
• 4 large Honeycrisp apples, cubed
• 2 ribs celery, thinly sliced
• 1 cup seedless red grapes, halved
• ½ cup chopped pecans
• ½ cup dried cranberries
• For the Dressing:
• ⅓ cup mayonnaise
• 1 ½ tablespoons brown sugar
• Juice of 1 lemon
Instructions
1. Prepare the Apples:
• Thoroughly wash the Honeycrisp apples under cold water and pat them dry. Cube the apples into bite-sized pieces and place them in a large mixing bowl.
• Squeeze the juice of one lemon over the cubed apples and toss to coat evenly. This will add a zesty flavor and prevent the apples from browning.
2. Make the Dressing:
• In a separate large mixing bowl, whisk together the mayonnaise and brown sugar until smooth and the sugar is fully dissolved. The dressing should be creamy with a hint of sweetness to balance the tart lemon juice.
3. Combine Ingredients:
• Add the dressed apples to the bowl with the dressing. Follow with the sliced celery, halved grapes, chopped pecans, and dried cranberries.
• Gently mix all the ingredients, ensuring everything is evenly coated with the dressing without over-mixing to maintain the texture of the ingredients.
4. Chill the Salad:
• Cover the bowl with plastic wrap or transfer the salad to an airtight container and refrigerate for at least 30 minutes. This chilling time allows the flavors to meld and enhances the salad’s refreshing taste.
5. Serve:
• After chilling, give the salad a gentle stir to redistribute the dressing and ingredients. Serve chilled as a delightful side dish or a light main course.
Tips
• Apple Selection: Honeycrisp apples are ideal for their sweet flavor and crisp texture, but you can also use other crisp varieties like Pink Lady or Gala.
• Nut Variations: Substitute pecans with walnuts or almonds for a different flavor and crunch.
• Dressing Alternatives: For a lighter version, you can substitute Greek yogurt for mayonnaise or add a dash of cinnamon for a spicy twist.
Storage Options
• Refrigerate: Store any leftovers in an airtight container in the refrigerator for up to 2 days.
• Best Served Fresh: While this salad is best enjoyed fresh, it can be kept refrigerated and should be stirred before serving to redistribute the dressing and flavors.
This apple salad is a celebration of textures and flavors that come together beautifully in each bite. Enjoy this refreshing dish alongside your favorite main courses or as a standalone treat!
This Chicken Pot Pie Noodle Skillet transforms the classic comfort of a chicken pot pie into a quick, one-pan dish that’s perfect for weeknight dinners. Combining tender noodles with creamy sauce, vegetables, and chicken, this recipe captures all the homely flavors of a traditional pot pie but is simpler and faster to prepare. It’s a hearty and satisfying meal that brings the cozy warmth of a pot pie to your table in less time and with less fuss.
Why You’ll Love This Recipe
• Quick and Easy: Ready in about 30 minutes, making it ideal for a speedy dinner.
• One-Pan Meal: Minimal cleanup required as everything cooks in one skillet.
• Comfort Food: Delivers the comforting taste of chicken pot pie without the need to bake a crust.
Ingredients
• 10 ounces egg noodles
• 2 tablespoons unsalted butter
• 1 sweet onion, diced
• 3 cloves garlic, minced
• 2 teaspoons Italian seasoning
• 1 1/2 cups frozen peas and carrots, thawed
• 2 tablespoons all-purpose flour
• 1 cup chicken broth
• 1 cup heavy cream
• 1 1/2 cups cooked chicken breast, cut into small cubes
• Salt and pepper to taste
Instructions
1. Cook the Noodles
• Bring a large pot of salted water to a boil. Add the egg noodles and cook them al dente according to the package instructions. Once cooked, drain and set aside.
2. Sauté Vegetables
• In a large skillet, melt the butter over medium-high heat. Add the diced onion, minced garlic, Italian seasoning, peas, and carrots. Season with salt and pepper to taste.
• Cook for about 3 minutes, or until the onions are soft and translucent.
3. Make the Sauce
• Sprinkle the flour over the sautéed vegetables and stir until well combined. This will help thicken the sauce.
• Gradually pour in the chicken broth and heavy cream, stirring constantly. Bring the mixture to a boil, then reduce the heat to a simmer.
• Continue to stir occasionally as the sauce thickens, about 5 minutes.
4. Combine and Serve
• Add the drained noodles and cooked chicken to the skillet. Toss everything together until the noodles and chicken are evenly coated with the sauce and heated through.
• Taste and adjust seasoning with additional salt and pepper, if needed.
• Serve hot directly from the skillet.
Tips
• Protein Options: While chicken is traditional, you can easily substitute it with leftover turkey, especially after the holidays.
• Vegetable Variations: Feel free to add other vegetables like mushrooms or corn to the skillet according to your preferences.
• Creamier Texture: For an even creamier texture, add an extra splash of cream or a dollop of sour cream at the end of cooking.
Storage Options
• Refrigerate: Store leftovers in an airtight container in the refrigerator for up to 3 days.
• Reheat: Reheat in a skillet over medium heat, adding a little broth or water if the mixture seems dry.
Enjoy the rich and creamy flavors of this Chicken Pot Pie Noodle Skillet, a delightful twist on a traditional dish that’s both fulfilling and easy to make. Perfect for a comforting dinner any night of the week!