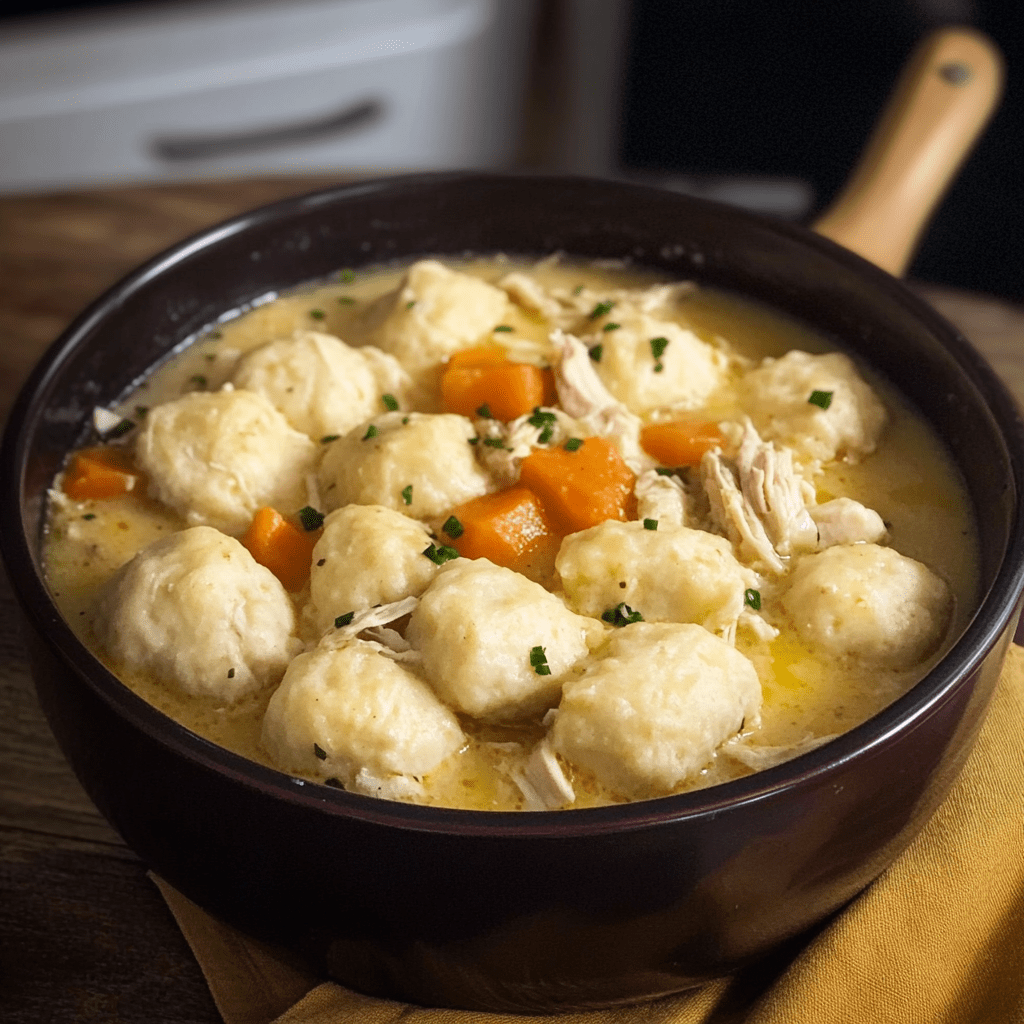
Vanilla Cream and Chocolate Ganache Delight

0

Vanilla Cream and Chocolate Ganache Delight is an elegant dessert that combines a luscious vanilla cream layer with a rich, velvety chocolate ganache topping. This no-bake treat is perfect for special occasions or indulgent gatherings, offering a sophisticated presentation and a heavenly taste.

Each bite delivers a creamy and smooth texture, complemented by the rich, glossy ganache. With a delicate balance of sweetness and a hint of vanilla, this dessert is as delightful to eat as it is to look at.

Why You’ll Love This Recipe

Elegant and Decadent: Perfect for impressing guests with minimal effort.

No-Bake Simplicity: Easy to prepare without the need for an oven.

Rich and Creamy: Combines light vanilla cream with indulgent chocolate ganache.

Ingredients

For the Vanilla Cream Layer:

• 500 ml heavy cream (whipping cream)

• 250 g cream cheese, softened

• 1 cup powdered sugar

• 1 tbsp vanilla extract

• 4 sheets gelatin or 1 packet gelatin powder

For the Chocolate Ganache Topping:

• 200 g dark chocolate, chopped

• 200 ml heavy cream

• 50 g butter

Instructions

Step 1: Prepare the Vanilla Cream Layer

1. Hydrate the Gelatin:

• If using sheets, soak them in cold water until softened.

• If using powder, dissolve it in a small amount of cold water.

2. Whip the Cream:

• In a large mixing bowl, whip the heavy cream until stiff peaks form. Set aside.

3. Prepare the Cream Cheese Mixture:

• In another bowl, beat the softened cream cheese until smooth.

• Add powdered sugar and vanilla extract, beating until fully combined.

4. Incorporate the Gelatin:

• For sheets, squeeze out excess water and dissolve them in a small saucepan over low heat.

• For powder, gently heat the gelatin mixture until fully dissolved.

• Let cool slightly before folding into the cream cheese mixture.

5. Combine Mixtures:

• Gently fold the whipped cream into the cream cheese mixture, ensuring a smooth and fluffy texture.

6. Chill:

• Pour the vanilla cream mixture into a suitable dish or pan.

• Refrigerate for at least 4 hours, or until fully set.

Step 2: Prepare the Chocolate Ganache Topping

1. Heat the Cream:

• In a small saucepan, heat the heavy cream over medium heat until it begins to simmer.

2. Melt the Chocolate:

• Remove the saucepan from heat and add the chopped dark chocolate.

• Stir until the chocolate is completely melted and the mixture is smooth.

3. Add Butter:

• Add the butter and stir until the ganache is glossy and fully incorporated.

4. Cool Slightly:

• Let the ganache cool slightly before pouring over the vanilla cream layer.

Step 3: Assemble and Chill

1. Pour Ganache:

• Once the vanilla cream layer has set, pour the cooled ganache over the top, spreading evenly with a spatula if needed.

2. Chill Again:

• Return the dessert to the refrigerator for at least 2 hours, or until the ganache is firm.

Step 4: Serve

1. Slice and Serve:

• Carefully slice the dessert into portions using a sharp knife.

• Serve chilled and enjoy the rich, creamy layers with the smooth chocolate topping.

Tips

Smooth Layers: Ensure the vanilla cream layer is fully set before adding the ganache to prevent mixing.

Decorative Finish: Top with shaved chocolate, fresh berries, or edible gold dust for an elegant presentation.

Chocolate Variation: Use milk or white chocolate for a different flavor profile.

Gelatin Alternatives: Substitute with agar-agar for a vegetarian option, adjusting quantities accordingly.

Storage Options

Refrigerator: Store the dessert in an airtight container for up to 5 days.

Freezing: Freeze in individual portions for up to 1 month. Thaw in the refrigerator before serving.

Vanilla Cream and Chocolate Ganache Delight is a luxurious dessert that’s sure to impress. Its creamy texture and rich chocolate topping make it the perfect indulgence for any occasion!

Chocolate Covered Coconut Bars

0

Chocolate Covered Coconut Bars are a simple yet decadent treat that combines the tropical sweetness of coconut with the rich, smooth flavor of chocolate. These bars are a homemade version of the popular candy, perfect for satisfying your sweet tooth or impressing guests with a delightful dessert.

The recipe is straightforward, requiring minimal ingredients and effort. With their creamy coconut filling and glossy chocolate coating, these bars are ideal for gifting, parties, or indulging at home.

Why You’ll Love This Recipe

Easy to Make: Minimal ingredients and no baking required.

Decadent Flavor: Sweet coconut filling paired with rich chocolate for the perfect bite.

Customizable: Adjust sweetness or add extras like chopped nuts for variation.

Ingredients

• 3 cups sweetened shredded coconut

• 1 cup sweetened condensed milk

• 1 teaspoon vanilla extract

• 2 cups semisweet chocolate chips

• 2 tablespoons coconut oil (or vegetable oil)

Instructions

Step 1: Prepare the Coconut Filling

1. In a medium mixing bowl, combine the shredded coconut, condensed milk, and vanilla extract. Stir until well blended.

2. Using your hands, form the mixture into small rectangular bars, about 2 inches long and 1 inch wide.

3. Place the bars on a baking sheet lined with parchment paper.

4. Freeze the bars for at least 30 minutes, or until firm.

Step 2: Prepare the Chocolate Topping

1. In a microwave-safe bowl, combine the chocolate chips and coconut oil.

2. Microwave in 30-second intervals, stirring after each interval, until the chocolate is melted and smooth.

3. Alternatively, melt the chocolate and coconut oil in a heatproof bowl over a pan of simmering water (double boiler method), stirring until smooth.

Step 3: Coat the Coconut Bars

1. Remove the frozen coconut bars from the freezer.

2. Using a fork, dip each bar into the melted chocolate, ensuring it is completely coated.

3. Let any excess chocolate drip off before placing the bar back on the parchment-lined baking sheet.

Step 4: Set the Chocolate

1. Refrigerate the coated bars for about 20 minutes, or until the chocolate is firm.

Step 5: Serve and Store

1. Once the chocolate is set, the bars are ready to be served.

2. Store any leftovers in an airtight container in the refrigerator for up to 1 week.

Tips

Even Bars: Use a small cookie scoop to portion the coconut mixture for uniform-sized bars.

Extra Flavor: Sprinkle a pinch of sea salt on top of the chocolate coating before it sets for a salty-sweet twist.

Alternative Coating: Use dark chocolate or white chocolate for variation.

Add-ins: Incorporate chopped nuts or dried fruits into the coconut mixture for extra texture and flavor.

Storage Options

Refrigerator: Keep the bars in an airtight container for up to 1 week.

Freezer: Freeze the bars in a freezer-safe container for up to 2 months. Thaw in the refrigerator before serving.

Chocolate Covered Coconut Bars are a delightful, no-bake treat that’s easy to make and impossible to resist. Whether enjoyed as a snack or dessert, these bars are a delicious way to satisfy your sweet cravings!

Stuffed Cabbage Rolls

0

Stuffed Cabbage Rolls are a comforting, classic dish that combines tender cabbage leaves wrapped around a savory meat and rice filling, simmered in a tangy tomato sauce. Perfect for family dinners or special occasions, these rolls are hearty, flavorful, and satisfying. The combination of ground beef, pork, and fragrant herbs like dill creates a filling that’s rich and well-balanced, while the tomato sauce ties everything together with its bright, tangy notes.

This recipe is a timeless favorite that’s worth the effort. While it does take a bit of preparation, the results are absolutely worth it. Serve these cabbage rolls with crusty bread or mashed potatoes for a complete meal.

Why You’ll Love This Recipe

Classic Comfort Food: A hearty, satisfying dish that’s perfect for any occasion.

Flavorful and Savory: The combination of meats, rice, and herbs creates a filling that’s rich and aromatic.

Great for Leftovers: Tastes even better the next day as the flavors meld together.

Ingredients

For the Cabbage Rolls:

• 1 medium head cabbage (3 pounds)

• 1/2 pound uncooked ground beef

• 1/2 pound uncooked ground pork

• 1 can (15 ounces) tomato sauce, divided

• 1 small onion, chopped

• 1/2 cup uncooked long grain rice

• 1 tablespoon dried parsley flakes

• 1/2 teaspoon salt

• 1/2 teaspoon snipped fresh dill or dill weed

• 1/8 teaspoon cayenne pepper

For the Sauce:

• 1 can (14.5 ounces) diced tomatoes, undrained

• 1/2 teaspoon sugar

Directions

Step 1: Prepare the Cabbage

1. Bring a large pot of water to a boil.

2. Add the cabbage head and cook just until the outer leaves pull away easily, about 5-7 minutes.

3. Carefully remove the cabbage and set aside 12 large leaves for the rolls.

4. Slice the remaining cabbage and spread it in the bottom of a Dutch oven or large baking dish.

Step 2: Make the Filling

1. In a large mixing bowl, combine the ground beef, ground pork, 1/2 cup of the tomato sauce, chopped onion, rice, parsley, salt, dill, and cayenne pepper.

2. Mix well until all ingredients are evenly incorporated.

Step 3: Assemble the Rolls

1. Cut out the thick vein from the bottom of each cabbage leaf, making a small V-shaped cut.

2. Place about 1/4 cup of the meat mixture in the center of a cabbage leaf.

3. Fold in the sides, then roll the leaf from the cut end toward the top, tucking in the edges as you go.

4. Repeat with the remaining leaves and filling.

Step 4: Arrange in the Pan

1. Place the cabbage rolls seam side down over the sliced cabbage in the Dutch oven.

Step 5: Prepare the Sauce

1. In a medium bowl, combine the diced tomatoes, sugar, and remaining tomato sauce.

2. Pour the sauce mixture evenly over the cabbage rolls.

Step 6: Bake

1. Cover the Dutch oven and bake in a preheated oven at 350°F (175°C) for 1 1/2 hours, or until the cabbage rolls are tender.

Step 7: Serve

1. Let the rolls rest for a few minutes before serving.

2. Garnish with fresh dill or parsley, if desired, and enjoy warm.

Tips

Choose the Right Cabbage: Use a fresh, medium-sized cabbage with tightly packed leaves for easier rolling.

Make-Ahead Option: Assemble the rolls the night before and refrigerate. Add the sauce just before baking.

Flavor Boost: Add a splash of vinegar or Worcestershire sauce to the tomato mixture for extra tanginess.

Storage Options

Refrigeration: Store leftovers in an airtight container in the refrigerator for up to 3 days.

Freezing: Freeze the cooked cabbage rolls in a freezer-safe container for up to 2 months. Thaw overnight in the refrigerator before reheating.

Reheating: Reheat in a covered baking dish in the oven at 350°F until warmed through, or heat in the microwave.

Stuffed Cabbage Rolls are a timeless dish that combines the best of savory, hearty flavors in one comforting package. Whether it’s for a family meal or a special occasion, these rolls are sure to delight!

Million Dollar Chicken Casserole

0

Million Dollar Chicken Casserole is the ultimate comfort food, combining tender chicken, creamy filling, and a buttery, crunchy cracker topping. With its rich flavors and bubbly golden crust, it’s a dish that feels both indulgent and comforting. Perfect for family dinners, potlucks, or even a cozy weeknight meal, this casserole lives up to its “million-dollar” name.

This recipe is simple to make yet delivers a big flavor payoff. The combination of cream of chicken soup, sour cream, and cheeses creates a velvety filling, while the crushed Ritz crackers add a satisfying crunch. Serve it with a fresh salad or steamed veggies for a complete meal.

Why You’ll Love This Recipe

Rich and Creamy: A cheesy, savory filling that’s irresistibly delicious.

Easy to Prepare: Simple ingredients and minimal prep time.

Crowd-Pleaser: Perfect for feeding a hungry family or guests.

Ingredients

• 3 cups cooked chicken, shredded or diced

• 1 can (10.5 oz) condensed cream of chicken soup

• 1 cup sour cream

• 1/2 cup mayonnaise

• 1 cup shredded cheddar cheese

• 1 cup shredded mozzarella cheese

• 1 sleeve Ritz crackers, crushed

• 1/4 cup unsalted butter, melted

• Salt and pepper, to taste

• Chopped parsley, for garnish (optional)

Directions

Step 1: Preheat the Oven

1. Preheat your oven to 350°F (175°C).

2. Grease a 9×13-inch baking dish with cooking spray or butter.

Step 2: Combine the Filling

1. In a large mixing bowl, combine the cooked chicken, condensed cream of chicken soup, sour cream, mayonnaise, cheddar cheese, and mozzarella cheese.

2. Season with salt and pepper to taste. Mix until well combined.

Step 3: Assemble the Casserole

1. Spread the chicken mixture evenly into the prepared baking dish, smoothing it out into an even layer.

Step 4: Prepare the Topping

1. In a small bowl, mix the crushed Ritz crackers with the melted butter until evenly coated.

2. Sprinkle the cracker mixture over the chicken filling, ensuring it’s evenly distributed.

Step 5: Bake the Casserole

1. Place the dish in the preheated oven and bake for 25-30 minutes, or until the casserole is bubbly and the topping is golden brown.

Step 6: Garnish and Serve

1. Let the casserole cool slightly before serving.

2. Garnish with chopped parsley for a fresh touch, if desired.

Tips

Rotisserie Chicken Shortcut: Use a store-bought rotisserie chicken for quick prep.

Customize the Cheese: Swap cheddar and mozzarella for other favorites like Monterey Jack or Parmesan.

Add Veggies: Stir in cooked broccoli, peas, or carrots for added nutrition.

Storage Options

Refrigeration: Store leftovers in an airtight container in the refrigerator for up to 3 days.

Freezing: Freeze the baked casserole for up to 2 months. Thaw overnight in the refrigerator before reheating.

Reheating: Warm in the oven at 350°F until heated through, about 15-20 minutes.

Million Dollar Chicken Casserole is a creamy, cheesy delight with a crunchy topping that will have everyone coming back for seconds. Simple, satisfying, and delicious—this dish truly earns its name!

Vanilla Soufflé

0

Vanilla Soufflé is the epitome of elegance in the dessert world. Light, airy, and delicately flavored with vanilla, it’s a delightful treat that feels like a cloud on your tongue. Its dramatic rise in the oven and delicate texture make it a show-stopping dessert for special occasions or intimate dinners.

This classic French dessert relies on the perfect balance of a rich, creamy base and stiffly whipped egg whites. The process may seem daunting, but with a bit of attention to detail, it’s surprisingly simple to make. Best of all, the result is a sweet, golden soufflé that’s as beautiful as it is delicious.

Why You’ll Love This Recipe

Elegant Presentation: The golden, puffed soufflé is a stunning centerpiece for any dessert table.

Light and Fluffy: The airy texture makes it feel indulgent yet light.

Vanilla Perfection: Simple, pure flavors that let the vanilla shine.

Ingredients

• 4 egg yolks

• 6 egg whites

• 60g sugar (plus extra for sprinkling)

• 50g butter (plus extra for greasing)

• 40g flour

• 250ml milk

• 2 teaspoons vanilla extract

• A pinch of salt

• Icing sugar (optional, for decoration)

Instructions

Step 1: Prepare the Mold

1. Generously grease the soufflé mold with butter.

2. Sprinkle a little sugar inside the mold and rotate it to coat evenly. This helps the soufflé rise uniformly.

Step 2: Make the Roux

1. In a medium saucepan, melt 50g of butter over low heat.

2. Stir in the flour and cook for about 2 minutes, stirring constantly to avoid browning.

3. Gradually add the milk, whisking continuously to form a smooth, lump-free mixture.

4. Cook over low heat, stirring, until the mixture thickens. Remove from heat and stir in the vanilla extract.

Step 3: Incorporate the Yolks

1. Allow the mixture to cool slightly, then add the egg yolks one at a time, mixing thoroughly after each addition.

Step 4: Whip the Whites

1. In a clean, dry bowl, beat the egg whites with a pinch of salt until soft peaks form.

2. Gradually add the sugar, continuing to beat until stiff, glossy peaks form.

Step 5: Blend the Mixtures

1. Stir one-third of the whipped egg whites into the vanilla mixture to lighten it.

2. Gently fold in the remaining egg whites, using a spatula and a rolling motion to keep the mixture airy.

Step 6: Bake

1. Preheat your oven to 190°C (375°F).

2. Fill the prepared mold with the soufflé mixture, leaving about 1/4 of the mold empty to allow room for rising.

3. Place the mold on the middle rack of the oven and bake for 18-20 minutes, or until the soufflé has risen and developed a golden crust.

Step 7: Serve Immediately

1. Dust the soufflé with icing sugar, if desired, and serve immediately. The soufflé is best enjoyed while puffed and warm.

Tips

Room-Temperature Eggs: Separate eggs while cold but allow them to come to room temperature for easier whipping.

Avoid Overmixing: Gently fold the egg whites to maintain the airy texture.

Serve Quickly: Soufflés begin to deflate shortly after coming out of the oven, so serve immediately for the best presentation.

Storage Options

Not Ideal for Storage: Soufflés are best enjoyed fresh out of the oven, as they lose their airy structure upon cooling.

Vanilla Soufflé is a timeless dessert that never fails to impress. With its delicate vanilla flavor and light texture, it’s a true masterpiece of simplicity and elegance. Enjoy the magic of creating and savoring this classic treat!

Crab and Shrimp Casserole

0

Crab and Shrimp Casserole is a luxurious and comforting seafood dish that combines tender lump crabmeat, juicy shrimp, and a creamy sauce with a golden breadcrumb and cheese topping. Perfect for family dinners, holidays, or special occasions, this casserole is a crowd-pleaser that pairs beautifully with a crisp salad or warm bread.

The savory flavors of Old Bay seasoning and the creamy sauce elevate the seafood while the cheesy, crispy topping adds a delightful texture. This casserole is easy to assemble and bake, making it an ideal choice for seafood lovers looking for a hearty and flavorful dish.

Why You’ll Love This Recipe

Rich and Creamy: A decadent sauce enhances the natural sweetness of the crab and shrimp.

Perfectly Textured: The breadcrumbs and cheese topping provide a crunchy contrast to the creamy filling.

Easy to Prepare: Simple steps for a showstopping dish.

Ingredients

• 1 pound lump crabmeat

• 1 pound large shrimp, peeled and deveined

• 1 cup chopped onion

• 1 cup chopped bell pepper

• 1 cup chopped celery

• 2 cloves garlic, minced

• 1/4 cup butter

• 1/4 cup all-purpose flour

• 2 cups milk

• 1 cup chicken broth

• 1 teaspoon Old Bay seasoning

• Salt and pepper, to taste

• 1 cup shredded cheddar cheese

• 1 cup breadcrumbs

• Chopped fresh parsley, for garnish

Directions

Step 1: Preheat and Prepare

1. Preheat your oven to 375°F (190°C).

2. Grease a 9×13-inch baking dish and set it aside.

Step 2: Cook the Vegetables

1. In a large skillet, melt the butter over medium heat.

2. Add the chopped onion, bell pepper, celery, and garlic.

3. Sauté until the vegetables are softened, about 5-7 minutes.

Step 3: Make the Sauce

1. Stir in the flour and cook for 2 minutes, stirring constantly to prevent lumps.

2. Gradually whisk in the milk and chicken broth until smooth.

3. Cook over medium heat until the mixture thickens, about 5 minutes.

4. Season with Old Bay seasoning, salt, and pepper to taste.

Step 4: Add the Seafood

1. Gently fold the crabmeat and shrimp into the sauce.

2. Stir until the seafood is evenly coated with the creamy mixture.

Step 5: Assemble the Casserole

1. Transfer the seafood mixture to the prepared baking dish.

2. Sprinkle the top with shredded cheddar cheese, followed by an even layer of breadcrumbs.

Step 6: Bake

1. Place the casserole in the preheated oven and bake for 25-30 minutes, or until the dish is bubbly and the top is golden brown.

Step 7: Garnish and Serve

1. Allow the casserole to cool slightly before garnishing with chopped parsley.

2. Serve warm and enjoy this creamy seafood delight.

Tips

Fresh or Frozen Seafood: Use fresh crabmeat and shrimp for the best flavor, but thawed frozen options work well too.

Customize the Topping: Add Parmesan cheese or mix breadcrumbs with melted butter for extra crunch.

Spice It Up: Add a pinch of cayenne pepper for a spicy kick.

Storage Options

Refrigeration: Store leftovers in an airtight container in the refrigerator for up to 3 days.

Freezing: Freeze the baked casserole (without garnishing) in a freezer-safe container for up to 2 months. Thaw overnight in the refrigerator before reheating.

Reheating: Reheat in the oven at 350°F (175°C) until warmed through, about 15-20 minutes.

This Crab and Shrimp Casserole is a rich, flavorful dish that’s perfect for seafood lovers. Its creamy sauce, tender seafood, and cheesy, crunchy topping make it a meal that will leave everyone coming back for seconds!

Strawberry Cheesecake with Red Velvet Crust

0

Strawberry Cheesecake with Red Velvet Crust is an elegant dessert that brings together the classic flavors of creamy cheesecake, tangy strawberries, and decadent red velvet. This stunning combination is not only visually appealing but also rich and indulgent, making it the perfect centerpiece for special occasions or celebrations.

The velvety cheesecake filling sits atop a vibrant red velvet crust, offering a delightful textural contrast. The fresh strawberry topping adds a sweet and slightly tangy note that perfectly balances the richness of the cheesecake. Every bite is a symphony of flavors and textures that will leave your guests raving.

Why You’ll Love This Recipe

Striking Presentation: The vibrant red velvet crust and glossy strawberry topping make it a showstopper.

Rich and Creamy: The cheesecake filling is smooth and luscious, with just the right balance of sweetness.

Fresh and Fruity: The homemade strawberry topping adds a burst of freshness.

Ingredients

For the Red Velvet Crust:

• 1 1/2 cups crushed red velvet cake (boxed mix or homemade)

• 1/4 cup unsalted butter, melted

For the Cheesecake Filling:

• 3 packages (8 oz each) cream cheese, softened

• 1 cup granulated sugar

• 3 large eggs

• 1 cup sour cream

• 1 teaspoon vanilla extract

• 1 tablespoon lemon juice

For the Strawberry Topping:

• 1 pint fresh strawberries, hulled and sliced

• 1/2 cup granulated sugar

• 1 tablespoon cornstarch

• 1/2 cup water

• 1 tablespoon lemon juice

Instructions

Step 1: Prepare the Red Velvet Crust

1. Preheat your oven to 325°F (160°C).

2. In a medium bowl, mix the crushed red velvet cake crumbs with the melted butter until well combined.

3. Press the mixture firmly into the bottom of a 9-inch springform pan to form an even crust.

4. Bake for 10 minutes, then set aside to cool.

Step 2: Make the Cheesecake Filling

1. In a large mixing bowl, beat the cream cheese and granulated sugar with a mixer until smooth and creamy.

2. Add the eggs one at a time, beating well after each addition.

3. Mix in the sour cream, vanilla extract, and lemon juice until fully combined.

4. Pour the cheesecake filling over the cooled red velvet crust.

Step 3: Bake the Cheesecake

1. Place the springform pan inside a larger baking pan. Pour hot water into the larger pan to come halfway up the sides of the springform pan (this creates a water bath to prevent cracking).

2. Bake in the preheated oven for 55-65 minutes, or until the center is set but still slightly jiggly.

3. Turn off the oven and leave the cheesecake inside with the door slightly ajar for 1 hour.

4. Remove the cheesecake from the oven and let it cool to room temperature, then refrigerate for at least 4 hours or overnight.

Step 4: Prepare the Strawberry Topping

1. In a medium saucepan, combine the sliced strawberries, granulated sugar, cornstarch, water, and lemon juice.

2. Cook over medium heat, stirring constantly, until the mixture thickens and becomes glossy, about 5-7 minutes.

3. Remove from heat and let cool completely.

Step 5: Assemble and Serve

1. Carefully remove the chilled cheesecake from the springform pan and place it on a serving plate.

2. Spoon the cooled strawberry topping over the cheesecake, spreading it evenly.

3. Slice and serve chilled.

Tips

Room Temperature Ingredients: Use softened cream cheese and room-temperature eggs for a smoother filling.

Avoid Cracks: The water bath helps prevent cracking, but don’t skip leaving the cheesecake in the oven to cool gradually.

Make Ahead: The cheesecake and topping can be prepared a day in advance for convenience.

Storage Options

Refrigeration: Store the cheesecake in an airtight container in the refrigerator for up to 5 days.

Freezing: Freeze individual slices without the topping for up to 2 months. Thaw in the refrigerator overnight and top with strawberry sauce before serving.

Strawberry Cheesecake with Red Velvet Crust is the perfect dessert for anyone who loves rich, creamy, and fruity flavors. Its elegant appearance and delightful taste will make it a hit at any gathering!

Best Homemade Salsa Ever

0

This salsa is vibrant, fresh, and bursting with flavor, making it the perfect addition to any snack or meal. The combination of canned tomatoes, Rotel, fresh cilantro, lime juice, and spices creates a salsa that’s both zesty and slightly spicy, with a smooth yet chunky texture that’s perfect for dipping. Whether you’re enjoying it with tortilla chips, topping tacos, or adding it to a breakfast burrito, this salsa is guaranteed to impress.

What makes this recipe a standout is its simplicity and customizability. With just a few pulses in a blender or food processor, you’ll have restaurant-quality salsa that’s ready to serve after a quick chill in the fridge. It’s a crowd-pleaser for game days, parties, or any occasion where bold flavors are a must.

Why You’ll Love This Recipe

Quick and Easy: Ready in minutes with simple ingredients you likely already have.

Customizable: Adjust the spice, texture, and flavors to your preference.

Fresh and Flavorful: Tastes just like restaurant salsa—or even better!

Ingredients

• 1 can (28 ounces) whole tomatoes with juice

• 2 cans (10 ounces each) Rotel (diced tomatoes and green chilies)

• 1/4 cup chopped onion

• 1 clove garlic, minced

• 1 whole jalapeño, quartered and sliced thin (adjust to taste)

• 1/4 teaspoon sugar

• 1/4 teaspoon salt

• 1/4 teaspoon ground cumin

• 1/2 cup cilantro (or more, to taste)

• Juice of 1/2 lime

Directions

Step 1: Combine Ingredients

1. Add the whole tomatoes (with juice), Rotel, onion, jalapeño, garlic, sugar, salt, cumin, lime juice, and cilantro to a blender or food processor.

Step 2: Blend to Desired Consistency

1. Pulse the mixture 10 to 15 times, or until you reach your preferred consistency.

2. Taste the salsa using a tortilla chip and adjust seasonings (salt, lime juice, or cilantro) as needed.

Step 3: Refrigerate and Serve

1. Transfer the salsa to an airtight container and refrigerate for at least 1 hour to let the flavors meld.

2. Serve chilled with tortilla chips, cheese nachos, or as a topping for your favorite dishes.

Tips

Control the Heat: For a milder salsa, remove the seeds and membrane from the jalapeño. For extra heat, add an additional jalapeño or a pinch of cayenne.

Enhance Freshness: Add diced fresh tomatoes or extra cilantro for a burst of freshness.

Longer Storage: Keep in an airtight container in the refrigerator for up to 5 days.

Storage Options

Refrigeration: Store salsa in an airtight container in the refrigerator for up to 5 days.

Freezing: Freeze the salsa in a freezer-safe container for up to 2 months. Thaw overnight in the refrigerator and stir well before serving.

This homemade salsa is a vibrant, fresh, and zesty addition to any occasion. With its simple preparation and bold flavors, it’s sure to become a staple in your kitchen!

Slow Cooker Creamy Bacon Chicken

0

Slow Cooker Creamy Bacon Chicken is a rich and comforting dish that combines tender chicken, smoky bacon, and a luscious creamy sauce. Perfect for busy days, this recipe lets the slow cooker do the hard work, infusing the chicken with incredible flavor as it cooks. With the addition of cheddar cheese and a touch of sour cream, this dish becomes irresistibly indulgent.

This meal pairs beautifully with mashed potatoes, rice, or pasta, allowing you to soak up every bit of the decadent sauce. Topped with a garnish of fresh parsley, it’s as visually appealing as it is delicious.

Why You’ll Love This Recipe

Rich and Creamy: The sauce is velvety and loaded with savory flavors from bacon and cheddar.

Easy to Prepare: Minimal prep makes this a fuss-free dinner option.

Slow-Cooked Perfection: The chicken turns tender and juicy after hours of gentle cooking.

Ingredients

• 4 boneless, skinless chicken breasts

• 1 teaspoon garlic powder

• 1 teaspoon dried thyme

• Salt and freshly ground black pepper, to taste

• 6 slices bacon

• 1 small onion, finely chopped

• 2 cloves garlic, minced

• 1 cup chicken broth

• 1 cup heavy cream

• 1 tablespoon all-purpose flour

• ½ cup sour cream

• 1 cup shredded cheddar cheese

• Fresh parsley, chopped (for garnish)

Instructions

Step 1: Prep the Chicken

1. Season the chicken breasts with garlic powder, dried thyme, salt, and freshly ground black pepper.

2. Arrange the seasoned chicken snugly at the bottom of your slow cooker.

Step 2: Cook the Bacon

1. In a skillet over medium heat, cook the bacon until crisp.

2. Remove the bacon and place it on paper towels to cool and drain. Once cooled, crumble the bacon and set it aside.

Step 3: Sauté Onions and Garlic

1. Using the rendered bacon grease in the skillet, sauté the chopped onion until translucent, about 2-3 minutes.

2. Add the minced garlic and cook for an additional 30 seconds until fragrant.

3. Scoop the onion and garlic mixture over the chicken in the slow cooker.

Step 4: Deglaze the Skillet

1. Pour the chicken broth into the skillet to deglaze, scraping up any browned bits from the bottom of the pan.

2. Pour this flavorful liquid over the chicken in the slow cooker.

Step 5: Slow Cook the Chicken

1. Cover the slow cooker and cook on low for 6-7 hours or high for 3-4 hours, until the chicken is fully cooked and tender.

Step 6: Make It Creamy

1. In a small bowl, whisk together the heavy cream and flour until smooth.

2. Stir this mixture into the slow cooker along with the crumbled bacon.

3. Cook on high for an additional 25-30 minutes, allowing the sauce to thicken slightly.

Step 7: Add the Final Touches

1. Stir in the sour cream and shredded cheddar cheese. Mix until the cheese has melted and the sauce is smooth and creamy.

Step 8: Garnish and Serve

1. Garnish with freshly chopped parsley for a burst of color and freshness.

2. Serve warm over mashed potatoes, rice, or pasta for a complete and satisfying meal.

Tips

Crispy Bacon: Cook the bacon until very crisp for the best texture in the finished dish.

Thicker Sauce: For a thicker sauce, whisk in an additional teaspoon of flour with the cream.

Make-Ahead: Prep the ingredients the night before for an easy start in the morning.

Storage Options

Refrigeration: Store leftovers in an airtight container in the refrigerator for up to 3 days.

Freezing: Freeze the cooked chicken and sauce in a freezer-safe container for up to 2 months. Thaw overnight in the refrigerator before reheating.

Reheating: Reheat gently on the stovetop or in the microwave, adding a splash of cream if the sauce thickens too much.

Slow Cooker Creamy Bacon Chicken is a decadent and comforting dish that’s perfect for family dinners or special occasions. With its creamy sauce and smoky bacon flavor, it’s a meal everyone will love!

Buttermilk Biscuits and Sausage Gravy

0

Buttermilk Biscuits and Sausage Gravy is a classic Southern breakfast dish that’s comforting, hearty, and packed with rich, savory flavors. Warm, flaky biscuits smothered in creamy sausage gravy make for a meal that’s perfect for a weekend brunch or a cozy morning treat. With a balance of spice from crushed red pepper and aromatic herbs like thyme and rosemary, this dish is both satisfying and flavorful.

The beauty of this recipe lies in its simplicity and homestyle appeal. The sausage provides a robust base for the creamy gravy, while the buttery biscuits soak up all the delicious flavors. It’s a dish that’s sure to please both kids and adults alike.

Why You’ll Love This Recipe

Comforting and Hearty: A filling breakfast that keeps you satisfied for hours.

Rich in Flavor: The herbs and spices elevate the creamy sausage gravy.

Simple and Quick: Ready in under 30 minutes, making it perfect for busy mornings.

Ingredients

For the Biscuits and Gravy:

• 8 flaky buttermilk biscuits (homemade or store-bought)

• 1 pound pork sausage

• 2 tablespoons + 1 teaspoon all-purpose flour

• 2 1/2 cups half and half

• 1 tablespoon butter

• 1/8 teaspoon dried thyme

• 1/8 teaspoon dried crushed rosemary

• 1/8 teaspoon crushed red pepper flakes

• Freshly ground black pepper, to taste

Instructions

Step 1: Brown the Sausage

1. Heat a large saucepan over medium heat.

2. Add the pork sausage and cook, breaking it into small pieces, until browned and fully cooked.

3. Use a paper towel to blot out most of the grease from the pan, leaving just enough to coat the bottom lightly.

Step 2: Make the Gravy

1. Sprinkle the flour over the cooked sausage and stir well to combine.

2. Add the butter and continue cooking for 1 minute to create a roux.

3. Gradually pour in the half and half, stirring constantly to prevent lumps.

Step 3: Season and Thicken

1. Reduce the heat to medium-low and cook the gravy, stirring often, until it thickens to your desired consistency, about 5-7 minutes.

2. Stir in the dried thyme, crushed rosemary, crushed red pepper flakes, and freshly ground black pepper. Adjust seasoning to taste.

Step 4: Prepare the Biscuits

1. While the gravy cooks, bake the buttermilk biscuits according to package directions or your preferred recipe.

Step 5: Serve

1. Split the warm biscuits in half and ladle the sausage gravy generously over the top.

2. Garnish with additional black pepper, if desired, and serve immediately.

Tips

Use Fresh Herbs: Swap dried thyme and rosemary for fresh herbs if you have them on hand. Use about twice the amount of fresh herbs for the same intensity of flavor.

Adjust Thickness: If the gravy becomes too thick, stir in an extra splash of half and half until the desired consistency is achieved.

Spice Level: Adjust the crushed red pepper flakes to suit your heat preference or omit them for a milder flavor.

Storage Options

Refrigeration: Store leftover gravy in an airtight container in the refrigerator for up to 3 days.

Reheating: Reheat the gravy in a saucepan over low heat, adding a splash of half and half to loosen it as needed.

Freezing: Freeze the sausage gravy in a freezer-safe container for up to 2 months. Thaw overnight in the refrigerator before reheating.

Buttermilk Biscuits and Sausage Gravy is the ultimate comfort breakfast, combining flaky biscuits with a creamy, herb-infused gravy. Whether you’re making it for a lazy weekend morning or a special occasion, it’s a dish that’s sure to impress!