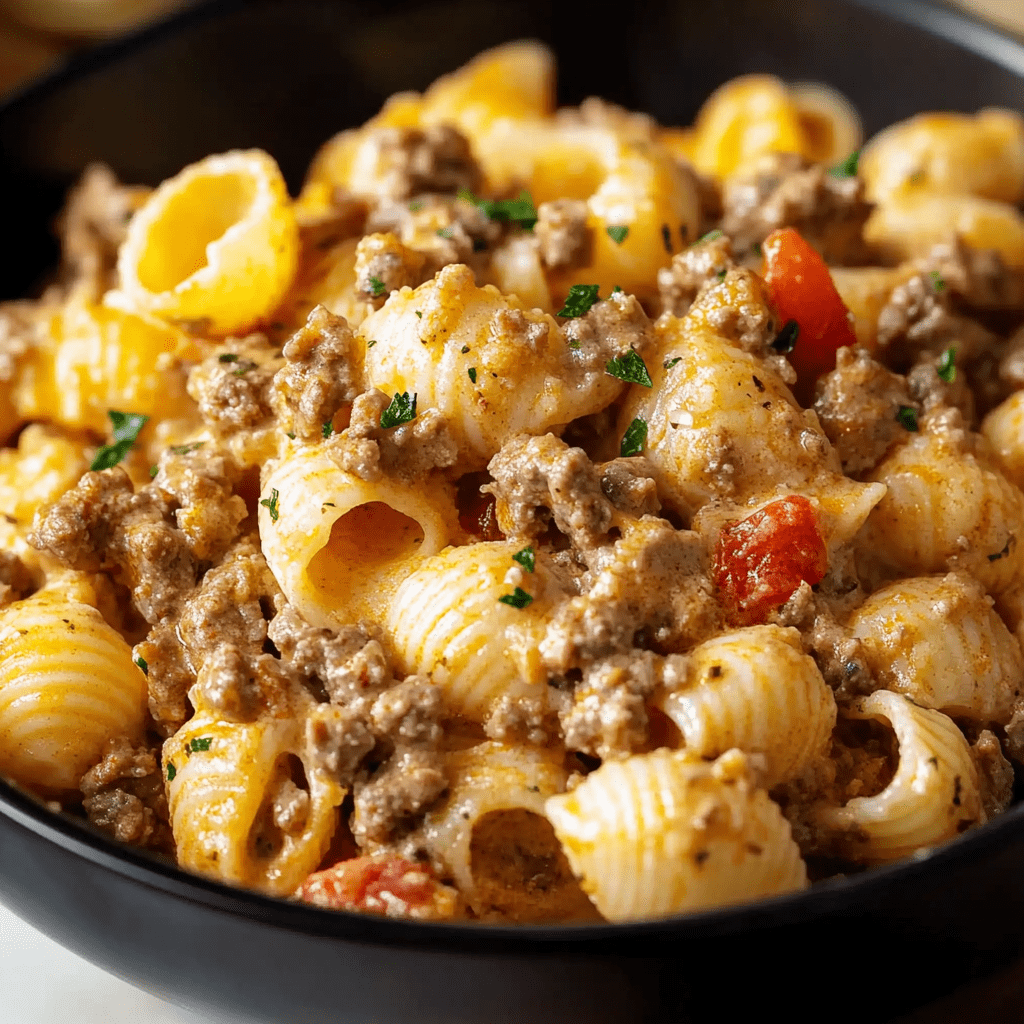
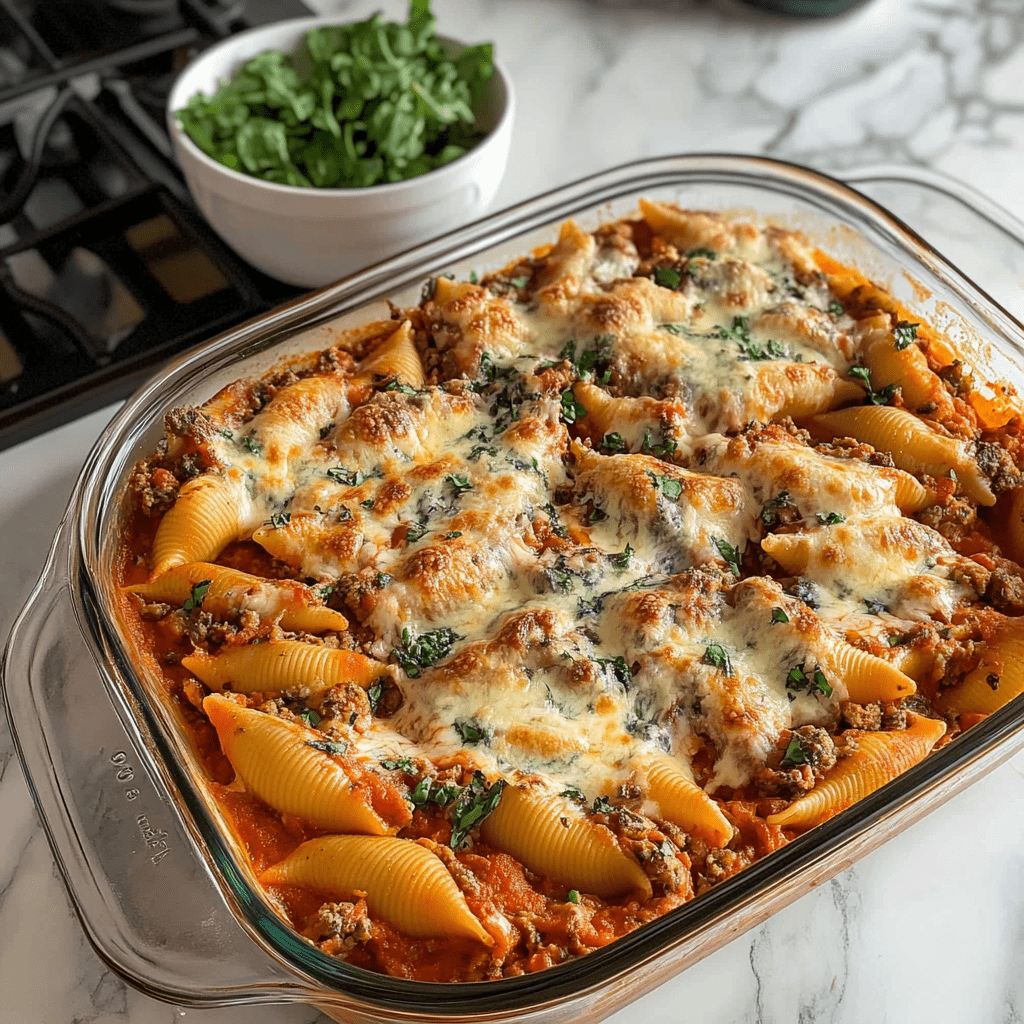
Bacon Cheddar Mashed Potato Patties

0

Bacon Cheddar Mashed Potato Patties are a delightful way to transform leftover mashed potatoes into a crispy, savory treat. These golden-brown patties are loaded with the smoky flavor of bacon and the creamy richness of cheddar cheese, making them a hit for breakfast, lunch, or dinner. With a crisp exterior and a soft, cheesy interior, they’re comfort food at its finest.

This recipe is incredibly versatile and easy to prepare. Whether you serve them as a side dish, an appetizer, or even the main event, these patties are sure to please everyone at the table. Plus, the use of bacon drippings for frying adds an extra layer of flavor that’s hard to resist.

Why You’ll Love This Recipe

Perfect for Leftovers: A creative way to use up cold mashed potatoes.

Crispy and Cheesy: The golden crust contrasts beautifully with the cheesy, creamy interior.

Packed with Flavor: Bacon and cheddar make these patties irresistible.

Ingredients

• 4 cups cold mashed potatoes

• 5 slices bacon

• 1/2 teaspoon onion powder

• 1/2 teaspoon salt

• 1/2 teaspoon black pepper

• 2 eggs, well beaten

• 1/2 cup shredded cheddar cheese

Instructions

Step 1: Cook the Bacon

1. Place the bacon in a large, deep skillet.

2. Cook over medium-high heat, turning occasionally, until evenly browned and crisp, about 10 minutes.

3. Remove the bacon slices, crumble them, and set aside. Leave the bacon drippings in the skillet.

Step 2: Prepare the Potato Mixture

1. In a large bowl, combine the cold mashed potatoes, beaten eggs, onion powder, salt, and black pepper.

2. Add the crumbled bacon and shredded cheddar cheese. Stir until well combined.

Step 3: Form the Patties

1. Using your hands, shape the potato mixture into 8 evenly sized patties.

Step 4: Fry the Patties

1. Reheat the bacon drippings in the skillet over medium heat.

2. Add the patties to the skillet in batches, being careful not to overcrowd the pan.

3. Fry each patty until crisp and golden brown on both sides, about 4 minutes per side.

Step 5: Serve

1. Transfer the cooked patties to a serving plate.

2. Serve warm and enjoy the crispy, cheesy goodness!

Tips

Chill the Mixture: If the potato mixture feels too soft, chill it in the refrigerator for 15-20 minutes to make shaping easier.

Use Fresh Potatoes: If you don’t have leftover mashed potatoes, prepare fresh ones and let them cool completely before using.

Add Herbs: Mix in fresh parsley, chives, or green onions for added flavor.

Storage Options

Refrigeration: Store leftover patties in an airtight container in the refrigerator for up to 3 days.

Reheating: Reheat in a skillet over medium heat or in the oven at 350°F until warmed through.

Freezing: Freeze uncooked patties on a baking sheet, then transfer to a freezer-safe bag. Cook directly from frozen, adding an extra minute or two per side.

Bacon Cheddar Mashed Potato Patties are a delicious and satisfying dish that’s as easy to make as it is to eat. They’re perfect for any time of day and guaranteed to become a family favorite!

Garlic Butter Steak Bites and Cheesy Smashed Potatoes

0

Garlic Butter Steak Bites and Cheesy Smashed Potatoes is a dish that combines rich, savory flavors and textures into one hearty meal. Tender steak bites are seared to perfection in a garlic-infused butter, while crispy smashed potatoes are topped with gooey melted cheddar cheese. This recipe is perfect for an indulgent dinner, whether you’re hosting guests or treating yourself to a special weeknight meal.

The combination of buttery steak bites and cheesy, golden-brown potatoes makes this a dish that’s satisfying and easy to prepare. Each bite is packed with flavor, from the herbaceous parsley garnish on the steak to the crispy edges of the potatoes. This recipe uses simple ingredients to create a truly elevated experience.

Why You’ll Love This Recipe

Quick and Easy: Perfect for weeknights, this recipe comes together in under 45 minutes.

Flavor-Packed: Garlic butter steak and cheesy potatoes deliver bold, comforting flavors.

Crowd-Pleaser: Ideal for family meals or entertaining guests.

Ingredients

For the Steak Bites:

• 1 pound sirloin steak, cut into cubes

• 2 tablespoons garlic, minced

• 4 tablespoons butter

• Salt and pepper, to taste

• Fresh parsley, chopped (for garnish)

For the Smashed Potatoes:

• 1 pound baby potatoes

• 1 cup cheddar cheese, shredded

• 2 tablespoons olive oil

• Salt and pepper, to taste

• Fresh chives, chopped (for garnish)

Directions

Step 1: Prepare the Potatoes

1. Boil the baby potatoes in a large pot of salted water until tender, about 15 minutes.

2. Drain the potatoes and let them cool slightly.

Step 2: Smash and Season the Potatoes

1. Place the boiled potatoes on a hot griddle or skillet.

2. Use a spatula to gently smash each potato, flattening them slightly.

3. Drizzle with olive oil and season with salt and pepper.

Step 3: Cook the Potatoes

1. Cook the smashed potatoes over medium-high heat until golden and crispy, about 10 minutes on each side.

2. Sprinkle the potatoes with shredded cheddar cheese and cook for another 2-3 minutes, or until the cheese is fully melted.

Step 4: Prepare the Steak Bites

1. Heat the griddle over high heat and add the butter.

2. Once the butter is melted and foamy, add the minced garlic and sauté for about 1 minute, until fragrant.

3. Add the steak bites to the griddle, spreading them out for even cooking.

Step 5: Cook the Steak Bites

1. Season the steak bites with salt and pepper.

2. Sear the steak bites for 8-10 minutes, stirring occasionally, until they are browned on all sides and cooked to your desired level of doneness.

3. Remove the steak bites from the heat and garnish with chopped parsley.

Step 6: Serve

1. Plate the garlic butter steak bites alongside the cheesy smashed potatoes.

2. Garnish the potatoes with fresh chives for a pop of color and flavor.

Tips

Choose the Right Steak: Sirloin is tender and flavorful, but ribeye or tenderloin can also be used.

Cheese Variety: Swap cheddar for mozzarella, Gruyère, or Parmesan for a unique twist on the potatoes.

Monitor Heat: Keep the griddle hot for a good sear on the steak bites, but avoid burning the garlic.

Storage Options

Refrigeration: Store leftovers in an airtight container in the refrigerator for up to 3 days.

Reheating: Reheat steak bites and potatoes in a skillet over low heat to maintain their texture.

Freezing: Freeze the cooked steak bites and potatoes separately in freezer-safe containers for up to 2 months. Thaw in the refrigerator before reheating.

Garlic Butter Steak Bites and Cheesy Smashed Potatoes is a recipe that’s as delicious as it is easy to prepare. With its bold flavors and satisfying textures, it’s a dish you’ll want to make again and again!

Salisbury Steak with Onion Gravy

0

Salisbury Steak with Onion Gravy is a classic comfort food that combines tender beef patties with a rich, savory onion gravy. This hearty dish is perfect for a cozy dinner and pairs wonderfully with mashed potatoes, rice, or buttered noodles. The combination of seasoned beef and velvety gravy creates a meal that’s satisfying and flavorful, ideal for family dinners or when you’re craving something warm and nostalgic.

The recipe is straightforward, using simple pantry staples to create layers of flavor. The beef patties are seasoned with onion and garlic powders, breadcrumbs, and Worcestershire sauce, then browned to perfection. The onion gravy, enriched with beef broth and a touch of cooking sherry, ties the dish together with a luscious finish. It’s a one-skillet wonder that delivers maximum flavor with minimal effort.

Why You’ll Love This Recipe

Rich and Comforting: The savory onion gravy enhances the juicy beef patties for a deeply satisfying meal.

Simple Ingredients: Uses everyday pantry staples for a quick and easy dish.

Perfect Pairing: Versatile enough to serve with mashed potatoes, rice, or steamed vegetables.

Ingredients

For the Patties:

• 1 pound ground beef

• 1 egg

• 1/4 cup bread crumbs

• 1/8 teaspoon ground black pepper

• 1/2 teaspoon seasoned salt

• 1/2 teaspoon onion powder

• 1/2 teaspoon garlic powder

• 1 teaspoon Worcestershire sauce

For Cooking:

• 1 tablespoon vegetable oil

• 1 cup thinly sliced onion

For the Gravy:

• 2 tablespoons all-purpose flour

• 1 cup beef broth

• 1 tablespoon cooking sherry

• 1/2 teaspoon seasoned salt

Instructions

Step 1: Prepare the Beef Patties

1. In a large mixing bowl, combine the ground beef, egg, bread crumbs, black pepper, 1/2 teaspoon seasoned salt, onion powder, garlic powder, and Worcestershire sauce. Mix until well combined.

2. Divide the mixture into 8 equal portions, shaping each into a ball, then flatten into patties.

Step 2: Cook the Patties and Onions

1. Heat the vegetable oil in a large skillet over medium heat.

2. Add the beef patties and sliced onions to the skillet. Cook the patties for about 4 minutes per side, or until browned.

3. Remove the patties from the skillet and keep warm. Leave the onions in the skillet.

Step 3: Make the Gravy

1. Sprinkle the flour over the onions and drippings in the skillet. Stir to combine, scraping up any browned bits from the bottom of the pan.

2. Gradually whisk in the beef broth and cooking sherry, stirring constantly to prevent lumps.

3. Season the gravy with the remaining 1/2 teaspoon of seasoned salt.

4. Simmer the gravy over medium-low heat, stirring frequently, for about 5 minutes, or until thickened.

Step 4: Combine and Simmer

1. Reduce the heat to low and return the beef patties to the skillet.

2. Spoon the gravy over the patties, cover, and simmer for 15 minutes to allow the flavors to meld.

Step 5: Serve

1. Serve the Salisbury steak patties smothered in onion gravy. Pair with mashed potatoes, rice, or your favorite side dish.

Tips

Use Fresh Ingredients: Freshly ground beef and thinly sliced onions make all the difference in flavor and texture.

Don’t Overmix: When preparing the patties, mix just until combined to keep them tender.

Thicker Gravy: For a thicker gravy, use an extra tablespoon of flour when making the roux.

Storage Options

Refrigeration: Store leftovers in an airtight container in the refrigerator for up to 3 days.

Freezing: Freeze cooked patties and gravy in a freezer-safe container for up to 2 months. Thaw overnight in the refrigerator before reheating.

Reheating: Reheat in a skillet over low heat, adding a splash of beef broth if needed to loosen the gravy.

Salisbury Steak with Onion Gravy is a timeless dish that delivers on flavor and comfort. It’s a recipe that will quickly become a staple in your dinner rotation!

Pineapple Ice Cream

0

Pineapple Ice Cream is a tropical treat that brings the vibrant flavors of summer to your table all year round. Its creamy texture combined with the juicy sweetness of pineapple creates a refreshing dessert that’s perfect for any occasion. Whether you’re relaxing by the pool, hosting a luau-themed party, or simply indulging in a midweek pick-me-up, this Pineapple Ice Cream delivers a luscious, tropical escape with every bite.

This recipe is delightfully simple, requiring only a handful of ingredients and no special equipment beyond a mixer. The heavy whipping cream gives the ice cream its rich, velvety texture, while the sweetened condensed milk adds sweetness and ensures a smooth consistency. The crushed pineapple brings the dessert to life with bursts of fruity flavor in every spoonful. This no-churn ice cream is perfect for those looking to enjoy homemade frozen desserts without the hassle of an ice cream maker.

Why You’ll Love This Recipe

No-Churn Convenience: You don’t need an ice cream maker to whip up this creamy treat.

Tropical Bliss: The crushed pineapple adds a bright and refreshing flavor that pairs beautifully with the creamy base.

Simple Ingredients: Made with just a few pantry staples, it’s quick and easy to prepare.

Ingredients

For the Ice Cream Base:

• 2 cups heavy whipping cream

• 14 ounces sweetened condensed milk

• 1/2 teaspoon vanilla extract

For the Pineapple Flavor:

• 2 cups crushed pineapple or a 16-ounce can, drained

Instructions

Step 1: Whip the Cream

1. In a large mixing bowl, add the heavy whipping cream.

2. Use an electric hand mixer or a stand mixer with a whisk attachment to whip the cream on medium speed until soft peaks form. This should take about 3-5 minutes.

Step 2: Combine the Base Ingredients

1. Add the sweetened condensed milk and vanilla extract to the whipped cream.

2. Mix on low speed until the ingredients are fully combined, forming a smooth and creamy mixture.

Step 3: Add the Pineapple

1. Gently fold in the crushed pineapple using a spatula.

2. Ensure the pineapple is evenly distributed throughout the mixture for consistent flavor in every bite.

Step 4: Prepare for Freezing

1. Pour the ice cream mixture into a freezer-safe dish, spreading it evenly to ensure uniform freezing.

2. Cover the dish with a lid or plastic wrap to prevent ice crystals from forming.

Step 5: Freeze the Ice Cream

1. Place the dish in the freezer and let the ice cream freeze for 4 to 8 hours, or until it reaches your desired level of firmness.

2. For a firmer consistency, let it freeze overnight.

Step 6: Serve and Enjoy

1. Once frozen, scoop the Pineapple Ice Cream into bowls or cones.

2. Garnish with fresh pineapple chunks or a sprig of mint for an extra tropical flair.

Tips

Drain the Pineapple Thoroughly: Excess liquid can make the ice cream icy rather than creamy. Press the pineapple lightly to remove as much juice as possible before folding it into the base.

Use Full-Fat Ingredients: For the creamiest texture, opt for full-fat heavy cream and sweetened condensed milk.

Add Texture: Mix in shredded coconut or finely chopped nuts for a delightful crunch.

Storage Options

Freezer Storage: Keep the ice cream in a tightly sealed, freezer-safe container for up to 2 weeks.

Avoid Freezer Burn: Place a layer of plastic wrap directly on the surface of the ice cream before sealing the container to prevent freezer burn.

Softening Before Serving: Let the ice cream sit at room temperature for 5-10 minutes before scooping for easier serving.

Pineapple Ice Cream is the ultimate tropical indulgence, combining creamy richness with bursts of fruity freshness. It’s an easy-to-make dessert that’s sure to brighten your day!

Caramel Cheesecake-Stuffed Churro Rings

0

Caramel Cheesecake-Stuffed Churro Rings combine two beloved desserts into one decadent treat. The crispy, golden churro rings are coated in cinnamon sugar and filled with creamy cheesecake and luscious caramel. Each bite is a delightful contrast of textures and flavors, from the crunchy exterior to the smooth and rich filling. These churro rings are perfect for special occasions, parties, or anytime you want to impress your guests with something extraordinary.

What makes this recipe truly irresistible is its fusion of flavors and presentation. The cheesecake filling adds a creamy tanginess that balances the sweetness of the caramel sauce, while the churro dough provides a slightly crisp texture that melts in your mouth. Whether served warm as a dessert centerpiece or enjoyed as a fun snack, these stuffed churro rings are guaranteed to leave everyone reaching for seconds.

Why You’ll Love This Recipe

Irresistible Combination: Crispy churros paired with creamy cheesecake and caramel create a dessert dream.

Fun and Unique Presentation: The ring shape is perfect for parties or as an eye-catching dessert.

Make-Ahead Options: Prep the cheesecake filling in advance for easy assembly.

Ingredients

For the Churro Dough:

• 1 cup water

• 1/2 cup unsalted butter

• 1/4 teaspoon salt

• 1 cup all-purpose flour

• 3 large eggs

• 1 teaspoon vanilla extract

For the Cheesecake Filling:

• 1 package (8 oz) cream cheese, softened

• 1/4 cup granulated sugar

• 1 teaspoon vanilla extract

For the Caramel Filling:

• 1/2 cup caramel sauce (store-bought or homemade)

For the Cinnamon Sugar Coating:

• 1 cup granulated sugar

• 1 tablespoon ground cinnamon

For Frying:

• Vegetable oil

Instructions

Prepare the Cheesecake Filling:

1. In a medium bowl, beat the softened cream cheese, granulated sugar, and vanilla extract until smooth and creamy.

2. Transfer the mixture to a piping bag fitted with a round tip. Refrigerate until needed.

Prepare the Churro Dough:

1. Combine water, unsalted butter, and salt in a medium saucepan. Bring to a boil over medium heat.

2. Once boiling, reduce the heat to low and add the flour all at once. Stir vigorously until the mixture forms a smooth ball and pulls away from the sides of the pan.

3. Remove from heat and let the dough cool for 5 minutes.

4. Add the eggs one at a time, mixing thoroughly after each addition until the dough is smooth and glossy. Stir in the vanilla extract.

5. Transfer the dough to a piping bag fitted with a large star tip.

Form and Fry the Churro Rings:

1. Heat vegetable oil in a large, deep saucepan or deep fryer to 350°F (175°C).

2. Pipe rings of churro dough onto small squares of parchment paper.

3. Carefully lower the parchment paper into the hot oil, allowing the dough rings to separate from the paper. Fry in batches until golden brown and crispy, about 2-3 minutes per side.

4. Use a slotted spoon to transfer churro rings to paper towels to drain. Toss them in the cinnamon sugar coating while still warm.

Assemble the Churro Rings:

1. Once the churro rings have cooled slightly, use a small knife to create a slit on the side of each ring.

2. Pipe the cheesecake filling into each ring until full.

3. Drizzle or pipe the caramel sauce into the cheesecake-filled churro rings.

Serve:

Serve the churro rings immediately while warm, with the cheesecake filling slightly gooey and the caramel perfectly drizzled.

Tips

Oil Temperature: Keep the oil at a steady 350°F for even frying. Use a thermometer to monitor the temperature.

Mess-Free Piping: Use a large star tip for the dough and a fine round tip for the cheesecake filling for precision.

Customize the Filling: Swap out caramel for chocolate ganache or fruit compote for a twist.

Storage Options

Room Temperature: Store unfilled churro rings in an airtight container for up to 1 day. Reheat briefly in the oven before serving.

Refrigeration: Store assembled churro rings in the refrigerator for up to 2 days. Note that the churros may lose some crispness.

Freezing: Freeze unfilled churro rings in a freezer-safe bag for up to 1 month. Reheat in a 350°F oven until crisp before filling and serving.

Caramel Cheesecake-Stuffed Churro Rings bring together the best of crispy churros and creamy cheesecake, making them a must-try dessert that’s as delicious as it is visually stunning.

Cherry Pie Bites

0

Cherry Pie Bites are a quick and delightful dessert that combines the flaky, buttery goodness of crescent dough with the sweet-tart flavor of cherry pie filling. Perfect for satisfying a sweet craving or impressing guests with minimal effort, these bite-sized treats are a great addition to any gathering or casual snack.

With only two ingredients and a simple preparation process, Cherry Pie Bites are easy enough for novice bakers yet impressive enough to serve at a party. Their golden brown crust and gooey cherry center make them irresistible!

Why You’ll Love This Recipe

Quick and Easy: Ready in under 20 minutes with just two main ingredients.

Versatile: Substitute with your favorite pie fillings for endless variations.

Perfectly Portioned: Bite-sized for convenient serving and snacking.

Ingredients

1 can (21 ounces) cherry pie filling

2 tubes (8 ounces each) crescent roll dough

Instructions

Step 1: Prepare the Muffin Tin

1. Preheat your oven to 375°F (190°C).

2. Lightly grease a muffin tin or line it with muffin cups for easy cleanup.

Step 2: Shape the Crescent Dough

1. Unroll the crescent roll dough and separate it into individual triangles.

2. Place each triangle into a muffin tin cup, pressing gently to form a cup shape.

Step 3: Add the Filling

1. Spoon a generous scoop of cherry pie filling into each crescent dough cup.

Step 4: Seal the Dough

1. Gently fold the corners of the dough over the filling, pinching them together to seal.

Step 5: Bake

1. Place the muffin tin in the preheated oven.

2. Bake for about 12 minutes, or until the dough is golden brown and cooked through.

Step 6: Cool and Serve

1. Remove the muffin tin from the oven and allow the Cherry Pie Bites to cool slightly.

2. Serve warm or at room temperature, as desired.

Tips

Extra Flavor: Dust with powdered sugar or drizzle with icing for a sweet finishing touch.

Filling Options: Try apple, blueberry, or peach pie filling for variety.

Storage: Store leftovers in an airtight container at room temperature for up to 2 days.

Storage Options

Refrigeration: These can be stored in the refrigerator for up to 3 days. Reheat in the oven for a freshly baked texture.

Freezing: Freeze after baking and cooling for up to 1 month. Thaw and reheat before serving.

Cherry Pie Bites are a delightful combination of convenience and flavor, perfect for any occasion. Whether you’re serving them to guests or enjoying them as a quick dessert, these little treats are sure to please. Enjoy!

Chocolate Peanut Butter Rice Krispie Cups

0

Chocolate Peanut Butter Rice Krispie Cups are the ultimate no-bake treat, combining the crispy texture of Rice Krispies with the creamy, nutty richness of peanut butter and a luxurious layer of chocolate. Perfect for snacking, parties, or a quick dessert fix, these cups are easy to make yet utterly indulgent.

Each bite delivers a delightful contrast of crunch and smoothness, balanced by the sweetness of honey and the richness of chocolate. Whether you’re sharing them with loved ones or enjoying them solo, these treats promise pure joy in every bite.

Why You’ll Love This Recipe

No-Bake Simplicity: No oven required, making it a breeze to prepare.

Perfect Texture: The crunch of Rice Krispies meets creamy peanut butter and velvety chocolate.

Versatile: Easily adaptable for vegan or gluten-free diets.

Ingredients

3 cups Rice Krispies cereal

1½ cups chocolate chips (vegan chocolate chips can be used)

1 cup chunky peanut butter

6 tablespoons honey

⅛ teaspoon salt

Instructions

Step 1: Prepare the Muffin Tin

1. Line a muffin tin with paper or silicone liners to ensure easy removal.

Step 2: Make the Peanut Butter Mixture

1. In a saucepan over low heat, combine the peanut butter, honey, and salt.

2. Stir continuously until the mixture becomes smooth and pourable.

3. Remove the saucepan from the heat.

Step 3: Combine with Rice Krispies

1. Pour the Rice Krispies into the peanut butter mixture.

2. Gently fold until every piece of cereal is coated evenly.

Step 4: Form the Cups

1. Spoon the coated Rice Krispies mixture into the prepared muffin tin.

2. Press gently to create a firm base for the cups.

Step 5: Melt the Chocolate

1. In a separate pan or microwave-safe bowl, melt the chocolate chips until smooth and glossy. Use short bursts in the microwave, stirring frequently to avoid burning.

2. Spoon the melted chocolate over the peanut butter layer in each cup, spreading it evenly to cover.

Step 6: Chill

1. Place the muffin tin in the refrigerator and let the cups chill for at least 1 hour, or until the chocolate is fully set.

Step 7: Serve and Enjoy

1. Once set, remove the cups from the refrigerator.

2. Peel away the liners and enjoy the crunchy, chocolatey, peanut buttery bliss!

Tips

Ingredient Quality: Use high-quality chocolate chips for a richer, smoother topping.

Customizable: Add a sprinkle of sea salt or chopped nuts on top of the chocolate for an extra touch.

Storage: Store in an airtight container in the refrigerator for up to 1 week.

Storage Options

Refrigeration: Best stored in the refrigerator to keep the chocolate firm and the texture intact.

Freezing: These cups freeze well. Store in a freezer-safe container for up to 2 months. Thaw in the refrigerator before serving.

Chocolate Peanut Butter Rice Krispie Cups are an easy, no-fuss treat that delivers big on flavor and texture. Perfect for satisfying your sweet tooth or impressing guests, these little cups are guaranteed to disappear quickly. Enjoy!

Texas Sheet Cake

0

Texas Sheet Cake is a rich, chocolatey dessert that’s as easy to make as it is to devour. Known for its moist, tender crumb and decadent cocoa icing, this Southern classic is perfect for celebrations, potlucks, or any time you’re craving chocolate. Topped with pecans for extra texture and flavor, this cake is baked in a thin sheet pan, making it quick to cook and simple to serve.

The real magic happens when the warm cocoa icing is poured over the freshly baked cake, creating a glossy, fudge-like topping that seeps into the layers. Whether enjoyed warm or at room temperature, this dessert is guaranteed to disappear fast!

Why You’ll Love This Recipe

Quick and Easy: Made with simple ingredients and ready in under an hour.

Rich Flavor: A double dose of cocoa in the cake and icing satisfies every chocolate craving.

Perfect for Sharing: Baked in a large pan, it’s ideal for feeding a crowd.

Ingredients

For the Cake:

1 cup butter

1 cup water

¼ cup cocoa powder

2 cups sugar

2 cups all-purpose flour

⅛ teaspoon salt

2 eggs

1 teaspoon baking soda

½ cup sour cream

1 teaspoon vanilla extract

For the Icing:

½ cup butter

¼ cup cocoa powder

¼ cup plus 2 tablespoons milk

1 pound confectioners’ sugar, sifted

½ teaspoon vanilla extract

Chopped pecans (optional)

Instructions

Step 1: Prepare the Cake

1. Preheat your oven to 350°F (175°C). Grease a sheet cake pan or jelly roll pan.

2. In a medium saucepan over medium heat, combine the butter, water, and cocoa powder. Stir until the butter melts and the mixture is smooth. Remove from heat and set aside.

3. In a large mixing bowl, combine the sugar, flour, and salt. Add the eggs and baking soda, mixing until combined.

4. Gradually add the hot cocoa mixture to the dry ingredients, stirring continuously to prevent scrambling the eggs.

5. Mix in the sour cream and vanilla extract until the batter is smooth.

6. Pour the batter into the prepared pan, spreading it evenly.

7. Bake for 20 minutes, or until a toothpick inserted in the center comes out clean.

Step 2: Prepare the Icing

1. While the cake bakes, make the icing. In a saucepan over medium heat, combine the butter, cocoa powder, and milk. Bring the mixture to a boil, then immediately remove it from heat.

2. Using a mixer, beat the confectioners’ sugar and vanilla extract into the cocoa mixture until smooth.

3. If using pecans, you can stir them into the icing or sprinkle them on top after icing the cake.

Step 3: Ice the Cake

1. Pour the hot icing over the cake as soon as it comes out of the oven. Spread it evenly with a spatula to cover the entire surface.

2. If you didn’t mix the pecans into the icing, sprinkle them over the top now.

Step 4: Cool and Serve

1. Allow the cake to cool slightly before cutting it into squares or rectangles.

2. Serve warm for a gooey treat, or at room temperature for a firmer texture.

Tips

Sifting Sugar: Always sift the confectioners’ sugar to ensure a smooth icing.

Pecan Variations: Toast the pecans before adding for a deeper, nuttier flavor.

Storage: Cover the cake tightly and store at room temperature for up to 3 days or refrigerate for up to a week.

Texas Sheet Cake is a timeless dessert that’s simple to make and impossible to resist. Its rich, fudgy icing and tender cake make it a favorite for any occasion. Enjoy!

Homemade Blackberry Cobbler

0

Homemade Blackberry Cobbler is the epitome of comfort dessert, offering the perfect balance between tart blackberries and a buttery, golden crust. This dessert is easy to prepare yet delivers a wow factor with its rustic appearance and incredible flavor. The natural sweetness of blackberries is coaxed out through maceration, while the batter bakes into a tender, slightly crisp topping that soaks up the luscious berry juices.

Whether served warm with cream, a scoop of vanilla ice cream, or simply enjoyed on its own, this cobbler is a celebration of simplicity and deliciousness. It’s perfect for gatherings, a sweet family treat, or even a decadent breakfast the next day!

Why You’ll Love This Recipe

Simple Ingredients: Pantry staples come together to make a crowd-pleasing dessert.

Fresh Flavor: Highlighting the natural sweetness of blackberries with a touch of sugar.

Rustic Elegance: A dessert that looks as good as it tastes, with minimal effort.

Ingredients

2½ cups fresh blackberries, washed

1 cup sugar

1 cup flour

2 teaspoons baking powder

½ teaspoon salt

1 cup milk

1 stick unsalted butter, melted

Instructions

Step 1: Macerate the Blackberries

1. In a large bowl, stir together the blackberries and sugar.

2. Let the mixture sit for 25-30 minutes to allow the berries to release their juices and absorb the sugar. This process, called maceration, enhances the flavor of the blackberries.

Step 2: Preheat the Oven and Prepare the Batter

1. After about 20 minutes, preheat your oven to 375°F (190°C).

2. In another bowl, stir together the flour, baking powder, salt, and milk with a wooden spoon.

3. Add the melted butter to the mixture and stir until smooth and well combined.

Step 3: Assemble the Cobbler

1. Choose a small baking dish (such as an 8×8-inch pan).

2. Pour the batter into the baking dish and smooth it out with a spatula. No need to grease the pan; the butter in the batter will suffice.

3. Evenly distribute the macerated blackberries, along with all their juices, over the batter.

Step 4: Bake the Cobbler

1. Place the dish in the preheated oven and bake for 45-60 minutes, or until the top is golden brown and the batter has puffed up around the bubbling blackberries.

2. Remove from the oven and let the cobbler cool for at least 15 minutes to set up and make it easier to slice.

Step 5: Serve and Enjoy

1. Serve the cobbler warm or at room temperature.

2. Pair with warmed cream, fresh whipped cream, or a scoop of vanilla ice cream for an extra indulgent treat.

Tips

Berry Substitutions: If blackberries aren’t available, substitute with blueberries, raspberries, or a mix of berries.

Golden Perfection: Keep an eye on the cobbler towards the end of baking. If you prefer a lighter crust, bake for less time.

Storage: Cover the cobbler with foil and store at room temperature for 2-3 days or in the refrigerator for up to 5 days. Reheat in the oven to refresh its texture.

Homemade Blackberry Cobbler is a timeless dessert that’s as delightful to make as it is to eat. With its bubbling, juicy filling and crisp, buttery crust, this cobbler is sure to become a favorite in your recipe collection. Enjoy every bite!

Cherry Cheesecake Fluff

0

Cherry Cheesecake Fluff is a decadent yet simple dessert that combines the tangy richness of cheesecake with the fruity sweetness of cherry pie filling. The fluffy texture comes from whipped cream and marshmallows, creating a light yet indulgent treat that’s perfect for gatherings, potlucks, or a family dessert night.

This no-bake dessert is as easy to make as it is to enjoy. With its creamy texture and bursts of cherry flavor, it’s a guaranteed crowd-pleaser that can be prepared in advance, making it as convenient as it is delicious.

Why You’ll Love This Recipe

No-Bake Simplicity: Perfect for hot days or when you need a quick dessert.

Sweet and Tangy: The cheesecake flavor perfectly complements the cherry filling.

Crowd-Pleaser: Ideal for potlucks, holidays, or as an easy weeknight treat.

Ingredients

8 ounces cream cheese, room temperature

3.4 ounces cheesecake instant pudding mix

1 teaspoon vanilla extract

¼ cup milk

8 ounces Cool Whip (or homemade stabilized whipped cream)

21 ounces cherry pie filling

10 ounces mini marshmallows

Instructions

Step 1: Prepare the Base

1. In a large mixing bowl, combine the softened cream cheese, cheesecake instant pudding mix, vanilla extract, and milk.

2. Beat with a hand mixer or stand mixer until smooth and creamy.

Step 2: Incorporate the Whipped Cream

1. Fold in the Cool Whip gently to maintain the light, fluffy texture.

Step 3: Add the Cherry Pie Filling and Marshmallows

1. Gently fold in the cherry pie filling, ensuring the cherries are evenly distributed throughout the mixture.

2. Add the mini marshmallows and fold until evenly combined.

Step 4: Chill the Dessert

1. Cover the bowl with plastic wrap or transfer the fluff to an airtight container.

2. Refrigerate for at least 2 hours, or up to 24 hours, to allow the flavors to meld and the fluff to set.

Step 5: Serve and Enjoy

1. Serve the Cherry Cheesecake Fluff chilled.

2. Optionally, garnish with extra cherries, whipped cream, or a sprinkle of graham cracker crumbs for a decorative touch.

Tips

Room Temperature Cream Cheese: Ensures a smoother mixture without lumps.

Homemade Whipped Cream: Substitute Cool Whip with homemade stabilized whipped cream for a fresher flavor.

Add Crunch: Sprinkle chopped nuts or graham cracker crumbs on top for added texture.

Storage Options

Refrigeration: Store in an airtight container in the refrigerator for up to 3 days.

Freezing: Not recommended, as the marshmallows may become soggy when thawed.

Cherry Cheesecake Fluff is an effortless dessert that’s sure to impress with its creamy texture and fruity, tangy flavors. It’s the perfect addition to any dessert table, offering a delightful, no-fuss treat for all occasions. Enjoy!