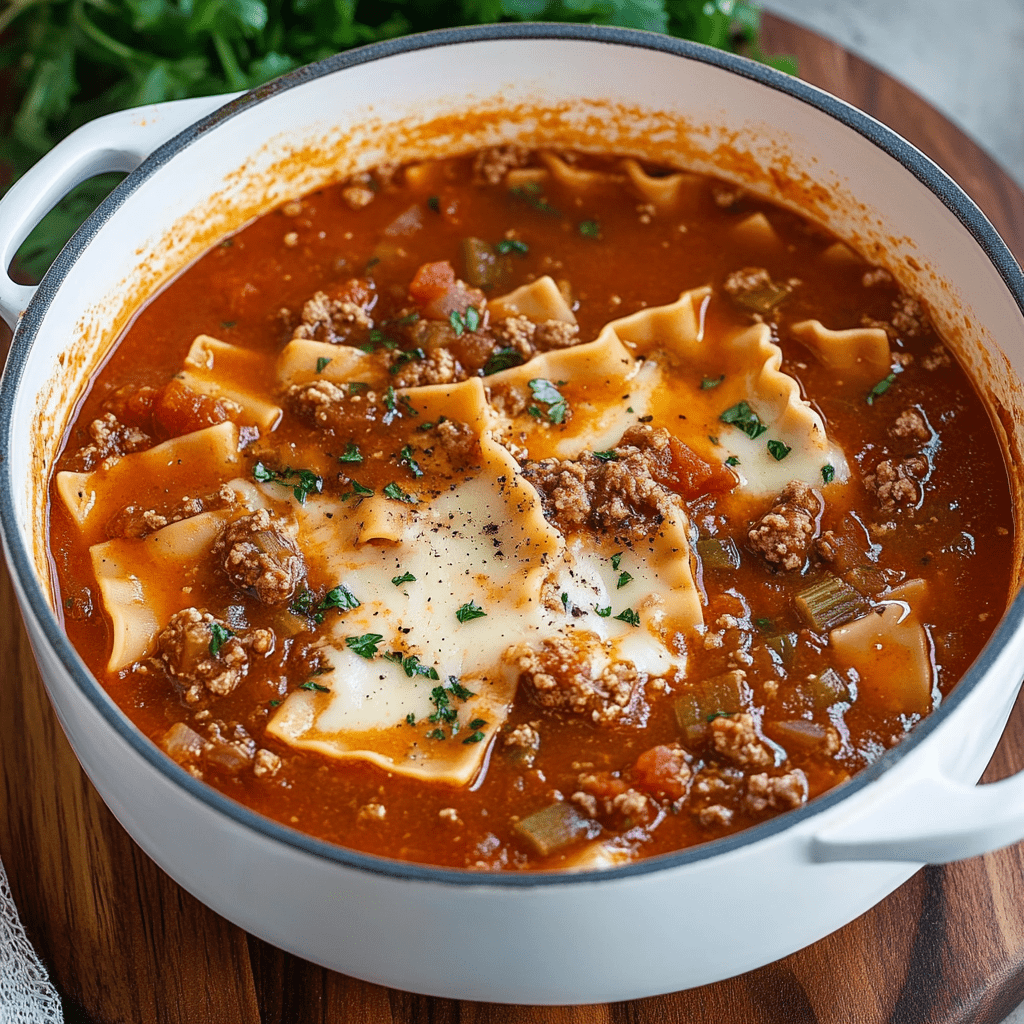
Cheddar Garlic Biscuits

0

These Cheddar Garlic Biscuits are a warm and savory treat that will delight any biscuit lover. With their tender, cheesy texture and a buttery garlic finish, they’re perfect as a side dish, appetizer, or snack. Baked in a cast-iron skillet, these biscuits develop a deliciously crisp bottom and fluffy interior, making them irresistible.

Whether you’re pairing them with a hearty soup or serving them at a family dinner, these biscuits are sure to become a favorite addition to your recipe collection.

Why You’ll Love This Recipe

Rich and Savory: Packed with sharp cheddar and seasoned with garlic and Old Bay.

Easy to Make: Simple ingredients and straightforward steps for perfect biscuits every time.

Versatile: Great as a side dish or a standalone snack.

Ingredients

For the Biscuits:

• 2 cups self-rising flour

• ½ stick butter, frozen and grated (unsalted)

• 1 cup cheddar cheese, shredded (plus more for topping)

• ¾ cup milk (whole or buttermilk recommended)

• 1 teaspoon garlic powder

• ½ teaspoon Old Bay seasoning

• 1 tablespoon oil (for seasoning cast iron skillet)

For the Garlic Butter Sauce:

• 2 tablespoons butter, melted

• ¼ teaspoon garlic powder

• ½ teaspoon dried parsley

Instructions

Step 1: Prep Work

1. Chill your mixing bowl, box grater, and butter in the freezer for 15–30 minutes.

2. Preheat your oven to 425°F (220°C) and place a 10-inch cast iron skillet inside to heat.

Step 2: Mix the Dry Ingredients

1. In the chilled mixing bowl, combine the self-rising flour, garlic powder, and Old Bay seasoning.

Step 3: Add Butter and Cheese

1. Grate the frozen butter directly into the flour mixture and stir to combine.

2. Mix in the shredded cheddar cheese.

Step 4: Form the Dough

1. Pour in the milk and stir gently until the dough just comes together. Avoid overmixing to keep the biscuits tender.

Step 5: Prepare the Skillet and Bake

1. Remove the hot skillet from the oven and carefully coat it with 1 tablespoon of oil.

2. Scoop the biscuit dough into the skillet using a large cookie scoop, forming 6 large biscuits. Optionally, sprinkle additional cheddar on top of each biscuit.

3. Bake in the preheated oven for 12–15 minutes, or until the biscuits are golden brown.

Step 6: Make the Garlic Butter Sauce

1. While the biscuits are baking, melt the butter and mix it with garlic powder and dried parsley.

Step 7: Finish and Serve

1. Once the biscuits are done baking, immediately brush them with the garlic butter sauce.

2. Serve warm and enjoy!

Tips

Use Cold Ingredients: Keeping your butter and milk cold ensures flaky, tender biscuits.

Customize the Flavor: Add chopped chives or a pinch of cayenne for a spicy kick.

Don’t Overmix: Overworking the dough can make the biscuits dense instead of light and fluffy.

Storage Options

Refrigeration: Store leftover biscuits in an airtight container in the refrigerator for up to 3 days. Reheat in the oven or microwave before serving.

Freezing: Freeze unbaked biscuits on a tray, then transfer to a freezer bag. Bake directly from frozen, adding a few extra minutes to the baking time.

These Cheddar Garlic Biscuits are a flavorful, buttery delight that’s easy to whip up and sure to impress. Pair them with soups, salads, or simply enjoy them on their own!

Cheesy Patty Melts with Special Sauce

0

Cheesy Patty Melts with Special Sauce combine the rich, savory flavors of a classic burger with the toasty, gooey goodness of a grilled cheese sandwich. Featuring perfectly seasoned beef patties, layers of melty cheddar and provolone, and a tangy bacon-loaded special sauce, these patty melts are a mouthwatering comfort food masterpiece.

With their buttery, crisp rye bread and oozing cheesy layers, these patty melts are the perfect choice for a satisfying lunch, dinner, or indulgent treat on a cozy weekend.

Why You’ll Love This Recipe

Rich and Savory: Bold flavors from the seasoned patties, melted cheese, and special sauce.

Easy to Make: Quick to prepare with simple ingredients.

Crowd-Pleasing: A hit with both kids and adults alike.

Ingredients

For the Patty Melts:

• 1 pound ground beef

• 6 slices rye bread

• ½ teaspoon onion powder

• ½ teaspoon garlic powder

• Salt and pepper to taste

• 6 slices cheddar cheese

• 6 slices provolone cheese

• 6 tablespoons butter, softened and unsalted

For the Special Sauce:

• ¼ cup mayonnaise

• 2 tablespoons chopped bacon pieces

• 3 tablespoons ketchup

• 1 teaspoon sugar

• 1 teaspoon relish

Instructions

Step 1: Prepare the Beef Patties

1. Divide the ground beef into three equal portions and shape each portion into a patty that matches the size of your bread slices.

2. Season both sides of each patty with onion powder, garlic powder, salt, and pepper.

Step 2: Cook the Patties

1. Heat a skillet over medium-high heat.

2. Cook the patties until browned and fully cooked, about 4–5 minutes per side.

3. Remove from the skillet and set aside.

Step 3: Make the Special Sauce

1. In a small bowl, mix together the mayonnaise, chopped bacon, ketchup, sugar, and relish until well combined. Set aside.

Step 4: Assemble the Patty Melts

1. Spread butter on one side of each slice of rye bread.

2. Place three slices of bread, buttered side down, in the skillet over medium heat.

3. Layer two slices of provolone cheese, a cooked beef patty, two slices of cheddar cheese, and spread some special sauce on the inside of the remaining bread slices.

4. Top the sandwiches with the remaining bread slices, sauce side down.

Step 5: Cook the Patty Melts

1. Cook the sandwiches until the bottom bread is golden brown and toasted, and the cheese starts to melt.

2. Flip carefully and cook the second side until it’s toasted and the cheese is fully melted.

Step 6: Serve

1. Remove the patty melts from the skillet and let them rest for 1–2 minutes.

2. Slice in half if desired and serve hot.

Tips

Customize Your Cheese: Swap in Swiss, Gouda, or Pepper Jack for a different flavor profile.

Rye Bread Substitute: Use sourdough or thick white bread if rye isn’t your favorite.

Make It Spicy: Add a dash of hot sauce to the special sauce or sprinkle some jalapeño slices inside the sandwich.

Storage Options

Refrigeration: Wrap leftovers tightly in foil and refrigerate for up to 2 days. Reheat in a skillet or oven for the best texture.

Freezing: Freeze uncooked patties and assemble the melts fresh when ready to cook.

Cheesy Patty Melts with Special Sauce are a decadent and satisfying meal that combines all the best elements of a burger and a grilled cheese. Serve with fries, a salad, or your favorite dipping sauce for a meal that hits all the right notes!

Easy Pocket-Size Calzones

0

These Easy Pocket-Size Calzones are a fun and delicious snack or meal that comes together quickly using refrigerated biscuit dough. With gooey Monterey Jack cheese, mini pepperoni, and a golden crust, they’re the perfect portable treat for game nights, picnics, or casual dinners.

Each bite delivers the classic flavors of pizza in a handheld size, and they pair perfectly with warm pizza sauce for dipping. Plus, the customizable filling options make them a hit with kids and adults alike!

Why You’ll Love This Recipe

Quick and Easy: Using store-bought biscuit dough saves time.

Portable and Fun: Perfect for lunches, snacks, or on-the-go meals.

Customizable: Swap out fillings to suit your taste.

Ingredients

• 16.3 oz package Pillsbury refrigerated buttermilk biscuit dough (8 biscuits total)

• 8 oz Monterey Jack cheese, shredded

• ¾ cup mini pepperoni

• 1 egg, beaten

• Pizza sauce, served on the side for dipping

Optional Garnishes:

• Fresh chopped parsley

• Grated Parmesan

Instructions

Step 1: Preheat the Oven

1. Preheat your oven to 400°F (200°C).

Step 2: Roll Out the Dough

1. Roll each biscuit dough piece into a circle about ¼ inch thick.

Step 3: Add the Fillings

1. Place an even amount of shredded Monterey Jack cheese and mini pepperoni on one half of each dough circle, leaving the edges free for sealing.

Step 4: Seal the Calzones

1. Fold each circle in half to form a half-moon shape.

2. Press the edges firmly with a fork to seal them.

Step 5: Prepare for Baking

1. Brush the top of each calzone with the beaten egg to create a golden, shiny crust.

2. Use a knife to cut three small slits in the top of each calzone to allow steam to escape during baking.

Step 6: Bake the Calzones

1. Place the calzones on a baking sheet lined with parchment paper or a silicone mat.

2. Bake in the preheated oven for 16–18 minutes, or until they are golden brown and crispy.

Step 7: Garnish and Serve

1. Sprinkle freshly chopped parsley and grated Parmesan over the baked calzones.

2. Serve warm with a side of pizza sauce for dipping.

Tips

Filling Variations: Try different cheeses like mozzarella or cheddar and swap mini pepperoni for diced ham, cooked sausage, or sautéed vegetables.

Seal Properly: Make sure to press the edges tightly to prevent the filling from leaking during baking.

Reheating: Warm leftover calzones in the oven or air fryer to retain their crispiness.

Storage Options

Refrigeration: Store cooled calzones in an airtight container in the refrigerator for up to 3 days. Reheat in the oven for the best texture.

Freezing: Freeze unbaked calzones on a baking sheet, then transfer to a freezer-safe bag. Bake directly from frozen, adding a few extra minutes to the baking time.

Easy Pocket-Size Calzones are a delicious and versatile dish that will quickly become a family favorite. They’re the perfect balance of cheesy, savory, and crispy—try them today!

Slow Cooker Creamy Chicken

0

Slow Cooker Creamy Chicken is the ultimate comfort food. This simple, flavorful recipe delivers tender, juicy chicken smothered in a rich, creamy sauce that’s perfect for pairing with rice, pasta, or mashed potatoes. It’s a fuss-free dish that requires minimal effort but yields maximum flavor, making it ideal for busy weeknights or cozy family dinners.

With its creamy gravy and well-seasoned chicken, this dish is sure to become a family favorite. The slow cooker does all the work, infusing the chicken with the flavors of the savory gravy and soup mixture. Serve it hot and fresh for a meal that feels like a warm hug on a plate.

Why You’ll Love This Recipe

Effortless Cooking: The slow cooker does all the heavy lifting, making this a hands-off recipe.

Rich and Creamy: A comforting sauce enhances the natural flavors of the chicken.

Versatile: Pairs beautifully with a variety of sides, from rice to vegetables.

Ingredients

• 2 cups water

• 2 packets chicken gravy mix

• 1 can cream of chicken soup

• 6 boneless chicken breasts

• Salt and pepper, to taste

• 1 tablespoon garlic powder

• 1 teaspoon onion powder

Instructions

Step 1: Prepare the Ingredients

1. In the slow cooker, combine the water, chicken gravy mix, cream of chicken soup, salt, pepper, garlic powder, and onion powder.

2. Mix well to create a smooth, creamy sauce.

Step 2: Add the Chicken

1. Place the boneless chicken breasts into the slow cooker.

2. Ensure the chicken is submerged in the sauce for even cooking and maximum flavor absorption.

Step 3: Cook the Chicken

1. Cover the slow cooker with its lid.

2. Cook on low heat for 8 hours or on medium heat for 4 hours. (For best results, use the low heat setting to achieve tender, juicy chicken.)

Step 4: Serve and Enjoy

1. Once the chicken is fully cooked and tender, it’s ready to serve.

2. Serve hot with your favorite sides, such as long-grain rice, egg noodles, or mashed potatoes.

Tips

Check for Doneness: Ensure the chicken reaches an internal temperature of 165°F (74°C) before serving.

Adjust Seasoning: Taste the sauce after cooking and adjust salt and pepper if necessary.

Thicken the Sauce: If the sauce is too thin, mix 1 tablespoon of cornstarch with 2 tablespoons of cold water, then stir it into the sauce and cook on high for 15 minutes.

Shred or Leave Whole: For a different presentation, shred the chicken and mix it back into the sauce before serving.

Storage Options

Refrigerator: Store leftovers in an airtight container for up to 3 days. Reheat gently in a saucepan or microwave.

Freezing: Freeze cooked chicken and sauce in a freezer-safe container for up to 2 months. Thaw in the refrigerator overnight and reheat before serving.

Slow Cooker Creamy Chicken is a satisfying, stress-free recipe that will delight your family and friends. Its rich flavor and creamy texture make it a standout choice for any meal. Enjoy!

Blueberry Pie Bombs

0

Blueberry Pie Bombs are a delightful, easy-to-make dessert perfect for satisfying your sweet tooth. These bite-sized treats feature a warm, gooey blueberry filling encased in golden, buttery biscuit dough. With their crisp, sugary exterior and luscious interior, they’re like mini pies you can hold in your hand!

This recipe is quick and versatile, making it a great choice for dessert, snacks, or even breakfast on the go. Whether you use store-bought or homemade blueberry pie filling, these pie bombs are guaranteed to be a hit.

Why You’ll Love This Recipe

Quick and Easy: With minimal prep and cooking time, these come together effortlessly.

Perfectly Portable: Ideal for picnics, parties, or any time you need a hand-held treat.

Versatile: Swap out the blueberry filling for your favorite pie flavors like apple, cherry, or peach.

Ingredients

• 1 (8-count) can Pillsbury Grand Biscuits (not the flaky layers)

• 1 cup blueberry pie filling (store-bought or homemade)

• ½ cup (1 stick) unsalted butter, melted

• 2 tablespoons granulated sugar

Instructions

Step 1: Prepare the Biscuits

1. Open the can of biscuits and separate each biscuit into two rounds.

2. Pat each round into a 4-inch circle.

Step 2: Add the Filling

1. Spoon about 1 tablespoon of blueberry pie filling into the center of each biscuit circle.

2. Fold the edges over the filling, pinching them firmly together to seal. Shape into a ball, ensuring there are no gaps for the filling to escape.

Step 3: Butter and Sugar

1. Brush the top and bottom of each pie bomb generously with the melted butter.

2. Sprinkle granulated sugar over the tops for a sweet, caramelized finish.

Step 4: Air Fry

1. Spray the air fryer basket with nonstick spray and preheat to 330°F (165°C).

2. Place the pie bombs into the preheated air fryer basket, leaving about 2 inches of space between each one. Work in batches if needed.

3. Air fry for 7–8 minutes, or until the pie bombs are golden brown and crisp.

Step 5: Serve and Enjoy

1. Let the pie bombs cool slightly before serving to avoid burning your mouth with the hot filling.

2. Serve warm, either plain or with a scoop of vanilla ice cream or a dollop of whipped cream for an extra indulgent treat.

Tips

Seal the Edges Well: Ensure the edges are tightly pinched to prevent the filling from leaking during cooking.

Experiment with Fillings: Try different fruit fillings, Nutella, or cream cheese for variety.

Oven Alternative: If you don’t have an air fryer, bake the pie bombs in a preheated 375°F (190°C) oven for 15–20 minutes, or until golden brown.

Storage Options

Refrigeration: Store leftovers in an airtight container in the refrigerator for up to 3 days. Reheat in the air fryer for a few minutes to regain their crispiness.

Freezing: Freeze uncooked pie bombs on a baking sheet, then transfer to a freezer bag. Cook directly from frozen, adding a few extra minutes to the air frying time.

Blueberry Pie Bombs are a fun and delicious dessert that’s easy enough to make any day of the week. Whether you’re serving them to guests or enjoying them as a sweet treat for yourself, they’re sure to bring a smile with every bite!

Famous Cream Puffs

0

These Famous Cream Puffs are a timeless dessert that deliver a light, airy shell filled with rich, creamy vanilla filling. Whether you’re serving them at a fancy gathering or simply indulging at home, these delicate pastries are sure to impress. The shells, made from classic pâte à choux dough, puff up beautifully in the oven to create the perfect hollow interior ready to be filled with whipped vanilla cream.

What sets these cream puffs apart is the easy yet luxurious filling—a blend of heavy cream, instant pudding, and a splash of milk whipped to fluffy perfection. The shells are crisp on the outside, soft on the inside, and filled with just the right amount of sweet cream. Finished with a dusting of powdered sugar, these treats are as elegant as they are satisfying.

Why You’ll Love This Recipe

Classic & Elegant: A beautiful dessert for any special occasion.

Light Yet Decadent: Airy shells filled with creamy, dreamy vanilla.

Make-Ahead Friendly: Prepare the shells in advance and fill before serving.


Ingredients

For the Shells:

• 8 tbsp unsalted butter

• 1 cup water

• 1 tsp vanilla extract

• 1 tsp granulated sugar

• 1 cup all-purpose flour

• 4 eggs, preferably room temperature

For the Filling:

• 1 pint heavy cream

• 1 (3.4 oz) package instant vanilla pudding mix

• ⅓ cup milk

Optional Topping:

Powdered sugar for dusting


Instructions

Step 1: Prepare the Cream Puff Shells

1. In a heavy-bottomed pot, combine butter, sugar, water, and vanilla extract.

2. Heat over medium heat until the mixture reaches a boil.

3. Quickly add the flour and stir constantly until the mixture forms a ball and pulls away from the sides.

4. Remove from heat and let cool for a few minutes.

Step 2: Add the Eggs

1. Add the eggs one at a time, mixing thoroughly after each addition until the dough is smooth and glossy.

Step 3: Shape the Shells

1. On a parchment-lined baking sheet, spoon or pipe the dough into mounds (about 1½–2 inches wide).

2. Preheat your oven to 400°F (204°C).

3. Bake for 15 minutes, then reduce the oven to 350°F (177°C) and bake for another 15 minutes, or until puffed and golden.

4. Immediately after baking, cut a small slit in the side of each puff to release steam.

5. Let the shells cool completely on a wire rack.


Step 4: Make the Filling

1. In a mixing bowl, combine heavy cream, instant vanilla pudding mix, and milk.

2. Beat with an electric mixer until the mixture thickens into a whipped cream consistency.


Step 5: Fill the Puffs

1. Once cooled, slice each cream puff in half or make a slit large enough for piping.

2. Spoon or pipe the filling generously into each shell.

3. Dust the tops with powdered sugar just before serving.


Tips for Success

Let the dough cool slightly before adding eggs to prevent curdling.

Do not open the oven early or the shells may collapse.

Use a star tip piping bag for beautiful, uniform shapes.

Storage Options

Unfilled shells: Store in an airtight container for up to 2 days or freeze for up to 1 month.

Filled cream puffs: Store in the refrigerator for up to 24 hours. Best enjoyed fresh!

Savory Cheesesteak Meatloaf

0

This Savory Cheesesteak Meatloaf is a mouthwatering twist on the classic comfort food, combining the bold flavors of a Philly cheesesteak with the heartiness of a traditional meatloaf. Packed with juicy ground beef, sautéed vegetables, and layers of gooey cheese, this dish is a surefire crowd-pleaser.

The melted cheese inside and on top creates a creamy contrast to the savory meat, while Worcestershire sauce and seasonings add depth. Perfect for family dinners or gatherings, this meatloaf will quickly become a favorite at your table.

Why You’ll Love This Recipe

Cheesy Goodness: Layers of melted mozzarella or provolone make every bite indulgent.

Hearty and Flavorful: A satisfying combination of beef, vegetables, and seasonings.

Easy to Prepare: Simple steps and common ingredients make this a go-to meal.

Ingredients

• 1½ lb lean ground beef

• 1 large onion, chopped

• 1 green bell pepper, chopped small

• ½ cup whole milk

• ½ cup mushrooms, chopped (optional)

• 1 tbsp olive oil

• 1 cup bread crumbs (regular, Italian style, or panko)

• 1 large egg

• ½ tsp salt

• 1 tsp pepper

• 1 tsp garlic powder

• 1 tsp onion powder

• ½ tsp Adobo seasoning

• 3 tbsp Worcestershire sauce

• 8 slices mozzarella or provolone cheese, thick cut

Instructions

Step 1: Preheat the Oven

Preheat your oven to 350°F (175°C).

Step 2: Cook the Vegetables

1. Heat the olive oil in a skillet over medium heat.

2. Add the chopped onions and green bell peppers, and sauté until softened and tender.

Step 3: Mix the Ingredients

1. In a large bowl, combine the sautéed onions and peppers with the ground beef, whole milk, mushrooms (if using), bread crumbs, egg, garlic powder, onion powder, Adobo seasoning, salt, pepper, and Worcestershire sauce.

2. Use your hands to mix everything together until evenly combined.

Step 4: Prepare the Loaf Pan

1. Lightly grease a loaf pan with oil or non-stick spray.

2. Place half of the meat mixture into the pan and press it down to create an even layer.

Step 5: Add the Cheese Filling

1. Lay four slices of cheese over the meat layer, ensuring it covers the surface.

Step 6: Add Remaining Meat and Bake

1. Add the remaining meat mixture on top of the cheese layer, pressing gently to seal the edges.

2. Place the loaf pan in the oven and bake for 30 minutes.

Step 7: Add Topping Cheese

1. Remove the pan from the oven and lay the remaining four slices of cheese on top of the meatloaf.

2. Return to the oven and bake for another 10–15 minutes, or until the cheese is melted and slightly golden.

Step 8: Rest and Serve

1. Let the meatloaf rest for 5–10 minutes after baking.

2. Slice and serve warm, alongside mashed potatoes, steamed vegetables, or a fresh salad.

Tips

Customize Vegetables: Add mushrooms, jalapeños, or roasted red peppers for extra flavor.

Use Fresh Herbs: Sprinkle fresh parsley or thyme on top for a fresh finish.

Cheese Choices: Experiment with Swiss, gouda, or pepper jack cheese for a unique twist.

Storage Options

Refrigeration: Store leftovers in an airtight container in the refrigerator for up to 3 days. Reheat in the microwave or oven.

Freezing: Wrap individual slices in plastic wrap and foil, then freeze for up to 2 months. Thaw in the refrigerator and reheat before serving.

Savory Cheesesteak Meatloaf combines the hearty appeal of meatloaf with the irresistible flavors of a cheesesteak. This dish is a guaranteed hit for comfort food lovers!

White Almond Wedding Cake

0

White Almond Wedding Cake is a soft, moist, and flavorful dessert perfect for weddings, anniversaries, or any special occasion. This elevated version of a classic white cake is enriched with sour cream, almond extract, and vanilla flavoring, creating a rich and indulgent treat. Paired with a luscious almond buttercream frosting, this cake is as beautiful as it is delicious.

The cake’s light almond flavor and velvety texture make it a crowd-pleaser, while the frosting adds a creamy, nutty finish. With its simple preparation and elegant taste, this recipe is sure to be a hit at your next celebration.

Why You’ll Love This Recipe

Elegant Flavor: Subtle almond and vanilla notes make this cake both delicate and decadent.

Moist Texture: Sour cream ensures the cake is soft and tender.

Perfect for Celebrations: A timeless dessert for weddings, birthdays, and anniversaries.

Ingredients

For the Cake:

• 1 (18.25 oz) package white cake mix

• 1 cup all-purpose flour

• 1 cup granulated sugar

• ¾ teaspoon salt

• 1⅓ cups water

• 1 cup sour cream

• 2 tablespoons vegetable oil

• 1 teaspoon almond extract

• 1 teaspoon clear vanilla flavoring

• 4 large egg whites

For the Almond Buttercream Frosting:

• 3 cups confectioners’ sugar

• ⅓ cup unsalted butter, room temperature

• 1 teaspoon clear vanilla flavoring

• ½ teaspoon almond extract

• 1–2 tablespoons whole milk

Instructions

Step 1: Prepare the Cake Batter

1. Preheat your oven to 325°F (163°C). Grease and flour two 8-inch round cake pans.

2. In a large bowl, stir together the white cake mix, flour, sugar, and salt until well combined.

3. Add the water, sour cream, vegetable oil, almond extract, and vanilla flavoring. Beat on low speed until combined.

4. Add the egg whites and mix on low for about 4 minutes, or until the batter is smooth and uniform.

Step 2: Bake the Cakes

1. Divide the batter evenly between the prepared cake pans.

2. Bake for 45–55 minutes, or until the tops are light golden brown and a toothpick inserted into the center comes out clean.

3. Allow the cakes to cool in the pans for 10 minutes before turning them out onto a wire rack to cool completely.

Step 3: Make the Almond Buttercream Frosting

1. In a large mixing bowl, beat the confectioners’ sugar and unsalted butter together until creamy.

2. Add the clear vanilla flavoring, almond extract, and 1 tablespoon of milk. Beat on high speed for about 5 minutes, or until the frosting is light and fluffy.

3. If the frosting is too thick, add additional milk 1 teaspoon at a time until the desired consistency is reached.

Step 4: Assemble the Cake

1. Once the cakes are completely cooled, place one layer on a serving plate. Spread a generous layer of almond buttercream frosting on top.

2. Add the second cake layer and frost the top and sides of the cake evenly.

3. Use a piping bag to decorate the cake with additional frosting, if desired.

Step 5: Chill or Serve

1. Store the frosted cake in the refrigerator to keep the frosting firm, especially in warm or humid conditions.

2. Allow the cake to come to room temperature before serving for the best flavor and texture.

Tips

Room Temperature Ingredients: Ensure all ingredients are at room temperature for a smooth batter and frosting.

Decorative Touch: Garnish the cake with slivered almonds, edible flowers, or white chocolate shavings for an elegant finish.

Make Ahead: Bake the cake layers a day in advance and assemble on the day of serving.

Storage Options

Refrigeration: Store the frosted cake in the refrigerator for up to 5 days. Cover with plastic wrap or place in an airtight container.

Freezing: Freeze unfrosted cake layers tightly wrapped in plastic for up to 2 months. Thaw in the refrigerator overnight before frosting.

White Almond Wedding Cake is a timeless dessert that’s sure to wow your guests. Its moist layers, rich frosting, and delicate almond flavor make it a sophisticated centerpiece for any celebration!

Sausage and Hashbrown Mini Muffins

0

Sausage and Hashbrown Mini Muffins are a bite-sized breakfast treat perfect for busy mornings or meal prepping. These savory muffins combine the hearty flavors of sausage, hashbrowns, and cheddar cheese with a pop of freshness from red bell pepper and parsley.

Their small, portable size makes them an excellent option for brunches, picnics, or as a quick snack. Packed with protein and flavor, these muffins are a crowd-pleaser for both kids and adults alike.

Why You’ll Love This Recipe

Convenient and Portable: Ideal for on-the-go breakfasts or snacks.

Customizable: Easily adjust the ingredients to suit your preferences.

Meal Prep Friendly: Make ahead and enjoy throughout the week.

Ingredients

• 450 grams (1 pound) ground sausage

• 450 grams (2 cups) frozen hashbrowns, thawed

• 225 grams (1 cup) shredded cheddar cheese

• 120 grams (1/2 cup) diced red bell pepper

• 60 grams (1/4 cup) diced onion

• 60 grams (1/4 cup) chopped fresh parsley

• 4 large eggs

• Salt and pepper, to taste

• Cooking spray

Instructions

Step 1: Preheat and Prep the Pan

1. Preheat your oven to 375°F (190°C).

2. Spray a mini muffin tin with cooking spray to prevent sticking.

Step 2: Cook the Sausage

1. Heat a skillet over medium heat and cook the sausage until browned and fully cooked.

2. Drain any excess grease and set the sausage aside to cool slightly.

Step 3: Combine the Ingredients

1. In a large mixing bowl, combine the cooked sausage, thawed hashbrowns, shredded cheddar cheese, diced red bell pepper, diced onion, and chopped parsley.

2. In a separate bowl, beat the eggs and season with salt and pepper. Pour the eggs into the sausage mixture and fold until all ingredients are evenly combined.

Step 4: Fill the Muffin Tin

1. Spoon the mixture into the prepared mini muffin cups, filling each one almost to the top.

2. Press the mixture lightly into the cups to help them hold their shape.

Step 5: Bake

1. Place the muffin tin in the preheated oven and bake for 20–25 minutes, or until the tops are golden brown and the muffins are set.

Step 6: Cool and Serve

1. Let the muffins cool in the pan for 5 minutes before carefully removing them.

2. Serve warm, or let them cool completely and store for later.

Tips

Cheese Variations: Swap cheddar for Monterey Jack, pepper jack, or gouda for different flavor profiles.

Add Heat: For a spicy kick, mix in diced jalapeños or a pinch of red chili flakes.

Vegetarian Option: Substitute cooked sausage with sautéed mushrooms or plant-based crumbles.

Storage Options

Refrigeration: Store cooled muffins in an airtight container in the refrigerator for up to 4 days. Reheat in the microwave or oven.

Freezing: Freeze muffins in a single layer on a baking sheet, then transfer to a freezer-safe container. Reheat directly from frozen in the oven or microwave.

Sausage and Hashbrown Mini Muffins are a versatile, flavorful dish that’s perfect for any time of day. Enjoy their crispy edges and savory goodness warm out of the oven or as a quick meal on the go!

Strawberry Cream Cheese Icebox Cake

0

Strawberry Cream Cheese Icebox Cake is a refreshing, no-bake dessert that’s perfect for warm weather gatherings. With layers of graham crackers, creamy cheesecake filling, and fresh strawberries, this cake offers a delightful combination of textures and flavors.

The creamy layers soak into the graham crackers, softening them to create a cake-like texture without needing to bake. This simple yet elegant dessert is ideal for potlucks, barbecues, or whenever you need a cool, sweet treat.

Why You’ll Love This Recipe

No-Bake Ease: Perfect for summer or when you want a quick dessert without turning on the oven.

Creamy and Fruity: Cheesecake-flavored pudding and fresh strawberries create a perfect balance of creaminess and tang.

Impressive Layers: Beautifully layered for a stunning presentation.

Ingredients

• 2 lbs strawberries, washed and sliced ¼ inch thick

• 2 sleeves graham crackers

• 1 (8 oz) package cream cheese, room temperature

• 1 (14 oz) can sweetened condensed milk

• 2 (3.4 oz) packages instant cheesecake-flavored pudding mix

• 3 cups milk

• 1 (12 oz) carton whipped topping, divided

Instructions

Step 1: Prep the Strawberries and Dish

1. Wash the strawberries, remove the tops, and slice them ¼ inch thick. Set aside.

2. Line the bottom of a 3-quart (13×9-inch) baking dish with a single layer of graham crackers.

Step 2: Make the Cheesecake Mixture

1. In a large mixing bowl, combine the cream cheese and sweetened condensed milk. Beat with a mixer until smooth and creamy.

2. Add the pudding mixes and milk to the bowl. Mix on low speed for 4–5 minutes, or until the mixture starts to thicken.

3. Fold in 2 cups of whipped topping until fully incorporated and smooth.

Step 3: Layer the Dessert

1. Pour half of the cream cheese mixture over the layer of graham crackers in the baking dish. Spread evenly.

2. Arrange a single layer of sliced strawberries over the cream cheese mixture.

3. Top the strawberries with another layer of graham crackers.

4. Spread the remaining cream cheese mixture over the graham crackers.

5. Add another layer of sliced strawberries on top of the cream cheese mixture.

Step 4: Chill the Cake

1. Cover the baking dish with plastic wrap and refrigerate for 6–8 hours, or overnight for best results.

Step 5: Garnish and Serve

1. Before serving, spread the remaining whipped topping evenly over the dessert.

2. Crush any leftover graham crackers and sprinkle the crumbs over the whipped topping.

3. Slice and serve chilled.

Tips

Fresh Strawberries: Use ripe, firm strawberries for the best flavor and texture.

Customize the Layers: Add a drizzle of chocolate syrup or strawberry preserves for extra flavor.

Plan Ahead: This dessert tastes even better the next day as the layers meld together.

Storage Options

Refrigeration: Store the cake in an airtight container in the refrigerator for up to 3 days.

Freezing: Freeze leftovers in individual portions for up to 1 month. Thaw in the refrigerator before serving.

Strawberry Cream Cheese Icebox Cake is a simple yet elegant dessert that’s as delicious as it is beautiful. Enjoy the combination of creamy cheesecake, juicy strawberries, and tender graham crackers with every bite!