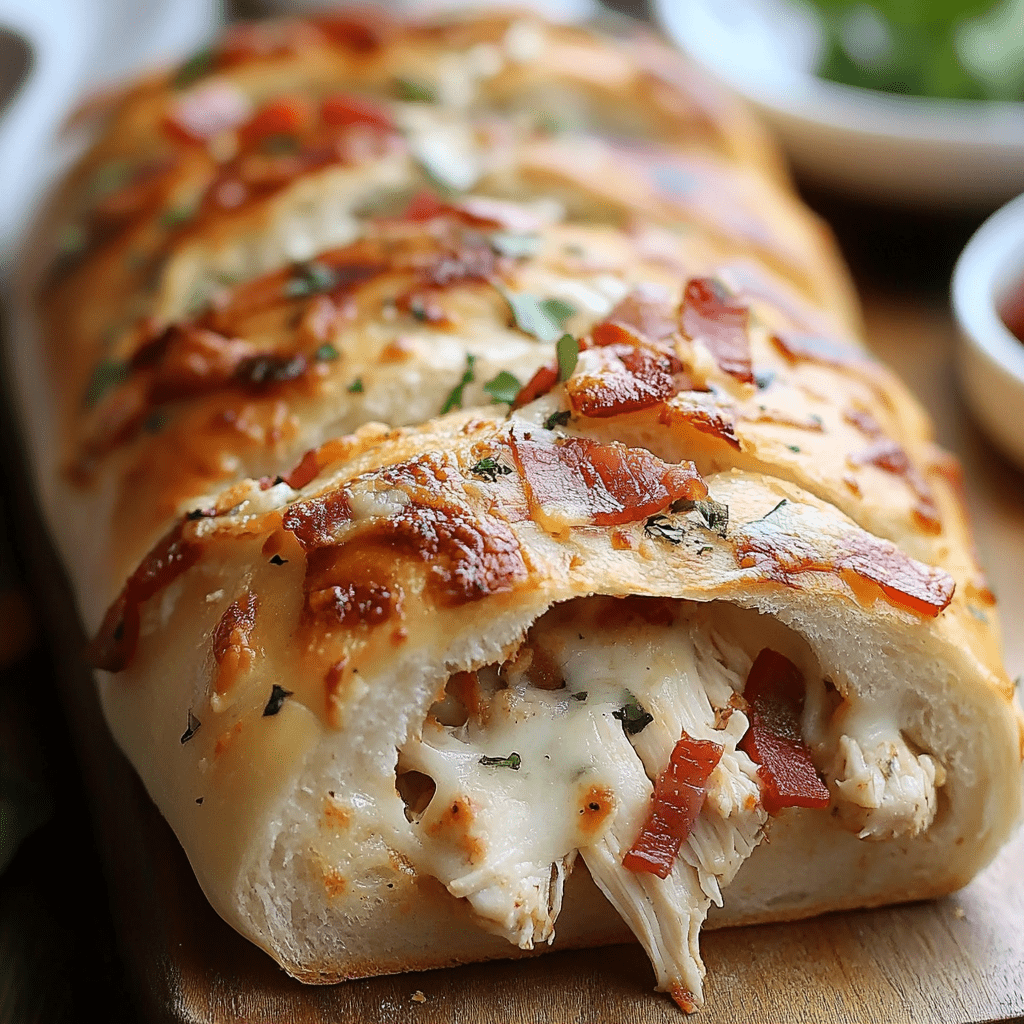
Boston Cream Pie Poke Cake

0

Boston Cream Pie Poke Cake is a delightful twist on the classic dessert. With its layers of moist yellow cake, creamy homemade custard filling, and rich chocolate ganache topping, this cake delivers all the flavors you love in an easy-to-make, crowd-pleasing format.

The poke cake method allows the custard to seep into the cake, ensuring every bite is as creamy and delicious as the next. Whether you’re serving it at a family gathering, potluck, or just as a weekend treat, this cake is sure to impress.

Why You’ll Love This Recipe

Classic Flavors, Simplified: The essence of Boston Cream Pie with less effort.

Moist and Creamy: Poke holes let the custard soak through, creating a luscious texture.

Crowd-Pleasing: Perfect for parties or casual get-togethers.

Ingredients

For the Cake:

• 1 box yellow cake mix (plus ingredients listed on the package)

For the Custard Filling:

• 3 large eggs

• 1 cup whole milk

• ½ cup all-purpose flour

• ½ cup granulated sugar

• 2 teaspoons vanilla extract

For the Ganache:

• ½ cup heavy cream

• ½ cup semi-sweet chocolate chips

Instructions

Step 1: Prep and Bake the Cake

1. Preheat your oven to 350°F (177°C). Grease a 9×13-inch baking dish.

2. Prepare the yellow cake mix according to the package instructions. Pour the batter into the prepared dish.

3. Bake for 20–25 minutes, or until a toothpick inserted into the center comes out clean.

Step 2: Make the Custard Filling

1. While the cake bakes, whisk together the eggs, milk, flour, sugar, and vanilla extract in a medium saucepan.

2. Cook over medium heat, stirring constantly, until the mixture thickens, about 5–7 minutes. Remove from heat.

Step 3: Poke and Fill the Cake

1. Let the baked cake cool slightly. Using the end of a wooden spoon, poke holes all over the top of the cake.

2. Pour the warm custard over the cake, ensuring it fills the holes and covers the surface evenly.

Step 4: Prepare the Ganache

1. In a small saucepan, heat the heavy cream until just boiling. Remove from heat and stir in the chocolate chips. Mix until the ganache is smooth and glossy.

2. Pour the ganache over the custard layer, spreading evenly to cover the entire cake.

Step 5: Cool and Serve

1. Let the cake cool to room temperature, then refrigerate for at least 2 hours to allow the layers to set.

2. Slice and serve, optionally garnished with whipped cream or a scoop of vanilla ice cream.

Tips

Even Custard Distribution: Use a spatula to help spread the custard and ensure it fills the holes.

Chocolate Variety: Substitute milk or dark chocolate chips for a different ganache flavor.

Make Ahead: Prepare the cake a day in advance for even better flavor and texture as it chills.

Storage Options

Refrigeration: Store the cake in an airtight container in the refrigerator for up to 5 days.

Freezing: Freeze individual slices wrapped tightly in plastic wrap for up to 2 months. Thaw in the refrigerator before serving.

Boston Cream Pie Poke Cake is a dessert that combines simplicity with indulgence. With its creamy custard and rich ganache topping, it’s a guaranteed hit for any occasion!

Yummy Summer Pea Salad

0

Sweet Pea and Bacon Salad is a delightful combination of flavors and textures, bringing together the crisp freshness of peas, the smoky richness of bacon, and the sweet and tangy touch of golden raisins and wine vinegar dressing. This dish is perfect for potlucks, picnics, or as a refreshing side dish for your favorite meals.

This salad’s versatility makes it a crowd-pleaser. The creamy dressing ties all the ingredients together, enhancing the contrast between the crunch of sunflower seeds and the tenderness of sweet peas. With just a few simple steps, you can create a dish that’s both vibrant and satisfying.

Why You’ll Love This Recipe

Flavorful Balance: The smoky bacon, sweet raisins, and creamy dressing create a perfect harmony.

Quick and Easy: Simple to prepare with minimal effort, yet packed with flavor.

Crowd-Pleaser: A unique and refreshing salad that stands out at gatherings.

Ingredients

For the Salad:

• 2 (6-ounce) packages frozen peas, thawed

• 1 pound cooked bacon, chopped

• 1 cup golden raisins

• 1 (8-ounce) package shredded Cheddar cheese

• 1 sweet onion, chopped

• ½ cup sunflower seeds

For the Dressing:

• 1 cup mayonnaise

• 2 tablespoons wine vinegar

• ¼ teaspoon white sugar, or to taste

Instructions

Step 1: Prepare the Salad

1. In a large mixing bowl, combine the thawed peas, chopped bacon, golden raisins, shredded Cheddar cheese, chopped sweet onion, and sunflower seeds.

2. Toss gently to ensure all the ingredients are evenly distributed.

Step 2: Make the Dressing

1. In a small bowl, whisk together the mayonnaise, wine vinegar, and white sugar.

2. Mix until the sugar is fully dissolved and the dressing is smooth and creamy. Adjust sugar to taste if needed.

Step 3: Combine Salad and Dressing

1. Drizzle the dressing over the salad mixture in the large bowl.

2. Toss gently to coat all the ingredients evenly with the dressing.

Step 4: Chill the Salad

1. Cover the bowl with plastic wrap and refrigerate for at least 1 hour.

2. This allows the flavors to meld together for a richer taste.

Step 5: Serve and Enjoy

1. Before serving, give the salad a final toss to redistribute the dressing.

2. Serve chilled as a side dish or a light main course.

Tips

Fresh Peas Option: Substitute frozen peas with fresh ones if available for an even brighter flavor.

Cheese Variations: Use a sharp Cheddar for more pronounced flavor or mix in Colby Jack for a milder taste.

Customize Add-Ins: Try adding diced bell peppers, chopped celery, or sliced almonds for extra crunch.

Make Ahead: This salad can be prepared a day in advance, making it an excellent choice for parties.

Storage Options

Refrigerator: Store leftovers in an airtight container for up to 3 days. Toss before serving again.

Not Freezer-Friendly: The creamy dressing and fresh ingredients don’t freeze well, so it’s best enjoyed fresh or refrigerated.

Sweet Pea and Bacon Salad is a standout dish that combines savory, sweet, and tangy elements in a creamy, refreshing way. It’s sure to become a favorite addition to your salad repertoire!

Cowboy Baked Beans Recipe

0

Cowboy Baked Beans is a hearty, flavor-packed dish that channels the spirit of the Old West. Perfect for potlucks, family dinners, or backyard barbecues, this recipe combines the rich, smoky taste of baked beans with savory ground beef, vibrant green bell peppers, and a sweet and tangy touch of brown sugar and Worcestershire sauce. Each bite is a medley of robust flavors, evoking campfire meals shared under open skies.

This dish is as versatile as it is delicious. Serve it as a standalone meal, a comforting side dish, or even a topping for baked potatoes or hot dogs. Its rich, satisfying flavor makes it a crowd-pleaser at any gathering, big or small.

Why You’ll Love This Recipe

Hearty and Filling: A one-dish wonder loaded with protein and veggies.

Bold Flavors: Sweet, savory, and slightly tangy for a perfectly balanced taste.

Versatile: Great as a main dish or a side, and pairs well with a variety of accompaniments.

Ingredients

• 1 can (28 oz) Bush’s Baked Beans

• ½ pound ground beef

• 2 tablespoons Worcestershire sauce

• 2 tablespoons brown sugar

• 1 tablespoon onion & herb seasoning

• ¼ cup minced onions

• ½ cup chopped onions

• ½ cup chopped green bell peppers

Instructions

Step 1: Prepare the Ground Beef

1. Heat a skillet over medium heat.

2. Add the ground beef and cook, breaking it into small pieces as it browns. This ensures even cooking and flavor distribution.

Step 2: Season the Beef

1. Once the beef is fully browned, stir in Worcestershire sauce, brown sugar, onion & herb seasoning, and minced onions.

2. Cook for about 5 minutes, allowing the flavors to meld and the minced onions to soften.

Step 3: Combine the Ingredients

1. In a large baking dish, combine the cooked beef mixture with the baked beans.

2. Add the chopped onions and green bell peppers, stirring well to ensure even distribution of ingredients.

Step 4: Bake the Beans

1. Preheat your oven to 375°F (190°C).

2. Cover the baking dish with a lid or aluminum foil and bake for approximately 30 minutes.

3. Check for bubbling beans and softened bell peppers, which indicate the dish is ready.

Step 5: Serve and Enjoy

1. Remove the dish from the oven and let it rest for a few minutes.

2. Serve warm, garnished with fresh herbs or shredded cheese if desired.

Tips

Enhance the Flavor: Add a splash of barbecue sauce or a pinch of smoked paprika for a smoky kick.

Customize Veggies: Substitute or add red bell peppers, jalapeños, or celery for extra crunch and flavor.

Texture Tip: Cook the beef until just browned to retain its juiciness in the final dish.

Make It a Meal: Serve with cornbread, rice, or a crisp salad to round out the meal.

Storage Options

Refrigerator: Store leftover baked beans in an airtight container for up to 3 days. Reheat in the microwave or oven before serving.

Freezing: Transfer cooled baked beans to a freezer-safe container or bag. Freeze for up to 2 months. Thaw in the refrigerator overnight and reheat gently.

Cowboy Baked Beans is a comforting, flavor-packed dish that’s perfect for gatherings or cozy meals. Its robust flavors and satisfying texture make it a favorite for any occasion, offering a taste of the rugged West with every bite!

Philly Cheesesteak Garlic Bread

0

Philly Cheesesteak Garlic Bread takes all the classic flavors of a cheesesteak and transforms them into a hearty, cheesy, and utterly satisfying appetizer or main course. Featuring a crisp loaf of Italian or French bread, tender ribeye steak, caramelized onions, and melted provolone cheese, this dish is a guaranteed crowd-pleaser.

Whether you’re serving it for a game day snack, a family dinner, or a fun twist on a classic sandwich, this garlic bread recipe is versatile and easy to customize with additional toppings like bell peppers, mushrooms, or jalapeños.

Why You’ll Love This Recipe

Classic Cheesesteak Flavors: Juicy steak, caramelized onions, and melted cheese create an irresistible combination.

Easy to Make: Simple steps that deliver a gourmet-level appetizer or main course.

Customizable: Add your favorite toppings for a personal twist.

Ingredients

• 1 loaf Italian bread or French baguette

• 1 pound thinly sliced ribeye steak

• 1 onion, thinly sliced

• 2 cloves garlic, minced

• 1 cup shredded provolone or mozzarella cheese

• 2 tablespoons olive oil

• Salt and pepper, to taste

• Optional toppings: sliced bell peppers, mushrooms, or jalapeños

Instructions

Step 1: Prepare Your Bread and Oven

1. Preheat your oven to 400°F (200°C).

2. Slice the loaf of bread in half lengthwise and place it cut side up on a baking sheet.

Step 2: Cook the Steak

1. Heat 1 tablespoon of olive oil in a skillet over medium-high heat.

2. Add the thinly sliced ribeye steak, season with salt and pepper, and cook until browned and fully cooked (about 4–5 minutes).

3. Remove the steak from the skillet and set aside.

Step 3: Caramelize the Onions

1. In the same skillet, add the remaining tablespoon of olive oil.

2. Sauté the onions over medium heat until they are caramelized, stirring occasionally (about 10 minutes).

3. Stir in the minced garlic and cook for 1 more minute until fragrant.

Step 4: Assemble the Garlic Bread

1. Evenly distribute the cooked steak over the bread halves.

2. Spread the caramelized onions and garlic on top of the steak.

3. Generously sprinkle the shredded cheese over the bread, ensuring it covers the steak and onions.

Step 5: Add Optional Toppings

1. For additional flavor and texture, layer optional toppings such as bell peppers, mushrooms, or jalapeños over the cheese.

Step 6: Bake

1. Place the assembled bread in the preheated oven.

2. Bake for 10–12 minutes, or until the cheese is melted and bubbly and the edges of the bread are crisp.

Step 7: Serve

1. Remove from the oven and let cool for a few minutes to allow the cheese to set.

2. Slice into individual portions and serve warm.

Tips

Best Bread: Use a sturdy loaf that can hold up to the toppings without getting soggy.

Cheese Variations: Try a mix of provolone and cheddar for extra flavor.

Prep Ahead: Cook the steak and onions ahead of time for faster assembly.

Storage Options

Refrigeration: Store leftovers in an airtight container in the refrigerator for up to 2 days. Reheat in the oven for best results.

Freezing: Wrap the assembled (but unbaked) bread tightly in foil and freeze for up to 1 month. Bake directly from frozen, adding a few extra minutes.

Philly Cheesesteak Garlic Bread combines the best of both worlds—a hearty cheesesteak and a comforting loaf of garlic bread. It’s an irresistible dish that’s sure to be a hit at any gathering or family meal!

Whip Cookies

0

Whip Cookies are delightfully soft and fluffy treats made with just four simple ingredients. With their slightly crispy exterior and melt-in-your-mouth center, these cookies are a quick and versatile dessert option. Whether you choose lemon for a zesty kick, chocolate for indulgence, or strawberry for a fruity touch, this recipe is perfect for satisfying your sweet tooth with minimal effort.

These cookies are ideal for unexpected guests, bake sales, or just a fun project with kids. Their simplicity and customizable flavors make them a go-to favorite for any occasion.

Why You’ll Love This Recipe

Minimal Ingredients: Just four items create delicious cookies in no time.

Quick and Easy: Prepped, baked, and ready to enjoy in under 30 minutes.

Versatile: Choose your favorite cake mix flavor for endless variations.

Ingredients

• 1 box (approximately 15.25 oz) cake mix (lemon, chocolate, or strawberry work well)

• 1 tub (8 oz) Cool Whip, thawed

• 1 large egg

• ½ cup powdered sugar (for coating)

Instructions

Step 1: Preheat the Oven

1. Preheat your oven to 350°F (175°C).

2. Line a baking sheet with parchment paper or a silicone mat to prevent sticking.

Step 2: Mix the Dough

1. In a large mixing bowl, combine the cake mix, Cool Whip, and egg.

2. Mix thoroughly until all ingredients are well blended. The dough will be sticky—this is normal.

Step 3: Shape the Cookies

1. Scoop out teaspoons of dough and drop them into the powdered sugar.

2. Roll the dough gently to coat completely and shape into balls.

3. Place the sugar-coated dough balls on the prepared baking sheet, leaving about 2 inches of space between each.

Step 4: Bake

1. Bake the cookies in the preheated oven for 10–12 minutes, or until the edges are set and the tops show slight cracks.

2. Avoid overbaking to keep the cookies soft and fluffy.

Step 5: Cool

1. Allow the cookies to cool on the baking sheet for 2–3 minutes to firm up.

2. Transfer them to a wire rack to cool completely.

Tips

Sticky Dough Solution: Lightly grease your hands or use a cookie scoop to handle the sticky dough more easily.

Experiment with Flavors: Try different cake mix flavors like red velvet, funfetti, or spice for unique variations.

Extra Zest: Add lemon zest or a splash of vanilla extract for added flavor depth.

Storage Options

Room Temperature: Store cookies in an airtight container for up to 5 days.

Freezing: Freeze the baked cookies in a freezer-safe bag for up to 2 months. Thaw at room temperature before enjoying.

Whip Cookies are a simple yet delightful dessert that everyone will love. Their soft texture, vibrant flavors, and easy preparation make them a must-try treat for any occasion!

Caramel Brownie Cheesecake

0

Caramel Brownie Cheesecake is a decadent dessert that combines three irresistible layers: a rich brownie base, a velvety cheesecake filling, and a luscious swirl of caramel sauce. This indulgent treat is perfect for special occasions or when you want to spoil your friends and family with a show-stopping dessert.

The combination of the fudgy brownie, creamy cheesecake, and sweet caramel creates a dessert that’s as visually stunning as it is delicious. Topped with whipped cream and chocolate shavings, each slice is a luxurious experience you’ll savor bite by bite.

Why You’ll Love This Recipe

Triple Layers of Delight: Fudgy brownie, creamy cheesecake, and gooey caramel—what’s not to love?

Impressive Yet Simple: Easy to assemble but delivers bakery-quality results.

Perfect for Sharing: A crowd-pleasing dessert for parties, holidays, or birthdays.

Ingredients

For the Brownie Base:

• 1 package brownie mix (plus ingredients required on the package)

For the Cheesecake Layer:

• 24 ounces cream cheese, softened

• 1 cup granulated sugar

• 1 teaspoon vanilla extract

• 3 large eggs

• ¼ cup sour cream

• ¼ cup heavy cream

For the Caramel Swirl:

• ½ cup caramel sauce (plus extra for drizzling)

For Garnish:

• Whipped cream

• Chocolate shavings

Instructions

Step 1: Prepare the Brownie Base

1. Preheat your oven to 350°F (175°C). Grease a 9-inch springform pan.

2. Prepare the brownie batter according to the package instructions. Pour the batter into the greased pan, spreading it evenly.

3. Bake for 25–30 minutes, or until a toothpick inserted into the center comes out with moist crumbs. Allow the brownie to cool completely on a wire rack.

Step 2: Make the Cheesecake Layer

1. Reduce the oven temperature to 325°F (160°C).

2. In a large mixing bowl, beat the softened cream cheese until smooth and creamy. Gradually add the sugar and mix until well blended. Stir in the vanilla extract.

3. Add the eggs, one at a time, ensuring each is fully incorporated before adding the next. Scrape down the sides of the bowl as needed.

4. Mix in the sour cream and heavy cream until the cheesecake filling is smooth and velvety.

5. Pour the cheesecake mixture over the cooled brownie base, smoothing the top with a spatula.

Step 3: Add the Caramel Swirl

1. Drizzle the caramel sauce over the cheesecake layer.

2. Use a knife or toothpick to gently swirl the caramel into the cheesecake to create a marbled effect.

Step 4: Bake the Cheesecake

1. Place the springform pan on a baking sheet to catch any drips. Bake for 45–50 minutes, or until the edges are set but the center slightly jiggles.

2. Turn off the oven and crack the door slightly. Let the cheesecake cool in the oven for about 1 hour to prevent cracking.

Step 5: Chill and Garnish

1. Once cooled, refrigerate the cheesecake for at least 4 hours, or overnight for best results.

2. Carefully remove the cheesecake from the springform pan before serving.

3. Drizzle additional caramel sauce over the top and garnish with whipped cream and chocolate shavings.

Step 6: Serve and Enjoy

1. Slice the cheesecake and serve chilled as a luxurious dessert.

Tips

Prevent Sticking: Line the base of the springform pan with parchment paper for easy removal.

Room Temperature Ingredients: Ensure cream cheese, eggs, and sour cream are at room temperature for a smoother filling.

Custom Garnishes: Add crushed nuts, toffee bits, or a sprinkle of sea salt for a creative twist.

Storage Options

Refrigeration: Store leftovers in an airtight container in the refrigerator for up to 5 days.

Freezing: Freeze individual slices wrapped in plastic wrap and foil for up to 2 months. Thaw in the refrigerator before serving.

Caramel Brownie Cheesecake is a decadent masterpiece that’s as much fun to make as it is to eat. Indulge in this rich, layered dessert and enjoy the perfect balance of textures and flavors with every bite!

Creamed Chicken and Biscuits Casserole

0

Creamed Chicken and Biscuits Casserole is a comforting and hearty dish that brings together tender chicken, a creamy sauce, and golden, cheesy biscuits. This recipe is perfect for busy weeknights or when you’re craving a cozy, homemade meal. The combination of creamy chicken filling and fluffy biscuits baked to perfection creates a deliciously satisfying dinner.

Whether served as a standalone meal or paired with a crisp salad, this casserole is sure to please everyone at the table. Its rich, cheesy flavor and simple preparation make it a go-to comfort food dish.

Why You’ll Love This Recipe

Comforting and Filling: A one-dish meal that combines creamy, cheesy goodness with flaky biscuits.

Quick and Easy: Minimal prep time and a short baking time make it perfect for weeknight dinners.

Versatile: Add your favorite vegetables or spices to customize the flavor.

Ingredients

• 1 ½ teaspoons butter

• 1 small onion, chopped

• 2 pounds cooked chicken, cut or shredded

• 1 can cream of chicken soup

• ½ cup mayonnaise

• 1 cup milk

• ½ cup roasted red pepper, chopped

• 1 ½ cups mild cheddar cheese, shredded

• 1 can refrigerated biscuit dough

Instructions

Step 1: Preheat and Prep

1. Preheat your oven to 350°F (175°C).

2. Grease the bottom and sides of a baking dish with butter or cooking spray.

Step 2: Sauté the Onion

1. Heat the butter in a skillet over medium heat.

2. Add the chopped onion and sauté until softened, about 5 minutes.

Step 3: Mix the Filling

1. In a large bowl, combine the cooked chicken, sautéed onion, cream of chicken soup, mayonnaise, milk, and roasted red peppers.

2. Mix until all the ingredients are evenly combined.

Step 4: Assemble the Casserole

1. Pour the chicken mixture into the prepared baking dish.

2. Bake in the preheated oven for 15 minutes.

Step 5: Add Cheese and Biscuits

1. Remove the baking dish from the oven and sprinkle 1 cup of shredded cheddar cheese over the chicken mixture.

2. Arrange the biscuit dough on top of the cheese in a single layer.

3. Sprinkle the remaining ½ cup of cheese over the biscuits.

Step 6: Bake and Serve

1. Return the dish to the oven and bake for an additional 20 minutes, or until the biscuits are golden brown and cooked through.

2. Let the casserole rest for 5 minutes before serving.

Tips

Extra Vegetables: Add frozen peas, carrots, or green beans to the chicken mixture for added nutrition.

Customize the Cheese: Try using a blend of cheddar and mozzarella for extra gooeyness.

Herb Topping: Sprinkle fresh parsley or thyme over the biscuits before serving for a burst of flavor.

Storage Options

Refrigeration: Store leftovers in an airtight container in the refrigerator for up to 3 days. Reheat in the oven or microwave before serving.

Freezing: Freeze the fully assembled casserole (before baking) for up to 2 months. Thaw in the refrigerator overnight and bake as directed.

Creamed Chicken and Biscuits Casserole is the ultimate comfort food. Its creamy filling, cheesy topping, and golden biscuits make it a family favorite that’s easy to whip up and incredibly satisfying. Enjoy!

Cheesy Mashed Potato Puffs

0

Cheesy Mashed Potato Puffs are a delightful and easy-to-make treat that combines creamy mashed potatoes with gooey cheese, fresh chives, and a crispy Parmesan crust. These bite-sized puffs are baked to golden perfection, making them an irresistible appetizer, side dish, or snack.

Perfect for using up leftover mashed potatoes or creating a fresh batch, these puffs are versatile enough for casual dinners or festive gatherings. Their crispy exterior and soft, cheesy interior are guaranteed to impress everyone at the table.

Why You’ll Love This Recipe

Great Use of Leftovers: A creative and delicious way to repurpose leftover mashed potatoes.

Crowd-Pleasing Snack: Bite-sized and loaded with cheesy goodness, they’re perfect for parties or family dinners.

Crispy and Cheesy: The Parmesan coating adds a delightful crunch to the creamy interior.

Ingredients

• 3 cups mashed potatoes, chilled

• 1 cup shredded cheddar cheese

• 1 large egg

• ¼ cup chopped chives

• ¼ cup all-purpose flour

• ½ teaspoon garlic powder

• Salt and pepper, to taste

• ½ cup grated Parmesan cheese

• Cooking spray or butter, for greasing

Instructions

Step 1: Prep the Oven and Pan

1. Preheat your oven to 400°F (200°C).

2. Generously grease a mini muffin pan with cooking spray or butter to prevent sticking.

Step 2: Mix Ingredients

1. In a large mixing bowl, combine the chilled mashed potatoes, shredded cheddar cheese, chives, flour, garlic powder, salt, and pepper.

2. Crack the egg into the mixture and mix thoroughly until all ingredients are evenly combined.

Step 3: Shape the Puffs

1. Using your hands or a small scoop, shape the potato mixture into 1-inch balls.

2. Roll each ball in the grated Parmesan cheese, coating them completely.

3. Place each ball into a muffin cup, pressing gently to mold into the shape of the pan.

Step 4: Bake

1. Place the muffin pan in the preheated oven and bake for 15–20 minutes, or until the edges of the puffs are golden brown and crispy.

Step 5: Cool and Serve

1. Allow the puffs to cool in the pan for 3–5 minutes to set.

2. Remove gently with a spoon or knife and serve warm for the best experience.

Tips

Use Chilled Potatoes: Chilled mashed potatoes hold their shape better when baked.

Customize the Cheese: Swap cheddar for mozzarella, Gruyère, or a cheese blend for different flavors.

Add Bacon: Fold in cooked, crumbled bacon for an extra savory touch.

Storage Options

Refrigeration: Store leftovers in an airtight container in the refrigerator for up to 3 days. Reheat in the oven to restore crispiness.

Freezing: Freeze uncooked puffs on a baking sheet, then transfer to a freezer-safe container. Bake from frozen, adding a few extra minutes to the baking time.

Cheesy Mashed Potato Puffs are the ultimate comfort food snack. Their crispy exterior and creamy, cheesy interior make them an irresistible addition to any meal or celebration!

Crab and Shrimp Seafood Bisque Recipe

0

Elevate your dining experience with the luxurious Crab and Shrimp Seafood Bisque, a dish that finds its roots in the sophisticated world of French cuisine. The term “bisque” evokes images of smooth, creamy soups, often brimming with the finest seafood selections. This particular bisque marries the exquisite flavors of crab and shrimp, creating a dish that is not only rich and indulgent but also offers the warm comfort of a classic comfort food, cherished by seafood aficionados through the ages.

Serving Suggestions:

Let the bisque shine as the centerpiece of your meal. Complement its opulence with a light, crisp salad dressed in a simple vinaigrette to cut through the richness, or pair it with crusty French bread or garlic bread perfect for savoring every last drop of this creamy delight. For a fuller meal, a small portion of white or brown rice makes an excellent addition, turning the bisque into a hearty feast. Embellish with fresh herbs such as parsley or chives for a dash of color and a hint of freshness.

Crab and Shrimp Seafood Bisque Recipe

Ingredients:

1 tablespoon olive oil

1/2 cup onion, finely chopped

1/4 cup celery, finely chopped

1/4 cup carrot, finely chopped

2 garlic cloves, minced

2 tablespoons tomato paste

1 teaspoon paprika

1/4 teaspoon cayenne pepper (optional, for a spicy kick)

Salt and black pepper, to taste

1/4 cup all-purpose flour

4 cups seafood or chicken broth

1 cup heavy cream

1/2 pound cooked crab meat, shells removed

1/2 pound cooked shrimp, peeled, deveined, and chopped

2 tablespoons sherry (optional)

Fresh herbs for garnish

Instructions:

Heat olive oil in a large pot over medium heat. Sauté onion, celery, and carrot until softened, about 5 minutes. Add garlic and cook for an additional minute.

Stir in tomato paste, paprika, cayenne (if using), and season with salt and pepper. Cook for 2 minutes, stirring constantly.

Sprinkle flour over the mixture, stirring until well combined. Cook for another minute.

Gradually add broth, stirring continuously to prevent lumps. Simmer on low heat for 10 minutes, stirring occasionally.

Puree the soup until smooth using an immersion blender, or transfer to a standard blender in batches.

Mix in the heavy cream and simmer for 10 more minutes, until slightly thickened.

Add crab meat, shrimp, and sherry (if using). Simmer for 5 minutes or until seafood is heated through, keeping the heat low to avoid curdling the cream.

Adjust seasoning with salt and black pepper as needed.

Serve hot, garnished with fresh herbs.

This Crab and Shrimp Seafood Bisque is a celebration of flavor and texture, perfect for warming up on a cool day or making any occasion feel extra special. Delight in the depth of taste and the sumptuous, creamy consistency that makes this bisque a beloved choice among gourmet dishes.

Golden Seared Cod with Herb Butter Sauce

0

Golden Seared Cod with Herb Butter Sauce is an elegant yet simple dish that highlights the delicate flavor and flaky texture of cod. Perfectly seared to achieve a golden crust, the fish is paired with a rich, buttery sauce infused with garlic, lemon, and fresh herbs like parsley, dill, and chives.

This dish is quick to prepare and versatile, making it an excellent choice for weeknight dinners or special occasions. Pair it with steamed vegetables, roasted potatoes, or a fresh salad for a complete and satisfying meal.

Why You’ll Love This Recipe

Quick and Easy: Ready in under 30 minutes, perfect for busy evenings.

Healthy and Flavorful: Packed with lean protein and vibrant herbs for a wholesome dish.

Elegant Presentation: A beautiful golden crust and vibrant herb butter elevate this meal.

Ingredients

• 4 (6-ounce) cod fillets

• 2 tablespoons olive oil

• Salt and freshly ground black pepper, to taste

• 4 tablespoons unsalted butter

• 1 garlic clove, minced

• Juice of ½ lemon

• 2 tablespoons fresh parsley, chopped

• 1 tablespoon fresh dill, chopped

• 1 tablespoon fresh chives, snipped

Instructions

Step 1: Prep the Fish

1. Pat the cod fillets dry with paper towels to remove excess moisture.

2. Season generously with salt and pepper on both sides.

Step 2: Sear the Cod

1. Heat the olive oil in a large skillet over medium-high heat until shimmering but not smoking.

2. Place the cod fillets in the skillet, presentation side down.

3. Sear for about 4 minutes, or until the underside develops a golden crust.

4. Carefully flip the fillets using a spatula and cook for an additional 3 minutes, or until the cod is opaque and flakes easily with a fork.

Step 3: Make the Herb Butter Sauce

1. Transfer the seared cod to a warm plate and tent loosely with foil to keep warm.

2. Lower the skillet heat to medium and add the butter and minced garlic.

3. Cook, stirring, until the butter has melted and the garlic is fragrant, about 1 minute.

4. Remove the skillet from heat and stir in the lemon juice, parsley, dill, and chives.

Step 4: Serve

1. Spoon the warm herb butter sauce generously over the cod fillets.

2. Serve immediately with your favorite side dishes.

Tips

Dry the Fish: Patting the fish dry ensures a crispy golden crust during searing.

Fresh Herbs: Use fresh herbs for the best flavor; dried herbs can be substituted in a pinch but reduce the amount by half.

Gentle Handling: Cod is delicate, so handle carefully to prevent breaking during flipping.

Storage Options

Refrigeration: Store leftovers in an airtight container in the refrigerator for up to 2 days. Reheat gently in a skillet or microwave.

Freezing: Freeze cooked cod fillets in an airtight container for up to 2 months. Thaw overnight in the refrigerator and reheat before serving.

Golden Seared Cod with Herb Butter Sauce is a refined, flavorful dish that’s easy to prepare yet impressive enough for special occasions. The buttery, herbaceous sauce complements the tender, flaky cod perfectly, making this recipe a go-to for seafood lovers!