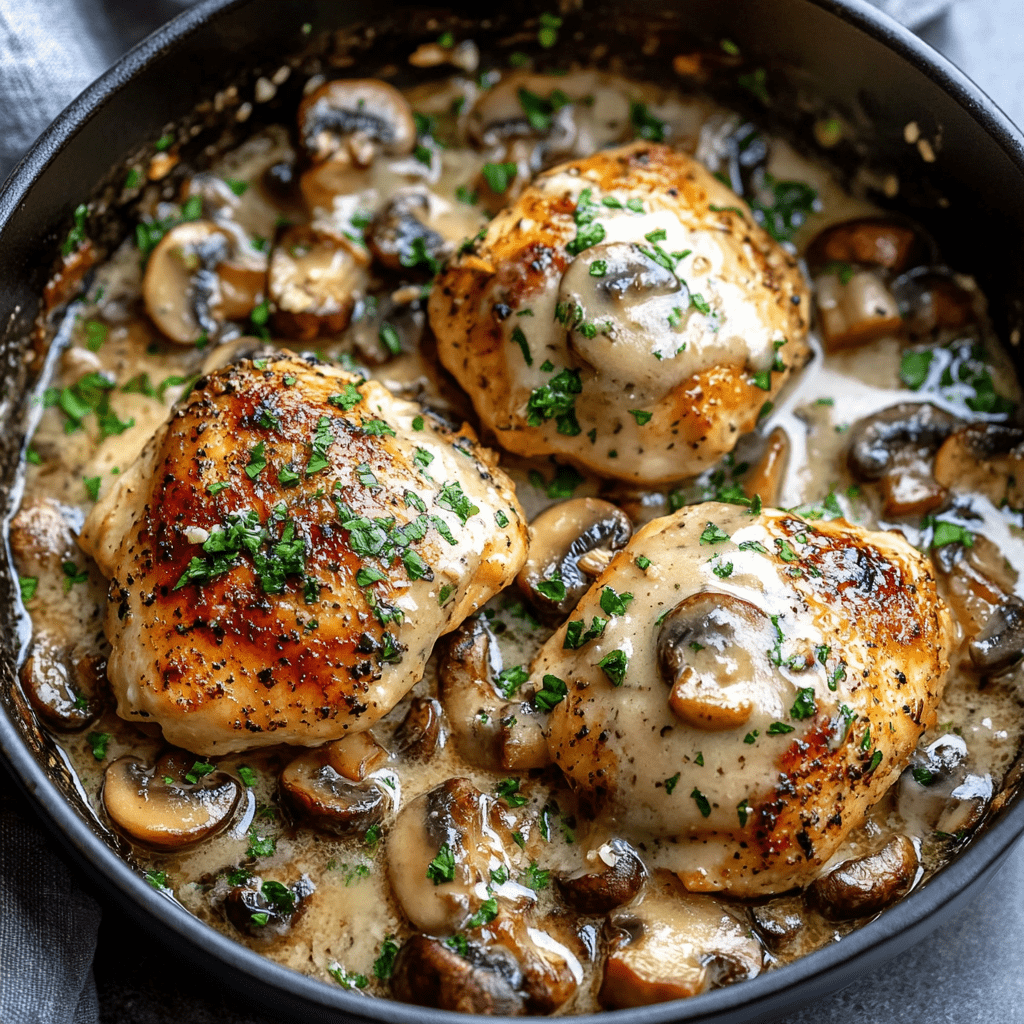
Deviled Egg Pasta Salad

0

Deviled Egg Pasta Salad combines the creamy richness of deviled eggs with the hearty texture of pasta for a unique and flavorful dish. This recipe is perfect for potlucks, barbecues, or family dinners, offering a satisfying blend of tangy, creamy, and savory flavors in every bite.

The soft, chopped eggs meld beautifully with the pasta, while the dressing—featuring mayonnaise, mustard, and a hint of paprika—provides the signature deviled egg taste. Add in fresh celery, green onions, and optional sweet pickle relish for extra crunch and flavor. Serve this chilled dish as a standout side or even as a main course.

Why You’ll Love This Recipe

Deviled Egg Twist: Combines the classic flavors of deviled eggs with pasta for a fresh take on a beloved dish.

Creamy and Tangy: The perfect balance of creamy dressing and zesty accents.

Make-Ahead Friendly: Tastes even better the next day, making it ideal for entertaining.

Ingredients

For the Salad:

• 8 ounces elbow macaroni (or your favorite small pasta shape)

• 6 hard-boiled eggs, peeled and chopped

• 2 celery stalks, finely chopped

• 3 green onions, thinly sliced

• ¼ cup sweet pickle relish (optional)

For the Dressing:

• ⅓ cup mayonnaise

• ¼ cup sour cream

• 1 tablespoon mustard (Dijon or yellow)

• 1 tablespoon apple cider vinegar

• 1 teaspoon sugar

• ½ teaspoon paprika, plus more for garnish

• ¼ teaspoon salt

• ¼ teaspoon black pepper

For Garnish:

• Fresh parsley, chopped

Instructions

Step 1: Prepare the Pasta

1. Cook the pasta according to the package directions in a large pot of salted boiling water until al dente.

2. Drain the pasta and rinse under cold water to stop the cooking process and cool it down. Set aside.

Step 2: Make the Dressing

1. In a large bowl, whisk together the mayonnaise, sour cream, mustard, apple cider vinegar, sugar, paprika, salt, and black pepper until smooth and creamy.

Step 3: Combine the Ingredients

1. Add the cooked pasta, chopped eggs, celery, green onions, and sweet pickle relish (if using) to the bowl with the dressing.

2. Fold gently to ensure all the ingredients are evenly coated with the creamy dressing.

Step 4: Chill the Salad

1. Cover the bowl and refrigerate the salad for at least 1 hour to allow the flavors to meld.

Step 5: Serve and Garnish

1. Before serving, stir the salad gently.

2. Sprinkle extra paprika on top and garnish with chopped fresh parsley. Serve chilled.

Variations and Tips

Spicy Kick: Add a dash of hot sauce or a pinch of cayenne pepper for a fiery twist.

Lighter Option: Substitute Greek yogurt for mayonnaise and sour cream for a healthier version.

Tangy Alternative: Replace sweet pickle relish with chopped dill pickles or capers for a tangy variation.

Herbaceous Boost: Fresh dill or chives can add an aromatic lift to the dish.

Make-Ahead Friendly: Prepare this salad a day in advance to enhance the flavors further.

Storage

Refrigeration: Store leftovers in an airtight container in the refrigerator for up to 3 days. Stir well before serving.

Not Freezer-Friendly: This salad is best enjoyed fresh as freezing can alter its creamy texture.

Deviled Egg Pasta Salad is a delightful blend of classic deviled egg flavors and pasta salad goodness. Its creamy texture, tangy dressing, and crunchy vegetables make it a standout dish that will have everyone asking for seconds!

Easy Taco Pizza

0

Easy Taco Pizza combines the best of two worlds—pizza and tacos—into a simple and delicious dish that’s perfect for weeknight dinners or gatherings. With a base made from crescent rolls, a layer of refried beans, seasoned ground beef, and fresh taco toppings, this recipe is a surefire crowd-pleaser.

This taco pizza offers a medley of flavors and textures: a flaky crust, a hearty and spiced beef layer, melted cheese, and fresh, crunchy vegetables on top. It’s quick to prepare and serves a crowd, making it ideal for busy evenings or casual get-togethers.

Why You’ll Love This Recipe

Simple and Quick: Ready in under 30 minutes, using convenient ingredients.

Customizable: Add or swap toppings to suit your preferences.

Great for Sharing: Perfect for family dinners, game days, or potlucks.

Ingredients

For the Crust and Toppings:

• 1 lb ground beef

• 1 envelope taco seasoning mix

• 2 (8 oz) cans Pillsbury crescent rolls

• 1 (16 oz) can refried beans

• 2–3 cups shredded cheddar or Mexican blend cheese

• ½ cup chopped tomatoes

• ¼ cup sliced black olives

• 4 chopped green onions

Instructions

Step 1: Preheat and Cook the Beef

1. Preheat your oven to 375°F (190°C).

2. In a skillet over medium heat, brown the ground beef until fully cooked. Drain any excess fat.

3. Add the taco seasoning mix to the beef according to the package instructions. Set aside.

Step 2: Prepare the Crescent Roll Crust

1. Unroll the crescent rolls onto an 11½ x 16½-inch jelly roll pan or cookie sheet.

2. Arrange the rolls into rectangles, pressing the seams together to form a single crust.

3. Press the dough onto the bottom of the pan and ½ inch up the sides to create a slight edge for the crust.

4. Bake for 11–13 minutes, or until lightly golden.

Step 3: Add the Bean and Beef Layers

1. Microwave the refried beans for 1 minute to soften them.

2. Spread the beans evenly over the baked crust.

3. Top the bean layer with the seasoned beef mixture.

Step 4: Add Cheese and Toppings

1. Sprinkle the shredded cheese evenly over the beef layer.

2. Add the chopped tomatoes, sliced black olives, and chopped green onions.

Step 5: Final Bake

1. Return the pizza to the oven and bake for 3–6 minutes, or until the cheese is melted and bubbly.

Step 6: Serve and Enjoy

1. Slice the taco pizza into squares and serve hot.

Tips

Customize Toppings: Add jalapeños, avocado slices, or sour cream for extra flavor.

Crispier Crust: Bake the crescent roll crust for an additional 1–2 minutes before adding the toppings.

Make It Vegetarian: Replace ground beef with black beans or plant-based meat.

Storage Options

Refrigeration: Store leftovers in an airtight container in the refrigerator for up to 3 days. Reheat in the oven or microwave.

Freezing: Freeze individual portions for up to 1 month. Thaw and reheat in the oven for best results.

Easy Taco Pizza is a versatile and tasty dish that will have everyone coming back for seconds. It’s quick to make, full of flavor, and perfect for any occasion!

Homemade Dole Pineapple Whip

0

Bringing the enchantment of Disneyland’s sun-kissed treats into your kitchen, the homemade Dole Pineapple Whip offers a delectable journey back to cherished memories and creates an opportunity for making new ones. This cool, creamy dessert, celebrated for its refreshing taste and hint of nostalgia, is not only a crowd-pleaser but also a delightful way to incorporate more fruit into your daily diet. Perfect as a stand-alone delicacy or paired with light, crispy cookies for a delightful textural contrast, it’s an ideal addition to family barbecues, relaxed afternoons on the porch, or any gathering in need of a sweet, fruity uplift.

Servings: 4-6

Ingredients:

2 cups frozen pineapple chunks
1/4 cup milk (substitute with almond, soy, or coconut milk for dairy-free options)
1/2 teaspoon lemon juice
1/2 teaspoon lime juice
2 tablespoons sugar (or honey, to taste)
A pinch of salt
1 cup whipped cream (optional, for a richer texture)

Directions:

Blend the Base: Combine frozen pineapple, milk, lemon juice, lime juice, sugar, and salt in a blender. Involve any eager little helpers by letting them add the pineapple chunks. Blend on high until the mixture achieves a smooth, soft-serve consistency.

Adjust Consistency: If the mixture is too thick, gradually add more milk, a tablespoon at a time, until you reach the desired thickness without compromising the whip’s creaminess.

Serve with Flair: Transfer the mixture into a piping bag fitted with a star tip and swirl into serving bowls or glasses. No piping bag? A zip-top bag with a corner cut off works well as a substitute.

Add Whipped Cream: For an extra touch of indulgence, top each serving with a dollop of whipped cream.

Variations & Tips:

Tropical Twist: Incorporate a bit of coconut extract or a handful of shredded coconut for those craving tropical flavors.

Banana Alternative: For a lighter version, substitute whipped cream with a frozen banana, blending it with the other ingredients for a creamy, dairy-free option.

Sweet Toppings: Elevate the sweetness with a drizzle of caramel or pineapple syrup before serving.

Frozen is Key: Use frozen pineapple chunks to achieve the signature creamy texture of the whip.

Enjoy Fresh: This dessert is best enjoyed immediately. However, if needed, freeze any leftovers and re-blend before serving to restore its creamy consistency.

This homemade Dole Pineapple Whip is a testament to the simple joys of cooking, offering a burst of joy with every spoonful. As you savor this delightful treat, may it bring back warm memories and inspire the creation of new ones. Enjoy this taste of nostalgia, perfect for sharing with loved ones and sure to have everyone asking for seconds.

Korean Sweet and Spicy Chicken

0

Korean Sweet and Spicy Chicken, also known as Yangnyeom Chicken, is a popular dish that balances sweet, tangy, and spicy flavors. With its crispy fried chicken coated in a bold gochujang-based sauce, this dish is a favorite for parties, family dinners, or simply indulging in Korean cuisine at home.

The combination of crunchy chicken and a sticky glaze makes this recipe irresistible. Whether served as an appetizer or paired with steamed rice for a complete meal, it delivers a punch of flavor that will leave you craving more.

Why You’ll Love This Recipe

Flavor Explosion: A perfect balance of sweet, tangy, and spicy flavors.

Crispy Perfection: Double-coated chicken ensures a crunchy texture that holds up to the sauce.

Customizable Heat: Adjust the spice level by adding or reducing gochujang.

Ingredients

For the Chicken:

• 2 pounds chicken thighs, cut into small pieces

• 1 teaspoon salt

• ½ teaspoon black pepper

• ½ cup cornstarch

• ½ cup all-purpose flour

• Oil for frying

For the Sauce:

• 2 tablespoons soy sauce

• 4 tablespoons ketchup

• ¼ cup honey

• 2 tablespoons brown sugar

• 2 tablespoons gochujang (Korean chili paste)

• 4 garlic cloves, minced

• 1 tablespoon chopped ginger

• 1 tablespoon sesame oil

• 2 tablespoons rice vinegar

For Garnish:

• Sesame seeds

• Sliced green onions

Instructions

Step 1: Prepare the Chicken

1. In a large mixing bowl, season the chicken pieces with salt and pepper.

2. Add the cornstarch and all-purpose flour, tossing to coat the chicken evenly.

Step 2: Fry the Chicken

1. Heat the oil in a heavy-bottomed pot or deep fryer to 350°F (175°C).

2. Fry the chicken in batches, ensuring not to overcrowd the pot. Fry each batch for about 6–8 minutes, or until the chicken is golden brown and crispy.

3. Transfer the fried chicken to a plate lined with paper towels to drain excess oil.

Step 3: Prepare the Sauce

1. In a saucepan over medium heat, combine soy sauce, ketchup, honey, brown sugar, gochujang, garlic, ginger, sesame oil, and rice vinegar.

2. Whisk the ingredients together and let the sauce simmer for about 5 minutes, or until it thickens slightly.

Step 4: Coat the Chicken

1. Add the fried chicken pieces to the saucepan with the prepared sauce.

2. Toss the chicken in the sauce until evenly coated.

Step 5: Garnish and Serve

1. Sprinkle sesame seeds and sliced green onions over the chicken.

2. Serve hot as an appetizer or with steamed rice for a satisfying main course.

Tips

Crispier Chicken: For an even crispier texture, fry the chicken twice. Fry once at 350°F and a second time at 375°F for 1–2 minutes.

Adjust Spice Level: Increase or decrease the amount of gochujang based on your heat preference.

Extra Garnishes: Add julienned radish or pickled vegetables for a traditional Korean touch.

Storage Options

Refrigeration: Store leftovers in an airtight container in the refrigerator for up to 3 days. Reheat in the oven or air fryer to restore crispiness.

Freezing: Freeze the fried chicken (without sauce) for up to 2 months. Reheat and toss in the sauce just before serving.

Korean Sweet and Spicy Chicken is a flavor-packed dish that’s sure to impress your taste buds. Its crispy, saucy, and spicy profile makes it a true crowd-pleaser that’s perfect for any occasion!

KFC Original Secret Chicken Recipe

0

The KFC Original Secret Chicken Recipe recreates the iconic flavor of the fast-food giant’s famous fried chicken, right in your kitchen. This recipe uses a blend of herbs and spices to create a flavorful coating that crisps up beautifully when fried. With tender, juicy chicken and a perfectly seasoned crust, this dish is bound to impress your family and guests.

Requiring just a few simple steps and ingredients, this recipe offers a nostalgic experience and the chance to enjoy the deliciousness of KFC-style chicken without leaving home. Serve it with classic sides like mashed potatoes, coleslaw, or biscuits for the full KFC experience.

Why You’ll Love This Recipe

Classic Taste at Home: The unique blend of spices mimics the original KFC flavor.

Crispy and Juicy: A crunchy, golden crust encases tender, juicy chicken.

Customizable: Adjust the spice blend to suit your personal taste.

Ingredients

For the Chicken:

• 1 whole chicken, cut into pieces

• 3 beaten eggs

• 4 tablespoons oil

For the Coating:

• 2 cups flour

• 4 teaspoons paprika

• 1 teaspoon salt

• 1 teaspoon pepper

• 1 teaspoon poultry seasoning (or chicken stock powder)

• 1 teaspoon oregano

• 1 teaspoon tarragon

• 1 teaspoon parsley

• ½ teaspoon thyme

• 1 teaspoon chives

• ½ teaspoon garlic powder

• ½ teaspoon onion powder

• ½ teaspoon celery salt

Instructions

Step 1: Prepare the Coating

1. Sift the flour into a bowl.

2. Add all the coating ingredients—paprika, salt, pepper, poultry seasoning, oregano, tarragon, parsley, thyme, chives, garlic powder, onion powder, and celery salt.

3. Mix thoroughly. For the best texture, grind the spices finely with a mortar and pestle.

Step 2: Coat the Chicken

1. Beat the eggs in a shallow bowl and set aside.

2. Place the flour mixture into a clean plastic bag or a large dish.

3. Dip each chicken piece into the beaten egg, ensuring it is fully coated.

4. Transfer the chicken to the flour mixture and shake or toss to coat evenly. Ensure each piece is well-covered for maximum crispiness.

Step 3: Fry the Chicken

1. Heat the oil in a large skillet over medium heat.

2. Add the chicken pieces to the skillet and fry uncovered, turning occasionally, until golden brown.

3. Once browned, reduce the heat to low, cover the skillet, and continue frying gently until the chicken is fully cooked through (internal temperature of 165°F or 74°C).

Step 4: Drain and Serve

1. Remove the chicken from the skillet and place it on paper towels to drain excess oil.

2. Serve hot with your favorite sides like mashed potatoes, coleslaw, or biscuits.

Tips

Even Cooking: Fry chicken in batches to avoid overcrowding the skillet, ensuring even browning and crispiness.

Use a Thermometer: Check the internal temperature of the chicken to ensure it’s fully cooked.

Adjust the Spice Blend: Customize the seasoning to suit your preference—add cayenne for heat or more herbs for extra flavor.

Storage Options

Refrigeration: Store leftover chicken in an airtight container in the refrigerator for up to 3 days. Reheat in the oven to retain crispiness.

Freezing: Freeze cooked chicken in a freezer-safe container for up to 2 months. Reheat directly from frozen in the oven.

The KFC Original Secret Chicken Recipe is a nostalgic and flavorful way to enjoy fried chicken at home. With its signature crispy coating and tender meat, it’s a guaranteed hit for dinner or a special gathering!

Chocolate Oreo Cake

0

Chocolate Oreo Cake is a rich, indulgent dessert perfect for any celebration or when you simply want to satisfy a serious chocolate craving. Layers of moist, chocolate cake are paired with a creamy, Oreo-infused frosting that delivers the perfect balance of sweetness and crunch. Each bite is a decadent blend of velvety cocoa flavor and the beloved taste of Oreos.

Whether it’s for a birthday, holiday, or a special family dinner, this cake is a showstopper that will have everyone asking for seconds. The crushed Oreo frosting takes this chocolate cake to the next level, making it a true treat for Oreo lovers.

Why You’ll Love This Recipe

Ultimate Chocolate Indulgence: Moist chocolate cake paired with creamy Oreo frosting is an irresistible combination.

Crowd-Pleasing: A perfect dessert for birthdays, parties, or any gathering.

Versatile: Customize with different types of Oreos or add extra toppings for a creative twist.

Ingredients

For the Cake:

• 2 cups all-purpose flour

• 1 ¾ cups granulated sugar

• ¾ cup cocoa powder

• 2 teaspoons baking soda

• 1 teaspoon baking powder

• 1 teaspoon salt

• 1 cup buttermilk

• ½ cup vegetable oil

• 2 large eggs

• 2 teaspoons vanilla extract

• 1 cup hot water

For the Frosting:

• 1 package Oreo cookies (about 14–16 cookies)

• 1 cup butter, softened

• 4 cups powdered sugar

• 1 teaspoon pure vanilla extract

• 2 tablespoons heavy cream

Instructions

Step 1: Prepare the Cake Batter

1. Preheat your oven to 350°F (175°C). Grease and flour two 9-inch round cake pans or line them with parchment paper.

2. In a large bowl, sift together the flour, sugar, cocoa powder, baking soda, baking powder, and salt.

3. Add the buttermilk, vegetable oil, eggs, and vanilla extract to the dry ingredients. Mix on medium speed until well combined.

4. Gradually add the hot water to the batter, mixing on low speed. The batter will be thin, but this ensures a moist cake.

Step 2: Bake the Cake Layers

1. Divide the batter evenly between the prepared cake pans.

2. Bake for 30–35 minutes, or until a toothpick inserted in the center comes out clean.

3. Allow the cakes to cool in the pans for 10 minutes, then transfer them to a wire rack to cool completely.

Step 3: Make the Oreo Frosting

1. In a large bowl, beat the softened butter with an electric mixer on medium speed until creamy and smooth.

2. Gradually add the powdered sugar, 1 cup at a time, beating well after each addition.

3. Mix in the vanilla extract and heavy cream. Beat on high speed until the frosting is light and fluffy.

4. Crush the Oreo cookies into small pieces and fold them gently into the frosting.

Step 4: Assemble the Cake

1. Place one cake layer on a serving plate or cake stand. Spread a generous layer of Oreo frosting on top.

2. Place the second cake layer on top and frost the outside and top of the cake with the remaining Oreo frosting.

Step 5: Decorate and Serve

1. Garnish the cake with additional crushed Oreos, whole cookies, or chocolate drizzle, if desired.

2. Slice and serve this decadent dessert to wow your guests!

Tips

Room Temperature Ingredients: Ensure eggs and buttermilk are at room temperature for smoother mixing.

Extra Moist Cake: Replace hot water with hot coffee to enhance the chocolate flavor.

Decorating Ideas: Add a border of whole Oreos around the base or on top for an elegant presentation.

Storage Options

Refrigeration: Store the cake in an airtight container in the refrigerator for up to 5 days. Bring to room temperature before serving.

Freezing: Freeze individual slices or the whole cake (without decorations) for up to 3 months. Wrap tightly in plastic wrap and thaw in the refrigerator overnight.

Chocolate Oreo Cake is a dream come true for chocolate and cookie lovers alike. Its moist layers and creamy frosting make it a standout dessert for any occasion!

Peach Cobbler Pound Cake

0

Peach Cobbler Pound Cake is a rich, buttery, and moist cake infused with the warm spices of cinnamon and nutmeg, layered with sweet, tender peaches. This dessert beautifully combines the flavors of a classic peach cobbler with the density and texture of a traditional pound cake, creating a stunning centerpiece for any occasion.

The incorporation of brandy peach schnapps, buttermilk, and fresh peaches adds a depth of flavor and a delightful balance of sweetness and tanginess. Perfect for a family gathering, a summer barbecue, or simply to treat yourself, this cake is a showstopper both in taste and presentation. Serve it with a scoop of vanilla ice cream or a dollop of whipped cream for an extra special touch.

Why You’ll Love This Recipe

Unique Combination: Blends the flavors of peach cobbler with the texture of a pound cake.

Rich and Spiced: Cinnamon, nutmeg, and peach schnapps enhance the flavor profile.

Perfect for Any Occasion: Elegant enough for celebrations and simple enough for everyday indulgence.

Ingredients

• 1 ½ cups unsalted butter

• 2 cups sugar

• 3 tablespoons brown sugar

• 4 eggs, separated

• 1 teaspoon vanilla extract

• ¾ cup brandy peach schnapps

• ¼ cup buttermilk

• 3 cups all-purpose flour

• 1 teaspoon baking powder

• ½ teaspoon salt

• 3 ½ teaspoons cinnamon

• 1 teaspoon walnut butternut extract (optional)

• 2 cans (15 oz each) sliced peaches in syrup, drained

Instructions

Step 1: Prepare the Pan

1. Preheat your oven to 325°F (163°C).

2. In a small bowl, mix together the brown sugar and ½ teaspoon cinnamon.

3. Generously butter a 10-inch bundt pan or skillet and sprinkle the brown sugar-cinnamon mixture evenly to coat the interior.

Step 2: Season the Peaches

1. In a medium bowl, combine the drained sliced peaches, 2 teaspoons cinnamon, and ½ teaspoon nutmeg. Toss gently and set aside.

Step 3: Mix the Dry Ingredients

1. In a large bowl, whisk together the flour, baking powder, salt, and remaining cinnamon and nutmeg. Set aside.

Step 4: Beat the Egg Whites

1. In a separate small bowl, beat the egg whites until stiff peaks form. Set aside.

Step 5: Cream the Butter and Sugar

1. In a large mixing bowl, beat the butter and granulated sugar on medium speed until light and fluffy (about 3–5 minutes).

2. Add the egg yolks one at a time, beating well after each addition.

3. Mix in the peach schnapps and vanilla extract.

Step 6: Combine Wet and Dry Ingredients

1. Gradually add the dry ingredient mixture to the wet ingredients, mixing gently but thoroughly.

2. Stir in the buttermilk until just combined.

3. Fold in the beaten egg whites carefully to maintain the lightness of the batter.

Step 7: Assemble the Cake

1. Pour half of the batter into the prepared pan.

2. Arrange the spiced peaches evenly over the batter, reserving a few slices for garnish.

3. Pour the remaining batter over the peaches, spreading it gently to cover them.

Step 8: Bake the Cake

1. Bake in the preheated oven for about 90 minutes. Start checking for doneness with a cake tester or toothpick after 60 minutes—it should come out clean when the cake is ready.

2. Remove the cake from the oven and let it cool in the pan for 10–20 minutes.

Step 9: Cool and Serve

1. Carefully invert the cake onto a wire rack and allow it to cool completely.

2. Slice and serve with reserved peach slices, a dollop of whipped cream, or a scoop of vanilla ice cream.

Tips

Fresh Peaches: Substitute canned peaches with fresh peaches when in season for an even fresher flavor.

Avoid Overmixing: Stir the batter gently to prevent the cake from becoming dense.

Enhance Presentation: Drizzle a simple glaze or dust powdered sugar over the cooled cake for added elegance.

Storage Options

Room Temperature: Store in an airtight container for up to 3 days.

Refrigeration: Keep refrigerated for up to 5 days for extended freshness.

Freezing: Wrap slices in plastic wrap and freeze for up to 3 months. Thaw at room temperature before serving.

Peach Cobbler Pound Cake is a delightful blend of two Southern favorites, bringing warmth, sweetness, and elegance to your table. Its tender crumb and spiced peach layers are sure to impress and satisfy!

Crispy Honey Garlic Chicken

0

Crispy Honey Garlic Chicken is a mouthwatering dish that combines juicy, tender chicken cutlets with a flavorful honey garlic glaze. The crispy coating, spiced with cayenne and paprika, provides the perfect contrast to the sweet and savory sauce. This dish is a great choice for family dinners or special occasions, and it pairs wonderfully with steamed rice, roasted vegetables, or a crisp salad.

Why You’ll Love This Recipe

Perfect Texture: Crispy, golden chicken with a glossy, sticky glaze.

Bold Flavors: A balance of sweet honey, garlicky goodness, and a hint of spice.

Quick and Easy: Ready in under 40 minutes, making it perfect for weeknights.

Ingredients

For the Chicken:

• 2 large boneless, skinless chicken breasts (cut in half lengthwise and pounded to an even thickness)

• 2 large eggs, beaten + 1 tbsp water

• 1 cup flour

• 1 tsp cayenne pepper

• 1 tsp smoked paprika (or regular paprika)

• ½ tsp salt

• ¼ tsp pepper

• ½ tsp garlic powder

• ¼ cup vegetable oil

For the Honey Garlic Sauce:

• ½ cup honey

• 2 tsp minced garlic

• 2 tbsp soy sauce

• 1 tbsp cornstarch + 3 tbsp cold water

Instructions

Step 1: Make the Honey Garlic Sauce

1. Place a saucepan over medium heat and add soy sauce, honey, and minced garlic. Stir until well combined.

2. Allow the mixture to come to a gentle boil.

3. In a small bowl, mix the cornstarch and cold water until smooth.

4. Slowly whisk the cornstarch mixture into the saucepan, stirring constantly until the sauce thickens.

5. Remove the sauce from heat and set aside.

Step 2: Prepare the Chicken Coating

1. In a mixing bowl, combine the flour, garlic powder, cayenne pepper, paprika, salt, and pepper. Whisk until well blended.

2. In a separate bowl, whisk the eggs and 1 tablespoon of water together.

Step 3: Coat and Fry the Chicken

1. Dip each chicken cutlet into the egg wash, ensuring it’s fully coated.

2. Dredge the chicken in the flour mixture, pressing lightly to adhere the coating.

3. Heat the vegetable oil in a large skillet over medium heat.

4. Once the oil is hot, add the coated chicken pieces and fry for about 5 minutes per side, or until golden brown and fully cooked. Remove the chicken from the skillet and place it on a paper towel-lined plate to drain excess oil.

Step 4: Combine Chicken and Sauce

1. Add the fried chicken pieces to the bowl with the honey garlic sauce.

2. Toss until the chicken is evenly coated in the sauce.

Step 5: Serve and Enjoy

1. Serve the crispy honey garlic chicken hot with your favorite sides, such as rice, vegetables, or salad.

Tips

Pounding the Chicken: Ensure even thickness for uniform cooking.

Adjust Spice Level: Add more cayenne pepper for extra heat, or reduce for a milder flavor.

Crispier Chicken: Let the coated chicken rest for a few minutes before frying to help the coating adhere better.

Storage Options

Refrigeration: Store leftovers in an airtight container in the refrigerator for up to 3 days. Reheat in the oven to maintain crispiness.

Freezing: Freeze the fried chicken (without sauce) for up to 2 months. Reheat in the oven and toss in the sauce before serving.

Crispy Honey Garlic Chicken is a satisfying and flavorful dish that’s sure to impress. With its perfectly crispy coating and rich, sticky glaze, it’s a recipe you’ll want to make again and again!

Lazy Pecan Pie Bars

0

Enjoy the classic flavors of pecan pie in a simpler, bar form with these Lazy Pecan Pie Bars. This recipe combines a buttery shortbread crust with a rich, gooey pecan filling, offering all the taste of traditional pecan pie without the fuss of pie dough. Perfect for any occasion, these bars are a hit at holiday gatherings, potlucks, or as a cozy treat to enjoy at home.

Why You’ll Love This Recipe:

Easy to Make: Simplified steps and fewer ingredients make this dessert approachable for bakers of all skill levels.

Portable: Unlike traditional pie, these bars are easy to transport and serve, making them perfect for social events.

Deliciously Nutty: Loaded with pecans, these bars offer a satisfying texture and nutty flavor that pecan pie lovers will adore.

Ingredients:

For the crust:

  • 1 cup all-purpose flour
  • 1/2 cup unsalted butter, melted
  • 1/4 cup packed brown sugar

For the filling:

  • 2/3 cup packed brown sugar
  • 1/2 cup corn syrup (light or dark)
  • 2 large eggs
  • 2 tablespoons unsalted butter, melted
  • 1 teaspoon vanilla extract
  • Pinch of salt
  • 1 1/2 cups pecan halves

Instructions:

  1. Preheat your oven to 350°F (175°C). Grease or line a 9×9 inch baking dish with parchment paper, leaving an overhang for easy removal.
  2. In a mixing bowl, combine the flour, melted butter, and brown sugar for the crust. Stir until well combined and crumbly.
  3. Press the crust mixture evenly into the bottom of the prepared baking dish. Bake in the preheated oven for 15-18 minutes, or until lightly golden brown.
  4. While the crust is baking, prepare the filling. In a separate mixing bowl, whisk together the brown sugar, corn syrup, eggs, melted butter, vanilla extract, and salt until smooth.
  5. Once the crust is baked, remove it from the oven and sprinkle the pecan halves evenly over the hot crust.
  6. Pour the filling mixture over the pecans, ensuring they are evenly coated.
  7. Return the baking dish to the oven and bake for an additional 25-30 minutes, or until the filling is set and slightly golden brown on top.
  8. Remove the dish from the oven and let it cool completely in the pan on a wire rack.
  9. Once cooled, use the parchment paper overhang to lift the bars out of the pan. Transfer to a cutting board and slice into bars or squares.
  10. Serve and enjoy your delicious Lazy Pecan Pie Bars!

These bars are perfect for satisfying your pecan pie cravings with minimal effort. They’re great for potlucks, holiday gatherings, or just a sweet treat any day of the week.

Southern Tea Cake Cookies

0

Southern Tea Cake Cookies are a timeless treat that combines a soft, buttery texture with a touch of sweetness, making them perfect for tea time or as a delightful snack. These simple, classic cookies are lightly flavored with vanilla, allowing their buttery richness to shine.

Whether you’re serving them with a warm cup of tea, coffee, or milk, these cookies are a comforting reminder of Southern hospitality and home baking traditions.

Why You’ll Love This Recipe

Simple Ingredients: Made with pantry staples, these cookies are easy to whip up any time.

Soft and Buttery: Their tender texture and rich flavor make them a favorite for all ages.

Versatile: Perfect for snacks, tea parties, or a sweet addition to any gathering.

Ingredients

• 1 ½ cups all-purpose flour

• ¼ teaspoon salt

• ¼ teaspoon baking soda

• 1 stick (½ cup) unsalted butter, at room temperature

• ¾ cup granulated sugar

• 1 large egg, at room temperature

• 2 teaspoons pure vanilla extract

Instructions

Step 1: Prepare the Dry Ingredients

1. In a medium-sized bowl, whisk together the flour, salt, and baking soda. Set aside.

Step 2: Cream the Butter and Sugar

1. In the bowl of your mixer, add the butter and sugar.

2. Mix on high speed for 4–5 minutes, or until the mixture is fluffy and smooth.

Step 3: Add Wet Ingredients

1. Reduce the mixer speed to medium and add the egg and vanilla extract.

2. Beat until the egg is fully incorporated into the mixture.

Step 4: Incorporate Dry Ingredients

1. Turn the mixer to low speed and gradually add the flour mixture in three intervals.

2. Mix after each addition until the flour is just incorporated, being careful not to overmix.

Step 5: Chill the Dough

1. Remove the dough from the mixer and transfer it to a Ziploc bag.

2. Refrigerate the dough for at least 1 hour to firm up.

Step 6: Prepare for Baking

1. Preheat your oven to 325°F (165°C).

2. Line a cookie sheet with parchment paper.

Step 7: Shape the Cookies

1. Scoop out tablespoon-sized portions of the dough and roll them into balls.

2. Gently press the center of each dough ball with your thumb to slightly flatten it.

3. Place the dough balls on the prepared baking sheet, leaving at least 1 ½ inches between each.

Step 8: Bake

1. Bake in the preheated oven for 9–11 minutes, or until the edges are golden brown.

2. Remove from the oven and let the cookies cool on the baking sheet for 5–10 minutes.

Step 9: Serve and Enjoy

1. Transfer the cookies to a wire rack to cool completely or serve warm.

Tips

Room Temperature Ingredients: Ensure the butter and egg are at room temperature for a smooth, even dough.

Chill for Best Results: Chilling the dough prevents the cookies from spreading too much during baking.

Add a Twist: Dust the cooled cookies with powdered sugar or drizzle with a simple glaze for a decorative touch.

Storage Options

Refrigeration: Store cookies in an airtight container at room temperature for up to 5 days.

Freezing: Freeze unbaked dough balls for up to 3 months. Bake directly from frozen, adding 1–2 extra minutes to the baking time.

Southern Tea Cake Cookies are a nostalgic treat that brings warmth and sweetness to any occasion. Soft, buttery, and wonderfully simple, these cookies are sure to become a family favorite!