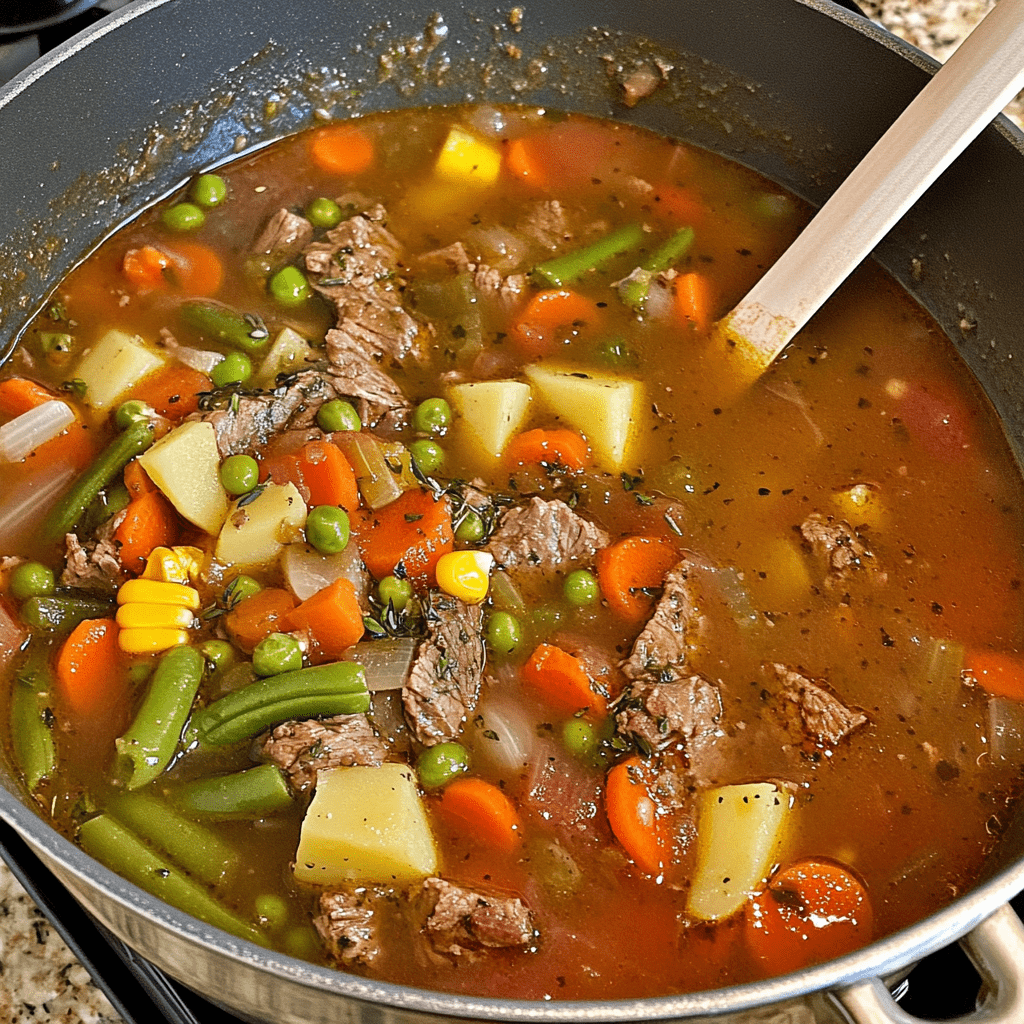
Good Old-Fashioned Mac and Cheese

0

This classic Mac and Cheese recipe is the epitome of comfort food. Rich, creamy, and loaded with layers of gooey cheese, it’s the perfect dish for family dinners, potlucks, or simply satisfying a craving for something warm and indulgent. Using a mix of cheddar and mozzarella, this recipe delivers a delightful blend of sharpness and melt-in-your-mouth goodness, complemented by a touch of paprika for an extra kick of flavor.

Why You’ll Love This Recipe

Timeless Classic: Perfectly cheesy and creamy, it’s everything you love about traditional mac and cheese.

Easy to Prepare: Simple ingredients and straightforward steps make this recipe approachable for cooks of all levels.

Customizable: Add bacon bits, breadcrumbs, or spices to make it your own.

Ingredients

3 cups elbow macaroni

4 tablespoons salted butter

2 (12 oz) cans evaporated milk

1/3 cup regular milk (your choice)

2 large eggs

1/4 teaspoon garlic salt

4 cups shredded cheddar cheese

2 cups shredded mozzarella cheese

1 teaspoon paprika

Instructions

Step 1: Cook the Pasta

1. Bring a large pot of salted water to a boil.

2. Add the elbow macaroni and cook until tender but still firm to the bite (al dente).

3. Drain the pasta and return it to the pot.

Step 2: Add Butter

1. Stir the butter into the hot pasta until fully melted and evenly coated. Set aside.

Step 3: Prepare the Milk Mixture

1. In a large mixing bowl, whisk together the evaporated milk, regular milk, eggs, and garlic salt until smooth.

Step 4: Mix the Cheeses

1. In another bowl, combine the shredded cheddar and mozzarella cheeses.

Step 5: Layer the Dish

1. Preheat your oven to 375°F (190°C). Grease a 9×13-inch baking dish with non-stick cooking spray.

2. Spread a third of the macaroni evenly across the bottom of the dish.

3. Sprinkle a third of the cheese mixture over the macaroni.

4. Repeat the layering process two more times, ending with cheese on top.

Step 6: Pour the Milk Mixture

1. Evenly pour the milk mixture over the layered macaroni and cheese.

2. Sprinkle paprika on top for added flavor and a splash of color.

Step 7: Bake

1. Place the dish in the preheated oven and bake for 25-30 minutes, or until the top is golden and bubbly.

Step 8: Serve

1. Remove the mac and cheese from the oven and let it cool for 5 minutes before serving.

2. Enjoy the cheesy, creamy goodness with your favorite sides or on its own!

Tips for Success

Use Freshly Grated Cheese: Pre-shredded cheese can contain anti-caking agents that affect meltability.

Don’t Overcook the Pasta: Slightly undercooked pasta will absorb flavors without becoming mushy.

Layer for Flavor: Proper layering ensures every bite has a balanced mix of pasta and cheese.

Serving Suggestions

Pair this mac and cheese with roasted vegetables, fried chicken, or a crisp green salad for a complete meal.

Storage

Refrigeration: Store leftovers in an airtight container in the fridge for up to 3 days.

Reheating: Warm in the oven at 350°F or in the microwave, adding a splash of milk to maintain creaminess.

This Good Old-Fashioned Mac and Cheese is a timeless crowd-pleaser that never disappoints. Whether you’re making it for a holiday dinner or a casual weekday meal, its rich, cheesy layers are guaranteed to bring smiles to the table! 🧀🍝

Italian Drunken Noodles

0

Italian Drunken Noodles bring together the robust flavors of Italian sausage, colorful bell peppers, and a white wine tomato sauce, all tossed with hearty egg noodles. This vibrant dish is a perfect marriage of bold spices and comforting pasta, making it an ideal choice for weeknight dinners or special gatherings. The wine-infused sauce elevates the flavors, creating a rich and satisfying meal that feels like a restaurant-quality indulgence right at home.

Why You’ll Love This Recipe

Burst of Flavors: The combination of Italian sausage, white wine, and herbs delivers a rich and aromatic experience.

Vibrant Colors: The tri-color bell peppers not only add sweetness but also create a visually stunning dish.

Simple yet Elegant: Easy enough for a quick meal, yet impressive for entertaining guests.

Ingredients

1 tablespoon olive oil, divided

1 lb Italian sausage

1 teaspoon salt

Freshly ground pepper, to taste

½ cup red bell pepper, sliced

½ cup yellow bell pepper, sliced

½ cup orange bell pepper, sliced

¼ cup onion, thinly sliced

2 garlic cloves, minced

1 teaspoon Italian seasoning

½ teaspoon red pepper flakes

½ cup white wine

1 (28-ounce) can diced tomatoes, undrained

2 tablespoons chopped fresh parsley

12 ounces egg noodles

Instructions

Step 1: Cook the Sausage

1. Heat ½ tablespoon olive oil in a 4-quart Dutch oven or large skillet over medium heat.

2. Add the Italian sausage, breaking it up with a wooden spoon, and cook until browned. Remove the sausage from the pot and set it aside.

Step 2: Sauté the Vegetables

1. In the same pot, heat the remaining ½ tablespoon olive oil.

2. Add the sliced onion, red, yellow, and orange bell peppers. Sauté for about 3 minutes until the vegetables are slightly softened and fragrant.

3. Stir in the minced garlic and cook for an additional minute.

Step 3: Deglaze with Wine

1. Pour in the white wine, scraping up any browned bits from the bottom of the pot to incorporate them into the sauce.

2. Let the wine simmer and reduce until almost fully evaporated.

Step 4: Prepare the Sauce

1. Add the undrained diced tomatoes to the pot, followed by the Italian seasoning, red pepper flakes, salt, and freshly ground pepper.

2. Stir to combine and let the sauce simmer gently for 10 minutes.

Step 5: Combine the Ingredients

1. Return the cooked sausage to the pot and stir in the chopped fresh parsley.

2. Cook for an additional 5 minutes to meld the flavors. Keep the sauce warm while preparing the noodles.

Step 6: Cook the Noodles

1. Cook the egg noodles in a large pot of salted boiling water according to package instructions. Drain thoroughly.

Step 7: Assemble the Dish

1. Add the cooked noodles to the pot with the sauce and toss until evenly coated.

Step 8: Serve and Enjoy

1. Divide the Italian Drunken Noodles among serving plates and garnish with additional parsley if desired.

Tips for Success

Deglaze with Care: Ensure the wine reduces fully to avoid an overly tangy sauce.

Noodle Alternatives: Swap egg noodles for fettuccine or linguine if preferred.

Make it Creamy: Stir in a splash of heavy cream at the end for a creamy variation.

Serving Suggestions

Pair this dish with a crisp green salad and a slice of crusty garlic bread for a complete meal. For a festive touch, serve with a glass of the same white wine used in the sauce.

Storage Tips

Store leftovers in an airtight container in the refrigerator for up to 3 days. Reheat gently on the stovetop or in the microwave, adding a splash of water to loosen the sauce if needed.

This Italian Drunken Noodles recipe delivers comfort and flavor in every bite. Enjoy the perfect harmony of pasta, sausage, and a rich tomato sauce infused with white wine! 🍷🍝

WHITE BEAN AND HAM HOCK SOUP

0

Hearty White Bean and Ham Soup, perfect for cold winter days! White beans, ham shanks, onions, celery, carrots, garlic, Tabasco, and herbs make this delicious ham and bean soup a cool weather classic.

When the weather turns cold, and all you want to do is stay cozy and warm, the best thing to do is to make a big pot of hearty soup. On days like these, nothing is more comforting than this ham and white bean soup. (Well, maybe some fuzzy woolen slippers, but you can’t eat those!)

The Best Ham and Bean Soup – A Family Classic

This ham and bean soup is one of my favorite recipes on the website, and one that my father has been making for the family for decades. He makes a big batch (doubles this one) and because it just gets better as the days go by, we’ll enjoy it for dinner one night and then for lunch for several days afterward.

Why is it that some stews and soups improve the next day? I think it’s because the flavors from the beans, ham, and vegetables have time to blend. The starch from the beans settles more into the broth making the soup thicker and more stew-like too.

Ingredients

  • 1 lb or 2 1/2 cups dry white beans—Cannellini or Great Northern
  • 2 quarts of water
  • 2-3 lbs of smoked ham shanks or ham hocks
  • 2 teaspoons Herbes de Provence, or Italian seasoning
  • 1 Tbsp extra virgin olive oil
  • 1 cup of diced onions (about 1 small onion)
  • 1 cup chopped celery (about 2-3 ribs)
  • 2/3 cup chopped carrots (about 1 medium carrot)
  • 2-3 cloves garlic, minced
  • Tabasco sauce
  • Salt and pepper
  • Fresh parsley

Method

1 Soak the dry beans in hot water: Fill a pot large enough to hold the beans with water and bring to a boil. Turn off the heat, add the beans and soak the beans for about 2 hours. Drain the water.

2 Make the ham broth: While the beans are soaking in step 1, put the ham shanks or ham hocks in a separate large pot and cover them with 2 quarts of water. Add the herbes de Provence or Italian seasoning. Heat on high heat until the water comes to a simmer, then lower the heat, partially cover and maintain the simmer for about an hour.

3 Sauté the onions: Heat olive oil in a small sauté pan on medium high heat. Add the chopped onions and cook until translucent, about 5 to 6 minutes. Add the minced garlic and cook a minute more.

4 Add vegetables and beans to the ham broth: Once the ham hocks or shanks have been simmering for an hour, add the drained soaked beans from step 1, the onions, garlic, and the chopped celery and carrots. Cook for another 40 minutes or so, uncovered, until the vegetables are soft and the ham meat easily pulls away from the bone. Remove the ham bones from the soup and pull off any meat and return it to the soup. Discard the bones.

5 Season to taste: Add several drops of Tabasco to taste. Add salt and pepper to taste.

Serve with a pinch of chopped fresh parsley.

Saltine Toffee Recipe

0

Saltine Toffee, also known as “Christmas Crack,” is an irresistible treat made with just a handful of pantry staples. This sweet and salty dessert combines the crunch of saltine crackers with the richness of toffee, creamy chocolate, and a sprinkle of chopped pecans for added texture. Perfect for holiday gifting, parties, or a quick indulgence, this recipe is as simple as it is delicious!

Why You’ll Love This Recipe

Quick and Easy: Ready in under 30 minutes with minimal effort.

Sweet and Salty Delight: The combination of buttery toffee and saltine crackers creates the perfect flavor contrast.

Customizable: Swap out pecans for almonds, sprinkles, or a drizzle of white chocolate for a unique twist.

Ingredients

• 4 ounces saltine crackers (about 1 sleeve)

• 1 cup butter

• 1 cup dark brown sugar

• 2 cups semisweet chocolate chips

• ¾ cup chopped pecans

Instructions

Step 1: Prepare the Baking Sheet

1. Preheat the oven to 400°F (200°C).

2. Line a rimmed baking sheet with parchment paper or aluminum foil for easy cleanup. Arrange the saltine crackers in a single layer, ensuring they cover the entire sheet.

Step 2: Make the Toffee

1. In a medium saucepan, combine the butter and dark brown sugar.

2. Heat over medium heat, stirring occasionally, until the mixture comes to a full boil.

3. Allow it to boil for 3 minutes without stirring to achieve a rich toffee consistency.

Step 3: Pour and Bake

1. Immediately pour the hot toffee mixture over the saltine crackers, spreading it evenly with a spatula to cover all the crackers.

2. Bake in the preheated oven for 5–6 minutes, or until the toffee is bubbly and golden brown.

Step 4: Add Chocolate

1. Remove the tray from the oven and immediately sprinkle the semisweet chocolate chips over the hot toffee.

2. Let the chocolate sit for about 5 minutes until softened.

Step 5: Spread and Garnish

1. Once the chocolate is soft, use a spatula to spread it evenly over the toffee layer.

2. Sprinkle the chopped pecans over the top while the chocolate is still warm.

Step 6: Cool and Break

1. Allow the toffee to cool completely at room temperature, about 25 minutes, or place it in the refrigerator to speed up the process.

2. Once fully set, break the toffee into irregular pieces by hand.

Tips for Success

Use Fresh Crackers: Ensure your saltines are fresh for the best crunch.

Even Spreading: Spread the toffee and chocolate quickly while they’re hot for a smooth layer.

Storage: Store the toffee in an airtight container at room temperature for up to a week or refrigerate for longer shelf life.

Serving Ideas

• Enjoy with a cup of coffee or hot cocoa.

• Pack in decorative tins or bags for gifting during holidays or special occasions.

Saltine Toffee is a crowd-pleasing treat that’s easy to whip up and always leaves everyone craving more. Whether you’re making it for a festive gathering or just to satisfy your sweet tooth, it’s guaranteed to disappear in no time! 🌟

Old-Fashioned Pancakes

0

Old-Fashioned Pancakes are a timeless breakfast favorite that brings nostalgia to the table with every bite. Fluffy, golden, and slightly sweet, these pancakes are perfect for weekend brunches, weekday breakfasts, or even a quick and comforting snack. With a simple blend of pantry staples, this recipe offers the classic taste and texture that has been cherished for generations.

These pancakes are as versatile as they are delicious. Serve them with your favorite toppings, from traditional maple syrup and butter to fresh berries, whipped cream, or a sprinkle of powdered sugar. Their straightforward preparation and universal appeal make them a go-to recipe for both beginners and seasoned cooks.

Why You’ll Love This Recipe

Classic Flavor: A traditional recipe that delivers perfect pancakes every time.

Quick and Easy: Whip up a batch in minutes with simple ingredients.

Customizable: Add mix-ins like chocolate chips, nuts, or fruit to personalize your pancakes.

Ingredients

• 1 ½ cups all-purpose flour

• 3 ½ teaspoons baking powder

• 1 tablespoon white sugar

• ¼ teaspoon salt (or more, to taste)

• 1 ¼ cups milk

• 3 tablespoons butter, melted

• 1 egg

Instructions

Step 1: Prepare the Dry Ingredients

1. Sift together the flour, baking powder, sugar, and salt in a large mixing bowl.

2. Create a well in the center of the dry ingredients.

Step 2: Add the Wet Ingredients

1. Pour the milk, melted butter, and egg into the well.

2. Mix gently with a whisk or spoon until the batter is smooth. Avoid overmixing to keep the pancakes fluffy.

Step 3: Heat the Griddle or Pan

1. Heat a lightly oiled griddle or non-stick pan over medium-high heat.

2. Test the heat by sprinkling a few drops of water on the surface. If they sizzle and evaporate quickly, the griddle is ready.

Step 4: Cook the Pancakes

1. Pour approximately ¼ cup of batter onto the griddle for each pancake.

2. Cook until bubbles form on the surface and the edges appear dry, about 2 to 3 minutes.

3. Flip the pancake carefully and cook for an additional 1 to 2 minutes, or until the underside is golden brown.

4. Repeat with the remaining batter, adding more oil to the pan if necessary.

Step 5: Serve and Enjoy

1. Stack the pancakes on a plate and serve them warm with your favorite toppings.

Tips

Room Temperature Ingredients: Allow the milk and egg to come to room temperature for better mixing.

Don’t Overmix: Overmixing the batter can lead to dense pancakes. Mix just until combined.

Grease Wisely: Use a paper towel to lightly coat the griddle with oil or butter for an even, non-stick surface.

Check Doneness: Look for bubbles forming and edges drying as a cue to flip the pancakes.

Storage Options

Refrigerator: Store leftover pancakes in an airtight container for up to 3 days. Reheat in the microwave or toaster.

Freezing: Place cooled pancakes in a single layer on a baking sheet to freeze. Once frozen, transfer them to a freezer-safe bag or container. Reheat directly from frozen in the toaster or microwave.

Old-Fashioned Pancakes are the perfect combination of simplicity and flavor. Whether you’re enjoying them plain or with a variety of toppings, they’re guaranteed to bring smiles to the breakfast table!

Caramel Apple Upside Down Cake

0

This Caramel Apple Upside Down Cake is the perfect dessert for fall, blending the warm flavors of cinnamon and nutmeg with buttery caramel and tender apples. With a moist and fluffy cake on top and a gooey caramel apple topping, it’s a show-stopping treat that’s surprisingly easy to make. Serve it warm with a scoop of vanilla ice cream for a truly indulgent experience.

Why You’ll Love This Recipe

Rich and Indulgent: The salted caramel sauce and sweet apples create a luscious topping.

Warm Fall Flavors: Cinnamon and nutmeg make this cake a cozy dessert for cooler months.

Impressive Presentation: The upside-down design makes this cake look as good as it tastes.

Ingredients

For the Cake:

• 1 ¾ cup (8 ¾ oz / 247g) all-purpose flour

• 2 teaspoons ground cinnamon

• 1 teaspoon baking powder

• ¼ teaspoon salt

• ¼ teaspoon nutmeg

• ½ cup (4 oz / 115g) butter, softened

• 1 cup (8 oz / 225g) granulated sugar

• ⅔ cup (4 oz / 115g) brown sugar

• 2 large eggs

• 1 teaspoon vanilla extract

For the Topping:

• A generous ½ cup (4 floz / 115ml) salted caramel sauce

• 2-3 apples, peeled, cored, and sliced about ½ inch (1.5 cm) thick

Instructions

Step 1: Preheat and Prepare the Pan

1. Preheat your oven to 350°F (180°C).

2. Butter the sides of a 9-inch (23 cm) cake pan.

Step 2: Prepare the Dry Ingredients

1. In a medium bowl, whisk together the flour, cinnamon, baking powder, salt, and nutmeg. Set aside.

Step 3: Cream the Butter and Sugars

1. In a stand mixer or with a handheld mixer, beat the butter, granulated sugar, and brown sugar on medium speed until light and fluffy, about 2-3 minutes.

Step 4: Incorporate the Wet Ingredients

1. Add the eggs one at a time, beating well after each addition.

2. Mix in the vanilla extract.

Step 5: Combine Wet and Dry Ingredients

1. Gradually add the dry ingredients to the wet mixture, mixing on low speed.

2. Scrape down the sides of the bowl as needed, and mix until just combined.

Step 6: Prepare the Topping

1. Pour the salted caramel sauce into the prepared cake pan, spreading it evenly over the bottom and up the sides.

2. Arrange the sliced apples in a single layer on top of the caramel.

Step 7: Add the Batter

1. Gently spread the cake batter evenly over the apples, being careful not to disturb the arrangement.

Step 8: Bake

1. Bake for 45-55 minutes, or until a toothpick inserted into the center comes out clean.

Step 9: Cool and Invert

1. Let the cake cool in the pan for 5 minutes. Carefully invert it onto a serving plate while it’s still warm to prevent the caramel from sticking.

Serving Suggestions

• Enjoy the cake warm with a scoop of vanilla ice cream or a dollop of whipped cream.

• Drizzle with additional salted caramel for an extra touch of decadence.

Storage Options

• Store leftovers in an airtight container in the refrigerator for up to 2 days.

• Reheat slices in the microwave for 15-20 seconds to restore the warm, gooey texture.

This Caramel Apple Upside Down Cake is a guaranteed crowd-pleaser that will fill your home with the irresistible aroma of caramelized apples and spices. It’s the ultimate dessert for family gatherings, holidays, or whenever you’re in the mood for a cozy treat! 🍎✨

Buckeye Brownie Cookies

0

These Buckeye Brownie Cookies are a delightful fusion of rich brownie flavors and creamy peanut butter goodness. With a smooth chocolate topping reminiscent of the classic Buckeye candy, these cookies are a decadent treat perfect for any occasion. Each bite is an indulgent combination of soft, chewy brownie, creamy peanut butter, and a luscious chocolate coating, making them irresistible for dessert lovers.

Why You’ll Love This Recipe

Indulgent Combination: A rich brownie base paired with creamy peanut butter and a decadent chocolate topping.

Simple Preparation: Using a brownie mix simplifies the process while still delivering gourmet results.

Perfect for Sharing: These cookies are a crowd-pleaser, ideal for parties, bake sales, or gifting.

Ingredients

• 1 box fudge brownie mix (19.5 ounces or family size)

• 2 teaspoons vanilla extract

• 1 teaspoon cornstarch

• ¼ cup butter, melted

• 4 ounces cream cheese, softened

• 1 egg

• 1 cup powdered sugar

• 1 cup creamy peanut butter

• 4 ounces semi-sweet chocolate chips

Instructions

Step 1: Preheat the Oven

1. Preheat your oven to 350°F (175°C).

Step 2: Prepare the Dough

1. In a medium bowl, combine the brownie mix, vanilla extract, cornstarch, melted butter, cream cheese, and egg using a hand mixer. The dough will be sticky but manageable.

Step 3: Scoop and Shape Cookies

1. Use a cookie scoop or tablespoon to portion the dough onto an ungreased cookie sheet.

2. Smooth the edges of each scoop to form round cookies.

Step 4: Bake the Cookies

1. Bake the cookies for 12 minutes.

Step 5: Prepare the Peanut Butter Balls

1. While the cookies are baking, mix the powdered sugar and peanut butter in a medium bowl until well combined.

2. Roll the mixture into 1-inch balls, making enough for each cookie.

Step 6: Add Peanut Butter Centers

1. As soon as the cookies come out of the oven, gently press a peanut butter ball into the center of each cookie. The warmth of the cookies will soften the peanut butter slightly.

2. Let the cookies cool for about 5 minutes, then transfer them to a wire rack to cool completely.

Step 7: Melt the Chocolate

1. In a microwavable bowl, melt the chocolate chips in 30-second intervals, stirring after each until fully melted and smooth.

Step 8: Add the Chocolate Topping

1. Spoon about ½ tablespoon of melted chocolate over each cookie, covering the peanut butter ball.

2. Allow the chocolate to set before storing or serving.

Tips for Success

Room Temperature Ingredients: Ensure the cream cheese and butter are softened for easier mixing.

Peanut Butter Consistency: Use creamy peanut butter for a smooth, professional look and texture.

Storage: Store in an airtight container at room temperature for up to 5 days or refrigerate for up to a week.

Storage Options

Room Temperature: Store in an airtight container for up to 5 days.

Refrigeration: Keep in the fridge for up to a week for a firmer texture.

These Buckeye Brownie Cookies are a rich, decadent treat that combines the best of brownies and Buckeye candy. Perfect for celebrations, gifting, or indulging yourself—be prepared for these cookies to disappear quickly! 🍪✨

Delicious Beetroot and Lemon Juice Cleans Colon Waste and Loses Weight

0

A poisoned colon can affect our quality of life and generate other pains, such as diabetes or frequent headaches. Purifying it brings benefits to the whole organism.

Many people do not know this , but it is estimated that 90% of diseases and weight problems are linked to a dirty colon.

This organ plays an important role in our health because it is responsible for expelling all the toxins and waste that our body does not need and which, in the long term, can cause serious health problems.

The juice we offer combines the benefits of beetroot, carrots and red apple to make an ideal drink for cleansing the intestine:

Ingredients :

  • 6 kale leaves
  • 3 carrots
  • 2 red apples cut into pieces
  • 1 beet
  • Half a peeled lemon
  • 2.5 cm piece of ginger

Do not forget to peel and wash the carrots, beet and lemon.

Make sure your fruits and vegetables are organic.

Instructions :

  1. Pour one to two cups of water into your blender.
  2. Add all the ingredients and mix everything.
  3. Using a strainer, filter the mixture to collect the juice.
  4. Mix again with a spoon.
  5. You can add a few ice cubes to your juice to refresh it.
  6. To store this juice, use a glass jar and put it in a refrigerator.

Warnings :

– Lemon is not recommended if you suffer from ulcer or heartburn or citrus allergy

– It is also not recommended if you are taking antacid medicines, or medicines to treat blood or heart problems.

– Beets are prohibited if you are on anticoagulant treatment or if you suffer from kidney disease.

Homemade Crunch Wrap Supremes

0

Homemade Crunch Wrap Supremes are a delightful way to recreate a fast-food favorite in the comfort of your own kitchen. With their crispy layers, seasoned beef, creamy cheese, and fresh veggies, they offer the perfect combination of flavors and textures. The crunch of the toasted corn tortilla encased in a soft flour tortilla makes every bite a satisfying experience.

Perfect for casual dinners, game nights, or even a fun DIY meal assembly with friends and family, this recipe allows you to customize fillings to suit your taste. With fresh ingredients and easy preparation, you’ll have a meal that feels indulgent yet is made entirely at home.

Why You’ll Love This Recipe

Customizable: Adjust fillings to your preference—add beans, extra veggies, or your favorite cheese.

Family-Friendly: Everyone can assemble their own crunch wrap, making it a fun activity for all ages.

Budget-Friendly: Uses simple, affordable ingredients to create a meal that tastes gourmet.

Ingredients

• 12 large “burrito size” flour tortillas

• 6 corn tortillas

• 1 lb ground beef

• 1 package taco seasoning (your choice)

• 1 jar taco cheese (nacho cheese sauce)

• 1 container sour cream

• 3-4 tomatoes, diced

• 1 bag/head iceberg lettuce, shredded

Note: Quantities for fillings are estimates. Adjust based on personal preference.

Instructions

Step 1: Prepare the Corn Tortillas

1. Preheat your oven to 400°F (200°C).

2. Spread out 6 corn tortillas on a baking sheet. Bake until crispy, about 7 minutes, checking every 2–3 minutes after the 5-minute mark to avoid burning.

3. Remove from the oven and set aside. Reduce oven temperature to “warm.”

Step 2: Shape the Flour Tortillas

1. Use one of the corn tortillas as a guide to cut 6 smaller circles out of 6 of the flour tortillas. These will be used to seal the crunch wraps. Reserve the scraps for making tortilla chips or discard.

Step 3: Cook the Beef

1. In a large skillet over medium heat, cook the ground beef until browned, breaking it into crumbles.

2. Drain any excess fat. Stir in taco seasoning and prepare according to the package instructions. Set aside.

Step 4: Assemble the Crunch Wraps

1. Lay one large flour tortilla flat. In the center, spread a layer of taco cheese.

2. Add a scoop of seasoned ground beef on top of the cheese.

3. Place a crispy corn tortilla on top of the beef.

4. Spread a layer of sour cream over the corn tortilla, then add diced tomatoes, shredded lettuce, and any additional toppings you like.

5. Top the layers with one of the smaller flour tortilla circles. Fold the edges of the large tortilla over the center, working in sections, until it forms a sealed wrap.

Step 5: Cook the Crunch Wraps

1. Heat a non-stick skillet over medium heat. Place the assembled crunch wrap seam-side down and cook for 2–3 minutes until golden and sealed.

2. Flip and cook the other side for an additional 2–3 minutes. Repeat with the remaining wraps.

Step 6: Serve and Enjoy

1. Serve the crunch wraps warm with additional taco cheese, sour cream, or salsa for dipping.

Tips for Success

Tortilla Size: Ensure the flour tortillas are large enough to fold over the fillings completely.

Extra Crispiness: Brush the outside of the crunch wraps with a little oil before cooking for extra crispiness.

Leftovers: Store leftover fillings separately and assemble fresh crunch wraps as needed.

Storage Options

Refrigeration: Store assembled but uncooked crunch wraps in the fridge for up to 2 days. Cook just before serving.

Freezing: Wrap individually in foil and freeze for up to 1 month. Reheat in a skillet or oven.

Homemade Crunch Wrap Supremes are a crowd-pleaser that’s as fun to make as it is to eat. Whether you stick to the classic recipe or add your own twist, these wraps are sure to become a household favorite! 🌮✨

Classic Beef Stroganoff

0

This Classic Beef Stroganoff is a creamy and savory dish that brings together tender slices of beef, earthy mushrooms, and a rich sour cream sauce. Served over egg noodles, it’s the perfect comfort meal with flavors that are satisfying and well-balanced. The Worcestershire sauce and Dijon mustard add a subtle depth, while the sour cream provides a touch of tanginess that enhances the beef and mushroom flavors.

This dish is ideal for weeknight dinners but delicious enough to serve to guests. With fresh parsley as a garnish, this stroganoff is both delicious and visually appealing.

Why You’ll Love This Recipe:

Comforting and Hearty: The creamy sauce and tender beef make it a warm, satisfying meal.

Easy Preparation: Straightforward ingredients and steps for a no-fuss meal.

Classic Flavors: A traditional stroganoff with flavors that everyone loves.

Ingredients:

• 12 ounces egg noodles

• 2 tablespoons unsalted butter

• 1 ½ lbs thinly sliced beef steak (petite shoulder recommended)

• 1 medium onion, chopped

• 12 ounces cremini mushrooms

• 3 cloves garlic, minced

• 3 tablespoons all-purpose flour

• 2 cups low-sodium beef broth

• 1 tablespoon Worcestershire sauce

• 1 tablespoon Dijon mustard

• 2/3 cup sour cream

• Kosher salt and freshly ground black pepper, to taste

• Chopped fresh parsley, for garnish

Instructions:

Step 1: Cook the Egg Noodles

• Bring a large pot of salted water to a boil, then add the egg noodles and cook according to package instructions. Drain well and set aside.

Step 2: Brown the Beef

• In a Dutch oven or large skillet, melt 1 tablespoon of butter over medium-high heat. Add the beef in batches, browning on both sides. Avoid overcrowding to ensure even browning. Remove the beef from the skillet and set aside, covering it to keep warm.

Step 3: Sauté Onions and Mushrooms

• Add the remaining tablespoon of butter to the pan. Once melted, add the chopped onion and mushrooms, cooking for 4-5 minutes over medium-high heat until the onions are soft and the mushrooms are browned.

Step 4: Add Garlic and Flour

• Reduce the heat to low, add the minced garlic, and cook for about 1 minute. Sprinkle the flour over the mixture and cook, stirring constantly, for 2 minutes to remove the raw flour taste.

Step 5: Make the Sauce

• Slowly stir in the beef broth, Worcestershire sauce, and Dijon mustard. Simmer the mixture for about 10 minutes, or until it thickens to a sauce-like consistency.

Step 6: Finish with Sour Cream

• Remove the skillet from the heat, then stir in the sour cream. Season the sauce with salt and freshly ground black pepper to taste.

Step 7: Combine and Serve

• Add the cooked egg noodles and browned beef back to the skillet, stirring gently to coat everything in the sauce. Warm over low heat for 1-2 minutes to combine the flavors.

• Garnish with chopped fresh parsley and serve immediately.

Storage Options:

Refrigerator: Store leftovers in an airtight container for up to 3 days. Reheat on the stovetop over low heat.

Freezer: Beef Stroganoff can be frozen, but the texture of the sour cream may change. To freeze, cool completely and store in a freezer-safe container for up to 2 months. Thaw in the fridge overnight and reheat gently.

Tips:

Tender Meat: Petite shoulder or sirloin are great choices for tender meat slices in this recipe.

Keep the Sauce Creamy: Avoid boiling the sauce after adding sour cream to maintain a smooth texture.

Add Extra Depth: A splash of red wine can be added to the sauce for extra flavor if desired.

This Classic Beef Stroganoff is a delicious, comforting meal that’s full of rich flavors and creamy goodness. It’s sure to be a favorite!