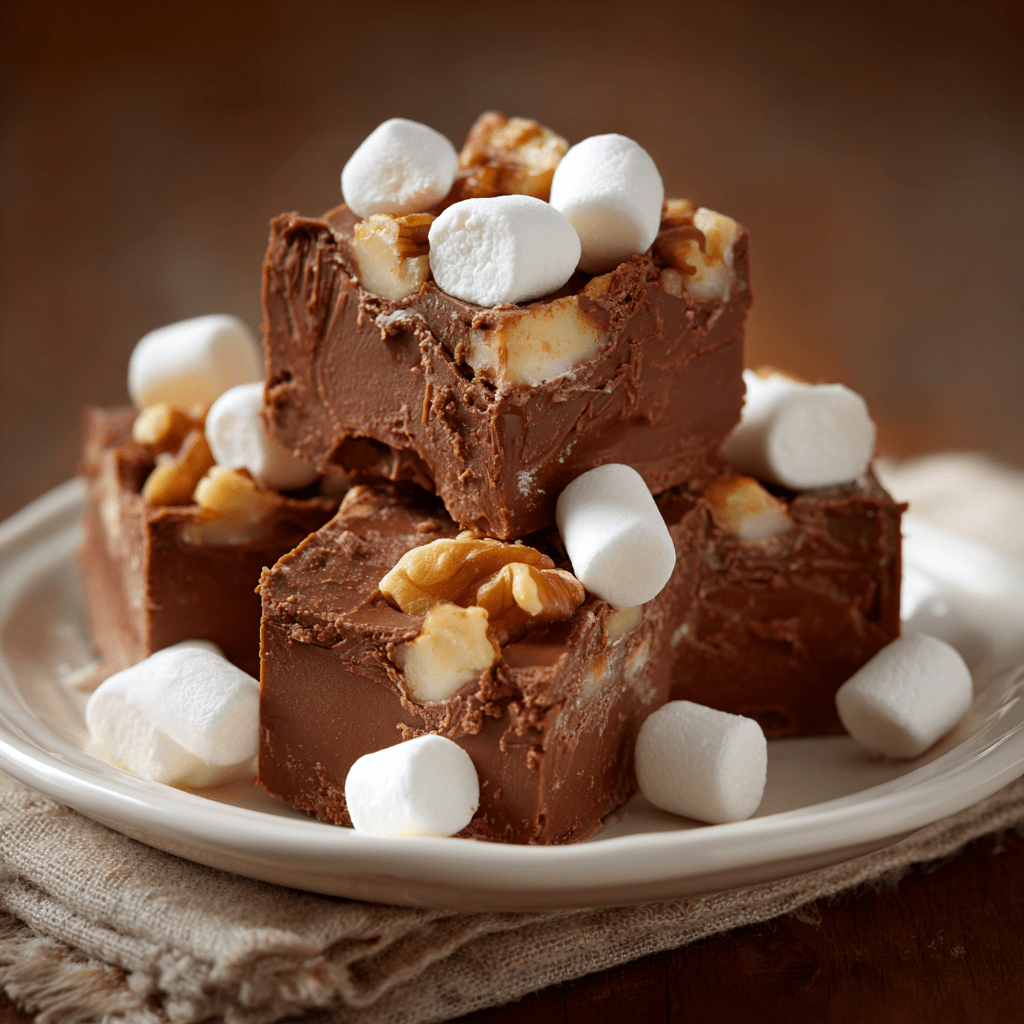
Brown Sugar and Bacon Baked Beans

0

Brown Sugar and Bacon Baked Beans are the ultimate side dish, combining smoky, sweet, and tangy flavors in a rich, hearty casserole. This recipe elevates a classic favorite by layering tender pork and beans with caramelized onions, bell peppers, and a luscious sauce made from brown sugar, molasses, and cider vinegar. The crispy bacon topping adds a smoky, savory crunch, making this dish a perfect accompaniment to barbecues, potlucks, or family gatherings.

The slow baking process allows the flavors to meld together, creating a thick, almost caramelized consistency that’s both satisfying and indulgent. Whether you’re pairing these beans with grilled meats or serving them as a standalone dish, their bold, balanced taste is sure to make them a standout hit.

Why You’ll Love This Recipe

Perfect Balance of Flavors: Smoky bacon, sweet molasses, and tangy vinegar create an irresistible combination.

Crowd-Pleaser: A guaranteed favorite for gatherings and potlucks.

Easy to Customize: Adjust the sweetness or spice level to suit your taste.

Ingredients

• 10 slices bacon, diced

• 1 yellow onion, finely diced

• ½ green bell pepper, finely diced

• 54 oz can pork and beans (or 4 cans, 15.5 oz each)

• 4 tablespoons ketchup

• ¼ cup molasses

• ⅔ cup brown sugar

• ¼ cup cider vinegar

• 2 teaspoons dry mustard

Instructions

Step 1: Prepare the Bacon

1. Cook the bacon about halfway through, using your preferred method (pan-frying or baking).

2. Drain the bacon on paper towels and allow it to cool. Roughly chop into bite-sized pieces.

Step 2: Preheat the Oven

1. Preheat your oven to 325°F (163°C).

2. Adjust the oven rack to the lower-middle position.

Step 3: Sauté the Vegetables

1. In a deep skillet, heat about 2 tablespoons of bacon grease (or butter) over medium heat.

2. Add the diced onion and green bell pepper. Sauté for about 5 minutes, or until softened and fragrant.

Step 4: Mix the Sauce

1. Add the ketchup, molasses, brown sugar, cider vinegar, and dry mustard to the skillet.

2. Stir well to combine all ingredients, then let the mixture simmer for about 1-2 minutes.

Step 5: Assemble the Dish

1. Grease a 13×9-inch baking dish or a 3-quart casserole dish.

2. Pour the pork and beans into the prepared dish.

3. Stir in the sautéed vegetable and sauce mixture until well combined.

4. Lay the cooked bacon pieces evenly on top of the beans.

Step 6: Bake the Beans

1. Place the dish in the preheated oven and bake for 2-3 hours.

2. Check the beans occasionally to ensure they reach your desired consistency (longer baking yields thicker beans).

Step 7: Cool and Serve

1. Allow the beans to stand for about 5 minutes before serving.

2. Serve warm and enjoy the rich, smoky-sweet flavors.

Tips

Bacon Alternatives: Use turkey bacon or omit it for a vegetarian version (replace bacon grease with butter or olive oil).

Sweetness Level: Adjust the brown sugar and molasses for a sweeter or less sweet sauce.

Spice It Up: Add a pinch of cayenne or smoked paprika for a hint of heat.

Storage Options

Refrigeration: Store leftovers in an airtight container in the fridge for up to 4 days. Reheat in the oven or microwave before serving.

Freezing: Allow the beans to cool completely, then transfer to a freezer-safe container. Freeze for up to 3 months and thaw in the refrigerator before reheating.

Brown Sugar and Bacon Baked Beans are a timeless dish that pairs beautifully with everything from grilled ribs to cornbread. Their deep, smoky sweetness and rich texture make them the perfect addition to any feast.

Pizza Casserole

0

Pizza Casserole is the ultimate comfort food for pizza lovers, offering all the flavors of your favorite pizza in a hearty, layered dish. With gooey mozzarella cheese, savory pepperoni, flavorful meat sauce, and perfectly cooked pasta, this casserole brings everyone to the table for seconds. It’s the perfect combination of a pizza night and a baked pasta dish, making it an excellent choice for busy weeknights or casual family gatherings.

This dish stands out for its simplicity and versatility. The rich, tomato-based sauce infused with Italian herbs coats every piece of pasta, while layers of melted cheese and pepperoni deliver bursts of pizza goodness. Whether you’re making it for a crowd or meal prepping for the week, Pizza Casserole is a satisfying and crowd-pleasing option that’s easy to customize with your favorite pizza toppings.

Why You’ll Love This Recipe

All-in-One Meal: Combines the best elements of pizza and pasta in one delicious dish.

Family Favorite: The layers of cheesy goodness and pepperoni make it a hit with kids and adults alike.

Easy to Make Ahead: Perfect for meal prep or assembling ahead of time for a stress-free dinner.

Ingredients

• 1 pound ground beef or Italian sausage

• 6 ounces pepperoni

• 3 cups mozzarella cheese

• 28 ounces crushed tomatoes (or two 15-ounce cans)

• 1 teaspoon garlic salt

• 1 tablespoon Italian seasoning

• 16 ounces penne pasta

• ¼ cup Parmesan cheese

Instructions

Step 1: Prepare the Meat

1. In a large skillet over medium heat, cook the ground beef or Italian sausage until browned.

2. Drain any excess grease and set aside.

Step 2: Make the Sauce

1. Add the crushed tomatoes, garlic salt, and Italian seasoning to the skillet with the cooked meat.

2. Stir to combine and let the mixture simmer for 5-7 minutes, allowing the flavors to meld together.

Step 3: Cook the Pasta

1. While the sauce simmers, cook the penne pasta in a large pot of salted boiling water until al dente.

2. Drain the pasta and set it aside.

Step 4: Layer the Casserole

1. Preheat your oven to 350°F (175°C).

2. In a 9×13-inch baking dish, start with a layer of half the cooked pasta.

3. Spread half of the meat sauce over the pasta, then sprinkle with half of the mozzarella cheese.

4. Arrange half of the pepperoni slices over the cheese.

5. Repeat the layering process with the remaining pasta, meat sauce, mozzarella cheese, and pepperoni.

Step 5: Add Parmesan and Bake

1. Sprinkle the top layer with the Parmesan cheese.

2. Cover the dish tightly with aluminum foil and bake for 30 minutes.

Step 6: Finish Baking

1. Remove the foil and bake for an additional 15 minutes, or until the cheese is golden brown and bubbly.

Step 7: Cool and Serve

1. Allow the casserole to cool for 5 minutes before slicing and serving.

Tips

Customize Your Toppings: Add vegetables like mushrooms, bell peppers, or black olives to the layers for extra flavor.

Cheese Options: Try mixing in other cheeses like cheddar or provolone for a unique twist.

Cook Pasta to Al Dente: The pasta will continue cooking in the oven, so don’t overcook it beforehand.

Storage Options

Refrigeration: Store leftovers in an airtight container in the refrigerator for up to 3 days. Reheat individual portions in the microwave or oven.

Freezing: Assemble the casserole without baking, cover it tightly with foil, and freeze for up to 2 months. Bake directly from frozen, adding an extra 20-30 minutes to the baking time.

Pizza Casserole is a cozy and indulgent dish that combines the flavors you love in a new, family-friendly format. Whether it’s for a weekday dinner or a potluck, this recipe is guaranteed to please!

Peanut Butter Chocolate Cookies

0

Peanut Butter Chocolate Cookies are a heavenly combination of two beloved flavors: rich chocolate and creamy peanut butter. These soft and chewy cookies bring together the nuttiness of peanut butter with the deep, decadent taste of cocoa. Perfect for any occasion, they’re a crowd-pleaser that’s easy to whip up in no time. Whether enjoyed warm out of the oven or cooled with a glass of milk, these cookies are sure to satisfy your sweet tooth.

What makes these cookies truly special is their delightful texture and balance of flavors. The peanut butter adds a creamy richness, while the cocoa imparts a deep chocolatey note. These cookies are great for bake sales, gifting, or simply treating yourself after a long day. Plus, they’re versatile enough to pair with your favorite add-ins, like chocolate chips or chopped nuts.

Why You’ll Love This Recipe

Perfect Flavor Combo: The classic pairing of chocolate and peanut butter in every bite.

Soft and Chewy Texture: These cookies are tender on the inside with just a hint of crispness on the edges.

Quick and Easy: Simple ingredients and straightforward steps make them a breeze to prepare.

Ingredients

For the Cookies:

• ½ cup shortening (regular or butter flavor)

• ¾ cup creamy peanut butter

• 1 ½ cups brown sugar, packed

• 3 tablespoons milk

• 1 teaspoon vanilla extract

• 1 large egg

• 1 ¼ cups all-purpose flour

• ½ cup unsweetened cocoa powder

• 1 teaspoon baking soda

• ½ teaspoon salt

Instructions

Step 1: Preheat the Oven

1. Preheat your oven to 375°F (190°C).

2. Prepare a cookie sheet by leaving it ungreased or using parchment paper.

Step 2: Mix the Wet Ingredients

1. In a large mixing bowl, combine the shortening, peanut butter, brown sugar, milk, and vanilla extract.

2. Use an electric mixer to beat the ingredients until smooth and creamy.

3. Add the egg and mix just until incorporated.

Step 3: Combine the Dry Ingredients

1. In a separate bowl, whisk together the flour, cocoa powder, baking soda, and salt.

2. Gradually add the dry mixture to the wet mixture, stirring until the dough comes together.

Step 4: Shape the Dough

1. Scoop the dough to form 1 to 1 ½ inch balls and place them onto the prepared cookie sheet.

2. Using a fork, press each ball down to create the traditional crisscross pattern.

Step 5: Bake the Cookies

1. Bake the cookies in the preheated oven for 7-8 minutes, or until the edges are set. Avoid overbaking to maintain a soft texture.

2. Remove the cookies from the oven and let them cool on the cookie sheet for 2 minutes.

Step 6: Cool Completely

1. Transfer the cookies to a wire cooling rack and allow them to cool completely before serving.

Tips

Creamy or Crunchy Peanut Butter: For extra texture, use crunchy peanut butter instead of creamy.

Add-ins: Mix in chocolate chips, chopped peanuts, or Reese’s Pieces for an added treat.

Chill the Dough: If the dough feels too soft, refrigerate it for 15 minutes before shaping.

Storage Options

Room Temperature: Store cookies in an airtight container for up to 5 days.

Freezing: Freeze baked cookies in a freezer-safe container for up to 3 months. To enjoy, thaw at room temperature or warm slightly in the microwave.

Dough Storage: Shape the dough into balls and freeze them raw. Bake directly from frozen, adding 1-2 minutes to the baking time.

Peanut Butter Chocolate Cookies are a timeless treat that blend comfort and indulgence in every bite. Share them with loved ones or keep a stash for yourself—they’re impossible to resist!

Homestyle Apple Pie Bread

0

Homestyle Apple Pie Bread is the epitome of comfort baked into a loaf. This sweet, spiced bread combines the flavors of apple pie with the convenience of quick bread. Every slice bursts with cinnamon warmth, soft apple pieces, and a tender, moist crumb. Perfect for breakfast, a snack, or dessert, this bread brings the essence of fall to your kitchen all year round.

What makes this bread truly special is its simplicity. By combining the ease of a cake mix with the nostalgic flavors of homemade apple pie, it’s a foolproof recipe anyone can master. The cinnamon-sugar topping adds a delightful crunch, contrasting beautifully with the soft interior. Serve it warm with a dollop of whipped cream, or enjoy it cold with a cup of coffee—the possibilities are endless!

Why You’ll Love This Recipe

Effortless Preparation: With a mix of pantry staples and ready-made pie filling, this recipe comes together quickly.

Classic Apple Pie Flavors: The cinnamon and apple combination delivers a cozy, nostalgic taste.

Versatile Treat: Serve it warm or cold, as breakfast, dessert, or a sweet snack.

Ingredients

For the Bread:

• 1 box (15 oz) yellow cake mix

• 1 can (21 oz) apple pie filling (or homemade)

• 4 large eggs

• 1 cup self-rising flour

• 1 tablespoon cinnamon

For the Cinnamon-Sugar Topping:

• ¼ cup sugar

• 2 tablespoons cinnamon

Instructions

Step 1: Preheat the Oven

1. Preheat your oven to 325°F (163°C).

2. Spray two 9×5 inch loaf pans with non-stick spray or line them with parchment paper for easy removal.

Step 2: Prepare the Batter

1. In a large mixing bowl, use a fork to gently mash the apple pie filling into smaller pieces.

2. Add the yellow cake mix, eggs, self-rising flour, and cinnamon to the mashed apples.

3. Using a handheld mixer, blend the ingredients until the batter is smooth and well combined.

Step 3: Fill the Loaf Pans

1. Evenly divide the batter between the two prepared loaf pans.

2. Smooth the tops with a spatula to ensure even baking.

Step 4: Add the Cinnamon-Sugar Topping

1. In a small bowl, mix the sugar and cinnamon for the topping.

2. Generously sprinkle the mixture over the batter in each loaf pan.

Step 5: Bake to Perfection

1. Place the pans in the preheated oven and bake for approximately 45 minutes.

2. Test for doneness by inserting a toothpick into the center; if it comes out clean, the bread is ready.

Step 6: Cool and Serve

1. Allow the bread to cool in the pans for about 10 minutes before transferring it to a wire rack to cool completely.

2. Slice and serve warm or at room temperature.

Tips

Mash with Care: Mashing the apple pie filling ensures a consistent texture while leaving small chunks of apple for added flavor.

Customize the Spice: For extra warmth, consider adding nutmeg or cloves to the batter.

Perfect Topping: If you love extra crunch, double the cinnamon-sugar topping and apply it generously.

Storage Options

Room Temperature: Store in an airtight container for up to 3 days.

Refrigeration: Extend the freshness by storing the bread in the fridge for up to a week. Warm slices in the microwave for a few seconds before serving.

Freezing: Wrap the cooled loaves tightly in plastic wrap and aluminum foil. Freeze for up to 3 months. Thaw at room temperature or heat slices directly in the oven.

Homestyle Apple Pie Bread is a delightful addition to any table, whether you’re celebrating the holidays or simply craving a slice of homemade goodness. It’s the perfect way to enjoy apple pie flavors with minimal effort.

Turkey and Stuffing Balls

0

Turkey and Stuffing Balls are a delightful way to transform your holiday leftovers into a new, mouthwatering dish. These bite-sized morsels combine tender turkey, flavorful stuffing, and creamy mashed potatoes into golden, crispy bites that are perfect for sharing. Whether served as an appetizer or a side dish, they bring comfort and festivity to any meal. With just a few simple ingredients, they’re as easy to make as they are satisfying to eat.

This recipe offers the perfect balance of textures and flavors. The softness of mashed potatoes and turkey pairs wonderfully with the crispy, golden crust. They’re an excellent addition to any holiday menu or an inventive way to reinvent leftovers. Serve them alongside classic accompaniments like gravy or cranberry sauce for a nostalgic, yet fresh twist on traditional holiday flavors.

Why You’ll Love This Recipe

Quick and Easy: Simple ingredients and straightforward steps make this recipe a breeze to prepare.

Great for Leftovers: A creative and delicious way to use up holiday turkey, mashed potatoes, and stuffing.

Versatile Serving Options: Perfect as a snack, appetizer, or side dish, and pairs well with your favorite sauces.

Ingredients

For the Balls:

• 2 cups mashed potatoes

• 2 cups stuffing

• 1 cup shredded turkey

• ½ cup grated Parmesan cheese

• 1 egg, beaten

• ¼ cup bread crumbs

• ¼ teaspoon salt

• ⅛ teaspoon black pepper

Instructions

Step 1: Preheat the Oven

1. Preheat your oven to 375°F (190°C).

2. Line a baking sheet with parchment paper for easy cleanup.

Step 2: Combine Ingredients

1. In a large mixing bowl, combine mashed potatoes, stuffing, shredded turkey, Parmesan cheese, beaten egg, bread crumbs, salt, and black pepper.

2. Mix thoroughly until all ingredients are well incorporated.

Step 3: Shape the Balls

1. Scoop about 1 tablespoon of the mixture and roll it into a 1-inch ball between your palms.

2. Place each ball on the prepared baking sheet, ensuring they are evenly spaced for even cooking.

Step 4: Bake to Perfection

1. Place the baking sheet in the preheated oven and bake for 15-20 minutes.

2. Check for a golden-brown exterior and remove from the oven when done.

Step 5: Serve and Enjoy

1. Transfer the balls to a serving platter and pair them with gravy or cranberry sauce.

2. Serve warm and enjoy the comforting flavors of turkey and stuffing in every bite.

Tips

Ensure Even Size: Use a cookie scoop for consistent ball sizes, ensuring even baking.

Add Herbs: For extra flavor, consider adding a pinch of dried sage, thyme, or parsley to the mixture.

Customize the Cheese: Swap Parmesan for sharp cheddar or Gruyère for a different flavor profile.

Storage Options

Refrigeration: Store leftovers in an airtight container in the refrigerator for up to 3 days. Reheat in the oven at 350°F (175°C) for 5-10 minutes.

Freezing: Place uncooked balls on a tray and freeze until solid, then transfer to a freezer-safe container or bag. Bake directly from frozen, adding an extra 5 minutes to the cooking time.

Turkey and Stuffing Balls are a delicious nod to the flavors of the holiday season. Serve them hot, and watch as they disappear from the plate in no time!

Bacon Cheeseburger Roll

0

The Bacon Cheeseburger Roll combines all the best elements of a classic cheeseburger into a portable and delicious loaf. Stuffed with seasoned ground beef, melty American cheese, crispy bacon, and tangy condiments, it’s wrapped in golden French bread dough for a satisfying crunch in every bite. Perfect as a party appetizer, weeknight dinner, or game-day snack, this roll is both versatile and irresistible.

Why You’ll Love This Recipe

Quick and Convenient: Uses store-bought French bread dough for easy preparation.

Packed with Flavor: Classic bacon cheeseburger fillings in every slice.

Crowd-Pleasing: Perfect for sharing at gatherings or family meals.

Ingredients

For the Roll:

• 1 pound ground beef

• ½ cup diced onion

• ¼ teaspoon salt

• ¼ teaspoon pepper

• 11-ounce tube refrigerated French bread dough

• ⅓ cup ketchup

• 3 tablespoons mustard

• 6 slices cooked and crumbled bacon (or store-bought bacon pieces)

• 2 dill pickle spears, chopped

• 8 slices American cheese

For the Topping:

• 1 large egg, beaten

• 1 tablespoon sesame seeds

For Serving:

• Thousand Island dressing for dipping

Instructions

Step 1: Preheat and Prepare

1. Preheat your oven to 350°F (175°C).

2. Line a baking sheet with parchment paper or spray it lightly with non-stick cooking spray.

Step 2: Cook the Ground Beef

1. Heat a skillet over medium heat. Add the ground beef and diced onion, cooking until the beef is browned.

2. Season with salt and pepper. Drain any excess grease and set aside.

Step 3: Roll Out the Dough

1. On a lightly floured surface, roll the refrigerated French bread dough into a large rectangle, about 12×18 inches.

Step 4: Add Condiments

1. Spread the ketchup and mustard evenly over the surface of the dough, leaving a ½-inch border around the edges.

Step 5: Layer the Fillings

1. Distribute the cooked ground beef evenly over the condiments.

2. Sprinkle the crumbled bacon and chopped pickles on top.

3. Place the American cheese slices in a single layer over the fillings.

Step 6: Roll and Seal

1. Starting at one long edge, carefully roll the dough tightly into a log.

2. Pinch the edges to seal, and place the roll seam-side down on the prepared baking sheet.

Step 7: Brush and Bake

1. Brush the top of the roll with the beaten egg and sprinkle sesame seeds evenly over the surface.

2. Bake for 20–25 minutes, or until the dough is golden brown.

Step 8: Cool and Serve

1. Allow the roll to cool for at least 5 minutes before slicing into pieces.

2. Serve warm with Thousand Island dressing on the side for dipping.

Tips

Custom Fillings: Swap out American cheese for cheddar or pepper jack, or add sautéed mushrooms for extra flavor.

Even Distribution: Spread the fillings evenly to ensure consistent slices.

Storage: Store leftovers in an airtight container in the fridge for up to 3 days. Reheat in the oven for the best texture.

Variations

Spicy Version: Add sliced jalapeños or a drizzle of hot sauce for a kick.

BBQ Style: Replace ketchup and mustard with BBQ sauce for a smoky twist.

This Bacon Cheeseburger Roll is a fun, delicious way to enjoy all the flavors of a cheeseburger in a unique presentation. Whether it’s a casual dinner or a party centerpiece, it’s sure to be a hit!

Italian Pastina Vegetable Soup

0

Italian Pastina Vegetable Soup is a warm, comforting dish that’s perfect for chilly days or when you’re in need of a wholesome, nourishing meal. This classic Italian recipe combines tender pastina pasta with a rich, blended vegetable broth, creating a velvety, flavorful soup. It’s simple, nutritious, and easy to make, with options to customize based on your taste preferences.

Why You’ll Love This Recipe

Wholesome Comfort: Packed with vegetables and tiny, tender pastina pasta, this soup is both hearty and light.

Quick and Easy: Simple ingredients and straightforward steps make it perfect for weeknights.

Customizable: Easily adaptable to include your favorite vegetables or protein.

Ingredients

• 1 cup pastina pasta (stelline shape recommended)

• 1 brown onion

• 2 carrots

• 2 celery sticks

• 4 garlic cloves

• 1 bay leaf (optional)

• 6 cups vegetable broth (or chicken broth for added depth)

• Salt and black pepper to taste

Optional Garnishes: Chopped parsley, grated parmesan cheese, and a drizzle of olive oil

Instructions

Step 1: Prepare the Vegetables

1. Roughly chop the onion, carrots, celery, and garlic cloves. Precision isn’t necessary since they’ll be blended later.

Step 2: Cook the Vegetables

1. In a large pot, pour in the vegetable broth and add the chopped vegetables along with the bay leaf.

2. Season generously with salt and black pepper. Cover the pot with a lid and simmer over medium-high heat for about 20 minutes, or until the vegetables are soft and tender.

Step 3: Blend the Vegetables

1. Remove the bay leaf and strain the cooked vegetables using a slotted spoon or colander. Reserve the broth in the pot.

2. Place the vegetables into a blender with ½ cup of water and blend until smooth.

Step 4: Combine the Soup

1. Return the blended vegetables to the pot with the reserved broth. Stir well to combine and taste for seasoning, adjusting if necessary.

Step 5: Cook the Pastina

1. Bring the soup back to a boil.

2. Add the pastina pasta, stirring frequently to prevent it from sticking to the bottom. Cook according to the package instructions (usually about 5–6 minutes) until the pastina is tender.

Step 6: Serve and Garnish

1. Ladle the soup into bowls and garnish with chopped parsley, a sprinkle of grated parmesan cheese, and a drizzle of olive oil if desired.

Tips

Make it Creamier: Add a splash of cream or a dollop of mascarpone for a richer texture.

Boost Protein: Stir in cooked shredded chicken or chickpeas for added protein.

Storage: This soup reheats well—just add a splash of water or broth when reheating to loosen the texture.

Storage Options

Refrigeration: Store in an airtight container for up to 3 days.

Freezing: Freeze the soup (without the pasta) for up to 3 months. When reheating, cook fresh pastina and add it to the thawed soup.

This Italian Pastina Vegetable Soup is a heartwarming classic that will quickly become a staple in your kitchen. With its simple preparation and delicious results, it’s the perfect recipe to bring comfort to your table!

Homemade English Muffins

0

Homemade English muffins are a delightful treat, perfect for breakfast, brunch, or as a snack. These soft, chewy muffins have a golden crust and a signature cornmeal-dusted surface, making them a versatile option for everything from a simple spread of butter to hearty breakfast sandwiches.

Creating English muffins at home is surprisingly easy and requires only a handful of pantry staples. The satisfaction of enjoying these fresh-from-the-pan delights makes the process worthwhile.

Why You’ll Love This Recipe

Fresh and Delicious: Enjoy soft, homemade muffins without preservatives.

Versatile: Perfect for sweet or savory toppings.

Easy Process: Simple ingredients and steps for foolproof results.

Ingredients

• 1 ¼ cup warm water (should feel warm on your wrist)

• 1 tbsp sugar (12.5 grams)

• 1 tsp instant dry yeast (2.83 grams)

• 2 tbsp oil (canola, vegetable, or melted butter)

• 2 ¾ cups all-purpose or bread flour (plus up to ¼ cup extra if needed)

• 1 tsp salt (add an extra pinch if using kosher salt)

• Cornmeal for dusting (about 2–3 tbsp)

Instructions

Step 1: Prepare the Yeast Mixture

1. In a mixing bowl, combine warm water and sugar.

2. Sprinkle the yeast on top and let it sit for about 10 minutes, or until foamy.

Step 2: Make the Dough

1. Stir the oil and salt into the yeast mixture.

2. Gradually add the flour, stirring until combined.

3. Turn the dough onto a floured surface and knead until smooth, adding small amounts of flour if the dough is sticky.

Step 3: Let the Dough Rise

1. Place the dough in a clean, lightly oiled bowl. Cover it with a damp cloth or plastic wrap.

2. Let it rise in a warm spot until it doubles in size, about 1 hour.

Step 4: Shape the Muffins

1. Once risen, gently punch down the dough and knead it briefly.

2. Divide the dough into 10 equal pieces. Roll each piece into a disc and flatten slightly.

3. Sprinkle cornmeal on a baking sheet and place the discs on top. Dust the tops with more cornmeal.

4. Cover and let them puff up for 20 minutes.

Step 5: Cook the Muffins

1. Heat a skillet or griddle over medium-low heat and lightly oil it.

2. Place the muffins on the skillet in batches. Cover with a lid and cook for 9 minutes on one side.

3. Flip and cook for another 5 minutes, or until golden brown.

Step 6: Cool and Serve

1. Transfer the cooked muffins to a wire rack to cool for 10–15 minutes before slicing.

2. Serve warm with butter, jam, or your favorite toppings.

Tips

Warm Water Temperature: The water should be warm but not hot to ensure the yeast activates properly.

Uniform Size: Use a kitchen scale to divide the dough evenly for consistent muffins.

Cooking Temperature: Keep the skillet at medium-low to prevent the muffins from burning before cooking through.

Storage Options

Refrigeration: Store in an airtight container for up to 5 days. Reheat in a toaster before serving.

Freezing: Freeze cooled muffins in a zip-top bag for up to 2 months. Thaw and toast when ready to eat.

Homemade English muffins are a versatile and satisfying addition to your baking repertoire. Whether you enjoy them plain, toasted, or as a base for eggs Benedict, these muffins will quickly become a household favorite!

No-Bake Coconut Cream Balls

0

No-Bake Coconut Cream Balls are a delightful treat perfect for any occasion. With their creamy coconut center wrapped in a crisp chocolate shell, these bite-sized desserts are not only delicious but also incredibly easy to make. The combination of smooth cream cheese, sweet coconut, and rich chocolate makes them a hit for holidays, parties, or just an indulgent snack.

This no-bake recipe requires minimal effort and delivers maximum flavor. It’s a fantastic choice when you need a quick, crowd-pleasing dessert that’s both elegant and satisfying.

Why You’ll Love This Recipe

No Baking Required: Easy to prepare, making it ideal for busy schedules.

Rich and Decadent: The creamy coconut filling is perfectly balanced by the chocolate coating.

Customizable: Add sprinkles, crushed nuts, or drizzle with white chocolate for a festive touch.

Ingredients

For the Coconut Cream Balls:

• 8 oz cream cheese, softened

• 1 tbsp butter, softened

• 4 cups powdered sugar

• 1 cup shredded coconut

For the Chocolate Coating:

• 1 (12 oz) bag melting chocolate chips

Instructions

Step 1: Prepare Your Workspace

1. Line a baking sheet with parchment paper to place the shaped coconut cream balls.

Step 2: Make the Coconut Cream Mixture

1. In a medium bowl, beat the softened cream cheese and butter with a hand mixer until smooth and well combined.

2. Gradually add the powdered sugar, mixing thoroughly after each addition until the mixture is thick and slightly sticky.

3. Stir in the shredded coconut until evenly distributed.

4. Refrigerate the mixture for about 1 hour to make it easier to handle.

Step 3: Shape the Coconut Cream Balls

1. Dust your hands with powdered sugar to prevent sticking.

2. Scoop small amounts of the coconut mixture and roll them into egg shapes or small balls between your palms.

3. Place the shaped balls on the parchment-lined baking sheet.

4. Freeze the balls for about 1 hour to firm them up for dipping.

Step 4: Prepare the Chocolate Coating

1. Melt the chocolate chips according to the package instructions:

• In a microwave-safe bowl, heat in 30-second intervals, stirring after each interval until smooth.

• Alternatively, use a double boiler on the stove.

Step 5: Dip the Coconut Balls in Chocolate

1. Remove the coconut balls from the freezer.

2. Using a fork, dip each ball into the melted chocolate, ensuring it’s fully coated.

3. Gently lift the ball with the fork, allowing excess chocolate to drip off, then transfer it back onto the parchment paper.

4. Repeat for all the coconut balls.

Step 6: Set the Chocolate

1. Place the baking sheet with the coated balls in the refrigerator for 5–10 minutes to allow the chocolate to harden and set.

Step 7: Serve and Store

1. Once the chocolate has set, serve the No-Bake Coconut Cream Balls on a festive platter or store them in an airtight container in the refrigerator.

2. They can be enjoyed chilled or at room temperature, depending on your preference.

Tips

Customize the Coating: Sprinkle with crushed nuts, coconut flakes, or festive sprinkles while the chocolate is still wet.

Alternative Flavors: Add a splash of vanilla or almond extract to the coconut mixture for extra flavor.

Storage: Keep in the fridge for up to 5 days or freeze for up to a month. Thaw at room temperature before serving.

No-Bake Coconut Cream Balls are an indulgent yet simple treat that’s perfect for any sweet tooth. Their creamy coconut interior and crisp chocolate shell make them a delightful addition to any dessert spread. Enjoy creating and sharing these bite-sized delights!

Turtle Buckeye Brownies

0

Turtle Buckeye Brownies combine the indulgent layers of gooey caramel, crunchy pecans, creamy peanut butter, and rich chocolate for a dessert that’s absolutely irresistible. Starting with a classic brownie base, these decadent bars elevate the traditional treat into a multi-layered masterpiece. Perfect for special occasions, potlucks, or whenever you crave a rich dessert, these brownies will leave everyone asking for the recipe.

Why You’ll Love This Recipe

Decadent Layers: A combination of brownie, caramel, peanut butter, and chocolate.

Texture Heaven: Chewy, creamy, and crunchy layers in every bite.

Customizable: Easily adaptable with gluten-free brownies or alternative nuts.

Ingredients

For the Brownies:

• 1 9×13-inch brownie recipe (homemade, boxed mix, or gluten-free)

For the Turtle Topping:

• 11 ounces bag of caramels, unwrapped

• 2 tablespoons milk

• 1½ cups chopped pecans

For the Peanut Butter Topping:

• 6 tablespoons butter, softened

• ¾ cup creamy peanut butter

• 1½ cups powdered sugar

• 1½ tablespoons milk

For the Chocolate Topping:

• 1 cup semi-sweet chocolate chips

• 1½ teaspoons vegetable oil

• Coarse sea salt or fleur de sel (optional)

Instructions

Step 1: Bake the Brownies

1. Prepare your chosen brownie recipe in a 9×13-inch pan according to the instructions.

2. Allow the brownies to cool completely before adding the toppings.

Step 2: Make the Turtle Topping

1. In a microwave-safe bowl, combine the caramels and milk. Heat in 30-second intervals, stirring each time, until the mixture is smooth and melted.

2. Stir in the chopped pecans.

3. Spread the caramel-pecan mixture evenly over the cooled brownies.

Step 3: Prepare the Peanut Butter Topping

1. In a bowl, beat the softened butter, peanut butter, powdered sugar, and milk together until smooth and creamy.

2. Carefully spread this peanut butter mixture over the turtle topping, ensuring an even layer.

Step 4: Add the Chocolate Topping

1. Melt the semi-sweet chocolate chips and vegetable oil together in the microwave, stirring every 30 seconds until smooth.

2. Pour the melted chocolate over the peanut butter layer and spread evenly with a spatula.

Step 5: Add Finishing Touches

1. Sprinkle coarse sea salt or fleur de sel on top of the chocolate layer for an extra burst of flavor, if desired.

Step 6: Set and Slice

1. Let the brownies cool completely and allow the layers to set. For faster results, refrigerate for 30–60 minutes.

2. Once set, cut the brownies into squares and serve.

Tips

Cool Completely: Ensure the brownies are fully cooled before adding each topping layer for clean, defined layers.

Alternative Nuts: Swap pecans for walnuts or almonds if preferred.

Storage: Keep the brownies in an airtight container at room temperature for up to 3 days or in the fridge for up to 5 days.

Storage Options

Refrigeration: Store in an airtight container for up to 5 days. Bring to room temperature before serving for the best texture.

Freezing: Freeze individual squares wrapped in plastic wrap and foil for up to 2 months. Thaw in the refrigerator or at room temperature.

Turtle Buckeye Brownies are a show-stopping dessert that layers indulgence on top of indulgence. Whether you’re sharing them with a crowd or savoring them solo, they’re sure to satisfy any sweet tooth!