These Ham and Cheese Puff Pastry Sticks are a delightful, savory snack or appetizer that combines flaky pastry, savory ham, and melted cheese. They’re quick to assemble and bake up beautifully golden and crispy, making them perfect for gatherings, game days, or a tasty snack. The puff pastry provides a buttery, crispy base, while the ham and cheese add a delicious, savory filling. Customize with herbs or serve with mustard for extra flavor!
Why You’ll Love This Recipe:
• Simple and Quick: Minimal prep makes these perfect for last-minute appetizers.
• Customizable: Try different cheeses or add herbs for a unique twist.
• Crowd-Pleasing: These handheld treats are easy to share and pair well with dips.
Ingredients:
• 1 package of puff pastry (thawed)
• 4-6 slices of ham (thinly sliced)
• 4-6 slices of cheese (Swiss, cheddar, or mozzarella)
• 1 egg (beaten, for egg wash)
• Optional: fresh herbs (like rosemary or thyme), mustard for dipping
Instructions:
Preheat the Oven:
• Preheat your oven to 400°F (200°C) and line a baking sheet with parchment paper to prevent sticking.
Prepare the Pastry:
• Roll out the puff pastry on a lightly floured surface. Cut it into strips about 1 inch wide, ensuring they are long enough to hold the ham and cheese slices.
Assemble the Sticks:
• Place a slice of ham and a slice of cheese on each pastry strip. Sprinkle fresh herbs on top if desired for added flavor.
Fold and Seal:
• Fold each pastry strip over the ham and cheese to create a “stick” shape. Press the edges firmly to seal, using a fork to crimp the edges for a decorative finish.
Egg Wash:
• Brush the tops of each stick with the beaten egg to give them a golden, shiny finish.
Bake:
• Arrange the sticks on the prepared baking sheet, leaving a bit of space between each. Bake for 15-20 minutes, or until the pastry is golden brown and puffed.
Serve:
• Let the sticks cool slightly before serving. These Ham and Cheese Puff Pastry Sticks are delicious on their own or with a side of mustard or your favorite dipping sauce.
Tips:
• Cheese Options: Feel free to use different cheeses like Gruyère or provolone for varied flavors.
• Herb Variations: Add a sprinkle of thyme, rosemary, or even Italian seasoning for extra aroma.
• Make-Ahead: Assemble and refrigerate until ready to bake, or freeze for quick prep later.
These Ham and Cheese Puff Pastry Sticks are sure to be a hit, with their crispy exterior and savory filling. They’re a perfect finger food that’s easy, delicious, and full of flavor!
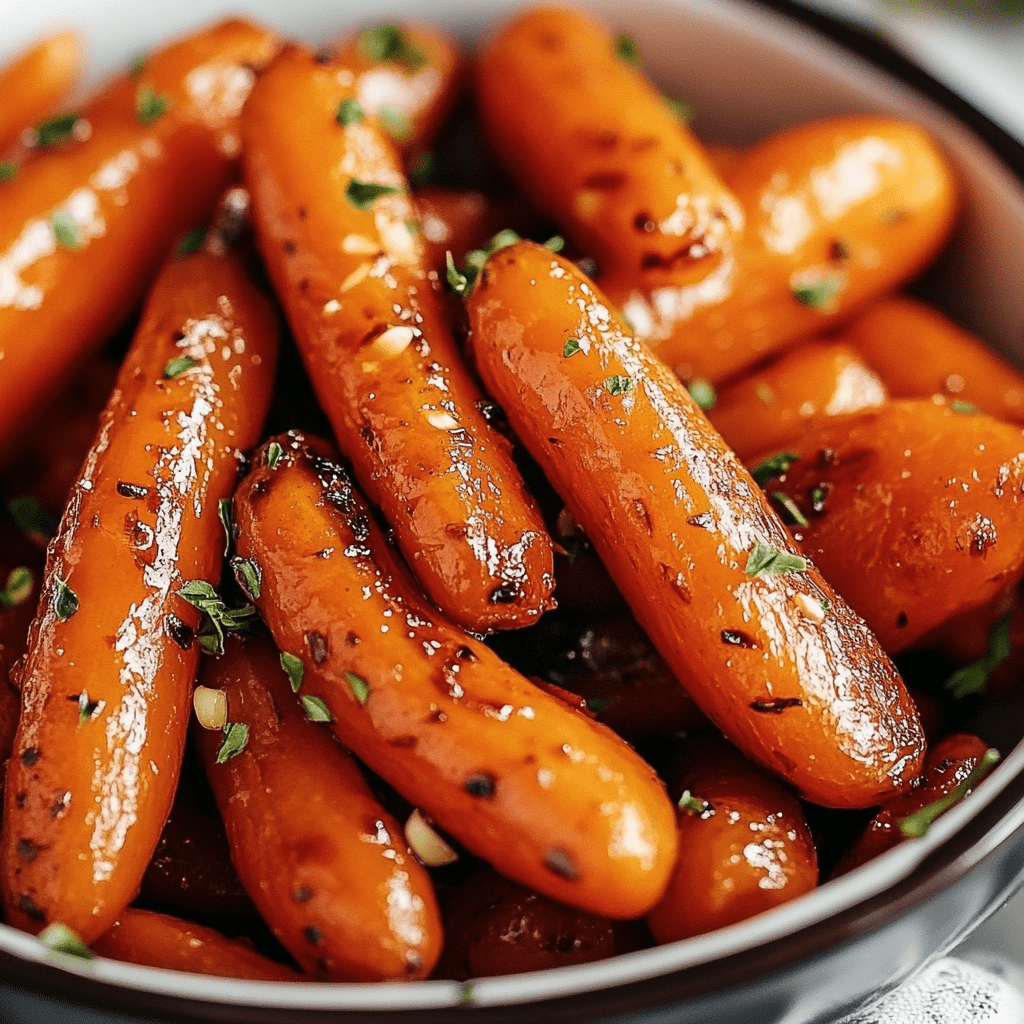
These Honey Garlic Roasted Baby Carrots are a deliciously simple yet flavorful side dish. The sweet, natural flavors of baby carrots are enhanced by a buttery honey garlic sauce, while a quick roast in the oven caramelizes the edges, creating a tender and slightly crisp texture. This dish is perfect for family dinners, holiday feasts, or any time you want an easy and impressive side that pairs well with various main courses.
The honey provides a touch of sweetness that balances perfectly with the savory garlic and rich butter, making each bite both indulgent and fresh. Garnishing with parsley adds a bright finish, making this dish a feast for the eyes and taste buds alike.
Why You’ll Love This Recipe:
• Quick and Easy: Minimal ingredients and simple steps make this dish easy to prepare.
• Flavorful and Sweet: Honey, garlic, and butter create a beautiful combination that enhances the carrots’ natural sweetness.
• Versatile Side Dish: Pairs well with a variety of main dishes, from roast chicken to grilled steaks.
• Preheat your oven to 425°F (220°C). This high temperature helps achieve a tender interior with slightly crispy edges on the carrots.
Step 2: Create the Honey Garlic Butter Sauce
• In a medium-sized pan, melt the butter over medium heat. Once melted, add the honey and stir until fully combined, allowing the honey to blend smoothly with the butter.
Step 3: Infuse with Garlic
• Add the minced garlic (or garlic powder) to the pan. Cook for about 30 seconds, just until fragrant. Be careful not to let the garlic burn, as it can become bitter.
Step 4: Coat the Carrots
• Add the baby carrots to the pan, tossing them to coat evenly with the honey garlic butter sauce. Allow the sauce to thicken slightly for about a minute to meld the flavors.
Step 5: Season
• Season the carrots with salt and cracked black pepper to taste, enhancing the natural sweetness and savory flavors.
Step 6: Roast to Perfection
• Transfer the coated carrots to a greased baking sheet, arranging them in a single layer for even roasting. Place the baking sheet in the preheated oven and roast for about 20 minutes, or until the carrots are fork-tender.
Step 7: Broil for Crispness
• For added texture, turn on the broiler and broil the carrots for an additional 2-3 minutes, which will crisp up the edges.
Step 8: Garnish and Serve
• Remove the carrots from the oven, transfer them to a serving dish, and top with freshly chopped parsley. Serve immediately.
Storage Options:
• Refrigerator: Store leftovers in an airtight container in the fridge for up to 3 days. Reheat in the oven or microwave.
• Freezer: Not recommended, as carrots may lose texture and become mushy upon thawing.
Tips:
• Adjust Sweetness: For a less sweet version, reduce the honey to 2 tablespoons.
• Add Spice: Add a pinch of red pepper flakes for a subtle kick of heat.
• Serving Suggestions: Pair with roasted meats, grilled fish, or alongside a fresh green salad for a complete meal.
These Honey Garlic Roasted Baby Carrots are a delightful side dish that brings out the natural sweetness of carrots while adding layers of flavor and texture. Perfect for any occasion, they’ll quickly become a favorite at the dinner table.
Chili is more than just a dish—it’s a topic of intense debate among culinary enthusiasts, with opinions divided sharply over one particular ingredient: beans. Whether you’re a staunch traditionalist or a culinary innovator, everyone seems to have a strong opinion on whether beans belong in a true bowl of chili. Today, we delve into this delicious debate and make a case for why beans might just deserve a place in your chili pot.
Why This Debate Matters
If you love food, cooking, or just a good bowl of chili, this discussion is for you. Exploring the arguments for and against beans in chili not only enriches your culinary knowledge but might also challenge or reinforce your views on what makes chili genuinely authentic. So, let’s embark on this flavorful journey through the history, nutrition, and culinary versatility of bean-inclusive chili.
A Brief History of Chili
Understanding the origins of chili is crucial to the beans vs. no-beans debate. Originating from Texan and Mexican cuisines, traditional chili con carne was a simple stew consisting mainly of meat and chili peppers. As chili gained popularity and spread across various regions, its recipe evolved, with many adding ingredients like beans for added texture and flavor.
The Case for Beans in Chili
1. Nutritional Boost: Beans are rich in protein, vitamins, and minerals, enhancing the dish’s nutritional value. They complement the meat well, providing a balanced protein profile, and are high in fiber, which aids digestion and enhances gut health.
2. Flavor and Texture Enhancements: Beans absorb and amplify the flavors of the spices and meats they’re cooked with, contributing to a richer culinary experience. They also add a creamy texture that contrasts nicely with the meat, enhancing the overall mouthfeel of the dish.
3. Culinary Creativity and Flexibility: Adding beans introduces a layer of customization to chili. You can choose from various beans like kidney, pinto, or black beans, each adding its unique flavor and texture. Beans also make the dish more budget-friendly and accessible for larger groups.
Arguments Against Beans in Chili
Despite the benefits, many purists argue that beans dilute chili’s traditional essence, which should focus on meat and peppers. This perspective values historical authenticity and the preservation of the original culinary techniques that defined early chili recipes.
Why Beans Belong in Chili
While the debate is far from settled, the inclusion of beans in chili offers numerous benefits, from enhanced nutrition and richer flavors to greater flexibility in recipe customization. Whether you’re making a heartier meal to feed a crowd or catering to different dietary preferences, beans can play a pivotal role in elevating your chili.
Conclusion: Embrace the Bean
The beans-in-chili debate showcases the dynamic nature of culinary traditions and personal taste preferences. While some may prefer their chili strictly traditional, others find that beans add a welcome dimension to the dish. By understanding both sides of the argument, you can better appreciate chili’s rich history and culinary diversity, and perhaps find your perfect chili recipe—beans or no beans.
Ultimately, chili should be a dish that brings comfort and joy, whether it’s served with beans or sticks to its meaty roots. So why not keep an open mind and maybe even a pot of bean-inclusive chili on your stove? After all, the best recipe for chili is the one that tastes like home to you. Happy cooking!
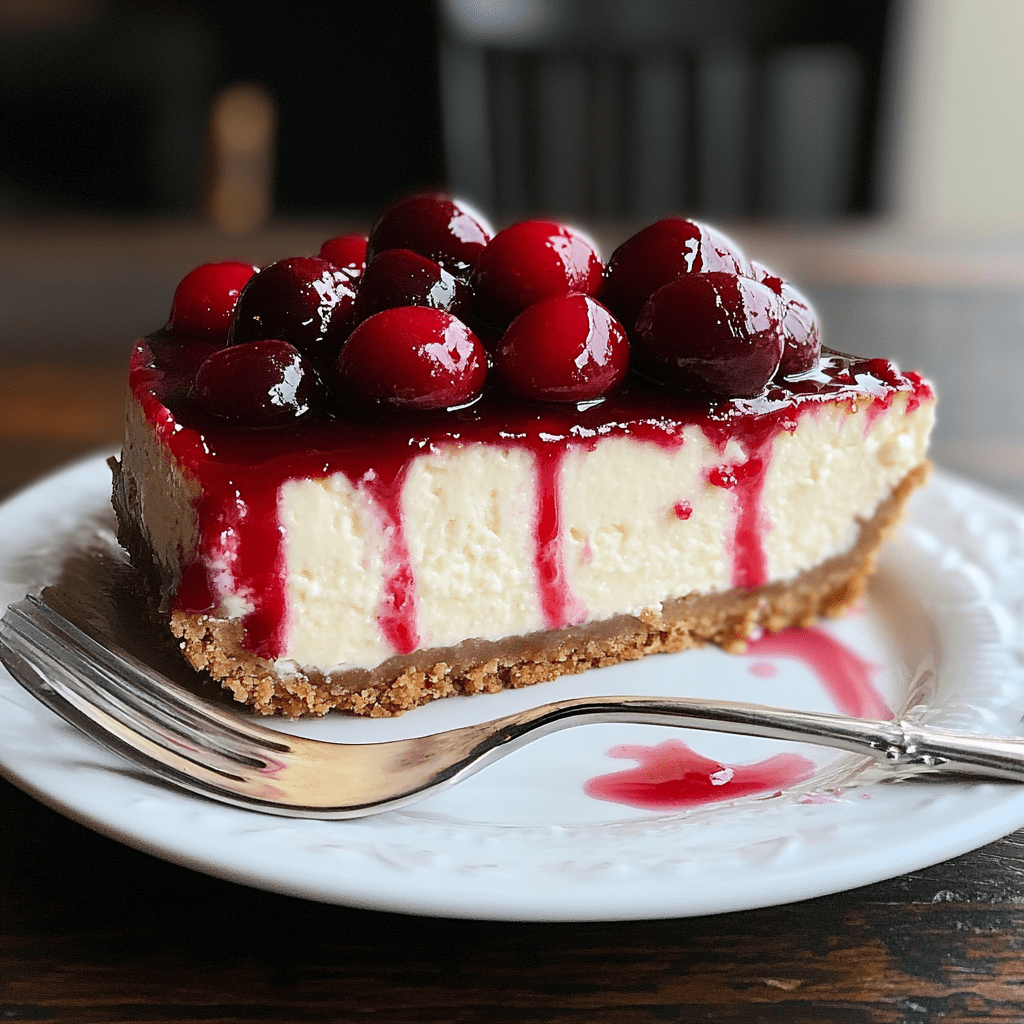
This Cherry-Topped Cheesecake is a classic dessert that combines a buttery graham cracker crust, rich and creamy cheesecake filling, and a sweet-tart cherry topping. It’s perfect for holidays, special gatherings, or any occasion where you want to impress. The cheesecake filling is rich yet light, with a hint of lemon that perfectly balances the creaminess. Topped with vibrant cherry filling, this dessert is as beautiful as it is delicious.
The step-by-step process of baking, cooling, and chilling ensures a smooth, crack-free cheesecake with a luscious texture. Once chilled, the cherry topping adds a beautiful finish, making each slice a show-stopper.
Why You’ll Love This Recipe:
• Classic, Crowd-Pleasing Flavor: A creamy cheesecake with a tangy cherry topping is always a favorite.
• Perfect Texture: The gradual cooling process keeps the cheesecake smooth and prevents cracks.
• Make-Ahead Friendly: This cheesecake can be made a day ahead, giving you one less thing to worry about for special occasions.
Ingredients:
Graham Cracker Crust:
• 1 ¾ cup graham cracker crumbs
• ⅓ cup granulated sugar
• 7 tablespoons butter, melted
Cheesecake Filling:
• 32 ounces full-fat cream cheese, softened
• 1 cup sugar
• ½ cup sour cream, room temperature
• 1 teaspoon vanilla extract
• 2 teaspoons lemon juice
• 1 tablespoon lemon zest
• 4 eggs, room temperature
• 1 (21-ounce) can cherry pie filling
Instructions:
Prepare the Pan and Crust:
• Preheat your oven to 350°F. Butter the bottom and 1 ½ inches up the sides of a 9-inch springform pan.
• In a medium bowl, mix together the graham cracker crumbs, sugar, and melted butter until well combined.
• Press the mixture evenly into the bottom and about an inch up the sides of the prepared pan.
• Bake the crust for 10 minutes, then let it cool completely before proceeding.
Prepare the Water Bath:
• Reduce the oven temperature to 300°F. Fill a large baking dish with hot water and place it on the rack below the middle rack to create a steam bath, which helps prevent cracks in the cheesecake.
Make the Cheesecake Filling:
• In a stand mixer with a paddle attachment (or using a hand mixer), beat the softened cream cheese and sugar on medium speed until smooth and creamy. Scrape down the bowl and beaters with a rubber spatula as needed.
• Add the sour cream, vanilla extract, lemon juice, and lemon zest, mixing until fully incorporated.
• Reduce the mixer speed to low and add the eggs one at a time, mixing just until each egg is incorporated to avoid overmixing.
Bake the Cheesecake:
• Pour the cream cheese mixture into the cooled crust. Smooth the top with a spatula.
• Bake in the preheated oven at 300°F for 70 minutes. Then, turn off the oven and use a wooden spoon to prop the oven door open by about 1 to 1 ½ inches. Let the cheesecake cool slowly in the oven for 1 hour.
Cool and Chill:
• Place the cheesecake on a wire rack to cool completely at room temperature. Once cooled, cover the pan with plastic wrap and refrigerate for at least 6 hours, or overnight if possible, to allow the flavors and texture to fully develop.
Add the Cherry Topping:
• After the cheesecake has chilled, use a sharp, thin knife to run along the edge of the pan, loosening the cheesecake from the sides.
• Carefully unbuckle the springform pan and lift the ring off, leaving the cheesecake on the bottom base.
• Gently spoon the cherry pie filling evenly over the top of the cheesecake.
Serve:
• Refrigerate until ready to serve. Promptly refrigerate any leftovers to maintain freshness.
Storage Options:
• Refrigerator: Store leftovers in an airtight container in the fridge for up to 5 days.
• Freezer: Wrap individual slices tightly in plastic wrap and place in a freezer-safe container for up to 1 month. Thaw in the refrigerator before serving.
Tips:
• Preventing Cracks: The water bath and slow cooling in the oven help prevent cracks by keeping the cheesecake’s temperature steady.
• Room Temperature Ingredients: Use room temperature cream cheese, eggs, and sour cream to create a smooth filling and avoid lumps.
• Serving Suggestions: For an extra touch, add whipped cream or sprinkle fresh lemon zest over the cherry topping.
This Cherry-Topped Cheesecake is a creamy, delicious dessert that will impress with its beautiful layers and satisfying flavor. It’s a crowd-pleasing treat that’s perfect for any celebration or gathering.
These Carb Bacon Cheddar Mini Cheese Balls are a delicious, low-carb snack or appetizer that combines creamy cheese, smoky bacon, and savory seasonings. They’re easy to prepare and perfect for parties, gatherings, or as a quick, tasty snack when you want something satisfying but low in carbs. Each bite is packed with bold flavors, from the sharp cheddar to the crisp bacon and fresh green onions, making these mini cheese balls a hit with everyone.
These cheese balls are a versatile snack and can be customized with additional herbs or spices to suit your taste. Roll them in almond flour for a slight crunch, or experiment with other coatings like crushed nuts or extra bacon bits for added texture and flavor.
Why You’ll Love This Recipe:
• Low-Carb Friendly: Perfect for those on keto or low-carb diets.
• Easy to Make: Simple, no-cook recipe that’s ready in minutes.
• Flavor-Packed: Each bite is creamy, cheesy, and full of delicious savory flavors.
Ingredients:
• 8 oz cream cheese, softened
• 1 cup shredded sharp cheddar cheese
• 1/2 cup cooked bacon, crumbled
• 1/4 cup green onions, finely chopped
• 1 tsp garlic powder
• 1 tsp onion powder
• Salt and pepper, to taste
• 1/2 cup almond flour (optional, for rolling)
How To Make Carb Bacon Cheddar Mini Cheese Balls:
Mix Ingredients:
• In a mixing bowl, combine the softened cream cheese, shredded cheddar cheese, crumbled bacon, finely chopped green onions, garlic powder, onion powder, salt, and pepper. Mix until everything is evenly combined.
Form Balls:
• Using your hands, shape the mixture into small balls, approximately 1 inch in diameter.
Coat (Optional):
• If you like, roll each cheese ball in almond flour for added texture. You could also use crushed nuts or extra crumbled bacon for a different flavor profile.
Chill:
• Place the formed cheese balls on a plate and refrigerate for at least 30 minutes to allow them to firm up.
Serve:
• Enjoy these mini cheese balls as a snack or appetizer. They’re perfect for parties or as a quick, satisfying treat!
Tips:
• Make Ahead: These cheese balls can be made a day ahead and stored in the fridge for an easy grab-and-go snack.
• Flavor Customization: Add fresh herbs like parsley or chives, or a dash of smoked paprika for extra flavor.
• Serving Suggestions: Serve with low-carb crackers or sliced veggies like cucumber, bell peppers, and celery.
These Carb Bacon Cheddar Mini Cheese Balls are a crowd-pleasing, flavorful snack that’s simple to prepare and delicious to enjoy. Perfect for those on a low-carb diet, these mini bites will add a tasty, satisfying option to your snack lineup.
This Crockpot Potato Broccoli Cheddar Soup is the ultimate comfort food, blending creamy potatoes, hearty broccoli, and rich cheese into a savory, warming meal. It’s perfect for cold days when you want something cozy and filling. The slow cooker does all the work for you, making it an effortless dish that delivers a big reward in flavor. With a base of Velveeta cheese and the convenience of frozen broccoli, this soup is simple to prepare but packed with delicious, cheesy goodness.
The addition of cream soups and chicken broth creates a smooth and creamy texture, while the broccoli and potatoes provide substance. Whether you’re serving this for lunch or dinner, it’s a dish that will leave you feeling satisfied and comforted. Top it with extra cheese or crispy bacon bits for a little extra indulgence!
Why You’ll Love This Recipe:
• Easy Preparation: Just toss everything into the crockpot, and let it do the work for you.
• Cheesy Comfort: Velveeta cheese gives this soup its creamy, cheesy base that’s impossible to resist.
• Hearty and Filling: Potatoes and broccoli add texture and make this soup a meal in itself.
Ingredients:
• 32 oz frozen broccoli
• 2 russet potatoes, peeled and diced
• 1 can cream of chicken soup
• 1 can cream of mushroom soup
• 1 yellow onion, chopped
• 2 cloves garlic, minced
• 2 cups chicken broth
• 2 tbsp butter
• 16 oz Velveeta cheese, cubed
• 1 tsp flour
• Salt and pepper, to taste
Instructions:
Prepare the Ingredients:
• Start by placing the diced russet potatoes and chopped yellow onion into the bottom of your slow cooker.
• Add the frozen broccoli florets on top of the potatoes.
Add Cheese and Butter:
• Scatter the cubed Velveeta cheese and butter evenly over the vegetables in the crockpot.
Mix the Soup Base:
• In a large mixing bowl, combine the cream of chicken soup, cream of mushroom soup, minced garlic, and chicken broth.
• Sprinkle in the flour, salt, and pepper, then whisk everything together until smooth.
Combine and Stir:
• Pour the soup mixture over the vegetables, cheese, and butter in the slow cooker.
• Gently stir everything together to ensure that the soup base coats all the ingredients evenly.
Cook in the Crockpot:
• Cover the slow cooker with the lid and set it to cook on LOW for 5-6 hours.
• Stir occasionally during cooking to help the cheese melt evenly and prevent any sticking to the sides of the slow cooker.
Final Touches:
• Once the cooking time is up, check the potatoes and broccoli to make sure they’re tender.
• Taste the soup and adjust the seasoning with additional salt and pepper if needed.
Serve:
• Ladle the hot soup into bowls and serve immediately. For extra cheesiness, top each bowl with shredded cheddar cheese, a sprinkle of fresh parsley, or crispy bacon bits.
• Pair with a side of crusty bread or garlic toast for the perfect comfort meal.
Storage Options:
• Refrigerator: Store leftovers in an airtight container in the fridge for up to 3 days. Reheat gently on the stove or in the microwave.
• Freezer: You can freeze the soup for up to 3 months. Allow it to thaw in the fridge overnight before reheating.
Tips:
• Customizing the Cheese: For a richer flavor, add shredded sharp cheddar along with the Velveeta.
• Add More Veggies: Feel free to add other vegetables like carrots or cauliflower for added flavor and nutrition.
• Serving Suggestions: Serve with a side salad or garlic bread to make it a complete meal.
This Crockpot Potato Broccoli Cheddar Soup is the ultimate bowl of cheesy, hearty goodness. It’s perfect for cold weather and a great option when you want a hands-off meal that still delivers on flavor. Enjoy!
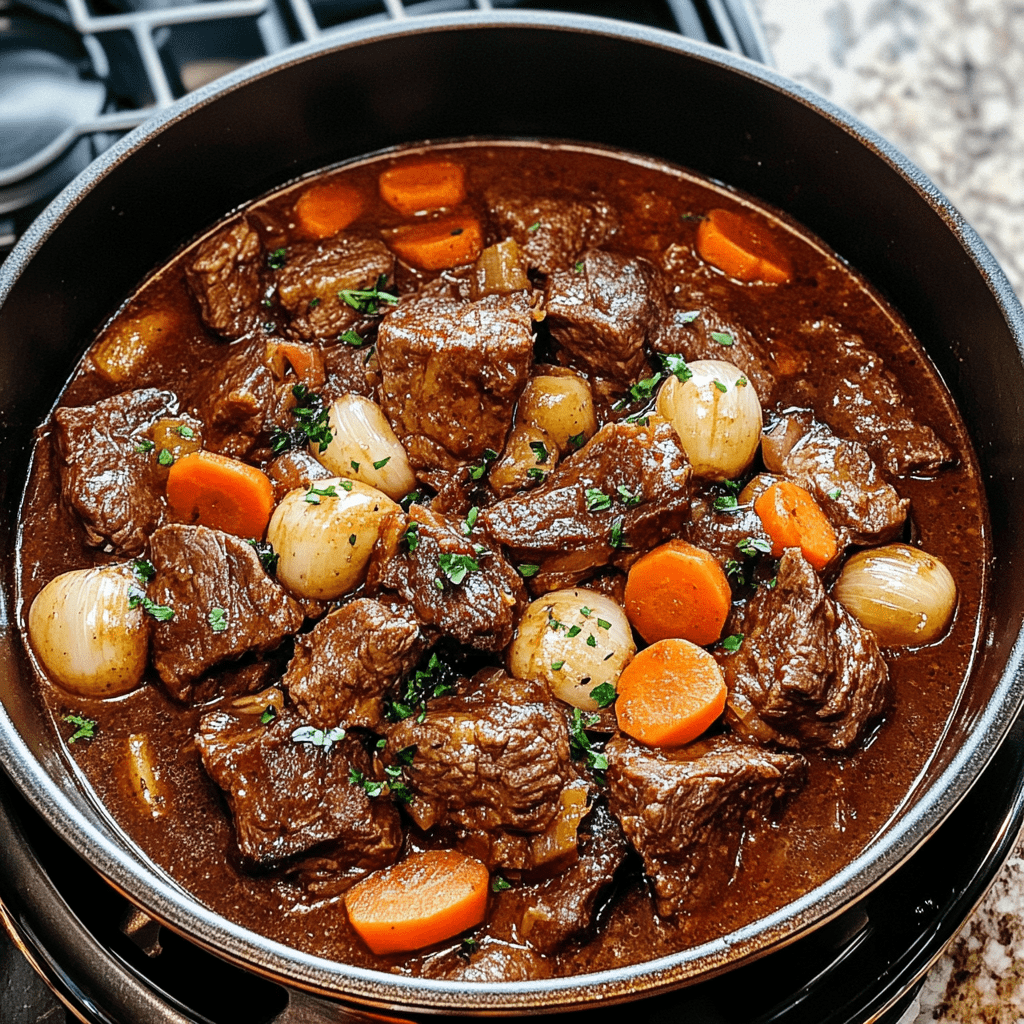
Beef Bourguignon is a rich, flavorful French stew made with tender chunks of beef, crisp bacon, hearty vegetables, and a deep, red wine sauce. This slow-cooked dish is the epitome of comfort food, offering layers of savory flavors that develop as the stew gently simmers for hours. It’s a perfect dish for cozy family dinners, special gatherings, or whenever you’re craving a warming, hearty meal that feels gourmet without being overly complicated.
This recipe allows you to experience classic French cooking with easy-to-find ingredients. The combination of bacon, beef, red wine, and aromatic herbs creates a deep, rich flavor that makes every bite incredibly satisfying.
Why You’ll Love This Recipe:
• Tender, Fall-Apart Beef: The long, slow cooking process ensures that the beef becomes melt-in-your-mouth tender.
• Rich, Savory Sauce: The red wine and beef stock create a deep, flavorful sauce that’s perfect for serving over mashed potatoes, rice, or buttered noodles.
• A Classic French Dish: Impress guests or treat yourself with this elegant, comforting meal.
Ingredients:
• 1 tbsp extra-virgin olive oil
• 6 oz bacon, roughly chopped
• 3 lb beef brisket, chuck steak, or stewing beef, cut into 2-inch chunks
• 1 large carrot, sliced ½-inch thick
• 1 large white onion, diced
• 6 cloves garlic, minced, divided
• 1 pinch coarse salt
• 1 pinch ground pepper
• 2 tbsp flour (for thickening the stew)
• 12 pearl onions (optional)
• 3 cups red wine (like Merlot, Pinot Noir, or Chianti)
• 2-3 cups beef stock (use 3 cups if using 2 cups of wine)
• 2 tbsp tomato paste
• 1 beef bouillon cube, crushed
• 1 tsp fresh thyme, finely chopped
• 2 tbsp fresh parsley, finely chopped, divided
• 2 bay leaves
• 1 lb white or brown mushrooms, quartered
• 2 tbsp butter (for sautéing mushrooms)
Instructions:
Preheat the Oven:
• Preheat your oven to 350°F (175°C). Heat olive oil in a large Dutch oven or heavy-based pot over medium heat.
Cook the Bacon:
• Add the chopped bacon to the hot oil and sauté for about 3 minutes until crispy and browned. Use a slotted spoon to transfer the bacon to a plate, leaving the rendered fat in the pot.
Sear the Beef:
• Pat the beef chunks dry with paper towels and season with salt and pepper. Sear the beef in batches in the hot oil and bacon fat, browning all sides, about 2-3 minutes per side. Once seared, remove the beef and place it on the plate with the bacon.
Sauté the Vegetables:
• In the same pot, add the sliced carrots and diced onions. Sauté for about 3 minutes until they begin to soften. Add 4 cloves of minced garlic and cook for another minute until fragrant. Drain any excess fat, leaving about 1 tablespoon in the pot.
Thicken the Stew:
• Return the bacon and seared beef to the pot with the vegetables. Season with a pinch of salt and pepper. Sprinkle flour over the mixture, tossing well to coat the meat and vegetables. Cook for 4-5 minutes, allowing the flour to brown slightly.
Add the Liquid:
• Add the pearl onions (if using), red wine, and enough beef stock to barely cover the meat. Stir in the tomato paste, crushed beef bouillon cube, thyme, and bay leaves. Bring the mixture to a gentle simmer on the stove.
Bake the Stew:
• Cover the pot with a lid and transfer it to the lower part of the oven. Let it cook for 2 to 3 hours, or until the meat is fall-apart tender. Check occasionally to ensure the liquid is simmering gently—adjust the heat if necessary.
Prepare the Mushrooms:
• In the last 5 minutes of cooking, melt butter in a medium skillet over medium heat. When the butter begins to foam, add the remaining 2 cloves of minced garlic and sauté for about 30 seconds until fragrant. Add the quartered mushrooms and cook for 5-6 minutes until browned. Set aside.
Finish the Stew:
• Remove the Dutch oven from the oven and carefully pour its contents into a colander set over a large pot to separate the sauce from the meat and vegetables. Discard the bay leaves and any herb sprigs.
• Return the beef, bacon, and vegetables back into the Dutch oven. Skim off any excess fat from the sauce and pour it back over the meat mixture. Add the prepared mushrooms on top of the meat.
Simmer and Serve:
• Simmer the sauce for a minute or two to heat through, skimming off any additional fat that rises to the surface. Adjust the consistency by adding a few tablespoons of stock if the sauce is too thick, or simmer longer if too thin.
• Taste for seasoning and adjust with salt and pepper if needed. Garnish with fresh parsley and serve the Beef Bourguignon hot over mashed potatoes, rice, or buttered egg noodles.
Storage Options:
• Refrigerator: Store leftovers in an airtight container in the fridge for up to 4 days. Reheat on the stove over low heat.
• Freezer: Beef Bourguignon freezes well. Store in a freezer-safe container for up to 3 months. Thaw in the fridge overnight and reheat gently on the stove.
Tips:
• Wine Choice: Use a wine you enjoy drinking, as the flavor will concentrate in the stew.
• Make-Ahead: This dish tastes even better the next day, making it a perfect make-ahead option.
• Serving Suggestions: Serve with crusty French bread to soak up the delicious sauce.
This Beef Bourguignon is the ultimate comfort food, with rich, bold flavors that develop slowly during cooking. Whether for a special occasion or a cozy dinner, this dish is sure to impress and satisfy.
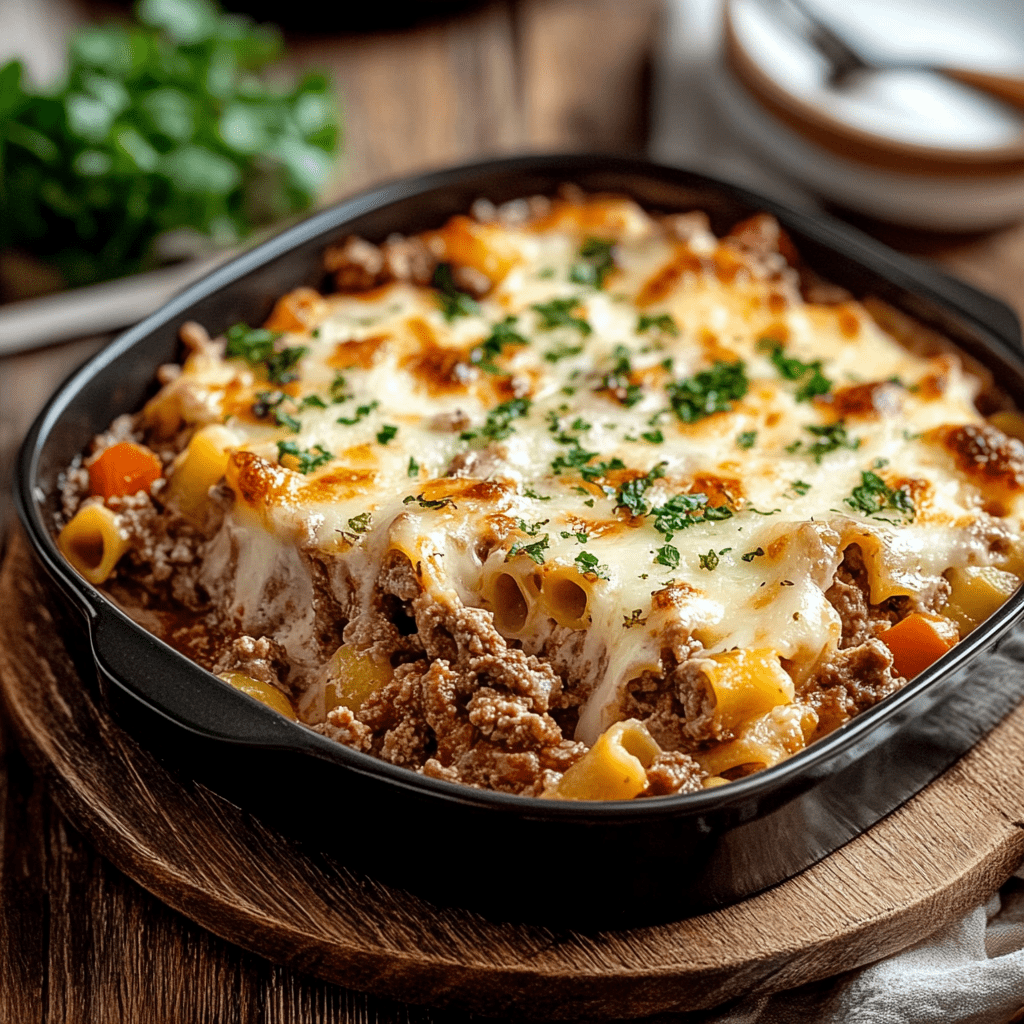
Beef Lombardi Casserole is a hearty, comforting dish that blends rich beefy flavors with creamy noodles and a topping of melted cheese. This casserole is perfect for feeding a crowd or for a cozy family dinner. The combination of seasoned beef, tangy tomatoes, and soft noodles, all topped with a cheesy golden crust, makes this casserole a favorite comfort food. It’s easy to prepare, and with a few pantry staples, you can create a delicious meal that’s sure to please everyone at the table.
The casserole comes together quickly and bakes to bubbly perfection in the oven. The layers of seasoned beef sauce, creamy noodles, and cheese offer a satisfying balance of flavors and textures, making this dish a crowd-pleaser. It’s also a great make-ahead meal that reheats beautifully, making it perfect for leftovers or meal prep.
Why You’ll Love This Recipe:
• Hearty and Satisfying: Packed with ground beef, tomatoes, and noodles, this casserole is a filling and flavorful meal.
• Cheesy Goodness: With a triple-cheese topping of cheddar, Parmesan, and mozzarella, it’s hard to resist the gooey, golden-brown crust.
• Great for Leftovers: This dish tastes even better the next day, making it perfect for meal prepping or reheating for busy nights.
Ingredients:
• 1 lb ground beef
• 1 can diced tomatoes (14.5 oz, with juice)
• 1 can Rotel diced tomatoes and green chilies (10 oz, with juice)
• 1 tsp salt
• 1/4 tsp black pepper
• 1/4 tsp onion powder
• 1/4 tsp garlic powder
• 1 can tomato paste (6 oz)
• 1 package medium egg noodles (6 oz)
• 1 cup sour cream
• 1 cup shredded cheddar cheese
• 1 cup grated Parmesan cheese
• 1 cup shredded mozzarella cheese
Instructions:
Prepare the Oven and Baking Dish:
• Preheat your oven to 350°F (175°C). Lightly spray a 9×13-inch baking dish with cooking spray and set it aside.
Cook the Beef:
• In a large skillet over medium heat, cook the ground beef, breaking it into crumbles as it cooks, until it is no longer pink. Drain any excess fat.
Prepare the Meat Sauce:
• Stir the diced tomatoes with juice, Rotel diced tomatoes and green chilies with juice, salt, black pepper, onion powder, garlic powder, and tomato paste into the cooked ground beef. Mix everything together until well combined.
• Reduce the heat to low and allow the sauce to simmer for 20 minutes, stirring occasionally. The sauce should thicken slightly as the flavors meld together.
Cook the Noodles:
• While the meat sauce simmers, bring a large pot of salted water to a boil. Add the medium egg noodles and cook according to the package directions until al dente. Drain the noodles well and transfer them to a large mixing bowl.
Prepare the Noodle Layer:
• Add the sour cream to the hot noodles and stir until the noodles are evenly coated with the sour cream.
Assemble the Casserole:
• Spread the sour cream-coated noodles evenly across the bottom of the prepared baking dish.
• Spoon the meat sauce over the noodles, spreading it out with a spatula to ensure it covers the noodles evenly.
Add the Cheese Topping:
• In a small bowl, mix together the shredded cheddar cheese, grated Parmesan cheese, and shredded mozzarella cheese.
• Sprinkle the cheese mixture evenly over the top of the meat sauce.
Bake the Casserole:
• Cover the baking dish with aluminum foil and bake in the preheated oven for 35 minutes, or until the casserole is hot and bubbly.
• Remove the foil and bake for an additional 5-10 minutes, allowing the cheese to melt completely and turn golden brown on top.
Serve:
• Once baked, remove the casserole from the oven and let it rest for about 5 minutes before serving.
• Serve hot with garlic bread, a fresh green salad, or steamed vegetables.
Storage Options:
• Refrigerator: Store leftovers in an airtight container in the fridge for up to 4 days.
• Freezer: Beef Lombardi Casserole freezes well. Store in a freezer-safe container for up to 3 months. Thaw in the refrigerator overnight and reheat in the oven until hot.
Tips:
• Make-Ahead Option: You can assemble the casserole ahead of time and store it in the refrigerator for up to 24 hours before baking.
• Spice It Up: For a spicier version, add extra Rotel or diced jalapeños to the meat sauce.
• Cheese Substitutions: Feel free to mix up the cheese topping with other varieties like Monterey Jack or Colby for a different flavor profile.
This Beef Lombardi Casserole is the perfect combination of creamy, cheesy, and savory. It’s a comforting dish that will have everyone coming back for seconds, whether you’re serving it for a family meal or saving some for easy weekday leftovers.
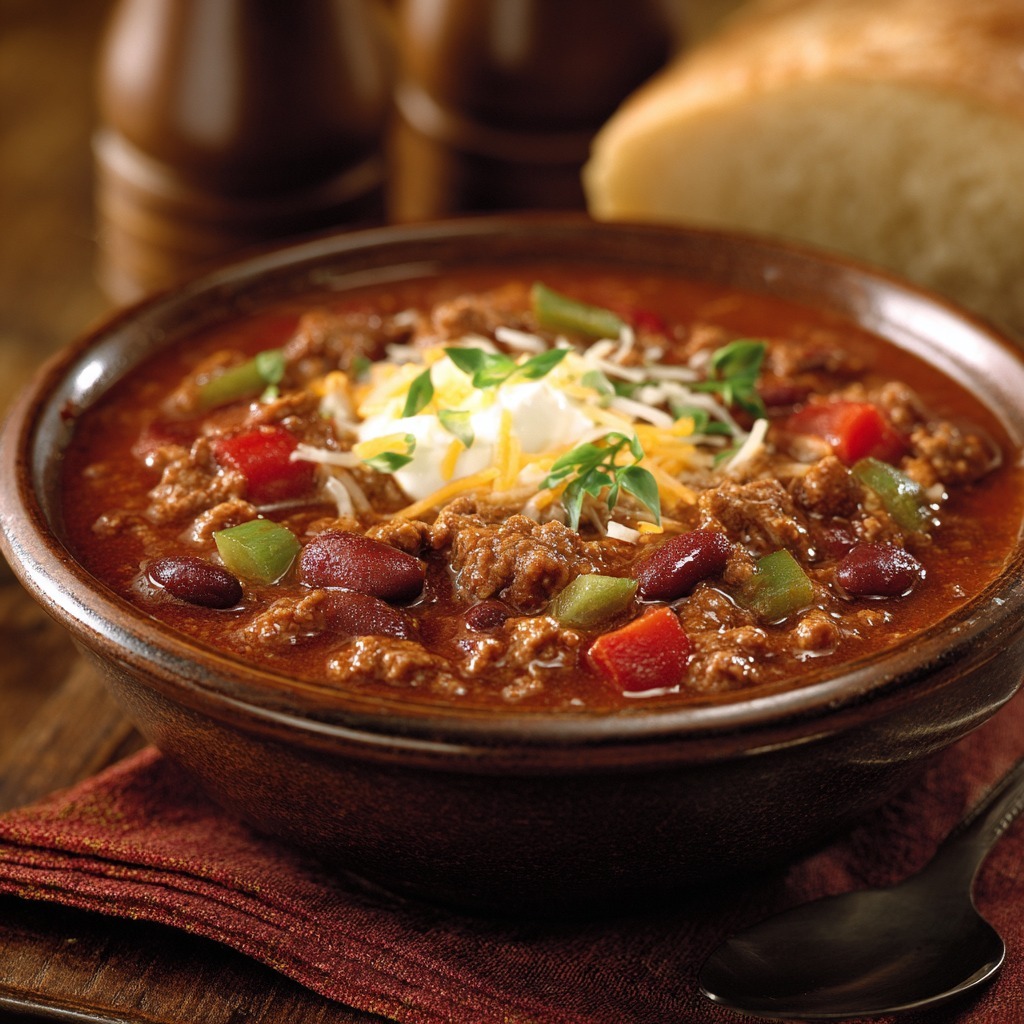
This homemade version of Wendy’s classic chili brings all the comfort and flavor of the original fast-food favorite to your kitchen. Packed with hearty ground beef, a variety of beans, and a flavorful blend of spices, this chili is perfect for a cozy family dinner, game day, or a quick meal that satisfies your craving for something warm and filling. Whether you cook it on the stove or in a slow cooker, this recipe delivers a satisfying bowl of chili that’s easy to make and even easier to enjoy.
What makes this chili so beloved is its combination of simplicity and robust flavor. The ground beef provides a hearty base, while the tomato juice and purée give it a rich and slightly tangy tomato flavor. Beans add texture and make it a filling, nutritious meal. Spices like chili powder, cumin, and garlic powder ensure every bite is packed with warmth and a little kick.
Why You’ll Love This Recipe:
• Classic Comfort Food: This chili is a classic dish that provides warmth and satisfaction, perfect for any day of the week.
• Hearty and Filling: With ground beef, beans, and plenty of vegetables, this chili is a complete meal in itself.
• Great for Meal Prep: Make a large batch, and you’ll have leftovers to enjoy for days. It even freezes well!
• 1/4 cup chili powder (use less for milder chili)
• 1 teaspoon ground cumin (use more for a stronger flavor)
• 1 1/2 teaspoons garlic powder
• 1 teaspoon salt
• 1/2 teaspoon ground black pepper
• 1/2 teaspoon dried oregano
• 1/2 teaspoon sugar
• 1/8 teaspoon cayenne pepper
Instructions:
Browning the Beef:
• In a large skillet, brown the ground beef over medium heat. Break the beef into small pieces as it cooks, ensuring it browns evenly.
• Once the beef is fully cooked, drain off any excess fat.
Combining Ingredients:
• Transfer the browned beef into a large 6-quart pot.
• Add the tomato juice, tomato purée, drained kidney beans, and drained pinto beans.
• Stir in the chopped onion, diced celery, and diced green bell pepper.
• Sprinkle in the chili powder, ground cumin, garlic powder, salt, ground black pepper, dried oregano, sugar, and cayenne pepper.
Simmering:
• Cover the pot with a lid and bring the mixture to a simmer over medium heat.
• Reduce the heat to low and let the chili simmer for 1 to 1 1/2 hours, stirring every 15 minutes to prevent sticking and to ensure the flavors meld together.
Slow Cooker Option:
• If you prefer using a slow cooker, simply add the browned beef and all the remaining ingredients to the slow cooker.
• Cook on low for 3 to 4 hours, stirring occasionally.
Storage Options:
• Refrigerator: Store any leftovers in an airtight container in the fridge for up to 4 days.
• Freezer: Chili freezes wonderfully. Store it in freezer-safe containers for up to 3 months. Thaw in the fridge overnight and reheat on the stove or in the microwave.
Tips:
• Adjusting the Spice Level: If you prefer a milder chili, reduce the amount of chili powder and cayenne pepper. For a spicier version, you can increase the cayenne or add diced jalapeños.
• Optional Toppings: Serve your chili with toppings like shredded cheese, sour cream, diced onions, or tortilla chips for extra texture and flavor.
• Serving Suggestions: Pair with a side of cornbread or warm crusty bread for a complete, comforting meal.
This Wendy’s Chili copycat recipe is a perfect way to enjoy the flavors of a fast-food favorite in the comfort of your own home. Whether you serve it for dinner, meal prep for the week, or save some in the freezer for later, this chili is sure to become a go-to recipe that you’ll come back to again and again.
Cinnamon Roll French Toast Rolls combine the delightful flavors of cinnamon rolls and the texture of French toast into an easy-to-make breakfast treat. This recipe transforms simple white bread into something spectacular with a sweet cinnamon-sugar coating and a soft, custardy interior. Perfect for a leisurely weekend breakfast or a special brunch, these rolls are sure to please anyone with a sweet tooth and a love for comforting, warm breakfasts.
The beauty of this recipe lies in its simplicity and the quick transformation of everyday ingredients into a delicious dish that looks as impressive as it tastes. Serve these cinnamon-infused delights with a drizzle of maple syrup or a dusting of powdered sugar for a truly indulgent experience.
Why You’ll Love This Recipe:
Fun and Easy to Make: Enjoy the process of rolling and dipping these treats, which is simple enough for cooks of all skill levels.
Delightfully Sweet: The cinnamon-sugar coating adds a crunch that perfectly complements the soft, fluffy texture inside.
Versatile Serving Options: These rolls are delicious on their own or can be dressed up with syrup, powdered sugar, or even fruit for extra flair.
Ingredients:
8 slices white bread, crusts removed
2 large eggs
1/4 cup milk
1 tsp vanilla extract
2 tbsp unsalted butter, melted
1/4 cup granulated sugar
1 tbsp ground cinnamon
2 tbsp unsalted butter, for frying
Maple syrup or powdered sugar, for serving
Instructions:
Prepare the Bread:
Start by removing the crusts from the bread slices. Flatten each slice with a rolling pin to thin them out, which makes them easier to roll.
Cinnamon-Sugar Mixture:
In a small bowl, combine the granulated sugar and ground cinnamon. Mix well and set aside for coating the rolls later.
Egg Mixture:
In a shallow bowl, whisk together the eggs, milk, and vanilla extract until smooth. This mixture will help create the custardy texture inside the rolls.
Assembly:
Brush each flattened bread slice with melted butter. This helps to add flavor and assists in sealing the rolls.
Carefully roll each slice into a tight log, ensuring they do not unroll during the cooking process.
Cooking:
Heat 2 tablespoons of unsalted butter in a skillet over medium heat.
Dip each bread roll in the egg mixture, ensuring it is fully coated.
Place the rolls in the skillet and fry for 2-3 minutes per side, turning occasionally, until each side is golden brown and crisp.
Finishing Touches:
As soon as you remove the rolls from the skillet, roll them in the cinnamon-sugar mixture until fully coated.
Serve the rolls warm, with maple syrup or a sprinkle of powdered sugar on top.
Storage Options:
Refrigerator: Store any leftovers in an airtight container in the refrigerator for up to 2 days. Reheat in the oven or microwave before serving.
Freezer: For longer storage, freeze the rolls on a baking sheet, then transfer to a freezer bag. Reheat in the oven directly from frozen until warm.
Tips:
Butter Management: Make sure the skillet isn’t too hot, as this can cause the butter to burn. Adjust the heat as necessary to keep the rolls cooking evenly.
Alternative Flavors: Add a touch of nutmeg or cardamom to the cinnamon-sugar mix for a different flavor twist.
Serving Suggestion: These rolls pair wonderfully with a side of fresh fruit or a dollop of whipped cream for a more decadent breakfast.
These Cinnamon Roll French Toast Rolls are a delightful twist on classic breakfast dishes, offering a unique and tasty way to start your day or enjoy a special brunch. Their sweet, cinnamon-spiced flavor and satisfying texture make them a new favorite that you’ll want to revisit again and again.