Cream Horns with Vanilla Whipped Cream

0

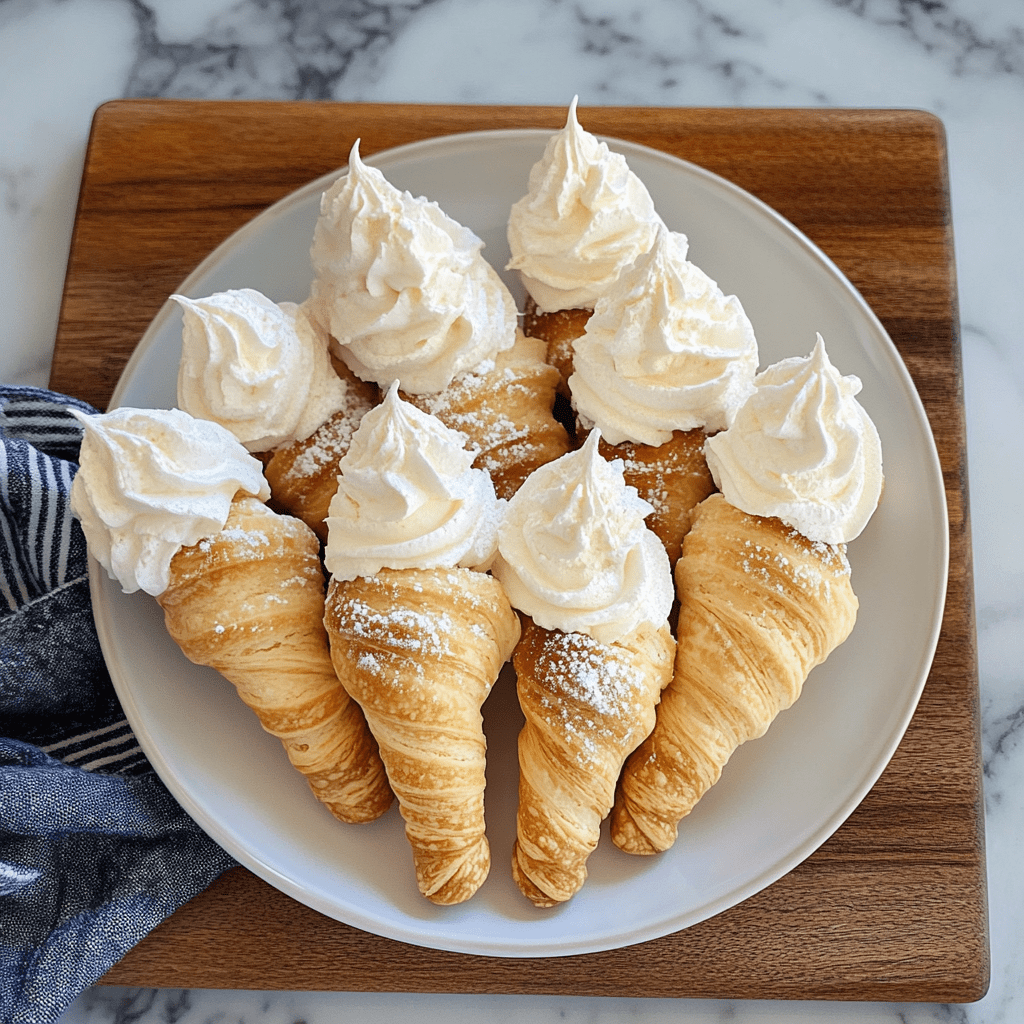
Cream horns are a delightful pastry featuring a crispy puff pastry shell and a light, airy filling. This recipe for Cream Horns with Vanilla Whipped Cream offers a simple yet elegant dessert that combines the rich flavor of vanilla with the delicate texture of puff pastry. Whether you’re hosting a special event or looking for a fancy treat to enjoy with your afternoon tea, these cream horns are sure to impress.

The puff pastry is rolled into cone-shaped molds, creating a perfect cavity for the homemade vanilla whipped cream. The process of making these pastries may seem intricate, but it’s quite straightforward, and the results are both visually appealing and delicious. The vanilla whipped cream is subtly sweet and perfectly complements the flaky pastry, making these cream horns a delightful balance of textures and flavors.

Why You’ll Love This Recipe:

  • Elegant Presentation: These cream horns look as exquisite as they taste, perfect for impressing guests or adding a special touch to your dining table.
  • Delicious Combination: The flaky pastry filled with creamy, vanilla-scented whipped cream offers a satisfying contrast.
  • Versatility: Serve them as a dessert at parties, a sweet treat at showers, or as a decadent snack during a family gathering.

Ingredients:

  • 1-2 tsp softened butter, for greasing horn molds
  • 1 sheet frozen puff pastry, thawed per package instructions
  • 1 large egg, beaten with 2 tsp cold water
  • Powdered sugar, for dusting
  • 1 1/2 cups heavy cream
  • 1 tsp pure vanilla extract
  • 1/3 cup granulated sugar, plus additional as needed to taste
  • 1/4 tsp cream of tartar
  • Assorted berries for garnishing (optional)

Instructions:

Preheat and Prepare:

  • Preheat your oven to 375°F (190°C). Line a baking sheet with parchment paper or a silicone baking mat and set aside.
  • Generously brush 12 large metal French horn cones with softened butter to prevent sticking.

Prepare the Pastry:

  • Unroll the thawed puff pastry on a non-stick surface into approximately a 9-10 x 8-inch rectangle.
  • Using a sharp knife or a pastry cutter, cut the pastry into 3/4-inch strips. Aim for even size but don’t worry about perfection.
  • Wind the pastry strips around the buttered cones, starting at the narrow end and slightly overlapping each layer to create a spiral effect.
  • Once wrapped, brush the puff pastry with the egg wash on all sides and lightly dust with powdered sugar. Arrange them seam side down on the prepared baking sheet.

Bake:

  • Bake in the preheated oven for 15-20 minutes, or until the pastries are golden brown and puffed up.
  • Allow the cream horns to cool completely on the metal forms; this helps them maintain their shape.

Prepare the Filling:

  • In a mixing bowl, use an electric mixer to whip the heavy cream, vanilla extract, and cream of tartar until soft peaks form.
  • Gradually add granulated sugar while continuing to whip, adjusting the sweetness to your taste.

Assemble the Cream Horns:

  • Carefully remove the cooled pastries from the metal forms.
  • Fill a piping bag (or a Ziploc bag with the corner snipped off) with the whipped cream and pipe the cream into each pastry shell.
  • Dust the filled cream horns with additional powdered sugar and garnish with fresh berries if desired.

Storage Options:

  • Refrigerator: Store any leftover cream horns in an airtight container in the refrigerator for up to 3 days. Note that the pastry may soften over time.

Tips:

  • Handling Puff Pastry: Keep the puff pastry cold for easier handling. If it warms up and becomes sticky, place it back in the refrigerator for a few minutes.
  • Filling Variations: Experiment with different fillings such as chocolate mousse or lemon curd for a variety of flavors.
  • Serving Suggestion: Serve the cream horns soon after filling to ensure the pastry stays crisp.

Enjoy the process of creating these stunning Cream Horns with Vanilla Whipped Cream, a treat that is sure to delight everyone who tries them. The combination of flaky pastry and creamy filling is not just tasty but also a joy to present.

Slow Cooker Unstuffed Cabbage Roll Soup: Comfort in Every Spoonful

0

Craving the comforting taste of cabbage rolls but not up for the meticulous preparation? This Slow Cooker Unstuffed Cabbage Roll Soup is your stress-free solution, delivering all the cozy flavors without the fuss. Perfect for those hectic weeknights or when you’re meal-prepping for the week ahead, this recipe promises a delicious, satisfying meal with minimal effort. And the best part? The flavors only get better overnight, making your leftovers something to look forward to.

Why You’ll Adore This Soup
This unstuffed cabbage roll soup brings a hearty, scrumptious experience to your dinner table. The combination of savory broth, tender cabbage, and the mild sweetness from tomatoes and brown sugar creates a rich, comforting dish. Ideal with a side of crusty bread, warm dinner rolls, or a sprinkle of cheese on top, this soup is bound to become a staple in your home cooking repertoire.

Ingredients You’ll Need

  • 1 lb ground beef (or substitute turkey or chicken for a lighter touch)
  • 1 small onion, diced
  • 3 cloves garlic, minced
  • 1 medium head of cabbage, chopped
  • 2 carrots, sliced
  • 3 cups beef broth (essential for a rich, meaty base)
  • 28 oz can diced tomatoes (with juices for extra tang)
  • 15 oz can tomato sauce (for smooth, rich tomato flavor)
  • 1/2 cup uncooked long grain white rice (adds great texture)
  • 2 tbsp brown sugar (to balance the tomatoes’ acidity)
  • 1 tbsp Worcestershire sauce (for depth)
  • 1 tsp paprika (for a hint of warmth)
  • 1 tsp dried thyme (for aromatic depth)
  • 1 bay leaf (infuses a subtle, earthy flavor)
  • Salt and pepper, to taste

Easy Step-by-Step Cooking Guide

  1. Brown the Ground Beef: In a skillet over medium heat, cook the beef until browned. Be sure to crumble it as it cooks. Drain excess fat.
  2. Sauté Onions and Garlic: In the same skillet, sauté onions and garlic until soft and translucent, about 3-4 minutes.
  3. Transfer to Slow Cooker: Add the beef, sautéed onions and garlic, and all other ingredients to the slow cooker. Stir well to combine.
  4. Slow Cook: Set your slow cooker on low for 6-7 hours or high for 3-4 hours, until the cabbage and rice are tender.
  5. Final Seasoning: Remove the bay leaf, then season with salt and pepper to taste. Serve hot.

Customize Your Soup

  • Switch the Protein: Use ground turkey, chicken, or pork as alternatives.
  • Add More Vegetables: Bell peppers, celery, or zucchini make great additions.
  • Spice It Up: A pinch of red pepper flakes or some diced jalapeños will add a kick.
  • Thicken It Up: For a thicker broth, stir in a small can of tomato paste.

Helpful FAQs

  1. Making Ahead: Perfect for meal prep, this soup’s flavor improves with time.
  2. Storing Leftovers: Keep in an airtight container in the fridge for up to 4 days.
  3. Freezing: Cool the soup completely and freeze for up to 3 months. Thaw in the fridge.
  4. Using Pre-cooked Rice: Add during the last 30 minutes of cooking to avoid mushiness.
  5. Making It Gluten-Free: Ensure your beef broth and Worcestershire sauce are gluten-free.

Serving Suggestions

Pair this hearty soup with crusty bread or buttery rolls to soak up the delicious broth, or enjoy it with a light salad for a balanced meal. For a touch of luxury, top each bowl with shredded cheese right before serving.

Wrap-Up

This Slow Cooker Unstuffed Cabbage Roll Soup is the epitome of comfort food, easy enough for any day of the week yet satisfying enough to feel like a treat. It’s a practical, delightful way to enjoy the essence of cabbage rolls with a fraction of the effort. Give it a try and savor the warm, comforting embrace of a well-made home-cooked meal.

Filet Mignon with Creamy Mushroom Sauce

0

Prepare to indulge in the ultimate culinary experience with this Filet Mignon with Creamy Mushroom Sauce recipe. This dish combines the luxurious tenderness of perfectly cooked filet mignon with a rich, savory mushroom sauce that elevates the steak to new heights of deliciousness. Whether you’re planning a romantic dinner or looking to impress at a dinner party, this recipe is sure to be a showstopper.

The key to this dish is the high-quality filet mignon, known for its buttery texture and mild flavor, making it the perfect canvas for the bold, creamy sauce. The mushrooms, simmered in a concoction of beef broth, heavy cream, and aromatics, provide a delightful contrast with their earthy tones, while the subtle kick of Dijon mustard and the depth of Worcestershire sauce create a complex flavor profile. Each component of this dish complements the others beautifully, creating a harmonious and unforgettable dining experience.

Why You’ll Love This Recipe:

  • Luxurious Flavor: The rich sauce and premium cut of meat make this dish feel like a gourmet meal.
  • Perfect for Special Occasions: Its impressive presentation and exquisite taste make it ideal for special events.
  • Simplicity in Preparation: Despite its sophisticated appearance, this recipe is straightforward to prepare, requiring just a few steps to achieve perfection.

Ingredients:

  • 2 filet mignon steaks, about 1 1/2 inches thick
  • Salt and freshly ground black pepper, to taste
  • 2 tablespoons olive oil
  • 2 tablespoons unsalted butter, divided
  • 1 cup sliced mushrooms (such as cremini or button)
  • 2 cloves garlic, minced
  • 1/2 cup beef broth
  • 1/2 cup heavy cream
  • 1 teaspoon Dijon mustard
  • 1 teaspoon Worcestershire sauce
  • Fresh thyme, for garnish
  • Fresh parsley, chopped, for garnish

Instructions:

Preparation:

  • Allow the filet mignon steaks to sit at room temperature for about 30 minutes before cooking. This ensures even cooking. Season generously with salt and pepper.

Preheat the Oven:

  • Set your oven to 400°F (200°C) to preheat while you begin cooking the steaks.

Cooking the Steak:

  • In a heavy skillet, heat olive oil over high heat until just smoking. Add the steaks and sear on each side for 2-3 minutes until a golden crust forms.
  • Add one tablespoon of butter to the skillet, then transfer the skillet to the preheated oven. Roast the steaks for 5-7 minutes for medium-rare. Adjust the cooking time depending on your preferred doneness.
  • Remove the steaks from the skillet and let them rest on a plate, tented with foil, to keep them warm and allow the juices to redistribute.

Making the Sauce:

  • Reduce the heat to medium and add the remaining tablespoon of butter to the skillet. Add the mushrooms and garlic, sautéing until the mushrooms are golden and soft.
  • Deglaze the pan with beef broth, scraping up the browned bits from the bottom of the pan. These bits add rich flavor to the sauce.
  • Stir in the heavy cream, Dijon mustard, and Worcestershire sauce. Allow the sauce to simmer until it thickens enough to coat the back of a spoon.

Serving:

  • Place the rested filet mignon steaks on plates. Spoon the creamy mushroom sauce generously over the steaks.
  • Garnish with fresh thyme and chopped parsley to add a touch of freshness and color.

Storage Options:

  • Refrigerator: Store any leftovers in an airtight container for up to 3 days. Reheat gently to preserve the quality of the meat.
  • Freezer: It’s best to freeze the sauce separately from the steak to maintain the texture of the meat. Use within a month for optimal taste.

Tips:

  • Selecting Steaks: Choose steaks that are uniform in thickness to ensure they cook evenly.
  • Resting Time: Allowing the steaks to rest after cooking is crucial for a juicy, flavorful steak.
  • Sauce Consistency: If the sauce is too thin, let it simmer a few minutes longer. If it’s too thick, thin it with a little more beef broth.

The Sweet Debate: Should You Add Sugar to Tomato Sauce?

0

Adding sugar to tomato sauce stirs up a lively debate among cooks and food enthusiasts alike. This discussion isn’t just about taste—it delves into culinary philosophy, balancing flavors, and health considerations. Whether you’re aiming to refine your cooking skills, make healthier food choices, or perhaps resolve a culinary disagreement, understanding both sides of this debate can be quite enlightening.

Arguments for Adding Sugar to Tomato Sauce

  1. Countering Acidity:
    Tomatoes, especially certain varieties, can have a high acidity that might overpower the sauce, giving it a sharp taste. Adding a small amount of sugar can mellow this acidity, leading to a more balanced and palatable flavor.
  2. Enhancing Flavors:
    Sugar can bring out the inherent sweetness of tomatoes, which is particularly beneficial if the tomatoes lack natural sweetness or are not fully ripe. This enhancement can make the sauce more complex and pleasing.
  3. Improving Texture:
    Sugar has the ability to alter the texture of tomato sauce, giving it a smoother, richer mouthfeel. This can make the sauce more enjoyable and luxurious on the palate.

Arguments Against Adding Sugar to Tomato Sauce

  1. Natural Flavors:
    Many culinary purists believe that high-quality tomatoes should shine on their own in a sauce without the need for added sweeteners. They argue that adding sugar not only masks the tomatoes’ natural flavors but also shifts the taste profile from savory to excessively sweet.
  2. Health Concerns:
    Adding sugar to foods can have negative health implications, particularly if consumed frequently. Excessive sugar intake is linked to various health issues, including weight gain and an increased risk of heart disease.
  3. Culinary Authenticity:
    Traditional tomato sauce recipes, especially from regions like Italy, typically do not include sugar. Deviating from these traditional methods can sometimes lead to criticisms of inauthenticity, especially from culinary traditionalists who value recipe heritage.

To Sugar or Not to Sugar?

Ultimately, the choice to add sugar to tomato sauce depends on various factors, such as the type of tomatoes used, the desired balance of flavors, and personal or dietary preferences. If you’re using particularly tart tomatoes or serving a dish to those who prefer a slightly sweeter taste, a pinch of sugar might be beneficial. Conversely, if you’re using ripe, sweet tomatoes or aim to keep your dishes as healthy and authentic as possible, you might choose to forego the sugar.

Understanding the impact of adding sugar to tomato sauce helps in making informed culinary choices that align with your cooking style, health goals, and taste preferences. This knowledge not only improves the dishes you create but also enhances your overall cooking experience. Whether or not you choose to add sugar, the key is to create a sauce that delights your palate and suits your culinary ethos.

Oven-Braised Beer Brats with Caramelized Onions

0

Oven-Braised Beer Brats with Caramelized Onions is a classic dish that perfectly melds the heartiness of bratwurst sausages with the sweet depth of caramelized onions, all enhanced by the rich flavors of beer and beef broth. This dish is a testament to the power of slow cooking, transforming simple ingredients into a comforting and robust meal. Ideal for a laid-back dinner, game day, or any occasion that calls for satisfying, beer-infused fare, this recipe promises to delight everyone at the table with its deep flavors and tender sausages.

The process of caramelizing the onions brings out their natural sugars, which beautifully complement the savory bratwursts. Braising the sausages in a mixture of beer and beef broth not only adds an incredible depth of flavor but also ensures that the bratwursts are juicy and tender. This method of cooking makes the dish incredibly flavorful, as the brats absorb all the aromas and seasonings from their surrounding ingredients.

Why You’ll Love This Recipe:

  • Rich Flavors: The combination of caramelized onions, beer, and Dijon mustard creates a complex and hearty flavor profile.
  • Comforting Meal: This warming dish is perfect for cooler weather, offering a comforting and satisfying meal.
  • Versatile Serving: Great as a main course served with sides like mashed potatoes or roasted vegetables, or as part of a festive buffet.

Ingredients:

  • 6 bratwursts
  • 2 large onions, thinly sliced
  • 2 cloves garlic, minced
  • 1 tbsp olive oil
  • 2 tbsp butter
  • 12 oz beer (pilsner or lager works well)
  • 1 cup beef broth
  • 1 tbsp Dijon mustard
  • Salt and pepper, to taste
  • Fresh parsley, chopped (for garnish, optional)

Instructions:

  1. Preheat and Prep:
    Preheat your oven to 350°F (175°C).
  2. Caramelize Onions:
    In a large, oven-safe skillet or Dutch oven, heat the olive oil and butter over medium heat. Add the sliced onions and cook, stirring occasionally, until they are soft and golden brown, about 20-25 minutes.
  3. Add Garlic:
    Stir in the minced garlic and cook for an additional 2-3 minutes until fragrant.
  4. Arrange Bratwursts:
    Nestle the bratwursts among the caramelized onions in the skillet.
  5. Prepare Braising Liquid:
    Pour the beer and beef broth into the skillet, ensuring the bratwursts are mostly submerged. Stir in the Dijon mustard, and season with salt and pepper to taste.
  6. Braise:
    Bring the mixture to a gentle simmer on the stovetop. Once simmering, transfer the skillet to the preheated oven and bake, uncovered, for 30-40 minutes, until the bratwursts are cooked through.
  7. Rest and Serve:
    Remove the skillet from the oven and let the dish rest for a few minutes. If desired, garnish with chopped fresh parsley before serving.
  8. Presentation:
    Serve the bratwursts with your choice of side, such as mashed potatoes, roasted vegetables, or crusty bread.

Tips:

  • Beer Selection: Choose a beer that complements the flavors of the dish. A lighter pilsner or a medium-bodied lager can add subtle flavor without overpowering the other ingredients.
  • For the Onions: Ensure that the onions are fully caramelized to bring out their natural sweetness, which balances the savory elements of the bratwursts.
  • Serving Suggestions: Consider adding a tangy component like sauerkraut or a sharp mustard on the side to cut through the richness of the dish.

This Oven-Braised Beer Brats with Caramelized Onions recipe is not just a meal but an experience, offering a delightful array of flavors and textures that are sure to please any palate. Enjoy the melding of hearty ingredients and rich, comforting tastes in each bite.

Boston Cream Donuts

0

Boston Cream Donuts are a decadent twist on the classic donut, featuring a rich custard filling and a smooth chocolate glaze atop a fluffy, yeast-raised donut. These donuts combine the velvety texture of cream with the sweet crunch of glazed donut, offering a delightful treat that’s hard to resist. Perfect for a special brunch or an indulgent snack, Boston Cream Donuts bring a touch of bakery-style sophistication to your kitchen.

This recipe pays homage to the beloved Boston cream pie but in a portable donut form. By incorporating a luxurious vanilla custard filling and a rich chocolate topping, these donuts offer a multi-layered taste experience that’s both satisfying and impressively elegant. Whether you’re sharing with friends or treating yourself, these donuts are sure to be a hit, combining traditional flavors with the fun of home frying.

Why You’ll Love This Recipe:

  • Gourmet at Home: Create a bakery-quality treat in your own kitchen, complete with custard filling and chocolate glaze.
  • Perfect Combination: The creamy filling and rich glaze complement the light, airy dough beautifully.
  • Crowd-Pleaser: Ideal for impressing guests or bringing a special touch to family breakfasts.

Ingredients:

For the Dough:

  • 500g all-purpose flour
  • 60g sugar
  • 1 packet dry yeast
  • 250ml warm milk
  • 50g melted butter
  • 2 eggs
  • 1 tsp vanilla extract
  • Oil for frying

For the Custard Filling:

  • 2 cups whole milk
  • 1/2 cup sugar
  • 4 egg yolks
  • 1/4 cup cornstarch
  • 1 tsp vanilla extract

For the Chocolate Glaze:

  • 200g powdered sugar
  • 4 tbsp cocoa powder
  • 3-4 tbsp milk
  • 1 tsp vanilla extract

Instructions:

Dough Preparation:

  1. In a large bowl, mix the flour, sugar, and yeast. Add warm milk, melted butter, eggs, and vanilla extract. Knead until the dough is smooth and elastic, about 10 minutes.
  2. Let the dough rise in a warm place until doubled in size, approximately 1 hour.

Shaping:

  1. Roll out the dough on a floured surface to about ½ inch thickness. Cut out doughnuts using a doughnut cutter.
  2. Let the shaped doughnuts rise again on a baking sheet for about 30 minutes.

Frying:

  1. Heat oil in a deep fryer or large pot to 350°F (175°C). Fry the doughnuts in batches, turning once, until golden brown.
  2. Remove and drain on paper towels.

Custard Filling:

  1. In a saucepan, heat milk and sugar until just simmering. In a bowl, whisk egg yolks and cornstarch.
  2. Gradually pour hot milk into yolks, whisking constantly. Return mixture to the pan and cook over low heat, stirring until thick.
  3. Remove from heat, add vanilla, and let cool. Once cool, fill a piping bag with the custard.

Filling the Doughnuts:

  1. Using a small knife, make a hole in the side of each doughnut. Pipe custard into the doughnuts until filled.

Chocolate Glaze:

  1. In a bowl, mix powdered sugar, cocoa powder, milk, and vanilla extract until smooth.
  2. Dip the top of each filled doughnut into the chocolate glaze.
  3. Set on a rack to let the glaze set.

Storage Options:

  • Refrigerator: Store filled and glazed doughnuts in an airtight container in the refrigerator for up to 2 days.

Tips:

  • Smooth Filling: Ensure the custard is smooth and lump-free by straining it if necessary.
  • Even Glazing: For a smooth glaze, make sure the chocolate mixture is free of lumps by sifting the powdered sugar and cocoa powder.
  • Serving: These doughnuts are best served the same day they are made to enjoy the freshness and texture.

Boston Cream Donuts are not just a treat but an experience, bringing together the joy of doughnut-making with the elegance of classic desserts. Enjoy crafting these at home for a truly special addition to any dessert table or morning treat lineup.

Philly Cheesesteak Cheesy Bread

0

This Philly Cheesesteak Cheesy Bread is the perfect fusion of a beloved classic sandwich and a shareable, cheesy loaf, making it an irresistible treat for any occasion. Imagine the savory goodness of a Philly cheesesteak piled high on a crusty French bread, layered with a creamy mayonnaise spread, and topped with melted cheese. This recipe takes the traditional elements of a Philly cheesesteak—tender ground beef, sautéed onions, peppers, and mushrooms—and combines them with the hearty base of French bread to create a dish that is both satisfying and delicious.

The beauty of this dish lies in its simplicity and the crowd-pleasing flavors it brings to the table. It’s perfect for gatherings, easy weeknight dinners, or watching the game with friends. The melty cheese, combined with the savory beef and vegetables, creates a mouthwatering meal that is both filling and comforting. Whether you’re looking for a new way to enjoy the flavors of a Philly cheesesteak or need a quick and easy recipe that is sure to delight, this cheesy bread is the way to go.

Why You’ll Love This Recipe:

  • Comforting and Savory: It combines the classic, comforting flavors of a Philly cheesesteak with the satisfying crunch of French bread.
  • Easy to Prepare: This recipe comes together quickly with simple, straightforward steps.
  • Perfect for Sharing: The format makes it easy to slice and share, ideal for any social gathering or family meal.

Ingredients:

  • 1 loaf French bread, cut in half lengthwise
  • 1/4 cup mayonnaise
  • 1 tbsp olive oil
  • 1 small sweet onion, diced
  • 1 small green bell pepper, diced
  • 4 oz button mushrooms, diced
  • 1 lb lean ground beef
  • 2 tbsp Worcestershire sauce
  • 1/4 tsp coarse salt
  • 1/4 tsp black pepper
  • 1 tsp cornstarch
  • 1/3 cup low sodium beef broth
  • 1 1/2 cups shredded Provolone or Monterey Jack cheese
  • Red pepper flakes, for garnish (optional)

Instructions:

Prepare the Bread:

    • Preheat your oven to 375°F (190°C).
    • Slice the French bread in half lengthwise and scoop out some of the inside to create a shallow well.
    • Spread mayonnaise over each half of the bread to add a creamy layer and prevent sogginess.

    Cook the Vegetables and Beef:

      • Heat olive oil in a skillet over medium-high heat.
      • Sauté the onions, bell peppers, and mushrooms until they start to soften, about 3-4 minutes.
      • Add the ground beef to the skillet. Cook, breaking up the meat, until browned and no longer pink. Drain any excess fat.

      Add Flavorings and Thicken:

        • Stir in Worcestershire sauce, salt, and pepper.
        • Whisk together cornstarch and beef broth until smooth. Add to the skillet and simmer until the mixture thickens, about 2-3 minutes.

        Assemble the Cheesy Bread:

          • Spoon the beef and veggie mixture evenly over each half of the bread.
          • Top with shredded cheese.

          Bake:

            • Place the bread on a baking sheet and bake for about 15 minutes, until the cheese is melted and bubbly.
            • For a golden, crispy top, broil for the last 1-2 minutes.

            Serve:

              • Remove from the oven and let cool slightly before slicing.
              • Sprinkle with red pepper flakes for a little heat, if desired.

              Storage Options:

              • Refrigerator: Store any leftovers in an airtight container for up to 3 days. Reheat in the oven to retain crispiness.
              • Freezer: Freeze in individual slices for up to 1 month. Reheat directly from frozen in the oven.

              Tips:

              • Cheese Variations: Experiment with different types of cheese such as mozzarella or a cheddar blend for different flavors.
              • Additional Toppings: Consider adding jalapeños or a drizzle of hot sauce for extra spice.

              This Philly Cheesesteak Cheesy Bread is not just a meal; it’s an experience. It brings the beloved flavors of a Philly cheesesteak into a new form that is both fun to eat and share. Whether you’re serving it at a party or enjoying a slice on a quiet night in, it’s sure to be a hit.

              7 Secrets to Making Perfectly Fluffy and Delicious Scrambled Eggs

              0

              Scrambled eggs might seem simple, but perfecting them is an art. They’re the quintessential quick breakfast for anyone from cooking novices to busy morning warriors. However, achieving that light, fluffy texture with rich flavor isn’t just about tossing eggs in a pan. Ready to elevate your scrambled eggs? Here are seven essential tips to ensure you cook up the perfect batch every time.

              1. Opt for a Non-Stick Pan
                A non-stick pan is crucial for scrambled eggs. It prevents the eggs from sticking and tearing, ensuring clean and easy cooking without leaving half your breakfast in the pan.
              2. Crack Eggs into a Bowl First
                While it might save a minute, cracking eggs directly into the pan can sacrifice fluffiness. Instead, crack them into a bowl, whisking well to incorporate air, which is the secret to that sought-after fluffy texture.
              3. Add a Splash of Water
                Contrary to the common practice of adding milk or cream, a splash of water is the real game-changer. Water turns into steam as it cooks, working its magic to create wonderfully light and airy eggs.
              4. Low Heat is Key
                Resist the urge to speed up the cooking by turning up the heat. Cooking eggs over low heat helps them cook evenly, maintaining moisture and preventing a rubbery texture.
              5. Perfect Your Scrambling Technique
                The way you scramble affects the egg’s texture. For larger, softer curds, use long, sweeping strokes with a spatula. For finer curds, stir quickly and continuously. The right technique will yield tender, creamy eggs.
              6. Finish with Butter for Richness
                Incorporate a small knob of butter towards the end of cooking. This adds a luxurious, creamy texture and enriches the flavor, making your eggs taste indulgent.
              7. Season at the End
                Adding salt too early can draw out moisture and toughen the eggs. Instead, season them when they’re almost done to enhance flavor without affecting the tender texture.

              Bonus Tips for Mastering Scrambled Eggs

              • Use Fresh Eggs: Fresh eggs not only taste better but also have a firmer structure, contributing to better texture.
              • Don’t Overcook: Remove eggs from the heat when they still look slightly underdone; they will continue to cook with the residual heat.
              • Keep Stirring: Consistent, gentle stirring during cooking ensures even heat distribution and prevents overcooking.

              FAQs for Upgrading Your Scrambled Eggs

              1. Why are my eggs rubbery?
                Rubbery scrambled eggs often result from high heat. Cook them on low, and don’t overcook.
              2. Can I use oil instead of butter?
                Yes, oil can be used, but butter provides extra richness and flavor that oils can’t match.
              3. When are scrambled eggs done?
                They should still look slightly glossy and undercooked when you turn off the heat. They will finish cooking with the residual heat after serving.
              4. What’s the best way to reheat scrambled eggs?
                Gently reheat them on the stove with a touch of butter or water to keep them moist.
              5. Do I need a whisk?
                A fork will work in a pinch! Just ensure you whisk vigorously to fully combine the yolks and whites for the best air incorporation.

              With these tips, you’ll turn a simple dish of scrambled eggs into a gourmet experience that’s fluffy, creamy, and irresistibly delicious. Next time you’re in the kitchen, try these strategies and elevate your breakfast game to impressive new heights.

              Peanut Butter Sheet Cake

              0

              This Peanut Butter Sheet Cake is a sumptuous treat that combines the rich, savory flavor of peanut butter with the sweet, comforting base of a classic yellow cake. The luscious peanut butter frosting and a sprinkle of chopped peanuts crown this delightful dessert, making it a guaranteed crowd-pleaser. Whether for a casual gathering, a birthday celebration, or just a weekday dessert, this cake promises to deliver both excellent taste and texture.

              Crafting this cake involves a straightforward process that yields professional-level results, even for novice bakers. The use of high-quality ingredients like premium peanut butter and a reliable cake mix is key to enhancing the flavor profile of this dessert. With its perfectly moist base and richly flavored topping, this sheet cake serves as an excellent canvas for the creamy peanut butter frosting, providing a satisfying contrast with every bite.

              Why You’ll Love This Recipe:

              • Rich Peanut Butter Flavor: The intense peanut butter flavor is a dream for peanut butter lovers, offering a deep, satisfying taste.
              • Easy to Make: Simple, step-by-step instructions make this recipe accessible to bakers of all skill levels.
              • Perfect for All Occasions: This versatile cake is ideal for parties, potlucks, or as a special treat for peanut butter aficionados.

              Ingredients:

              For the Cake:

              • ½ cup salted butter, cut into 4 pieces
              • ⅔ cup creamy peanut butter
              • ⅓ cup milk (from whole to skim)
              • ⅓ cup vegetable oil
              • 1 teaspoon vanilla extract
              • 2 large eggs
              • 1 box yellow cake mix (Duncan Hines recommended)
              • ⅓ cup chopped peanuts (for garnish)

              For the Peanut Butter Frosting:

              • ½ cup salted butter, cut into pieces
              • ½ cup creamy or crunchy peanut butter
              • ⅓ cup milk
              • 1 teaspoon vanilla extract
              • 1 (16-ounce) box powdered sugar

              Instructions:

              Preheat Your Oven:

              • Set your oven to 350°F (175°C).
              • Grease a 15×10-inch sheet pan or a 13×9-inch baking pan to ensure easy removal of the cake.

              Prepare the Peanut Butter Batter:

              • In a microwave-safe bowl, combine the butter, peanut butter, and milk. Microwave on HIGH for 1 minute until the butter melts. Stir until smooth.
              • Stir in the vegetable oil and vanilla extract.

              Incorporate the Eggs:

              • Beat the eggs lightly right in the bowl with the peanut butter mixture until well combined.

              Add the Cake Mix:

              • Gradually add the yellow cake mix, mixing thoroughly until the batter is smooth and free of lumps.

              Transfer to Baking Pan:

              • Pour the batter into the prepared pan, spreading it evenly to ensure uniform baking.

              Baking Instructions:

              • Bake in the preheated oven. The baking time will depend on the size of the pan:
              • 15×10-inch pan: 13-15 minutes.
              • 13×9-inch pan: 19-21 minutes.
              • Check doneness by inserting a toothpick into the center of the cake; it should come out clean.

              Cool the Cake:

              • Allow the cake to cool in the pan for 15 minutes before frosting.

              Prepare the Frosting:

              • For the frosting, combine the butter, peanut butter, and milk in a saucepan over medium heat. Stir until the butter and peanut butter are melted.
              • Remove from heat and stir in vanilla extract. Gradually beat in powdered sugar until the frosting is smooth and spreadable.

              Frost and Finish:

              • Spread the frosting evenly over the cooled cake.
              • Sprinkle with chopped peanuts for texture and presentation.

              Serve and Enjoy:

              • Let the cake stand at room temperature for one hour or chill in the refrigerator for 30 minutes for the frosting to set before slicing.
              • Cut into 24 slices and serve.

              Storage Options:

              • Refrigerator: Keep the cake refrigerated in an airtight container for up to 5 days.
              • Freezer: Freeze individual slices on a baking sheet before transferring to a freezer-safe container. Thaw at room temperature or in the refrigerator when ready to enjoy.

              Tips:

              • Quality Ingredients: Opt for high-quality peanut butter for the best flavor and texture.
              • Uniform Slices: Use a hot, clean knife for slicing to get neat, beautiful pieces.

              This Peanut Butter Sheet Cake recipe is not only a treat for the taste buds but also a joy to prepare, promising a delectable dessert that’s sure to become a new favorite. Enjoy the process and the delicious outcome!

              Should You Rinse Pasta After Cooking? Discover the Best Practices

              0

              Pasta is a beloved staple in countless kitchens, where achieving the perfect al dente texture is often akin to an art form. During a recent culinary session, I observed my uncle rinse freshly drained pasta under cold water—a method that baffled me. Traditionally, I had learned that this step could strip away the starches that help sauces adhere to pasta. So, what could be the rationale behind such a practice? In this exploration, we’ll delve into the reasons some opt to rinse their pasta, unpack the science behind it, and pinpoint when this method is advantageous.

              Traditional Pasta Cooking Techniques

              The classic approach to cooking pasta involves boiling it in well-salted water to the firm-to-the-bite stage known as ‘al dente’ and then directly combining it with sauce. This process is pivotal as the starches released during cooking act as a natural thickener, ensuring sauces meld seamlessly with the pasta.

              Why Rinse Pasta?

              Understanding the implications of rinsing pasta under cold water is crucial. Here’s what happens:

              • Stops Cooking: Immediately rinsing pasta in cold water halts the cooking process, preventing it from overcooking and maintaining the desired texture.
              • Removes Starch: While essential for hot dishes where sauce adhesion is desired, starch can be problematic in cold pasta dishes where a non-sticky texture is preferred.
              • Prevents Clumping: For dishes that require the pasta to remain loose, such as salads or certain pre-prepared meals, rinsing is beneficial as it prevents the strands from sticking together.

              Appropriate Times to Rinse Pasta

              Though traditionally frowned upon for hot dishes, rinsing pasta can be beneficial in specific scenarios:

              1. Pasta Salads: For cold pasta dishes, rinsing is beneficial. It cools the pasta rapidly, removes unwanted starch, and keeps the noodles loose for a light, airy salad.
              2. Advance Preparation: If pasta needs to be cooked ahead of time, rinsing can prevent it from continuing to cook and sticking together. A toss in olive oil after rinsing can keep it ready for later use.
              3. Asian Noodle Dishes: In recipes where noodles are meant to be tossed or stirred in sauces, such as in stir-fries, rinsing removes excess starch that could make the dish gummy.

              When Rinsing Pasta Is a Misstep

              For most hot pasta dishes, rinsing should be avoided for several reasons:

              • Sauce Adhesion: The starch on the surface of the pasta helps the sauce cling, creating a harmonious dish.
              • Dish Temperature: Rinsing pasta cools it down, which can be undesirable for hot dishes as it affects the consistency and absorption of flavors from the sauce.
              • Pasta Water Utilization: The starchy pasta water is often used to enhance and thicken sauces. Rinsing the pasta deprives you of this “liquid gold.”

              Debunking Common Pasta Rinsing Myths

              Let’s clear up some misconceptions about rinsing pasta:

              • Carbohydrate Reduction: Rinsing does not significantly decrease the carbohydrate content; it only removes surface starch.
              • Reviving Overcooked Pasta: Once pasta is overcooked, rinsing won’t restore its firmness, though it can stop further softening.
              • Universal Necessity: Rinsing isn’t a requisite step for all pasta dishes, especially not for those served hot.

              Expert Insights on Pasta Rinsing

              Culinary experts typically advise against rinsing for hot dishes, suggesting instead to use the pasta water to fine-tune sauce consistency and enhance flavor integration. However, they acknowledge that rinsing has its place in the preparation of cold dishes or when making pasta in advance.

              Concluding Thoughts: Tailoring Pasta Preparation

              Before you drain your next pot of pasta, consider the final dish you’re aiming to create. While rinsing may be ideal for a refreshing pasta salad or a make-ahead meal, it’s generally unsuitable for hot pasta dishes where you want robust sauce integration. By understanding when and why to rinse pasta, you can adapt your cooking technique to suit the dish, ensuring optimal results every time.

              Whether my uncle’s approach was correct depends largely on the intended dish. Cooking, after all, is as much about personal preference as it is about technique. Being aware of when to employ different methods like pasta rinsing empowers you to craft the perfect culinary experience, tailored to your tastes and needs.