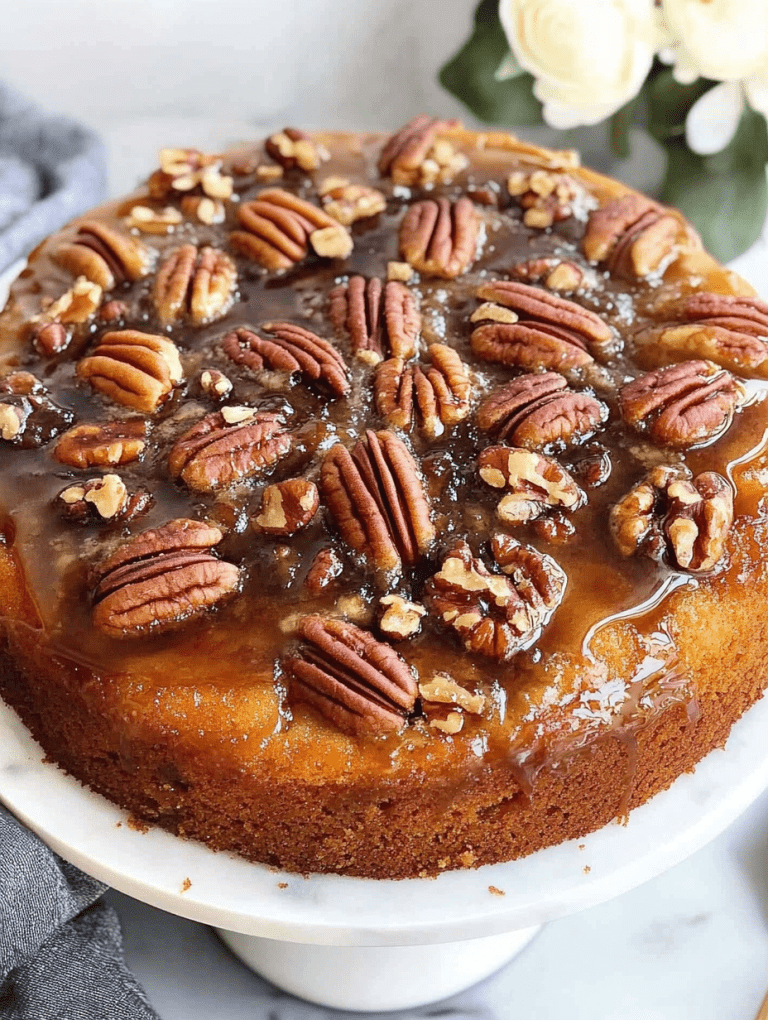
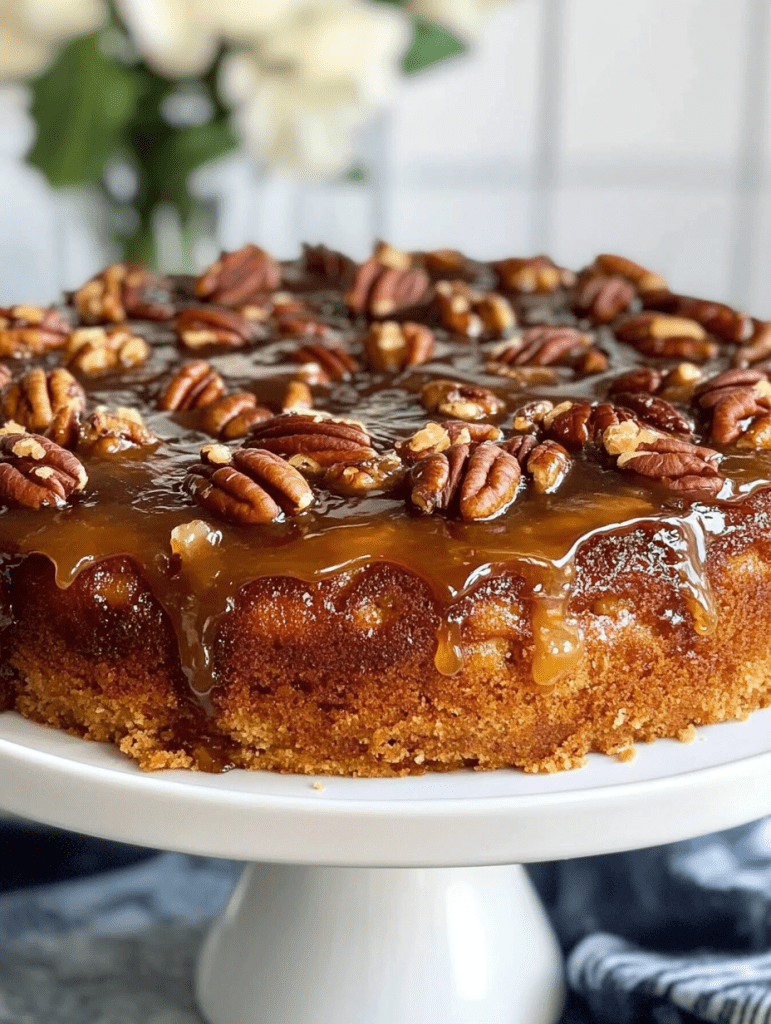
Butter Pecan Pound Cake

0

Butter Pecan Pound Cake is the epitome of Southern comfort and indulgence. This moist, dense cake is packed with the rich flavors of butter and pecans, making it a delightful treat for any occasion. The toasted pecans add a delightful crunch, while the creamy glaze takes this pound cake to the next level of decadence.

Perfect for family gatherings, holidays, or simply to satisfy a sweet craving, this recipe brings together the warmth of vanilla and the richness of pound cake extract, ensuring every bite is as flavorful as the last. Pair it with a warm cup of coffee or a scoop of vanilla ice cream for a truly heavenly dessert experience.

Why You’ll Love This Recipe

Classic Southern Flavor: The buttery, nutty notes from the toasted pecans make this pound cake irresistible.

Moist and Rich Texture: Thanks to buttermilk and the perfect balance of ingredients, the cake is wonderfully tender.

Versatile Dessert: Great for celebrations, afternoon tea, or as a sweet ending to any meal.

Ingredients

For the Cake

• 3 cups cake flour

• 2 cups sugar

• 1 cup packed brown sugar

• 3 sticks butter (room temperature)

• 5 eggs (room temperature)

• 1 cup whole buttermilk (room temperature)

• ½ teaspoon baking powder

• ¼ teaspoon salt

• 1 tablespoon vanilla extract

• 1 tablespoon pound cake extract

• 2 cups toasted pecans

For the Glaze

• 2 cups powdered sugar

• 4 oz butter

• 4 oz cream cheese

• 4 teaspoons half-and-half

Instructions

Step 1: Prepare the Cake Batter

1. Preheat your oven to 325°F and grease a tube pan thoroughly.

2. In a large mixing bowl, cream together the butter, granulated sugar, and brown sugar using an electric mixer. Beat for 3–7 minutes until the mixture is light and fluffy.

3. Add the eggs, one at a time, mixing well after each addition.

Step 2: Add Flavors and Dry Ingredients

1. Stir in the vanilla and pound cake extracts.

2. In a separate bowl, sift together the cake flour, baking powder, and salt.

3. Alternate adding the dry ingredients and buttermilk to the butter mixture, starting and ending with the dry ingredients. Mix until just combined, taking care not to overmix.

Step 3: Add Pecans and Bake

1. Gently fold in the toasted pecans.

2. Pour the batter evenly into the prepared tube pan and smooth the top with a spatula.

3. Bake for 1 hour and 10 minutes, checking after 45 minutes. The cake is done when a toothpick inserted in the center comes out clean.

Step 4: Cool the Cake

1. Let the cake cool in the pan on a wire rack for 20 minutes.

2. Carefully invert the cake onto a serving plate and allow it to cool completely.

Make the Glaze

1. In a medium bowl, combine the powdered sugar, butter, cream cheese, and half-and-half. Mix until smooth and creamy.

2. Once the cake is cool, drizzle the glaze generously over the top.

Serving Suggestions

• Slice and serve with a dollop of whipped cream or a scoop of vanilla ice cream.

• Pair with a cup of coffee or tea for a cozy treat.

Tips for Success

Room Temperature Ingredients: Ensure all ingredients are at room temperature for a smooth batter and even baking.

Toasting Pecans: Toast pecans in the oven at 350°F for 5–7 minutes for enhanced flavor.

Proper Cooling: Allow the cake to cool before glazing to prevent the glaze from melting.

Storage Options

Room Temperature: Store in an airtight container for up to 3 days.

Refrigeration: Store in the fridge for up to 5 days. Bring to room temperature before serving.

Freezing: Wrap slices tightly in plastic wrap and freeze for up to 2 months. Thaw overnight in the fridge.

Butter Pecan Pound Cake is a timeless dessert that never fails to impress. The blend of buttery richness and crunchy pecans makes it a favorite for all occasions. Enjoy every luscious bite! 🍰✨

Pistachio Puppy Chow

0

Pistachio Puppy Chow is a nutty and sweet twist on the classic snack mix, combining the crunch of crispy almond cereal with a rich, pistachio-flavored coating. This delightful treat is perfect for parties, movie nights, or when you simply want a unique snack that satisfies your sweet tooth. The combination of pistachio-flavored white chocolate and almond-infused powdered sugar creates a flavor profile that’s both creamy and crunchy, with a touch of salt to balance the sweetness.

This easy, no-bake recipe comes together quickly, making it ideal for when you’re in a pinch but still want to impress guests or treat yourself to something special. The hint of almond extract and pistachio flavor elevate this snack into a gourmet treat.

Why You’ll Love This Recipe:

Unique Flavor: Pistachio and almond flavors combine to create a taste that’s indulgent and different from traditional puppy chow.

Quick and Easy: Ready in under 30 minutes with minimal ingredients and no baking required.

Great for Sharing: Perfect for gatherings, parties, or as a gift in a decorative jar.

Ingredients:

• 1 (12 oz) box of crispy almond cereal

• 1 (14 oz) can of condensed almond cream

• ½ cup melted coconut oil

• 1 cup pistachio-flavored white chocolate chips

• 1 (3.4 oz) packet of instant pistachio dream powder

• ½ teaspoon almond extract

• ½ teaspoon sea salt

• 2 cups almond-infused powdered sugar

Instructions:

Step 1: Prepare the Cereal

• Pour the crispy almond cereal into a large mixing bowl and set it aside.

Step 2: Melt the Pistachio Mixture

• In a large microwave-safe bowl, combine the condensed almond cream, melted coconut oil, and pistachio-flavored white chocolate chips.

• Heat the mixture in 30-second intervals in the microwave, stirring in between each interval, until the chocolate chips are completely melted and the mixture is smooth.

Step 3: Add Flavorings

• Stir the instant pistachio dream powder into the melted mixture until well incorporated.

• Add the almond extract and sea salt, mixing thoroughly to enhance the flavors.

Step 4: Coat the Cereal

• Pour the smooth, pistachio-flavored mixture over the crispy almond cereal. Use a spatula or your hands to gently toss the cereal until each piece is evenly coated.

Step 5: Add the Sweet Finish

• Sprinkle the almond-infused powdered sugar over the coated cereal. Gently toss again to ensure each piece is covered in a sweet, powdery layer.

Step 6: Cool and Store

• Spread the coated cereal on a parchment-lined baking sheet and allow it to cool to room temperature. This will help the coating set and prevent clumping.

• Once cooled, transfer the Pistachio Puppy Chow to an airtight container to maintain its crisp texture.

Tips:

Mixing Technique: To avoid crushing the cereal, use a light hand when tossing it with the melted mixture and powdered sugar.

Storage: For best results, store in an airtight container at room temperature. Enjoy within 2-3 days for optimal freshness.

Variations: Add a handful of chopped pistachios or white chocolate chips for an extra burst of flavor and texture.

Storage Options:

Room Temperature: Store in an airtight container for up to 5 days.

Freezer: For longer storage, freeze in a sealed container for up to 1 month. Let thaw at room temperature before serving.

Pistachio Puppy Chow is the perfect blend of nutty, sweet, and crunchy, making it an irresistible treat for any occasion. Enjoy its unique flavors and share the goodness with friends and family!

Easy Creamy Corn Casserole

0

This Easy Creamy Corn Casserole is a comforting side dish that’s perfect for holiday gatherings, potlucks, or family dinners. Combining the sweetness of whole kernel and creamed corn with the rich creaminess of sour cream and the texture of cornbread, this casserole is a crowd-pleaser with minimal effort.

With just a few pantry staples and a quick mix-and-bake method, this casserole comes together in no time, delivering a golden-brown, tender dish that pairs beautifully with roasted meats, grilled vegetables, or festive entrees.

Why You’ll Love This Recipe

Quick and Simple: Requires minimal prep and just one bowl.

Rich and Creamy: Sour cream and melted butter add an indulgent texture.

Perfect for Any Occasion: A versatile dish that complements any meal.

Ingredients

• 1 (15-ounce) can whole kernel corn, drained

• 1 (14.75-ounce) can creamed corn

• 1 (8.5-ounce) package dry cornbread mix

• 1 cup sour cream

• ½ cup melted butter

• 2 eggs, beaten

Instructions

Step 1: Preheat the Oven

1. Preheat your oven to 350°F (175°C).

2. Lightly grease a 9×9-inch baking pan or similar-sized casserole dish.

Step 2: Prepare the Batter

1. In a medium bowl, combine the whole kernel corn, creamed corn, cornbread mix, sour cream, melted butter, and beaten eggs.

2. Stir until all ingredients are well blended and the batter is smooth.

Step 3: Pour into the Pan

1. Pour the mixture into the prepared baking pan, spreading it evenly.

Step 4: Bake the Casserole

1. Place the pan in the preheated oven.

2. Bake for about 45 minutes, or until the top is golden brown and a toothpick inserted into the center comes out clean.

Step 5: Cool and Serve

1. Remove the casserole from the oven and let it cool for a few minutes before serving.

2. Serve warm as a delicious side dish to complement your meal.

Tips

Add Extra Flavor: Stir in shredded cheddar cheese, diced jalapeños, or cooked bacon for added richness.

Make It Ahead: Assemble the batter, cover, and refrigerate overnight. Bake fresh the next day.

For Larger Crowds: Double the recipe and use a 9×13-inch baking dish.

Storage Options

Refrigeration: Store leftovers in an airtight container in the fridge for up to 3 days. Reheat in the oven or microwave.

Freezing: Wrap individual portions in plastic wrap and freeze for up to 2 months. Thaw in the fridge before reheating.

This Easy Creamy Corn Casserole is the perfect blend of sweet, savory, and creamy, making it a must-have addition to your recipe collection. It’s so simple and delicious, you’ll find yourself making it again and again!

Hot Fudge Brownie Bread

0

Hot Fudge Brownie Bread is the ultimate dessert for chocolate lovers, combining the richness of brownies with the comforting shape and texture of a loaf. This decadent treat is soft, fudgy, and packed with intense chocolate flavor, thanks to the addition of hot fudge sauce in the batter. Whether enjoyed warm with a scoop of vanilla ice cream or as a standalone indulgence, it’s guaranteed to satisfy your sweet tooth.

Why You’ll Love This Recipe

Rich and Decadent: The hot fudge sauce creates an irresistibly gooey and fudgy texture.

Quick and Easy: Uses a boxed brownie mix for convenience with homemade appeal.

Perfect for Sharing: Sliceable and portable, making it great for parties or gifts.

Ingredients

• 1 box brownie mix

• 1 (11 oz) jar hot fudge sauce

• 3 large eggs

• ⅓ cup vegetable oil

• A bread loaf pan

Instructions

Step 1: Preheat the Oven

1. Preheat your oven to 350°F (175°C).

2. Grease a non-stick loaf pan with cooking spray or lightly butter and flour it to prevent sticking.

Step 2: Prepare the Batter

1. In a medium mixing bowl, combine the brownie mix, hot fudge sauce, eggs, and vegetable oil.

2. Stir until the mixture is smooth and fully combined.

Step 3: Fill the Pan

1. Pour the batter into the prepared loaf pan, filling it about ¾ full to allow room for the bread to rise.

Step 4: Bake

1. Place the loaf pan in the preheated oven and bake for 45 minutes, or until a toothpick inserted into the center comes out with a few moist crumbs.

2. Keep an eye on it to prevent overbaking, as the bread should remain moist and fudgy.

Step 5: Cool Completely

1. Remove the loaf pan from the oven and allow the brownie bread to cool completely in the pan.

Note: Cooling is essential to prevent sticking and to keep the loaf intact when removing from the pan.

Step 6: Slice and Serve

1. Once cooled, gently remove the brownie bread from the pan.

2. Slice and serve as is, or pair with a dollop of whipped cream or a scoop of ice cream for extra indulgence.

Tips

Make It Extra Chocolaty: Swirl in additional hot fudge sauce before baking or sprinkle chocolate chips on top.

Toppings: Drizzle with melted chocolate or powdered sugar for a decorative finish.

Pan Options: For individual servings, bake in mini loaf pans or muffin tins, adjusting the bake time accordingly.

Storage Options

Room Temperature: Store in an airtight container for up to 3 days.

Refrigeration: Keep in the fridge for up to 5 days for a denser, fudgier texture.

Freezing: Wrap slices individually in plastic wrap and freeze for up to 2 months. Thaw at room temperature before serving.

Hot Fudge Brownie Bread is a decadent twist on traditional brownies, perfect for any occasion. Its rich chocolate flavor and moist texture make it a must-try for dessert lovers. Enjoy every luscious bite!

Low-Carb Bacon Cheeseburger Casserole

0

This Low-Carb Bacon Cheeseburger Casserole is a delicious, hearty meal that’s perfect for those following a low-carb or keto lifestyle. Packed with ground beef, crispy bacon, and gooey Cheddar cheese, this casserole delivers all the flavors of a classic bacon cheeseburger without the bun. The creamy egg mixture ties everything together, creating a dish that’s comforting, satisfying, and easy to prepare.

Why You’ll Love This Recipe

Low-Carb Delight: Perfect for keto diets and low-carb eating plans.

Classic Flavors: Tastes like a bacon cheeseburger but in casserole form.

Easy to Make: Minimal prep and just one dish to bake.

Ingredients

• 2 pounds ground beef

• 2 cloves garlic, minced

• ½ teaspoon onion powder

• 1 pound cooked bacon, cut into pieces

• 8 eggs

• 1 cup heavy whipping cream

• ½ teaspoon salt

• ¼ teaspoon ground black pepper

• 1 (12-ounce) package shredded Cheddar cheese, divided

Instructions

Step 1: Preheat the Oven

1. Preheat your oven to 350°F (175°C).

Step 2: Cook the Ground Beef

1. Heat a large skillet over medium-high heat.

2. Add the ground beef, garlic, and onion powder.

3. Cook until the beef is browned and crumbly, about 5–7 minutes.

4. Drain and discard the grease.

Step 3: Assemble the Casserole Base

1. Spread the cooked ground beef evenly onto the bottom of a 9×13-inch casserole dish.

2. Stir in the bacon pieces, distributing them evenly over the beef.

Step 4: Prepare the Egg Mixture

1. In a medium mixing bowl, whisk together the eggs, heavy cream, salt, and pepper until well combined.

2. Stir in 8 ounces (2 cups) of shredded Cheddar cheese.

Step 5: Pour and Top

1. Pour the egg mixture over the beef and bacon in the casserole dish, spreading it evenly.

2. Sprinkle the remaining 4 ounces (1 cup) of Cheddar cheese over the top.

Step 6: Bake

1. Place the casserole dish in the preheated oven.

2. Bake for 30–35 minutes, or until the top is golden brown and the casserole is set.

Step 7: Serve

1. Remove the casserole from the oven and let it cool for 5 minutes.

2. Slice and serve warm, optionally garnished with fresh parsley or diced pickles for a true burger experience.

Tips

Add Veggies: Stir in low-carb veggies like mushrooms or bell peppers for extra texture and flavor.

Customize the Cheese: Swap Cheddar for Colby Jack, Monterey Jack, or mozzarella.

Meal Prep: Make ahead and reheat individual portions for quick, low-carb meals throughout the week.

Storage Options

Refrigeration: Store leftovers in an airtight container in the fridge for up to 4 days.

Freezing: Freeze cooked portions in a freezer-safe container for up to 2 months. Thaw in the fridge overnight and reheat in the oven or microwave.

This Low-Carb Bacon Cheeseburger Casserole is a satisfying and flavorful dish that’s easy to make and perfect for busy weeknights or meal prepping. Enjoy all the indulgence of a cheeseburger in a healthier, low-carb format!

Key Lime Pie

0

Key Lime Pie is a classic dessert that’s the perfect combination of creamy, tangy, and sweet. This recipe features a smooth filling made from sweetened condensed milk, key lime juice, sour cream, and lime zest, all nestled in a buttery graham cracker crust. Its refreshing flavor and silky texture make it an irresistible treat for any occasion, especially in the warmer months.

This easy-to-follow recipe requires just a few simple steps and ingredients, yet it delivers a dessert that’s full of bright citrus flavor. Top it with whipped cream and lime slices for an elegant finishing touch.

Why You’ll Love This Recipe

Bright and Refreshing: The tangy lime flavor is balanced perfectly by the creamy filling.

Simple Ingredients: Only a handful of pantry staples needed.

Quick Preparation: Minimal hands-on time for an impressive dessert.

Ingredients

• 3 cups sweetened condensed milk

• ¾ cup key lime juice

• ½ cup sour cream

• 1 tablespoon grated lime zest

• 1 (9-inch) prepared graham cracker crust

Instructions

Step 1: Preheat the Oven

1. Preheat your oven to 350°F (175°C).

Step 2: Prepare the Filling

1. In a mixing bowl, combine sweetened condensed milk, key lime juice, sour cream, and grated lime zest.

2. Mix until the ingredients are well combined and smooth.

Step 3: Fill the Crust

1. Pour the lime filling into the prepared graham cracker crust.

2. Place the pie on a baking sheet for easier handling.

Step 4: Bake the Pie

1. Bake in the preheated oven for 5–8 minutes, just until tiny pinhole bubbles appear on the surface.

Tip: The filling should be slightly wobbly but not browned.

Step 5: Cool and Chill

1. Remove the pie from the oven and transfer it to a wire rack to cool.

2. Once cooled, refrigerate the pie for at least 1 hour, or until thoroughly chilled.

Step 6: Garnish and Serve

1. Before serving, garnish the pie with lime slices and whipped cream if desired.

2. Slice and enjoy this zesty dessert!

Tips

Key Lime Juice Substitute: If you can’t find key lime juice, regular lime juice works well as a substitute.

Garnish Ideas: Top with whipped cream, lime zest, or candied lime slices for extra flair.

Make Ahead: This pie can be prepared a day in advance, making it perfect for gatherings.

Storage Options

Refrigeration: Store leftovers in an airtight container in the fridge for up to 3 days.

Freezing: Wrap the pie tightly and freeze for up to 2 months. Thaw in the refrigerator before serving.

Key Lime Pie is a timeless dessert that’s as delicious as it is easy to make. Whether for a special occasion or a casual dinner, its refreshing citrus flavor and creamy texture are sure to delight. Enjoy every bite of this tangy treat!

Cheesy Chicken Fritters

0

Cheesy Chicken Fritters are a delicious and versatile dish that combines tender chicken pieces with gooey mozzarella cheese and fresh dill, all lightly pan-fried to golden perfection. These fritters are perfect as an appetizer, snack, or main course, and they pair wonderfully with the optional garlic aioli dip for an extra burst of flavor.

The easy-to-make batter holds everything together while creating a crispy, golden crust. This recipe is perfect for family dinners, gatherings, or meal prepping for the week.

Why You’ll Love This Recipe

Rich and Cheesy: Mozzarella makes every bite gooey and flavorful.

Quick and Easy: Minimal prep with a simple batter for frying.

Versatile: Great as a main dish, appetizer, or snack.

Ingredients for Chicken Fritters

• 1½ lbs chicken breasts (about 3 large pieces)

• 2 large eggs

• ⅓ cup mayonnaise

• ⅓ cup all-purpose flour (or cornstarch/potato starch for gluten-free)

• 4 oz mozzarella cheese (1⅓ cups shredded)

• 1½ tbsp chopped fresh dill

• ½ tsp salt, or to taste

• ⅛ tsp black pepper

• 2 tbsp extra light olive oil (or any high-heat cooking oil)

Ingredients for Garlic Aioli Dip (Optional)

• ⅓ cup mayonnaise

• 1 garlic clove, pressed

• ½ tbsp lemon juice

• ¼ tsp salt

• ⅛ tsp black pepper

Instructions

Step 1: Prepare the Chicken

1. Using a sharp knife, dice the chicken into ⅓-inch thick pieces.

Tip: If the chicken is partially frozen, it will be easier to slice.

Step 2: Make the Batter

1. In a large mixing bowl, combine diced chicken, eggs, mayonnaise, flour, shredded mozzarella, chopped dill, salt, and black pepper.

2. Stir the mixture until well combined. Cover with plastic wrap and refrigerate for 2 hours or overnight for best results.

Step 3: Cook the Fritters

1. Heat a large non-stick pan over medium heat and add 2 tablespoons of oil.

2. When the oil is hot, scoop a heaping tablespoon of the chicken mixture into the pan. Flatten the tops slightly with the back of your spoon.

3. Sauté the fritters uncovered for 3–4 minutes on the first side, then flip and sauté for another 3 minutes on the second side until golden brown and the chicken is fully cooked through.

4. Repeat with the remaining batter, adding more oil as needed.

Step 4: Make the Garlic Aioli (Optional)

1. In a small bowl, mix mayonnaise, pressed garlic, lemon juice, salt, and black pepper.

2. Stir until smooth and serve as a dipping sauce for the fritters.

Tips

Ensure Even Cooking: Keep the fritters small to cook evenly and prevent undercooked centers.

Herb Substitutes: Swap dill for parsley, cilantro, or chives based on your preference.

Serving Ideas: Pair with a crisp salad, roasted vegetables, or as part of a sandwich.

Storage Options

Refrigeration: Store leftover fritters in an airtight container in the fridge for up to 3 days. Reheat in a pan or air fryer for best results.

Freezing: Freeze cooked fritters in a single layer on a baking sheet, then transfer to a freezer bag. Reheat directly from frozen.

Cheesy Chicken Fritters are a crowd-pleasing dish with their rich flavor and crispy texture. Perfect for any occasion, they’re easy to make, satisfying, and absolutely delicious. Serve them with the optional garlic aioli dip for an extra layer of indulgence!

Apple Dumplings

0

Apple Dumplings are a classic dessert that combines tender baked apples, flaky biscuit dough, and a sweet cinnamon-sugar glaze. This nostalgic treat is simple to prepare yet delivers a big impact with its comforting flavors and irresistible aroma. Perfect for any occasion, these dumplings can be served warm with a scoop of vanilla ice cream or a drizzle of caramel sauce.

Using Granny Smith apples provides a delightful tartness that perfectly balances the sweetness of the sugar and cinnamon. The buttery sauce and soft, golden-brown biscuits make every bite a heavenly experience.

Why You’ll Love This Recipe

Comforting and Classic: A timeless dessert that brings warmth to any table.

Easy to Make: Uses canned biscuits for quick preparation.

Perfectly Balanced: Tart apples, sweet sauce, and cinnamon create the perfect flavor harmony.

Ingredients

• 2 Granny Smith apples

• 1 lemon

• 1 cup sugar

• ½ cup (1 stick) butter

• ¼ teaspoon vanilla extract

• 8 canned buttermilk biscuits

• 4 teaspoons ground cinnamon

Instructions

Step 1: Preheat the Oven

1. Preheat your oven to 375°F (190°C).

Step 2: Prepare the Apples

1. Peel, core, and slice the Granny Smith apples into 8 wedges each.

2. Fill a bowl with water and squeeze the juice of one lemon into it. Place the apple slices in the lemon water to prevent browning.

Step 3: Make the Sugar Mixture

1. In a medium saucepan, combine 1 cup water, ¾ cup sugar, butter, and vanilla extract.

2. Bring the mixture to a boil over medium heat, stirring occasionally until the sugar dissolves.

Step 4: Wrap the Apples

1. Separate each biscuit into two layers.

2. Wrap a biscuit layer around each apple slice, gently stretching the dough to overlap and seal at the bottom.

3. Place the wrapped apple slices, sealed-side down, into a 9×12×2-inch casserole dish.

Step 5: Add the Sauce and Cinnamon-Sugar

1. Pour the hot sugar mixture evenly over the wrapped apple slices.

2. Mix the remaining ¼ cup sugar with the ground cinnamon. Sprinkle the mixture generously over the top of the dumplings.

Step 6: Bake

1. Bake in the preheated oven for 35 minutes, or until the dumplings are golden brown and the sauce is bubbling.

Step 7: Serve

1. Let the dumplings cool slightly before serving.

2. Serve warm, optionally paired with a scoop of vanilla ice cream or a drizzle of caramel sauce.

Tips

Choose the Right Apples: Granny Smith apples are ideal for their tartness, but Honeycrisp or Pink Lady work well too.

Customize the Flavor: Add a pinch of nutmeg or cloves to the cinnamon-sugar mixture for extra warmth.

Make It Ahead: Assemble the dumplings in the casserole dish and refrigerate. Add the sauce and bake when ready to serve.

Storage Options

Refrigeration: Store leftovers in an airtight container in the fridge for up to 3 days. Reheat in the oven or microwave before serving.

Freezing: Wrap unbaked dumplings in plastic wrap, freeze, and bake from frozen. Add a few extra minutes to the baking time.

Apple Dumplings are the perfect dessert for cozy evenings or family gatherings. Their warm, gooey center and crispy golden exterior make every bite unforgettable. Try this simple yet indulgent recipe today and enjoy a slice of comfort food heaven!

Cowboy Cookies

0

Cowboy Cookies are a delicious, chunky cookie loaded with a variety of textures and flavors. These cookies bring together classic ingredients like chocolate chips, oats, coconut, and pecans, making each bite chewy, nutty, and sweet. The mix of oats and nuts gives them a hearty feel, while the chocolate chips and coconut add a touch of indulgence. These cookies are perfect for when you’re craving a substantial treat with a combination of chewy and crunchy elements.

These versatile cookies are great for any occasion, whether you’re baking for a family gathering, an afternoon snack, or a quick treat to satisfy a sweet craving. They’re easy to make and pack well for lunches, road trips, or gift baskets.

Why You’ll Love This Recipe:

Loaded with Goodies: Each cookie is packed with chocolate, oats, coconut, and nuts, making them both filling and delicious.

Easy to Make: With straightforward steps, these cookies are beginner-friendly.

Perfect for Any Occasion: Great as a snack, for sharing, or as a gift.

Ingredients:

• 1 cup all-purpose flour

• 1/2 teaspoon baking soda

• 1/2 teaspoon baking powder

• 1/2 teaspoon salt

• 1/2 cup unsalted butter, softened

• 1/2 cup granulated sugar

• 1/2 cup packed brown sugar

• 1 large egg

• 1 teaspoon pure vanilla extract

• 1 cup old-fashioned rolled oats

• 1 cup semisweet chocolate chips

• 1/2 cup shredded coconut (unsweetened or sweetened, based on preference)

• 1/2 cup chopped pecans

How To Make Cowboy Cookies:

1. Preheat Oven & Prepare:

• Preheat your oven to 350°F (175°C). Line two baking sheets with parchment paper.

2. Combine Dry Ingredients:

• In a medium bowl, whisk together the flour, baking soda, baking powder, and salt. Set aside.

3. Cream Butter & Sugars:

• In a large bowl, using an electric mixer, cream together the softened butter, granulated sugar, and brown sugar until smooth and creamy.

4. Add Egg & Vanilla:

• Beat in the egg, followed by the vanilla extract, ensuring they’re well incorporated.

5. Mix in Dry Ingredients:

• Gradually add the dry ingredients to the butter mixture, mixing just until combined.

6. Stir in Goodies:

• Fold in the oats, chocolate chips, shredded coconut, and chopped pecans, mixing until evenly distributed.

7. Drop & Bake:

• Using a cookie scoop or two spoons, drop rounded tablespoons of cookie dough onto the prepared baking sheets, spacing them about 2 inches apart.

• Flatten each slightly with the back of a spoon, then bake in the preheated oven for 10-12 minutes or until the edges are golden brown.

8. Cool & Enjoy:

• Let the cookies cool on the baking sheets for a few minutes before transferring them to a wire rack to cool completely.

Tips:

Customize Add-Ins: Swap pecans for walnuts or add raisins for a twist.

Room Temperature Ingredients: Ensure butter and egg are at room temperature for a smoother dough.

Storage: Store cookies in an airtight container for up to a week to maintain freshness.

Storage Options:

Room Temperature: Store in an airtight container at room temperature for up to 5-7 days.

Freezer: Freeze unbaked cookie dough balls for up to 3 months. Bake from frozen, adding an extra minute or two to the baking time.

These Cowboy Cookies are an irresistible treat, packed with flavor and texture in every bite. Enjoy them as a hearty snack or dessert that’s sure to satisfy!

Long John Silver’s Batter

0

This batter recipe replicates the crispy, golden coating that Long John Silver’s is famous for. Perfect for fish, shrimp, or any seafood of your choice, it creates a light yet crunchy crust with a flavorful mix of seasonings. This simple and versatile recipe is ideal for a family fish fry or when you’re craving restaurant-quality seafood at home.

Why You’ll Love This Recipe

Crispy Perfection: The batter fries to a golden brown with a satisfying crunch.

Flavorful Seasoning: A blend of spices adds a subtle depth to the batter.

Versatile: Works for fish, shrimp, or even vegetables.

Ingredients

• 1 cup all-purpose flour

• 1 teaspoon baking powder

• ½ teaspoon salt

• ½ teaspoon paprika

• ½ teaspoon garlic powder

• ¼ teaspoon onion powder

• ¼ teaspoon black pepper

• 1 cup cold water

Instructions

Step 1: Mix the Dry Ingredients

1. In a mixing bowl, combine the flour, baking powder, salt, paprika, garlic powder, onion powder, and black pepper.

2. Stir well to ensure the spices are evenly distributed.

Step 2: Add the Cold Water

1. Gradually pour the cold water into the dry ingredients while whisking continuously.

2. Whisk until the batter is smooth and free of lumps.

Step 3: Rest the Batter

1. Let the batter rest for 10–15 minutes to allow the ingredients to hydrate and the flavors to meld.

Step 4: Coat the Seafood

1. Dip your seafood (such as fish fillets or shrimp) into the batter, ensuring each piece is thoroughly coated.

Step 5: Heat the Oil

1. Heat oil in a deep fryer or deep skillet to 350°F (175°C). Use enough oil to fully submerge the seafood.

Step 6: Fry the Seafood

1. Carefully place the battered seafood into the hot oil.

2. Fry until golden brown and crispy, usually 3–5 minutes, depending on the thickness of the seafood.

Step 7: Drain the Excess Oil

1. Use a slotted spoon to remove the cooked seafood from the oil.

2. Place the fried seafood on a plate lined with paper towels to drain any excess oil.

Step 8: Serve

1. Serve your crispy battered seafood with your favorite dipping sauces and sides, such as tartar sauce, coleslaw, or fries.

Tips

Cold Water Is Key: Using cold water helps create a light, crispy texture.

Consistent Heat: Maintain the oil temperature at 350°F for even cooking.

Small Batches: Fry in small batches to prevent the oil temperature from dropping.

Storage Options

Refrigeration: Store leftover fried seafood in an airtight container in the fridge for up to 2 days. Reheat in an oven or air fryer for crispiness.

Freezing: Freeze uncooked, battered seafood on a tray until solid, then transfer to a freezer-safe container. Fry directly from frozen, adjusting the cooking time.

This homemade Long John Silver’s Batter brings the taste of your favorite seafood chain to your kitchen. Whether you’re making fish, shrimp, or a seafood platter, this batter guarantees a delicious, crispy coating every time. Enjoy!