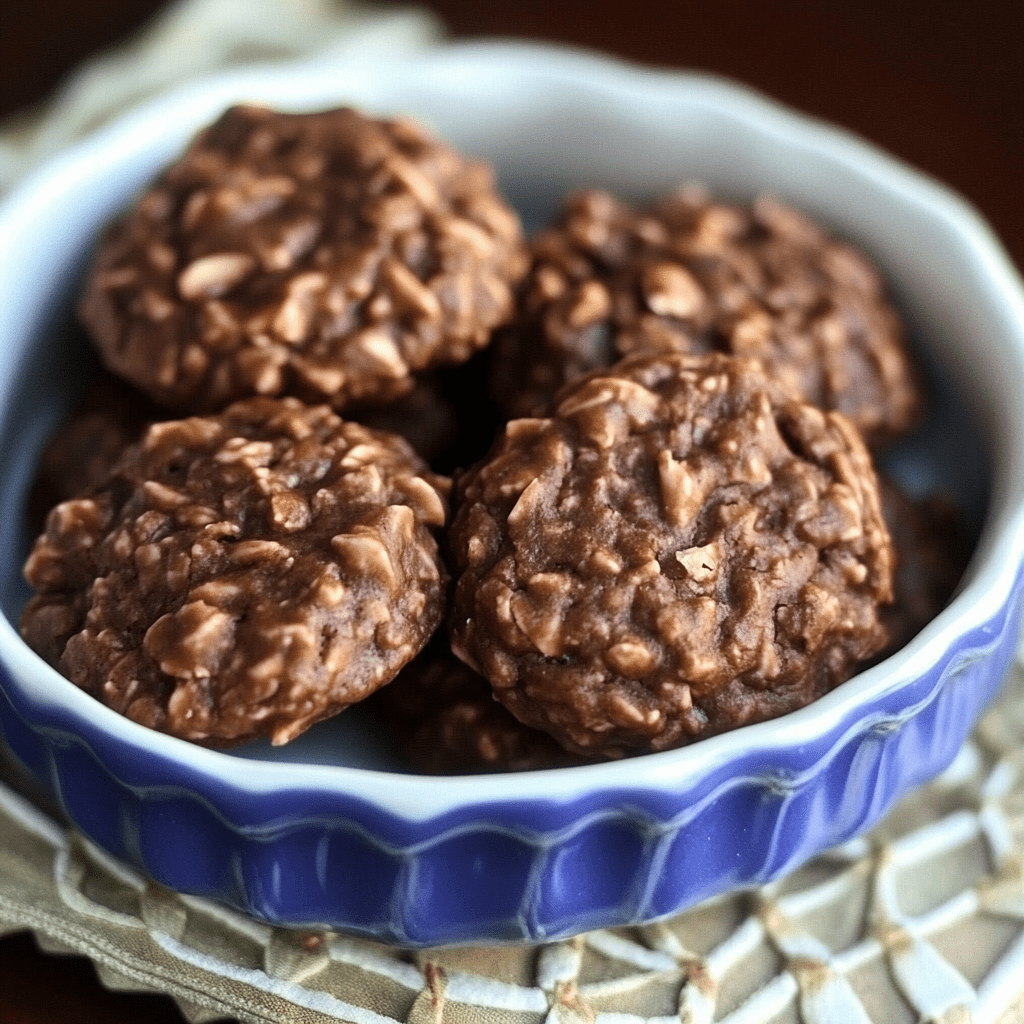
Creamy Ham and Potato Soup

0

Creamy Ham and Potato Soup is the epitome of comfort food, offering a warm, hearty bowl filled with tender potatoes, savory ham, and a rich, creamy broth. It’s a perfect dish for chilly evenings or whenever you’re craving something nourishing and flavorful. The combination of sautéed vegetables, garlic, and thyme creates a savory base, while the addition of cream gives the soup its signature velvety texture.

This soup is not only delicious but also versatile. You can customize it with your favorite vegetables, spices, or garnishes, making it a dish you’ll come back to time and time again. Pair it with crusty bread for an even more satisfying meal that will leave everyone asking for seconds.

Why You’ll Love This Recipe

Rich and Hearty: Perfectly balanced creaminess with tender potatoes and savory ham.

Comforting and Nutritious: Packed with veggies, protein, and a luscious broth.

Easy to Customize: Adjust seasonings or add your favorite ingredients to make it your own.

Ingredients

Base:

• 4 tablespoons butter

• 1 medium onion, finely chopped

• 3 cloves garlic, minced

• 2 stalks celery, chopped

• 2 large carrots, chopped

• 4 large russet potatoes, peeled and diced

• 2 cups cooked ham, diced

Broth and Cream:

• 4 cups chicken broth

• 2 cups milk

• 1 cup heavy cream

• ¼ cup flour

Seasonings:

• 1 teaspoon salt

• ½ teaspoon black pepper

• ½ teaspoon dried thyme

Garnish:

• ¼ cup green onions, chopped

• 1 cup shredded cheddar cheese (optional)

Instructions

Step 1: Prepare the Base

1. Melt the butter in a large pot or Dutch oven over medium heat.

2. Add the chopped onion and garlic, sautéing until the onion is translucent and fragrant, about 3-4 minutes.

3. Stir in the celery and carrots, cooking for another 5 minutes until slightly softened.

Step 2: Add the Potatoes and Ham

1. Add the diced potatoes and cooked ham to the pot, stirring to combine with the vegetables.

Step 3: Make the Broth

1. Sprinkle the flour over the vegetable and ham mixture, stirring constantly to avoid lumps.

2. Cook for about 2 minutes to eliminate the raw flour taste.

3. Gradually pour in the chicken broth, stirring continuously to ensure a smooth consistency.

4. Bring the mixture to a boil, then reduce the heat to a simmer.

Step 4: Simmer the Soup

1. Cover the pot and let the soup simmer for 15-20 minutes, or until the potatoes are fork-tender.

Step 5: Add the Cream

1. Stir in the milk and heavy cream, then season with salt, black pepper, and thyme.

2. Cook for another 5-10 minutes, allowing the flavors to meld and the soup to thicken slightly.

Step 6: Adjust Consistency

1. If the soup is too thick, add additional chicken broth or milk.

2. For a thicker soup, simmer uncovered to reduce the liquid.

Step 7: Garnish and Serve

1. Serve hot, garnished with chopped green onions and shredded cheddar cheese if desired.

Tips

Texture: For a creamier soup, mash some of the potatoes directly in the pot before adding the cream.

Ham Alternatives: Use smoked sausage or leftover turkey for a different protein option.

Spice It Up: Add a pinch of cayenne pepper or paprika for a subtle kick.

Storage Options

Refrigeration: Store leftovers in an airtight container in the refrigerator for up to 3 days. Reheat gently on the stovetop or microwave.

Freezing: Freeze in individual portions for up to 2 months. Thaw in the refrigerator overnight before reheating.

Creamy Ham and Potato Soup is a cozy, satisfying dish that’s perfect for any time of year. It’s easy to prepare, deeply flavorful, and guaranteed to warm both the body and soul. Enjoy!

Crispy Chicken Wings

0

Crispy Chicken Wings are the ultimate crowd-pleasing appetizer or snack. These wings are baked to golden perfection, delivering all the crunch and flavor of fried wings without the extra oil and mess. Coated in a savory blend of spices and baking powder, the wings crisp up beautifully in the oven, making them a healthier yet equally delicious alternative to deep-fried versions.

To elevate the flavor, pair the wings with a tangy, buttery hot sauce or serve them plain with a side of blue cheese or ranch dressing. Whether you’re hosting a game day gathering, a casual get-together, or simply indulging in a wing craving, this recipe is guaranteed to impress with its irresistible crunch and bold flavors.

Why You’ll Love This Recipe

Healthier Option: Baked instead of fried, yet perfectly crispy.

Customizable: Adjust the spice level and sauce to your liking.

Easy to Make: Simple preparation with minimal cleanup.

Ingredients

For the Chicken Wings:

• 2 pounds chicken wings (split into drumettes and flats)

• 2 tablespoons baking powder (not baking soda)

• 1 teaspoon salt

• ½ teaspoon black pepper

• 1 teaspoon garlic powder

• 1 teaspoon onion powder

• 1 teaspoon paprika (optional, for color)

• ½ teaspoon cayenne pepper (optional, for heat)

For the Sauce (Optional):

• ½ cup butter (1 stick), melted

• ½ cup hot sauce (e.g., Frank’s RedHot)

• 2 tablespoons honey (for a sweeter sauce)

• ½ teaspoon garlic powder

Instructions

Prepare the Chicken Wings

1. Preheat the Oven:

Preheat your oven to 425°F (220°C). Line a baking sheet with aluminum foil and place a wire rack on top. Lightly spray the rack with non-stick cooking spray.

2. Dry the Wings:

Pat the chicken wings dry with paper towels. Removing excess moisture helps achieve a crispy texture.

3. Season the Wings:

In a large bowl, mix the baking powder, salt, black pepper, garlic powder, onion powder, paprika, and cayenne pepper. Toss the chicken wings in the mixture until evenly coated.

Bake the Wings

1. Arrange on Rack:

Place the seasoned wings in a single layer on the wire rack, ensuring they don’t touch for even cooking.

2. Bake:

Bake in the preheated oven for 25 minutes. Flip the wings and bake for another 20-25 minutes, or until the wings are golden brown and crispy.

Prepare the Sauce (Optional)

1. Mix Ingredients:

In a small saucepan, combine the melted butter, hot sauce, honey, and garlic powder. Stir over medium heat until well combined and heated through. Remove from heat and set aside.

Toss the Wings in Sauce

1. Cool Slightly:

Once the wings are done baking, let them cool slightly.

2. Coat in Sauce:

For sauced wings, place the wings in a large bowl, pour the prepared sauce over them, and toss until evenly coated.

Serve

1. Arrange the wings on a serving platter. Serve with celery sticks, carrot sticks, and a side of blue cheese or ranch dressing for dipping.

2. Enjoy the crispy, flavorful wings hot from the oven.

Tips

Crispier Wings: Make sure the wings are completely dry before tossing in the seasoning mix.

Flavor Boost: Marinate the wings in your favorite spices for a few hours before baking.

Make It Spicy: Add more cayenne or use a hotter sauce for extra heat.

Storage Options

Refrigeration: Store leftovers in an airtight container in the refrigerator for up to 3 days. Reheat in the oven at 375°F (190°C) to retain crispiness.

Freezing: Freeze cooked wings in a freezer-safe container for up to 2 months. Thaw in the refrigerator before reheating.

Crispy Chicken Wings are a classic favorite that never disappoints. Perfectly crispy, juicy, and packed with flavor, they’re a must-try for wing enthusiasts and food lovers alike!

Easy Peanut Butter Fudge

0

Peanut Butter Fudge is a timeless treat, loved for its rich, creamy texture and deep peanut butter flavor. This recipe is simple to prepare and perfect for satisfying your sweet tooth or sharing with friends and family. With just a few ingredients and minimal cooking time, you’ll have a delicious homemade dessert that’s sure to impress.

This fudge is perfect for holiday gatherings, gifting, or an indulgent snack at home. The addition of extra-crunchy peanut butter adds a delightful texture, while the vanilla extract enhances the rich flavor. It’s a no-fuss recipe that turns pantry staples into a delightful sweet treat.

Why You’ll Love This Recipe

Quick and Simple: Made with just four ingredients in a matter of minutes.

Rich and Creamy: Perfectly smooth texture with the option for added crunch.

Great for Sharing: Ideal for parties, holidays, or gifting.

Ingredients

• 2 cups sugar

• ½ cup milk

• 1 cup peanut butter (extra crunchy for added texture)

• 1 teaspoon vanilla extract

Instructions

Step 1: Boil the Sugar and Milk

1. In a medium saucepan, combine the sugar and milk.

2. Heat over medium, stirring occasionally, and bring the mixture to a boil.

3. Continue boiling for about 3 minutes, ensuring the sugar dissolves completely to avoid a gritty texture.

Step 2: Add Peanut Butter and Vanilla

1. Remove the saucepan from heat.

2. Stir in the peanut butter and vanilla extract.

3. Mix vigorously until the peanut butter is fully incorporated and the mixture is smooth.

Step 3: Pour and Cool

1. Pour the mixture into an 8×8-inch pan, spreading it evenly.

2. Allow the fudge to cool at room temperature until set.

Step 4: Slice and Serve

1. Once cooled and firm, cut the fudge into squares.

2. Serve and enjoy!

Tips

Texture Variation: Use creamy peanut butter for a smooth fudge or extra crunchy for added texture.

Line the Pan: Line the pan with parchment paper for easy removal and cleanup.

Add a Twist: Sprinkle chocolate chips, chopped nuts, or a pinch of sea salt on top before cooling for added flavor.

Storage Options

Room Temperature: Store in an airtight container at room temperature for up to a week.

Refrigeration: Extend shelf life by storing in the refrigerator for up to two weeks.

Freezing: Freeze the fudge in a sealed container for up to three months. Thaw at room temperature before serving.

Easy Peanut Butter Fudge is a quick, satisfying dessert that’s perfect for any occasion. With its rich flavor and creamy texture, it’s a treat you’ll want to make again and again!

Roasted Asparagus & Carrots

0

Roasted Asparagus & Carrots is a simple yet elegant side dish that celebrates the natural sweetness and flavor of fresh vegetables. The combination of tender asparagus and slightly caramelized carrots makes this recipe a versatile accompaniment for any meal. Tossed in olive oil and seasoned with garlic and thyme, the vegetables roast to golden perfection, delivering a delightful blend of textures and earthy flavors. Whether paired with roasted meats, fish, or a vegetarian main, this dish is a healthy and visually appealing addition to your table.

What sets this recipe apart is its simplicity and ease of preparation. With minimal ingredients and a straightforward process, you can create a vibrant, nutrient-packed side dish in just under 30 minutes. Optional Parmesan cheese adds a savory touch that takes the flavor to the next level, making it equally suited for weeknight dinners or holiday feasts. This dish not only looks beautiful but also tastes divine, making it a go-to recipe for any occasion.

Why You’ll Love This Recipe

Healthy and Flavorful: Packed with nutrients and seasoned to perfection.

Quick and Easy: Simple preparation with a bake time of just 20-25 minutes.

Versatile Side Dish: Complements a variety of main courses.

Ingredients

• 1 bunch of asparagus, woody ends trimmed

• 4 large carrots, peeled and sliced into sticks

• 2 tablespoons olive oil

• 2 cloves garlic, minced

• 1 teaspoon dried thyme

• Salt and pepper, to taste

• Optional: Grated Parmesan cheese, for serving

Instructions

Step 1: Preheat the Oven

1. Preheat your oven to 400°F (200°C).

2. Line a baking sheet with parchment paper or aluminum foil for easy cleanup.

Step 2: Prepare the Vegetables

1. Place the trimmed asparagus and carrot sticks on the prepared baking sheet.

2. Drizzle the olive oil over the vegetables.

3. Sprinkle with minced garlic, dried thyme, salt, and pepper. Toss the vegetables until evenly coated.

Step 3: Roast the Vegetables

1. Spread the vegetables out in a single layer on the baking sheet to ensure even cooking.

2. Roast in the preheated oven for 20-25 minutes, tossing halfway through, until tender and lightly browned.

Step 4: Serve and Enjoy

1. Transfer the roasted vegetables to a serving platter.

2. Serve hot as a side dish, garnished with grated Parmesan cheese if desired.

Tips

Even Cooking: Slice carrots into similar-sized sticks to ensure they cook evenly with the asparagus.

Customize Seasoning: Add your favorite spices, such as smoked paprika or chili flakes, for a unique twist.

Watch for Tenderness: Check for doneness around 20 minutes to avoid overcooking the asparagus.

Storage Options

Refrigeration: Store leftovers in an airtight container in the refrigerator for up to 3 days.

Reheating: Reheat in the oven at 375°F (190°C) or in a skillet over medium heat to retain crispness.

Freezing: Not recommended, as the texture of roasted asparagus may change.

Roasted Asparagus & Carrots is a healthy, flavorful dish that’s easy to prepare and sure to impress. It’s a simple yet delicious way to add color and nutrients to your plate, making it a must-try recipe for vegetable lovers!

Gooey Mozzarella Biscuit Bombs

0

Gooey Mozzarella Biscuit Bombs are the ultimate comfort snack, combining buttery biscuit dough with melted, stretchy mozzarella cheese. Brushed with garlic butter and sprinkled with Parmesan cheese, these delightful bites are perfect for game day, parties, or a cozy night in. Serve them with marinara sauce for dipping, and you’ve got an irresistible appetizer or snack that’s sure to be a crowd-pleaser.

Why You’ll Love This Recipe

Cheesy Goodness: Melted mozzarella makes every bite gooey and delicious.

Easy to Make: Uses simple, store-bought biscuit dough for quick prep.

Perfect for Sharing: Great for parties, gatherings, or a fun family snack.

Ingredients

• 1 can refrigerated biscuit dough

• 16 cubes mozzarella cheese (about 1 inch each)

• 4 tablespoons melted butter

• 1 teaspoon garlic powder

• 1 teaspoon Italian seasoning

• 2 tablespoons grated Parmesan cheese

• Fresh parsley, chopped (for garnish)

Instructions

Step 1: Preheat the Oven

1. Preheat your oven to 375°F (190°C).

2. Line a baking sheet with parchment paper or lightly grease it with non-stick cooking spray.

Step 2: Prepare the Biscuit Dough

1. Open the can of refrigerated biscuit dough and separate the biscuits.

2. Flatten each biscuit slightly using your hands or a rolling pin to create a small disc.

Step 3: Add the Cheese

1. Place a mozzarella cheese cube in the center of each biscuit disc.

2. Wrap the biscuit dough around the cheese cube, pinching the edges tightly to seal.

3. Repeat for all the biscuits and cheese cubes.

Step 4: Brush with Garlic Butter

1. In a small bowl, mix the melted butter, garlic powder, and Italian seasoning.

2. Brush the garlic butter mixture generously over each biscuit bomb.

Step 5: Add Parmesan and Bake

1. Sprinkle grated Parmesan cheese over the tops of the biscuit bombs.

2. Arrange the bombs on the prepared baking sheet, spacing them slightly apart.

3. Bake for 12-15 minutes, or until the biscuits are golden brown and the cheese is melted.

Step 6: Garnish and Serve

1. Remove the biscuit bombs from the oven and let them cool slightly.

2. Garnish with chopped fresh parsley.

3. Serve warm with marinara sauce for dipping, if desired.

Tips

Seal Tightly: Ensure the dough is sealed around the cheese to prevent leaks during baking.

Experiment with Cheese: Try using other cheeses like cheddar or pepper jack for a twist.

Reheat Gently: Reheat leftovers in the oven or air fryer to restore crispiness.

Storage Options

Refrigeration: Store leftovers in an airtight container in the refrigerator for up to 3 days.

Freezing: Freeze unbaked biscuit bombs on a baking sheet until solid, then transfer to a freezer-safe bag. Bake directly from frozen, adding a few extra minutes to the baking time.

Gooey Mozzarella Biscuit Bombs are a cheesy, garlicky delight that’s perfect for any occasion. Quick to prepare and impossible to resist, they’re sure to become a favorite!

Fried Potatoes, Onions, and Smoked Polish Sausage

0

This Fried Potatoes, Onions, and Smoked Polish Sausage dish is a hearty, flavorful meal that combines tender roasted potatoes, caramelized onions, and savory sausage. Infused with Cajun spices and paprika, it’s a smoky, slightly spicy delight that’s easy to prepare. Perfect for a comforting family dinner or a quick, crowd-pleasing dish, this recipe is both simple and satisfying.

Why You’ll Love This Recipe

Simple Ingredients: Uses pantry staples and fresh ingredients.

Bold Flavors: Cajun spices and smoked sausage pack a flavorful punch.

One-Pan Wonder: Easy prep and cleanup, making it perfect for busy evenings.

Ingredients

• 1 pound Cajun smoked sausage

• 1 pound smoked turkey sausage

• 2 pounds baby red potatoes, halved

• 2 large onions, cut into chunks

• 1 tablespoon Cajun spice

• ½ teaspoon salt

• 1 teaspoon paprika

• ½ teaspoon black pepper

• Olive oil

• Fresh parsley, chopped (optional, for garnish)

Instructions

Step 1: Preheat the Oven

1. Preheat your oven to 400°F (200°C).

Step 2: Prepare the Ingredients

1. Slice the Cajun smoked sausage and smoked turkey sausage into ½-inch slices.

2. Cut the onions into chunks or wedges.

3. Place the sausage, onions, and halved baby red potatoes into a large mixing bowl.

Step 3: Season the Mixture

1. Add the Cajun spice, salt, paprika, and black pepper to the bowl.

2. Drizzle olive oil over the ingredients and toss to coat everything evenly.

Step 4: Roast the Dish

1. Spread the seasoned sausage, potatoes, and onions onto a prepared rimmed baking sheet in an even layer.

2. Place the sheet in the preheated oven and roast for 45 minutes, stirring halfway through to ensure even cooking.

Step 5: Garnish and Serve

1. Once the potatoes are tender and the sausage is golden and slightly crispy, remove the sheet from the oven.

2. Garnish with chopped parsley, if desired, and serve immediately.

Tips

Uniform Cuts: Cut the potatoes and sausage into similar sizes to ensure even cooking.

Add Veggies: Include bell peppers or zucchini for extra flavor and nutrition.

Adjust Spice: Increase or decrease Cajun spice to match your heat preference.

Storage Options

Refrigeration: Store leftovers in an airtight container in the refrigerator for up to 3 days.

Reheating: Reheat in the oven at 350°F or in a skillet over medium heat to maintain crispiness.

Freezing: Not recommended, as potatoes can lose their texture when thawed.

This dish is a flavorful, easy-to-make meal that combines the smokiness of sausage with the comforting taste of roasted potatoes and onions. Serve it as a standalone dish or alongside a fresh green salad for a complete meal.

Pizza Grilled Cheese Sandwich

0

Pizza Grilled Cheese Sandwich combines the cheesy, saucy goodness of pizza with the crispy, buttery texture of grilled cheese. This indulgent sandwich features layers of pepperoni, mozzarella, and spaghetti sauce nestled between slices of garlic Texas toast, grilled to golden perfection. It’s a fun and flavorful twist on two classic comfort foods, making it perfect for a quick lunch, a family-friendly dinner, or a satisfying snack.

With its melty cheese, zesty sauce, and crispy exterior, this sandwich is sure to become a favorite. Easy to make and endlessly satisfying, it’s a recipe that will please pizza and grilled cheese lovers alike.

Why You’ll Love This Recipe

Two Classics in One: Combines the best parts of pizza and grilled cheese into one irresistible sandwich.

Quick and Easy: Simple ingredients and straightforward preparation make this a go-to recipe.

Customizable: Add your favorite pizza toppings for a personalized twist.

Ingredients

• 8 tablespoons spaghetti sauce

• 1 box garlic Texas toast (8 slices)

• 6 ounces pepperoni slices

• 8 ounces mozzarella cheese slices

Instructions

Step 1: Preheat and Toast

1. Preheat your oven to 425°F (220°C).

2. Arrange the garlic Texas toast slices on a baking sheet.

3. Bake for about 7 minutes, or until the edges are lightly crispy.

Step 2: Layer the Ingredients

1. Spread 1 tablespoon of spaghetti sauce evenly on each of 4 slices of the garlic toast.

2. Layer 6 slices of pepperoni on top of the sauce-covered toast slices.

3. Place a slice of mozzarella cheese on each.

4. Add another layer of pepperoni and top with another slice of mozzarella cheese.

Step 3: Complete the Sandwich

1. Spread 1 tablespoon of spaghetti sauce on each of the remaining 4 slices of garlic toast.

2. Place these sauce-covered slices sauce-side down on top of the pepperoni and cheese layers to form sandwiches.

Step 4: Grill to Perfection

1. Heat a skillet or griddle over medium heat and drizzle lightly with olive oil.

2. Place the sandwiches in the skillet and cook for 3-4 minutes on each side, or until the cheese is melted and the exterior is golden brown.

Step 5: Serve and Enjoy

1. Remove the sandwiches from the skillet and let them cool for a minute before serving.

2. Serve hot and enjoy the melty, pizza-inspired goodness.

Tips

Toppings: Add your favorite pizza toppings like mushrooms, olives, or bell peppers for extra flavor.

Crispy Exterior: Press the sandwiches gently with a spatula while grilling to ensure even toasting.

Dipping Sauce: Serve with a side of marinara or ranch for dipping.

Storage Options

Refrigeration: Store leftover sandwiches in an airtight container in the refrigerator for up to 2 days. Reheat in a skillet or oven to maintain crispness.

Freezing: Freeze ungrilled sandwiches wrapped tightly in plastic wrap. Grill directly from frozen, adding an extra minute or two on each side.

Pizza Grilled Cheese Sandwich is the ultimate comfort food mashup, delivering the best of both worlds in every bite. It’s cheesy, crispy, and bursting with pizza flavors—what’s not to love?

Bang Bang Shrimp Pasta

0

Bang Bang Shrimp Pasta is a bold and flavorful dish that combines tender shrimp, al dente spaghetti, and a creamy, spicy sauce with just the right amount of heat. The sauce, a mix of sweet Thai chili, sriracha, and lime juice, is rich and zesty, making this pasta dish a standout meal for weeknights or casual gatherings.

This recipe is quick to prepare, offering the perfect balance of creamy, spicy, and savory flavors. Topped with fresh cilantro and a sprinkle of red pepper flakes, it’s an irresistible fusion of comfort food and bold Asian-inspired flavors.

Why You’ll Love This Recipe

Bold Flavors: The sauce brings a delightful mix of sweet, spicy, and tangy.

Quick and Easy: Ready in about 30 minutes, perfect for busy weeknights.

Restaurant-Quality Dish: Impress family or guests with this flavorful pasta.

Ingredients

For the Pasta:

• 8 ounces spaghetti noodles

• 2 tablespoons butter

• 10 ounces shrimp, deveined and peeled

• 3 cloves garlic, minced

• ½ teaspoon paprika

• Salt and pepper, to taste

• 1 tablespoon cilantro, chopped

• Red pepper flakes, for garnish

For the Sauce:

• ½ cup mayonnaise

• ⅓ cup sweet Thai chili sauce

• ½ lime, juiced

• 1 teaspoon sriracha sauce

Instructions

Step 1: Prepare the Sauce

1. In a small bowl, combine the mayonnaise, sweet Thai chili sauce, lime juice, and sriracha sauce.

2. Mix until smooth and set aside.

Step 2: Cook the Pasta

1. Bring a large pot of salted water to a boil.

2. Add the spaghetti noodles and cook according to the package directions until al dente.

3. Drain the pasta and set aside.

Step 3: Cook the Shrimp

1. Season the shrimp with salt, pepper, and paprika.

2. In a large skillet, melt the butter over medium heat.

3. Add the seasoned shrimp and cook for 1-2 minutes on each side, or until they turn pink and opaque.

4. During the last 30 seconds of cooking, add the minced garlic and sauté until fragrant.

Step 4: Combine Pasta and Sauce

1. Turn off the heat and add the cooked spaghetti noodles to the skillet with the shrimp.

2. Pour the prepared sauce over the shrimp and noodles.

3. Toss everything together until the pasta and shrimp are well coated with the sauce.

Step 5: Garnish and Serve

1. Sprinkle with chopped cilantro and red pepper flakes for garnish.

2. Serve immediately and enjoy!

Tips

Customize Heat Level: Adjust the amount of sriracha and red pepper flakes to suit your spice preference.

Use Fresh Shrimp: Fresh shrimp will provide the best flavor and texture.

Alternative Pasta: Substitute spaghetti with linguine or fettuccine if preferred.

Storage Options

Refrigeration: Store leftovers in an airtight container in the refrigerator for up to 2 days. Reheat gently on the stovetop or microwave.

Freezing: Not recommended, as the sauce may separate upon thawing.

Bang Bang Shrimp Pasta is a delightful fusion of flavors that’s simple to make yet packed with restaurant-quality taste. Perfect for spice lovers and pasta enthusiasts alike!

German Chocolate Sheet Cake

0

German Chocolate Sheet Cake is a decadent dessert that combines a moist, chocolatey cake with a rich, coconut-pecan frosting. This classic recipe delivers the deep flavor of German baking chocolate paired with a sweet and nutty topping, making it perfect for celebrations, potlucks, or when you’re craving a slice of indulgence. The sheet cake format ensures it’s easy to bake, serve, and share with a crowd.

Every bite of this cake is an experience, with the soft crumb of the chocolate base beautifully complemented by the creamy, textured frosting. Whether you’re a fan of traditional German Chocolate Cake or trying it for the first time, this recipe is guaranteed to impress.

Why You’ll Love This Recipe

Rich Chocolate Flavor: The combination of cocoa powder and German baking chocolate creates a deep, luscious taste.

Iconic Frosting: Sweet and creamy, the coconut-pecan frosting is a perfect match for the cake.

Easy to Share: The sheet cake format is ideal for serving a crowd.

Ingredients

For the Cake:

• 2 cups all-purpose flour

• 2 cups white sugar

• ¼ cup cocoa powder

• 1 cup water

• ½ cup butter (1 stick)

• ½ cup shortening

• 4 oz German baking chocolate

• ½ cup buttermilk

• 1 teaspoon baking soda

• ½ teaspoon salt

• 2 eggs

• 1 teaspoon vanilla

For the Frosting:

• 12 oz can evaporated milk

• 3 egg yolks

• ¾ cup butter

• 1 cup sugar

• ½ cup brown sugar

• 1½ cups shredded coconut

• 1½ cups pecans, roughly chopped

• 1½ teaspoons vanilla

Instructions

For the Cake

1. Prepare the Oven and Pan:

• Preheat your oven to 400°F (200°C).

• Grease a sheet pan or line it with parchment paper for easy removal.

2. Mix Dry Ingredients:

• In a large mixing bowl, combine the flour, sugar, and cocoa powder. Whisk to distribute evenly.

3. Make the Chocolate Mixture:

• In a small saucepan, combine the water, butter, shortening, and German baking chocolate.

• Heat over medium, stirring until the mixture is smooth and fully melted.

4. Combine Wet and Dry Ingredients:

• Pour the chocolate mixture into the bowl with the dry ingredients. Whisk until well combined.

5. Add Remaining Ingredients:

• Stir in the buttermilk, baking soda, salt, eggs, and vanilla, one at a time, ensuring each is fully incorporated before adding the next.

6. Bake the Cake:

• Transfer the batter to the prepared sheet pan, spreading it evenly.

• Bake for 20-22 minutes, or until a toothpick inserted in the center comes out clean.

• Let the cake cool completely before frosting.

For the Frosting

1. Prepare the Frosting Base:

• In a medium saucepan, combine the evaporated milk, egg yolks, butter, sugar, and brown sugar.

• Heat over medium, stirring frequently until the mixture comes to a boil. Reduce the heat to a simmer and cook for 10-12 minutes, or until thickened.

2. Add Mix-Ins:

• Remove the saucepan from heat and stir in the shredded coconut, chopped pecans, and vanilla extract.

3. Cool and Frost:

• Let the frosting cool slightly before spreading it evenly over the cooled cake.

4. Chill and Serve:

• Refrigerate the frosted cake for 1-2 hours to set the frosting.

• Slice and serve chilled or at room temperature.

Tips

Use Day-Old Coconut: Slightly dry coconut absorbs the frosting better, enhancing flavor and texture.

Check Cake Doneness: A clean toothpick ensures the cake is perfectly baked without being overdone.

Easy Serving: Use a serrated knife for cleaner cuts, especially if chilled.

Storage Options

Refrigeration: Store in an airtight container in the refrigerator for up to 5 days.

Freezing: Freeze unfrosted cake or individual frosted slices for up to 2 months. Thaw in the refrigerator before serving.

German Chocolate Sheet Cake is a timeless dessert that’s as indulgent as it is crowd-pleasing. Perfectly moist with a topping that’s to die for, this cake is sure to become a favorite for any occasion!

Mississippi Mud Potatoes

0

Mississippi Mud Potatoes are a rich and comforting dish, combining tender potatoes with crispy bacon, gooey cheddar cheese, and a creamy, flavorful coating. This recipe is perfect as a hearty side dish or a standout addition to any meal. The slow baking process ensures the potatoes are soft and infused with the delicious flavors of garlic, onion, and smoky bacon, all topped with golden melted cheese.

Whether you’re hosting a family gathering, attending a potluck, or simply craving a cozy side dish, Mississippi Mud Potatoes are sure to be a crowd-pleaser.

Why You’ll Love This Recipe

Hearty and Cheesy: Loaded with cheese and bacon, this dish is pure comfort.

Perfect Side Dish: Complements a variety of main courses.

Crowd Favorite: Ideal for gatherings, potlucks, or a family dinner.

Ingredients

• 6 cups potatoes, peeled and diced

• 1 cup shredded cheddar cheese

• ¾ cup mayonnaise

• 1 cup cooked and crumbled bacon

• 3 teaspoons minced garlic

• ½ cup chopped onion

<script async src="https://pagead2.googlesyndication.com/pagead/js/adsbygoogle.js?client=ca-pub-9120728087142485"
     crossorigin="anonymous"></script>
<!-- Te7t-thumb -->
<ins class="adsbygoogle"
     style="display:block"
     data-ad-client="ca-pub-9120728087142485"
     data-ad-slot="1251680065"
     data-ad-format="auto"
     data-full-width-responsive="true"></ins>
<script>
     (adsbygoogle = window.adsbygoogle || []).push({});
</script>

Instructions

Step 1: Prepare the Oven and Pan

1. Preheat your oven to 325°F (163°C).

2. Lightly grease a 9×13-inch baking pan to prevent sticking.

Step 2: Combine Ingredients

1. In the prepared baking pan, combine the diced potatoes, shredded cheddar cheese, cooked bacon, minced garlic, and chopped onion.

2. Add the mayonnaise to the mixture, stirring thoroughly to ensure everything is evenly coated.

Step 3: Bake

1. Place the pan in the preheated oven and bake for approximately 1½ hours.

2. Check for doneness by piercing a potato with a fork—it should be tender. The top should be golden brown and slightly crisp.

Step 4: Serve and Enjoy

1. Remove the dish from the oven and let it rest for 5 minutes before serving.

2. Serve hot and enjoy the creamy, cheesy, bacon-filled goodness.

Tips

Use Starchy Potatoes: Russet or Yukon Gold potatoes work best for a creamy texture.

Customize Add-Ins: Add green onions, jalapeños, or a sprinkle of paprika for extra flavor.

Cheese Variations: Substitute cheddar with Monterey Jack, Colby, or a blend for a different taste.

Storage Options

Refrigeration: Store leftovers in an airtight container in the refrigerator for up to 3 days. Reheat in the oven or microwave before serving.

Freezing: Freeze the baked dish in a freezer-safe container for up to 2 months. Thaw overnight in the refrigerator before reheating.

Mississippi Mud Potatoes are a comforting, indulgent side dish that’s perfect for any occasion. Creamy, cheesy, and loaded with flavor, they’re a guaranteed hit every time!