Spicy Dumpling Soup

0

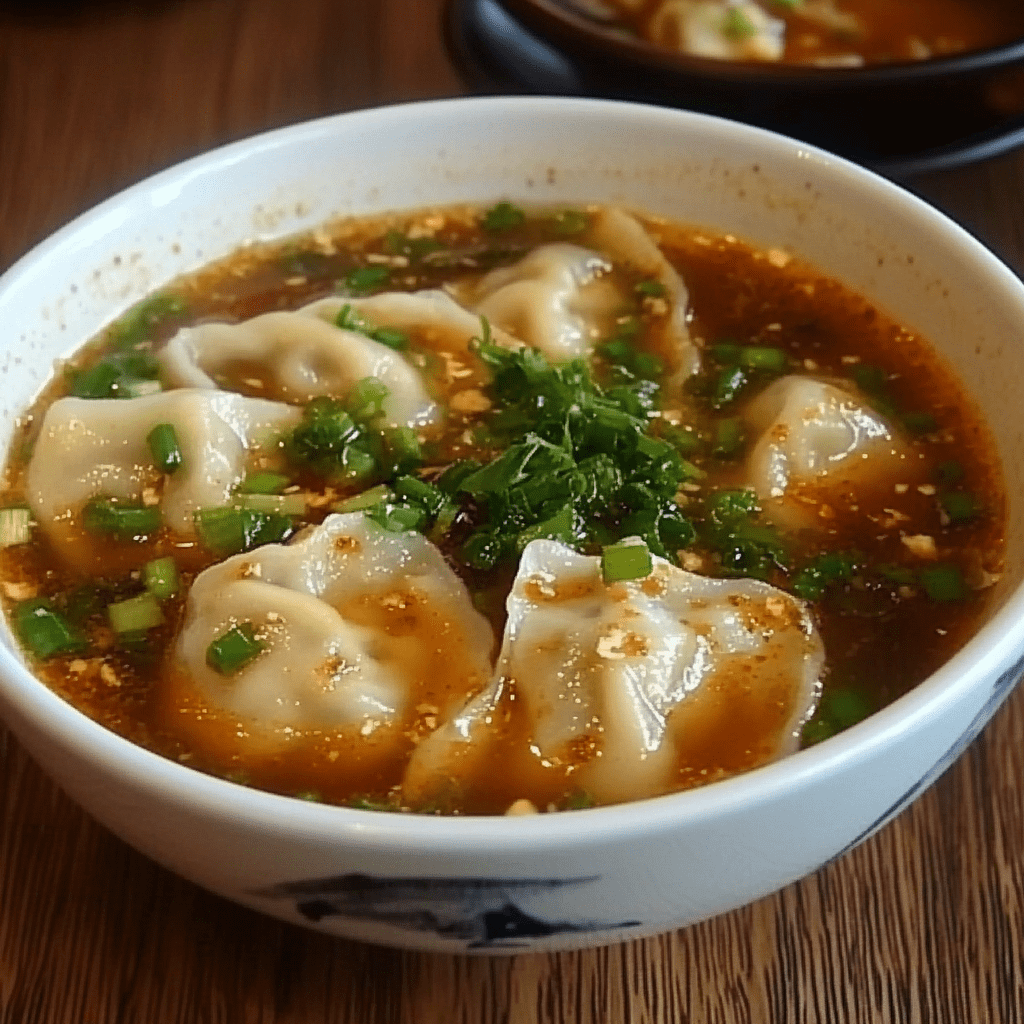
Delve into the invigorating warmth of Spicy Dumpling Soup, where tender dumplings swim in a rich, flavorful broth infused with bold spices and fresh vegetables. This comforting dish brings the heartiness of homemade dumplings together with the satisfying heat of a well-spiced soup, creating a perfect bowl for chilly evenings or whenever you need a bit of warmth and comfort.

Why You’ll Love This Recipe:

  • Robust Flavor: The spicy broth combined with tender dumplings offers a dynamic and satisfying flavor profile that will excite your taste buds.
  • Hearty and Nourishing: Packed with vegetables, protein, and hearty dumplings, this soup is as nourishing as it is delicious.
  • Customizable Heat: Adjust the level of spice to suit your taste, making it perfect for those who love a little or a lot of heat.

Ingredients:

For the Dumplings:

  • Ground meat (pork, chicken, or beef): 1 pound
  • Finely chopped green onions: 1/2 cup
  • Minced garlic: 2 cloves
  • Soy sauce: 2 tbsp
  • Sesame oil: 1 tbsp
  • Ground ginger: 1 tsp
  • Dumpling wrappers: 1 pack (about 40 wrappers)

For the Spicy Broth:

  • Chicken or vegetable broth: 6 cups
  • Soy sauce: 3 tbsp
  • Chili paste or Sriracha: 2 tbsp (adjust to taste)
  • Fresh ginger, thinly sliced: 1 inch piece
  • Garlic, minced: 3 cloves
  • Carrots, thinly sliced: 2 medium
  • Bok choy or spinach: 2 cups, roughly chopped
  • Mushrooms, sliced: 1 cup
  • Green onions, chopped: 1/2 cup
  • Sesame oil: 1 tbsp

Instructions:

Dumpling Preparation:

  1. In a large mixing bowl, combine the ground meat, green onions, minced garlic, soy sauce, sesame oil, and ground ginger. Mix until well combined.
  2. Place about 1 teaspoon of filling in the center of each dumpling wrapper. Moisten the edges with water, fold over, and press to seal. Set the prepared dumplings aside.

Spicy Broth Preparation:

  1. In a large pot, heat the sesame oil over medium heat. Add the minced garlic and sliced ginger, sautéing until fragrant, about 2 minutes.
  2. Add the chicken or vegetable broth, soy sauce, and chili paste or Sriracha. Bring the mixture to a boil, then reduce to a simmer.
  3. Stir in the carrots and mushrooms, simmering for about 5 minutes until they begin to soften.

Cooking the Dumplings:

  1. Carefully add the prepared dumplings to the simmering broth. Cook for 5-7 minutes, or until the dumplings are cooked through and float to the surface.
  2. Add the bok choy or spinach and cook for an additional 2 minutes, just until wilted.

Serving:

  1. Ladle the soup into bowls, ensuring each serving has a generous portion of dumplings and vegetables. Garnish with chopped green onions.
  2. Serve hot, enjoying the warming and spicy flavors.

Storage Options:

Store any leftover soup in an airtight container in the refrigerator for up to 3 days. The dumplings will continue to absorb the broth, so consider adding a little extra broth when reheating. This soup can also be frozen for up to 2 months—simply reheat gently on the stovetop when ready to enjoy.

Enjoy this Spicy Dumpling Soup as a flavorful and comforting meal, perfect for warming up on a cold day or whenever you’re craving something hearty and satisfying!

Garlic Bread Sloppy Joes

0

Garlic Bread Sloppy Joes are a fun and flavorful twist on the classic sloppy joe sandwich. Combining the rich, savory filling with the crunchy, buttery goodness of garlic bread, this dish is perfect for a family dinner or a casual get-together. It’s a quick and satisfying meal that everyone will love!

Why You’ll Love This Recipe

This recipe takes two beloved comfort foods—garlic bread and sloppy joes—and combines them into one mouthwatering dish. The crunchy garlic bread perfectly complements the hearty sloppy joe filling, and the melted cheese on top adds an extra layer of indulgence. It’s an easy, one-pan meal that’s perfect for busy weeknights or feeding a crowd. Plus, it’s customizable: you can adjust the seasoning or add extra toppings like jalapeños or pickles to suit your taste.

Ingredients

For the Bread:

  • 1 loaf of Italian bread
  • ½ cup unsalted butter, softened
  • 1 teaspoon garlic salt

For the Sloppy Joe Filling:

  • 1 pound ground beef
  • ¼ cup yellow onion, chopped
  • ½ teaspoon garlic powder
  • 1 teaspoon yellow mustard
  • ¾ cup ketchup
  • ½ teaspoon kosher salt
  • ¼ teaspoon black pepper
  • ½ cup water

For the Topping:

  • 1 cup shredded mozzarella cheese
  • 1 cup shredded sharp cheddar cheese
  • Chopped parsley for garnish

Instructions

Preparation:
Preheat your oven to 350°F (175°C). Line a baking sheet with parchment paper to prevent sticking and make cleanup easier.

Preparing the Bread:
Slice the Italian bread lengthwise into two halves, creating a perfect base for the sloppy joe filling. Place the halves cut side up on the prepared baking sheet. In a small bowl, combine the softened butter and garlic salt, mixing until smooth. Spread this garlic butter mixture evenly over the cut sides of the bread. The garlic butter will not only add flavor but also help the bread achieve a golden, crispy texture when baked. Set the bread aside while you prepare the sloppy joe filling.

Making the Sloppy Joe Filling:
In a medium nonstick skillet over medium heat, cook the ground beef and chopped onions until the beef is browned and no longer pink, about 8-10 minutes. Stir frequently to break up the beef into small pieces, ensuring even cooking. Once the beef is browned, drain any excess grease from the skillet to avoid a greasy filling. Stir in the garlic powder, mustard, ketchup, salt, pepper, and water. Mix thoroughly until all the ingredients are well combined and the sauce thickens slightly, about 2-3 minutes. This mixture should be rich and tangy, with just the right balance of sweetness and spice.

Assembling the Garlic Bread Sloppy Joes:
Spoon the prepared sloppy joe mixture evenly over the two halves of the bread. Be generous with the filling to ensure every bite is packed with flavor. Once the sloppy joe mixture is evenly spread, sprinkle the shredded mozzarella and sharp cheddar cheese over the top. The combination of these cheeses adds a deliciously gooey, melty texture that pairs perfectly with the savory filling and crispy bread.

Baking:
Place the assembled bread halves in the preheated oven and bake for 12-14 minutes, or until the cheese is fully melted and the bread is golden brown and crispy around the edges. The cheese should be bubbly and slightly browned, adding a nice contrast to the rich filling. Keep an eye on the bread towards the end of the baking time to ensure it doesn’t burn.

Serving:
Once the Garlic Bread Sloppy Joes are out of the oven, let them cool slightly before cutting them into slices. Garnish with freshly chopped parsley for a burst of color and a hint of freshness. The parsley not only adds a nice visual touch but also complements the rich flavors of the dish.

Storage Options

If you have any leftovers (which is rare because they’re so delicious!), you can store them in an airtight container in the refrigerator for up to 2 days. To reheat, place the slices in a preheated oven at 350°F (175°C) for about 10 minutes, or until warmed through. You can also reheat them in the microwave for a quicker option, but the bread may lose some of its crispiness.

Conclusion

These Garlic Bread Sloppy Joes are a fantastic way to elevate a classic comfort food. The combination of crispy garlic bread, savory sloppy joe filling, and melted cheese creates a dish that’s satisfying, easy to make, and perfect for any occasion. Whether you’re making them for a family dinner, a party, or just because, these sloppy joes are sure to become a new favorite in your recipe rotation. Enjoy the rich flavors and the fun twist on a classic with this easy-to-follow recipe.

Savory Beef and Vegetable Pie

0

This hearty Savory Beef and Vegetable Pie is a comforting and satisfying dish that brings together tender beef, flavorful vegetables, and a flaky, buttery crust. It’s perfect for a cozy dinner with family or a special meal to impress guests.

Why You’ll Love This Recipe

This pie is a complete meal in itself, packed with protein, vegetables, and rich, cheesy goodness. The combination of savory ground beef, vibrant vegetables, and creamy filling makes it a family favorite. The homemade crust adds a flaky texture that perfectly complements the hearty filling. Whether you’re serving it for a weeknight dinner or a special occasion, this pie is sure to please everyone at the table.

Ingredients

For the Crust:

  • 2 cups all-purpose flour
  • 1/2 cup cold unsalted butter, cubed
  • 1/4 cup cold vegetable shortening
  • 1/4 teaspoon salt
  • 5-7 tablespoons ice water

For the Filling:

  • 1 pound ground beef
  • 1 onion, finely chopped
  • 1 red bell pepper, diced
  • 2 cloves garlic, minced
  • 1 cup potatoes, peeled and diced
  • 1 cup frozen mixed vegetables (peas, carrots, corn)
  • 1 teaspoon dried thyme
  • 1 teaspoon paprika
  • Salt and pepper to taste
  • 1 cup shredded cheddar cheese
  • 1/2 cup shredded mozzarella cheese
  • 1/2 cup heavy cream
  • 1 tablespoon flour

Instructions

For the Crust:
In a large bowl, mix the flour and salt. Cut in the cold butter and shortening until the mixture resembles coarse crumbs. It’s important to keep the fats cold to ensure a flaky crust. Gradually add the ice water, one tablespoon at a time, mixing with a fork until the dough begins to come together. You may not need all the water; just add enough to bring the dough together. Divide the dough into two balls, flatten them into disks, wrap them in plastic wrap, and refrigerate for at least 30 minutes. This resting time allows the dough to firm up, making it easier to roll out later.

For the Filling:
Preheat your oven to 375°F (190°C). In a large skillet, cook the ground beef over medium heat until browned, breaking it up into small pieces as it cooks. Once browned, drain any excess fat to avoid a greasy filling. Add the chopped onion, red bell pepper, and garlic to the skillet. Cook until the vegetables are softened, about 5 minutes. The onion should become translucent, and the peppers should be tender. Stir in the diced potatoes, mixed vegetables, thyme, paprika, salt, and pepper. Cook for an additional 5 minutes, allowing the flavors to meld together. Sprinkle the flour over the mixture and stir to combine. This will help thicken the filling. Slowly pour in the heavy cream, stirring until the mixture thickens. Once the filling has thickened and is well mixed, remove it from heat and let it cool slightly. Cooling the filling a bit before adding it to the crust will prevent the crust from becoming soggy.

Assembling the Pie:
Roll out one of the dough disks on a lightly floured surface to fit into a 9-inch pie plate. Carefully transfer the dough to the pie plate, pressing it gently into the bottom and sides. Trim any excess dough hanging over the edges. Pour the slightly cooled filling into the pie crust, spreading it evenly to ensure every slice has a good mix of ingredients. Sprinkle the shredded cheddar and mozzarella cheese over the filling. The cheese adds a creamy, melty layer that ties the pie together. Roll out the second dough disk and place it over the filling. Trim any excess dough, then crimp the edges to seal the pie. Use a sharp knife to cut a few slits in the top crust to allow steam to escape during baking.

Baking:
Place the pie in the preheated oven and bake for 35-40 minutes, or until the crust is golden brown and the filling is bubbling. The top crust should be firm and flaky, and the cheese should be melted and slightly browned. If the edges of the crust begin to brown too quickly, cover them with aluminum foil to prevent burning. Once the pie is done, remove it from the oven and let it cool for 10-15 minutes before slicing. This cooling time allows the filling to set, making it easier to cut clean slices.

Storage Options

If you have any leftovers (which might be unlikely given how delicious this pie is), you can store them in the refrigerator for up to 3 days. To reheat, place slices in a preheated oven at 350°F (175°C) for about 10-15 minutes, or until heated through. The pie can also be frozen for up to 3 months. To freeze, wrap the pie tightly in plastic wrap, then in aluminum foil. When ready to eat, thaw the pie in the refrigerator overnight and reheat in the oven as directed above.

Conclusion

This Savory Beef and Vegetable Pie is a comforting dish that’s perfect for any meal. The combination of a buttery, flaky crust with a rich and hearty filling makes it a favorite among both kids and adults. It’s easy to make, and with simple ingredients, you can have a delicious homemade pie that’s sure to impress. Whether for a family dinner or a special gathering, this pie will leave everyone asking for seconds.

Toffee Pecan Dream Bars

0

These Toffee Pecan Dream Bars are a delightful treat that combines the rich flavors of buttery toffee, crunchy pecans, and a moist, tender crust. Perfect for any occasion, these bars are both decadent and easy to make, offering a satisfying dessert that will impress your friends and family.

Why You’ll Love This Recipe

These Toffee Pecan Dream Bars are an indulgent treat that combines several layers of flavors and textures. The buttery crust provides a solid foundation, while the rich, gooey center filled with toffee bits and pecans adds a delightful crunch. The bars are versatile and can be enjoyed at any time of the year, making them an excellent choice for holiday gatherings, potlucks, or as a special treat for yourself. The best part? They’re incredibly simple to prepare, even for beginner bakers.

Ingredients

  • 1 package of premium yellow or butter cake mix
  • 2 fresh eggs
  • 1 can of Eagle Brand Milk sweetened condensed milk
  • 1/2 cup of high-quality softened butter
  • 1 teaspoon of pure vanilla extract
  • 1 cup of freshly chopped pecans
  • 1/2 cup of Heath Milk Chocolate Toffee Bits

Instructions

Preparation:
Start by preheating your oven to 350°F (175°C). This ensures that the oven is at the right temperature by the time you’re ready to bake, which is crucial for even cooking.

Crust Formation:
In a large mixing bowl, combine the cake mix, one egg, and the softened butter. Use a fork or a pastry cutter to mix these ingredients together until they form a crumbly texture. It might take a few minutes to get the right consistency, but this step is essential for creating a firm and buttery crust. Once the mixture is crumbly, press it firmly into the bottom of a greased 9×13 inch baking pan. Ensure the crust is evenly spread and compacted, as this will serve as the foundation for the bars.

Toffee-Pecan Mixture:
In a separate bowl, blend the condensed milk, the remaining egg, and vanilla extract until smooth. This mixture is the heart of the dream bars, so make sure to mix it well until the ingredients are fully incorporated. After achieving a smooth mixture, fold in the chopped pecans and toffee bits. Make sure that the pecans and toffee bits are evenly distributed throughout the mixture for consistent flavor in every bite. Pour this rich and creamy mixture over the prepared crust, spreading it out evenly with a spatula to ensure it covers the entire surface.

Baking:
Place the baking pan in the preheated oven on the middle rack. Bake for approximately 30 minutes, or until the edges are golden brown and the center is just slightly jiggly. It’s important not to overbake, as the bars will continue to set as they cool. Overbaking could result in a dry, crumbly texture, so keep a close eye on them as the 30-minute mark approaches.

Cooling and Serving:
Once the bars are done baking, remove them from the oven and place the pan on a wire rack to cool completely. This cooling period allows the bars to set properly, making them easier to cut. It might be tempting to dive in while they’re still warm, but waiting for them to cool will ensure cleaner cuts and better texture. Once they’ve cooled to room temperature, slice the bars into squares or rectangles, depending on your preference. These bars are rich, so smaller pieces might be best for serving. Arrange them on a serving platter or store them for later enjoyment.

Storage Options

Toffee Pecan Dream Bars can be stored in an airtight container at room temperature for up to 3 days. If you prefer to keep them longer, they can be refrigerated for up to a week. To store them in the refrigerator, place the bars in a single layer in an airtight container. If you need to stack them, place a piece of parchment paper between layers to prevent sticking. For longer storage, these bars can be frozen for up to 3 months. To freeze, wrap each bar individually in plastic wrap, then place them in a freezer-safe bag or container. When you’re ready to enjoy them, simply thaw at room temperature or warm them slightly in the microwave for a gooey, fresh-out-of-the-oven experience.

Chicken and Rice Soup Recipe

0

There’s nothing quite like a bowl of Chicken and Rice Soup to soothe the soul. This recipe is a timeless classic, combining tender chicken, hearty rice, and a medley of vegetables in a comforting broth. It’s perfect for cold days, when you’re feeling under the weather, or whenever you need a quick and nourishing meal. With its simple ingredients and easy preparation, this soup is a staple that you’ll want to return to time and time again.

Why You’ll Love This Recipe

  • Comforting and Satisfying: This soup is like a warm hug in a bowl, offering comfort with every spoonful. The combination of chicken, rice, and vegetables creates a satisfying meal that will keep you full and content.
  • Easy to Make: With straightforward instructions and common ingredients, this recipe is perfect for both beginners and seasoned cooks.
  • Versatile: You can easily customize this soup by adding your favorite vegetables, swapping the type of rice, or adjusting the seasoning to suit your taste.

Ingredients

  • 1 tablespoon olive oil or butter
  • 1 medium onion, chopped
  • 2 cloves garlic, minced
  • 2 carrots, diced
  • 2 celery stalks, diced
  • 1 cup uncooked rice (white, brown, or basmati)
  • 6 cups chicken broth
  • 2 cups cooked chicken, shredded or diced
  • 1 teaspoon dried thyme
  • 1 teaspoon dried parsley
  • Salt and pepper to taste
  • Optional: 1 bay leaf for added flavor
  • Fresh parsley or cilantro, chopped (for garnish)
  • Juice of 1/2 lemon (optional, for a fresh flavor boost)

Instructions

Sauté the Vegetables:

  1. Heat the olive oil or butter in a large pot over medium heat. Once heated, add the chopped onion, carrots, and celery. Sauté for about 5 minutes until the vegetables are softened and the onion becomes translucent.
  2. Add the minced garlic and cook for an additional minute, stirring constantly to ensure the garlic doesn’t burn. The garlic should become fragrant, adding a rich aroma to the base of your soup.

Cook the Rice:

  1. Add the uncooked rice to the pot, stirring it around to coat each grain with the oil and to mix it evenly with the sautéed vegetables. This step helps the rice absorb more flavor as it cooks.
  2. Pour in the chicken broth, making sure to scrape up any browned bits from the bottom of the pot for added flavor. Add the dried thyme, dried parsley, and bay leaf if using. Stir to combine, and then bring the mixture to a boil.

Simmer the Soup:

  1. Once the soup reaches a boil, reduce the heat to low, cover the pot, and let the soup simmer gently for about 15-20 minutes. During this time, the rice will cook and absorb the broth, becoming tender and flavorful.

Add the Chicken:

  1. After the rice is fully cooked and tender, add the cooked chicken to the pot. Stir well to combine the chicken with the soup. Allow the chicken to heat through, which should take about 5 minutes. This step ensures that the chicken is warmed and its flavors meld with the soup.

Season and Serve:

  1. Taste the soup and adjust the seasoning as needed with salt and pepper. If you prefer a brighter flavor, squeeze in the juice of 1/2 a lemon and stir it through the soup.

Garnish and Enjoy:

  1. Ladle the soup into bowls and garnish with freshly chopped parsley or cilantro for a pop of color and freshness.
  2. Serve the soup hot, with crusty bread or crackers on the side for a complete and satisfying meal.

Storage Options

  • Refrigerator: Store any leftover soup in an airtight container in the refrigerator for up to 4 days. When reheating, you may need to add a little extra broth or water if the rice has absorbed too much liquid.
  • Freezer: To freeze, allow the soup to cool completely and then transfer it to a freezer-safe container. Freeze for up to 3 months. Thaw in the refrigerator overnight and reheat on the stove over low heat, adding extra broth if needed.

This Chicken and Rice Soup is a perfect example of how a few simple ingredients can come together to create something truly comforting and delicious. Whether you’re looking for a quick weeknight meal or something to make in advance for easy lunches, this soup is a reliable choice. Customize it to your liking and enjoy a warm, satisfying bowl whenever the craving strikes.

Oven-Baked Chicken Wings with Mustard Cream Sauce: Elevate Your Feast

0

Transform your usual finger food delight with Oven-Baked Chicken Wings slathered in a sumptuous Mustard Cream Sauce. This dish takes the beloved game-day snack to new heights with its creamy, tangy sauce that perfectly balances the smokiness of the crispy wings. Ideal for social gatherings or as a tantalizing main dish, these wings are sure to please everyone at the table.

Why You’ll Love This Dish

  • Crisp Perfection: Achieve that sought-after crispy skin through baking, avoiding the mess of deep frying.
  • Decadent Mustard Cream Sauce: A smooth sauce enriched with mustard brings a sophisticated flair, enhancing the wings with its creamy texture and sharp zest.
  • Simple and Straightforward: Easy ingredients and clear instructions make this a foolproof recipe for any home cook.

Ingredients

Chicken Wings:

  • 2 lbs (1 kg) chicken wings, tips removed, halved at the joints
  • 2 tablespoons olive oil
  • 1 teaspoon each of garlic powder, onion powder, and smoked paprika
  • Salt and pepper, to taste

Mustard Cream Sauce:

  • 2 tablespoons unsalted butter
  • 2 tablespoons all-purpose flour
  • 1 cup chicken broth
  • 1/2 cup heavy cream
  • 2 tablespoons Dijon mustard
  • 1 tablespoon whole grain mustard (optional)
  • Salt and pepper, to taste
  • Fresh parsley, chopped, for garnish

Instructions

Preparing the Wings:

  1. Heat your oven to 400°F (200°C).
  2. Toss the chicken wings in olive oil and season with garlic powder, onion powder, smoked paprika, salt, and pepper.
  3. Spread the wings on a parchment-lined baking sheet or a greased wire rack in a single layer.
  4. Bake for 40-45 minutes, turning once, until they are golden and crisp.

Creating the Mustard Cream Sauce:

  1. While the wings bake, start the sauce by melting butter in a saucepan over medium heat.
  2. Add flour, stirring continuously, until golden and bubbly to form a roux.
  3. Gradually add chicken broth and heavy cream, whisking until the sauce thickens.
  4. Mix in both mustards and season with salt and pepper. Keep the sauce warm off the heat.

Serving the Wings:

  1. Place the baked wings on a serving dish.
  2. Either pour the mustard cream sauce over the wings or serve it alongside as a dip.
  3. Sprinkle with chopped parsley for a fresh finish.

Storage Tips

  • Refrigerator: Keep wings and sauce in separate containers, refrigerated, for up to 3 days. Reheat wings in the oven to keep them crispy.
  • Freezer: Freeze wings and sauce separately for up to 2 months. Thaw in the fridge and reheat as above.

With their crispy texture and rich, flavorful sauce, these Oven-Baked Chicken Wings with Mustard Cream Sauce are a standout choice for any occasion, ensuring a memorable and delicious experience. Enjoy crafting this dish that’s sure to gather compliments and satisfy cravings.

Pecan Pie Brownie Bombs: A Delightful Fusion Treat

0

Dive into the delight of our Pecan Pie Brownie Bombs, a perfect blend of comforting brownie warmth and the sweet nuttiness of traditional pecan pie. Wrapped up in bite-sized portions, these bombs are a joyous celebration for any occasion or a cozy evening treat.

Why This Recipe is a Must-Try

  • Layered Flavor Sensation: Enjoy the lush chocolate of brownies combined with the classic, sweet crunch of pecan pie.
  • Ideal for Sharing: Crafted in small bites, these treats are perfect for sharing, allowing everyone a taste of indulgence without the commitment of a large dessert.
  • Easy Ingredients: Simple and familiar ingredients come together effortlessly, making this a go-to for those homemade dessert cravings.

Ingredients

Brownie Layer:

  • 1 box brownie mix (and ingredients listed on the box: eggs, oil, and water)
  • 1/4 cup all-purpose flour

Pecan Pie Filling:

  • 1 cup chopped pecans
  • 1/2 cup brown sugar, packed
  • 1/2 cup corn syrup
  • 1/4 cup unsalted butter, melted
  • 1 teaspoon vanilla extract
  • 2 large eggs

Assembly and Topping:

  • 1/2 cup semi-sweet chocolate chips
  • 1 tablespoon vegetable oil
  • Extra chopped pecans for garnish

Instructions

Brownie Batter Preparation:

  1. Start by heating your oven to 350°F (175°C). Mix the brownie ingredients as directed on the package, adding an extra 1/4 cup of flour to thicken the batter.

Creating the Pecan Pie Filling:

  1. In a bowl, mix the chopped pecans, brown sugar, corn syrup, melted butter, vanilla, and eggs until glossy and smooth, ensuring the sugar is fully dissolved.

Assembling the Bombs:

  1. Grease a mini muffin pan. Place about a tablespoon of brownie batter into each cup, followed by a teaspoon of pecan pie filling. Top with another tablespoon of brownie batter to seal the filling inside.

Baking Time:

  1. Bake for 20-25 minutes, or until the bombs are set and a toothpick comes out clean when inserted in the center.

Preparing the Topping:

  1. As the bombs cool, melt the chocolate chips with vegetable oil in the microwave in 30-second bursts, stirring until smooth.

Finishing Touches:

  1. Drizzle the melted chocolate over the cooled brownie bombs and sprinkle with extra pecans. Let the chocolate set before serving.

Storage Tips

  • Room Temperature: Store in an airtight container for up to 3 days.
  • Refrigerator: Keep refrigerated for up to a week in a sealed container.
  • Freezer: Freeze for up to a month and thaw at room temperature or in the fridge overnight.

Every bite of these Pecan Pie Brownie Bombs bursts with the crunch of pecans and the rich, chocolate depth of brownies, topped with a luxurious chocolate finish. They’re not just treats—they’re an experience, easy to make and even easier to love. Enjoy crafting and sharing these irresistible delights.

Saffron Seafood Linguine

0

Dive into a plate of Saffron Seafood Linguine, where shrimp, squid, and clams mingle with a creamy saffron-infused sauce. This dish is an elegant choice for festive dining or a special dinner that elevates the everyday.

Why You’ll Love This Dish:

  • Rich Taste Profile: Saffron and seafood unite for a sophisticated flavor that’s both intricate and inviting.
  • Elegant Presentation: Impress guests with a dish that looks as good as it tastes, perfect for special occasions.
  • Flexible Ingredients: Tailor the seafood selection to suit your taste or what’s available locally.
  • Complete Meal: This recipe offers a fulfilling blend of protein and pasta, all in one pot.

Ingredients:
Shrimp Stock:

  • Shells from shrimp
  • 1 liter water
  • 1/4 lemon
  • 1/4 red bell pepper
  • 1 bay leaf
  • Thyme sprigs
  • 3 garlic cloves

Linguine:

  • 380 g linguine
  • 3 liters water
  • 1 tablespoon salt

Sauce:

  • 1 tablespoon onion, finely chopped
  • 1/2 clove garlic, minced
  • 20 g butter
  • A drizzle of oil
  • A squeeze of lemon juice
  • 8 saffron threads
  • 200 ml fish or shrimp stock
  • 100 g shrimp, peeled
  • 100 g squid rings
  • 400 g clams
  • 4 tablespoons heavy cream

Garnish:

  • Parsley leaves
  • Lemon slices

Instructions:

Making Shrimp Stock:

  • Combine shrimp shells, water, lemon, bell pepper, bay leaf, thyme, and garlic in a pot.
  • Boil, then simmer until the volume is reduced by half.
  • Cool and strain.

Cooking Pasta:

  • Boil linguine in salted water for 8 minutes.
  • In a separate pan, melt butter with oil, sauté onion and garlic.
  • Add lemon juice, saffron threads, and shrimp stock, simmer for 5 minutes.
  • Introduce clams, squid, and shrimp, mix in drained pasta and heavy cream.
  • Cook over low heat until pasta is perfectly al dente, about 4-6 minutes.

Plating:

  • Serve the linguine garnished with parsley and slices of lemon.

Good to Know:

  • Cleaning Clams: Soak clams in salted water for 30 minutes to expel sand, then rinse well.

Storing the Dish:

  • Refrigerator: Store in an airtight container for up to 3 days.
  • Freezer: Ideally, enjoy fresh, but freezing is possible. Thaw and reheat gently for best results.

Prepare to be enchanted by this Saffron Seafood Linguine, a dish bursting with the flavors of the ocean and elegantly accented by saffron’s unique aroma.

Raspberry Chocolate Cheesecake Delight

0

Step into a world of decadent flavors with our Raspberry Chocolate Cheesecake Delight. This dessert is a perfect harmony of tart raspberries and luxurious chocolate, crafted to make any occasion feel special. Enjoy the sumptuous taste and stunning presentation that this recipe offers.

Why You’ll Adore This Dessert:

  • Rich and Refreshing: The iconic pairing of chocolate and raspberry dances on your palate, offering both richness and a refreshing zing.
  • Creamy and Crunchy: Each mouthful combines smooth, creamy filling with a crisp crust, delighting your taste senses with varied textures.
  • A Feast for the Eyes: Not only tasty, this cheesecake is a visual treat, sure to captivate and impress at any event.
  • Perfect for Any Occasion: Whether it’s a cozy family dinner or a grand affair, this cheesecake adapts beautifully to your decorative desires.

Ingredients:
Crust:

  • 1 ½ cups graham cracker crumbs
  • ¼ cup granulated sugar
  • ½ cup unsalted butter, melted

Cheesecake Filling:

  • 3 packages of cream cheese (8 oz each), softened
  • 1 cup granulated sugar
  • 3 large eggs
  • 1 teaspoon vanilla extract
  • 1 cup sour cream
  • 1 ½ cups fresh raspberries (extra for topping)
  • ½ cup semi-sweet chocolate chips

Chocolate Ganache:

  • ½ cup heavy cream
  • 1 cup semi-sweet chocolate chips

Topping:

  • Fresh raspberries
  • Optional: Powdered sugar

Instructions:

Oven Preparation:

  • Preheat your oven to 325°F (165°C). Grease a 9-inch springform pan and set aside.

Creating the Crust:

  • Mix graham cracker crumbs, sugar, and melted butter in a medium bowl until well combined.
  • Firmly press the mixture into the bottom of your springform pan to form a solid base.
  • Bake for 10 minutes, then allow to cool as you prepare the filling.

Making the Cheesecake Filling:

  • Beat the cream cheese in a large bowl with an electric mixer until smooth.
  • Gradually mix in the sugar.
  • Add eggs one at a time, mixing gently after each addition.
  • Blend in vanilla extract and sour cream until smooth.
  • Carefully fold in raspberries and chocolate chips without crushing the berries.

Baking the Cheesecake:

  • Pour the filling over the crust in your pan.
  • Bake for about 55-65 minutes, or until the center is just set but slightly jiggly.
  • Turn off the oven, open the door slightly, and let the cheesecake cool inside for an hour.
  • Remove, cool to room temperature, then chill in the refrigerator for at least 4 hours, preferably overnight.

Preparing the Chocolate Ganache:

  • Heat the heavy cream in a small saucepan until it simmers.
  • Pour over chocolate chips in a heatproof bowl, wait a minute, then stir until smooth.
  • Let the ganache cool a bit before topping the cheesecake with it.

Finishing Touches:

  • Once the ganache is set, decorate with fresh raspberries.
  • Optionally, sprinkle with powdered sugar for extra flair.
  • Serve chilled.

Storing the Cheesecake:

  • Refrigerator: Keep covered for up to 5 days.
  • Freezer: Wrap well without ganache and freeze for up to 2 months. Thaw in the fridge and add ganache and raspberries before serving.

Savor the layers of taste and texture in this exquisite Raspberry Chocolate Cheesecake Delight, crafted for both elegance and enjoyment.

Cinnamon Toast Crunch Cheesecake Pops

0

Dive into the delightful world of Cinnamon Toast Crunch Cheesecake Pops! These treats blend the nostalgic, sugary crunch of Cinnamon Toast Crunch cereal with the smooth, creamy luxury of cheesecake, crafted into a fun, poppable form. Ideal for gatherings, celebrations, or a creative kitchen project with kids, these cheesecake pops offer a whimsical twist on dessert that’s both satisfying and unique.

Why You’ll Love This Recipe:

  • Distinctive and Delicious: The beloved flavor of Cinnamon Toast Crunch gives these cheesecake pops an irresistible edge over traditional desserts.
  • Engaging and Enjoyable: From crushing cereal to mixing and freezing, the process is interactive and fun for bakers of all ages.
  • Perfectly Portioned: Each pop is a self-contained treat on a stick, making them super convenient for serving at events or for a quick snack.

Ingredients:

  • 2 cups of Cinnamon Toast Crunch cereal, finely ground
  • 2 cups of graham cracker crumbs
  • 1/2 cup of unsalted butter, melted
  • 16 oz of cream cheese, softened
  • 1 cup of granulated sugar
  • 1 teaspoon of vanilla extract
  • 2 large eggs
  • 1/2 cup of sour cream
  • Popsicle sticks

Detailed Instructions:

  1. Prepare the Crust: Start by grinding the Cinnamon Toast Crunch cereal in a food processor until it’s finely ground. In a mixing bowl, stir together the ground cereal, graham cracker crumbs, and melted butter until the mixture is uniformly moistened. Firmly press this mixture into the bottom of a parchment-lined 9×13-inch baking pan. Refrigerate this crust base while you prepare the cheesecake filling.
  2. Make the Filling: Using a large mixing bowl, beat the softened cream cheese together with the granulated sugar until the mixture is smooth and creamy. Add in the vanilla extract. Incorporate the eggs one at a time, ensuring each one is fully blended into the mixture before adding the next. Stir in the sour cream until the filling is thoroughly combined and smooth.
  3. Assemble and Bake: Pour the cheesecake filling over the prepared crust, smoothing the top to ensure an even layer. Bake in a preheated oven at 325°F (163°C) for about 35-40 minutes. The cheesecake should be set in the center and lightly golden around the edges. Remove from the oven and allow it to cool completely at room temperature.
  4. Create the Pops: After the cheesecake has cooled, cut it into small squares suitable for pops. Insert a popsicle stick into each square, then place them on a baking sheet lined with parchment paper.
  5. Freeze: Transfer the sheet with the cheesecake pops into the freezer and freeze for at least 2 hours, or until the pops are firm and fully set.

Storage Options:

  • Refrigerator: If not serving immediately, store any remaining unfrozen cheesecake pops in a covered container in the refrigerator. They will keep for up to 5 days.
  • Freezer: For longer storage, place the frozen cheesecake pops in an airtight container in the freezer. They can be stored for up to one month. For optimal freshness, wrap each pop individually in plastic wrap.

Crafting these Cinnamon Toast Crunch Cheesecake Pops is a delightful way to merge the worlds of cereal and cheesecake into one spectacular treat. Whether you’re making them for a party or as a special treat for the family, these pops are sure to bring a smile to everyone’s face. Enjoy the creamy texture, the crunchy crust, and the overall joy that comes with each bite of these fun-filled pops.