Creamy Pasta with Asparagus and Bacon

0

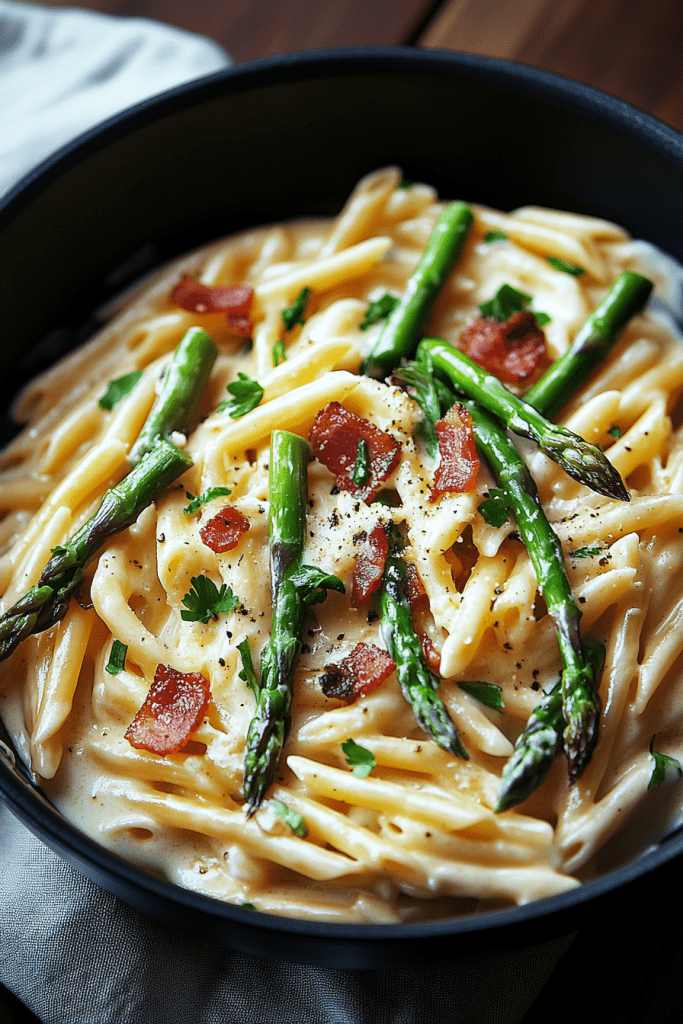
This rich and creamy pasta dish combines the savory crunch of bacon with the fresh, tender flavor of asparagus in a luscious cream sauce. Perfect for busy weeknights or a cozy dinner, it’s a quick and satisfying recipe that feels both indulgent and comforting. The creamy sauce, enriched with Parmesan and garlic, clings beautifully to the pasta, while butter adds a silky finish. With just a few ingredients, you can whip up this versatile dish in under 30 minutes.

The beauty of this recipe lies in its simplicity. While asparagus adds a vibrant touch of freshness, the bacon contributes a smoky, salty depth. The cream sauce ties everything together, ensuring every bite is full of flavor. You can easily customize this dish by adding mushrooms, spinach, or even a protein like chicken or shrimp. Whether served as a standalone dish or with a side salad, this pasta is sure to be a hit.

Why You’ll Love This Recipe

Flavorful and Comforting: The creamy sauce, crispy bacon, and fresh asparagus create a perfect harmony.

Quick to Make: Ready in under 30 minutes, this dish is perfect for any day of the week.

Minimal Ingredients: Deliciously simple, yet feels gourmet.

Customizable: Add your favorite vegetables or proteins for variety.

Ingredients

For the Pasta:

• 300g (10 oz) pasta of your choice (penne, rigatoni, or fusilli recommended)

• Salt, for the pasta water

For the Sauce:

• 6 strips of bacon, chopped

• 2 cups (250g) asparagus, trimmed and cut into 2-inch pieces

• 2 cloves garlic, minced

• 1 cup (240ml) heavy cream

• 1/2 cup (50g) freshly grated Parmesan cheese

• 1/4 cup (60ml) chicken or vegetable broth

• 2 tablespoons butter

• Salt and freshly ground black pepper, to taste

For Garnish (Optional):

• Fresh parsley, chopped

Instructions

Step 1: Cook the Pasta

1. Bring a large pot of salted water to a boil.

2. Add the pasta and cook according to the package instructions until al dente.

3. Drain and set aside, reserving 1/4 cup of the pasta cooking water.

Step 2: Cook the Bacon

1. In a large skillet over medium-high heat, cook the chopped bacon until crispy.

2. Use a slotted spoon to transfer the bacon to a paper towel-lined plate, leaving the bacon drippings in the skillet.

Step 3: Sauté the Asparagus

1. Add the asparagus to the skillet with the bacon drippings.

2. Cook for 3–4 minutes, stirring occasionally, until the asparagus is tender but still crisp.

Step 4: Sauté the Garlic

1. Add the minced garlic to the skillet and cook for 30 seconds, stirring frequently, until fragrant.

Step 5: Make the Cream Sauce

1. Lower the heat to medium-low.

2. Stir in the heavy cream, Parmesan cheese, broth, and butter.

3. Simmer gently for 3–4 minutes, stirring occasionally, until the sauce thickens slightly.

Step 6: Combine and Finish

1. Add the cooked pasta, crispy bacon, and sautéed asparagus to the skillet with the sauce.

2. Toss everything together until well coated. If the sauce is too thick, add a splash of the reserved pasta water to loosen it.

3. Season with salt and black pepper to taste.

Step 7: Serve

1. Divide the pasta among serving plates.

2. Garnish with freshly chopped parsley if desired, and serve warm.

Tips

Choosing Pasta: Short pasta like penne or rigatoni holds the sauce well, but spaghetti or fettuccine can also be used.

Asparagus Prep: Snap off the woody ends for a more tender bite.

Bacon Substitution: Turkey bacon or pancetta works as an alternative.

Fresh Parmesan: Always use freshly grated Parmesan for the best flavor and texture.

Storage Options

Refrigerator: Store leftovers in an airtight container for up to 3 days. Reheat gently on the stovetop or in the microwave, adding a splash of cream or milk if the sauce thickens.

Freezer: This dish isn’t ideal for freezing as the cream sauce may separate. Prepare fresh for the best results.

This creamy pasta with asparagus and bacon is a restaurant-worthy dish that’s quick, customizable, and sure to impress your family or guests. Enjoy crafting and savoring this flavorful meal!

Coconut Cream Pie

0

Coconut Cream Pie is a luscious, creamy dessert that combines the tropical flavor of coconut with a silky custard filling and a light, flaky crust. Topped with whipped cream and garnished with flaked coconut, this classic pie is perfect for special occasions or simply indulging in a sweet treat.

With its rich texture and sweet, nutty taste, this pie is as elegant as it is comforting. The recipe is straightforward, yet the results are truly spectacular, making it a guaranteed crowd-pleaser.

Why You’ll Love This Recipe

Tropical Flavors: Sweet coconut and creamy custard bring a taste of the tropics.

Classic Comfort: A timeless dessert that’s always a hit at gatherings.

Make-Ahead Friendly: Perfect for prepping in advance and serving chilled.

Ingredients

For the Filling

• 1 cup milk

• 1 cup sweetened, flaked coconut

• 1 cup light cream

• ½ cup sugar

• 2 tablespoons cornstarch

• 2 eggs, separated

• 1 teaspoon vanilla extract

For the Crust and Topping

• 1 pre-baked pie crust

• 8 ounces whipped cream (store-bought or homemade)

• Additional flaked coconut or chocolate shavings (optional, for garnish)

Instructions

Step 1: Prepare the Pie Crust

1. Bake your pie crust according to the package directions or your favorite homemade recipe.

2. Allow the crust to cool completely before filling.

Step 2: Prepare the Cream Mixture

1. In a double boiler, combine the milk, light cream, and sugar. Heat over medium heat, stirring frequently, until the mixture comes to a boil.

Step 3: Create the Cornstarch Slurry

1. In a small bowl, mix 2 tablespoons of cold water with the cornstarch until dissolved and smooth.

Step 4: Beat the Egg Yolks

1. Separate the eggs, placing the yolks in a small bowl.

2. Beat the yolks until light and frothy.

Step 5: Combine Egg Mixture and Cornstarch Slurry

1. Mix the cornstarch slurry into the beaten egg yolks, whisking until fully combined.

Step 6: Add the Egg Mixture to the Milk Mixture

1. Gradually pour the egg and cornstarch mixture into the boiling milk mixture, stirring constantly to avoid curdling.

2. Continue cooking for about 5 minutes, stirring frequently, until the mixture thickens to a custard-like consistency.

Step 7: Finish the Filling

1. Remove the custard from heat. Stir in the vanilla extract and the sweetened, flaked coconut.

2. Allow the mixture to cool slightly, about 30 minutes, before assembling the pie.

Step 8: Assemble the Pie

1. Pour the cooled coconut cream mixture into the pre-baked pie crust.

2. Smooth the surface with a spatula and refrigerate for at least 30 minutes, or until the filling is fully set.

Step 9: Add the Whipped Cream

1. Once the filling is set, spread the whipped cream evenly over the top of the pie.

2. Garnish with additional flaked coconut or chocolate shavings, if desired.

Step 10: Serve and Enjoy

1. Slice the pie and serve chilled.

2. Pair with a cup of coffee or tea for a delightful dessert experience.

Tips

Double Boiler Alternative: If you don’t have a double boiler, use a heatproof bowl set over a pot of simmering water.

Homemade Whipped Cream: Whip 1 cup of heavy cream with 2 tablespoons of powdered sugar and 1 teaspoon of vanilla extract until soft peaks form.

Toasted Coconut Garnish: Toast flaked coconut in a dry skillet over medium heat, stirring frequently, until golden brown for a nutty, crunchy topping.

Prevent Lumps: Stir constantly when adding the egg mixture to the hot milk to ensure a smooth custard.

Storage Options

Refrigeration: Store the pie covered in the refrigerator for up to 4 days.

Freezing: Avoid freezing, as the custard filling may become watery when thawed.

This Coconut Cream Pie is a dreamy dessert that combines creamy textures and sweet, tropical flavors for a slice of pure indulgence. It’s sure to be a hit at your next gathering or family dinner!

Classic Lasagna

0

Classic Lasagna is the ultimate comfort food, featuring layers of tender pasta, rich meat sauce, creamy ricotta, and gooey melted cheese. This timeless dish is perfect for family dinners, special occasions, or meal prep. The combination of hearty flavors and a bubbly, golden topping makes every bite satisfying and delicious.

This step-by-step recipe ensures a foolproof lasagna that’s easy to assemble and loaded with flavor. Whether you’re a seasoned cook or a beginner, this dish is sure to impress!

Why You’ll Love This Recipe

Rich and Hearty: A perfect balance of savory meat, creamy cheese, and tender noodles.

Make-Ahead Friendly: Prepare in advance and bake when ready for stress-free hosting.

Customizable: Add vegetables or switch up the protein to suit your taste.

Ingredients

For the Lasagna

• 12 lasagna noodles

• 1 pound ground beef (or a combination of beef and Italian sausage)

• 1 jar (24 ounces) marinara sauce (or homemade tomato sauce)

• 3 cups ricotta cheese

• 2 cups shredded mozzarella cheese

• ½ cup grated Parmesan cheese

• 1 large egg

• 2 tablespoons chopped fresh parsley (optional)

• Salt and pepper to taste

• Olive oil

Instructions

Step 1: Prepare the Noodles

1. Cook the lasagna noodles in a large pot of salted boiling water according to the package instructions until al dente.

2. Drain and rinse the noodles under cold water. Lay them flat on a lightly oiled baking sheet to prevent sticking.

Step 2: Make the Meat Sauce

1. Heat 1 tablespoon of olive oil in a large skillet over medium heat.

2. Add the ground beef (and sausage, if using) and cook until browned, breaking it up with a spoon.

3. Drain any excess fat, then stir in the marinara sauce.

4. Simmer for about 10 minutes, stirring occasionally. Season with salt and pepper to taste.

Step 3: Prepare the Ricotta Mixture

1. In a medium mixing bowl, combine the ricotta cheese, egg, 1 cup of mozzarella, ¼ cup of Parmesan, and chopped parsley (if using).

2. Season with salt and pepper and mix until smooth and well combined.

Step 4: Assemble the Lasagna

1. Preheat your oven to 375°F (190°C).

2. Spread a thin layer of the meat sauce on the bottom of a 9×13-inch baking dish.

3. Lay 3 noodles over the sauce.

4. Spread a layer of the ricotta mixture over the noodles, then spoon some meat sauce on top.

5. Repeat the layers (noodles, ricotta, sauce) until all ingredients are used, finishing with a layer of meat sauce.

6. Sprinkle the remaining mozzarella and Parmesan evenly over the top.

Step 5: Bake the Lasagna

1. Cover the baking dish with aluminum foil, ensuring it doesn’t touch the cheese.

2. Bake in the preheated oven for 25 minutes.

3. Remove the foil and bake for an additional 20-25 minutes, or until the cheese is melted, bubbly, and golden brown.

Step 6: Rest and Serve

1. Let the lasagna rest for 10-15 minutes before slicing. This allows the layers to set and makes serving easier.

2. Garnish with additional parsley, if desired, and serve hot.

Tips

Prevent Sticking: Lay noodles flat on an oiled surface after cooking to keep them from sticking together.

Boost Flavor: Add a pinch of red pepper flakes or Italian seasoning to the meat sauce for extra flavor.

Vegetable Variation: Add sautéed spinach, zucchini, or mushrooms for a veggie-packed version.

Freezer-Friendly: Assemble the lasagna, cover tightly, and freeze unbaked. Thaw overnight in the refrigerator before baking.

Storage Options

Refrigeration: Store leftovers in an airtight container in the fridge for up to 3 days. Reheat in the oven or microwave until warmed through.

Freezing: Freeze baked or unbaked lasagna for up to 3 months. Cover tightly with plastic wrap and foil before freezing.

Classic Lasagna is a timeless dish that never fails to please. Its layers of tender pasta, savory meat sauce, and melted cheese make it a go-to recipe for family gatherings or cozy nights at home. Enjoy every cheesy bite!

Salisbury Steak with Mushroom Gravy

0

Salisbury Steak with Mushroom Gravy is a classic, comforting dish featuring tender, juicy beef patties smothered in a rich, savory mushroom gravy. It’s the perfect meal for cozy evenings and pairs beautifully with mashed potatoes or steamed vegetables.

This recipe delivers hearty flavors and a luxurious sauce made from scratch. The secret lies in the combination of grated onion for moisture and seasoning, along with the beef broth and Worcestershire sauce that give the gravy its depth.

Why You’ll Love This Recipe

Rich and Savory: The beef patties and mushroom gravy are full of flavor.

Perfect Comfort Food: A hearty and satisfying dish for any occasion.

Customizable: Adjust seasonings or add your favorite herbs and sides.

Ingredients

For the Salisbury Steak

• ½ onion (white, brown, or yellow), grated

• ½ cup panko breadcrumbs (or ⅓ cup regular breadcrumbs)

• 1 lb (500g) ground beef (mince)

• 1 garlic clove, minced

• 1 egg

• 2 tbsp ketchup

• 1 beef bouillon cube, crumbled

• ½ tsp Worcestershire sauce

• 3 tsp Dijon mustard (or 2 tsp dry mustard powder)

For the Gravy

• 1 tbsp olive oil

• 2 garlic cloves, minced

• ½ onion, finely chopped

• 5 oz (150g) mushrooms, sliced

• 2 tbsp unsalted butter (30g)

• 3 tbsp all-purpose flour

• 2 cups beef broth (low sodium)

• ½ cup water

• 2 tsp Dijon mustard

• 2 tsp Worcestershire sauce

• Salt and pepper to taste

Instructions

Step 1: Prepare the Salisbury Steaks

1. Grate the Onion: Place breadcrumbs in a large bowl. Grate the onion directly over the breadcrumbs. Mix with your fingers and let soak for a few minutes.

2. Combine Ingredients: Add the ground beef, garlic, egg, ketchup, bouillon cube, Worcestershire sauce, and Dijon mustard to the bowl.

3. Mix Thoroughly: Use your hands to mix until just combined. Mix for a couple of minutes until the mixture becomes slightly “pasty,” ensuring the patties hold together.

4. Form Patties: Divide the mixture into 5 portions and shape into oval patties, about ¾-inch thick.

Step 2: Cook the Patties and Make the Gravy

1. Brown the Patties: Heat oil in a large skillet over high heat. Add the patties and cook for 1 minute on each side until browned. Remove and set aside (they will still be raw inside).

2. Cook Aromatics: If the skillet looks dry, add a bit more oil. Add the chopped onion and garlic, cooking for 2 minutes until the onions are translucent.

3. Cook Mushrooms: Add the mushrooms to the skillet and cook for 2-3 minutes until golden.

4. Make the Roux: Reduce heat to medium. Add butter to the skillet. Once melted, stir in the flour and cook for 30 seconds, stirring constantly.

Step 3: Make the Gravy

1. Gradually Add Liquids: Slowly pour in the beef broth, stirring constantly to avoid lumps. Once mostly smooth, whisk in the water, Dijon mustard, Worcestershire sauce, and season with salt and pepper.

Step 4: Finish Cooking the Steaks

1. Simmer: Add the patties back into the skillet, including any juices on the plate. Simmer for 5-7 minutes, stirring the gravy occasionally, until the steaks are fully cooked (internal temperature of 160°F/71°C) and the gravy has thickened. If the gravy thickens too quickly, add a bit more water.

2. Adjust Seasoning: Taste the gravy and adjust salt and pepper as needed.

Step 5: Serve

1. Remove the steaks and serve over mashed potatoes, rice, or egg noodles.

2. Spoon the mushroom gravy generously over the steaks. Garnish with fresh parsley if desired.

Tips

Use Fresh Mushrooms: Cremini or button mushrooms work well for a savory flavor.

Make-Ahead: Prepare the patties and gravy separately, then reheat together for an easy meal.

Thicker Gravy: For an extra-thick gravy, cook the roux a bit longer before adding the liquids.

Customize: Add a splash of red wine to the gravy for deeper flavor.

Storage Options

Refrigeration: Store leftovers in an airtight container in the fridge for up to 3 days.

Freezing: Freeze the cooked patties and gravy separately for up to 2 months. Thaw in the fridge overnight and reheat gently on the stovetop.

Salisbury Steak with Mushroom Gravy is a comforting, flavorful dish that’s perfect for any night of the week. Serve it with mashed potatoes or steamed vegetables for a complete, satisfying meal!

Pineapple Nut Cake with Cream Cheese Frosting

0

Pineapple Nut Cake with Cream Cheese Frosting is a moist, flavorful dessert that combines the tropical sweetness of pineapple with the crunch of pecans or walnuts. Topped with a rich and tangy cream cheese frosting, this cake is perfect for celebrations or as a delightful treat for any day.

With simple ingredients and an easy preparation process, this cake comes together quickly while delivering a deliciously tender crumb and creamy finish. It’s a true crowd-pleaser that’s sure to earn rave reviews!

Why You’ll Love This Recipe

Moist and Flavorful: Crushed pineapple keeps the cake irresistibly moist while adding a natural sweetness.

Easy to Make: No fancy techniques required, perfect for beginner bakers.

Versatile: Great for potlucks, holidays, or simply indulging your sweet tooth.

Ingredients

For the Cake

• 2 cups all-purpose flour

• 2 cups granulated sugar

• 2 large eggs

• 1 teaspoon baking soda

• 1 teaspoon vanilla extract

• ½ teaspoon salt

• 1 (20 oz) can crushed pineapple, undrained

• 1 cup chopped pecans or walnuts

For the Cream Cheese Frosting

• 1 (8 oz) package cream cheese, softened

• ½ cup unsalted butter, softened

• 2 cups powdered sugar

• 1 teaspoon vanilla extract

Instructions

Step 1: Preheat the Oven

1. Preheat your oven to 350°F (175°C).

2. Grease and flour a 9×13-inch baking pan to prevent sticking.

Step 2: Prepare the Cake Batter

1. In a large mixing bowl, combine the flour, sugar, baking soda, and salt. Stir to mix evenly.

2. Add the eggs, vanilla extract, and undrained crushed pineapple to the dry ingredients. Mix until well combined and no dry streaks remain.

3. Fold in the chopped pecans or walnuts gently to distribute them throughout the batter.

Step 3: Bake the Cake

1. Pour the batter into the prepared baking pan, spreading it evenly with a spatula.

2. Place the pan in the preheated oven and bake for 30-35 minutes, or until a toothpick inserted into the center comes out clean.

3. Once baked, transfer the pan to a wire rack and let the cake cool completely.

Step 4: Prepare the Cream Cheese Frosting

1. In a medium mixing bowl, use an electric mixer to beat the softened cream cheese and butter until smooth and creamy.

2. Gradually add the powdered sugar, ½ cup at a time, beating well after each addition until the frosting is smooth and fluffy.

3. Stir in the vanilla extract to enhance the flavor.

Step 5: Frost the Cake

1. Once the cake has cooled completely, spread the cream cheese frosting evenly over the top using an offset spatula or butter knife.

Step 6: Serve

1. For added flair, garnish the frosted cake with additional chopped nuts or a light drizzle of pineapple juice.

2. Cut the cake into slices and serve.

Tips

Use Fresh Pineapple: For an extra burst of flavor, use fresh pineapple instead of canned. Chop finely and include the juice for moisture.

Make It Ahead: Bake the cake a day in advance and frost just before serving for best results.

Customize the Nuts: Substitute pecans or walnuts with almonds or omit them entirely if preferred.

Room Temperature Ingredients: Ensure eggs, butter, and cream cheese are at room temperature for a smoother batter and frosting.

Storage Options

Refrigeration: Store the frosted cake in an airtight container in the refrigerator for up to 4 days. Let it come to room temperature before serving.

Freezing: Freeze the unfrosted cake for up to 2 months. Thaw overnight in the refrigerator and frost before serving.

Pineapple Nut Cake with Cream Cheese Frosting is a delightful dessert that’s rich in flavor and simple to make. Its moist texture and tangy frosting make it a standout treat for any occasion!

Cheeseburger Soup

0

Cheeseburger Soup is a rich, creamy, and hearty dish that transforms the classic flavors of a cheeseburger into a comforting soup. Packed with tender potatoes, ground beef, melted cheddar, and aromatic vegetables, this dish is perfect for warming up on a chilly day.

This one-pot wonder combines savory beef, cheesy goodness, and a medley of vegetables to create a family-friendly meal that’s both filling and flavorful. Serve it with crusty bread or crackers for the ultimate comfort food experience.

Why You’ll Love This Recipe

Comforting and Hearty: Combines all the flavors of a cheeseburger into a cozy soup.

Family-Friendly: A dish that kids and adults alike will enjoy.

Simple to Make: Easy-to-follow steps with everyday ingredients.

Ingredients

For the Soup

• 1 lb ground beef

• 1 tablespoon olive oil (if needed)

• 1 small onion, chopped

• 2 garlic cloves, minced

• 2 large potatoes, peeled and chopped

• 2 carrots, chopped

• 2 celery sticks, chopped

• 4 cups chicken broth

• 1 cup milk

• 2 cups shredded cheddar cheese

• ¼ cup flour

• ¼ cup butter

• 1 teaspoon dried basil

• 1 teaspoon dried parsley

• ½ teaspoon paprika

• Salt and pepper, to taste

For Garnish

• Chopped green onions or chives

Instructions

Step 1: Cook the Beef

1. Heat a large pot over medium heat. Add the ground beef and cook until browned, breaking it into small pieces as it cooks.

2. If the beef is sticking, add a tablespoon of olive oil.

3. Drain any excess fat and set the cooked beef aside.

Step 2: Cook the Vegetables

1. In the same pot, add the chopped onion, carrots, and celery. Cook over medium heat until softened, about 5 minutes.

2. Stir in the minced garlic and cook for an additional 1-2 minutes, until fragrant.

Step 3: Add Potatoes and Broth

1. Add the chopped potatoes to the pot. Pour in the chicken broth and stir in the basil, parsley, paprika, salt, and pepper.

2. Bring the mixture to a boil, then reduce the heat and simmer for 15-20 minutes, or until the potatoes are tender.

Step 4: Make the Cheese Sauce

1. In a small saucepan, melt the butter over medium heat.

2. Whisk in the flour and cook for 2-3 minutes, stirring constantly, to form a roux.

3. Gradually pour in the milk, whisking continuously to avoid lumps. Cook until the mixture thickens, about 5 minutes.

4. Add the shredded cheddar cheese and stir until fully melted and smooth.

Step 5: Combine Everything

1. Return the cooked ground beef to the pot with the vegetables.

2. Pour the cheese sauce into the soup and stir until fully combined.

3. Simmer the soup for an additional 5-10 minutes, allowing the flavors to meld together.

Step 6: Serve

1. Ladle the soup into bowls.

2. Top with chopped green onions or chives for added freshness and flavor.

3. Serve hot with crusty bread or crackers on the side.

Tips

Use Fresh Cheese: Shred your cheddar from a block for better melting and flavor.

Customize Vegetables: Add corn, peas, or bell peppers for extra texture and flavor.

Add Spice: For a spicy kick, include a pinch of cayenne pepper or a dash of hot sauce.

Thicker Soup: For a heartier texture, blend a portion of the soup and return it to the pot.

Storage Options

Refrigeration: Store leftovers in an airtight container in the refrigerator for up to 3 days. Reheat gently on the stovetop or in the microwave.

Freezing: This soup freezes well without the cheese sauce. Freeze the base soup for up to 2 months and stir in freshly made cheese sauce when reheating.

Cheeseburger Soup is a creamy, indulgent dish that delivers the familiar flavors of a cheeseburger in a warm, satisfying way. It’s perfect for family dinners or cozy nights in!

Chocolate Rice Krispie Balls

0

Chocolate Rice Krispie Balls are a delightful no-bake treat that combines the crunch of Rice Krispies, the nuttiness of pecans and coconut, and a creamy peanut butter filling, all wrapped in a rich chocolate coating. These bite-sized indulgences are perfect for holidays, parties, or as a quick and easy dessert.

Why You’ll Love This Recipe

No-Bake Simplicity: Easy to make without needing the oven.

Texture Heaven: A mix of crunchy, creamy, and chewy in every bite.

Customizable: Add your favorite toppings like sprinkles or a drizzle of white chocolate.

Ingredients

For the Mixture

• ½ cup peanut butter

• 3 tablespoons soft butter

• 1 teaspoon vanilla extract

• 1 cup Rice Krispies

• ½ cup chopped pecans

• 1 cup shredded coconut

For the Chocolate Coating

• 1 package (12 oz) chocolate chips (semi-sweet or milk chocolate)

• 1 square (1 oz) sweet chocolate

Instructions

Step 1: Prepare the Mixture

1. In a mixing bowl, combine peanut butter, softened butter, and vanilla extract. Stir until smooth and creamy.

2. Add the Rice Krispies, chopped pecans, and shredded coconut to the mixture. Stir until all ingredients are evenly incorporated.

3. Refrigerate the mixture for at least 30 minutes to firm it up, making it easier to shape into balls.

Step 2: Form the Balls

1. Once chilled, take small portions of the mixture and roll them into bite-sized balls (about 1 inch in diameter).

2. Place the balls on a tray lined with parchment paper.

3. Refrigerate the tray for at least one hour to ensure the balls hold their shape during coating.

Step 3: Prepare the Chocolate Coating

1. Set up a double boiler by filling a pot with a couple of inches of water and placing a heatproof bowl on top, ensuring the bowl doesn’t touch the water.

2. Add the chocolate chips and the square of sweet chocolate to the bowl.

3. Heat over low heat, stirring occasionally, until the chocolate is fully melted and smooth. Keep the chocolate warm over low heat to prevent hardening.

Step 4: Coat the Balls

1. Using a fork or a skewer, dip each chilled ball into the melted chocolate, ensuring it is completely coated.

2. Gently lift the ball out, letting any excess chocolate drip back into the bowl.

3. Place the chocolate-coated balls back onto the parchment-lined tray.

Step 5: Set and Store

1. Once all the balls are coated, refrigerate the tray for about an hour, or until the chocolate sets.

2. Transfer the balls to an airtight container. Store in the refrigerator for up to one week or freeze for up to two months.

Tips

Chocolate Coating: For an extra glossy finish, add a teaspoon of coconut oil or vegetable shortening to the chocolate while melting.

Decorate: Sprinkle with crushed nuts, coconut, or festive sprinkles before the chocolate sets.

Nut-Free Option: Replace pecans with additional Rice Krispies or use sunflower seeds.

Mix It Up: Try using dark chocolate or white chocolate for variety.

Storage

Refrigeration: Store in an airtight container in the refrigerator for up to 1 week.

Freezing: Freeze the balls in a single layer before transferring them to a freezer-safe container. Thaw in the refrigerator for a few hours before serving.

These Chocolate Rice Krispie Balls are a crowd-pleasing treat that’s as fun to make as they are to eat. With their rich chocolate coating and crunchy filling, they’re bound to disappear in no time!

Loaded Potato Soup

0

Loaded Potato Soup is a comforting, creamy dish packed with hearty vegetables, crispy bacon, and rich flavors. This recipe combines tender potatoes, sautéed vegetables, and a creamy broth to create a thick, satisfying soup that’s perfect for chilly days. Topped with cheese, parsley, and more bacon, this dish feels indulgent and is sure to become a family favorite.

With simple ingredients and an easy preparation process, this soup is ideal for weeknight dinners, gatherings, or as a make-ahead meal. Serve it with crusty bread or a side salad to complete the experience.

Why You’ll Love This Recipe

Hearty and Satisfying: Packed with potatoes, veggies, and creamy goodness.

Customizable: Adjust toppings or flavors to suit your taste.

Perfect for Any Occasion: Great as a main dish or a starter for a larger meal.

Ingredients

For the Soup

• 6 medium Russet potatoes, cut into bite-size pieces

• 1 onion, diced

• 3 carrots, peeled and sliced

• 3 stalks celery, diced

• 8 cups vegetable broth or chicken broth

• 1 cup milk

• ½ cup heavy cream

• 1 tsp minced parsley

• Salt and pepper, to taste

• 3 tbsp flour (or cornstarch as a substitute)

For the Toppings

• 6 slices bacon, cooked and crumbled

• 1 cup finely grated cheese of your choice (cheddar works great)

• Additional minced parsley, for garnish

Instructions

Step 1: Prepare the Bacon

1. Heat a large soup pot over medium heat. Add the bacon slices and cook until crispy, about 8-10 minutes.

2. Remove the bacon with a slotted spoon and place it on a paper towel-lined plate. Drain most of the bacon fat, leaving 1-2 tablespoons in the pot.

Step 2: Sauté the Vegetables

1. Return the pot to medium heat. Add the diced onion, celery, and sliced carrots to the remaining bacon fat.

2. Sauté the vegetables for about 2 minutes, until softened and the onion becomes translucent.

3. Stir in the diced potatoes and season with salt and pepper. Mix well to combine.

Step 3: Cook the Soup

1. Pour in the vegetable or chicken broth, ensuring the vegetables are fully covered.

2. Bring the soup to a low boil, then reduce the heat and simmer for about 10 minutes, or until the potatoes are tender but not falling apart.

Step 4: Thicken the Soup

1. In a small bowl, whisk together the flour (or cornstarch) and milk until smooth.

2. Gradually pour the mixture into the soup while stirring constantly.

3. Continue cooking for another 5 minutes, allowing the soup to thicken.

Step 5: Blend and Finish

1. Remove about ¼ to ½ of the soup and blend it until smooth using an immersion blender or regular blender.

2. Slowly return the blended portion to the pot, stirring gently to incorporate.

3. Add the heavy cream and stir in most of the crumbled bacon, reserving some for garnish.

Step 6: Serve

1. Ladle the soup into bowls.

2. Garnish with reserved bacon, a sprinkle of minced parsley, and a handful of grated cheese.

3. Serve hot, with crusty bread or a side salad for a complete meal.

Tips

For Extra Flavor: Add a dash of smoked paprika or cayenne pepper for a subtle kick.

Vegetarian Option: Omit the bacon and use vegetable broth. You can add smoked tofu or mushrooms for added texture and flavor.

Make It Ahead: This soup reheats beautifully, making it perfect for meal prep. Store in the fridge for up to 3 days or freeze for up to 3 months.

Blend to Preference: Blend more or less of the soup depending on your desired texture.

Storage Options

Refrigeration: Store leftovers in an airtight container in the fridge for up to 3 days. Reheat gently on the stovetop or in the microwave, stirring occasionally.

Freezing: Freeze the soup (without the cream) for up to 3 months. Thaw overnight in the fridge, reheat, and stir in the cream just before serving.

Loaded Potato Soup is a creamy, comforting dish that’s sure to warm you up on cold days. With its rich flavors and satisfying texture, this soup is a must-try recipe for any potato lover!

Chocolate Peanut Butter Cups

0

Homemade Chocolate Peanut Butter Cups are a decadent treat that combines creamy peanut butter and rich chocolate with a hint of crunch from a graham cracker base. These no-bake cups are easy to make and perfect for satisfying your sweet tooth or gifting during the holidays.

The layered flavors and textures—from the crumbly base to the creamy peanut butter filling and the glossy chocolate topping—make each bite irresistible. With simple ingredients and minimal effort, you’ll create a crowd-pleasing dessert that rivals any store-bought version.

Why You’ll Love This Recipe

Easy to Make: Simple ingredients and no baking required.

Customizable: Adjust sweetness, chocolate type, or peanut butter texture to suit your preferences.

Perfect for Sharing: Ideal for parties, gifts, or keeping on hand for a quick indulgence.

Ingredients

For the Base

• 1 ½ cups graham cracker crumbs (or digestive biscuit crumbs)

• ½ cup unsalted butter, melted

• ¼ cup granulated sugar

• ½ cup peanut butter (smooth or crunchy)

For the Filling

• ¾ cup peanut butter (smooth or crunchy)

• ¼ cup powdered sugar

• ½ tsp vanilla extract (optional)

For the Chocolate Topping

• 1 ½ cups semi-sweet chocolate chips (or chopped chocolate)

• 2 tbsp unsalted butter

Instructions

Step 1: Prepare the Base

1. In a medium bowl, combine the graham cracker crumbs, melted butter, sugar, and peanut butter.

2. Mix until the ingredients are fully combined and the texture resembles damp sand.

3. Press the mixture into the bottom of a muffin tin, small tart pans, or silicone molds. Use a spoon or your fingers to press it down firmly.

4. Refrigerate for 20-30 minutes to allow the base to set.

Step 2: Prepare the Filling

1. In a small bowl, combine the peanut butter, powdered sugar, and vanilla extract (if using).

2. Mix until smooth and creamy.

3. Once the base has set, spoon a dollop of the peanut butter mixture onto each base, spreading it evenly.

Step 3: Prepare the Chocolate Topping

1. In a microwave-safe bowl, combine the chocolate chips and butter.

2. Microwave in 30-second intervals, stirring between each, until the chocolate is melted and smooth.

3. Pour the melted chocolate over the peanut butter layer in each cup, ensuring the filling is completely covered.

Step 4: Set the Peanut Butter Cups

1. Place the muffin tin or molds in the refrigerator for 1-2 hours, or until the chocolate is fully set and firm.

Step 5: Serve

1. Once set, carefully remove the peanut butter cups from the molds. If using a muffin tin, gently run a knife around the edges to loosen them.

2. Serve chilled or at room temperature.

Tips

Silicone Molds: Use silicone molds for easy removal and a smooth finish.

Customize Flavors: Add a pinch of sea salt to the peanut butter filling or sprinkle flaky salt on top of the chocolate for a salted caramel vibe.

Vegan Option: Use vegan butter, dairy-free chocolate, and plant-based graham crackers.

Storage: Keep refrigerated for up to a week or freeze for up to 2 months for a longer shelf life.

Storage Options

Refrigeration: Store in an airtight container in the refrigerator for up to 7 days.

Freezing: Freeze individually wrapped cups in a freezer-safe container for up to 2 months. Thaw in the refrigerator before serving.

Chocolate Peanut Butter Cups are an easy, delicious way to indulge in the perfect combination of sweet and salty. Whether you’re making them for yourself or sharing with loved ones, these treats are sure to delight!

Pineapple Lemonade Punch

0

Pineapple Lemonade Punch is a refreshing and vibrant drink perfect for warm weather, celebrations, or any gathering where you want to impress your guests with a tropical treat. The combination of zesty lemonade, sweet pineapple juice, and fizzy Sprite creates a delightful balance of flavors that’s both tangy and sweet. This easy-to-make punch is a guaranteed hit, offering a splash of sunshine in every sip.

This recipe is versatile enough to adapt for both casual and formal occasions. Whether you’re serving it at a picnic, birthday party, or holiday event, the addition of fresh fruit slices makes it as visually appealing as it is delicious. With minimal effort and ingredients, you can whip up this crowd-pleaser in minutes, leaving you more time to enjoy the moment.

Why You’ll Love This Recipe

Simple and Quick: Requires only a few ingredients and minimal prep time.

Refreshing Flavor: Combines tart, sweet, and fizzy elements for a perfect balance.

Visually Stunning: Fresh fruit slices make this punch as beautiful as it is tasty.

Ingredients

Base Ingredients

• 3 cups cold water

• 1 cup Country Time lemonade mix

• 46 oz pineapple juice (unsweetened or lightly sweetened)

• 1 liter Sprite

Optional Additions

• Fresh lemon slices

• Fresh pineapple slices

• Crushed ice

Instructions

Prepare the Lemonade Base

1. Gather a large pitcher, whisk, measuring cup, and spoon.

2. Pour 3 cups of cold water into the pitcher.

3. Add 1 cup of Country Time lemonade mix and whisk until fully dissolved. This forms a tangy lemonade base that’s the heart of the punch.

Add the Pineapple Juice

1. Gradually pour the 46 ounces of pineapple juice into the pitcher.

2. Stir gently to ensure the lemonade and pineapple juice blend seamlessly. The pineapple juice adds a tropical sweetness to balance the tartness of the lemonade.

Incorporate the Sprite

1. Slowly pour 1 liter of Sprite into the pitcher.

2. Stir gently to combine the flavors while preserving the drink’s effervescent bubbles.

Enhance with Fresh Fruit (Optional)

1. Add slices of fresh lemon and pineapple to the pitcher.

2. Let the fruit infuse into the punch for additional flavor and an elegant presentation.

Serve the Punch

1. Fill individual glasses with crushed ice to keep the drink cool and refreshing.

2. Ladle the punch over the ice, making sure to include some fruit slices in each serving.

3. Optionally, garnish each glass with a lemon or pineapple slice for an extra festive touch.

Tips

Chill Before Serving: Keep all the ingredients, especially the Sprite, refrigerated before mixing to ensure a perfectly chilled punch.

Adjust Sweetness: If you prefer a less sweet punch, use diet Sprite or cut the pineapple juice with water.

Fruit Variations: Try adding sliced oranges or berries for a unique twist and extra color.

Presentation Matters: Serve in a clear glass pitcher or punch bowl to showcase the vibrant colors and floating fruit slices.

Storage Options

Refrigeration: Store any leftover punch in the refrigerator for up to 2 days. Stir gently before serving to redistribute the flavors.

Pre-Mix Tip: If making ahead, combine the lemonade base and pineapple juice but add the Sprite just before serving to preserve its fizz.

Pineapple Lemonade Punch is a refreshing, crowd-pleasing drink that’s easy to prepare and perfect for any occasion. Its bright flavors and effervescent sparkle will make it the star of your next gathering.