Beef and Potato Casserole is a hearty, comforting dish that combines savory ground beef, tender potatoes, and a creamy mushroom sauce. Topped with melted cheddar cheese and crispy breadcrumbs, this slow-cooker recipe is the epitome of convenience and flavor. It’s a perfect choice for busy days, as it requires minimal prep and cooks itself while you tend to other tasks.
The layers of potatoes and beef soak up the creamy mushroom sauce, creating a rich, flavorful meal that’s satisfying and filling. Topped with golden, bubbly cheese and a crunchy breadcrumb layer, every bite offers a delightful contrast of textures. This casserole is a crowd-pleaser, perfect for weeknight dinners or family gatherings.
Why You’ll Love This Recipe
• Comfort Food Classic: Combines simple, wholesome ingredients for a satisfying meal.
• Easy and Hands-Off: The slow cooker does most of the work for you.
• Family-Friendly: Familiar flavors make it a hit with both kids and adults.
2. Add the ground beef and diced onion, cooking until the beef is browned and the onions are translucent.
3. Drain any excess fat and set the mixture aside.
Step 2: Assemble the Layers
1. Place the diced potatoes in an even layer at the bottom of your slow cooker.
2. Spread the cooked beef and onion mixture over the potatoes.
Step 3: Prepare the Sauce
1. In a medium bowl, mix the condensed cream of mushroom soup, milk, salt, and pepper until smooth.
2. Pour the sauce evenly over the beef and potatoes in the slow cooker.
Step 4: Cook Slowly
1. Cover the slow cooker with its lid.
2. Set the slow cooker to cook on low for 6–8 hours or on high for 4–5 hours.
3. Check for doneness by piercing the potatoes with a fork; they should be soft and tender.
Step 5: Add Another Layer
1. About an hour before serving, sprinkle the grated cheddar cheese and breadcrumbs over the top of the casserole.
2. Close the lid and continue cooking until the cheese is melted and bubbly.
Step 6: Enjoy Your Meal
1. Serve the casserole hot directly from the slow cooker.
2. Garnish with fresh parsley if desired for an added touch of freshness.
Tips
• Customize the Cheese: Try Monterey Jack or a sharp cheddar blend for extra flavor.
• Even Cooking: Dice the potatoes uniformly to ensure even cooking.
• Add Veggies: Include carrots, peas, or bell peppers for a more colorful and nutrient-packed dish.
Storage Options
• Refrigeration: Store leftovers in an airtight container in the fridge for up to 3 days. Reheat in the microwave or oven before serving.
• Freezing: Freeze individual portions in freezer-safe containers for up to 2 months. Thaw overnight in the fridge and reheat thoroughly before enjoying.
Beef and Potato Casserole is a timeless dish that brings warmth and comfort to any meal. With its creamy layers and cheesy topping, it’s bound to become a family favorite!
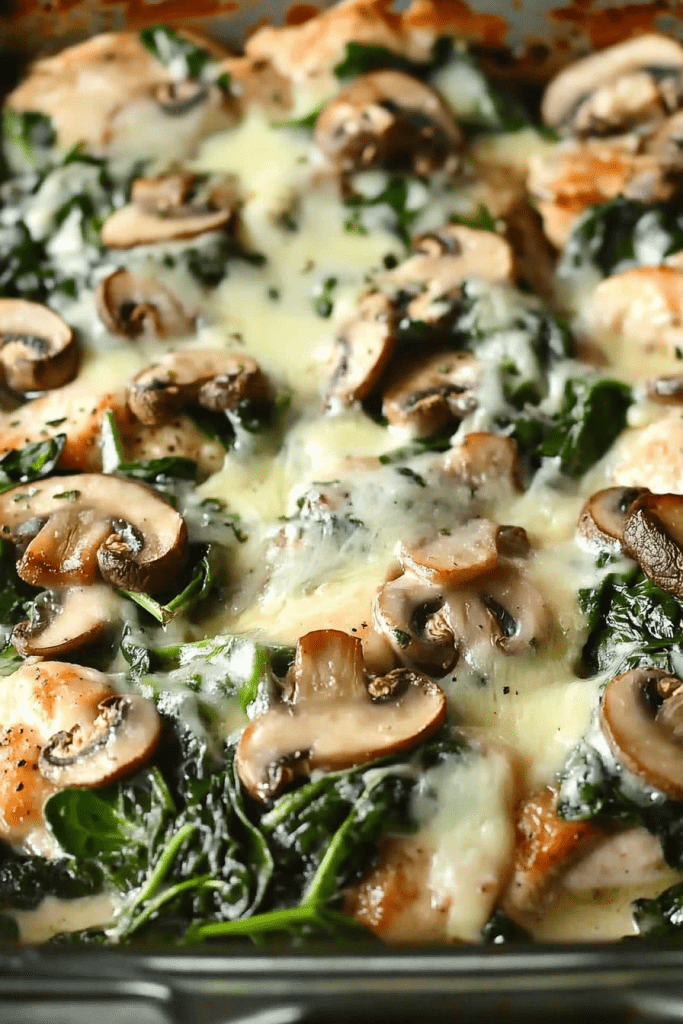
Chicken with Spinach, Mushroom, and Cream Cheese is a creamy, flavorful dish that combines tender chicken breasts with a medley of earthy mushrooms, vibrant spinach, and a rich cream cheese sauce. Topped with melted mozzarella, this dish is a perfect blend of comforting and indulgent. It’s simple enough for weeknight dinners but elegant enough to serve at gatherings.
This recipe brings together the natural flavors of fresh vegetables, savory chicken, and herbs, complemented by the smoothness of green onion cream cheese. Whether paired with a side of rice, pasta, or a fresh salad, this dish is sure to impress your family and guests alike.
Why You’ll Love This Recipe
• Creamy and Cheesy: The combination of cream cheese and mozzarella creates a luscious, indulgent sauce.
• Easy to Make: Simple preparation steps with minimal cleanup.
• Nutrient-Rich: Loaded with fresh spinach and mushrooms for added flavor and nutrition.
Ingredients
• 6 thin-sliced chicken breasts
• 1 container green onion cream cheese
• ¼ cup olive oil
• ½ cup chicken broth
• 1 large package sliced mushrooms
• 1 small bag fresh baby spinach
• Weber Herb and Garlic Seasoning (to taste)
• Pepper (to taste)
• 8 oz shredded mozzarella cheese
Instructions
Step 1: Preparing the Dish
1. Preheat your oven to 375°F (190°C).
2. Grease a 9×13-inch baking dish to prevent sticking.
Step 2: Layering the Ingredients
1. Arrange the chicken breasts in a single layer at the bottom of the prepared baking dish.
2. Spread the fresh baby spinach over the chicken, followed by an even layer of sliced mushrooms.
3. Season generously with Weber Herb and Garlic Seasoning and freshly ground pepper, adjusting to taste.
Step 3: Preparing the Creamy Sauce
1. Soften the green onion cream cheese by microwaving it for 15–20 seconds, or until easily stirrable.
2. In a small bowl, mix the softened cream cheese with olive oil and chicken broth until smooth and creamy.
3. Pour the sauce over the chicken, spinach, and mushrooms, spreading it evenly with a spatula.
Step 4: Baking the Dish
1. Cover the dish with foil, ensuring it rests lightly on top without sealing tightly.
2. Bake in the preheated oven for 20 minutes to allow the chicken to cook and flavors to meld.
3. After 20 minutes, remove the foil and sprinkle the shredded mozzarella cheese evenly over the top.
4. Return the dish to the oven, uncovered, and bake for an additional 10 minutes, or until the cheese is melted and begins to brown.
Step 5: Serving
1. Remove the dish from the oven and let it rest for about 10 minutes to allow the flavors to settle.
2. Serve hot, optionally garnished with fresh herbs like parsley or basil for a pop of color and added flavor.
Tips
• Tender Chicken: Pound the chicken breasts to an even thickness for consistent cooking.
• Customizable Veggies: Add other vegetables like zucchini or bell peppers for variation.
• Extra Flavor: Sprinkle grated Parmesan over the mozzarella for a richer cheese topping.
Storage Options
• Refrigeration: Store leftovers in an airtight container in the fridge for up to 3 days. Reheat in the oven or microwave before serving.
• Freezing: Freeze the prepared dish before baking for up to 2 months. Thaw overnight in the fridge and bake as directed.
This Chicken with Spinach, Mushroom, and Cream Cheese recipe is an easy yet impressive meal that’s sure to become a favorite. Its creamy texture and balanced flavors make it a comforting and satisfying choice for any occasion.
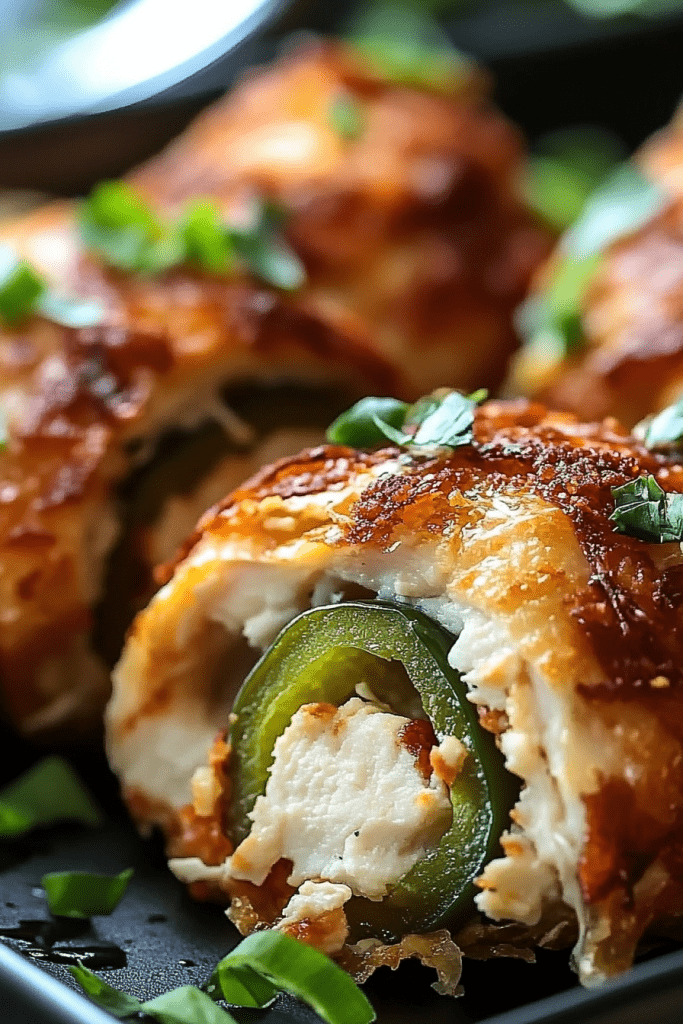
Smoked Jalapeño Popper Chicken Bombs are a flavor-packed dish that combines the spicy heat of jalapeños, the creamy richness of cheese, and the smoky goodness of bacon-wrapped chicken. This indulgent recipe is perfect for barbecue enthusiasts and anyone who loves bold flavors. With layers of Italian sausage, sharp cheddar, and cream cheese nestled inside spicy jalapeños, these chicken bombs are guaranteed to impress at any gathering or cookout.
This recipe embraces the art of smoking, which infuses the chicken and bacon with a deep, savory aroma while ensuring every bite is juicy and tender. The touch of BBQ sauce enhances the flavor, giving the bombs a glossy finish with a hint of sweetness that balances the spiciness. Whether served as a hearty main dish or as a party appetizer, these chicken bombs are sure to become a crowd favorite.
Why You’ll Love This Recipe
• Bold and Spicy: Packed with jalapeños and hot Italian sausage for a flavor explosion.
• Smoky Goodness: Cooking these on a smoker adds unparalleled depth of flavor.
• Crowd-Pleaser: Perfect for cookouts, game days, or special occasions.
Ingredients
For the Filling:
• 1 pound hot Italian sausage
• 6 ounces cream cheese, softened
• 1 ½ cups sharp cheddar cheese, shredded
• ⅓ cup green onions, sliced
For the Jalapeños:
• 10 fresh jalapeños, halved and deseeded
For the Chicken Bombs:
• 10 thin boneless, skinless chicken breasts
• 36 ounces bacon (3 packs)
• 2 tablespoons Slap Ya Mama Seasoning
• 1 tablespoon black pepper
• BBQ sauce, for brushing
Instructions
Step 1: Prepare the Filling
1. In a mixing bowl, combine the hot Italian sausage, cream cheese, shredded cheddar cheese, and sliced green onions. Mix until well blended.
Step 2: Stuff the Jalapeños
1. Slice off the tops of the jalapeños and cut them in half lengthwise.
2. Remove the seeds and membranes for a milder heat, or leave some seeds if you enjoy extra spice.
3. Fill each jalapeño half with the cheese and sausage mixture, packing it tightly to ensure it stays in place during cooking.
Step 3: Prepare the Chicken
1. Lay the chicken breasts flat on a clean surface.
2. Place a stuffed jalapeño half on each chicken breast.
3. Roll the chicken tightly around the jalapeño, securing the ends with toothpicks to hold everything together.
Step 4: Wrap with Bacon
1. Wrap each chicken roll with 2–3 slices of bacon, covering the entire surface.
2. Ensure the bacon overlaps slightly to prevent gaps and hold the roll securely.
Step 5: Season the Bombs
1. Sprinkle the bacon-wrapped chicken bombs evenly with Slap Ya Mama Seasoning and black pepper for a flavorful crust.
Step 6: Smoke the Chicken Bombs
1. Preheat your smoker to 250°F (120°C).
2. Place the chicken bombs on the smoker grates, ensuring there is space between each one for even cooking.
3. Smoke for 2–3 hours, or until the internal temperature of the chicken reaches 165°F (74°C) and the bacon is crisp.
Step 7: Glaze with BBQ Sauce
1. During the last 20 minutes of smoking, brush the chicken bombs with BBQ sauce for a glossy, flavorful finish.
2. Allow the sauce to caramelize slightly before removing the bombs from the smoker.
Step 8: Serve and Enjoy
1. Let the chicken bombs rest for 5 minutes before removing the toothpicks.
2. Serve hot as a main dish or slice into rounds for appetizers. Garnish with additional green onions or parsley if desired.
Tips
• Chicken Prep: Pound the chicken breasts slightly if needed to ensure they are thin and even for easy rolling.
• Smoker Variations: If you don’t have a smoker, bake the chicken bombs in the oven at 375°F (190°C) for 45–50 minutes, then broil briefly to crisp the bacon.
• Milder Heat: Substitute mini sweet peppers for jalapeños if you prefer a less spicy version.
Storage Options
• Refrigeration: Store leftovers in an airtight container in the fridge for up to 3 days. Reheat in the oven or microwave before serving.
• Freezing: Freeze uncooked chicken bombs individually wrapped in plastic wrap. Thaw overnight in the fridge before smoking or baking.
Smoked Jalapeño Popper Chicken Bombs are a delicious combination of creamy, spicy, and smoky flavors. This impressive dish is sure to make any meal or gathering unforgettable!
There’s something undeniably comforting about a creamy, savory stroganoff that makes even the most ordinary weeknight feel special. This Chicken Mushroom Stroganoff brings together tender slices of chicken breast and earthy mushrooms in a rich, tangy sauce that wraps around each bite like a warm hug. I first stumbled upon this recipe during a particularly cold winter when I was craving something hearty but didn’t want the heaviness of traditional beef stroganoff. What began as a simple experiment has since become one of my most requested dishes when friends and family gather around my table. The beautiful thing about this recipe is how it transforms simple, everyday ingredients into something that feels indulgent without requiring hours in the kitchen or specialized cooking techniques.
The history of stroganoff dates back to 19th century Russia, where it was traditionally made with beef and served to nobility. Over the centuries, this dish has traveled the world, being adapted and reimagined in countless kitchens. My chicken version maintains the soul of the original – that irresistible combination of savory meat, earthy mushrooms, and tangy sour cream – while offering a lighter alternative that comes together in just about 30 minutes. The sauce, with its velvety texture and complex flavor profile, is the true star here. It manages to be rich and indulgent while still allowing the natural flavors of the chicken and mushrooms to shine through. Served over a bed of egg noodles or fluffy rice, this Chicken Mushroom Stroganoff is the kind of meal that makes everyone at the table fall silent for those first few bites – the ultimate compliment to any home cook.
Why You’ll Love This Recipe
This Chicken Mushroom Stroganoff will quickly become a favorite in your recipe collection for so many reasons. First, it strikes that perfect balance between comfort food and everyday practicality – luxurious enough for special occasions but simple enough for busy weeknights. The entire dish comes together in about 30 minutes, making it a realistic option even when your schedule is packed.
You’ll appreciate how this recipe transforms affordable, accessible ingredients into something that tastes like it came from a cozy neighborhood bistro. The chicken stays tender and juicy, while the mushrooms provide that wonderful umami depth that makes each bite satisfying and complex. The sauce – oh, that sauce! – achieves the perfect consistency: thick enough to cling to the noodles but not so heavy that it overwhelms the dish.
For those watching their red meat intake, this chicken version of the classic stroganoff offers all the comfort without the beef. It’s also incredibly versatile – serve it over traditional egg noodles, rice, mashed potatoes, or even roasted vegetables for a lower-carb option. The leftovers (if there are any!) reheat beautifully, making this an excellent meal prep option that actually improves in flavor overnight.
Perhaps best of all, this recipe has that magical quality of pleasing both sophisticated palates and picky eaters alike. The familiar, comforting flavors appeal to everyone, while the depth and complexity satisfy those looking for something special. Whether you’re cooking for a family dinner, meal prepping for the week ahead, or hosting friends for a casual gathering, this Chicken Mushroom Stroganoff delivers on all fronts.
Ingredients
1 pound chicken breast, thinly sliced
2 cups fresh mushrooms, sliced
1 medium onion, finely chopped
2 cloves garlic, minced
1 tablespoon olive oil
1 tablespoon butter
1 teaspoon paprika
1 cup chicken broth
1 cup sour cream
Salt and pepper to taste
2 tablespoons all-purpose flour
Fresh parsley, chopped, for garnish
Cooked egg noodles or rice for serving
Detailed Instructions
Preparing Your Ingredients
Before you begin cooking, take a moment to prepare all your ingredients. This French technique called “mise en place” (everything in its place) will make the cooking process much smoother. Slice your chicken breast into thin, even strips – placing the chicken in the freezer for about 15 minutes beforehand can make this easier. Clean and slice your mushrooms, being careful not to wash them (which can make them soggy) but instead wiping them gently with a damp paper towel. Finely chop your onion and mince your garlic cloves. Having everything ready to go will make the cooking process much more enjoyable.
Cooking the Chicken to Perfection
Heat your large skillet over medium heat and add the olive oil and butter. The combination gives you the best of both worlds – the higher smoke point of the oil and the rich flavor of the butter. Once the butter has melted and the mixture is hot, add your thinly sliced chicken breast in a single layer. This is crucial – overcrowding the pan will cause the chicken to steam rather than brown, robbing you of that wonderful golden color and flavor.
Allow the chicken to cook undisturbed for 2-3 minutes until it develops a beautiful golden-brown crust on one side. Then flip each piece and cook for another 2-3 minutes on the other side. The chicken doesn’t need to be completely cooked through at this point – it will finish cooking later in the sauce. Once browned, transfer the chicken to a clean plate and set aside.
Building Layers of Flavor
In the same skillet – don’t clean it! Those browned bits from the chicken are flavor gold – add your finely chopped onion and minced garlic. Reduce the heat slightly if needed to prevent the garlic from burning. Cook for 3-4 minutes, stirring occasionally, until the onion becomes soft and translucent. The onions should take on a slight golden color, which indicates their natural sugars are caramelizing and developing deeper flavor.
Now add your sliced mushrooms to the skillet. Give everything a good stir to coat the mushrooms in the flavorful oil and butter mixture. Cook for 5-7 minutes, stirring occasionally but not constantly – you want to give the mushrooms time to brown and release their natural moisture. As they cook, you’ll notice the mushrooms first release liquid, then begin to reabsorb it as they brown. This process concentrates their earthy flavor and creates a wonderful foundation for your sauce.
Creating the Perfect Sauce
Once your mushrooms have browned nicely, it’s time to create that signature stroganoff sauce. Sprinkle the flour over the mushroom and onion mixture, stirring constantly to ensure it’s evenly distributed with no lumps. Cook for about a minute to eliminate the raw flour taste – this brief cooking time creates a roux that will thicken your sauce beautifully.
Gradually pour in the chicken broth, stirring continuously to prevent lumps from forming. The liquid will begin to thicken almost immediately as it combines with the flour. Bring the mixture to a gentle simmer, allowing it to thicken slightly. This should take about 2-3 minutes – you’re looking for a consistency that coats the back of a spoon but isn’t too thick, as you’ll be adding sour cream later.
Bringing It All Together
Return your browned chicken to the skillet, nestling the pieces into the sauce. Reduce the heat to low and let everything simmer gently for about 10 minutes. This allows the chicken to finish cooking through while the flavors meld together beautifully. The chicken will release some of its juices into the sauce, adding another layer of flavor.
After simmering, remove the skillet from the heat. This next step is crucial – you need to let the mixture cool slightly before adding the sour cream to prevent it from curdling. After about 2 minutes off the heat, gently stir in the sour cream and paprika. The sauce will transform before your eyes, becoming luxuriously creamy with a beautiful hint of color from the paprika. Taste and adjust the seasoning with salt and pepper as needed.
Serving Your Masterpiece
Serve your Chicken Mushroom Stroganoff over a bed of cooked egg noodles, rice, or your preferred base. The broad surface of egg noodles is particularly perfect for catching all that delicious sauce. Garnish generously with freshly chopped parsley, which adds a bright, fresh contrast to the rich, creamy dish. The vibrant green against the creamy sauce also makes for a beautiful presentation.
Tips for Success
Chicken Preparation: For the most tender results, slice your chicken against the grain. Partially freezing the chicken breast for about 15 minutes makes it easier to get thin, even slices. You can also use chicken thighs for a more flavorful, forgiving option that won’t dry out as easily.
Mushroom Selection: While white button mushrooms work perfectly well, consider using cremini (baby portobello) mushrooms for a deeper flavor. For a truly special occasion, a mix of wild mushrooms like shiitake, oyster, or chanterelle will elevate this dish to restaurant quality.
Sour Cream Success: To prevent your sour cream from curdling, make sure to remove the skillet from heat and let it cool slightly before adding it. Full-fat sour cream works best for this recipe, creating the richest, most stable sauce. In a pinch, you can substitute Greek yogurt, though the flavor will be slightly tangier.
Make-Ahead Option: You can prepare the dish up to the point of adding the sour cream, then refrigerate. When ready to serve, gently reheat the chicken and mushroom mixture, then stir in the sour cream off the heat. This makes it perfect for entertaining.
Flavor Boosters: For an extra layer of flavor, add a splash of white wine (about 1/4 cup) after cooking the mushrooms and before adding the flour. Let it reduce almost completely before proceeding. A teaspoon of Dijon mustard stirred in with the sour cream also adds wonderful depth.
Serving Suggestions: While egg noodles are traditional, this stroganoff is equally delicious over rice, mashed potatoes, or even roasted cauliflower for a lower-carb option. A side of simple steamed green vegetables like broccoli or green beans provides a perfect color and texture contrast.
Storage Options
Refrigerator Storage: This Chicken Mushroom Stroganoff can be stored in an airtight container in the refrigerator for up to 3 days. In fact, many people find the flavor improves overnight as the ingredients have more time to meld together. Just be aware that the sauce may thicken considerably when chilled.
Reheating Tips: When reheating, do so gently over low heat, stirring occasionally. You may need to add a splash of chicken broth or even a little more sour cream to bring the sauce back to its original consistency. Avoid using high heat or microwaving on full power, as this can cause the sauce to separate or the chicken to become tough.
Freezing Guidelines: While you can freeze this dish, be aware that cream-based sauces can sometimes separate when thawed and reheated. For best results, if you plan to freeze portions, consider making the recipe up to the point of adding the sour cream. Freeze the chicken and mushroom base, then thaw, reheat gently, and stir in fresh sour cream when ready to serve.
Meal Prep Strategy: This stroganoff makes an excellent meal prep option. Consider doubling the recipe and portioning it out with your choice of base for easy lunches or dinners throughout the week. Store the stroganoff and the noodles/rice separately for best texture, combining them just before reheating.
Repurposing Leftovers: Get creative with leftovers! Thin the sauce slightly with additional broth and use it as a filling for crepes or baked potatoes. Or thicken it further by reducing it and use as a savory filling for puff pastry turnovers. The versatility of this dish extends well beyond its first serving.
Doritos Chicken Casserole is a comforting, crowd-pleasing dish that combines the creamy, cheesy goodness of a classic casserole with the crunch and flavor of Doritos chips. Packed with seasoned chicken, a blend of creamy soups, and zesty diced tomatoes with green chilies, this recipe brings bold Tex-Mex flavors to your dinner table. It’s a perfect option for busy weeknights or potluck gatherings.
This casserole’s layered structure ensures each bite is packed with different textures—crunchy chips, tender chicken, and gooey melted cheese. The use of pantry-friendly ingredients makes it an easy, no-fuss recipe to whip up on short notice. Garnished with fresh cilantro or green onions, it delivers a vibrant, homemade touch that your family and guests will love.
Why You’ll Love This Recipe
• Full of Flavor: Doritos and diced tomatoes with green chilies bring a bold, zesty taste.
• Easy to Make: Assembling and baking the casserole is straightforward and quick.
• Perfect for Gatherings: A hearty dish that feeds a crowd and satisfies everyone.
Ingredients
• 3 cups cooked chicken, shredded (rotisserie chicken works well)
• 1 bag (9.75 oz) Doritos chips, lightly crushed
• 2 cups shredded cheddar cheese
• 1 can (10.75 oz) condensed cream of chicken soup
• 1 can (10.75 oz) condensed cream of mushroom soup
• 1 cup sour cream
• 1 can (10 oz) diced tomatoes and green chilies (such as Rotel), drained
• 1 teaspoon chili powder
• ½ teaspoon cumin
• ½ teaspoon garlic powder
• ½ teaspoon onion powder
• Salt and pepper to taste
• Chopped fresh cilantro or green onions for garnish (optional)
Instructions
Step 1: Prepare the Oven
1. Preheat your oven to 350°F (175°C).
2. Grease a 9×13-inch baking dish to prevent sticking.
Step 2: Season the Chicken
1. In a large mixing bowl, combine the shredded chicken with drained diced tomatoes and green chilies.
2. Add chili powder, cumin, garlic powder, onion powder, salt, and pepper. Mix well to evenly coat the chicken.
Step 3: Prepare the Creamy Sauce
1. In a separate bowl, whisk together the condensed cream of chicken soup, condensed cream of mushroom soup, and sour cream until smooth.
Step 4: Layer the Casserole
1. Spread half of the crushed Doritos across the bottom of the prepared baking dish.
2. Layer half of the seasoned chicken mixture over the Doritos.
3. Sprinkle half of the shredded cheddar cheese over the chicken.
4. Pour half of the creamy soup mixture evenly over the cheese.
5. Repeat the layering process with the remaining Doritos, chicken, cheese, and soup mixture.
Step 5: Bake the Casserole
1. Cover the baking dish with aluminum foil and bake in the preheated oven for 25–30 minutes.
2. Remove the foil and continue baking for another 10–15 minutes, or until the casserole is hot, bubbly, and the cheese is melted and slightly golden.
Step 6: Garnish and Serve
1. Once out of the oven, allow the casserole to cool slightly.
2. Optionally, garnish with chopped fresh cilantro or green onions for added color and a burst of freshness.
Tips
• Chip Selection: Nacho cheese Doritos are the classic choice, but feel free to try other flavors for a unique twist.
• Make Ahead: Prepare the casserole up to the baking step and refrigerate. Bake when ready to serve.
• Customize Flavors: Adjust the seasonings or add ingredients like black beans or corn for variation.
Storage Options
• Refrigeration: Store leftovers in an airtight container for up to 3 days. Reheat in the oven or microwave before serving.
• Freezing: Assemble the casserole and freeze before baking. Thaw overnight in the refrigerator and bake as directed.
Doritos Chicken Casserole is a satisfying dish that’s perfect for any occasion. Its creamy, cheesy layers and crunchy topping make it irresistible, ensuring everyone comes back for seconds!
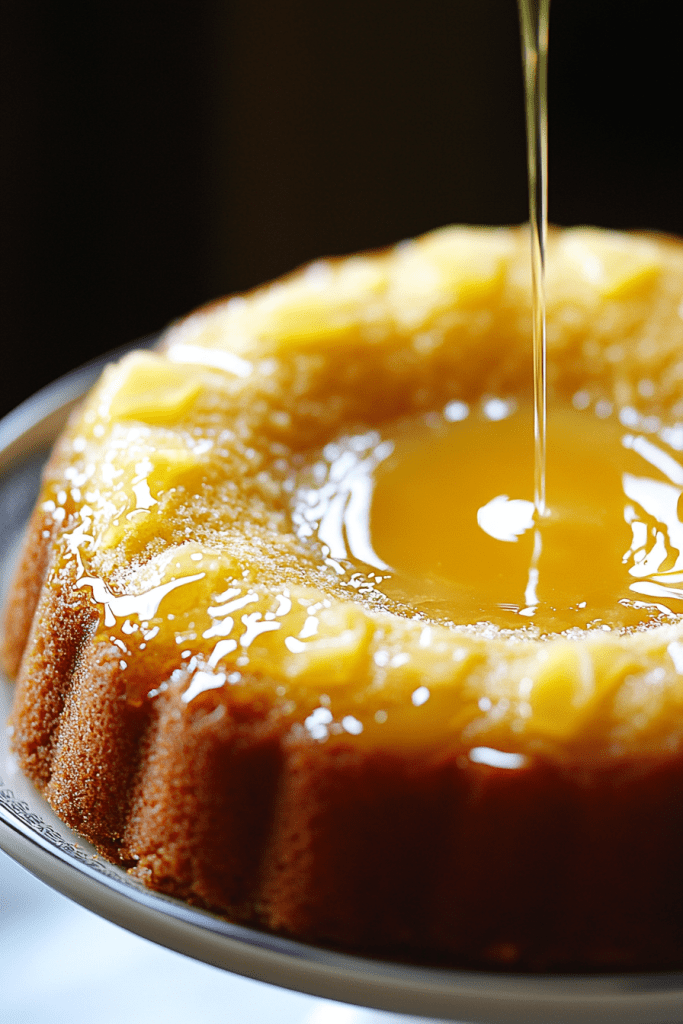
Pineapple Juice Cake is a tropical-inspired dessert that combines the simplicity of a yellow cake mix with the vibrant, fruity flavor of pineapple. This luscious bundt cake is soaked in a sweet pineapple syrup, making it incredibly moist and flavorful. The recipe is perfect for summer parties, family gatherings, or whenever you’re craving a dessert that’s both easy to prepare and undeniably delicious.
The magic of this cake lies in its ability to balance sweetness with tanginess. The pineapple juice not only flavors the cake but also infuses it with natural moisture, while the syrup adds a glossy, decadent finish. With minimal effort and pantry-friendly ingredients, this Pineapple Juice Cake is a delightful way to bring a taste of the tropics to your table.
Why You’ll Love This Recipe
• Moist and Flavorful: The pineapple syrup ensures every bite is rich and tender.
• Simple Ingredients: Uses a box cake mix and pantry staples for convenience.
• Tropical Vibes: Bursting with the fresh, sunny flavor of pineapple.
Ingredients
For the Cake:
• 1 (15.25 oz) box of yellow cake mix
• ¾ cup vegetable oil
• ¾ cup pineapple juice
• 4 large eggs, room temperature
For the Pineapple Syrup:
• 2 cups powdered sugar
• ¾ cup pineapple juice
• 4 tablespoons butter, melted and still hot
Instructions
Step 1: Preheat the Oven and Prepare the Pan
1. Preheat your oven to 350°F (175°C).
2. Generously grease a standard bundt pan to ensure the cake releases easily after baking.
Step 2: Make the Cake Batter
1. In a large mixing bowl, combine the yellow cake mix, vegetable oil, pineapple juice, and eggs.
2. Using a hand mixer or whisk, mix the ingredients until just combined. Avoid overmixing to keep the cake light and airy.
Step 3: Bake the Cake
1. Pour the batter into the prepared bundt pan, smoothing the top with a spatula.
2. Bake for 28–32 minutes, or until a toothpick inserted into the center comes out clean.
3. Once baked, let the cake cool in the pan for 10–15 minutes.
Step 4: Prepare the Pineapple Syrup
1. In a medium bowl, whisk together powdered sugar, pineapple juice, and melted butter until smooth and glossy.
Step 5: Soak the Cake with Syrup
1. While the cake is still in the pan, use a fork or skewer to poke holes throughout the top.
2. Pour three-quarters of the pineapple syrup over the cake, focusing on the holes to help the syrup penetrate deeply.
3. Let the cake rest in the pan for another 15 minutes to absorb the syrup.
Step 6: Serve
1. Carefully invert the cake onto a serving plate or cake stand.
2. Drizzle the remaining pineapple syrup over the top of the cake for an extra burst of sweetness and shine.
Tips
• Room Temperature Ingredients: Use room temperature eggs for a smoother batter.
• Prevent Sticking: Ensure every crevice of the bundt pan is well-greased. For added assurance, dust the pan lightly with flour.
• Make It Extra Fancy: Garnish with a sprinkle of powdered sugar or a few pineapple slices for a decorative touch.
Storage Options
• Room Temperature: Store in an airtight container at room temperature for up to 3 days.
• Refrigeration: For extended freshness, refrigerate the cake for up to 5 days. Allow it to come to room temperature before serving.
• Freezing: Wrap individual slices in plastic wrap and freeze for up to 2 months. Thaw at room temperature before enjoying.
Pineapple Juice Cake is the perfect dessert for any occasion. Its tropical flavors and ultra-moist texture make it a guaranteed hit with friends and family!
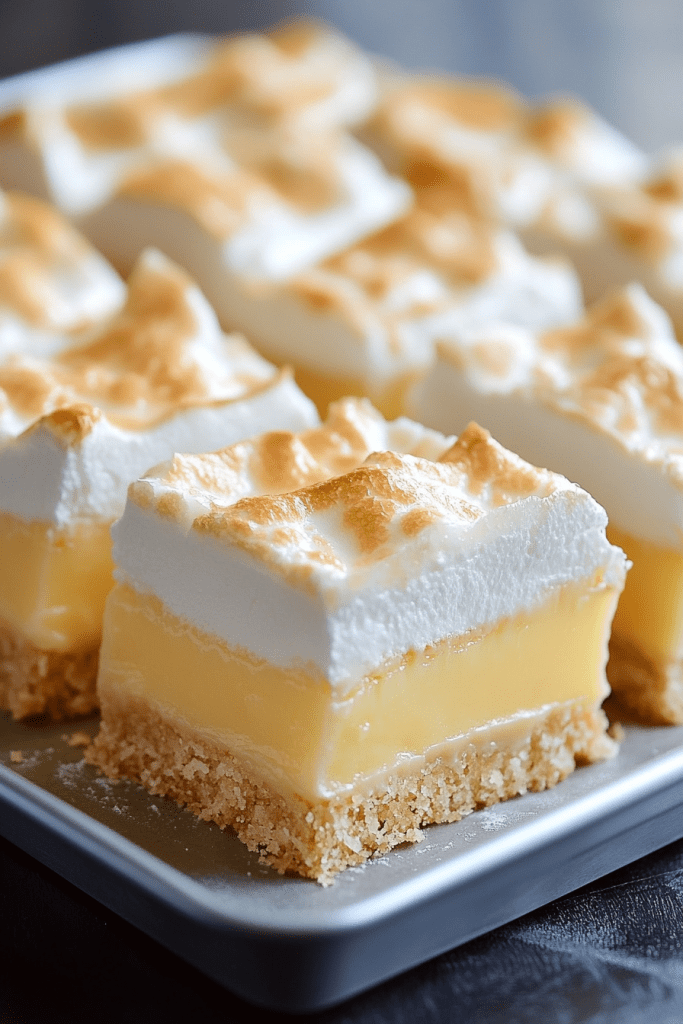
Lemon Meringue Bars are a delightful twist on the classic pie, offering all the tangy and sweet flavors you love in a convenient, shareable form. These bars feature a buttery graham cracker crust, a luscious lemon filling, and a cloud-like meringue topping. They’re perfect for spring picnics, summer gatherings, or as a refreshing dessert any time of year.
The graham cracker crust provides a sturdy yet crumbly base, complementing the vibrant lemon filling. The filling is the heart of this dessert, made with freshly squeezed lemon juice and zest for a bright, zesty flavor. Topped with a golden, fluffy meringue, these bars are as beautiful as they are delicious. With a balance of tartness, sweetness, and texture, Lemon Meringue Bars are sure to become a favorite among your family and friends.
Why You’ll Love This Recipe
• Tangy and Sweet: The lemon filling is perfectly balanced with the sweetness of the meringue.
• Easy to Serve: Bars are easier to cut, serve, and share compared to traditional pie.
• Elegant and Versatile: Suitable for casual gatherings or formal occasions.
Ingredients
For the Crust:
• 1 ½ cups graham cracker crumbs
• ¼ cup granulated sugar
• ½ cup unsalted butter, melted
For the Lemon Filling:
• 1 cup granulated sugar
• ½ cup fresh lemon juice
• 2 tablespoons lemon zest
• 4 large egg yolks
• ¼ cup cornstarch
• 1 ½ cups water
For the Meringue:
• 4 large egg whites
• ½ cup granulated sugar
• ¼ teaspoon cream of tartar
• ½ teaspoon vanilla extract
Instructions
Step 1: Prepare the Crust
1. Preheat your oven to 350°F (175°C).
2. In a medium bowl, mix graham cracker crumbs, granulated sugar, and melted butter until evenly combined.
3. Press the mixture firmly into the bottom of a 9×13-inch baking dish, creating an even layer.
4. Bake the crust for 10 minutes, then set it aside to cool.
Step 2: Make the Lemon Filling
1. In a medium saucepan, combine granulated sugar, lemon juice, lemon zest, egg yolks, cornstarch, and water.
2. Cook over medium heat, stirring constantly, until the mixture thickens and comes to a gentle boil.
3. Once thickened, remove the pan from the heat and pour the filling evenly over the cooled crust.
Step 3: Prepare the Meringue
1. In a large mixing bowl, beat egg whites with an electric mixer until foamy.
2. Add cream of tartar and continue beating until soft peaks form.
3. Gradually add granulated sugar, one tablespoon at a time, beating until stiff peaks form and the sugar dissolves completely.
4. Stir in vanilla extract.
Step 4: Assemble and Bake
1. Spread the meringue over the lemon filling, ensuring it touches the edges of the dish to seal.
2. Use the back of a spoon or spatula to create decorative peaks.
3. Bake in the preheated oven for 10–15 minutes, or until the meringue turns golden brown.
Step 5: Cool and Serve
1. Allow the bars to cool completely at room temperature before transferring them to the refrigerator to chill for at least 1 hour.
2. Once set, cut the bars into squares and serve chilled.
Tips
• Prevent Weeping Meringue: Ensure the meringue fully covers the filling and touches the edges to prevent it from shrinking.
• Use Fresh Lemons: Fresh lemon juice and zest are essential for the best flavor.
• Achieve Perfect Peaks: Make sure your bowl and beaters are clean and grease-free before beating the egg whites.
Storage Options
• Refrigeration: Store leftovers in an airtight container in the fridge for up to 3 days.
• Freezing: Lemon Meringue Bars do not freeze well, as the meringue may lose its texture and become watery upon thawing.
These Lemon Meringue Bars are a crowd-pleaser, combining the best elements of citrusy brightness and creamy indulgence in every bite. They’re the ultimate dessert for lemon lovers!
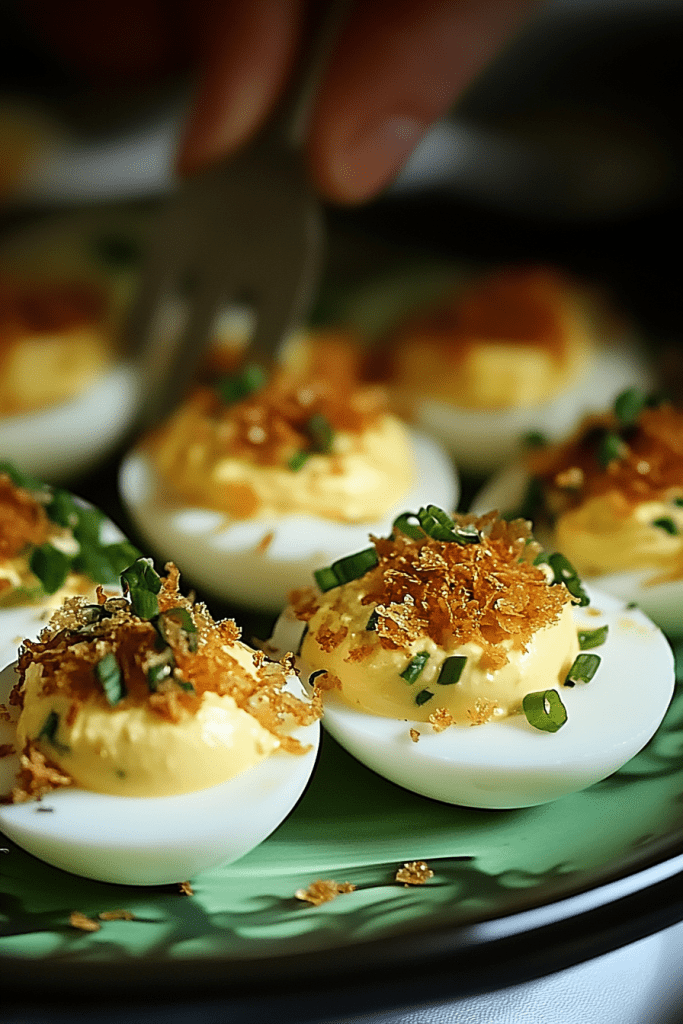
Deviled eggs are a timeless appetizer, known for their creamy, tangy, and irresistible filling. This recipe takes the classic to the next level with the addition of crispy bacon and shredded cheddar cheese, bringing a savory twist to the traditional flavors. Perfect for parties, picnics, or even a midday snack, these deviled eggs are easy to prepare and always a crowd-pleaser.
The richness of the egg yolks is balanced with a tangy touch of white vinegar and the smooth creaminess of sour cream or buttermilk. Crispy crumbled bacon adds a satisfying crunch, while the cheddar cheese provides a hint of indulgence. Garnished with paprika and fresh chives, these deviled eggs are as visually appealing as they are delicious. Whether you’re hosting a holiday gathering or preparing a casual spread, these deviled eggs are sure to disappear quickly.
Why You’ll Love This Recipe
• Enhanced Flavors: Bacon and cheddar elevate the taste of traditional deviled eggs.
• Quick and Easy: Simple ingredients come together in just a few steps.
• Perfect for Any Occasion: A versatile appetizer for gatherings or snacks.
Ingredients
For the Filling:
• 6 large eggs (hard-boiled, cooled, and halved)
• 6 slices of bacon (cooked until crisp and crumbled)
• 2 teaspoons of fresh chives (finely chopped)
• 2 teaspoons of white vinegar
• 2 tablespoons of finely shredded mild cheddar cheese
• ¼ cup of sour cream or buttermilk
For Garnish:
• Paprika
• Additional chopped chives (optional)
Instructions
Step 1: Prepare the Eggs
1. Peel the hard-boiled eggs and slice them in half lengthwise.
2. Carefully remove the yolks and place them in a mixing bowl. Arrange the egg whites on a serving platter.
Step 2: Make the Filling
1. To the bowl with the yolks, add crumbled bacon, chopped chives, vinegar, and shredded cheddar cheese.
2. Gradually mix in the sour cream or buttermilk, mashing and stirring until the mixture reaches a smooth, creamy consistency. Adjust the amount of sour cream or buttermilk as needed.
Step 3: Fill the Egg Whites
1. Spoon the yolk mixture into the hollowed-out egg whites.
2. Pile the filling high for a generous serving in each egg half.
Step 4: Garnish and Serve
1. Lightly sprinkle paprika over the filled eggs for color and flavor.
2. Add a sprinkle of extra chives, if desired, for a fresh, vibrant touch.
Tips
• Hard-Boiling Eggs: For easy peeling, use eggs that are a few days old and cool them in an ice bath immediately after boiling.
• Customize Flavors: Adjust the bacon, cheese, or chives to your liking for a personalized twist.
• Pipe the Filling: Use a piping bag for a more elegant presentation.
Storage Options
• Refrigeration: Store leftover deviled eggs in an airtight container for up to 2 days.
• Make-Ahead Tip: Prepare the filling and egg whites separately, storing them in the fridge until ready to assemble.
These deviled eggs with bacon and cheddar are a delightful combination of creamy, tangy, and savory flavors. They’re sure to become a staple at your table, offering a delicious update to a beloved classic.
Bananas are one of those quintessential fruits that seem to have a way of showing up in every household. Whether you’re munching on them for a quick snack, blending them into a smoothie, or using them in baking, bananas are both versatile and nutritious. But there’s a common frustration many of us face: bananas going from perfectly ripe to overripe, and eventually, black and rotten, often within just a few days. The inevitable fruit fly invasion and unpleasant odor make you wonder if there’s any hope of prolonging their freshness.
I remember vividly the days when my family would buy a bunch of bananas with the best intentions, only to find them overripe and mushy a few days later. The waste of good fruit always seemed like such a shame. But then, I discovered a simple yet ingenious method to extend the shelf life of bananas, allowing them to stay fresh for up to two years. This discovery was a game-changer, saving money and reducing food waste in our household. Now, I’m thrilled to share this practical technique with you.
The Problem with Rotten Bananas
Bananas are climacteric fruits, which means they continue to ripen after being harvested. This ripening process is driven by ethylene gas, a natural hormone released by the fruit. While this hormone is essential for the ripening process, it also means that bananas can quickly go from a vibrant yellow to a sad, blackened state if not managed properly.
As bananas ripen, their starches convert to sugars, which causes the fruit to become softer and sweeter. However, once the ripening process accelerates, the bananas start to break down, leading to a mushy texture and fermented smell. This rapid deterioration can make bananas unappealing to eat, often resulting in them being discarded, which contributes to food waste.
The Method to Extend Banana Shelf Life
Fortunately, you don’t have to resign yourself to a week of overripe bananas. With a simple method involving plastic wrap, you can keep your bananas fresh for an extended period. Here’s a detailed guide on how to make this work for you:
Ingredients and Tools:
Bananas (fresh)
Plastic wrap or plastic bags
Scissors (for cutting plastic wrap)
A fruit bowl or counter space
Instructions:
Step 1: Separate the Bananas
If you have a bunch of bananas, gently separate them. This step is crucial because when bananas are kept together, they produce and trap ethylene gas, which accelerates ripening. By separating them, you help reduce the amount of ethylene gas in the immediate area around each banana, slowing down the ripening process.
Inspect the Bunch: Look at the bunch of bananas and identify where you can gently pull them apart.
Separate Carefully: Use your hands to gently separate each banana from the bunch. Be careful not to bruise them.
Step 2: Wrap the Stems
The next step is to address the source of ethylene gas: the stems. By wrapping the stems, you create a barrier that helps to slow down the release of this gas.
Cut Plastic Wrap: Cut small pieces of plastic wrap, large enough to cover the stems of each banana.
Wrap the Stems: Take each banana and tightly wrap the plastic around its stem. Ensure that the wrap is secure but not so tight that it bruises the banana.
Step 3: Store at Room Temperature
With the stems wrapped, the bananas are now ready to be stored.
Find a Suitable Spot: Place the wrapped bananas in a fruit bowl or on a counter. Avoid placing them in the refrigerator, as bananas are sensitive to cold temperatures, which can cause their skin to turn brown or black.
Maintain Room Temperature: Keep them at room temperature, ideally in a cool, dry place. Avoid areas with direct sunlight or excessive heat, as these conditions can also accelerate ripening.
Step 4: Check Regularly
Regularly monitoring your bananas is important to ensure they are ripening at the desired rate.
Inspect the Bananas: Check the bananas daily to gauge their ripeness. If they reach your preferred level of ripeness, you can remove the plastic wrap.
Adjust as Needed: If you find that they are ripening too quickly, you can reapply the plastic wrap to slow down the process further.
Why Does This Method Work?
The effectiveness of this method lies in its ability to control ethylene gas exposure. By wrapping the stems, you reduce the amount of ethylene gas that is released into the air around the bananas, thereby slowing down the ripening process. Additionally, separating the bananas prevents the accumulation of ethylene gas in one area, further extending their freshness.
This method is particularly useful because it allows you to enjoy fresh bananas for a longer period without resorting to refrigeration, which can adversely affect their texture and flavor.
Chili Parlor Chili is a hearty, flavorful dish packed with bold spices and a touch of richness from unsweetened cocoa powder. Inspired by classic diner-style chili, this recipe features a perfect balance of savory, spicy, and umami flavors, making it a versatile dish that’s great on its own or as a topping for hot dogs, fries, or baked potatoes.
This chili is simple to prepare and deeply satisfying. The use of cocoa powder adds a subtle depth, while Worcestershire and soy sauce provide a savory kick that enhances the beefy flavor. Whether you’re looking for a cozy weeknight meal or something to serve at a casual gathering, this chili delivers big on taste with minimal effort.
Why You’ll Love This Recipe
• Bold and Unique Flavor: Cocoa powder and soy sauce elevate the traditional chili profile.
• Quick and Easy: Ready in under an hour, perfect for busy days.
• Versatile: Enjoy it as a standalone dish or as a topping for your favorite comfort foods.
• Kosher salt and freshly ground black pepper, to taste
Instructions
Step 1: Cook the Beef
1. Heat the olive oil in a large pot over medium heat.
2. Add the ground beef and use a spoon or spatula to break it into small crumbles.
3. Cook for 3 to 5 minutes, or until most of the pink is gone and the beef is browned evenly.
Step 2: Add Seasonings and Liquids
1. Stir in the broth and tomato sauce, mixing well to combine.
2. Add the chili powder, cocoa powder, Worcestershire sauce, chili flakes, paprika, soy sauce, onion powder, garlic powder, and cayenne pepper.
3. Stir thoroughly to ensure the seasonings are evenly distributed.
Step 3: Simmer the Chili
1. Bring the chili mixture to a gentle simmer over medium heat.
2. Reduce the heat to low, cover the pot, and let it cook for 35 to 40 minutes. Stir occasionally to prevent the chili from sticking to the bottom of the pot.
Step 4: Final Seasoning
1. Taste the chili and season with kosher salt and freshly ground black pepper as needed.
2. Adjust the seasoning to suit your preference, adding more chili powder or cayenne for extra heat if desired.
Step 5: Serve and Enjoy
1. Serve the chili hot in bowls, or use it as a topping for nachos, hot dogs, or fries.
2. Garnish with shredded cheese, sour cream, or chopped onions for added flavor and texture.
Tips
• Ground Beef Options: Use leaner ground beef for a lighter chili or a fattier cut for a richer flavor.
• Control the Heat: Adjust the cayenne and chili flakes to customize the spice level.
• Thicker Chili: If you prefer a thicker chili, simmer uncovered for the last 10 minutes to reduce the liquid.
Storage Options
• Refrigerator: Store leftover chili in an airtight container for up to 4 days. Reheat on the stovetop or in the microwave.
• Freezer: Freeze chili in individual portions for up to 3 months. Thaw in the refrigerator overnight before reheating.
Chili Parlor Chili is a flavorful, no-fuss recipe that brings the classic comfort of diner-style chili into your kitchen. Whether enjoyed solo or paired with your favorite toppings, this chili is sure to become a family favorite!