Steak Gorgonzola Alfredo

0

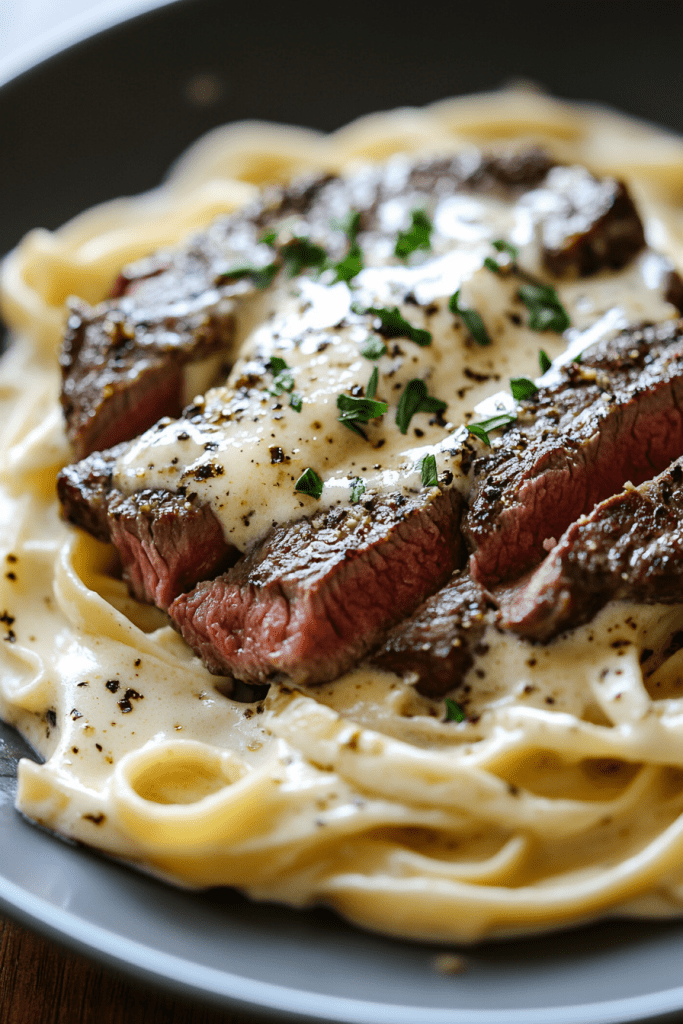
Steak Gorgonzola Alfredo is a decadent dish that combines tender slices of seared steak with a rich, creamy Gorgonzola and Parmesan sauce. Tossed with al dente fettuccine, this dish is perfect for special occasions or when you want to elevate a weeknight dinner. The savory steak complements the tangy, cheesy sauce, while a sprinkle of fresh parsley adds a touch of brightness and balance.

This recipe delivers restaurant-quality results with simple ingredients and straightforward steps. It’s a dish that’s sure to impress family and friends while satisfying even the most indulgent cravings. Pair it with a crisp green salad or garlic bread for a complete meal that’s as elegant as it is satisfying.

Why You’ll Love This Recipe

Decadent Flavors: Rich, cheesy Alfredo sauce pairs perfectly with savory steak.

Simple Elegance: Easy enough for weeknights yet impressive for entertaining.

Crowd-Pleaser: A dish that’s sure to wow steak and pasta lovers alike.

Ingredients

• 1 lb sirloin steak, thinly sliced

• Salt and pepper, to taste

• 8 oz fettuccine pasta

• 2 tablespoons olive oil

• 4 cloves garlic, minced

• 1 cup heavy cream

• 1 cup grated Parmesan cheese

• ½ cup crumbled Gorgonzola cheese

• Fresh parsley, for garnish

Directions

Step 1: Prepare the Steak

1. Season the thinly sliced sirloin steak with salt and pepper, ensuring the flavors penetrate the meat.

Step 2: Cook the Fettuccine

1. Bring a large pot of salted water to a boil.

2. Add the fettuccine and cook according to package instructions until al dente, about 8-10 minutes.

3. Drain the pasta and set it aside.

Step 3: Sear the Steak

1. Heat the olive oil in a large skillet over medium heat.

2. Add the seasoned steak slices and sear for 3-4 minutes per side, or until browned and cooked to your desired doneness.

3. Remove the steak from the skillet and cover to keep warm.

Step 4: Prepare the Garlic

1. Using the same skillet, sauté the minced garlic over medium heat for about 1 minute, stirring frequently to prevent burning.

Step 5: Make the Creamy Parmesan Sauce

1. Pour the heavy cream into the skillet with the garlic and stir gently. Bring the mixture to a simmer over medium heat.

2. Gradually add the grated Parmesan cheese, stirring until fully melted and incorporated into the sauce.

3. Add the crumbled Gorgonzola cheese and stir until the sauce is smooth and creamy.

Step 6: Combine the Steak and Pasta

1. Return the cooked steak to the skillet, stirring to coat it in the creamy sauce.

2. Add the cooked fettuccine and toss gently to ensure the pasta is evenly coated with the sauce.

Step 7: Serve and Garnish

1. Transfer the pasta and steak to serving plates or a large dish.

2. Garnish with freshly chopped parsley for a pop of color and added freshness.

3. Serve hot and enjoy the rich, indulgent flavors.

Tips

Cook the Steak to Preference: For the best results, cook the steak to your preferred doneness (medium-rare or medium is ideal).

Cheese Variations: If Gorgonzola is too strong, substitute with blue cheese or additional Parmesan.

Reheating: Warm leftovers gently over low heat, adding a splash of cream or milk to keep the sauce silky.

Storage Options

Refrigerator: Store leftovers in an airtight container for up to 3 days.

Reheating: Reheat on the stovetop over low heat, adding a little cream to maintain the sauce’s consistency.

Steak Gorgonzola Alfredo is a rich, satisfying dish that combines the best of tender steak and creamy pasta. It’s a meal that feels luxurious without requiring hours in the kitchen, making it the perfect choice for any occasion. Enjoy every bite of this indulgent creation!

Smothered Green Beans with Potatoes

0

Smothered Green Beans with Potatoes is a hearty and flavorful dish that combines fresh green beans, tender potatoes, and the savory richness of hickory-smoked bacon or smoked sausage. Slow-cooked in a seasoned beef broth with a hint of heat from hot sauce and crushed red pepper, this Southern-inspired recipe brings comfort and warmth to the dinner table.

This dish is as versatile as it is delicious, making it an ideal side for a family dinner or a stand-alone meal when you’re craving something hearty and satisfying. The combination of smoky, savory, and spicy flavors ensures that every bite is packed with depth and character.

Why You’ll Love This Recipe

Rich, Smoky Flavor: Bacon or smoked sausage adds a deliciously savory and smoky base.

Comfort Food Classic: Tender green beans and creamy potatoes make this dish warm and satisfying.

Customizable Heat: The level of spice can be easily adjusted to your preference.

Ingredients

• 4 slices thick-cut hickory-smoked bacon, chopped (or substitute with smoked sausage)

• ½ cup sliced yellow onion

• 2 teaspoons minced garlic

• 4 cups low-sodium beef broth

• 1½ pounds fresh green beans, cut into 2-inch pieces

• 1 tablespoon hot sauce (adjust to taste)

• ½ teaspoon kosher salt

• ¼ teaspoon crushed red pepper

• ⅛ teaspoon ground black pepper

• 4 medium red potatoes, quartered

• Ground black pepper for garnish (optional)

Instructions

Step 1: Cook the Bacon or Sausage

1. In a medium-sized Dutch oven, cook the chopped bacon over medium heat until crisp, about 10 minutes.

2. Use a slotted spoon to remove the bacon and place it on paper towels to drain. Reserve the bacon drippings in the pot.

3. If using smoked sausage, follow the same steps to render the fat.

Step 2: Sauté the Onions and Garlic

1. Add the sliced onions and minced garlic to the bacon drippings in the pot.

2. Cook over medium heat, stirring frequently, until the onions are translucent, about 2 minutes.

Step 3: Add the Green Beans and Seasonings

1. Return the cooked bacon or sausage to the pot.

2. Pour in the beef broth and add the green beans, hot sauce, kosher salt, crushed red pepper, and ground black pepper.

3. Stir well to combine and bring the mixture to a boil.

Step 4: Simmer the Green Beans

1. Reduce the heat to medium-low, cover the pot, and let the mixture simmer.

2. Stir occasionally, cooking for about 45 minutes, or until the green beans are tender.

Step 5: Cook the Potatoes

1. Increase the heat to medium and add the quartered red potatoes to the pot.

2. Cook uncovered for about 25 minutes, stirring occasionally, until the potatoes are fork-tender.

Step 6: Serve and Garnish

1. Remove the pot from heat and serve the smothered green beans with potatoes hot.

2. Optionally, garnish with freshly ground black pepper for added flavor.

Tips

Green Bean Selection: Use fresh green beans for the best flavor and texture, but frozen beans can work in a pinch.

Adjusting Spice: Reduce or omit the crushed red pepper and hot sauce for a milder version.

Adding Flavor: For extra depth, try adding a splash of apple cider vinegar or Worcestershire sauce near the end of cooking.

Storage Options

Refrigerator: Store leftovers in an airtight container for up to 3 days. Reheat gently on the stove or in the microwave.

Freezer: Freeze the dish in a freezer-safe container for up to 2 months. Thaw overnight in the refrigerator before reheating.

Smothered Green Beans with Potatoes is a soul-warming dish that celebrates simple ingredients and bold flavors. Perfect for family meals or as a comforting side, this recipe is sure to become a favorite at your table!

Easy Hamburger Rice Casserole

0

Easy Hamburger Rice Casserole is the perfect comfort food, combining hearty ingredients in one dish for a satisfying and flavorful meal. With tender ground beef, creamy soups, sour cream, and melted cheese, this casserole is a crowd-pleaser that’s simple to prepare and perfect for busy weeknights. The addition of vegetables like onion and green bell pepper adds a burst of freshness, while cooked rice makes it a filling and wholesome dish.

This casserole is a versatile recipe that can be adapted to suit your preferences. Whether you’re looking for a quick family dinner or a dish to bring to a potluck, this hearty casserole checks all the boxes. Its creamy, cheesy layers are sure to become a favorite in your household. Serve it on its own or pair it with a simple green salad for a complete meal.

Why You’ll Love This Recipe

Hearty and Comforting: A warm, filling meal perfect for any occasion.

Simple Ingredients: Made with pantry staples for convenience.

Family-Friendly: Loved by kids and adults alike.

Ingredients

• 1 lb ground beef

• 1 medium onion, chopped

• 1 green bell pepper, chopped

• 1 can (10.5 oz) cream of mushroom soup

• 1 can (10.5 oz) cream of chicken soup

• 1 cup sour cream

• 1 ½ cups cooked white rice

• 1 cup shredded cheddar cheese

• ½ teaspoon garlic powder

• Salt and pepper to taste

• Fresh parsley, chopped (optional, for garnish)

Instructions

Step 1: Preheat the Oven

1. Preheat your oven to 350°F (175°C).

2. Lightly grease a 9×13-inch baking dish and set it aside.

Step 2: Cook the Beef and Vegetables

1. In a large skillet over medium heat, cook the ground beef until browned.

2. Add the chopped onion and green bell pepper to the skillet. Cook until the vegetables are softened, about 5 minutes.

3. Drain any excess fat from the skillet.

Step 3: Combine the Ingredients

1. In a large mixing bowl, combine the cooked beef mixture, cream of mushroom soup, cream of chicken soup, sour cream, cooked rice, garlic powder, salt, and pepper.

2. Mix everything thoroughly until well incorporated.

Step 4: Assemble the Casserole

1. Transfer the mixture to the prepared baking dish, spreading it out evenly.

2. Sprinkle the shredded cheddar cheese over the top, ensuring it covers the casserole evenly.

Step 5: Bake the Casserole

1. Place the dish in the preheated oven and bake for 25-30 minutes.

2. The casserole is ready when the cheese is melted, bubbly, and golden brown.

Step 6: Garnish and Serve

1. Remove the casserole from the oven and let it cool slightly before serving.

2. Optionally, garnish with chopped fresh parsley for a pop of color and added freshness.

Tips

Customize the Veggies: Add diced carrots, celery, or frozen peas for extra nutrition.

Boost the Flavor: Use seasoned ground beef or add a dash of Worcestershire sauce for a richer taste.

Rice Options: Substitute white rice with brown rice or wild rice for a nuttier flavor and added fiber.

Storage Options

Refrigerator: Store leftovers in an airtight container for up to 3 days. Reheat in the oven or microwave until warmed through.

Freezer: Assemble the casserole and freeze before baking. Cover tightly with plastic wrap and foil, and freeze for up to 2 months. Bake directly from frozen, adding an extra 10-15 minutes to the baking time.

Easy Hamburger Rice Casserole is a comforting, flavorful dish that’s as easy to make as it is to enjoy. It’s perfect for feeding a crowd or preparing ahead for a hassle-free weeknight dinner. Your family will love the creamy, cheesy goodness in every bite!

Layered Salad

0

Layered Salad is a classic dish that combines vibrant layers of crisp vegetables, protein-rich ingredients, and a creamy dressing. This visually stunning salad is not only a treat for the eyes but also a versatile side dish perfect for potlucks, holidays, or casual family dinners. Its assembly-style preparation allows the flavors to meld beautifully while keeping the salad fresh and appealing.

Each layer contributes to the salad’s delightful contrast of textures and flavors. From the crunchy iceberg lettuce to the smoky crumbled bacon and sweet peas, every bite is a harmonious blend of savory and creamy goodness. The homemade dressing ties it all together with its tangy, herbaceous flavor, adding depth to this simple yet elegant dish.

Why You’ll Love This Recipe

Impressive Presentation: The layered assembly is not only visually appealing but also easy to serve.

Versatile Ingredients: You can customize the layers with your favorite vegetables and toppings.

Crowd-Pleaser: A perfect dish for gatherings, holidays, or any occasion where you need a show-stopping side.

Ingredients

For the Salad:

• 1 head iceberg lettuce, washed and torn into pieces

• 4 hard-boiled eggs, chopped

• 2 large tomatoes, chopped

• 1 (12-ounce) package frozen peas, thawed

• 6 to 8 strips bacon, cooked and crumbled

• 1 cup shredded sharp cheddar cheese

• ½ cup finely chopped red onion

• Parsley for garnish (optional)

For the Salad Dressing:

• 1 ½ cups mayonnaise

• ½ cup sour cream

• 1 teaspoon dried parsley

• 1 teaspoon dried oregano

• 1 teaspoon onion powder

• ½ teaspoon salt

• ¼ teaspoon black pepper

Instructions

Step 1: Prepare the Salad Layers

1. Begin by layering the torn lettuce at the bottom of a large glass trifle bowl or any deep, clear serving dish.

2. Add a layer of chopped hard-boiled eggs, ensuring an even distribution.

3. Follow with a layer of chopped tomatoes, spreading them evenly over the eggs.

4. Add the thawed peas, creating a bright green layer that contrasts beautifully with the tomatoes.

5. Sprinkle the crumbled bacon over the peas for a savory, smoky layer.

6. Add the shredded cheddar cheese, covering the bacon evenly.

7. Finish the layers with finely chopped red onion, providing a sharp, zesty flavor.

Step 2: Mix the Dressing

1. In a medium bowl, combine the mayonnaise, sour cream, dried parsley, dried oregano, onion powder, salt, and black pepper.

2. Stir until the dressing is smooth and well-blended.

Step 3: Assemble the Salad

1. Carefully spread the prepared dressing over the top of the salad. Use a spatula to create an even layer, ensuring it completely covers the salad. This layer helps preserve the freshness of the ingredients below.

Step 4: Garnish and Serve

1. For a final touch, garnish the salad with fresh parsley if desired.

2. Cover the dish with plastic wrap and refrigerate for at least 1 hour before serving. This allows the flavors to meld together while keeping the salad crisp.

Tips

Layering Tips: Use a clear glass dish to showcase the vibrant layers for an eye-catching presentation.

Customize Your Layers: Add cucumbers, bell peppers, or avocado for extra flavor and texture.

Make It Ahead: Prepare the salad a day in advance and refrigerate for convenience. Add the dressing and garnish just before serving.

Storage Options

Refrigerator: Store leftovers in an airtight container for up to 2 days. Keep in mind that the lettuce may lose some crispness over time.

Make Ahead: Prepare all components separately and assemble just before serving for the freshest results.

Layered Salad is a timeless recipe that combines simplicity and elegance. Its customizable nature makes it a versatile addition to any meal, ensuring it’s always a crowd favorite. Whether served as a side or a light main dish, this salad is as delightful to eat as it is to look at.

Death by Chocolate Bundt Cake

0

Death by Chocolate Bundt Cake is the ultimate dessert for chocolate lovers. This cake boasts layers of rich, intense chocolate flavor, with a moist crumb and a luscious glaze that drips down the sides, creating an irresistible visual and taste experience. The semisweet chocolate chips add pockets of gooey decadence, ensuring every bite is an indulgent treat. Perfect for special occasions, dinner parties, or a sweet pick-me-up, this cake delivers pure chocolate bliss in every slice.

The combination of cocoa powder, melted chocolate, and a silky glaze elevates this dessert to gourmet status. The inclusion of buttermilk keeps the cake tender and adds a subtle tang that balances the sweetness. Finished with a cascade of chocolate glaze and extra chocolate chips, it’s a showstopper that’s surprisingly easy to make. Serve it with a dollop of whipped cream or a scoop of vanilla ice cream for the ultimate indulgence.

Why You’ll Love This Recipe

Rich Chocolate Flavor: Cocoa powder, chocolate chips, and a silky glaze ensure an intense chocolate experience.

Moist and Tender: Buttermilk and boiling water create a soft, moist texture.

Simple Yet Impressive: Easy to prepare but elegant enough for any celebration.

Ingredients

For the Cake:

• 1 cup unsalted butter, softened

• 2 cups granulated sugar

• 4 large eggs

• 1 teaspoon vanilla extract

• 3/4 cup unsweetened cocoa powder

• 2 cups all-purpose flour

• 1 teaspoon baking powder

• 1 teaspoon baking soda

• 1/2 teaspoon salt

• 1 cup buttermilk

• 1 cup boiling water

• 1 cup semisweet chocolate chips

For the Glaze:

• 1 cup semisweet chocolate chips

• 1/2 cup heavy cream

• 1 tablespoon unsalted butter

• 1 teaspoon vanilla extract

For Topping:

• 1/2 cup semisweet chocolate chips

Instructions

Step 1: Prepare the Oven and Pan

1. Preheat your oven to 350°F (175°C).

2. Grease and flour a Bundt pan thoroughly to ensure easy cake release.

Step 2: Make the Cake Batter

1. In a large bowl, cream the butter and sugar together until light and fluffy.

2. Add the eggs one at a time, beating well after each addition. Stir in the vanilla extract.

3. In a separate bowl, sift together the cocoa powder, flour, baking powder, baking soda, and salt.

4. Gradually add the dry ingredients and buttermilk to the creamed mixture, alternating and starting and ending with the dry ingredients. Mix just until combined.

5. Stir in the boiling water until the batter is smooth. Note that the batter will be thin.

6. Fold in the chocolate chips.

Step 3: Bake the Cake

1. Pour the batter into the prepared Bundt pan and smooth the top.

2. Bake for 45-50 minutes or until a toothpick inserted into the center comes out clean.

3. Allow the cake to cool in the pan for 10 minutes, then invert onto a wire rack to cool completely.

Step 4: Prepare the Glaze

1. In a small saucepan over low heat, combine the chocolate chips, heavy cream, and butter.

2. Stir until the chocolate melts and the mixture is smooth.

3. Remove from heat and stir in the vanilla extract.

Step 5: Glaze and Decorate the Cake

1. Transfer the cooled cake to a serving platter.

2. Pour the chocolate glaze over the top, letting it drip down the sides.

3. Sprinkle the additional chocolate chips over the glaze while it is still soft to ensure they adhere.

Step 6: Serve and Enjoy

1. Allow the glaze to set for about 15 minutes before slicing.

2. Serve with whipped cream or ice cream for an extra indulgent touch.

Tips for Success

Room Temperature Ingredients: Ensure the butter, eggs, and buttermilk are at room temperature for a smoother batter and even baking.

Don’t Overmix: Mix the batter just until combined to avoid a dense cake.

Cool Before Glazing: Ensure the cake is completely cool before applying the glaze to prevent it from melting off.

Grease Thoroughly: Properly prepare your Bundt pan to prevent sticking.

Storage Options

Room Temperature: Store leftovers in an airtight container for up to 3 days.

Refrigerator: Refrigerate for up to a week; let the cake come to room temperature before serving.

Freezing: Wrap the cake tightly in plastic wrap and foil, and freeze for up to 2 months. Thaw overnight in the refrigerator before serving.

Death by Chocolate Bundt Cake is a dessert that truly lives up to its name, delivering an intense chocolate experience that’s perfect for chocolate enthusiasts. Whether you’re celebrating a special occasion or just indulging in a sweet craving, this cake is sure to impress and satisfy!

Ground Turkey and Cabbage Stir-Fry

0

Ground Turkey and Cabbage Stir-Fry is a wholesome, flavorful dish that comes together in no time. Perfect for busy weeknights, this recipe combines lean ground turkey with the crunch of fresh cabbage and carrots, all tossed in a light, Asian-inspired seasoning. It’s a nutritious option that doesn’t skimp on flavor, offering a satisfying meal without feeling heavy.

The beauty of this stir-fry lies in its versatility. The simple ingredient list allows for customization, making it easy to adapt to your tastes or what you have on hand. A hint of ginger and garlic brings warmth to the dish, while a splash of rice vinegar brightens the flavors. Pair it with steamed rice, quinoa, or enjoy it on its own for a low-carb, protein-packed dinner that’s as healthy as it is delicious.

Why You’ll Love This Recipe

Quick and Easy: Perfect for weeknights, this stir-fry is ready in under 30 minutes.

Healthy and Nutritious: Packed with lean protein, fresh vegetables, and light seasonings.

Customizable: Easily adapt the flavors or add extra veggies to suit your preferences.

Ingredients

• 1.5 lbs lean ground turkey (99% fat-free)

• ¼ cup water

• 3 cups green cabbage, shredded

• 1 medium carrot, shredded

• ½ teaspoon garlic powder or 2 cloves fresh garlic, minced

• 2 tablespoons toasted sesame oil

• ½ tablespoon fresh ginger, finely minced

• 2 tablespoons green onions, chopped

• 1 tablespoon rice vinegar

• Sea salt and black pepper, to taste

• Optional: 2 tablespoons coconut aminos or tamari, hoisin sauce, sesame seeds

Instructions

Step 1: Cook the Ground Turkey

1. Heat a large skillet over medium-high heat.

2. Add the ground turkey and cook, breaking it up with a spatula, until no longer pink.

3. If necessary, drain any excess fat before proceeding.

Step 2: Add Vegetables and Seasonings

1. Reduce the heat to medium and pour in the water.

2. Add the shredded cabbage, shredded carrot, garlic powder (or fresh garlic), sesame oil, ginger, and green onions to the skillet.

3. Stir to combine, and season with sea salt and black pepper to taste.

Step 3: Cook Until Tender

1. Stir the mixture frequently, allowing the cabbage and carrots to soften, about 4-5 minutes.

Step 4: Enhance the Flavor

1. Stir in the rice vinegar, and if desired, add coconut aminos or tamari for an extra layer of flavor.

2. Continue to cook for an additional 1-2 minutes, ensuring the flavors meld and the dish is heated through.

Step 5: Serve and Garnish

1. Remove the skillet from heat and transfer the stir-fry to a serving platter or bowl.

2. Sprinkle with sesame seeds for added crunch and flavor, if desired.

Tips

Even Cooking: Chop the cabbage and carrot into uniform sizes for even cooking.

Add Spice: For a kick of heat, include red pepper flakes or a drizzle of sriracha.

Extra Vegetables: Incorporate bell peppers, snap peas, or mushrooms for variety.

Storage Options

Refrigerator: Store leftovers in an airtight container for up to 3 days. Reheat in a skillet or microwave until warmed through.

Freezer: Freeze portions in freezer-safe containers for up to 2 months. Thaw overnight in the fridge before reheating.

Ground Turkey and Cabbage Stir-Fry is a simple yet satisfying dish that brings together wholesome ingredients in a flavorful way. Whether you’re watching your carbs or just craving a quick, nutritious meal, this recipe is sure to become a favorite at your dinner table.

Island Pecan Pie

0

Island Pecan Pie is a tropical twist on a classic dessert, blending the nutty richness of pecans with the sweet, creamy notes of bananas and a velvety custard filling. With a graham cracker crust as its base, this pie layers tropical flavors to create a dessert that feels like a vacation in every bite. The final touch of freshly whipped cream and a drizzle of caramel sauce makes it both indulgent and irresistible.

What sets this pie apart is its unique combination of textures and flavors. The crunch of the graham cracker crust, the creamy custard, and the soft banana slices create a harmonious medley. It’s perfect for gatherings, holidays, or simply treating yourself to something extraordinary. Whether you’re serving this after a hearty meal or as a stand-alone treat, Island Pecan Pie will captivate your taste buds and have everyone asking for seconds.

Why You’ll Love This Recipe

Tropical Flavor Profile: The addition of bananas gives this pecan pie a refreshing tropical twist.

Rich and Creamy: The custard filling is smooth and luxurious.

Simple Yet Impressive: With easy-to-find ingredients, this dessert looks and tastes like a gourmet creation.

Ingredients

For the Crust:

• 1 1/2 cups (180g) graham cracker crumbs

• 1/4 cup (50g) granulated sugar

• 1/2 cup (115g) unsalted butter, melted

For the Filling:

• 1/2 cup (100g) granulated sugar

• 1/4 cup (30g) cornstarch

• 1/2 teaspoon salt

• 3 cups (720ml) whole milk

• 4 large egg yolks, lightly beaten

• 2 tablespoons unsalted butter

• 1 teaspoon vanilla extract

• 2-3 ripe bananas, sliced

For the Topping:

• 1 cup (240ml) heavy whipping cream

• 2 tablespoons powdered sugar

• 1 teaspoon vanilla extract

• Additional banana slices for garnish

• Optional: Drizzle of caramel sauce

Instructions

Step 1: Prepare the Crust

1. Preheat your oven to 350°F (175°C).

2. In a medium bowl, mix the graham cracker crumbs and granulated sugar. Add melted butter and stir until evenly combined.

3. Press the mixture firmly into the bottom and up the sides of a pie dish or muffin tin for mini pies.

4. Bake for 5-7 minutes until the crust is lightly golden. Let it cool completely.

Step 2: Make the Custard Filling

1. In a medium saucepan, whisk together sugar, cornstarch, and salt. Gradually add milk, whisking constantly to prevent lumps.

2. Cook over medium heat, stirring continuously, until the mixture thickens and starts to boil. Let it boil for 1 minute, then remove from heat.

3. Slowly whisk about 1/2 cup of the hot mixture into the beaten egg yolks to temper them.

4. Gradually return the tempered yolks to the saucepan, whisking continuously. Bring the mixture back to a gentle boil and cook for another minute.

5. Remove from heat, stir in butter and vanilla extract, and let cool to room temperature. Cover the surface with plastic wrap to prevent a skin from forming.

Step 3: Assemble the Pie

1. Spread a thin layer of custard into the cooled crust.

2. Add a single layer of banana slices on top of the custard.

3. Pour the remaining custard over the bananas, spreading it evenly.

4. Refrigerate the pie for at least 2 hours to set.

Step 4: Whip the Cream and Garnish

1. In a mixing bowl, beat the heavy whipping cream, powdered sugar, and vanilla extract until stiff peaks form.

2. Spread or pipe the whipped cream over the chilled pie.

3. Garnish with banana slices and, if desired, drizzle with caramel sauce.

Tips

Even Crust: Use the bottom of a measuring cup to press the graham cracker mixture evenly into the pie dish.

Smooth Custard: Stir constantly while cooking to avoid lumps; strain the custard if necessary.

Fresh Bananas: Add bananas just before assembling to prevent browning.

Customizable Toppings: Swap caramel sauce for chocolate syrup or add toasted coconut flakes for extra tropical flair.

Storage Options

Refrigerator: Store the pie in an airtight container for up to 3 days. Add whipped cream and garnishes just before serving for the best presentation.

Freezing: Freeze the crust and custard layers without bananas or whipped cream for up to 1 month. Thaw overnight in the refrigerator, then assemble and garnish before serving.

Island Pecan Pie is the perfect dessert to bring a tropical vibe to your table. Its blend of nutty, creamy, and sweet flavors is sure to impress at any gathering or as a treat for yourself.

Mini Banana Cream Pies

0

Mini Banana Cream Pies are an irresistible treat, offering the classic flavors of a banana cream pie in a convenient, single-serving format. With a buttery graham cracker crust, creamy homemade custard, and slices of fresh banana, these pies are topped with fluffy whipped cream for the perfect balance of textures and flavors. They’re not only visually delightful but also incredibly satisfying with every bite.

What makes these mini pies truly special is their versatility. Perfect for parties, holidays, or a casual dessert, they’re easy to serve and transport. The individual portions allow everyone to enjoy their own pie without the need for slicing and serving. Plus, the combination of fresh bananas and silky custard is a nostalgic flavor that evokes warmth and comfort. Prepare these pies ahead of time and let the flavors meld together for a truly indulgent experience.

Why You’ll Love This Recipe

Single-Serve Elegance: Perfect for entertaining, these pies are easy to serve and look stunning.

Classic Flavors: The blend of creamy custard, fresh bananas, and whipped cream is timeless.

Make-Ahead Friendly: Ideal for preparing in advance, making them stress-free for events.

Ingredients

For the Crust:

• 1 1/2 cups (180g) graham cracker crumbs

• 1/4 cup (50g) granulated sugar

• 1/2 cup (115g) unsalted butter, melted

For the Filling:

• 1/2 cup (100g) granulated sugar

• 1/4 cup (30g) cornstarch

• 1/2 teaspoon salt

• 3 cups (720ml) whole milk

• 4 large egg yolks, lightly beaten

• 2 tablespoons unsalted butter

• 1 teaspoon vanilla extract

• 2-3 ripe bananas, sliced

For the Topping:

• 1 cup (240ml) heavy whipping cream

• 2 tablespoons powdered sugar

• 1 teaspoon vanilla extract

• Additional banana slices for garnish

• Optional: Drizzle of caramel sauce

Instructions

Step 1: Prepare the Crust

1. Preheat your oven to 350°F (175°C).

2. In a medium bowl, mix graham cracker crumbs and granulated sugar. Add melted butter and stir until the crumbs are evenly coated.

3. Press the mixture firmly into the bottoms and up the sides of a muffin tin to form mini pie crusts.

4. Bake for 5-7 minutes, or until lightly golden. Remove from the oven and let cool completely.

Step 2: Make the Custard Filling

1. In a medium saucepan, whisk together sugar, cornstarch, and salt. Gradually add milk, whisking to ensure no lumps.

2. Cook over medium heat, stirring constantly, until the mixture thickens and starts to boil. Let it boil for 1 minute.

3. Remove from heat. Slowly whisk 1/2 cup of the hot mixture into the beaten egg yolks to temper them.

4. Gradually return the yolk mixture to the saucepan, whisking constantly.

5. Bring the custard back to a gentle boil and cook for 1 more minute.

6. Remove from heat, stir in butter and vanilla extract, and let cool to room temperature with plastic wrap directly on the surface to prevent a skin from forming.

Step 3: Assemble the Pies

1. Spoon a layer of custard into each cooled crust.

2. Add a few banana slices on top of the custard, then cover with another layer of custard.

3. Refrigerate the assembled pies for at least 2 hours to allow the filling to set.

Step 4: Make the Whipped Cream

1. In a large bowl, whip heavy cream with powdered sugar and vanilla extract until stiff peaks form.

Step 5: Add Toppings

1. Top each pie with a dollop of whipped cream.

2. Garnish with additional banana slices and, if desired, drizzle with caramel sauce.

Tips

Perfect Crusts: Press the crust mixture firmly into the tin to ensure it holds its shape.

Custard Consistency: Stir constantly while cooking to prevent lumps. If lumps form, strain the custard before cooling.

Fresh Bananas: Slice bananas just before assembling to prevent browning.

Whipping Cream: Use cold cream for the best results when whipping.

Storage Options

Refrigerator: Store the pies in an airtight container for up to 3 days. Keep the whipped cream and garnishes separate until ready to serve for the freshest appearance.

Freezing: The crust and custard can be assembled and frozen without bananas or whipped cream for up to 1 month. Thaw overnight in the refrigerator before adding toppings.

Mini Banana Cream Pies are an elegant and delightful dessert that transforms simple ingredients into something extraordinary. Perfect for any gathering, these individual pies are sure to impress with their creamy, nutty, and sweet flavor profile.

Pecan Caramel Bars

0

Pecan Caramel Bars are the epitome of indulgent desserts, combining a buttery shortbread crust, rich caramel, toasted pecans, and a luscious layer of melted chocolate. These bars are the perfect balance of crunchy, gooey, and creamy textures, offering a treat that’s as decadent as it is satisfying. Whether you’re preparing for a holiday gathering, looking for an impressive dessert to share, or simply craving something sweet, these bars deliver a gourmet experience with surprisingly simple ingredients.

The combination of toasted pecans and caramelized sugar creates a warm, nutty flavor that pairs beautifully with the smooth chocolate topping. These bars are not only visually appealing but also pack a flavor punch in every bite. Easy to prepare and even easier to love, they’re destined to become a favorite among your family and friends.

Why You’ll Love This Recipe

Decadent Layers: Buttery crust, creamy caramel, and rich chocolate make these bars a multi-layered delight.

Crowd-Pleaser: Perfect for parties, holidays, or anytime you want to impress with minimal effort.

Make-Ahead Friendly: These bars can be prepared in advance and stored for several days.

Ingredients

For the Crust:

• 2 cups all-purpose flour

• 1/2 cup powdered sugar

• 1 cup unsalted butter, softened

For the Caramel Layer:

• 1 cup unsalted butter

• 1 cup packed brown sugar

• 1/4 cup light corn syrup

• 1 can (14 oz) sweetened condensed milk

For the Topping:

• 2 cups coarsely chopped pecans

• 1 1/2 cups semisweet chocolate chips

Instructions

Prepare the Crust:

1. Preheat the Oven: Set your oven to 350°F (175°C). Grease a 9×13-inch baking pan.

2. Mix Ingredients: In a large bowl, combine the flour, powdered sugar, and softened butter. Mix until the dough forms a cohesive ball.

3. Press and Bake: Evenly press the dough into the bottom of the prepared pan. Bake for 15-20 minutes, or until the edges are lightly golden. Remove from the oven and set aside to cool slightly.

Make the Caramel Layer:

1. Melt Butter: In a medium saucepan, melt the butter over medium heat.

2. Combine Ingredients: Add the brown sugar, corn syrup, and sweetened condensed milk. Stir constantly until well combined.

3. Cook Caramel: Bring the mixture to a gentle boil, then reduce the heat to low and simmer for 5-7 minutes, stirring frequently, until it thickens and reaches a deep caramel color.

4. Pour Over Crust: Evenly spread the caramel mixture over the baked crust.

Add the Topping and Bake:

1. Sprinkle Pecans: Scatter the chopped pecans evenly over the caramel layer.

2. Bake Again: Return the pan to the oven and bake for an additional 10-15 minutes, or until the caramel bubbles and the pecans are lightly toasted.

Add the Chocolate Layer:

1. Melt Chocolate Chips: Remove the pan from the oven and immediately sprinkle the chocolate chips over the hot pecan and caramel layer.

2. Spread Chocolate: Allow the chips to soften from the heat for a few minutes, then use a spatula to spread the melted chocolate evenly.

Cool and Set:

1. Cool at Room Temperature: Let the bars cool completely at room temperature.

2. Refrigerate: Place the pan in the refrigerator for at least 1 hour to allow the chocolate to set fully.

Slice and Serve:

1. Cut into Bars: Once set, slice the dessert into squares or rectangles.

2. Serve: Enjoy these rich, caramel-pecan-chocolate treats!

Tips

Line the Pan: Use parchment paper for easy removal and cleaner edges when slicing.

Even Slicing: For clean cuts, use a sharp knife and wipe it clean between slices.

Toasted Pecans: For deeper flavor, lightly toast the pecans before adding them to the caramel.

Storage Options

Room Temperature: Store in an airtight container for up to 3 days.

Refrigeration: Keep refrigerated for up to a week to maintain freshness and firmness.

Freezing: Wrap individual bars in plastic wrap and store in a freezer-safe container for up to 3 months. Thaw at room temperature before serving.

Pecan Caramel Bars are a decadent treat that combines rich flavors and textures for a truly indulgent experience. Whether you’re sharing them with loved ones or savoring them solo, these bars are guaranteed to satisfy your sweet tooth!

Garlic Butter Pork Chops with Cheesy Potato Bake

0

Garlic Butter Pork Chops with Cheesy Potato Bake is the ultimate comfort food combo, blending tender, juicy pork chops with rich, creamy potatoes baked to perfection. The dish is a harmony of savory garlic butter flavors, earthy thyme, and the gooey indulgence of cheddar cheese. Perfect for family dinners, this hearty meal is a crowd-pleaser that’s sure to impress without requiring complex techniques or hours in the kitchen.

This recipe is not only delicious but also versatile. You can easily swap ingredients to suit your preferences—use Gruyère cheese for a sophisticated twist or add a handful of crispy bacon bits for extra flavor. With its golden crust and fragrant, buttery sauce, paired with the creamy, cheesy potatoes, this dish is as beautiful to present as it is satisfying to eat.

Why You’ll Love This Recipe

Rich and Flavorful: Garlic butter, fresh thyme, and melted cheddar cheese come together for an irresistible flavor profile.

One-Dish Wonder: The pork chops and potatoes bake together, making cleanup a breeze.

Crowd-Pleaser: Perfect for family gatherings or a comforting weeknight meal.

Ingredients

For the Pork Chops:

• 4 bone-in pork chops, about 1 inch thick

• 3 tablespoons olive oil

• 4 tablespoons butter, divided

• 4 cloves garlic, minced

• 2 sprigs fresh thyme

• Salt and pepper, to taste

• Fresh parsley, for garnish (optional)

For the Cheesy Potato Bake:

• 4-5 medium potatoes, thinly sliced

• 1 medium onion, thinly sliced

• 2 cups shredded cheddar cheese

• 1 cup milk

• 1/2 cup sour cream

• 2 tablespoons butter

• 1 teaspoon garlic powder

• Salt and pepper, to taste

Instructions

Prepare the Cheesy Potato Bake:

1. Preheat the Oven: Set your oven to 375°F (190°C) and grease a 9×13 inch baking dish with butter or non-stick spray.

2. Caramelize the Onions: In a skillet over medium heat, melt 2 tablespoons of butter. Add the sliced onions and cook until translucent and slightly caramelized, about 5-7 minutes. Stir in garlic powder, salt, and pepper.

3. Layer the Potatoes and Onions: Place half of the sliced potatoes in the prepared baking dish. Top with half of the caramelized onions and sprinkle with 1 cup of shredded cheddar cheese. Repeat the layering with the remaining potatoes, onions, and cheese.

4. Prepare the Sauce: In a saucepan, warm the milk and sour cream over medium heat, stirring occasionally to prevent curdling. Once warmed, pour the mixture evenly over the potatoes.

5. Bake Initially: Cover the dish with aluminum foil and bake for 30 minutes.

Cook the Pork Chops:

1. Season and Sear: Season the pork chops with salt and pepper. Heat olive oil in a skillet over medium-high heat and sear the pork chops for 3-4 minutes per side, until golden brown. Remove from the skillet and set aside.

2. Make Garlic Butter Sauce: In the same skillet, melt 2 tablespoons of butter. Add minced garlic and thyme, cooking until fragrant, about 1-2 minutes. Return the pork chops to the skillet, spooning the garlic butter sauce over them.

Assemble and Finish the Dish:

1. Combine Pork and Potatoes: Remove the foil from the potato dish. Place the browned pork chops on top of the potatoes and pour over any remaining garlic butter sauce.

2. Final Bake: Return the dish to the oven, uncovered, and bake for an additional 30 minutes, or until the potatoes are tender and the pork chops reach an internal temperature of 145°F (63°C).

Serve and Garnish:

1. Rest: Let the dish rest for 5-10 minutes before serving to allow the flavors to settle.

2. Garnish: Optionally, sprinkle freshly chopped parsley over the dish for a burst of color and freshness.

Tips

Slice Potatoes Evenly: Use a mandoline slicer for consistent thickness, ensuring the potatoes cook evenly.

Choose Quality Cheese: Use sharp cheddar for a bold flavor, or experiment with other cheeses like Gruyère or Monterey Jack.

Test for Doneness: Ensure the pork chops reach an internal temperature of 145°F (63°C) to avoid undercooking.

Storage Options

Refrigeration: Store leftovers in an airtight container in the refrigerator for up to 3 days. Reheat in the oven at 350°F (175°C) for 10-15 minutes to maintain crispness.

Freezing: Freeze individual portions in airtight containers for up to 3 months. Thaw in the refrigerator overnight before reheating.

Garlic Butter Pork Chops with Cheesy Potato Bake is the perfect combination of hearty, cheesy, and savory goodness. Whether you’re hosting a dinner party or treating your family to something special, this recipe is sure to become a favorite at your table!