Famous Cream Puffs

0

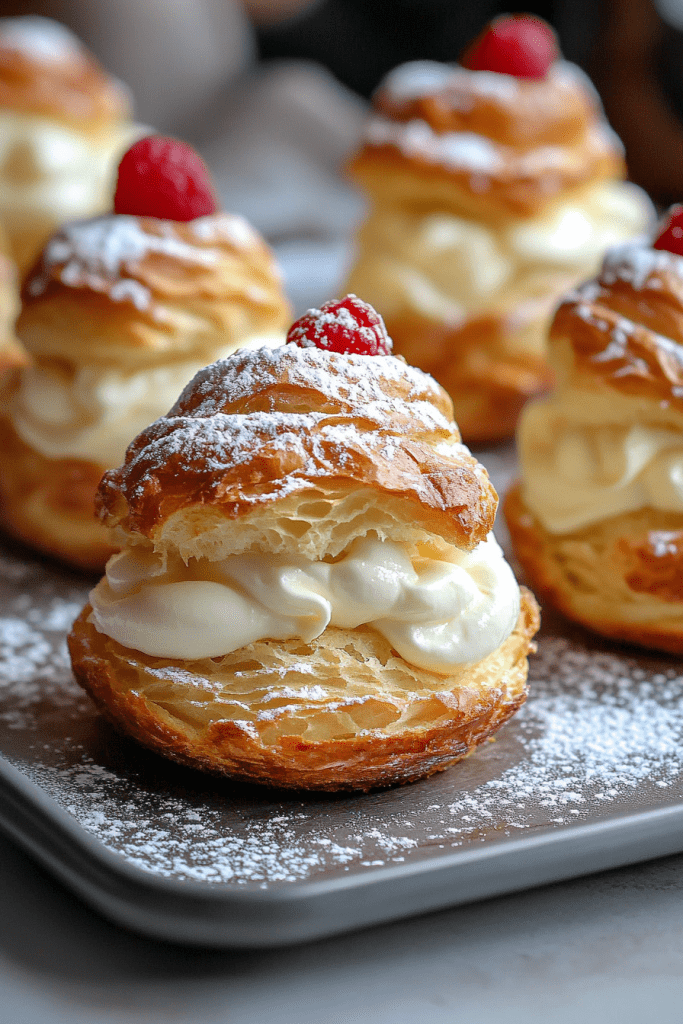
These Famous Cream Puffs are a timeless dessert that deliver a light, airy shell filled with rich, creamy vanilla filling. Whether you’re serving them at a fancy gathering or simply indulging at home, these delicate pastries are sure to impress. The shells, made from classic pâte à choux dough, puff up beautifully in the oven to create the perfect hollow interior ready to be filled with whipped vanilla cream.

What sets these cream puffs apart is the easy yet luxurious filling—a blend of heavy cream, instant pudding, and a splash of milk whipped to fluffy perfection. The shells are crisp on the outside, soft on the inside, and filled with just the right amount of sweet cream. Finished with a dusting of powdered sugar, these treats are as elegant as they are satisfying.

Why You’ll Love This Recipe

Classic & Elegant: A beautiful dessert for any special occasion.

Light Yet Decadent: Airy shells filled with creamy, dreamy vanilla.

Make-Ahead Friendly: Prepare the shells in advance and fill before serving.


Ingredients

For the Shells:

• 8 tbsp unsalted butter

• 1 cup water

• 1 tsp vanilla extract

• 1 tsp granulated sugar

• 1 cup all-purpose flour

• 4 eggs, preferably room temperature

For the Filling:

• 1 pint heavy cream

• 1 (3.4 oz) package instant vanilla pudding mix

• ⅓ cup milk

Optional Topping:

Powdered sugar for dusting


Instructions

Step 1: Prepare the Cream Puff Shells

1. In a heavy-bottomed pot, combine butter, sugar, water, and vanilla extract.

2. Heat over medium heat until the mixture reaches a boil.

3. Quickly add the flour and stir constantly until the mixture forms a ball and pulls away from the sides.

4. Remove from heat and let cool for a few minutes.

Step 2: Add the Eggs

1. Add the eggs one at a time, mixing thoroughly after each addition until the dough is smooth and glossy.

Step 3: Shape the Shells

1. On a parchment-lined baking sheet, spoon or pipe the dough into mounds (about 1½–2 inches wide).

2. Preheat your oven to 400°F (204°C).

3. Bake for 15 minutes, then reduce the oven to 350°F (177°C) and bake for another 15 minutes, or until puffed and golden.

4. Immediately after baking, cut a small slit in the side of each puff to release steam.

5. Let the shells cool completely on a wire rack.


Step 4: Make the Filling

1. In a mixing bowl, combine heavy cream, instant vanilla pudding mix, and milk.

2. Beat with an electric mixer until the mixture thickens into a whipped cream consistency.


Step 5: Fill the Puffs

1. Once cooled, slice each cream puff in half or make a slit large enough for piping.

2. Spoon or pipe the filling generously into each shell.

3. Dust the tops with powdered sugar just before serving.


Tips for Success

Let the dough cool slightly before adding eggs to prevent curdling.

Do not open the oven early or the shells may collapse.

Use a star tip piping bag for beautiful, uniform shapes.

Storage Options

Unfilled shells: Store in an airtight container for up to 2 days or freeze for up to 1 month.

Filled cream puffs: Store in the refrigerator for up to 24 hours. Best enjoyed fresh!

Savory Cheesesteak Meatloaf

0

This Savory Cheesesteak Meatloaf is a mouthwatering twist on the classic comfort food, combining the bold flavors of a Philly cheesesteak with the heartiness of a traditional meatloaf. Packed with juicy ground beef, sautéed vegetables, and layers of gooey cheese, this dish is a surefire crowd-pleaser.

The melted cheese inside and on top creates a creamy contrast to the savory meat, while Worcestershire sauce and seasonings add depth. Perfect for family dinners or gatherings, this meatloaf will quickly become a favorite at your table.

Why You’ll Love This Recipe

Cheesy Goodness: Layers of melted mozzarella or provolone make every bite indulgent.

Hearty and Flavorful: A satisfying combination of beef, vegetables, and seasonings.

Easy to Prepare: Simple steps and common ingredients make this a go-to meal.

Ingredients

• 1½ lb lean ground beef

• 1 large onion, chopped

• 1 green bell pepper, chopped small

• ½ cup whole milk

• ½ cup mushrooms, chopped (optional)

• 1 tbsp olive oil

• 1 cup bread crumbs (regular, Italian style, or panko)

• 1 large egg

• ½ tsp salt

• 1 tsp pepper

• 1 tsp garlic powder

• 1 tsp onion powder

• ½ tsp Adobo seasoning

• 3 tbsp Worcestershire sauce

• 8 slices mozzarella or provolone cheese, thick cut

Instructions

Step 1: Preheat the Oven

Preheat your oven to 350°F (175°C).

Step 2: Cook the Vegetables

1. Heat the olive oil in a skillet over medium heat.

2. Add the chopped onions and green bell peppers, and sauté until softened and tender.

Step 3: Mix the Ingredients

1. In a large bowl, combine the sautéed onions and peppers with the ground beef, whole milk, mushrooms (if using), bread crumbs, egg, garlic powder, onion powder, Adobo seasoning, salt, pepper, and Worcestershire sauce.

2. Use your hands to mix everything together until evenly combined.

Step 4: Prepare the Loaf Pan

1. Lightly grease a loaf pan with oil or non-stick spray.

2. Place half of the meat mixture into the pan and press it down to create an even layer.

Step 5: Add the Cheese Filling

1. Lay four slices of cheese over the meat layer, ensuring it covers the surface.

Step 6: Add Remaining Meat and Bake

1. Add the remaining meat mixture on top of the cheese layer, pressing gently to seal the edges.

2. Place the loaf pan in the oven and bake for 30 minutes.

Step 7: Add Topping Cheese

1. Remove the pan from the oven and lay the remaining four slices of cheese on top of the meatloaf.

2. Return to the oven and bake for another 10–15 minutes, or until the cheese is melted and slightly golden.

Step 8: Rest and Serve

1. Let the meatloaf rest for 5–10 minutes after baking.

2. Slice and serve warm, alongside mashed potatoes, steamed vegetables, or a fresh salad.

Tips

Customize Vegetables: Add mushrooms, jalapeños, or roasted red peppers for extra flavor.

Use Fresh Herbs: Sprinkle fresh parsley or thyme on top for a fresh finish.

Cheese Choices: Experiment with Swiss, gouda, or pepper jack cheese for a unique twist.

Storage Options

Refrigeration: Store leftovers in an airtight container in the refrigerator for up to 3 days. Reheat in the microwave or oven.

Freezing: Wrap individual slices in plastic wrap and foil, then freeze for up to 2 months. Thaw in the refrigerator and reheat before serving.

Savory Cheesesteak Meatloaf combines the hearty appeal of meatloaf with the irresistible flavors of a cheesesteak. This dish is a guaranteed hit for comfort food lovers!

White Almond Wedding Cake

0

White Almond Wedding Cake is a soft, moist, and flavorful dessert perfect for weddings, anniversaries, or any special occasion. This elevated version of a classic white cake is enriched with sour cream, almond extract, and vanilla flavoring, creating a rich and indulgent treat. Paired with a luscious almond buttercream frosting, this cake is as beautiful as it is delicious.

The cake’s light almond flavor and velvety texture make it a crowd-pleaser, while the frosting adds a creamy, nutty finish. With its simple preparation and elegant taste, this recipe is sure to be a hit at your next celebration.

Why You’ll Love This Recipe

Elegant Flavor: Subtle almond and vanilla notes make this cake both delicate and decadent.

Moist Texture: Sour cream ensures the cake is soft and tender.

Perfect for Celebrations: A timeless dessert for weddings, birthdays, and anniversaries.

Ingredients

For the Cake:

• 1 (18.25 oz) package white cake mix

• 1 cup all-purpose flour

• 1 cup granulated sugar

• ¾ teaspoon salt

• 1⅓ cups water

• 1 cup sour cream

• 2 tablespoons vegetable oil

• 1 teaspoon almond extract

• 1 teaspoon clear vanilla flavoring

• 4 large egg whites

For the Almond Buttercream Frosting:

• 3 cups confectioners’ sugar

• ⅓ cup unsalted butter, room temperature

• 1 teaspoon clear vanilla flavoring

• ½ teaspoon almond extract

• 1–2 tablespoons whole milk

Instructions

Step 1: Prepare the Cake Batter

1. Preheat your oven to 325°F (163°C). Grease and flour two 8-inch round cake pans.

2. In a large bowl, stir together the white cake mix, flour, sugar, and salt until well combined.

3. Add the water, sour cream, vegetable oil, almond extract, and vanilla flavoring. Beat on low speed until combined.

4. Add the egg whites and mix on low for about 4 minutes, or until the batter is smooth and uniform.

Step 2: Bake the Cakes

1. Divide the batter evenly between the prepared cake pans.

2. Bake for 45–55 minutes, or until the tops are light golden brown and a toothpick inserted into the center comes out clean.

3. Allow the cakes to cool in the pans for 10 minutes before turning them out onto a wire rack to cool completely.

Step 3: Make the Almond Buttercream Frosting

1. In a large mixing bowl, beat the confectioners’ sugar and unsalted butter together until creamy.

2. Add the clear vanilla flavoring, almond extract, and 1 tablespoon of milk. Beat on high speed for about 5 minutes, or until the frosting is light and fluffy.

3. If the frosting is too thick, add additional milk 1 teaspoon at a time until the desired consistency is reached.

Step 4: Assemble the Cake

1. Once the cakes are completely cooled, place one layer on a serving plate. Spread a generous layer of almond buttercream frosting on top.

2. Add the second cake layer and frost the top and sides of the cake evenly.

3. Use a piping bag to decorate the cake with additional frosting, if desired.

Step 5: Chill or Serve

1. Store the frosted cake in the refrigerator to keep the frosting firm, especially in warm or humid conditions.

2. Allow the cake to come to room temperature before serving for the best flavor and texture.

Tips

Room Temperature Ingredients: Ensure all ingredients are at room temperature for a smooth batter and frosting.

Decorative Touch: Garnish the cake with slivered almonds, edible flowers, or white chocolate shavings for an elegant finish.

Make Ahead: Bake the cake layers a day in advance and assemble on the day of serving.

Storage Options

Refrigeration: Store the frosted cake in the refrigerator for up to 5 days. Cover with plastic wrap or place in an airtight container.

Freezing: Freeze unfrosted cake layers tightly wrapped in plastic for up to 2 months. Thaw in the refrigerator overnight before frosting.

White Almond Wedding Cake is a timeless dessert that’s sure to wow your guests. Its moist layers, rich frosting, and delicate almond flavor make it a sophisticated centerpiece for any celebration!

Sausage and Hashbrown Mini Muffins

0

Sausage and Hashbrown Mini Muffins are a bite-sized breakfast treat perfect for busy mornings or meal prepping. These savory muffins combine the hearty flavors of sausage, hashbrowns, and cheddar cheese with a pop of freshness from red bell pepper and parsley.

Their small, portable size makes them an excellent option for brunches, picnics, or as a quick snack. Packed with protein and flavor, these muffins are a crowd-pleaser for both kids and adults alike.

Why You’ll Love This Recipe

Convenient and Portable: Ideal for on-the-go breakfasts or snacks.

Customizable: Easily adjust the ingredients to suit your preferences.

Meal Prep Friendly: Make ahead and enjoy throughout the week.

Ingredients

• 450 grams (1 pound) ground sausage

• 450 grams (2 cups) frozen hashbrowns, thawed

• 225 grams (1 cup) shredded cheddar cheese

• 120 grams (1/2 cup) diced red bell pepper

• 60 grams (1/4 cup) diced onion

• 60 grams (1/4 cup) chopped fresh parsley

• 4 large eggs

• Salt and pepper, to taste

• Cooking spray

Instructions

Step 1: Preheat and Prep the Pan

1. Preheat your oven to 375°F (190°C).

2. Spray a mini muffin tin with cooking spray to prevent sticking.

Step 2: Cook the Sausage

1. Heat a skillet over medium heat and cook the sausage until browned and fully cooked.

2. Drain any excess grease and set the sausage aside to cool slightly.

Step 3: Combine the Ingredients

1. In a large mixing bowl, combine the cooked sausage, thawed hashbrowns, shredded cheddar cheese, diced red bell pepper, diced onion, and chopped parsley.

2. In a separate bowl, beat the eggs and season with salt and pepper. Pour the eggs into the sausage mixture and fold until all ingredients are evenly combined.

Step 4: Fill the Muffin Tin

1. Spoon the mixture into the prepared mini muffin cups, filling each one almost to the top.

2. Press the mixture lightly into the cups to help them hold their shape.

Step 5: Bake

1. Place the muffin tin in the preheated oven and bake for 20–25 minutes, or until the tops are golden brown and the muffins are set.

Step 6: Cool and Serve

1. Let the muffins cool in the pan for 5 minutes before carefully removing them.

2. Serve warm, or let them cool completely and store for later.

Tips

Cheese Variations: Swap cheddar for Monterey Jack, pepper jack, or gouda for different flavor profiles.

Add Heat: For a spicy kick, mix in diced jalapeños or a pinch of red chili flakes.

Vegetarian Option: Substitute cooked sausage with sautéed mushrooms or plant-based crumbles.

Storage Options

Refrigeration: Store cooled muffins in an airtight container in the refrigerator for up to 4 days. Reheat in the microwave or oven.

Freezing: Freeze muffins in a single layer on a baking sheet, then transfer to a freezer-safe container. Reheat directly from frozen in the oven or microwave.

Sausage and Hashbrown Mini Muffins are a versatile, flavorful dish that’s perfect for any time of day. Enjoy their crispy edges and savory goodness warm out of the oven or as a quick meal on the go!

Strawberry Cream Cheese Icebox Cake

0

Strawberry Cream Cheese Icebox Cake is a refreshing, no-bake dessert that’s perfect for warm weather gatherings. With layers of graham crackers, creamy cheesecake filling, and fresh strawberries, this cake offers a delightful combination of textures and flavors.

The creamy layers soak into the graham crackers, softening them to create a cake-like texture without needing to bake. This simple yet elegant dessert is ideal for potlucks, barbecues, or whenever you need a cool, sweet treat.

Why You’ll Love This Recipe

No-Bake Ease: Perfect for summer or when you want a quick dessert without turning on the oven.

Creamy and Fruity: Cheesecake-flavored pudding and fresh strawberries create a perfect balance of creaminess and tang.

Impressive Layers: Beautifully layered for a stunning presentation.

Ingredients

• 2 lbs strawberries, washed and sliced ¼ inch thick

• 2 sleeves graham crackers

• 1 (8 oz) package cream cheese, room temperature

• 1 (14 oz) can sweetened condensed milk

• 2 (3.4 oz) packages instant cheesecake-flavored pudding mix

• 3 cups milk

• 1 (12 oz) carton whipped topping, divided

Instructions

Step 1: Prep the Strawberries and Dish

1. Wash the strawberries, remove the tops, and slice them ¼ inch thick. Set aside.

2. Line the bottom of a 3-quart (13×9-inch) baking dish with a single layer of graham crackers.

Step 2: Make the Cheesecake Mixture

1. In a large mixing bowl, combine the cream cheese and sweetened condensed milk. Beat with a mixer until smooth and creamy.

2. Add the pudding mixes and milk to the bowl. Mix on low speed for 4–5 minutes, or until the mixture starts to thicken.

3. Fold in 2 cups of whipped topping until fully incorporated and smooth.

Step 3: Layer the Dessert

1. Pour half of the cream cheese mixture over the layer of graham crackers in the baking dish. Spread evenly.

2. Arrange a single layer of sliced strawberries over the cream cheese mixture.

3. Top the strawberries with another layer of graham crackers.

4. Spread the remaining cream cheese mixture over the graham crackers.

5. Add another layer of sliced strawberries on top of the cream cheese mixture.

Step 4: Chill the Cake

1. Cover the baking dish with plastic wrap and refrigerate for 6–8 hours, or overnight for best results.

Step 5: Garnish and Serve

1. Before serving, spread the remaining whipped topping evenly over the dessert.

2. Crush any leftover graham crackers and sprinkle the crumbs over the whipped topping.

3. Slice and serve chilled.

Tips

Fresh Strawberries: Use ripe, firm strawberries for the best flavor and texture.

Customize the Layers: Add a drizzle of chocolate syrup or strawberry preserves for extra flavor.

Plan Ahead: This dessert tastes even better the next day as the layers meld together.

Storage Options

Refrigeration: Store the cake in an airtight container in the refrigerator for up to 3 days.

Freezing: Freeze leftovers in individual portions for up to 1 month. Thaw in the refrigerator before serving.

Strawberry Cream Cheese Icebox Cake is a simple yet elegant dessert that’s as delicious as it is beautiful. Enjoy the combination of creamy cheesecake, juicy strawberries, and tender graham crackers with every bite!

Boston Cream Pie Poke Cake

0

Boston Cream Pie Poke Cake is a delightful twist on the classic dessert. With its layers of moist yellow cake, creamy homemade custard filling, and rich chocolate ganache topping, this cake delivers all the flavors you love in an easy-to-make, crowd-pleasing format.

The poke cake method allows the custard to seep into the cake, ensuring every bite is as creamy and delicious as the next. Whether you’re serving it at a family gathering, potluck, or just as a weekend treat, this cake is sure to impress.

Why You’ll Love This Recipe

Classic Flavors, Simplified: The essence of Boston Cream Pie with less effort.

Moist and Creamy: Poke holes let the custard soak through, creating a luscious texture.

Crowd-Pleasing: Perfect for parties or casual get-togethers.

Ingredients

For the Cake:

• 1 box yellow cake mix (plus ingredients listed on the package)

For the Custard Filling:

• 3 large eggs

• 1 cup whole milk

• ½ cup all-purpose flour

• ½ cup granulated sugar

• 2 teaspoons vanilla extract

For the Ganache:

• ½ cup heavy cream

• ½ cup semi-sweet chocolate chips

Instructions

Step 1: Prep and Bake the Cake

1. Preheat your oven to 350°F (177°C). Grease a 9×13-inch baking dish.

2. Prepare the yellow cake mix according to the package instructions. Pour the batter into the prepared dish.

3. Bake for 20–25 minutes, or until a toothpick inserted into the center comes out clean.

Step 2: Make the Custard Filling

1. While the cake bakes, whisk together the eggs, milk, flour, sugar, and vanilla extract in a medium saucepan.

2. Cook over medium heat, stirring constantly, until the mixture thickens, about 5–7 minutes. Remove from heat.

Step 3: Poke and Fill the Cake

1. Let the baked cake cool slightly. Using the end of a wooden spoon, poke holes all over the top of the cake.

2. Pour the warm custard over the cake, ensuring it fills the holes and covers the surface evenly.

Step 4: Prepare the Ganache

1. In a small saucepan, heat the heavy cream until just boiling. Remove from heat and stir in the chocolate chips. Mix until the ganache is smooth and glossy.

2. Pour the ganache over the custard layer, spreading evenly to cover the entire cake.

Step 5: Cool and Serve

1. Let the cake cool to room temperature, then refrigerate for at least 2 hours to allow the layers to set.

2. Slice and serve, optionally garnished with whipped cream or a scoop of vanilla ice cream.

Tips

Even Custard Distribution: Use a spatula to help spread the custard and ensure it fills the holes.

Chocolate Variety: Substitute milk or dark chocolate chips for a different ganache flavor.

Make Ahead: Prepare the cake a day in advance for even better flavor and texture as it chills.

Storage Options

Refrigeration: Store the cake in an airtight container in the refrigerator for up to 5 days.

Freezing: Freeze individual slices wrapped tightly in plastic wrap for up to 2 months. Thaw in the refrigerator before serving.

Boston Cream Pie Poke Cake is a dessert that combines simplicity with indulgence. With its creamy custard and rich ganache topping, it’s a guaranteed hit for any occasion!

Yummy Summer Pea Salad

0

Sweet Pea and Bacon Salad is a delightful combination of flavors and textures, bringing together the crisp freshness of peas, the smoky richness of bacon, and the sweet and tangy touch of golden raisins and wine vinegar dressing. This dish is perfect for potlucks, picnics, or as a refreshing side dish for your favorite meals.

This salad’s versatility makes it a crowd-pleaser. The creamy dressing ties all the ingredients together, enhancing the contrast between the crunch of sunflower seeds and the tenderness of sweet peas. With just a few simple steps, you can create a dish that’s both vibrant and satisfying.

Why You’ll Love This Recipe

Flavorful Balance: The smoky bacon, sweet raisins, and creamy dressing create a perfect harmony.

Quick and Easy: Simple to prepare with minimal effort, yet packed with flavor.

Crowd-Pleaser: A unique and refreshing salad that stands out at gatherings.

Ingredients

For the Salad:

• 2 (6-ounce) packages frozen peas, thawed

• 1 pound cooked bacon, chopped

• 1 cup golden raisins

• 1 (8-ounce) package shredded Cheddar cheese

• 1 sweet onion, chopped

• ½ cup sunflower seeds

For the Dressing:

• 1 cup mayonnaise

• 2 tablespoons wine vinegar

• ¼ teaspoon white sugar, or to taste

Instructions

Step 1: Prepare the Salad

1. In a large mixing bowl, combine the thawed peas, chopped bacon, golden raisins, shredded Cheddar cheese, chopped sweet onion, and sunflower seeds.

2. Toss gently to ensure all the ingredients are evenly distributed.

Step 2: Make the Dressing

1. In a small bowl, whisk together the mayonnaise, wine vinegar, and white sugar.

2. Mix until the sugar is fully dissolved and the dressing is smooth and creamy. Adjust sugar to taste if needed.

Step 3: Combine Salad and Dressing

1. Drizzle the dressing over the salad mixture in the large bowl.

2. Toss gently to coat all the ingredients evenly with the dressing.

Step 4: Chill the Salad

1. Cover the bowl with plastic wrap and refrigerate for at least 1 hour.

2. This allows the flavors to meld together for a richer taste.

Step 5: Serve and Enjoy

1. Before serving, give the salad a final toss to redistribute the dressing.

2. Serve chilled as a side dish or a light main course.

Tips

Fresh Peas Option: Substitute frozen peas with fresh ones if available for an even brighter flavor.

Cheese Variations: Use a sharp Cheddar for more pronounced flavor or mix in Colby Jack for a milder taste.

Customize Add-Ins: Try adding diced bell peppers, chopped celery, or sliced almonds for extra crunch.

Make Ahead: This salad can be prepared a day in advance, making it an excellent choice for parties.

Storage Options

Refrigerator: Store leftovers in an airtight container for up to 3 days. Toss before serving again.

Not Freezer-Friendly: The creamy dressing and fresh ingredients don’t freeze well, so it’s best enjoyed fresh or refrigerated.

Sweet Pea and Bacon Salad is a standout dish that combines savory, sweet, and tangy elements in a creamy, refreshing way. It’s sure to become a favorite addition to your salad repertoire!

Cowboy Baked Beans Recipe

0

Cowboy Baked Beans is a hearty, flavor-packed dish that channels the spirit of the Old West. Perfect for potlucks, family dinners, or backyard barbecues, this recipe combines the rich, smoky taste of baked beans with savory ground beef, vibrant green bell peppers, and a sweet and tangy touch of brown sugar and Worcestershire sauce. Each bite is a medley of robust flavors, evoking campfire meals shared under open skies.

This dish is as versatile as it is delicious. Serve it as a standalone meal, a comforting side dish, or even a topping for baked potatoes or hot dogs. Its rich, satisfying flavor makes it a crowd-pleaser at any gathering, big or small.

Why You’ll Love This Recipe

Hearty and Filling: A one-dish wonder loaded with protein and veggies.

Bold Flavors: Sweet, savory, and slightly tangy for a perfectly balanced taste.

Versatile: Great as a main dish or a side, and pairs well with a variety of accompaniments.

Ingredients

• 1 can (28 oz) Bush’s Baked Beans

• ½ pound ground beef

• 2 tablespoons Worcestershire sauce

• 2 tablespoons brown sugar

• 1 tablespoon onion & herb seasoning

• ¼ cup minced onions

• ½ cup chopped onions

• ½ cup chopped green bell peppers

Instructions

Step 1: Prepare the Ground Beef

1. Heat a skillet over medium heat.

2. Add the ground beef and cook, breaking it into small pieces as it browns. This ensures even cooking and flavor distribution.

Step 2: Season the Beef

1. Once the beef is fully browned, stir in Worcestershire sauce, brown sugar, onion & herb seasoning, and minced onions.

2. Cook for about 5 minutes, allowing the flavors to meld and the minced onions to soften.

Step 3: Combine the Ingredients

1. In a large baking dish, combine the cooked beef mixture with the baked beans.

2. Add the chopped onions and green bell peppers, stirring well to ensure even distribution of ingredients.

Step 4: Bake the Beans

1. Preheat your oven to 375°F (190°C).

2. Cover the baking dish with a lid or aluminum foil and bake for approximately 30 minutes.

3. Check for bubbling beans and softened bell peppers, which indicate the dish is ready.

Step 5: Serve and Enjoy

1. Remove the dish from the oven and let it rest for a few minutes.

2. Serve warm, garnished with fresh herbs or shredded cheese if desired.

Tips

Enhance the Flavor: Add a splash of barbecue sauce or a pinch of smoked paprika for a smoky kick.

Customize Veggies: Substitute or add red bell peppers, jalapeños, or celery for extra crunch and flavor.

Texture Tip: Cook the beef until just browned to retain its juiciness in the final dish.

Make It a Meal: Serve with cornbread, rice, or a crisp salad to round out the meal.

Storage Options

Refrigerator: Store leftover baked beans in an airtight container for up to 3 days. Reheat in the microwave or oven before serving.

Freezing: Transfer cooled baked beans to a freezer-safe container or bag. Freeze for up to 2 months. Thaw in the refrigerator overnight and reheat gently.

Cowboy Baked Beans is a comforting, flavor-packed dish that’s perfect for gatherings or cozy meals. Its robust flavors and satisfying texture make it a favorite for any occasion, offering a taste of the rugged West with every bite!

Philly Cheesesteak Garlic Bread

0

Philly Cheesesteak Garlic Bread takes all the classic flavors of a cheesesteak and transforms them into a hearty, cheesy, and utterly satisfying appetizer or main course. Featuring a crisp loaf of Italian or French bread, tender ribeye steak, caramelized onions, and melted provolone cheese, this dish is a guaranteed crowd-pleaser.

Whether you’re serving it for a game day snack, a family dinner, or a fun twist on a classic sandwich, this garlic bread recipe is versatile and easy to customize with additional toppings like bell peppers, mushrooms, or jalapeños.

Why You’ll Love This Recipe

Classic Cheesesteak Flavors: Juicy steak, caramelized onions, and melted cheese create an irresistible combination.

Easy to Make: Simple steps that deliver a gourmet-level appetizer or main course.

Customizable: Add your favorite toppings for a personal twist.

Ingredients

• 1 loaf Italian bread or French baguette

• 1 pound thinly sliced ribeye steak

• 1 onion, thinly sliced

• 2 cloves garlic, minced

• 1 cup shredded provolone or mozzarella cheese

• 2 tablespoons olive oil

• Salt and pepper, to taste

• Optional toppings: sliced bell peppers, mushrooms, or jalapeños

Instructions

Step 1: Prepare Your Bread and Oven

1. Preheat your oven to 400°F (200°C).

2. Slice the loaf of bread in half lengthwise and place it cut side up on a baking sheet.

Step 2: Cook the Steak

1. Heat 1 tablespoon of olive oil in a skillet over medium-high heat.

2. Add the thinly sliced ribeye steak, season with salt and pepper, and cook until browned and fully cooked (about 4–5 minutes).

3. Remove the steak from the skillet and set aside.

Step 3: Caramelize the Onions

1. In the same skillet, add the remaining tablespoon of olive oil.

2. Sauté the onions over medium heat until they are caramelized, stirring occasionally (about 10 minutes).

3. Stir in the minced garlic and cook for 1 more minute until fragrant.

Step 4: Assemble the Garlic Bread

1. Evenly distribute the cooked steak over the bread halves.

2. Spread the caramelized onions and garlic on top of the steak.

3. Generously sprinkle the shredded cheese over the bread, ensuring it covers the steak and onions.

Step 5: Add Optional Toppings

1. For additional flavor and texture, layer optional toppings such as bell peppers, mushrooms, or jalapeños over the cheese.

Step 6: Bake

1. Place the assembled bread in the preheated oven.

2. Bake for 10–12 minutes, or until the cheese is melted and bubbly and the edges of the bread are crisp.

Step 7: Serve

1. Remove from the oven and let cool for a few minutes to allow the cheese to set.

2. Slice into individual portions and serve warm.

Tips

Best Bread: Use a sturdy loaf that can hold up to the toppings without getting soggy.

Cheese Variations: Try a mix of provolone and cheddar for extra flavor.

Prep Ahead: Cook the steak and onions ahead of time for faster assembly.

Storage Options

Refrigeration: Store leftovers in an airtight container in the refrigerator for up to 2 days. Reheat in the oven for best results.

Freezing: Wrap the assembled (but unbaked) bread tightly in foil and freeze for up to 1 month. Bake directly from frozen, adding a few extra minutes.

Philly Cheesesteak Garlic Bread combines the best of both worlds—a hearty cheesesteak and a comforting loaf of garlic bread. It’s an irresistible dish that’s sure to be a hit at any gathering or family meal!

Whip Cookies

0

Whip Cookies are delightfully soft and fluffy treats made with just four simple ingredients. With their slightly crispy exterior and melt-in-your-mouth center, these cookies are a quick and versatile dessert option. Whether you choose lemon for a zesty kick, chocolate for indulgence, or strawberry for a fruity touch, this recipe is perfect for satisfying your sweet tooth with minimal effort.

These cookies are ideal for unexpected guests, bake sales, or just a fun project with kids. Their simplicity and customizable flavors make them a go-to favorite for any occasion.

Why You’ll Love This Recipe

Minimal Ingredients: Just four items create delicious cookies in no time.

Quick and Easy: Prepped, baked, and ready to enjoy in under 30 minutes.

Versatile: Choose your favorite cake mix flavor for endless variations.

Ingredients

• 1 box (approximately 15.25 oz) cake mix (lemon, chocolate, or strawberry work well)

• 1 tub (8 oz) Cool Whip, thawed

• 1 large egg

• ½ cup powdered sugar (for coating)

Instructions

Step 1: Preheat the Oven

1. Preheat your oven to 350°F (175°C).

2. Line a baking sheet with parchment paper or a silicone mat to prevent sticking.

Step 2: Mix the Dough

1. In a large mixing bowl, combine the cake mix, Cool Whip, and egg.

2. Mix thoroughly until all ingredients are well blended. The dough will be sticky—this is normal.

Step 3: Shape the Cookies

1. Scoop out teaspoons of dough and drop them into the powdered sugar.

2. Roll the dough gently to coat completely and shape into balls.

3. Place the sugar-coated dough balls on the prepared baking sheet, leaving about 2 inches of space between each.

Step 4: Bake

1. Bake the cookies in the preheated oven for 10–12 minutes, or until the edges are set and the tops show slight cracks.

2. Avoid overbaking to keep the cookies soft and fluffy.

Step 5: Cool

1. Allow the cookies to cool on the baking sheet for 2–3 minutes to firm up.

2. Transfer them to a wire rack to cool completely.

Tips

Sticky Dough Solution: Lightly grease your hands or use a cookie scoop to handle the sticky dough more easily.

Experiment with Flavors: Try different cake mix flavors like red velvet, funfetti, or spice for unique variations.

Extra Zest: Add lemon zest or a splash of vanilla extract for added flavor depth.

Storage Options

Room Temperature: Store cookies in an airtight container for up to 5 days.

Freezing: Freeze the baked cookies in a freezer-safe bag for up to 2 months. Thaw at room temperature before enjoying.

Whip Cookies are a simple yet delightful dessert that everyone will love. Their soft texture, vibrant flavors, and easy preparation make them a must-try treat for any occasion!