Oreo Dirt Cake

0

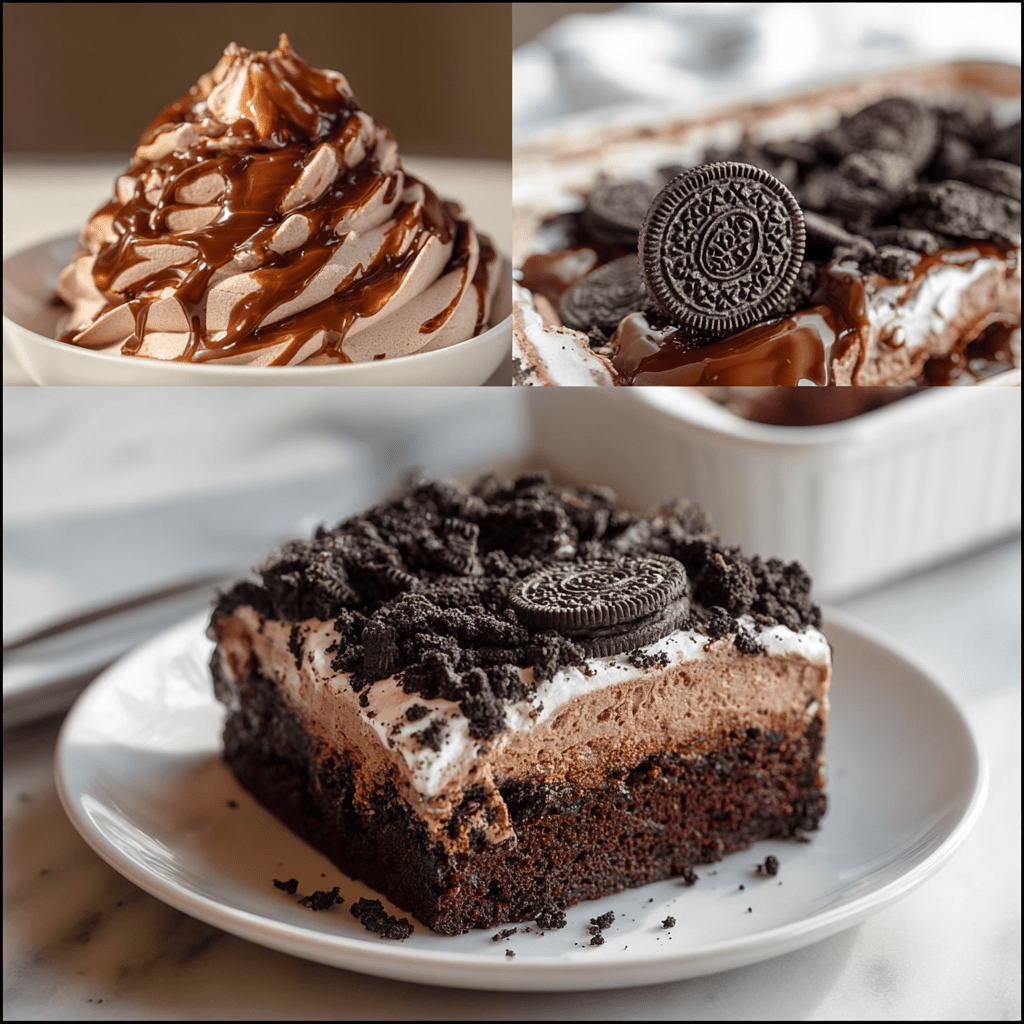
Oreo Dirt Cake is the ultimate nostalgic, decadent dessert—a glorious layered masterpiece that combines rich chocolate cake, fudgy hot fudge, creamy pudding, and a mountain of crushed Oreos to create a treat that looks like a bucket of “dirt” but tastes like pure heaven. This recipe is a celebration of over-the-top indulgence, taking a classic chocolate cake and transforming it into a showstopping dessert that’s as fun to look at as it is to eat. The magic begins with a simple boxed chocolate cake, baked to perfection in a 9×13-inch pan, then generously poked with holes and soaked with warm, gooey hot fudge sauce, creating pockets of intense chocolatey richness throughout. A layer of instant chocolate pudding, set with milk, is poured over the cake while still slightly warm, creating a creamy, decadent middle layer. The crowning glory is a light, fluffy mixture of whipped topping folded into another layer of chocolate pudding, generously studded with crushed Oreos, then piled high and finished with a final blanket of Oreo “soil.”

The brilliance of this recipe lies in its playful presentation and the incredible layers of texture and flavor it delivers. Each spoonful offers a journey: the fudge-soaked cake base, the creamy pudding layer, and the light, Oreo-studded topping. Served in a large baking dish, it’s perfect for scooping out generous portions at parties, potlucks, and family gatherings. Often served in a flower pot for a whimsical touch, it’s a dessert that delights both kids and adults alike. Oreo Dirt Cake is proof that sometimes the most fun desserts are also the most delicious, combining simple ingredients into a layered, creamy, crunchy, and utterly irresistible treat.

Why You’ll Love This Recipe:

  • Decadent Layered Indulgence: Fudge-soaked cake, creamy pudding, and Oreo-studded topping in every bite.
  • Fun and Whimsical Presentation: The “dirt” look is playful and perfect for parties, birthdays, and potlucks.
  • Incredibly Easy to Make: Uses boxed cake mix and instant pudding for a no-fuss showstopper.
  • Make-Ahead Friendly: Assemble and chill overnight for an easy, stress-free dessert.
  • Crowd-Pleasing Favorite: A guaranteed hit with kids and adults alike.

Ingredients:

For the Cake Layer:
1 box (15.25 oz) chocolate cake mix, plus ingredients listed on the box (eggs, oil, water)

For the Fudge Layer:
1 jar (12.8 oz) hot fudge sauce, warmed

For the Pudding Layers:*
2 boxes (3.4 oz each) instant chocolate pudding mix
3 ½ cups cold milk, divided
1 tub (8 oz) frozen whipped topping (like Cool Whip), thawed
30 Oreo cookies, crushed (divided)

Instructions:

Step 1: Bake the Cake
Preheat your oven according to the cake mix package directions (typically 350°F/175°C). Prepare the chocolate cake mix according to package instructions and bake in a greased 9×13-inch baking dish. Let the cake cool slightly (about 10-15 minutes) after baking.

Step 2: Add the Fudge Layer*
Using the handle of a wooden spoon or a fork, poke holes all over the warm cake, about ½ inch apart. Warm the hot fudge sauce in the microwave or on the stovetop until pourable. Pour the warm fudge evenly over the cake, spreading it to fill the holes and cover the surface. Let the cake cool completely.

Step 3: Make the First Pudding Layer*
In a medium bowl, whisk together 1 box of instant chocolate pudding mix with half of the cold milk (1¾ cups) until smooth and slightly thickened. Pour the pudding over the cooled cake and spread evenly. Refrigerate for 20 minutes to allow the pudding to set.

Step 4: Make the Oreo Pudding Topping*
In a large bowl, whisk together the remaining 1 box of instant chocolate pudding mix with the remaining 1¾ cups cold milk until smooth. Refrigerate for 5 minutes to let it thicken slightly. Fold in the thawed whipped topping until fully combined. Add about ¾ of the crushed Oreos and fold gently to combine.

Step 5: Assemble the Final Layer*
Spread the Oreo pudding mixture evenly over the set pudding layer. Sprinkle the remaining crushed Oreos over the top to create the “dirt” effect.

Step 6: Chill and Serve*
Cover and refrigerate for at least 2 hours, or overnight, to allow the layers to fully set. Serve chilled.

Tips:

  • Warm the Fudge: Warm fudge pours easily and seeps into the holes for maximum flavor.
  • Poke Generously: More holes mean more fudge-soaked cake pockets. Don’t be shy!
  • Chill Between Layers: Allowing the first pudding layer to set before adding the topping prevents mixing and keeps the layers distinct.
  • Crush Oreos Finely: For a realistic “dirt” look, crush the Oreos in a food processor or place them in a sealed bag and roll with a rolling pin until finely ground.
  • Serve in a Flower Pot: For a fun presentation, serve in a clean, new flower pot with a plastic liner and garnish with gummy worms.

Storage Options:

  • Refrigerator: Store covered in the refrigerator for up to 5 days. The flavors meld and improve over time.
  • Freezing: Not recommended, as the pudding and whipped topping layers may separate upon thawing.
  • Make-Ahead: This dessert is perfect for making a day or two ahead. Simply cover and refrigerate until ready to serve.

Oreo Dirt Cake is a fun, decadent, and irresistibly delicious dessert that brings smiles to every table. With its layers of fudge-soaked cake, creamy pudding, and crushed Oreos, it’s a playful twist on classic chocolate cake that will have everyone coming back for more.

What’s Fair in This Case?

0

When two people decide to move in together, it’s often an exciting step in a relationship. But it also comes with practical questions—especially around money. One of the most common? How to split rent fairly when incomes don’t match up.

Let’s look at a real scenario. A man earns $65,000 a year. His partner earns $33,000. Their rent is $2,000 a month. Should they split it right down the middle? Or is there a more balanced way to handle it?

Assessing Income Disparities in Cohabiting Couples

Income gaps like this are more common than you might think. When one person brings home nearly twice as much as the other, a straight 50/50 split can start to feel less like fairness and more like a burden. The key is to look at the full picture—not just income, but debts, savings goals, and what feels manageable for both people long-term.

Method 1: Income Proportionate Rent Split

One straightforward approach is to divide the rent in the same proportion as each person’s income. In this case, the man earns about 66% of the household income, and the woman earns about 34%. Applied to the $2,000 rent, that works out to roughly $1,320 for him and $680 for her.

This method keeps the rent aligned with what each person can realistically afford, without either one feeling stretched too thin.

Method 2: Flat Percentage of Income Contribution

Another option is for both partners to contribute the same percentage of their individual income toward rent. For example, if they agreed to put 30% of their monthly earnings toward housing, the man would pay about $1,625 and the woman about $825.

This approach ensures that rent takes up a similar portion of each person’s budget, which can feel more balanced—even though the dollar amounts are different.

Method 3: Equal Value Contributions Beyond Rent

Sometimes, rent doesn’t have to be the only way to balance things out. A couple might agree to split rent equally, but the partner with the lower income takes on a larger share of other household costs—like utilities, groceries, or shared subscriptions. Or one person handles more of the domestic responsibilities while the other contributes more financially.

This method works best when both partners are open about what feels fair and are willing to look at the full picture of shared life, not just the rent check.

The Importance of Open Communication in Financial Decisions

None of these methods work without honest conversation. Money can be a sensitive topic, but avoiding it usually makes things harder. The goal isn’t to find the one “right” answer—it’s to find an arrangement that both people genuinely feel good about. That means talking openly about income, expectations, and what each person needs to feel secure.

Considering Other Shared Expenses and Their Impact

Rent is just the starting point. Once you’re living together, shared expenses add up quickly—groceries, utilities, internet, streaming services, maybe a shared car or pet care. A budget that accounts for all of these costs gives a clearer picture of what’s truly fair. Sometimes the person who pays less in rent ends up covering more in other areas, and that can be a completely reasonable trade-off.

Impact of Financial Stress on Relationships

Money stress is one of the biggest strains on relationships. When one person feels stretched too thin, or when there’s unspoken resentment about who’s paying for what, it can leak into everyday life. Tackling financial decisions together, with transparency and empathy, helps keep the relationship strong—and keeps the focus where it belongs: on building a life together.

Legal Considerations for Cohabiting Couples

While it may not feel romantic, it’s worth being aware of the legal side of living together. In many places, unmarried couples don’t automatically have the same protections as married couples when it comes to shared property or financial obligations. A simple cohabitation agreement can outline who pays for what, what happens if someone moves out, and how shared items are handled—offering clarity and peace of mind.

Conclusion: Finding a Fair and Balanced Approach

There’s no universal formula for splitting rent. What’s fair depends on income, expenses, values, and what both people agree feels right. Whether you choose proportional rent, flat percentages, or a mix of financial and non-financial contributions, the most important thing is that the arrangement is discussed openly and revisited as needed.

Fairness isn’t just about math. It’s about respect, communication, and making sure both partners feel supported—financially and otherwise—in the home they’re building together.

What Does the “57” on a Heinz Ketchup Bottle Actually Mean? (It’s Not What Most People Think)

0

You’ve probably seen it a hundred times and never really thought about it.

That little “57” on the neck of a Heinz ketchup bottle.

It’s just… there.

Not big enough to demand attention, not explained anywhere obvious—just stamped into the glass like it’s supposed to mean something. And somehow, that makes it more interesting.

Because once you notice it, you can’t really un-notice it.

And then the question shows up: why 57?

The First Guess Is Almost Always Wrong

Most people assume it must be something practical.

Number of ingredients, maybe. Or the number of recipes. Or factories. Or countries.

Something measurable.

That would make sense.

Except… none of that is true.

The number isn’t based on anything concrete like that, which is honestly the part that throws people off the most.

It Actually Started With an Advertisement

This goes back to the late 1800s.

Henry Heinz—the guy behind the brand—was looking for a way to make his products stand out. Not just in quality, but in how people remembered them.

And apparently, he saw an ad for “21 styles of shoes.”

For some reason, that stuck.

So he borrowed the idea—but instead of picking a number that matched reality, he picked one that felt right.

At the time, the company had more than 60 products already. So the number wasn’t accurate even then.

But Heinz liked how it sounded. Thought it was catchy.

And that was enough.

Which Is Kind of Funny, If You Think About It

A number that doesn’t actually mean anything… becoming one of the most recognizable details in food branding.

It shouldn’t work, but it does.

“57 varieties” just sticks in your head. It has rhythm. It feels specific without being complicated.

And once people hear it a few times, it becomes part of how they see the brand.

That’s not accidental. That’s good marketing—before marketing was even really a formal thing.

The “57” Didn’t Go Anywhere (Even When It Could Have)

Over time, Heinz expanded. A lot.

More products, more countries, more everything.

They could have updated the number. Made it more accurate.

But they didn’t.

Because by that point, “57” wasn’t about counting anymore—it was identity.

Changing it would’ve felt like changing the brand itself.

So it stayed.

And Then There’s the Weirdly Practical Part

This is the part people usually hear about later—and it feels almost like a bonus detail.

That “57” isn’t just decorative.

It’s actually the spot you’re supposed to tap when ketchup won’t come out of the bottle.

Not the bottom. Not random shaking.

Right there—on the neck, where the “57” is.

Apparently, that’s the “sweet spot” for getting the ketchup to flow properly.

Which, if you’ve ever struggled with one of those glass bottles, makes this detail way more useful than expected.

There Are Still a Lot of Myths Around It

Even now, people keep coming up with explanations.

“It’s the number of ingredients.”
“It’s how many products they sell.”
“It’s a secret formula code.”

None of those hold up.

But they keep circulating anyway.

Which kind of shows how powerful a simple number can be when it’s left unexplained.

People fill in the blanks themselves.

It Somehow Became Part of Pop Culture Too

This is the part that sneaks up on you.

The “57” isn’t just a brand detail anymore—it shows up in movies, references, jokes, nostalgia pieces.

It’s tied to this idea of classic, reliable, old-school Americana.

Not flashy. Not modern in a loud way. Just… familiar.

And that familiarity sticks.

Why This Works (Even Today)

Here’s the interesting part.

Modern branding tends to over-explain everything. Features, benefits, numbers that need to be justified.

But “57” doesn’t explain itself.

It doesn’t need to.

It’s memorable, slightly mysterious, and consistent.

And somehow, that’s enough.

Final Thought (The Kind You Don’t Expect From Ketchup)

It’s just a number on a bottle.

But also… not really.

It’s a reminder that sometimes things stick not because they’re accurate or logical—but because they feel right and people remember them.

And once something is remembered long enough, it becomes part of the story.

Even if it started as a completely arbitrary choice.

Can You Put a Toilet Brush in the Dishwasher? (Short Answer… Please Don’t)

0

So let’s just start with the question people don’t always say out loud.

Can you wash a toilet brush in the dishwasher?

Technically… I mean, yes, you can. The machine will run. Water will spray. Things will happen.

But should you?

Yeah—no. Not really. And once you think it through, it starts to feel like one of those ideas that sounded fine for about three seconds and then quickly got worse.

Why This Even Comes Up (Because It Does)

Toilet brushes are one of those things nobody wants to deal with.

You use them, you put them back, and then at some point you realize… wait, this thing is probably not very clean.

And then the brain goes: dishwasher = hot water = cleaning = problem solved.

It’s kind of logical. But also kind of not.

The Dishwasher Isn’t Built for This (At All)

Dishwashers are great—but they have a lane.

Plates, glasses, forks. Stuff that had food on it.

Not… bathroom tools.

The issue isn’t just temperature or soap. It’s the type of mess. Toilet brushes deal with bacteria that dishwashers aren’t really designed to handle.

And more importantly, they’re not designed to keep that bacteria contained in a way that makes you feel good about using your dishes afterward.

Because that’s the part people gloss over.

The Cross-Contamination Thing (Yeah, It’s As Bad As It Sounds)

Let’s not overcomplicate it.

You put a toilet brush in the dishwasher… and then later you put plates in there.

Even if the machine runs hot, even if you use detergent, there’s still that mental—and honestly practical—line you’re crossing.

Water splashes around inside a dishwasher. It circulates. It doesn’t politely stay in one corner with the toilet brush and mind its business.

So now everything in there is sharing space.

And that’s just not a risk worth taking for something you could clean another way in five minutes.

Also, It Probably Won’t Even Clean It Well

This part gets overlooked, but it matters.

Toilet brushes aren’t smooth like dishes. They’re all bristles—tight, layered, kind of chaotic.

Dishwasher spray can’t always reach deep into that. So you end up with a brush that went through a full cycle… and still isn’t fully clean.

Which is somehow worse.

And There’s a Chance You Mess Up Your Dishwasher Too

It’s not guaranteed, but it happens.

Hard bristles knocking around, maybe scratching the interior, maybe getting caught somewhere they shouldn’t.

Plus, some brushes have metal parts, coatings, or materials that just don’t react well to dishwasher heat.

So now you’ve got a questionable brush and a dishwasher you’re side-eyeing.

Not ideal.

So What Should You Do Instead?

Nothing complicated, honestly. Just more appropriate.

  • Bleach (the classic, for a reason)
    Bucket. Hot water. A bit of bleach.
    Let the brush sit for a while—doesn’t have to be exact, just long enough to do its job.
    Rinse it well, let it dry.
    Simple, effective, done.
  • Hydrogen Peroxide (if bleach isn’t your thing)
    Pour it over the bristles, let it sit for a few minutes.
    Rinse. Dry.
    It’s a quieter method, but it works.
  • Vinegar + Baking Soda (a little fizzy, a little satisfying)
    This one’s more “natural cleaning aisle energy.”
    Sprinkle baking soda, add vinegar, let it bubble up. Give it a few minutes.
    Rinse everything off and you’re good.

The Small Habits That Actually Keep It Clean

This part matters more than any deep clean, honestly.

  • Rinse the brush after each use
  • Let it dry fully (don’t trap it in a wet holder)
  • Clean it regularly, not just when it starts looking suspicious

It’s not glamorous, but it keeps things under control.

And At Some Point… Just Replace It

There’s a limit to how clean a toilet brush can get.

If the bristles are bent, if there’s a smell that won’t go away, or if it just looks tired—replace it.

Every few months to a year is pretty normal.

It’s not the kind of item you keep forever.

So Yeah… Dishwasher Is a No

It seems convenient for about a minute.

But between the hygiene concerns, the not-great cleaning results, and the whole “this is where my plates go” realization… it’s just not worth it.

There are easier, safer ways to clean a toilet brush that don’t leave you questioning your life choices halfway through unloading the dishwasher.

And honestly? That’s reason enough.

Should You Wash Pre-Washed Lettuce?

0

You ever open a bag of lettuce, read “triple-washed, ready to eat”… and still pause for a second?

Yeah. Same.

There’s always that tiny voice in your head going, “Should I rinse this anyway?”—especially if you’ve ever seen one too many food safety headlines or just grew up in a kitchen where everything got washed twice, no questions asked.

So let’s talk about it. Not in a scary way. Just honestly.

What “Pre-Washed” Actually Means (And What It Doesn’t)

Here’s the thing—pre-washed lettuce isn’t just rinsed once and tossed in a bag.

Most of it goes through multiple cleaning stages, often with sanitized water systems designed to remove dirt, bacteria, and anything that shouldn’t be there. That’s why you’ll see labels like “triple-washed” or “ready to eat.”

So technically? It’s meant to be eaten straight from the bag.

But—and this is where people start to hesitate—”cleaned” doesn’t always feel the same as “completely risk-free.”

Why Some People Still Feel Unsure

Even with all those safety steps, lettuce is still… well, a fresh product.

It comes from farms. It travels. It gets handled, packaged, transported. And somewhere along that chain, contamination can happen—even if it’s rare.

That’s why you hear about things like:

  • E. coli
  • Salmonella
  • Listeria

Not often. But enough to make people pause in their kitchens.

And honestly? That hesitation isn’t irrational—it’s human.

The “Just Trust the Label” Side

A lot of food safety experts—and agencies like the FDA—say pre-washed lettuce is safe as is.

And their logic makes sense:

  • It’s processed under controlled conditions
  • It’s tested and regulated
  • Washing it again at home might not actually reduce risk

In fact, if you wash it improperly (say, in a not-so-clean sink), you could accidentally introduce new bacteria instead.

So from a purely technical standpoint? Opening the bag and eating it is perfectly acceptable.

But Then There’s the “I’m Still Gonna Rinse It” Crowd

And you know what? That group has a point too.

Because sometimes it’s not just about science—it’s about peace of mind.

People choose to rinse pre-washed lettuce because:

  • It feels safer
  • It removes any leftover grit or residue
  • It’s just how they’ve always done it

And especially for:

  • kids
  • elderly family members
  • anyone with a sensitive immune system

That extra step can feel worth it—even if it’s more about comfort than necessity.

So… What Do Experts Actually Say?

This is where it gets interesting.

There’s no dramatic divide. No “you must do this” rule.

Instead, experts tend to say something like:

  • It’s safe to eat without washing
  • But rinsing it isn’t a bad idea if it makes you feel better

That’s it. No pressure. No panic.

Kind of refreshing, honestly.

If You Do Wash It, Do It the Right Way

Here’s where people sometimes overcomplicate things.

If you’re going to rinse your lettuce:

  • Use cold, clean water
  • Make sure your hands and sink are clean
  • Skip soap (seriously—never use soap on produce)
  • Gently dry it if needed

Simple. Nothing fancy.

Small Habits That Matter More Than You Think

Whether you wash it or not, these habits actually make a bigger difference:

  • Check the expiration date
  • Look for slimy leaves or odd smells
  • Keep it refrigerated properly
  • Don’t leave the bag open too long

Because freshness plays a bigger role than people realize.

So… Should You Wash It or Not?

Here’s the honest answer:

You can.
You don’t have to.

And both choices are valid.

If you trust the process and want convenience—eat it straight from the bag.
If rinsing it gives you peace of mind—go ahead and rinse it.

There’s no gold star either way.

Final Thought (The Real Takeaway)

Food isn’t just about safety—it’s also about comfort.

Some people trust labels. Others trust habits. Most of us sit somewhere in between.

And that’s okay.

Because at the end of the day, the goal is simple: feel good about what you’re eating… and actually enjoy it.

Bacon Cranberry Walnut Stuffed Celery

0

Bacon Cranberry Walnut Stuffed Celery is the ultimate party appetizer—a perfect balance of creamy, crunchy, sweet, savory, and salty, all nestled into a crisp, refreshing celery boat. This recipe is a celebration of texture and flavor, transforming simple ingredients into an elegant, bite-sized treat that disappears faster than you can make it. The magic begins with a luscious cream cheese base, whipped to silky smoothness and infused with the sweet-tart pop of dried cranberries, the earthy crunch of glazed walnuts, and the sharp, fresh bite of green onions. The star of the show—crispy, smoky bacon—is folded in at the last moment, ensuring its salty crunch remains intact. This decadent mixture is then piped or spooned into crisp, refreshing celery stalks, creating a beautiful contrast between the creamy, loaded filling and the cool, crunchy vessel.

The brilliance of this recipe lies in its incredible versatility and make-ahead convenience. It’s a no-cook appetizer (aside from the bacon) that comes together in minutes and can be prepared hours in advance, making it the perfect stress-free addition to any gathering. The flavor combination is universally beloved—the salty bacon and rich cream cheese are perfectly balanced by the sweet-tart cranberries and the nutty warmth of glazed walnuts. Whether served at a holiday party, a game-day spread, or a casual get-together, these stuffed celery bites are guaranteed to be a hit. They’re proof that the simplest ideas—stuffing a crunchy vegetable with a creamy, loaded filling—can yield something truly spectacular.

Why You’ll Love This Recipe:

  • Perfect Balance of Flavors and Textures: Creamy, crunchy, sweet, savory, salty—every bite has it all.
  • Incredibly Easy and No-Bake: Simple mixing and assembly with no cooking required (except the bacon).
  • Make-Ahead Friendly: Can be prepared hours in advance and served chilled.
  • Beautiful and Elegant: A stunning appetizer that looks as good as it tastes.
  • Crowd-Pleasing Favorite: The combination of bacon, cranberries, walnuts, and cream cheese is universally loved.

Ingredients:

For the Filling:*
½ lb bacon (about 8 slices), cooked until crispy and crumbled
8 oz (226g) full-fat cream cheese, softened to room temperature
½ cup glazed walnuts, finely chopped
½ cup dried cranberries, finely chopped
2 green onions, thinly sliced (both white and green parts)
2 tablespoons heavy cream
1 teaspoon garlic powder

For the Base:*
12 stalks celery, washed, dried, and cut into 3-4 inch pieces

Instructions:

Step 1: Cook the Bacon*
In a skillet over medium heat, cook the bacon until crispy, about 6-8 minutes. Transfer to a paper towel-lined plate to drain and cool completely. Once cooled, crumble into small pieces.

Step 2: Make the Cream Cheese Base*
In a medium mixing bowl, beat the softened cream cheese with a hand mixer or sturdy spatula until smooth and creamy. Add the heavy cream and garlic powder and mix until well combined.

Step 3: Add the Mix-Ins*
Fold in the chopped glazed walnuts, dried cranberries, and sliced green onions until evenly distributed throughout the cream cheese mixture. Gently fold in the crumbled bacon, reserving a small amount for garnish if desired.

Step 4: Chill the Filling*
Cover the bowl and refrigerate the filling for at least 30 minutes. This allows the flavors to meld and the mixture to firm up for easier piping or spreading.

Step 5: Prepare the Celery*
While the filling chills, wash and thoroughly dry the celery stalks. Cut them into 3-4 inch pieces, or into bite-sized lengths. If desired, use a vegetable peeler to shave a thin strip off the rounded side of each piece to create a flat, stable base.

Step 6: Fill the Celery*
Using a piping bag fitted with a star tip (or a small spoon), fill each celery piece generously with the cream cheese mixture. Garnish with a sprinkle of reserved bacon bits or a few extra chopped walnuts if desired.

Step 7: Serve*
Arrange the stuffed celery on a serving platter and serve chilled or at cool room temperature.

Tips:

  • Soften the Cream Cheese: Room temperature cream cheese blends smoothly without lumps. Let it sit out for at least 30 minutes before mixing.
  • Chop Mix-Ins Finely: Finely chopping the walnuts and cranberries ensures they distribute evenly and makes the filling easier to pipe.
  • Dry the Celery Thoroughly: Patting the celery completely dry after washing helps the filling adhere better.
  • Create a Flat Base: For stable, tip-proof celery boats, use a vegetable peeler to shave a thin strip off the rounded side of each piece.
  • Make it Ahead: This appetizer is perfect for making a day ahead. Assemble and store covered in the refrigerator until ready to serve.

Storage Options:

  • Refrigerator: Store assembled stuffed celery in an airtight container in the refrigerator for up to 2 days. The celery will stay crisp if stored properly.
  • Make-Ahead: Prepare the filling up to 3 days in advance and store covered in the refrigerator. Assemble the celery up to 8 hours before serving.
  • Not for Freezing: The cream cheese filling will become grainy and watery upon thawing.

Bacon Cranberry Walnut Stuffed Celery is the ultimate crowd-pleasing appetizer—elegant, flavorful, and incredibly simple to make. With its perfect balance of creamy, crunchy, sweet, and savory, it’s guaranteed to be the first dish to disappear from any party spread.

Slow Cooker Beef Brisket

0

Slow Cooker Beef Brisket is the ultimate expression of low-and-slow comfort food—a glorious, fork-tender masterpiece that transforms a humble, tough cut of beef into a melt-in-your-mouth centerpiece, infused with layers of smoky, savory, and subtly sweet flavor. This recipe is a masterclass in the art of braising, where patience and gentle heat work their magic to break down the connective tissue of a beef brisket, rendering it impossibly tender while allowing it to absorb the rich, complex flavors of the cooking liquid. The magic begins with a robust dry rub of paprika, garlic and onion powders, and aromatic herbs, which creates a flavorful crust on the meat. A quick sear in a hot skillet locks in those flavors and builds a beautiful fond, the caramelized bits that will deepen the sauce. Nestled on a bed of onions and garlic in the slow cooker, the brisket then simmers for hours in a luscious bath of beef broth, tomato paste, Worcestershire, brown sugar, and apple cider vinegar, creating a sauce that is both tangy and sweet, deeply savory, and utterly irresistible.

The brilliance of this recipe lies in its hands-off simplicity and the spectacular results it delivers with minimal active effort. The slow cooker does all the work, gently coaxing the brisket to that perfect state of fork-tender goodness while filling your home with an intoxicating aroma. The final step—a simple cornstarch slurry transforms the rich cooking liquid into a silky, glossy gravy that perfectly complements the meat. Whether served sliced against the grain for a classic presentation or shredded for piled-high sandwiches, this brisket is a guaranteed showstopper. It’s the perfect centerpiece for a holiday table, a Sunday supper, or any occasion that calls for deeply satisfying, soul-warming food.

Why You’ll Love This Recipe:

  • Incredibly Tender, Fall-Apart Beef: The long, slow cook transforms brisket into melt-in-your-mouth perfection.
  • Rich, Complex Flavor: A robust dry rub and a tangy-sweet braising liquid create layers of savory, smoky, and slightly sweet taste.
  • Hands-Off Slow Cooker Method: Minimal active effort yields spectacular, company-worthy results.
  • Versatile Serving Options: Serve sliced with the rich gravy, or shred for sandwiches, tacos, or nachos.
  • Make-Ahead Friendly: Tastes even better the next day as the flavors continue to meld.

Ingredients:

For the Brisket:
3 to 3½ lb beef brisket (flat or point cut)
1 tablespoon olive oil
2 teaspoons kosher salt
1½ teaspoons freshly ground black pepper
2 teaspoons smoked or sweet paprika
1 teaspoon garlic powder
1 teaspoon onion powder
1 teaspoon dried thyme or rosemary

For the Slow Cooker Base:*
1 large yellow onion, thinly sliced
4 cloves garlic, minced

For the Braising Liquid:*
1 cup low-sodium beef broth
¼ cup tomato paste
2 tablespoons Worcestershire sauce
2 tablespoons brown sugar (light or dark)
1 tablespoon apple cider vinegar
2 bay leaves

Optional for Thicker Gravy:*
2 tablespoons cornstarch
2 tablespoons cold water

Instructions:

Step 1: Season the Brisket
Pat the brisket completely dry with paper towels. In a small bowl, combine the salt, pepper, paprika, garlic powder, onion powder, and dried thyme. Rub the seasoning mixture evenly over all sides of the brisket.

Step 2: Sear the Brisket (Optional but Highly Recommended)*
Heat the olive oil in a large skillet over medium-high heat. When the oil is shimmering, carefully place the brisket in the skillet. Sear for 2-3 minutes per side, until a deep, dark brown crust forms. Transfer the seared brisket to the slow cooker.

Step 3: Build the Base*
Scatter the sliced onions and minced garlic around and on top of the brisket in the slow cooker.

Step 4: Make the Braising Liquid*
In a medium bowl or large measuring cup, whisk together the beef broth, tomato paste, Worcestershire sauce, brown sugar, and apple cider vinegar until smooth. Pour the mixture over the brisket, ensuring the liquid comes partway up the sides. Add the bay leaves.

Step 5: Slow Cook*
Cover and cook on LOW for 8-10 hours, or on HIGH for 4-5 hours. The brisket is done when it is fork-tender and easily pulls apart or shreds with gentle pressure.

Step 6: Rest and Slice*
Carefully remove the brisket from the slow cooker and transfer it to a cutting board. Tent loosely with foil and let it rest for 10-15 minutes. This allows the juices to redistribute. Slice against the grain into ¼-inch thick slices, or shred with two forks.

Step 7: Make the Gravy (Optional)*
If you’d like a thicker gravy, remove the bay leaves from the cooking liquid. In a small bowl, whisk the cornstarch and cold water until smooth. Turn the slow cooker to HIGH. Whisk the cornstarch slurry into the cooking liquid and cook, uncovered, for 10-15 minutes until thickened.

Step 8: Serve*
Arrange the sliced or shredded brisket on a serving platter. Spoon the gravy over the top and serve hot.

Tips:

  • Don’t Skip the Sear: Searing builds incredible depth of flavor through the Maillard reaction. It’s worth the extra few minutes.
  • Slice Against the Grain: Look for the long muscle fibers and slice perpendicular to them for the most tender slices.
  • Choose the Right Cut: A whole packer brisket is ideal, but a flat or point cut works beautifully in the slow cooker. Look for good marbling for maximum tenderness.
  • Let It Rest: Resting allows the juices to redistribute throughout the meat, ensuring moist, flavorful slices.
  • Customize the Flavor: Add a smoked chipotle pepper, a dash of liquid smoke, or a splash of coffee to the braising liquid for deeper complexity.

Storage Options:

  • Refrigerator: Store sliced or shredded brisket and gravy in an airtight container in the refrigerator for up to 4 days.
  • Reheating: Reheat gently in a covered skillet or in the oven at 325°F (165°C) with a splash of broth or water to keep it moist. The microwave works but may dry it out.
  • Freezing: Brisket freezes beautifully. Cool completely, portion into freezer-safe containers, and freeze for up to 3 months. Thaw overnight in the refrigerator before reheating.
  • Make-Ahead: This dish is ideal for making a day ahead. The flavors meld and deepen overnight, and the fat is easy to remove from the gravy.

Slow Cooker Beef Brisket is the kind of dish that makes any day feel like a celebration. With its rich, complex flavor and melt-in-your-mouth tenderness, it’s a true testament to the magic of patient, loving cooking.

Tomato Paste: The Tiny Can That Won’t Quit…and 10 Surprisingly Fun Ways to Use What’s Left

0

You ever open a can of tomato paste, use a single spoonful, and then stare at the rest like, “Now what?” Same.

For the longest time, I thought tomato paste was just a one-time-use kind of thing—a splash in chili, a stir into marinara, and the rest? Forgotten. Lost in the fridge behind that mystery jar of pickles.

But once I realized just how versatile this stuff really is? Game-changer. That tiny blob of concentrated tomato magic turns out to be way more useful than it gets credit for.

So here we are—a little love letter to leftover tomato paste and all the weirdly wonderful things you can do with it.

First Things First: Store It Like a Pro (Or at Least Not Like Me)

If you’re anything like me, you’ve scraped tomato paste off the lid of a crusty can and hoped for the best. Let’s fix that.

  • Short-term fix: Wrap the paste in plastic wrap like a little tomato burrito, pop it in an airtight container, and store it in the fridge for up to a week.
  • Long-term magic: Scoop tablespoons into an ice cube tray, freeze ’em, then toss the cubes into a zip-top freezer bag. Now you’ve got perfectly portioned tomato power ready when you need it—no can opener required.

Now for the Good Stuff — 10 Clever Ways to Use Leftover Tomato Paste

1. Soup Starter Vibes

Making soup? Start it with a spoonful of tomato paste. Sauté it with onions and garlic—let it darken just a bit. That caramelized tomato flavor gives your soup a cozy, slow-cooked feel even if you’re working with whatever’s left in the fridge and 30 minutes before homework chaos.

Great for:

  • Lentil soup
  • Chicken noodle (trust me)
  • Any “throw-it-all-in” veggie soup

2. Upgrade Your Pasta Night

No full sauce jar? No problem. Sauté your leftover paste with olive oil, garlic, and Italian herbs. Add a splash of pasta water or cream, and boom—you’ve got a silky, savory, lick-the-bowl kind of sauce.

Want to level it up? Add:

  • Crumbled sausage
  • A handful of olives
  • A glug of red wine (for the sauce or you)

3. DIY Pizza Sauce That Actually Tastes Like Pizza

Tomato paste + oregano + garlic powder + olive oil + a tiny pinch of sugar = pizza sauce that doesn’t taste like spaghetti leftovers. Smooth it on your dough (or naan bread or English muffin or whatever you’re working with), add toppings, and bake.

Pro move: Make extra and freeze the sauce in small containers so future-you can thank current-you.

4. Sneak It into Chili

Chili purists, look away for a second. The rest of us? Toss in a tablespoon of tomato paste when browning your onions or ground meat. It deepens the flavor in a way that canned tomatoes alone just can’t.

Try it in:

  • Classic beef chili
  • Veggie bean chili
  • Even white chicken chili—just a touch, for balance

5. Slather It Into a Marinade

Mix tomato paste with olive oil, garlic, vinegar, paprika, cumin—whatever your spice mood is that day—and use it as a marinade for chicken, tofu, or roasted veggies. It’s thick, tangy, and gives off “I cooked this for hours” energy even if it only took 20 minutes.

Side bonus: It smells amazing while it cooks.

6. Tomato Hummus, Anyone?

Mash a spoonful of paste into your store-bought (or homemade!) hummus and give it a little swirl of smoked paprika and lemon. Suddenly you’re not just eating hummus. You’re eating fancy hummus.

Also works in:

  • White bean dip
  • Greek yogurt + garlic spread
  • That half-tub of cream cheese you forgot you had

7. Make a Fast BBQ or Ketchup-ish Sauce

Tomato paste is the unsung hero of homemade condiments. Mix it with:

  • Brown sugar
  • Vinegar
  • Spices (cayenne, mustard, garlic powder)

You’ve got a quick BBQ sauce that slaps. Or dial it sweeter and smoother for a DIY ketchup that’s way less sugary than the store stuff.

8. Give Casseroles a Little Backbone

You know that moment in a casserole when everything’s a little too… beige? Tomato paste brings the flavor and the color. Stir it in with the sauce, mix it into your cheesy layer, or blend it with broth to pour over the top.

Works wonders in:

  • Shepherd’s pie
  • Pasta bakes
  • Veggie gratins

9. Bake With It. No, Really.

Hear me out.

Add a teeny spoonful of tomato paste to savory muffins or scones with cheese and herbs. It gives them a subtle depth, almost like sun-dried tomato, without the chewy bits. It’s not sweet, just… rounder in flavor.

Think:

  • Cheddar chive muffins
  • Parmesan rosemary biscuits
  • Even garlic knots (mix into the dough or butter!)

10. Make Your Scrambled Eggs Fancy

I was skeptical too. But trust me—whisking in a tiny bit of tomato paste with your eggs before scrambling? Life-changing. It gives your eggs a savory, almost cheesy flavor that’s amazing on toast.

Top with:

  • Feta
  • Chives
  • A little chili oil, if you’re feeling wild

TL;DR: Tomato Paste Is the Sidekick Your Kitchen Needs

The next time you open a can for “just one tablespoon,” don’t sigh and shove it in the back of the fridge. Think of it like this tiny, flavor-packed superhero—just waiting for its next mission.

Freeze it. Stir it. Bake with it. Sneak it into places it doesn’t technically belong.

Tomato paste doesn’t care about the rules. And now? Neither do you.

Got your own weirdly genius use for tomato paste? I wanna hear it. Leave a comment, send a message, or just keep making food fun—and just a little bit scrappy.


Ready for the next one whenever you are!

Chicken Cordon Bleu Crescent Braid

0

Chicken Cordon Bleu Crescent Braid is the ultimate weeknight showstopper—a stunning, golden-baked creation that captures all the elegant flavors of classic chicken cordon bleu in a fun, easy-to-assemble, and utterly delicious braided pastry. This recipe is a brilliant fusion of gourmet comfort and convenience, transforming a simple sheet of crescent dough into a flaky, buttery vessel filled with tender shredded chicken, savory deli ham, and melty Swiss cheese. The magic begins with a seamless crescent dough sheet, cut into diagonal strips on each side, which are then artfully woven over the filling to create a beautiful, latticed braid. As it bakes, the dough puffs into a golden, flaky crust, while the cheese melts into a gloriously gooey layer, and the ham and chicken become warm and savory.

The brilliance of this recipe lies in its incredible simplicity and the dramatic presentation it delivers with minimal effort. Using pre-cooked chicken and ready-made crescent dough streamlines the process, making this an achievable weeknight dinner that feels special enough for company. The braiding technique is surprisingly simple but yields a stunning result that will have everyone at the table impressed. Served warm, each slice reveals the perfect combination of flaky pastry, savory chicken and ham, and melted Swiss cheese. It’s a complete meal on its own or pairs beautifully with a simple green salad. Whether you’re looking for an easy dinner, a fun recipe to make with kids, or a dish to bring to a potluck, this Chicken Cordon Bleu Crescent Braid is guaranteed to be a hit.

Why You’ll Love This Recipe:

  • All the Flavors of Classic Chicken Cordon Bleu: Savory chicken, salty ham, and melty Swiss cheese wrapped in flaky pastry.
  • Stunning Braided Presentation: The woven pastry creates a beautiful, impressive centerpiece with minimal effort.
  • Quick and Easy: Uses convenient crescent dough and pre-cooked chicken for a meal that comes together in under 30 minutes.
  • Perfect for Weeknights or Entertaining: Elegant enough for guests, simple enough for a busy family dinner.
  • Fun to Make: The braiding technique is satisfying and fun, especially for kids.

Ingredients:

For the Braid:*
8 oz crescent dough sheet (or seamless crescent roll dough)
2 cups cooked chicken breast, shredded or finely chopped
4-6 slices deli ham (thinly sliced)
4-6 slices Swiss cheese

For Serving (Optional):*
Dijon mustard or honey mustard, for dipping
Fresh parsley, chopped, for garnish

Instructions:

Step 1: Preheat Oven and Prepare Pan
Preheat your oven to 375°F (190°C). Line a large baking sheet with parchment paper or foil for easy cleanup.

Step 2: Prepare the Dough*
Unroll the crescent dough sheet onto the prepared baking sheet. If using individual crescent rolls, press the seams together firmly to form one solid rectangle. Gently stretch or roll the dough into a slightly larger rectangle, about 12×8 inches, if needed.

Step 3: Cut the Braid Strips*
Using a sharp knife or pizza cutter, make diagonal cuts down both long sides of the dough, creating strips about 1-inch wide. Leave a solid strip of dough down the center (about 3-4 inches wide) for the filling. You should have 6-8 strips on each side.

Step 4: Add the Filling*
Spread the shredded chicken evenly down the center section of the dough, leaving about ½ inch of space at the top and bottom. Layer the ham slices over the chicken, followed by the Swiss cheese. Keep all the filling centered.

Step 5: Braid the Dough*
Fold the top and bottom ends of the dough up over the filling to seal the ends. Starting at one end, fold one strip from the left over the filling at a slight angle, then fold one strip from the right over the left strip, continuing to alternate left and right to create a braid. Tuck the ends of the strips under the braid to secure.

Step 6: Bake*
Bake for 18-22 minutes, or until the dough is puffed, deep golden brown, and the cheese is melted and bubbly.

Step 7: Rest and Serve*
Remove from the oven and let the braid rest on the baking sheet for about 5 minutes. This allows the filling to set slightly for cleaner slicing. Slice into portions and serve warm, with Dijon mustard or honey mustard on the side if desired.

Tips:

  • Use Pre-Cooked Chicken: Rotisserie chicken is perfect for this recipe—quick, flavorful, and easy to shred.
  • Don’t Overfill: Keep the filling centered and avoid overloading to ensure the braid seals properly.
  • Seal the Ends Well: Folding the top and bottom ends over the filling helps prevent leaks during baking.
  • Customize Your Cheese: Gruyère, provolone, or a blend of Swiss and Parmesan work beautifully.
  • Add a Glaze: For an extra golden, shiny crust, brush the braid with an egg wash (1 egg beaten with 1 tablespoon water) before baking.

Storage Options:

  • Refrigerator: Store leftovers in an airtight container in the refrigerator for up to 4 days.
  • Reheating: Reheat in a 350°F (175°C) oven or air fryer for 5-8 minutes to restore crispness. The microwave will make the pastry soft.
  • Freezing: The baked braid freezes well. Cool completely, wrap tightly in plastic wrap and foil, and freeze for up to 2 months. Thaw in the refrigerator and reheat in the oven.
  • Make-Ahead: Assemble the braid (through Step 5), cover tightly, and refrigerate for up to 8 hours before baking. Add a few minutes to the bake time if baking from cold.

Chicken Cordon Bleu Crescent Braid is a delicious, elegant, and incredibly easy dish that brings classic flavors to the table in a fun, beautiful package. Perfect for busy weeknights or impressing guests, it’s a recipe you’ll turn to again and again.

Southern Roasted Cabbage Steaks with Garlic Bacon Butter

0

Southern Roasted Cabbage Steaks with Garlic Bacon Butter are a revelation—a stunning, deeply flavorful dish that transforms humble cabbage into a caramelized, savory, utterly irresistible centerpiece. This recipe is a celebration of Southern ingenuity, where thick slices of cabbage are roasted until the edges are beautifully charred and crispy while the interiors become tender and sweet, then lavished with a rich, smoky garlic bacon butter that seeps into every layer. The magic begins with slicing the cabbage into generous “steaks,” creating flat, sturdy rounds that hold their shape beautifully during roasting. A compound butter of melted butter, minced garlic, onion powder, smoked paprika, and crispy bacon bits is then spooned over each steak, working its way into the natural crevices of the cabbage. As it roasts at high heat, the butter melts and caramelizes, the bacon adds a salty, smoky crunch, and the cabbage transforms, developing a deep, nutty sweetness that is simply addictive.

The brilliance of this recipe lies in its simplicity and the spectacular results it delivers with minimal effort. Roasting at a high temperature is the secret to achieving those coveted crispy edges and tender centers without any fuss. The combination of smoky paprika, rich butter, and salty bacon elevates the cabbage from a humble side to a dish worthy of a special occasion. Served as a vegetarian main or alongside roasted meats, these cabbage steaks are guaranteed to convert even the most skeptical cabbage critics. They’re proof that sometimes the most extraordinary dishes come from the most ordinary ingredients, treated with a little creativity and a lot of love.

Why You’ll Love This Recipe:

  • Caramelized, Crispy, and Tender: High-heat roasting creates perfectly charred edges and sweet, tender centers.
  • Rich, Smoky, Garlicky Flavor: The butter mixture, infused with garlic, smoked paprika, and bacon, is absolutely irresistible.
  • Surprisingly Simple: Just slice, season, and roast—no complicated techniques required.
  • Visually Stunning: Cabbage steaks make a beautiful, impressive presentation on any plate.
  • Versatile Side or Main: Serve as a hearty vegetarian main or alongside roasted meats.

Ingredients:

For the Cabbage Steaks:*
1 green cabbage (about 2 to 2½ lbs)
Olive oil for greasing pan (if not using parchment)

For the Garlic Bacon Butter:*
6 tablespoons unsalted butter, melted
3 cloves garlic, minced
1 teaspoon onion powder
1 teaspoon smoked paprika
½ teaspoon kosher salt, plus more to taste
¼ teaspoon freshly ground black pepper
½ cup crispy cooked bacon bits (about 6 slices)

For Garnish:*
2 tablespoons fresh parsley, chopped (optional)

Instructions:

Step 1: Preheat Oven and Prepare Pan
Preheat your oven to 425°F (220°C). Line a large, rimmed baking sheet with parchment paper or lightly grease it with olive oil.

Step 2: Prepare the Cabbage
Remove any damaged or wilted outer leaves from the cabbage. Trim the base so the cabbage sits flat on the cutting board. Using a sharp knife, carefully slice the cabbage into ¾ to 1-inch thick rounds, cutting from the top down through the stem. You should get 4 to 6 steaks, depending on the size of the cabbage. Arrange them on the prepared baking sheet with a little space between each.

Step 3: Make the Garlic Bacon Butter
In a small bowl, combine the melted butter, minced garlic, onion powder, smoked paprika, salt, pepper, and bacon bits. Stir until well mixed.

Step 4: Coat the Cabbage Steaks
Spoon the butter mixture evenly over each cabbage steak, using the back of the spoon to spread it and gently work it into the layers where possible.

Step 5: Roast
Roast for 20 to 25 minutes, rotating the pan halfway through if needed for even browning. The cabbage steaks are done when the edges are deeply browned and crisp, and the centers are tender when pierced with a fork.

Step 6: Serve
Remove from the oven and taste; add a pinch more salt if desired. Spoon any pan juices back over the cabbage steaks. Garnish with fresh parsley if using. Serve warm.

Tips:

  • Slice Evenly: Aim for uniform thickness to ensure even cooking.
  • Don’t Skimp on the Butter: The butter mixture is key to flavor and caramelization. Make sure each steak gets a generous coating.
  • Use a Sharp Knife: Cabbage can be tough; a sharp, sturdy knife makes slicing easier and safer.
  • Watch the Browning: Ovens vary. Keep an eye on the edges to prevent burning; tent with foil if browning too quickly.
  • Add Parmesan: For an extra layer of flavor, sprinkle freshly grated Parmesan over the steaks during the last 5 minutes of roasting.

Storage Options:

  • Refrigerator: Store leftovers in an airtight container in the refrigerator for up to 4 days.
  • Reheating: Reheat in a 375°F (190°C) oven or air fryer for 5-7 minutes to restore crispness. The microwave will make them soft.
  • Not for Freezing: The texture of roasted cabbage becomes watery upon thawing.
  • Make-Ahead: The cabbage steaks are best enjoyed fresh from the oven, but you can prep the butter mixture a day in advance.

Southern Roasted Cabbage Steaks with Garlic Bacon Butter are a testament to the magic of simple ingredients and smart cooking. With their caramelized edges, tender centers, and irresistible smoky, garlicky flavor, they’re a dish that will have everyone asking for the recipe.