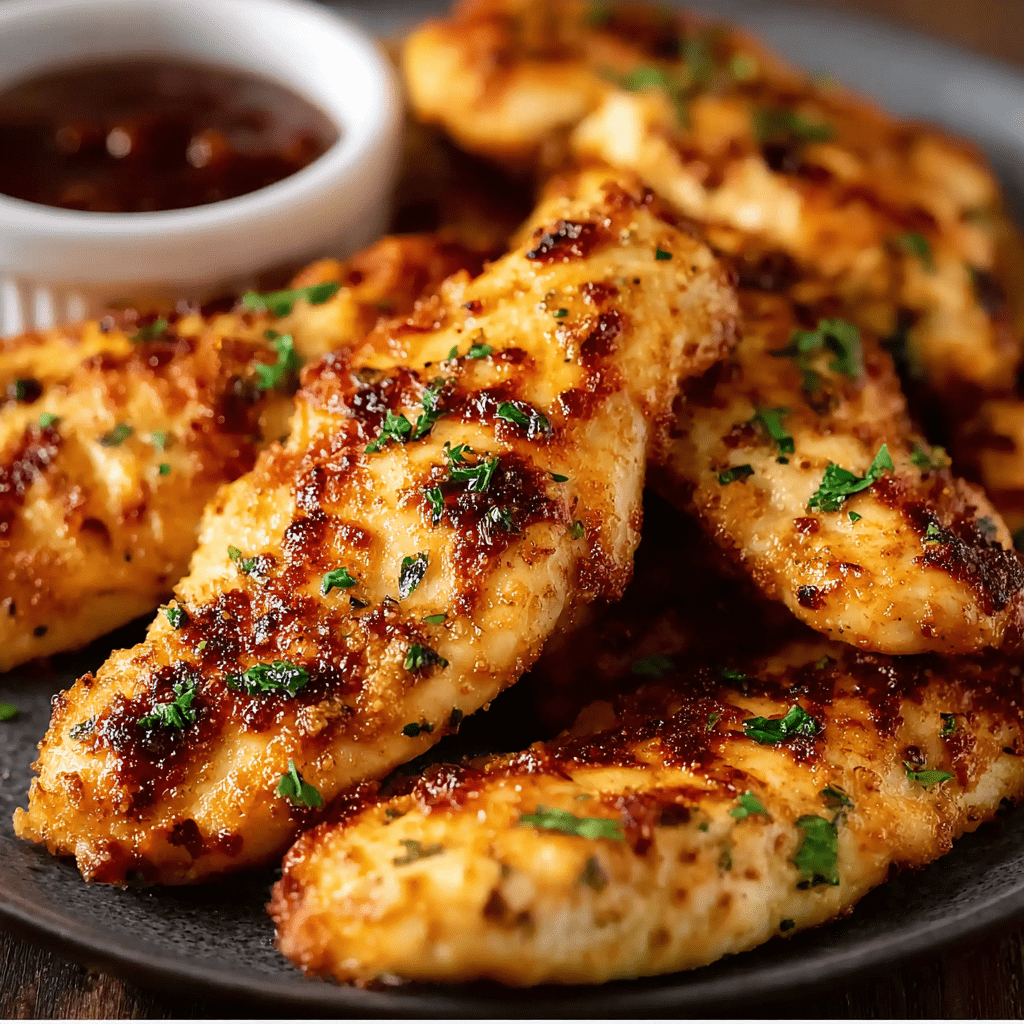
Cherry Cheesecake Lush

0

Cherry Cheesecake Lush is a no-bake dessert that layers creamy, tangy, and sweet flavors with a hint of crunch. It’s an irresistible treat that’s perfect for potlucks, summer gatherings, or anytime you crave a refreshing dessert. The buttery golden Oreo crust provides the perfect base for layers of sweetened cream cheese, velvety cheesecake-flavored pudding, luscious cherry pie filling, and a fluffy whipped topping. Chopped nuts add a delightful crunch, making each bite a textural masterpiece.

This dessert is as visually appealing as it is delicious, with vibrant cherry topping crowning the creamy layers below. It’s incredibly simple to make, thanks to a straightforward assembly process. The best part? There’s no need to turn on the oven! Whether you’re hosting a crowd or simply indulging your sweet tooth, this Cherry Cheesecake Lush is bound to impress with its layered perfection and delightful balance of flavors.

Why You’ll Love This Recipe:

No-Bake Ease: Perfect for hot days or when you want a quick dessert without using the oven.

Layered Perfection: Each layer contributes its own flavor and texture, from the buttery crust to the creamy pudding and tangy cherries.

Crowd-Pleaser: This dessert serves a crowd and is always a hit at parties and gatherings.

Ingredients

For the Crust:

• 1 package golden Oreos (14 oz), crushed in a food processor

• 1/3 cup salted butter, melted

• 1 tbsp butter (for preparing the pan)

For the Layers:

• 8 oz cream cheese, softened to room temperature

• 3/4 cup white sugar

• 16 oz frozen whipped topping, thawed (divided use)

• 2 packages cheesecake-flavored instant pudding mix (small boxes)

• 3 cups whole milk

For the Topping:

• 2 cans cherry pie filling (large cans)

• 1 cup chopped pecans or walnuts (for garnish)

Instructions

Step 1: Prepare the Crust

1. Butter a 9×13-inch baking dish lightly to prevent sticking.

2. Crush the golden Oreos in a food processor until fine crumbs form.

3. Combine the crumbs with melted butter and pulse until the mixture has a wet sand-like consistency.

4. Press the crumb mixture evenly into the bottom of the prepared baking dish, compacting it with a spoon or flat object.

5. Place the crust in the freezer for 10 minutes to set.

Step 2: Make the Cream Cheese Layer

1. In a mixing bowl, beat the softened cream cheese, white sugar, and 1 cup of whipped topping until smooth and creamy.

2. Spread the cream cheese mixture evenly over the chilled crust using a spatula.

3. Return the dish to the freezer for another 10 minutes to firm up.

Step 3: Prepare the Pudding Layer

1. Whisk the cheesecake pudding mix with whole milk and 1/2 cup whipped topping until the mixture thickens (about 2-3 minutes).

2. Spread the pudding mixture evenly over the cream cheese layer.

3. Place the dish in the refrigerator for 30 minutes to allow the pudding to set.

Step 4: Add the Cherry Layer

1. Gently spread the cherry pie filling over the pudding layer, ensuring it is evenly distributed.

Step 5: Top with Whipped Topping and Nuts

1. Spread the remaining whipped topping over the cherry filling, smoothing it into an even layer.

2. Sprinkle the chopped pecans or walnuts evenly across the top for added texture and crunch.

Step 6: Chill and Serve

1. Refrigerate the dessert for 1-2 hours to allow all the layers to set completely.

2. Slice into squares and serve chilled.

Tips:

Crust Firmness: Press the crust firmly into the pan to ensure it holds together when sliced.

Layer Smoothness: Use an offset spatula for even spreading of each layer.

Cherry Pie Filling Alternatives: Swap out cherries for blueberry or strawberry pie filling for variety.

Nut-Free Option: Omit the nuts if serving to someone with allergies or preferences.

Storage Options:

Refrigeration: Store leftovers in an airtight container in the refrigerator for up to 3 days.

Freezing: Freeze individual squares for up to 1 month. Wrap tightly in plastic wrap, then in foil. Thaw in the refrigerator before serving.

With its creamy, tangy layers and refreshing cherry topping, this Cherry Cheesecake Lush is sure to be a hit with anyone lucky enough to enjoy it.

French Onion Stuffed Potatoes

0

French Onion Stuffed Potatoes are a decadent twist on the classic baked potato, combining the rich flavors of caramelized onions with the heartiness of baked russet potatoes and the melty goodness of Gruyère cheese. The idea of stuffing a potato with a French onion soup-inspired filling brings a cozy, comforting element to any meal. The buttery caramelized onions, enhanced with beef broth and dry sherry or white wine, offer a depth of flavor that pairs beautifully with the creamy potato filling. Topped with melted Gruyère cheese, these stuffed potatoes are a perfect balance of savory and indulgent.

The process of making these potatoes begins by slowly cooking onions until they’re golden and tender, allowing their natural sweetness to come through. The dry sherry or white wine deglazes the pan, adding complexity to the onion mixture, while the beef broth helps bring everything together. Once the onions are ready, the potatoes are carefully scooped out and mixed with half of the onion mixture, creating a flavorful filling that’s then stuffed back into the potato shells. Topped with more onions and Gruyère cheese, these potatoes are baked until golden and bubbly, making them a standout dish for family dinners, casual gatherings, or even as a side dish at special occasions.

Why You’ll Love This Recipe:

Rich and Savory: The combination of caramelized onions, beef broth, and Gruyère cheese creates an irresistible flavor profile.

Comfort Food with a Twist: The familiar, comforting potato gets an upgrade with French onion soup-inspired filling.

Perfect for Any Meal: Serve as a side dish or as a main course – these stuffed potatoes are versatile and satisfying.

Ingredients

For the Stuffed Potatoes:

• 4 large russet potatoes

• 4 tablespoons unsalted butter

• 4 medium yellow onions, halved longitudinally and finely sliced

• 1/2 teaspoon dried thyme leaves

• 1/2 cup dry sherry or alternative dry white wine

• 1 cup beef broth

• 2 cups Gruyère cheese, grated

• Kosher salt and freshly ground black pepper, to taste

Instructions

Step 1: Preheat the Oven

1. Preheat the oven to 375°F (190°C).

Step 2: Cook the Onions

1. In a large skillet, melt the unsalted butter over medium-high heat.

2. Once the butter has melted, add the finely sliced onions to the skillet.

3. Season the onions with kosher salt, freshly ground black pepper, and dried thyme leaves.

4. Cook the onions slowly, stirring occasionally, for 15-20 minutes until they become soft and caramelized, turning golden brown.

Step 3: Deglaze the Pan

1. Add the dry sherry (or white wine) to the skillet, using a wooden spoon to deglaze the pan and release any flavorful bits stuck to the bottom.

2. Stir in the beef broth and bring the mixture to a gentle boil.

3. Allow the mixture to simmer for 5-10 minutes, reducing the liquid by about half, until it becomes a rich, savory sauce.

Step 4: Prepare the Potatoes

1. While the onions are cooking, scrub and bake the russet potatoes. Place them directly on the oven rack and bake for 45-60 minutes, or until tender when pierced with a fork.

2. Once baked, remove the potatoes from the oven. Carefully slice off the top third of each potato and scoop out the inner flesh, placing it in a medium-sized bowl.

Step 5: Make the Filling

1. Add half of the caramelized onion mixture to the potato flesh and mash until combined.

2. Season with additional salt and pepper to taste.

Step 6: Stuff the Potatoes

1. Carefully stuff each potato shell with the mashed potato-onion mixture.

2. Spoon the remaining onion mixture over the top of each stuffed potato.

Step 7: Add the Cheese

1. Generously sprinkle the grated Gruyère cheese over the stuffed potatoes.

2. Place the filled potatoes on a baking tray and bake for an additional 10-15 minutes, or until the cheese has melted and is lightly golden.

Step 8: Optional Final Touch

1. For extra browning, place the stuffed potatoes under the broiler set to high for about 1 minute. Keep an eye on them to prevent burning.

Step 9: Serve

1. Remove the potatoes from the oven and serve warm.

Tips:

Caramelizing the Onions: Take your time with the onions; slow cooking them brings out their natural sweetness and richness.

Cheese: Gruyère adds a nutty, melty texture, but you can substitute it with Swiss or cheddar cheese if preferred.

Stuffing the Potatoes: Be gentle when scooping out the potato flesh to avoid tearing the skin.

Wine: If you prefer not to use alcohol, you can substitute the dry sherry or white wine with vegetable broth or a splash of apple cider vinegar for acidity.

Storage Options:

Refrigeration: Leftover stuffed potatoes can be stored in an airtight container in the refrigerator for up to 3 days.

Freezing: For longer storage, these potatoes freeze well. Wrap each stuffed potato tightly in plastic wrap or foil, then place them in a freezer-safe bag. To reheat, bake from frozen at 375°F (190°C) for 25-30 minutes, or until heated through.

Enjoy these savory, cheesy stuffed potatoes as a delightful addition to any meal or as a satisfying main course.

Cream Cheese Brownies

0

Cream cheese brownies combine the best of two dessert worlds—rich, fudgy brownies and creamy, tangy cheesecake. This decadent dessert offers a swirl of contrasting textures and flavors in every bite. The luscious cream cheese layer creates a stunning marbled effect that’s as beautiful as it is delicious. Whether you’re hosting a gathering or simply craving an indulgent treat, these brownies are sure to impress your guests and satisfy your sweet tooth. They’re the perfect balance of sweetness and richness, making them a standout dessert for any occasion.

These brownies are made with pantry staples, so you can whip them up anytime. The addition of cream cheese elevates the classic brownie, giving it a velvety smoothness and a delightful tang. Plus, the swirling process adds a creative touch that’s fun and easy to do. Serve these cream cheese brownies on their own or with a scoop of vanilla ice cream for an unforgettable dessert experience.

Why You’ll Love This Recipe:

Beautiful Swirl Effect: A visually stunning dessert that’s just as delicious as it looks.

Perfect Balance: Combines the deep chocolate flavor with the tangy creaminess of cheesecake.

Easy to Make: Simple steps with guaranteed impressive results.

Ingredients

For the Brownies:

• 10 tablespoons butter

• ½ cup semisweet chocolate chips

• ½ cup + 1 ½ tablespoons cocoa powder

• ¾ cup brown sugar

• ¾ cup granulated sugar

• ½ teaspoon salt

• 2 large eggs (room temperature)

• 1 teaspoon vanilla extract

• ⅔ cup all-purpose flour

• 1 ½ tablespoons water

For the Cream Cheese Mixture:

• 8 ounces cream cheese (room temperature for 40 minutes)

• ¼ cup granulated sugar

• 1 large egg

• 1 teaspoon vanilla extract

Instructions

1. Preheat Oven and Prepare Pan:

• Preheat oven to 350°F (175°C).

• Line an 11×7-inch baking dish with aluminum foil or parchment paper, leaving an overhang for easy removal.

2. Make the Brownie Batter:

• Melt the butter and chocolate chips in the microwave at 50% power in 1-minute intervals, stirring until smooth.

• Stir in the cocoa powder until fully dissolved.

• Add the brown sugar, granulated sugar, and salt, mixing well.

• Stir in the eggs, vanilla extract, and flour until combined.

• Spread ¾ of the brownie batter evenly in the prepared pan.

3. Prepare the Cream Cheese Mixture:

• Using a stand or hand mixer on medium speed, beat the cream cheese and sugar until creamy.

• Reduce the speed to low and mix in the egg and vanilla extract until smooth.

• Spread the cream cheese mixture evenly over the brownie layer using an offset spatula.

4. Create the Swirl Effect:

• Stir the cold water into the remaining brownie batter.

• Drop spoonfuls of the batter over the cream cheese layer.

• Use a knife or chopstick to gently swirl the two layers together, being careful not to overmix or reach the bottom layer.

5. Bake:

• Bake for 35–40 minutes. A toothpick inserted near the edges should come out clean, while the center remains slightly gooey.

6. Cool and Serve:

• Let the brownies cool completely in the pan before lifting them out using the parchment or foil overhang.

• Slice into squares and enjoy!

Tips:

Room Temperature Ingredients: Ensure eggs and cream cheese are at room temperature for a smoother batter and even baking.

Don’t Over-Swirl: Swirl just enough to create a marbled effect for a visually stunning presentation.

Storage: Store in an airtight container in the refrigerator for up to 5 days. Serve chilled or at room temperature.

These cream cheese brownies are the perfect combination of fudgy and creamy, making them a guaranteed crowd-pleaser!

Air Fryer Mozzarella Sticks

0

Crispy on the outside, gooey on the inside, air fryer mozzarella sticks are a delicious and healthier take on a classic snack. Perfect as an appetizer or a party treat, these sticks are easy to make and pair wonderfully with marinara sauce or your favorite dip.

Why You’ll Love This Recipe:

Healthier Alternative: Made with less oil compared to traditional frying.

Customizable Flavor: Add your favorite seasonings to the breadcrumb coating.

Quick and Convenient: Ready in minutes, perfect for impromptu cravings.

Ingredients

• 8 mozzarella string cheese sticks, halved

• 1/4 cup all-purpose flour

• 2 large eggs, beaten

• 1 cup panko breadcrumbs

• 1 teaspoon Italian seasoning

• 1/2 teaspoon garlic powder

• 1/2 teaspoon kosher salt

• 1/4 teaspoon freshly ground black pepper

• 2 tablespoons olive oil or cooking spray

• 2/3 cup marinara sauce (optional, for dipping)

Instructions

1. Prepare the Mozzarella Sticks:

• Unwrap the mozzarella sticks and cut each one in half.

• Place the flour in a shallow bowl.

• In a second bowl, whisk the eggs until smooth.

• In a third bowl, mix the panko breadcrumbs, Italian seasoning, garlic powder, salt, and black pepper.

2. Coat the Mozzarella Sticks:

• Dredge each mozzarella piece in the flour, ensuring full coverage.

• Dip it into the beaten eggs.

• Roll it in the breadcrumb mixture, pressing gently to adhere the coating.

• Place the coated sticks on a parchment-lined baking sheet.

3. Freeze:

• Freeze the coated mozzarella sticks for at least 30 minutes. This helps the coating stick and prevents the cheese from melting too quickly during cooking.

4. Cook in the Air Fryer:

• Preheat the air fryer to 390°F (200°C).

• Lightly brush the frozen sticks with olive oil or spray with cooking spray.

• Arrange them in the air fryer basket, ensuring space between each stick for even cooking.

• Air fry for 5 minutes or until golden brown and crispy. Watch closely to prevent the cheese from oozing out.

5. Serve:

• Remove from the air fryer and serve warm with marinara sauce or your favorite dipping sauce.

Tips:

Double Coating: For extra crunch, repeat the egg and breadcrumb coating step before freezing.

Prevent Sticking: Use parchment paper in the air fryer basket to prevent sticking.

Watch Closely: Cooking times may vary based on the air fryer model.

Storage Options:

Refrigerator: Store leftovers in an airtight container for up to 2 days. Reheat in the air fryer at 350°F (175°C) for a few minutes.

Freezer: Freeze uncooked, coated sticks for up to 2 months. Cook directly from frozen when ready.

Enjoy these crispy, cheesy bites fresh out of the air fryer!

Orange Dreamsicle Cake

0

This cake brings the nostalgic flavors of an orange creamsicle to life with its vibrant citrus notes and creamy texture. With a tender orange-flavored cake base, luscious orange cream filling, and a tangy orange cream cheese frosting, it’s the ultimate dessert for citrus lovers. Perfect for summer gatherings or special occasions, this cake is as delightful to look at as it is to eat.

The reverse creaming method ensures a soft, moist crumb, while the bold orange flavor in every layer is sure to impress. The swirl of orange-tinted frosting adds a whimsical and elegant finish.

Why You’ll Love This Recipe:

Bold Citrus Flavor: The orange juice concentrate, zest, and extract create a rich, authentic orange flavor.

Creamy Filling: The orange cream filling adds a light, mousse-like texture.

Perfect for Decorating: The cream cheese frosting is smooth and stable, ideal for creative piping.

Ingredients

For the Cake:

• 2 ½ cups (285g) cake flour

• 1 ½ cups (300g) sugar

• ½ teaspoon (3g) salt

• 2 ½ teaspoons (12g) baking powder

• 1 ½ sticks (12 T) (169g) unsalted butter, slightly softened

• 4 large eggs

• ¾ cup (190g) frozen orange juice concentrate, thawed

• ½ cup (121g) milk

• 1 tablespoon (10g) orange extract

• Zest of 1 orange

• Orange coloring gel (optional)

For the Orange Cream Filling:

• 1 small box (3.4oz/96g) instant vanilla pudding mix

• 2 cups (464g) heavy cream or whipping cream

• 1 teaspoon (4g) orange extract

For the Orange Cream Cheese Frosting:

• 2 sticks (1 cup) (226g) unsalted butter, slightly softened

• 2 (8oz) packages (452g) full-fat cream cheese

• 1 teaspoon (4g) clear vanilla extract

• 1 teaspoon (4g) orange extract

• ½ teaspoon (2g) salt (optional)

• 6 to 6 ½ cups (690g to 747g) powdered sugar

• Orange coloring gel (optional)

Instructions

For the Cake:

1. Preheat Oven: Preheat to 350°F (175°C). Grease and flour two 8-inch round pans.

2. Combine Dry Ingredients: In the mixer bowl, combine cake flour, sugar, salt, and baking powder. Mix for 30 seconds.

3. Prepare Wet Ingredients: In a separate bowl, whisk eggs, orange juice concentrate, milk, orange extract, and zest.

4. Incorporate Butter: Gradually add butter slices to the dry ingredients, mixing on low. Increase speed to medium and mix until crumbly.

5. Add Wet Ingredients: Slowly add half the egg mixture, mixing on medium for 1½ minutes. Scrape the bowl, then add the remaining egg mixture in two parts, mixing for 20 seconds after each addition.

6. Optional Coloring: Add orange gel coloring for a vibrant hue.

7. Bake: Divide batter between pans and bake for 25-30 minutes or until a toothpick comes out clean. Let cakes cool in pans for 10 minutes, then transfer to a wire rack.

For the Orange Cream Filling:

1. Mix Ingredients: Combine pudding mix, heavy cream, and orange extract.

2. Whisk or Beat: Use a whisk or mixer on low, then high speed, until thickened. Refrigerate until needed.

For the Orange Cream Cheese Frosting:

1. Beat Butter and Cream Cheese: Beat butter until smooth. Add cream cheese in pieces and mix until incorporated.

2. Add Flavoring: Mix in vanilla and orange extracts.

3. Incorporate Sugar: Gradually add powdered sugar, mixing on low. Beat until fluffy but do not overmix.

Assembly:

1. Place one cake layer on a serving plate. Spread a generous layer of orange cream filling.

2. Top with the second cake layer and frost the entire cake with orange cream cheese frosting.

3. Optional: Use orange-tinted frosting for swirls or piping details.

Tips:

Softening Butter and Cream Cheese: Avoid over-softening for better texture.

Chill Before Serving: This cake tastes best chilled, allowing the flavors to meld.

Make-Ahead Options: The cake layers, filling, and frosting can be prepared a day in advance and assembled later.

Storage Options:

Refrigerator: Store the cake in an airtight container for up to 3 days.

Freezer: Wrap individual slices in plastic wrap and store in a freezer-safe container for up to 2 months.

This Orange Dreamsicle Cake is the perfect blend of creamy, zesty, and sweet, making it a showstopper at any event!

Shrimp Scampi Pasta Bake

0

This Shrimp Scampi Pasta Bake is a decadent twist on the classic shrimp scampi, transforming it into a hearty, cheesy baked pasta dish that’s perfect for family dinners or special occasions. The tender shrimp are sautéed in a garlic-infused buttery sauce, paired with perfectly cooked pasta, and layered with a creamy lemon-wine sauce. Topped with a generous layer of melted Parmesan and mozzarella, this dish is an irresistible combination of comforting flavors and textures.

What makes this recipe truly special is the balance of bright citrus notes, the richness of cream, and the sharpness of Parmesan cheese. It’s a meal that feels indulgent yet is surprisingly simple to make. With minimal prep time and just a short bake in the oven, this pasta bake is an excellent choice when you want something that looks and tastes gourmet without spending hours in the kitchen.

Why You’ll Love This Recipe:

Rich and Creamy Sauce: The combination of butter, cream, and cheese creates an irresistibly luscious sauce.

Simple Yet Elegant: Perfect for both weeknight meals and special gatherings.

Versatile Flavors: Easily customizable with your favorite pasta or seafood.

Ingredients

Pasta and Shrimp:

• 12 oz linguine or spaghetti

• 1 lb large shrimp, peeled and deveined

Sauce:

• 4 tablespoons butter

• 4 cloves garlic, minced

• ¼ teaspoon red pepper flakes

• ½ cup white wine or chicken broth

• 1 lemon, juiced and zested

• 1 cup heavy cream

• Salt and pepper to taste

Cheese and Garnish:

• ½ cup grated Parmesan cheese

• 1 cup shredded mozzarella cheese

• 2 tablespoons chopped fresh parsley

Instructions

Step 1: Preheat Oven

1. Preheat your oven to 375°F (190°C). Lightly grease a large baking dish and set it aside.

Step 2: Cook the Pasta

1. Bring a large pot of salted water to a boil. Cook the pasta according to the package instructions until al dente. Drain and set aside.

Step 3: Sauté Aromatics

1. In a large skillet, melt the butter over medium heat. Add the minced garlic and red pepper flakes, stirring constantly for about 1 minute until fragrant.

Step 4: Cook the Shrimp

1. Add the shrimp to the skillet and cook for 3-4 minutes, flipping halfway, until they turn pink and opaque. Remove the shrimp from the skillet and set them aside.

Step 5: Make the Sauce

1. Pour the white wine (or chicken broth) into the skillet, using a wooden spoon to scrape up any browned bits from the bottom. Let it simmer for 2 minutes.

2. Stir in the lemon juice, lemon zest, and heavy cream. Allow the mixture to come to a gentle simmer.

Step 6: Toss the Pasta

1. Add the cooked pasta to the skillet, tossing to coat it evenly in the sauce. Season with salt and pepper to taste.

Step 7: Assemble the Dish

1. Transfer the saucy pasta to the prepared baking dish, spreading it out evenly.

2. Arrange the cooked shrimp on top of the pasta.

Step 8: Add Cheese and Bake

1. Sprinkle the grated Parmesan and shredded mozzarella cheese evenly over the top.

2. Place the dish in the preheated oven and bake for 15-20 minutes, or until the cheese is melted, golden, and bubbly.

Step 9: Garnish and Serve

1. Remove the dish from the oven and sprinkle with chopped fresh parsley.

2. Serve immediately while hot and gooey.

Tips

Shrimp Selection: Use fresh or thawed shrimp for the best flavor. If using frozen shrimp, pat them dry before cooking.

Don’t Overcook Shrimp: Shrimp cook quickly—remove them as soon as they turn pink to avoid a rubbery texture.

Deglazing the Pan: Scraping up the browned bits when adding wine or broth enhances the sauce’s flavor.

Customizable Cheese: Swap mozzarella for fontina or Gruyère for a different cheesy twist.

Storage Options

Refrigerator: Store leftovers in an airtight container for up to 3 days. Reheat in the oven at 350°F (175°C) until warmed through.

Freezer: This dish can be frozen before baking. Assemble the pasta and shrimp in a baking dish, cover tightly with plastic wrap and foil, and freeze for up to 2 months. Thaw overnight in the refrigerator, then bake as directed.

This Shrimp Scampi Pasta Bake is a dish that brings restaurant-quality flavors to your table with ease. Once you try it, it’s sure to become a favorite!

Hamburger Mushroom Bake

0

The Hamburger Mushroom Bake is a comforting and hearty dish that’s packed with rich flavors and creamy textures. This recipe combines seasoned ground beef, sautéed mushrooms, and a luscious cream cheese and egg mixture for a dish that’s both satisfying and easy to prepare. Whether you’re making it for a family dinner or meal prepping for the week, it’s a versatile option that pairs well with salads, roasted veggies, or even crusty bread.

Why You’ll Love This Recipe:

Low-Carb Friendly: Ideal for keto or low-carb diets.

Simple Ingredients: Uses pantry and fridge staples for easy preparation.

Customizable: Add your favorite spices or extra veggies to make it your own.

Ingredients

• 1 pound lean ground beef

• 6 ounces cream cheese, softened

• 3 eggs

• 5 cups sliced mushrooms

• 2 tablespoons butter (for sautéing mushrooms)

• 1 teaspoon dried parsley

• Salt and pepper, to taste

• Grated cheese (optional, for topping)

Instructions

Step 1: Preheat the Oven

1. Preheat your oven to 350°F (175°C).

2. Grease a 9×13-inch casserole dish with butter or non-stick spray.

Step 2: Cook the Ground Beef

1. In a skillet over medium heat, cook the ground beef, breaking it into crumbles, until browned and fully cooked.

2. Season with salt and pepper. Remove from heat and set aside.

Step 3: Prepare the Cream Cheese Mixture

1. In a food processor, blend the softened cream cheese until smooth.

2. Add the eggs one at a time, blending after each addition to create a creamy mixture.

3. Pour this mixture over the cooked ground beef and stir to combine.

Step 4: Sauté the Mushrooms

1. In the same skillet, melt the butter over medium heat.

2. Add the sliced mushrooms and cook for 5–7 minutes, stirring occasionally, until golden brown and tender.

3. Season with salt, pepper, and dried parsley.

Step 5: Assemble the Dish

1. Spread the beef and cream cheese mixture evenly into the prepared casserole dish.

2. Layer the sautéed mushrooms on top.

3. (Optional) Sprinkle grated cheese over the mushrooms for an extra layer of flavor.

Step 6: Bake

1. Bake the dish in the preheated oven for 20–25 minutes, or until the top is lightly browned and set.

Step 7: Cool and Serve

1. Remove the casserole from the oven and let it cool for 5–10 minutes to set further.

2. Serve warm, garnished with fresh parsley if desired.

Tips

Make It Your Own: Add cooked spinach, onions, or garlic for additional flavor.

Cheese Options: Cheddar, mozzarella, or Parmesan work well for topping.

Ground Meat Variations: Swap ground beef for turkey, chicken, or pork if preferred.

Storage Options

Refrigeration: Store leftovers in an airtight container in the fridge for up to 4 days. Reheat in the microwave or oven before serving.

Freezing: Freeze in individual portions for up to 2 months. Thaw in the fridge overnight before reheating.

This Hamburger Mushroom Bake is a savory and satisfying meal that’s as delicious as it is easy to make. Perfect for any occasion!

Beef and Pepper Rice Bowl

0

The Beef and Pepper Rice Bowl is a simple, flavorful dish that’s perfect for a quick lunch or dinner. Packed with tender ground beef, vibrant bell peppers, and the gentle heat of jalapeño, this dish delivers a delicious combination of savory and spicy flavors. When served over a bed of rice, it becomes a hearty and satisfying meal that’s easy to prepare and enjoy.

The versatility of this recipe makes it a great go-to for busy weeknights. You can easily customize it to suit your preferences by adding different vegetables, adjusting the spice level, or serving it over quinoa or cauliflower rice for a low-carb option.

Why You’ll Love This Recipe:

Quick and Easy: Ready in under 30 minutes, it’s ideal for busy days.

One-Pan Wonder: Minimal cleanup required, as it’s all cooked in one pan.

Customizable: Adjust the spice, veggies, or base to your liking.

Ingredients

For the Beef and Peppers:

• 2 tablespoons butter

• 1 medium onion, diced

• 1 green bell pepper, diced

• 1 red bell pepper, diced

• 1 jalapeño, diced

• 1 pound ground beef

For the Seasoning:

• ½ cup soy sauce (low sodium, optional)

• 1 tablespoon garlic powder

• 1 teaspoon salt

• 2 teaspoons black pepper

Optional:

• Cooked rice, for serving

Instructions

Step 1: Prepare the Vegetables

1. Dice the onion, green bell pepper, red bell pepper, and jalapeño into bite-sized pieces. Adjust the amount of jalapeño based on your preferred spice level.

Step 2: Sauté the Vegetables

1. Heat a large pan over medium heat and melt the butter.

2. Add the diced onion, green bell pepper, red bell pepper, and jalapeño to the pan.

3. Sauté for about 5 minutes, stirring occasionally, until the vegetables start to soften.

Step 3: Cook the Ground Beef

1. Add the ground beef to the pan with the sautéed vegetables.

2. Cook the beef, breaking it up into crumbles with a spoon or spatula, until fully browned and cooked through.

Step 4: Drain Excess Grease

1. Once the beef is cooked and the vegetables are tender, carefully drain any excess grease from the pan. Return the mixture to the heat.

Step 5: Add Seasonings

1. Stir in the soy sauce, garlic powder, salt, and black pepper.

2. Mix well to ensure the beef and vegetables are evenly coated with the seasoning.

Step 6: Serve and Enjoy

1. Serve the beef and pepper mixture hot over cooked rice, if desired.

2. Garnish with fresh herbs or additional black pepper for extra flavor.

Tips

Customize the Veggies: Swap or add vegetables like zucchini, mushrooms, or snap peas for variety.

Control the Spice: Remove the seeds and membranes from the jalapeño for less heat, or add crushed red pepper flakes for extra spice.

Lower the Sodium: Use low-sodium soy sauce or reduce the amount for a lighter dish.

Meal Prep: This recipe stores well, making it perfect for meal prep.

Storage Options

Refrigeration: Store leftovers in an airtight container in the refrigerator for up to 4 days. Reheat in a skillet or microwave before serving.

Freezing: Freeze the cooked beef and pepper mixture in a freezer-safe container for up to 2 months. Thaw overnight in the fridge and reheat before serving.

This Beef and Pepper Rice Bowl is a quick, satisfying meal that combines bold flavors and simple ingredients. Perfect for a weeknight dinner or meal prep, it’s a dish you’ll come back to time and time again!

Cinnamon Sugar Pizza

0

Cinnamon Sugar Pizza is the perfect dessert or sweet treat for any occasion. With a buttery crescent roll crust, a caramelized cinnamon-sugar topping, and a sweet vanilla glaze, this easy recipe delivers all the flavors of a classic cinnamon roll in a fun and shareable pizza form.

Whether you’re looking for a quick dessert to whip up for a family night or a creative twist on a classic breakfast pastry, this Cinnamon Sugar Pizza is guaranteed to satisfy your sweet tooth. The soft, flaky base pairs beautifully with the warm, spiced topping and smooth glaze, making it an irresistible treat for kids and adults alike.

Why You’ll Love This Recipe:

Quick and Easy: Made with store-bought crescent roll dough, it’s ready in under 30 minutes.

Perfect for Sharing: Great for parties, brunches, or dessert cravings.

Customizable: Add your favorite toppings, such as nuts or fruit, to make it your own.

Ingredients

For the Pizza Base:

• 1 (8 oz) tube crescent roll dough

• 2 tablespoons unsalted butter, melted

For the Topping:

• ¼ cup (50g) granulated sugar

• 1 teaspoon ground cinnamon

• 2 tablespoons brown sugar (optional, for extra depth)

For the Glaze:

• ½ cup (60g) powdered sugar

• 1–2 tablespoons milk or heavy cream

• ½ teaspoon vanilla extract

Instructions

Step 1: Preheat the Oven

1. Preheat your oven to 375°F (190°C).

2. Lightly grease a pizza pan or line a baking sheet with parchment paper to prevent sticking.

Step 2: Prepare the Pizza Base

1. Unroll the crescent roll dough onto the prepared pan.

2. Press the seams together gently to form one large, smooth sheet of dough.

Step 3: Add the Topping

1. Brush the melted butter evenly over the entire surface of the dough.

2. In a small bowl, mix the granulated sugar, ground cinnamon, and brown sugar (if using).

3. Sprinkle the cinnamon-sugar mixture evenly over the buttered dough, ensuring complete coverage.

Step 4: Bake the Pizza

1. Place the pan in the preheated oven and bake for 10–12 minutes, or until the crescent roll base is golden brown and the topping is bubbling slightly.

Step 5: Make the Glaze

1. While the pizza bakes, whisk together the powdered sugar, milk (or heavy cream), and vanilla extract in a small bowl until smooth.

2. Adjust the milk or cream to achieve your desired glaze consistency.

Step 6: Finish and Serve

1. Remove the pizza from the oven and let it cool for about 5 minutes.

2. Drizzle the glaze over the pizza using a spoon or piping bag for a decorative touch.

3. Slice into wedges or squares and serve warm for the best taste and texture.

Tips

Sealing the Dough: Make sure to press the seams of the crescent roll dough firmly to prevent gaps.

Extra Toppings: For added crunch, sprinkle chopped nuts like pecans or walnuts on top before baking.

Custom Glaze: Experiment with flavored extracts, such as almond or maple, to customize the glaze.

Serving Suggestion: Pair with a scoop of vanilla ice cream for an extra indulgent dessert.

Storage Options

Refrigeration: Store leftover slices in an airtight container in the refrigerator for up to 2 days. Reheat in the oven at 350°F (175°C) for 5–7 minutes for a fresh-from-the-oven taste.

Freezing: Freeze unglazed slices in a freezer-safe bag for up to 2 months. Thaw in the refrigerator and warm in the oven before adding the glaze.

This Cinnamon Sugar Pizza is a fun and creative way to enjoy the classic flavors of cinnamon rolls with less effort. Perfect for breakfast, brunch, dessert, or an afternoon treat, it’s a recipe you’ll find yourself making again and again!

Avocado Pasta Salad

0

Avocado Pasta Salad is a creamy, refreshing, and vibrant dish that’s perfect for picnics, potlucks, or a quick and wholesome meal. The combination of al dente pasta, fresh vegetables, and a luscious avocado-based dressing creates a salad that’s packed with flavor and nutrition. With its creamy texture and tangy dressing, this salad is a delightful balance of taste and health.

This versatile dish can be customized to your liking by adding or omitting ingredients. Whether you enjoy it as a light main course or a side dish, this salad is a guaranteed crowd-pleaser that’s easy to prepare and perfect for any occasion.

Why You’ll Love This Recipe:

Nutritious and Delicious: Packed with fresh veggies and healthy fats from avocado.

Quick and Easy: Ready in under 30 minutes, making it perfect for busy days.

Customizable: Add your favorite veggies or proteins to make it your own.

Ingredients

For the Salad:

• 8 oz (225g) pasta (rotini, penne, or bowtie work well)

• 1 cup (150g) cherry tomatoes, halved

• 1 cup (150g) cucumber, diced

• 1 avocado, diced

• 1 cup (150g) sweet corn (canned, fresh, or frozen)

• ¼ cup (40g) red onion, finely chopped

• ¼ cup (40g) black olives, sliced (optional)

• ¼ cup (10g) fresh cilantro or parsley, chopped (optional)

For the Dressing:

• 1 large avocado

• 2 tablespoons olive oil

• 2 tablespoons lime or lemon juice

• 1 garlic clove, minced

• 3 tablespoons Greek yogurt or sour cream (optional, for extra creaminess)

• Salt and black pepper, to taste

• ¼ teaspoon chili flakes (optional, for a spicy kick)

Instructions

Step 1: Cook the Pasta

1. Bring a large pot of salted water to a boil.

2. Add the pasta and cook according to package instructions until al dente.

3. Drain the pasta, rinse under cold water to stop the cooking process, and set aside to cool.

Step 2: Make the Dressing

1. In a blender or food processor, combine the large avocado, olive oil, lime juice, minced garlic, Greek yogurt (if using), salt, black pepper, and chili flakes (if using).

2. Blend until smooth and creamy. Taste the dressing and adjust the seasonings to your preference.

Step 3: Assemble the Salad

1. In a large mixing bowl, combine the cooled pasta, cherry tomatoes, cucumber, diced avocado, corn, red onion, and black olives (if using).

2. Pour the avocado dressing over the salad.

3. Toss gently to ensure all ingredients are evenly coated with the dressing.

Step 4: Garnish and Serve

1. Sprinkle fresh cilantro or parsley over the top, if desired, for a pop of color and added flavor.

2. Serve immediately for the freshest taste, or refrigerate for up to 2 hours to let the flavors meld together. Enjoy chilled or at room temperature.

Tips

Prevent Avocado from Browning: Toss the diced avocado with a little lime or lemon juice before adding it to the salad.

Make It Heartier: Add grilled chicken, shrimp, or chickpeas for extra protein.

Customize the Veggies: Bell peppers, shredded carrots, or zucchini are great additions.

Chili Flakes: Adjust the spice level to your taste by increasing or omitting the chili flakes.

Storage Options

Refrigeration: Store leftovers in an airtight container in the refrigerator for up to 2 days. Keep in mind that the avocado dressing may darken slightly, but the flavor will remain delicious.

Meal Prep: Prepare the pasta, chop the vegetables, and make the dressing in advance. Store them separately and assemble just before serving for maximum freshness.

This Avocado Pasta Salad is a creamy, healthy, and satisfying dish that’s perfect for any occasion. It’s a versatile recipe you can customize to your taste, and the creamy avocado dressing adds a rich, tangy touch that makes every bite irresistible!