White Chocolate Caramel Pecan Fudge

0

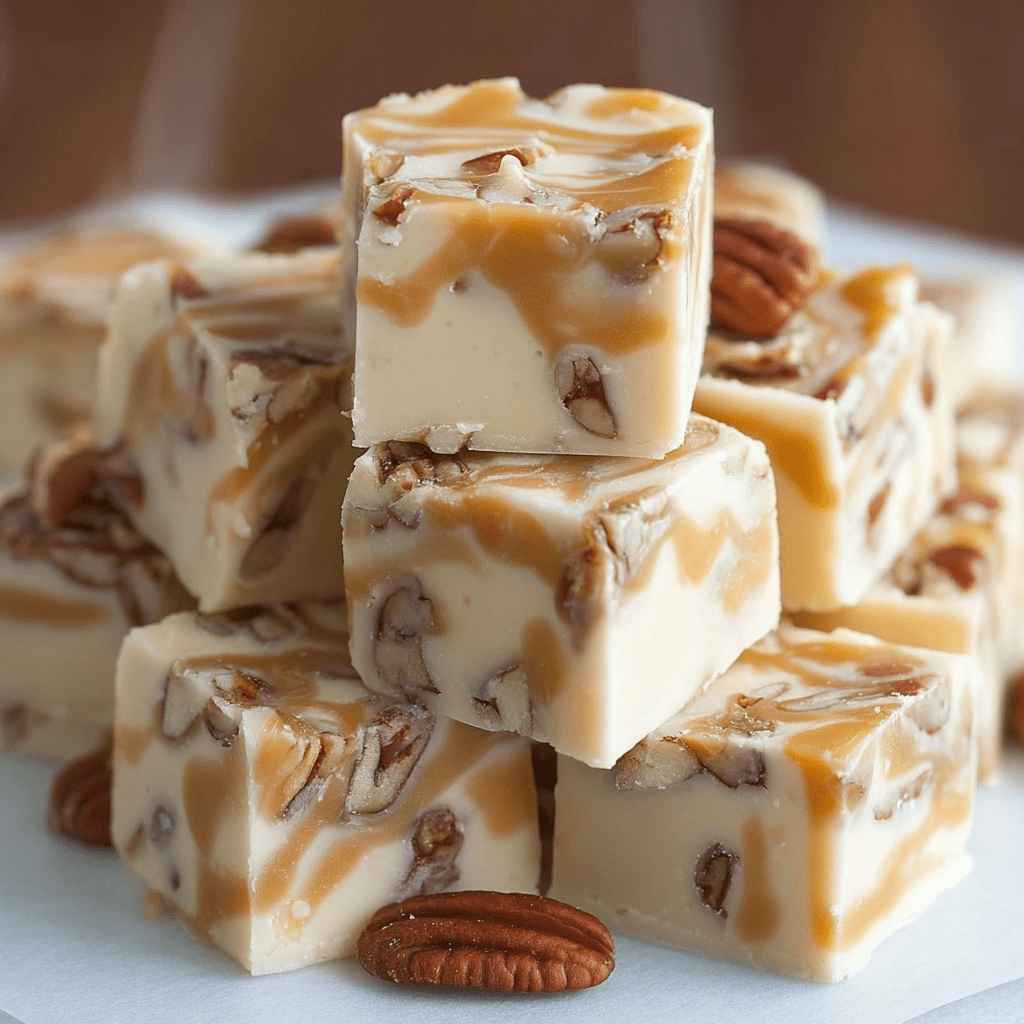
White Chocolate Caramel Pecan Fudge is an decadent and elegant confection that masterfully combines the creamy sweetness of white chocolate with the rich, buttery depth of caramel and the satisfying crunch of toasted pecans. This recipe is a celebration of texture and flavor, offering a luxurious treat that is surprisingly simple to create, requiring no candy thermometer or complex techniques. The foundation is a velvety-smooth fudge base made by gently melting together high-quality white chocolate chips, sweetened condensed milk, and butter. This combination guarantees a perfectly firm yet melt-in-your-mouth consistency that is far superior to traditional, grainier fudge recipes. The incorporation of toasted pecans adds a essential earthy crunch that cuts through the sweetness, while a generous swirl of room-temperature caramel sauce marbled throughout not only introduces a beautiful visual element but also pockets of gooey, rich flavor in every single bite.

The true brilliance of this fudge lies in its foolproof method and its stunning presentation. The microwave melting process ensures the chocolate mixture warms gently and evenly, preventing it from seizing or becoming greasy. The key is patience, stirring thoroughly after each heating interval to rely on the residual heat to finish the melting process. This careful approach results in a flawlessly smooth and glossy base ready to be packed with nuts and swirled with caramel. Once set and sliced, each square is a work of art, with streaks of golden caramel running through the ivory-white fudge, studded with the toasted pecans. This White Chocolate Caramel Pecan Fudge is more than just a candy; it’s a sophisticated homemade gift, a show-stopping addition to any holiday cookie tray, or a special indulgence that promises to deliver pure, unadulterated delight.

Why You’ll Love This Recipe:

  • Foolproof and No-Fail: The microwave method is incredibly simple and virtually impossible to mess up, making perfect fudge accessible to every home cook.
  • Luxurious Texture and Flavor: Enjoy the perfect balance of creamy, crunchy, and chewy in every bite, with a rich flavor profile that is sweet but not cloying.
  • Stunning Presentation: The marbled caramel and studded pecans make this fudge look like it came from a high-end confectionery.
  • Perfect for Gifting: This fudge packages beautifully and makes a thoughtful, impressive homemade gift for friends, neighbors, teachers, and hosts.

Ingredients:

  • 3 cups high-quality white chocolate chips
  • 1 (14 oz) can sweetened condensed milk
  • 4 tablespoons (1/2 stick) unsalted butter, cut into pieces
  • ½ teaspoon pure vanilla extract
  • 1 cup pecans, chopped and toasted
  • ½ cup thick caramel sauce or dulce de leche, at room temperature

Instructions:

Step 1: Prepare the Pan
Line an 8×8 or 9×9 inch baking pan with parchment paper, leaving an overhang on two opposite sides. This will act as a sling to easily lift the set fudge out for slicing.

Step 2: Melt the Fudge Base
In a large, microwave-safe bowl, combine the white chocolate chips, sweetened condensed milk, and butter. Microwave on high power for 60 seconds. Remove and stir well. Return to the microwave and heat in additional 20-second intervals, stirring vigorously after each interval, until the mixture is completely smooth and the chocolate has melted.

Step 3: Incorporate Flavors and Nuts
Stir the vanilla extract and the toasted, chopped pecans into the melted fudge base until they are evenly distributed throughout.

Step 4: Transfer and Spread
Pour the fudge mixture into the prepared parchment-lined pan. Use a spatula sprayed lightly with non-stick spray to spread it into a smooth, even layer.

Step 5: Swirl the Caramel
Drizzle the room-temperature caramel sauce in lines across the top of the fudge. Using the tip of a knife or a toothpick, gently swirl the caramel into the fudge to create a beautiful marbled effect. Be careful not to over-mix.

Step 6: Chill Until Firm
Refrigerate the fudge, uncovered, for at least 3-4 hours, or until it is completely firm to the touch.

Step 7: Slice and Serve
Using the parchment paper overhang, lift the entire block of fudge out of the pan. Place it on a cutting board and use a sharp knife to slice it into 1-inch squares. For clean cuts, wipe the knife blade clean between slices.

Tips:

  • Use High-Quality White Chocolate: The flavor of the fudge hinges on the quality of the chocolate. A good brand of chocolate chips or a chopped white chocolate bar will yield the best results.
  • Toast Your Pecans: Toasting the pecans in a dry skillet or a 350°F (175°C) oven for 5-7 minutes until fragrant dramatically enhances their nutty flavor and crunch.
  • Ensure Caramel is Pourable: The caramel sauce must be at room temperature and of a pourable consistency. If it’s too thick, warm it very briefly for a few seconds in the microwave.
  • Don’t Overheat the Chocolate: White chocolate is delicate and can scorch or seize easily. Heat it gently and rely on stirring to melt it completely with the residual heat.

Storage Options:

  • Refrigerator: Store the fudge in an airtight container in the refrigerator for up to 2 weeks. It is best served cool.
  • Freezer: This fudge freezes exceptionally well. Layer the squares between sheets of parchment paper in an airtight container and freeze for up to 3 months. Thaw in the refrigerator before serving.
  • Room Temperature: For serving, it can sit out at room temperature for 1-2 hours.

Amish Onion Fritters

0

Amish Onion Fritters are a humble yet spectacularly satisfying treat, a testament to the Amish tradition of creating deeply comforting and flavorful food from simple, pantry-staple ingredients. These fritters are the savory, grown-up answer to apple fritters, transforming the humble onion into a golden, crispy, and irresistibly delicious morsel. The batter is a straightforward blend of flour, a touch of sugar for balance, and the crucial addition of cornmeal, which provides a subtle grit and robust texture that sets them apart from other fritters. When mixed with milk and packed with a generous amount of sweet, chopped white onions, the batter transforms into a thick, scoopable mixture that fries up with a craggy, golden-brown exterior. The magic happens in the hot oil, where the baking powder works to create a light, airy interior that contrasts perfectly with the crisp shell and the soft, sweet, and savory strands of cooked onion within.

The true brilliance of this recipe lies in its simplicity and the profound flavor achieved with so few components. The onions are the undisputed star, their natural sugars caramelizing slightly in the hot oil, mellowing their sharp bite and releasing a wonderful sweetness that is perfectly seasoned with just salt and pepper. Unlike more complex batters, this one comes together in minutes and requires no resting, making these fritters an ideal last-minute side dish, a unique appetizer, or a satisfying snack. Served straight from the skillet while they are still piping hot, Amish Onion Fritters offer a delightful crunch that gives way to a tender, flavorful center. They are a beautiful example of how rustic, homestyle cooking can often produce the most memorable and crave-worthy dishes.

Why You’ll Love This Recipe:

  • Savory and Satisfying: These fritters offer a perfect balance of sweet, savory, and salty flavors with an incredibly appealing crispy-on-the-outside, tender-on-the-inside texture.
  • Incredibly Simple and Quick: With just a few basic ingredients and one bowl, you can have these fritters ready to eat in under 20 minutes.
  • Versatile Side or Snack: They are a fantastic accompaniment to soups and stews, a great burger topper, or a delicious standalone snack with a dipping sauce.
  • Crowd-Pleasing Appetizer: Serve them hot with ranch dressing, sour cream, or a spicy aioli for a unique and addictive party food that will disappear quickly.

Ingredients:

  • 2/3 cup all-purpose flour
  • 1 tablespoon granulated sugar
  • 1 tablespoon cornmeal
  • 2 teaspoons baking powder
  • 1/2 teaspoon kosher salt, plus more for seasoning
  • 1/4 teaspoon freshly ground black pepper, plus more for seasoning
  • 2/3 cup whole milk
  • 2 cups finely chopped white onions (about 1 large onion)
  • Vegetable or canola oil, for frying

Instructions:

Step 1: Make the Batter
In a medium mixing bowl, whisk together the all-purpose flour, granulated sugar, cornmeal, baking powder, salt, and pepper. Gradually pour in the milk while whisking, and continue to whisk until you have a smooth, thick batter.

Step 2: Add the Onions
Add the finely chopped onions to the batter. Use a spatula to fold them in until the onions are evenly coated throughout the batter.

Step 3: Heat the Oil
Pour oil into a heavy-bottomed skillet (like cast iron) to a depth of about 1/2 inch. Heat over medium-high heat until the oil reaches 365-375°F (185-190°C). Using a thermometer is highly recommended for perfect results.

Step 4: Fry the Fritters
Once the oil is hot, carefully drop heaping tablespoons of the onion batter into the oil. Do not overcrowd the skillet. Use the back of the spoon to gently flatten each fritter slightly. Fry for 2-3 minutes per side, flipping once, until they are a deep golden brown and crisp.

Step 5: Drain and Season
Use a slotted spoon or spider strainer to transfer the fried fritters to a plate or baking sheet lined with paper towels to drain any excess oil. While they are still hot, sprinkle them with an additional pinch of salt.

Step 6: Serve Immediately
Serve the fritters hot and fresh from the skillet for the best texture and flavor.

Tips:

  • Chop, Don’t Slice: Finely chopping the onions (about 1/4-inch pieces) ensures they cook through and integrate well into the fritter, rather than remaining in long, stringy pieces that can pull out.
  • Maintain Oil Temperature: The key to a crisp, non-greasy fritter is maintaining the correct oil temperature. If the oil is too cool, the fritters will absorb oil and be greasy. If it’s too hot, the outside will burn before the inside is cooked.
  • Don’t Overcrowd the Pan: Frying in batches is essential. Adding too many fritters at once will cause the oil temperature to drop dramatically.
  • Experiment with Dipping Sauces: While delicious on their own, these fritters are elevated with a dip. Try them with ranch dressing, honey mustard, or a spicy sriracha mayo.

Storage Options:

  • Best Served Immediately: Amish Onion Fritters are at their absolute peak when served straight from the fryer.
  • Refrigerator: Store leftover fritters in an airtight container in the refrigerator for up to 2 days.
  • Reheating: To recrisp, reheat leftovers in an air fryer at 375°F (190°C) for 3-4 minutes or in a conventional oven at 400°F (200°C) for 5-8 minutes. Microwaving will make them soft.
  • Freezing: It is not recommended to freeze these fritters, as the texture will become soggy upon thawing and reheating.

Strawberry Crackle Salad

0

Strawberry Crackle Salad is a legendary dessert that defies simple categorization, a breathtakingly delicious concoction that masterfully combines sweet, salty, creamy, and crunchy elements into a show-stopping dish that is as fun to eat as it is to name. This recipe is a study in brilliant contrasts, built upon a foundation of a no-bake, fluffy cream cheese and whipped topping base that is impossibly light and sweet. Into this cloud-like canvas, ripe, juicy sliced strawberries are folded, providing a burst of fresh, tart fruitiness that cuts through the richness. However, the true star and the source of the “crackle” is the phenomenal baked pretzel and pecan crunch. A mixture of crushed pretzels, chopped pecans, and brown sugar is bound with melted butter and baked until caramelized, creating clusters that are at once salty, sweet, buttery, and addictively crisp. When this crunch is layered with the creamy strawberry filling, it creates a textural symphony that is utterly irresistible and keeps you coming back for another bite.

The genius of this dessert salad lies in its perfect balance and its make-ahead flexibility. Unlike a traditional salad, this is a dessert through and through, but its name hints at the playful, unexpected combination of ingredients. The preparation is straightforward and divided into components that can be made in advance: the crunch can be baked and stored in an airtight container, and the creamy base can be whipped up and kept in the fridge. The final assembly is a quick affair, best done just before serving to preserve the legendary contrast between the cool, creamy filling and the crisp, buttery topping. Strawberry Crackle Salad is a guaranteed crowd-pleaser at potlucks, summer barbecues, and holiday gatherings, a dish that consistently draws requests for the recipe and disappears from the table faster than almost any other.

Why You’ll Love This Recipe:

  • The Ultimate Flavor and Texture Experience: Enjoy the perfect harmony of sweet, salty, creamy, and crunchy in every single spoonful.
  • No-Base Dessert: Unlike many layered desserts, this one has no cake or crust to bake, making the process quicker and the result lighter.
  • Perfect for a Crowd: This recipe yields a large portion and is a guaranteed hit at any gathering, from casual picnics to formal holiday meals.
  • Make-Ahead Components: Both the creamy filling and the pretzel crunch can be prepared ahead of time, making final assembly a breeze.

Ingredients:

For the Pretzel Pecan Crunch:

  • 2 cups pretzels, finely crushed
  • 1 cup chopped pecans
  • 1 cup packed light brown sugar
  • 1 cup (2 sticks) unsalted butter, melted

For the Creamy Filling:

  • 2 (8 oz) packages cream cheese, softened to room temperature
  • ¾ cup granulated sugar
  • 2 teaspoons vanilla extract
  • 1 (16 oz) container frozen whipped topping (like Cool Whip), thawed

For the Fruit & Assembly:

  • 4 cups fresh strawberries, hulled and sliced

Instructions:

Step 1: Create the Pretzel Pecan Crunch
Preheat your oven to 400°F (200°C). Line a large, rimmed baking sheet with parchment paper. In a medium bowl, combine the crushed pretzels, chopped pecans, and brown sugar. Pour the melted butter over the mixture and stir until everything is evenly coated. Spread the mixture out in a thin, even layer on the prepared baking sheet.

Step 2: Bake and Cool the Crunch
Bake for 8-10 minutes, until the mixture is bubbling and appears set. Remove from the oven and let it cool completely on the baking sheet. As it cools, it will harden. Once cool, break the baked sheet into small, bite-sized pieces and clusters.

Step 3: Prepare the Creamy Base
In a large mixing bowl, use an electric mixer to beat the softened cream cheese, granulated sugar, and vanilla extract on medium speed until the mixture is completely smooth and free of lumps. Using a spatula, gently fold in the thawed whipped topping until the mixture is uniform and no white streaks remain. Cover the bowl and refrigerate the creamy base until you are ready to assemble the salad, or for at least 30 minutes.

Step 4: Assemble the Salad
Just before serving, remove the creamy base from the refrigerator. Gently fold in the sliced fresh strawberries and about half of the pretzel pecan crunch mixture until they are evenly distributed.

Step 5: Serve Immediately
Transfer the salad to a serving bowl. Sprinkle the remaining pretzel pecan crunch generously over the top. Serve immediately to enjoy the full contrast of the crisp topping against the cool, creamy filling.

Tips:

  • Ensure Cream Cheese is Soft: Using truly room-temperature cream cheese is the most critical step for achieving a silky-smooth base without any lumps.
  • Don’t Skip the Parchment Paper: Lining the baking sheet is essential. The sugar and butter mixture is incredibly sticky and will be nearly impossible to remove without it.
  • Cool the Crunch Completely: The pretzel crunch must be completely cool and crisp before being added to the creamy filling. If it’s even slightly warm, it will become soggy.
  • Assemble at the Last Minute: For the best texture, assemble the salad no more than 30 minutes before serving. The pretzel crunch will begin to soften the longer it sits in the creamy mixture.

Storage Options:

  • Component Storage: Store the completely cooled pretzel crunch in an airtight container at room temperature for up to 3 days. The creamy base (without strawberries) can be stored covered in the refrigerator for up to 2 days.
  • Leftovers: Store any assembled leftovers in an airtight container in the refrigerator. Be aware that the pretzel crunch will soften significantly but will still be delicious. It is best enjoyed within 24 hours.
  • Freezing: Freezing is not recommended, as the texture of the creamy filling and the pretzel crunch will be compromised upon thawing.

Mexican Pizza

0

The Mexican Pizza is a spectacular fusion of Tex-Mex flavors and the universally loved pizza format, creating a handheld masterpiece that is infinitely more exciting than a standard taco. This recipe masterfully layers textures and tastes, beginning with a foundation of crisp-fried corn tortillas that provide a sturdy, crunchy base reminiscent of a tostada. The first layer is a smear of warm, creamy refried beans, which acts as a savory “glue” and flavor anchor. On top of this rests a hearty, aromatic filling of ground beef, sautéed onions, and bold taco seasoning, simmered until perfectly spiced and moist. The assembly is then crowned with a second crispy tortilla, creating a distinct “crust” and “sauce” structure, and finished with a generous blanket of melted cheddar and Monterey Jack cheese and a confetti of fresh, vibrant toppings. The final bake in a hot oven gently melts the cheese, warms the layers through, and bonds everything into a cohesive, sliceable pizza that delivers an unforgettable crunch with every bite.

The true genius of this dish lies in its customizable nature and its perfect balance of rich and fresh elements. While the base of beans, beef, and cheese provides deep, comforting savoriness, the final toppings of cool grape tomatoes, spicy jalapeño slices, briny black olives, and sharp green onions introduce bursts of freshness, acidity, and heat that cut through the richness. This method of frying the tortillas separately ensures they remain shatteringly crisp, avoiding the sogginess that can plague other layered tortilla bakes. The Mexican Pizza is a fun, interactive meal that allows everyone to build their own masterpiece, making it a fantastic choice for a family dinner or a casual gathering with friends. It’s a celebratory dish that takes the familiar and presents it in a new, irresistibly delicious form.

Why You’ll Love This Recipe:

  • Incredible Textural Contrast: Experience the perfect combination of a crispy fried tortilla crust, a creamy bean layer, savory beef, melted cheese, and fresh, crisp toppings.
  • Fun and Customizable: This recipe is a canvas for your favorite toppings. Add guacamole, sour cream, pickled onions, or different salsas after baking to make it your own.
  • A Crowd-Pleasing Showstopper: Its unique layered appearance and delicious flavor make it a guaranteed hit for game day, parties, or a fun family night.
  • Better Than Takeout: Recreate a beloved restaurant-style favorite at home with fresh, high-quality ingredients tailored to your taste.

Ingredients:

  • 12 (6-inch) corn tortillas
  • Canola or vegetable oil, for frying
  • 1 lb ground beef (80/20 works well)
  • ½ medium onion, finely chopped
  • 3 tablespoons taco seasoning
  • ¾ cup water
  • 1 (16-ounce) can refried beans
  • ¾ cup finely shredded cheddar cheese
  • ¾ cup finely shredded Monterey Jack cheese
  • 6 grape tomatoes, thinly sliced
  • 1 small jalapeño, thinly sliced (seeds removed for less heat)
  • ⅓ cup sliced black olives
  • 1 green onion, finely chopped

Instructions:

Step 1: Fry the Tortilla “Crusts”
In a Dutch oven or heavy-bottomed skillet, heat about ½ inch of oil over medium-high heat to 350-375°F (175-190°C). Working one at a time, carefully fry the corn tortillas for about 1 minute total, flipping halfway through, until they are golden brown and crisp. Remove with tongs and drain on a wire rack set over a paper towel-lined baking sheet. This keeps them crispy.

Step 2: Prepare the Beef Filling
While the tortillas fry, brown the ground beef in a large skillet over medium-high heat, breaking it up as it cooks. Halfway through, add the finely chopped onion and continue cooking until the beef is browned and the onion is soft. Drain any excess grease. Stir in the taco seasoning and ¾ cup of water. Bring to a simmer, reduce heat, and cook for 8-10 minutes, stirring occasionally, until the liquid has mostly reduced.

Step 3: Warm the Refried Beans
In a small saucepan, warm the refried beans over low heat, stirring occasionally, until they are soft and spreadable. If they seem too thick, you can add a tablespoon or two of water to loosen them.

Step 4: Assemble the Pizzas
Preheat your oven to 400°F (200°C). Line two baking sheets with parchment paper. Place 6 of the crispy tortillas on the baking sheets. Spread a generous, even layer of warm refried beans over each tortilla. Divide the seasoned ground beef mixture evenly over the beans. Sprinkle half of the combined cheddar and Monterey Jack cheeses over the beef. Carefully top each one with a second crispy tortilla to create the “pizza” structure.

Step 5: Add Toppings and Bake
Sprinkle the remaining cheese over the tops of the pizzas. Arrange the sliced tomatoes, jalapeño, and black olives over the cheese. Bake for 7-10 minutes, or until the cheese is completely melted and bubbly.

Step 6: Garnish and Serve
Remove the pizzas from the oven and let them cool for 1-2 minutes to set. Sprinkle with the chopped green onion before slicing each pizza into quarters with a sharp pizza cutter or knife. Serve immediately.

Tips:

  • Keep Tortillas Crispy: Frying the tortillas is key. Baking them will not yield the same sturdy, crisp texture needed to support the layers without getting soggy.
  • Customize the Protein: Ground turkey, chicken, or a plant-based ground meat alternative can be used in place of the ground beef.
  • Warm the Beans: Using warm refried beans makes them much easier to spread evenly without tearing the delicate fried tortillas.
  • Topping Bar: For a party, set up a topping bar with bowls of salsa, sour cream, guacamole, and pickled jalapeños so guests can customize their own slice after baking.

Storage Options:

  • Assemble Ahead: You can assemble the pizzas (up to the point of baking) a few hours in advance. Keep them covered in the refrigerator until ready to bake. You may need to add 1-2 minutes to the baking time.
  • Leftovers: Store leftover baked pizzas in an airtight container in the refrigerator for up to 2 days. Reheat in a toaster oven or conventional oven at 375°F (190°C) for 5-8 minutes to re-crisp the tortilla. Microwaving will make them soft.
  • Freezing: It is not recommended to freeze the assembled pizzas, as the fried tortillas will lose their texture upon thawing and reheating.

Cowboy Soup

0

Cowboy Soup is the epitome of hearty, homestyle comfort in a bowl, a robust and generously loaded dish that is designed to satisfy even the biggest appetites. This recipe is a masterful fusion of classic chili and rich, cheesy potato soup, creating a one-pot meal that is both deeply flavorful and incredibly nourishing. The foundation is built with lean ground beef, browned to savory perfection, and a colorful array of vegetables including tender potatoes, sweet corn, and hearty black beans. What truly sets this soup apart is its luxuriously creamy and cheesy base, achieved by first creating a simple roux-thickened milk mixture and then melting in a combination of velvety Velveeta for unparalleled creaminess and sharp cheddar for a bold, tangy depth. The subtle kick from green chiles and a warm hint of cumin tie all the elements together, resulting in a soup that is complex, comforting, and utterly irresistible.

The brilliance of this dish lies in its methodical, layered approach to building flavor. By starting with a roux, you guarantee a perfectly thickened, non-grainy base that prevents the soup from becoming watery. Cooking the onions, potatoes, and bell peppers in the rendered beef fat infuses them with a rich, savory foundation before the broth is even added. The final simmer allows the potatoes to become tender and all the flavors to meld into a cohesive and comforting whole. Topped with a final sprinkle of crispy bacon bits and extra cheese, this Cowboy Soup is a complete meal that requires little more than a slice of crusty bread for dipping. It’s a reliable, crowd-pleasing recipe perfect for a chilly evening, a family gathering, or any time you need a bowl of unwavering, cheesy comfort.

Why You’ll Love This Recipe:

  • The Ultimate Comfort Food: Packed with beef, potatoes, beans, and a rich, cheesy broth, this soup is the definition of hearty and satisfying.
  • Feeds a Crowd: This recipe makes a large pot of soup, making it perfect for family dinners, potlucks, or for having leftovers throughout the week.
  • One-Pot Wonder: While it uses an extra saucepan for the roux, the main cooking happens in a single Dutch oven or stockpot, making cleanup manageable.
  • Customizable Heat: The level of spice is easily controlled by the amount of cayenne pepper and the type of green chiles used, allowing you to tailor it to your preference.

Ingredients:

  • 1 pound lean ground beef
  • 1 yellow onion, finely chopped
  • 4 small potatoes (Yukon Gold or Russet), chopped into ½-inch cubes
  • 1 red bell pepper, diced
  • 1 (13.25 oz) can corn kernels, rinsed and drained
  • 1 (13.25 oz) can black beans, rinsed and drained
  • 1 (4 oz) can diced green chiles
  • 3 cups low-sodium chicken or beef broth
  • 2.5 cups whole milk
  • ¼ cup all-purpose flour
  • ¼ cup unsalted butter
  • 16 oz Velveeta, cubed
  • 1 cup sharp cheddar cheese, grated, divided
  • 1 teaspoon garlic powder
  • 1 teaspoon ground cumin
  • ½ teaspoon cayenne pepper (optional)
  • Kosher salt and black pepper, to taste
  • Bacon bits and sliced green onions, for garnish (optional)

Instructions:

Step 1: Prepare the Roux Base
In a medium saucepan, melt the ¼ cup of butter over medium-high heat. Whisk in the ¼ cup of flour and cook, whisking constantly, for 2-3 minutes until the mixture is bubbly and light golden in color. This is called a “blond roux.” Gradually whisk in the 2.5 cups of milk until the mixture is smooth. Bring to a gentle simmer, stirring constantly, until it thickens slightly. Season with a pinch of salt and pepper, then remove from heat, cover, and set aside. (Refrigerating is not necessary if you will be using it within 30 minutes).

Step 2: Brown the Beef
In a large Dutch oven or stockpot, cook the ground beef over medium-high heat, breaking it up with a spoon, until it is no longer pink. Season with 1 teaspoon of garlic powder, and salt and pepper to taste. Drain off any excess fat, leaving about 2 tablespoons in the pot for cooking the vegetables.

Step 3: Sauté the Vegetables
Add the chopped onion, potatoes, and red bell pepper to the pot with the beef drippings. Cook for 10-12 minutes, stirring occasionally, until the onions are softened and the potatoes have started to soften at the edges. Season the vegetables with 1 teaspoon of cumin, the optional ½ teaspoon of cayenne, and more salt and pepper.

Step 4: Build the Soup
Add the drained corn, black beans, and the entire can of green chiles (undrained) to the pot. Return the browned ground beef to the pot as well. Pour in the 3 cups of broth and stir to combine. Bring the soup to a boil, then reduce the heat to low, cover, and let it simmer for 15 minutes, or until the potatoes are fork-tender.

Step 5: Add Cream and Cheese
Stir the prepared milk and roux mixture (the white sauce) into the soup. Add the cubed Velveeta and half of the shredded sharp cheddar cheese. Stir continuously over low heat until all the cheese is completely melted and the soup is thick and creamy. Let it simmer gently, uncovered, for another 5-10 minutes to allow the flavors to fully combine.

Step 6: Serve and Garnish
Ladle the hot soup into bowls. Top with the remaining shredded cheddar cheese, crispy bacon bits, and sliced green onions, if desired. Serve immediately.

Tips:

  • Cube Potatoes Evenly: Cutting the potatoes into uniform ½-inch cubes ensures they all cook at the same rate and become perfectly tender.
  • Don’t Boil After Adding Cheese: Once the Velveeta and cheddar are added, keep the heat low and avoid boiling the soup, as high heat can cause the cheese to break and become greasy or grainy.
  • Adjust Consistency: If the soup is too thick for your liking after adding the cheese, thin it out with a little extra broth or milk until it reaches your desired consistency.
  • Make it Your Own: Feel free to add other vegetables like diced carrots or celery. For a smokier flavor, you can use a can of fire-roasted diced tomatoes in place of the red bell pepper.

Storage Options:

  • Refrigerator: Store cooled soup in an airtight container in the refrigerator for up to 4 days.
  • Reheating: Reheat gently on the stovetop over low heat, stirring frequently. You may need to add a splash of broth or milk when reheating as the soup will continue to thicken upon standing.
  • Freezing: Freezing is not highly recommended due to the dairy and potato content, which can become grainy and soft upon thawing. If you must freeze, expect a change in texture.

Moroccan Beet Salad

0

Moroccan Beet Salad is a vibrant and aromatic dish that beautifully showcases the art of North African flavor balancing, transforming the humble, earthy beet into a refreshingly bright and complex salad. This recipe celebrates the natural sweetness of fresh beets by pairing them with a dressing that is both warm and zesty, featuring the quintessential spices of Moroccan cuisine: earthy cumin and subtly sweet cinnamon. The method of grating the raw beets is a stroke of genius, creating a delicate, slaw-like texture that allows them to readily absorb the lemony dressing while retaining a satisfying, crisp-tender bite. The addition of a generous amount of fresh mint and parsley introduces a layer of cooling, herbaceous freshness that cuts through the richness of the beets and spices, creating a wonderfully balanced palate. The optional, but highly recommended, garnishes of salty, tangy feta cheese and crunchy, toasted walnuts provide the final textural and flavor contrasts that elevate this simple salad into an extraordinary culinary experience.

The true brilliance of this salad lies in its versatility and healthful simplicity. It is a perfect make-ahead dish, as the flavors meld and deepen beautifully when allowed to rest for an hour or more before serving. It stands proudly as a vibrant side dish alongside grilled meats like lamb or chicken, can be stuffed into a pita for a hearty vegetarian lunch, or served as part of a mezze platter. Unlike many salads that wilt, the sturdy nature of the grated beets ensures it remains crisp and refreshing for hours. Moroccan Beet Salad is more than just a side; it’s a colorful, nutrient-dense, and explosively flavorful dish that is as pleasing to the eye as it is to the palate, offering a delightful and healthy taste of Moroccan tradition.

Why You’ll Love This Recipe:

  • Explosion of Fresh Flavors: The combination of sweet beets, zesty lemon, warm spices, and fresh herbs creates a uniquely bright and complex taste profile.
  • Vibrant and Beautiful: The deep magenta color of the beets makes this salad a stunning addition to any table.
  • Excellent Make-Ahead Dish: The flavor improves as it chills, making it perfect for preparing in advance for parties, picnics, or weekly meal prep.
  • Healthy and Nutrient-Packed: Beets are a fantastic source of fiber, folate, and vitamins, making this a delicious way to eat well.

Ingredients:

  • 4 medium raw beets, peeled and finely grated
  • 2 tablespoons extra virgin olive oil
  • 2 tablespoons fresh lemon juice
  • 1 teaspoon ground cumin
  • ½ teaspoon ground cinnamon
  • ¼ cup fresh mint, finely chopped
  • ¼ cup fresh parsley, finely chopped
  • Salt and freshly ground black pepper, to taste
  • ¼ cup crumbled feta cheese (optional)
  • ¼ cup walnuts, chopped and lightly toasted (optional)

Instructions:

Step 1: Prepare the Beets
Peel the raw beets. Using the grater attachment on a food processor or a box grater, carefully grate the beets into a large mixing bowl. (Wearing disposable gloves is recommended to prevent staining your hands.)

Step 2: Make the Spiced Dressing
In a small bowl or jar, whisk together the extra virgin olive oil, fresh lemon juice, ground cumin, and ground cinnamon until well combined and emulsified.

Step 3: Dress the Beets
Pour the dressing over the grated beets. Using a fork or your hands (with gloves), toss very thoroughly until every strand of beet is evenly coated in the spiced dressing.

Step 4: Add Fresh Herbs
Add the finely chopped fresh mint and parsley to the bowl. Toss again to distribute the herbs evenly throughout the salad.

Step 5: Season and Marinate
Season the salad with salt and a generous amount of freshly ground black pepper to taste. For the best flavor, cover the bowl and allow the salad to marinate in the refrigerator for at least 30 minutes, or up to 4 hours.

Step 6: Garnish and Serve
Just before serving, give the salad a final toss. Transfer it to a serving platter and sprinkle the top with the crumbled feta cheese and toasted walnuts, if using. Serve chilled or at room temperature.

Tips:

  • Use a Food Processor: Grating the beets by hand can be messy and time-consuming. A food processor with a grating disk makes this step incredibly quick and easy.
  • Protect Your Hands: Raw beet juice can stain your skin and cutting boards. Wearing gloves and working on a protected surface is highly recommended.
  • Toast the Walnuts: Toasting the walnuts in a dry skillet for a few minutes until fragrant dramatically enhances their nutty flavor and adds a better crunch.
  • Taste and Adjust: After marinating, taste the salad again. You may want to add an extra squeeze of lemon juice or a pinch of salt to brighten the flavors just before serving.

Storage Options:

  • Refrigerator: Store the salad in an airtight container in the refrigerator for up to 3-4 days. The color will bleed slightly, but the flavor will remain excellent.
  • Make-Ahead: This salad is an ideal make-ahead dish. Prepare it (without the feta and walnut garnish) up to a day in advance. Add the garnishes right before serving to maintain their texture.
  • Freezing: Freezing is not recommended, as the texture of the raw beets will become unpleasantly watery upon thawing.

Buckeye Dip

0

Buckeye Dip is the ultimate no-bake, crowd-pleasing dessert that masterfully captures the iconic flavor of the classic Buckeye candy in a creamy, scoopable, and irresistibly fun form. This recipe is a celebration of simplicity, requiring just a handful of ingredients and minimal effort to create a dessert that is guaranteed to be the star of any party, potluck, or game-day spread. The magic begins with a rich and velvety base of sweetened cream cheese and creamy peanut butter, beaten together until perfectly smooth and fluffy. This decadent foundation is then lightened with the gentle folding of whipped topping, which introduces an airy, mousse-like texture that makes the dip incredibly easy to scoop. The final, signature touch is a glossy, firm layer of Magic Shell chocolate topping, which hardens into a thin, crackable crust that perfectly mimics the chocolate coating of a traditional Buckeye, providing a delightful textural contrast to the creamy peanut butter bliss beneath.

The true genius of this dessert lies in its versatility and foolproof nature. It can be prepared well in advance, making it an ideal make-ahead treat that only gets better after chilling, allowing the flavors to meld and the chocolate top to set to a perfect snap. Unlike many dips that can be overly sweet, the prominent salty-sweet flavor of the peanut butter provides a balanced richness that is perfectly complemented by the variety of dippers. Salty pretzel rods offer a classic sweet-and-salty combination, graham crackers or vanilla wafers provide a neutral, crunchy vehicle, and even sliced apples or bananas can add a fresh, fruity contrast. Buckeye Dip is more than just a dessert; it’s an interactive, customizable, and universally beloved treat that brings the comforting, familiar taste of peanut butter and chocolate together in a uniquely shareable way.

Why You’ll Love This Recipe:

  • No-Bake Ease: With zero cooking required and just a few minutes of mixing, this is the simplest path to an impressive and delicious dessert.
  • The Iconic Buckeye Flavor: It delivers the perfect, beloved combination of creamy peanut butter and rich chocolate in every single scoop.
  • Perfect Make-Ahead Dessert: It needs time to chill, making it an excellent do-ahead option for parties that relieves last-minute stress.
  • Crowd-Pleasing Fun: Its interactive, dippable format is a guaranteed hit with both kids and adults at any gathering.

Ingredients:

  • 2 (8 oz) blocks cream cheese, fully softened to room temperature
  • 1 ½ cups powdered sugar
  • 1 ½ cups creamy peanut butter
  • 2 teaspoons vanilla extract
  • 1 (8 oz) container frozen whipped topping (like Cool Whip), thawed
  • 1 ½ cups mini chocolate chips
  • 1 (7 oz) bottle Magic Shell chocolate topping
  • For serving: pretzel rods, vanilla wafers, graham crackers, apple slices, banana chips

Instructions:

Step 1: Cream the Base
In a large mixing bowl, use an electric mixer on medium speed to beat the softened cream cheese and powdered sugar together until the mixture is completely smooth, light, and fluffy. Scrape down the sides of the bowl as needed to ensure everything is incorporated.

Step 2: Incorporate Peanut Butter
Add the creamy peanut butter and vanilla extract to the bowl. Beat again on medium speed until all ingredients are fully combined and the mixture is uniform and smooth.

Step 3: Lighten the Dip
Using a spatula, gently fold the thawed whipped topping into the peanut butter mixture. Use a folding motion to maintain as much air as possible until no white streaks remain. Then, gently fold in the mini chocolate chips.

Step 4: Transfer and Smooth
Spoon the dip into a 9-inch pie plate, an 8×8-inch baking dish, or a similar serving dish. Use the spatula to smooth the top into a flat, even layer.

Step 5: Create the Chocolate Shell
Shake the bottle of Magic Shell well. Slowly pour the entire contents over the center of the dip. Using the back of a spoon, gently guide the chocolate to the edges to create a smooth, even layer that completely covers the peanut butter layer.

Step 6: Chill to Set
Place the dish in the refrigerator and chill for at least 30-40 minutes, or until the Magic Shell topping is completely firm and set.

Step 7: Serve and Enjoy
Remove the dip from the refrigerator. Provide an assortment of dippers like pretzel rods, vanilla wafers, and apple slices for scooping. To serve, simply press a dipper through the chocolate shell to scoop up the creamy peanut butter dip.

Tips:

  • Ensure Cream Cheese is Soft: Using truly room-temperature cream cheese is the most important step for a smooth, lump-free dip. If it’s even slightly cold, it will create lumps.
  • Fold, Don’t Stir: When incorporating the whipped topping, be gentle. Folding preserves the airy texture, while stirring will deflate it and make the dip denser.
  • Magic Shell is Key: Do not substitute with regular chocolate syrup or melted chocolate chips, as they will not harden. The Magic Shell is essential for the signature “crackable” top.
  • Customize Your Add-Ins: For a different texture, you can use Reese’s Pieces or chopped Reese’s peanut butter cups in place of the mini chocolate chips.

Storage Options:

  • Refrigerator: Store any leftovers covered tightly with plastic wrap in the refrigerator for up to 5 days. The chocolate shell may soften slightly but will re-firm upon chilling.
  • Freezing: Freezing is not recommended, as the texture of the cream cheese and whipped topping will become watery and grainy upon thawing.

One-Pot Creamy Parmesan Pasta

0

One-Pot Creamy Parmesan Pasta is a revelation in weeknight cooking, a brilliantly simple recipe that delivers the rich, satisfying flavor of a restaurant-quality Alfredo sauce with unparalleled ease and a fraction of the cleanup. This method breaks from tradition by cooking the pasta directly in a creamy, garlic-infused broth, allowing the noodles to absorb maximum flavor and release their starches to create a luxuriously smooth, naturally thickened sauce. The process begins by gently sautéing minced garlic in butter, building an aromatic foundation that permeates the entire dish. A combination of low-sodium chicken broth, milk, and a touch of heavy cream is then brought to a simmer, creating a liquid base that the linguine or fettuccine cooks in, becoming perfectly al dente while the liquid reduces around it. The final, crucial step is off-heat, stirring in a generous amount of freshly grated Parmesan cheese until it melts into a velvety, cohesive sauce that clings to every strand of pasta.

The true genius of this dish lies in its one-pot nature and its foolproof technique. By forgoing a separate pot of boiling water and a complex roux-based sauce, this recipe streamlines the entire process, resulting in a single pot to wash and a deeply flavorful, emulsified sauce that is far superior to many more complicated versions. The key is patience—allowing the pasta to simmer gently and stir frequently prevents sticking and ensures even cooking. The use of freshly grated Parmesan is non-negotiable; pre-grated cheese contains anti-caking agents that can leave the sauce grainy. The final result is a creamy, cheesy, and incredibly comforting pasta that feels indulgent yet is deceptively simple to make. This One-Pot Creamy Parmesan Pasta is the ultimate answer for a busy evening when you crave a decadent, homestyle meal without the hassle.

Why You’ll Love This Recipe:

  • One-Pot Wonder: The entire meal cooks in a single pot, meaning incredible flavor and dramatically easier cleanup.
  • Unbelievably Creamy Sauce: Cooking the pasta in the liquid allows its starch to thicken the sauce naturally, creating a luxurious, velvety texture without flour.
  • Effortless Elegance: This dish looks and tastes like it required far more effort, making it perfect for a quick weeknight dinner or a simple meal for guests.
  • Infinitely Customizable: Serve it as is, or add cooked chicken, sautéed mushrooms, spinach, or sun-dried tomatoes for a heartier meal.

Ingredients:

  • 2 tablespoons unsalted butter
  • 3 cloves garlic, minced
  • 3 cups low-sodium chicken broth
  • 1 cup whole milk
  • ½ cup heavy cream
  • 12 ounces linguine or fettuccine pasta
  • Salt and freshly ground black pepper, to taste
  • ½ cup freshly grated Parmesan cheese, plus more for serving
  • 1 tablespoon chopped fresh parsley or 1 teaspoon dried parsley

Instructions:

Step 1: Sauté the Aromatics
In a large pot or deep skillet with a lid, melt the butter over medium-low heat. Add the minced garlic and cook, stirring constantly, for about 1 minute, until fragrant. Be careful not to let the garlic brown, as it can become bitter.

Step 2: Add Liquids and Pasta
Pour in the chicken broth, whole milk, and heavy cream. Increase the heat to medium-high and bring the liquid to a gentle boil. Carefully add the dry pasta to the pot. As it softens, use tongs to gently submerge it all into the liquid.

Step 3: Simmer Until Tender
Reduce the heat to maintain a steady, gentle simmer. Cook, uncovered, for 15-20 minutes, stirring frequently and turning the pasta with tongs to prevent sticking. The pasta is done when it is al dente and most of the liquid has been absorbed, leaving behind a creamy sauce.

Step 4: Incorporate the Parmesan
Once the pasta is cooked, reduce the heat to low. Remove the pot from the heat source entirely. Stir in the freshly grated Parmesan cheese until it is completely melted and the sauce is smooth.

Step 5: Season and Serve
Taste the pasta and season generously with salt and black pepper. Keep in mind that the cheese and broth already contain salt. Garnish with fresh parsley and an extra sprinkle of Parmesan cheese. Serve immediately, as the sauce will continue to thicken as it sits.

Tips:

  • Use Freshly Grated Cheese: Pre-shredded Parmesan cheese contains cellulose, which prevents it from melting smoothly. A block of Parmesan that you grate yourself is essential for a silky sauce.
  • Stir Frequently: This is key to preventing the pasta from sticking to the bottom of the pot and ensuring it cooks evenly while the sauce reduces.
  • Don’t Rush the Simmer: Maintaining a gentle simmer, not a rolling boil, is crucial. Too high heat can cause the milk to scorch or the sauce to break.
  • Adjust Consistency: If the sauce becomes too thick before the pasta is done, add a splash of warm broth or milk. If it’s too thin once the pasta is cooked, let it sit off the heat for a few minutes; it will thicken further.

Storage Options:

  • Refrigerator: Store leftovers in an airtight container in the refrigerator for up to 3 days. The pasta will absorb the sauce, so it will be much thicker upon reheating.
  • Reheating: Reheat gently in a skillet or saucepan over low heat, adding a small splash of milk or broth to loosen the sauce to a creamy consistency again. Microwaving is not recommended as it can cause the sauce to separate.
  • Freezing: Freezing is not recommended for this dish, as the dairy-based sauce is likely to separate and become grainy upon thawing.

Toffee Pecan Shortbread Cookies

0

Toffee Pecan Shortbread Cookies are an exquisite fusion of buttery, classic shortbread and the rich, decadent crunch of toffee and toasted pecans, creating a cookie that is as elegant as it is irresistible. This recipe elevates the simple shortbread into a sophisticated treat with a perfect balance of textures and flavors. The foundation is a traditional, tender shortbread dough, made with cold butter and confectioners’ sugar for a melt-in-your-mouth crumb that is both delicate and substantial. Into this base, a generous amount of crunchy toffee bits and finely chopped, toasted pecans are folded, introducing pockets of caramel-like sweetness and a deep, nutty aroma in every bite. The optional, yet highly recommended, finale of a dark chocolate dip adds a layer of bittersweet richness that contrasts beautifully with the sweet, buttery cookie, making these a truly show-stopping confection perfect for holidays, gift-giving, or a special afternoon indulgence.

The true brilliance of this recipe lies in its slice-and-bake method, which allows for impeccable presentation with minimal effort. By forming the dough into logs and chilling them, you ensure not only a more flavorful cookie but also one that bakes to a perfect, uniform shape with clean, crisp edges. The chilling step is crucial, as it prevents the cookies from spreading too much in the oven, preserving their dense, crumbly texture. The process is wonderfully straightforward, yet the final product—with its golden hue, speckled interior, and glossy chocolate half-dip—looks and tastes like it came from a professional patisserie. These Toffee Pecan Shortbread Cookies are a testament to the idea that the best desserts often come from simple, quality ingredients combined with a thoughtful technique, resulting in a cookie that is sure to become a cherished favorite.

Why You’ll Love This Recipe:

  • Perfect Textural Harmony: Enjoy the contrast of the tender, buttery shortbread, the crunchy toffee bits, the nutty pecans, and the snap of dark chocolate.
  • Elegant and Impressive: These cookies have a beautiful, professional appearance that makes them perfect for cookie trays, holiday gifts, or special occasions.
  • Make-Ahead Convenience: The dough logs can be made days in advance and stored in the fridge or freezer, allowing you to bake fresh, warm cookies whenever the mood strikes.
  • Rich, Balanced Flavor: The combination of salty, sweet, and nutty flavors is deeply satisfying and complex, without being overly sweet.

Ingredients:

  • 1 cup (2 sticks) unsalted butter, cold and diced into small cubes
  • ⅔ cup confectioners’ sugar
  • 1 ½ teaspoons pure vanilla extract
  • ¼ teaspoon fine sea salt
  • 2 cups all-purpose flour, sifted
  • ¾ cup toffee bits (such as Heath bits), plus more for topping
  • ½ cup pecans, finely chopped and toasted, plus more for topping
  • 10 ounces dark chocolate (chopped bars or wafers)

Instructions:

Step 1: Cream Butter and Sugar
In the bowl of a stand mixer fitted with the paddle attachment, combine the cold, diced butter and confectioners’ sugar. Beat on medium speed until the mixture is smooth and creamy, about 2-3 minutes. Stop to scrape down the sides of the bowl as needed to ensure everything is well incorporated.

Step 2: Add Flavor and Dry Ingredients
Add the vanilla extract and salt to the butter mixture and mix until combined. With the mixer on low speed, gradually add the sifted flour. Mix just until the dough begins to come together and no dry streaks of flour remain. Be careful not to overmix.

Step 3: Incorporate Mix-Ins
Using a spatula, gently fold the toffee bits and the finely chopped, toasted pecans into the dough until they are evenly distributed.

Step 4: Form the Dough Logs
Turn the dough out onto a lightly floured surface. Divide it into two equal portions. Shape each portion into a log that is roughly 6 ½ inches long and 1 ½ to 1 ¾ inches in diameter. For a dense, uniform cookie without air pockets, compress the dough firmly as you roll. Wrap each log tightly in plastic wrap.

Step 5: Chill the Dough
Refrigerate the wrapped dough logs for at least 1 hour, or until the dough is firm. This step is essential for clean slicing and to prevent the cookies from spreading too much while baking.

Step 6: Slice and Bake
Preheat your oven to 350°F (175°C). Line a baking sheet with parchment paper. Remove one dough log from the refrigerator and unwrap it. Using a sharp knife, slice the log into rounds just under ½-inch thick, aiming for 14-15 cookies per log. Place the slices on the prepared baking sheet, spacing them about 1 inch apart.

Step 7: Bake to Perfection
Bake for 12-16 minutes, or until the cookies are set and the edges are just beginning to turn a very light golden brown. The centers should remain pale. Allow the cookies to cool on the baking sheet for 5 minutes before transferring them to a wire rack to cool completely.

Step 8: Dip in Chocolate (Optional)
Once the cookies are completely cool, melt the dark chocolate in a microwave-safe bowl in 20-second intervals on the defrost setting, stirring between each interval, until smooth. Dip half of each cookie into the melted chocolate, allowing any excess to drip off. Place the dipped cookies on a parchment-lined tray. While the chocolate is still wet, sprinkle with additional toffee bits or chopped pecans, if desired. Allow the chocolate to set completely at room temperature (about 1 hour) or in the refrigerator for 15 minutes.

Tips:

  • Keep Butter Cold: Using cold butter is the secret to a classic shortbread texture that is crumbly and not cakey.
  • Toast Your Pecans: Toasting the pecans before chopping them intensifies their flavor dramatically. Spread them on a baking sheet and toast at 350°F for 5-8 minutes, until fragrant.
  • Don’t Overbake: Shortbread should not brown significantly. Remove them from the oven as soon as the edges show the faintest hint of color for the best texture.
  • For Perfect Slices: If the dough log cracks when slicing, it may be too cold. Let it sit at room temperature for 5-10 minutes before trying again.

Storage Options:

  • Room Temperature: Store the finished cookies in an airtight container at room temperature for up to 5 days. Place parchment paper between layers if they are chocolate-dipped.
  • Freeze the Dough Logs: The wrapped dough logs can be frozen for up to 3 months. Slice and bake directly from the freezer, adding 1-2 minutes to the baking time.
  • Freeze Baked Cookies: The baked cookies (without chocolate) freeze very well. Thaw at room temperature before dipping in chocolate, or enjoy as is.

Creamy Slow Cooker Chicken & Cheese Casserole

0

Creamy Slow Cooker Chicken & Cheese Casserole is the ultimate solution for a busy day, a recipe that transforms a handful of simple ingredients into a rich, comforting, and family-friendly meal with virtually no effort. This dish masterfully leverages the gentle, consistent heat of the crockpot to slowly simmer chicken breasts until they become exceptionally tender and juicy, all while bathing them in a luxuriously creamy and savory sauce. The foundation of the sauce is a classic combination of cream of chicken soup and tangy sour cream, which melds together during the long cooking process to create a smooth, velvety texture that clings to every bite. The subtle yet essential additions of garlic and onion powder infuse the entire dish with a warm, aromatic depth, eliminating the need for any chopping or sautéing. The final, crowning touch of shredded cheddar cheese, melted into a golden, bubbly blanket during the last 30 minutes of cooking, adds a sharp, salty richness that makes this casserole irresistibly decadent.

The true genius of this recipe lies in its unparalleled convenience and versatility. It is the epitome of “set it and forget it” cooking, requiring nothing more than a few minutes of assembly in the morning to yield a complete, satisfying dinner by evening. The slow cooking process not only ensures perfectly cooked chicken but also allows the flavors to develop and intensify, resulting in a taste that is far more complex than the simplicity of its ingredients would suggest. This casserole is a blank canvas; it can be served over fluffy rice, egg noodles, mashed potatoes, or even spooned into a baked potato for the ultimate comfort food experience. Creamy Slow Cooker Chicken & Cheese Casserole is more than just a meal; it’s a reliable, go-to recipe for hectic weeknights, a warm and welcoming dish that promises to soothe and satisfy with its classic, homestyle flavors.

Why You’ll Love This Recipe:

  • Effortless Preparation: With just 10 minutes of active prep and no stovetop cooking required, this is the easiest path to a hot, home-cooked dinner.
  • Incredibly Tender Chicken: The slow, moist cooking environment guarantees chicken that is moist, tender, and easily shreddable every single time.
  • Rich and Comforting Sauce: The creamy, cheesy sauce is decadent and flavorful, creating a comforting gravy that is perfect for soaking up with your favorite side.
  • Total Family Pleaser: With its familiar, creamy, and cheesy profile, this dish is a guaranteed hit with both kids and adults, making it a stress-free dinner solution.

Ingredients:

  • 4 boneless, skinless chicken breasts (about 1.5 – 2 pounds)
  • 1 can (10.5 oz) cream of chicken soup
  • 1 cup sour cream
  • 1 cup shredded cheddar cheese
  • 1 teaspoon garlic powder
  • 1 teaspoon onion powder
  • ½ teaspoon kosher salt
  • ½ teaspoon black pepper
  • ¼ cup chicken broth
  • 1 tablespoon chopped fresh parsley or chives, for garnish
  • For serving: Cooked rice, pasta, mashed potatoes, or crusty bread

Instructions:

Step 1: Layer the Chicken
Place the boneless, skinless chicken breasts in a single layer at the bottom of your slow cooker insert.

Step 2: Create the Creamy Sauce
In a medium mixing bowl, combine the cream of chicken soup, sour cream, garlic powder, onion powder, salt, and black pepper. Stir until the mixture is smooth and well-combined.

Step 3: Assemble in the Slow Cooker
Pour the creamy sauce mixture over the chicken breasts. Use a spatula to spread it evenly, ensuring all the chicken is covered. Pour the ¼ cup of chicken broth around the edges of the slow cooker.

Step 4: Slow Cook to Perfection
Cover the slow cooker with the lid and cook on the LOW setting for 6-7 hours. The casserole is ready when the chicken is cooked through and tender enough to be easily shredded with a fork.

Step 5: Add the Cheese
About 30 minutes before you plan to serve, sprinkle the shredded cheddar cheese evenly over the top of the chicken and sauce. Re-cover the slow cooker and continue cooking on LOW for another 20-30 minutes, or until the cheese is completely melted and bubbly.

Step 6: Serve and Garnish
Once the cheese has melted, you can serve the chicken whole or use two forks to shred it directly in the slow cooker, mixing it into the creamy sauce. Garnish with fresh chopped parsley or chives for a pop of color and freshness. Serve immediately over your chosen base.

Tips:

  • For Extra Flavor: For a deeper flavor, you can season the chicken breasts lightly with a little extra salt and pepper before adding the sauce.
  • Shred the Chicken: For a more integrated casserole, shred the cooked chicken directly in the slow cooker using two forks after adding the cheese. Stir it all together to create a creamy, chicken-filled mixture.
  • Prevent Curdling: To ensure the sour cream incorporates smoothly without curdling, make sure it is at room temperature before mixing it with the soup.
  • Add Vegetables: To make it a more complete meal, add 1-2 cups of frozen mixed vegetables (like peas and carrots) or chopped broccoli florets to the slow cooker at the same time as the sauce.

Storage Options:

  • Refrigerator: Store any leftovers in an airtight container in the refrigerator for up to 3-4 days.
  • Reheating: Reheat gently in the microwave or in a saucepan on the stovetop over low heat. You may need to add a splash of chicken broth or milk when reheating to loosen the sauce to your desired consistency.
  • Freezing: This casserole freezes well. Cool completely and store in a freezer-safe container for up to 2 months. Thaw overnight in the refrigerator before reheating.