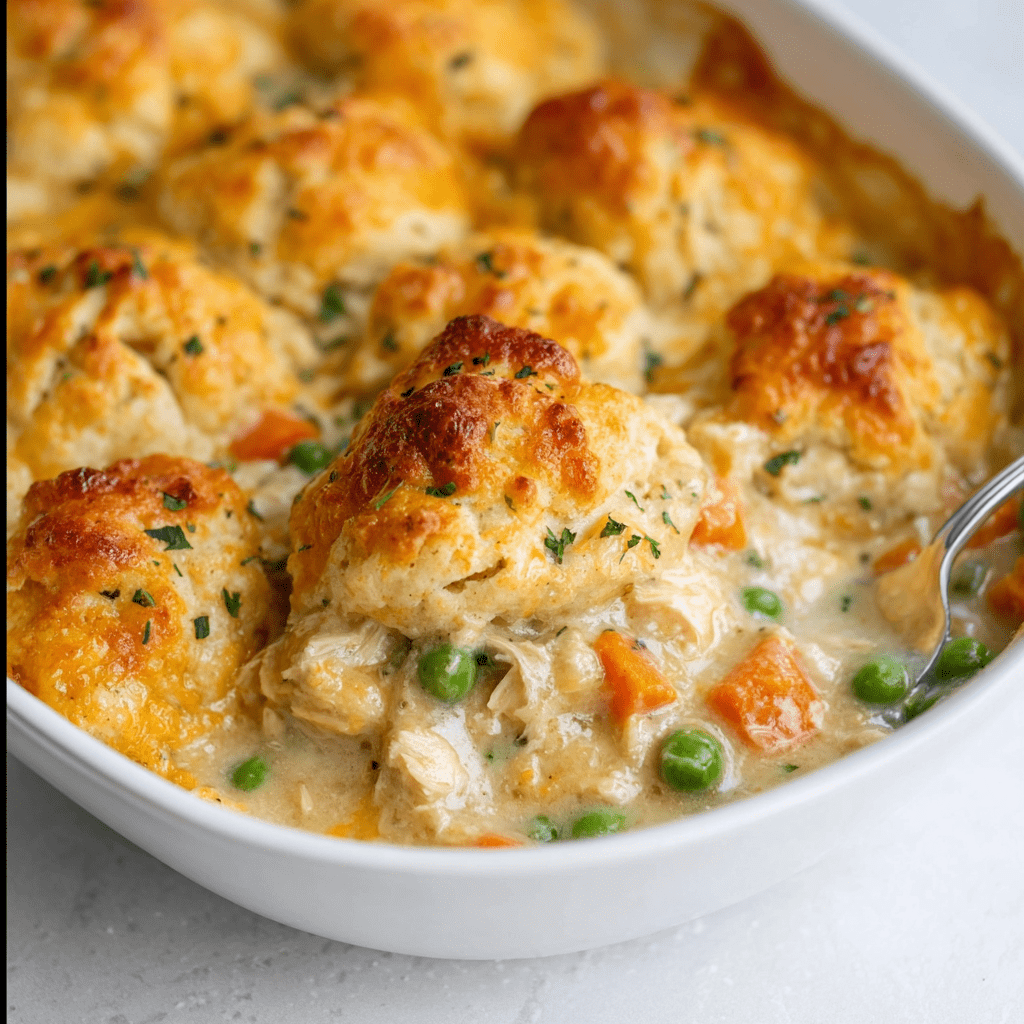
Caramel Apple Fritters

0

Caramel Apple Fritters are a delightful treat that combines the crisp sweetness of apples with a rich, golden batter and a luscious caramel drizzle. This recipe is a perfect dessert for fall or anytime you crave a warm, comforting bite of indulgence. The combination of warm spices and silky caramel elevates these fritters to an irresistible treat.

These fritters are easy to make at home and bring a sense of nostalgia with every bite. Perfect for serving at parties, gatherings, or simply as a family snack, they’re a hit with both kids and adults alike. Serve them fresh and warm for the ultimate experience!

Why You’ll Love This Recipe

Comforting and Nostalgic: A classic dessert with a homemade twist.

Simple Ingredients: Pantry staples come together for an easy yet impressive treat.

Perfectly Spiced: Cinnamon and nutmeg complement the apples and caramel beautifully.

Ingredients

For the Dough:

• 2 cups all-purpose flour

• 2 teaspoons baking powder

• ½ teaspoon salt

• ¼ cup granulated sugar

• ½ cup milk

• 1 egg

• 1 teaspoon vanilla extract

• 2 tablespoons melted butter

For the Apples:

• 2 large apples, peeled, cored, and sliced into ¼-inch thick rings

• ¼ cup all-purpose flour

• ½ teaspoon ground cinnamon

• ¼ teaspoon nutmeg

• Vegetable oil for frying

For the Caramel Sauce:

• 1 cup granulated sugar

• ¼ cup water

• ¼ cup heavy cream

• 1 tablespoon unsalted butter

• ½ teaspoon vanilla extract

Instructions

Step 1: Prepare the Dough

1. In a large bowl, whisk together the flour, baking powder, salt, and sugar.

2. In a separate bowl, whisk the milk, egg, vanilla extract, and melted butter.

3. Gradually add the wet ingredients to the dry ingredients, mixing until just combined. Avoid overmixing to keep the batter light.

Step 2: Prepare the Apples

1. In a shallow dish, combine the flour, cinnamon, and nutmeg.

2. Dredge each apple slice in the seasoned flour mixture, ensuring they are well coated.

Step 3: Heat the Oil

1. In a deep fryer or large skillet, heat the vegetable oil to 375°F (190°C). Use a thermometer to ensure consistent temperature.

Step 4: Fry the Apple Fritters

1. Dip each apple slice into the batter, making sure it is evenly coated.

2. Carefully lower the slices into the hot oil, frying 2-3 minutes per side until golden brown. Avoid overcrowding the skillet.

3. Remove the fritters with a slotted spoon and drain on paper towels.

Step 5: Make the Caramel Sauce

1. In a medium saucepan, combine the sugar and water over medium heat.

2. Cook, stirring occasionally, until the sugar dissolves and turns a deep amber color. This may take 8-10 minutes.

3. Remove from heat and carefully whisk in the heavy cream, butter, and vanilla extract. The mixture will bubble vigorously—stir until smooth. Let cool slightly before using.

Step 6: Serve

1. Arrange the fried apple fritters on a serving platter.

2. Drizzle the warm caramel sauce generously over the fritters.

3. Serve immediately while warm and enjoy!

Tips

Apple Choice: Granny Smith apples are excellent for their tartness, which balances the sweetness of the caramel.

Consistent Frying: Maintain the oil temperature to ensure evenly cooked fritters.

Caramel Caution: Be careful when adding cream to the caramel; the mixture will bubble. Stir slowly and consistently.

Storage Options

Refrigerator: Store leftover fritters in an airtight container for up to 2 days. Reheat in the oven at 350°F (175°C) to crisp them up.

Caramel Sauce: Refrigerate the sauce in a sealed container for up to a week. Reheat gently on the stovetop or in the microwave before using.

Caramel Apple Fritters are a delightful dessert that’s easy to make yet indulgently satisfying. Perfect for cozy gatherings or as a sweet treat on chilly evenings, these fritters bring joy with every bite!

Creamy Chicken and Spinach Casserole

0

Creamy Chicken and Spinach Casserole is a hearty and comforting dish packed with tender chicken, creamy cheese, and wholesome spinach. This one-dish wonder is perfect for family dinners or entertaining guests, offering a blend of savory flavors with a hint of freshness from lemon juice and zest. With melted mozzarella and Parmesan creating a golden, bubbly top, it’s as delicious as it is visually appealing.

This casserole is not only easy to prepare but also versatile, allowing you to use pantry staples and rotisserie chicken for convenience. The creamy sauce, enriched with chive and onion cream cheese, ties the ingredients together for a luscious, satisfying meal that’s sure to become a favorite.

Why You’ll Love This Recipe

Rich and Creamy: The sauce, featuring cream cheese and milk, ensures a luscious texture.

Wholesome Ingredients: Includes spinach, rice, and chicken for a balanced meal.

Quick Assembly: Using rotisserie chicken and pre-cooked rice saves time without sacrificing flavor.

Ingredients

• Cooking spray

• 3 tablespoons unsalted butter

• 1 ½ cups yellow onion, finely chopped

• 6 cloves garlic, thinly sliced

• 2 teaspoons dried Italian seasoning

• ¼ teaspoon crushed red pepper

• 1 ¾ teaspoons kosher salt, divided

• 3 tablespoons all-purpose flour

• 2 ½ cups whole milk

• 4 ounces chive and onion cream cheese

• 4 cups rotisserie chicken, shredded

• 3 cups long-grain white rice, cooked

• 2 packages (10 ounces each) frozen chopped spinach, thawed and excess water squeezed out

• 2 tablespoons fresh lemon juice

• 1 teaspoon lemon zest

• 8 ounces part-skim mozzarella cheese, shredded

• ¼ cup Parmesan cheese, grated

Instructions

Step 1: Preparation of Ingredients

1. Gather and measure all ingredients to ensure smooth assembly.

Step 2: Preheat Oven and Prepare Dish

1. Preheat the oven to 350°F (175°C) and position the oven rack in the upper third.

2. Coat a 9×13-inch baking dish evenly with cooking spray.

Step 3: Sauté the Base

1. In a large nonstick skillet, melt butter over medium heat.

2. Add the chopped onion, sliced garlic, Italian seasoning, crushed red pepper, and ¾ teaspoon of kosher salt.

3. Cook, stirring frequently, for about 4 minutes or until the onions are softened and translucent.

Step 4: Create the Roux

1. Stir in the flour and cook, stirring constantly, for 1 minute.

2. Gradually add the milk, stirring continuously to prevent lumps. Cook for about 3 minutes, or until the mixture slightly thickens.

Step 5: Combine the Main Ingredients

1. Stir the cream cheese and remaining 1 teaspoon of kosher salt into the sauce. Mix until the cheese is fully melted and the sauce is smooth.

2. Remove the skillet from heat and stir in the shredded chicken, cooked rice, spinach, lemon juice, and lemon zest. Mix until everything is evenly combined.

Step 6: Assemble the Casserole

1. Transfer the mixture into the prepared baking dish, spreading it into an even layer.

2. Sprinkle the shredded mozzarella and grated Parmesan cheeses evenly over the top.

Step 7: Bake and Broil

1. Place the casserole in the preheated oven and bake for 15 minutes, or until the cheese is melted.

2. Turn the oven to broil and broil for 2-3 minutes, or until the cheese is golden brown and bubbly.

Step 8: Serve

1. Remove the casserole from the oven and let it cool slightly before serving.

Tips

Drain Spinach Well: Squeeze out as much water as possible from the spinach to prevent a watery casserole.

Rotisserie Chicken Shortcut: Using store-bought rotisserie chicken saves time and adds flavor.

Lemon Freshness: Adjust the amount of lemon juice and zest to your preference for a brighter flavor.

Storage Options

Refrigerator: Store leftovers in an airtight container for up to 3 days. Reheat in the oven or microwave until heated through.

Freezer: Freeze the assembled (but unbaked) casserole for up to 2 months. Thaw overnight in the refrigerator before baking as directed.

Creamy Chicken and Spinach Casserole is a versatile, comforting dish that delivers rich, creamy flavors in every bite. Perfect for busy weeknights or cozy gatherings, it’s sure to satisfy and impress!

Chicken and Bacon Fried Rice

0

Chicken and Bacon Fried Rice is a crowd-pleasing dish that brings together savory flavors and satisfying textures. Combining tender chicken, crispy bacon, and aromatic fried rice, this recipe is a fusion of comfort food and Asian-inspired cuisine. The addition of fresh green onions and peas not only adds a pop of color but also enhances the dish’s nutritional value. Whether you’re using leftover chicken or freshly cooked, this meal comes together quickly, making it a perfect choice for busy weeknights.

The beauty of fried rice lies in its adaptability. This dish is a fantastic way to repurpose leftover rice and ingredients into a hearty, flavorful meal. It’s also a great recipe for experimenting with add-ins, such as carrots, bell peppers, or even pineapple for a hint of sweetness. One bite of this savory and smoky creation, and it’s sure to become a favorite in your household.

Why You’ll Love This Recipe

Quick and Easy: Ready in under 30 minutes, perfect for weeknight dinners.

Rich in Flavor: Bacon and sesame oil create a smoky and nutty aroma, while soy sauce ties everything together.

Versatile: You can customize the ingredients to include your favorite veggies or protein.

Ingredients

Base:

• 2 tablespoons bacon grease (or oil of choice), divided

• 5 cups cold cooked rice

Protein:

• 3 eggs, beaten

• 3 cups cooked chicken, cut into ½-inch pieces

• 1 cup cooked and crumbled bacon

Seasoning:

• ¼ cup low-sodium soy sauce

• 1 tablespoon sesame oil

• ½ teaspoon freshly ground black pepper

Vegetables and Garnish:

• ⅔ cup frozen peas

• 3 green onions, sliced thin

Instructions

Step 1: Prepare the Eggs

1. Heat 1 tablespoon of bacon grease or oil in a large skillet over medium heat.

2. Pour in the beaten eggs and let them cook undisturbed until they begin to set.

3. Gently scramble the eggs until fully cooked. Remove from the skillet and set aside.

Step 2: Cook the Rice

1. Add the remaining 1 tablespoon of bacon grease or oil to the skillet and heat over medium-high.

2. Break up the cold rice into chunks and add it to the skillet.

3. Stir to coat the rice with the oil, cooking until heated through.

Step 3: Season the Rice

1. Pour in the soy sauce and sesame oil, stirring to combine.

2. Cook for about 5 minutes, stirring frequently to evenly distribute the flavors.

Step 4: Add the Ingredients

1. Stir in the cooked chicken, crumbled bacon, and frozen peas.

2. Allow the mixture to heat through, ensuring the peas are tender but not overcooked.

Step 5: Combine and Serve

1. Gently fold in the cooked eggs and sliced green onions.

2. Sprinkle with freshly ground black pepper and adjust the seasoning to taste.

3. Serve the fried rice hot as a main dish or a side.

Tips for Success

Rice Texture: Use day-old rice for the best results. Freshly cooked rice tends to be too moist and can become mushy.

Bacon Substitute: Turkey bacon or pancetta works well if you’re looking for an alternative.

Add Veggies: Carrots, corn, or bell peppers can add more color and nutrients.

Storage

Refrigerate: Store leftovers in an airtight container in the refrigerator for up to 3 days.

Reheat: Warm in a skillet or microwave, adding a splash of water or soy sauce to prevent drying out.

Enjoy this flavorful Chicken and Bacon Fried Rice for a delicious meal that hits all the right notes!

Deli-Style Chicken Salad

0

Deli-Style Chicken Salad is the ultimate combination of simplicity and elegance, making it a classic recipe for any occasion. This dish offers tender chicken chunks seasoned to perfection, creamy mayonnaise for richness, and crunchy celery for texture. It’s a versatile recipe that fits effortlessly into a wide range of meals, from sandwiches and wraps to hearty salads or even as a standalone dish.

This recipe is perfect for meal prepping or serving as a quick and satisfying lunch option. Preparing it a day ahead allows the flavors to meld beautifully, ensuring that every bite is a harmonious blend of savory, creamy, and fresh. Whether for picnics, potlucks, or weekday lunches, this chicken salad will always deliver that comforting deli-style taste.

Why You’ll Love This Recipe

Rich and Creamy: The mayonnaise creates a luscious texture that complements the tender chicken.

Perfectly Seasoned: Lightly baked chicken seasoned with sea salt, pepper, and granulated onion enhances the flavor.

Versatile: Serve it as a sandwich filling, salad topping, or with crackers for a satisfying snack.

Ingredients

Chicken:

• 500g chicken breast, boneless and diced

• 300g chicken thighs, boneless and diced

Seasoning:

• 2 tbsp olive oil

• ½ tsp sea salt

• ¼ tsp black pepper

• ½ tsp granulated onion

Dressing:

• ⅔ cup mayonnaise

• 3 stalks celery, diced

Additional:

• Sea salt and black pepper, to taste

Instructions

Step 1: Season and Prepare the Chicken

1. Preheat your oven to 350°F (175°C).

2. Coat the diced chicken breasts and thighs lightly with olive oil.

3. Season the chicken with granulated onion, sea salt, and cracked black pepper.

4. Place the seasoned chicken in a baking dish and cover loosely with aluminum foil.

Step 2: Bake the Chicken

1. Bake for 25-30 minutes, or until the internal temperature of the chicken reaches 165°F (74°C) in the thickest portion.

2. Allow the chicken to cool for at least 10 minutes, then refrigerate for at least 1 hour.

Step 3: Dice the Chicken

1. Once cooled, dice the chicken into ¼-inch thick and ½-inch wide pieces.

2. Transfer the diced chicken to a large mixing bowl.

Step 4: Combine Ingredients

1. Add the diced celery and mayonnaise to the chicken.

2. Mix thoroughly until all ingredients are well combined.

Step 5: Chill and Serve

1. Cover the chicken salad and refrigerate for at least 1-2 hours or overnight for the best flavor.

2. Taste and adjust the seasoning with additional sea salt and black pepper if needed.

Tips for the Best Chicken Salad

For Extra Flavor: Add a squeeze of lemon juice or a pinch of smoked paprika.

Texture Variety: Incorporate chopped nuts, dried cranberries, or fresh herbs like dill or parsley.

Customizable Add-Ins: Mix in grapes, chopped apples, or pickles for a twist.

Storage

• Store in an airtight container in the refrigerator for up to 3 days. Stir before serving to refresh the texture.

Enjoy this deli-style classic that pairs perfectly with your favorite bread, greens, or crackers!

Tres Leches Cake

0

Tres Leches Cake, or “Three Milks Cake,” is a rich and creamy Latin American dessert that’s adored for its unique combination of light sponge and indulgent milk-soaked texture. The cake is delicately pierced and soaked in a mixture of whole milk, evaporated milk, and sweetened condensed milk, creating a dessert that is both airy and moist. Topped with a fluffy whipped cream layer, it’s a perfect balance of sweetness and creaminess that melts in your mouth with every bite.

This classic dessert is ideal for celebrations, gatherings, or simply when you want to treat yourself to a luxurious dessert. The addition of cinnamon on top adds a hint of warmth and spice, enhancing the already delightful flavor. Whether served on its own or paired with fresh fruit, Tres Leches Cake is sure to become a favorite in your recipe collection.

Why You’ll Love This Recipe

Incredibly Moist Texture: The milk mixture makes every bite rich and satisfying.

Perfect for Any Occasion: A crowd-pleaser at parties and family dinners alike.

Customizable Toppings: Add a dusting of cinnamon, fresh fruit, or even caramel drizzle for a personalized touch.

Ingredients

For the Cake:

• ½ cup (1 stick) butter

• 1 cup granulated sugar

• 5 eggs

• 1 teaspoon vanilla extract

• 1 ½ cups all-purpose flour

• 1 teaspoon baking powder

• ½ teaspoon salt

For the Milk Mixture:

• 2 cups whole milk

• 12 oz can evaporated milk

• 14 oz can sweetened condensed milk

For the Topping:

• 1 ½ cups heavy whipping cream

• 1 cup granulated sugar

• 1 teaspoon vanilla extract

• Ground cinnamon (optional, for garnish)

Instructions

Step 1: Prepare the Cake

1. Preheat your oven to 350°F (175°C) and grease a 9×13-inch baking dish.

2. In a large mixing bowl, beat the butter and sugar together until smooth and creamy.

3. Add eggs and vanilla extract, beating until the mixture becomes light and fluffy.

4. In a separate bowl, sift together flour, baking powder, and salt. Gradually add the dry ingredients to the wet ingredients, mixing just until combined.

Step 2: Bake the Cake

1. Pour the batter into the prepared baking dish, spreading it evenly.

2. Bake for 30–35 minutes, or until a toothpick inserted in the center comes out clean.

3. Remove the cake from the oven and allow it to cool to room temperature. Pierce the surface of the cake all over with a fork to help absorb the milk mixture.

Step 3: Soak the Cake

1. In a large bowl, mix together whole milk, evaporated milk, and sweetened condensed milk.

2. Slowly pour the milk mixture over the cake, ensuring even coverage. Let the cake rest, allowing the liquid to fully absorb (this may take 1–2 hours).

Step 4: Make the Whipped Topping

1. In a chilled mixing bowl, whip the heavy cream, sugar, and vanilla extract together until stiff peaks form.

2. Spread the whipped topping evenly over the soaked cake.

Step 5: Garnish and Serve

1. Sprinkle ground cinnamon over the whipped topping, if desired.

2. Refrigerate the cake for at least 1 hour before serving. Serve chilled for the best flavor and texture.

Storage

• Store any leftovers in an airtight container in the refrigerator for up to 4 days. The cake becomes even more flavorful as it rests!

Enjoy the decadence of this Tres Leches Cake with its creamy layers and a fluffy topping that will leave everyone asking for seconds!

Black Velvet Cake

0

Indulge in the luxurious allure of Black Velvet Cake, a stunning dessert that combines deep, rich chocolate flavor with a dramatic black hue. This cake is not only visually captivating but also incredibly moist and tender, thanks to the combination of buttermilk, vegetable oil, and butter. Perfect for special occasions or when you want to impress, this cake is as much a feast for the eyes as it is for the taste buds. Its soft, velvety crumb and intense chocolate flavor make it an unforgettable treat.

What sets Black Velvet Cake apart is its unique use of black cocoa powder, which deepens the color and enhances the chocolatey profile. A hint of buttermilk adds a tangy twist, balancing the sweetness while ensuring every bite is melt-in-your-mouth perfection. Whether layered with a creamy frosting or served as is, this cake promises to be the showstopper of any dessert table.

Why You’ll Love This Recipe

Stunning Appearance: The dramatic black color makes it an elegant centerpiece.

Moist and Tender: Buttermilk, oil, and butter combine for unparalleled texture.

Customizable: Pair with cream cheese frosting, vanilla buttercream, or a drizzle of ganache for added flair.

Ingredients

For the Cake:

• 2 cups all-purpose flour

• 1 cup granulated sugar

• 1 cup buttermilk

• 1/2 cup unsalted butter, softened

• 1/4 cup vegetable oil

• 2 large eggs

• 2 tablespoons black cocoa powder

• 1 tablespoon unsweetened cocoa powder

• 1 teaspoon baking powder

• 1/2 teaspoon baking soda

• 1/2 teaspoon salt

• 1 tablespoon white vinegar

• 1 teaspoon vanilla extract

• Black food coloring gel or paste (as needed)

Instructions

Step 1: Prepare Your Equipment

• Preheat your oven to 350°F (175°C).

• Grease and flour two 9-inch round cake pans or line them with parchment paper for easy removal.

Step 2: Cream Butter and Sugar

• In a large mixing bowl, beat softened butter and granulated sugar until light and fluffy. This incorporates air into the batter, ensuring a tender crumb.

• Add the vegetable oil and mix until fully combined.

Step 3: Add Wet Ingredients

• Beat in the eggs one at a time, followed by the vanilla extract and white vinegar.

Step 4: Combine Dry Ingredients

• In a separate bowl, sift together the flour, black cocoa powder, unsweetened cocoa powder, baking powder, baking soda, and salt.

Step 5: Mix Batter

• Alternate adding the dry ingredients and buttermilk to the wet mixture, starting and ending with the dry ingredients. Mix until just combined, taking care not to overmix.

• Add black food coloring, a few drops at a time, mixing until the desired shade is achieved.

Step 6: Bake

• Divide the batter evenly between the prepared pans, smoothing the tops with a spatula.

• Bake for 25–30 minutes or until a toothpick inserted into the center comes out clean.

Step 7: Cool

• Let the cakes cool in the pans for 10 minutes, then transfer them to a wire rack to cool completely.

Serving Suggestions

• Frost with cream cheese frosting or vanilla buttercream for a classic pairing.

• Add a drizzle of chocolate ganache for an extra indulgent touch.

• Decorate with edible gold flakes or fresh berries for an elegant presentation.

Storage

• Store leftovers in an airtight container at room temperature for up to 3 days or in the refrigerator for up to a week.

This Black Velvet Cake will surely become a staple for your most memorable celebrations!

Easy Cheesy Sausage Biscuit Bites

0

These Easy Cheesy Sausage Biscuit Bites are the ultimate finger food, perfect for parties, potlucks, or as a delightful breakfast option. The combination of savory sausage, gooey melted cheddar, and flaky biscuit layers creates a bite-sized treat that’s irresistibly delicious. Not only are they incredibly simple to make, but they also come together quickly, making them a go-to recipe when you’re short on time yet want to impress your guests or family.

What makes this recipe so special is its versatility. You can switch up the sausage flavor, try different types of cheese, or even add a dash of your favorite seasonings to customize them to your liking. These bites are perfect for dipping into your favorite sauces, like marinara, ranch, or a spicy mustard. Whether you’re hosting a gathering or just looking for a tasty snack, these cheesy sausage bites are sure to be a hit.

Why You’ll Love This Recipe

Quick & Easy: Requires just 3 simple ingredients and less than 30 minutes.

Customizable: Swap out the sausage or cheese for endless variations.

Crowd-Pleasing: Perfect for appetizers, breakfast, or snacking.

Ingredients

• 2 (10-count) cans flaky biscuits (Grands Jr)

• 1 lb sausage (such as Tennessee Pride or your favorite variety)

• 2 cups shredded cheddar cheese

Instructions

Step 1: Preheat Oven

• Preheat your oven to 400°F (200°C) and lightly grease a mini-cupcake pan to prevent sticking.

Step 2: Mix Sausage and Cheese

• In a large mixing bowl, combine the uncooked sausage and shredded cheddar cheese. Gently mix with your hands until evenly blended. Shape the mixture into 40 equal-sized balls.

Step 3: Prepare the Biscuits

• Open the cans of flaky biscuits and separate each biscuit into two layers, creating 40 biscuit rounds.

• Press each biscuit layer into the cup of a mini-cupcake pan, shaping it to form a small bowl.

Step 4: Assemble the Bites

• Place one sausage-cheese ball into each biscuit cup, ensuring it fits snugly.

Step 5: Bake

• Bake in the preheated oven for 8–10 minutes, or until the biscuits are golden brown and the sausage balls are bubbling.

Step 6: Serve

• Remove the bites from the oven and let them cool slightly in the pan before transferring to a serving platter.

Tips

Make Ahead: Prepare the sausage-cheese balls and biscuit cups ahead of time, then assemble and bake when ready.

Dipping Sauce: Pair with marinara, honey mustard, or ranch dressing for added flavor.

Storage Options

Refrigerate: Store leftovers in an airtight container in the refrigerator for up to 3 days.

Reheat: Warm them in the oven at 350°F (175°C) for 5–7 minutes, or microwave for 30 seconds.

These Easy Cheesy Sausage Biscuit Bites are sure to become a favorite for any occasion, offering a delicious combination of flavors in every bite.

Amish Cinnamon Bread

0

Amish Cinnamon Bread is the epitome of comfort baking, combining the warmth of cinnamon with the sweetness of a tender, buttery loaf. This delightful bread isn’t just about its taste—it’s about creating a sense of nostalgia and bringing the coziness of an Amish kitchen into your home. Whether enjoyed as a breakfast treat, an afternoon snack, or a dessert, this bread promises to impress with its layers of flavor and melt-in-your-mouth texture.

What makes this bread extra special is its simplicity and versatility. The soft crumb is interspersed with a sweet cinnamon sugar swirl, creating a beautifully marbled effect. It’s perfect for sharing with family, gifting to friends, or simply indulging in yourself. With ingredients you likely already have in your kitchen, this recipe transforms basic pantry staples into something extraordinary. Let’s dive into the process of crafting this cinnamon-infused masterpiece.

Why You’ll Love This Recipe

Simple Ingredients: Uses common kitchen staples, making it easy to whip up anytime.

Versatile: Perfect for breakfast, tea-time, or dessert.

Kid-Friendly: A fun recipe for little bakers to assist with layering and sprinkling cinnamon sugar.

Ingredients

For the Bread:

• Granulated sugar: 2 cups

• Softened unsalted butter: 1 cup

• Eggs: 2

• Buttermilk: 2 cups

• All-purpose flour: 4 cups

• Baking soda: 2 tsp

For the Cinnamon Sugar Mixture:

• Granulated sugar: 2/3 cup

• Ground cinnamon: 3 tsp

Instructions

Step 1: Prepare the Cinnamon Sugar

• In a small bowl, mix together 2/3 cup of granulated sugar and 3 teaspoons of ground cinnamon. Set aside.

Step 2: Make the Batter

• In a large mixing bowl, cream the softened butter, 2 cups of sugar, and eggs until smooth and well blended.

• Add the buttermilk, flour, and baking soda. Mix thoroughly to create a smooth batter.

Step 3: Layer the Loaf Pans

• Grease two loaf pans thoroughly. Divide half of the batter evenly between the two pans.

• Sprinkle a generous layer of the cinnamon sugar mixture over the batter in each pan, reserving about a quarter of the mixture for the topping.

Step 4: Add Final Layers

• Pour the remaining batter over the cinnamon sugar layer in both pans, spreading it evenly.

• Sprinkle the reserved cinnamon sugar mixture over the top of each loaf.

Step 5: Bake the Bread

• Preheat your oven to 350°F (175°C).

• Bake the loaves for 45–50 minutes, or until a toothpick inserted into the center comes out clean.

Step 6: Cool and Serve

• Allow the loaves to cool in the pans for at least 20 minutes.

• Gently remove the bread from the pans and transfer it to a wire rack to cool completely.

Tips

Prevent sticking: Line the loaf pans with parchment paper for easier removal.

Enhance flavor: Add a dash of nutmeg or a handful of chopped pecans for a twist.

Storage Options

Room Temperature: Wrap the loaf in plastic wrap or store in an airtight container for up to 3 days.

Freeze: Wrap in foil and freeze for up to 3 months. Thaw at room temperature before serving.

Amish Cinnamon Bread is a timeless recipe that brings warmth and sweetness to any occasion. Share it, gift it, or savor it with a steaming cup of coffee or tea.

Texas Toast Sloppy

0

When it comes to comfort food, nothing beats the warm, hearty satisfaction of a Sloppy Joe. Pairing this classic with the buttery crunch of Texas toast elevates it to a whole new level. This recipe is perfect for weeknight dinners, casual get-togethers, or whenever you need a quick and satisfying meal. With lean ground beef as the base, every bite is loaded with savory goodness, balanced by the tangy sweetness of ketchup and brown sugar.

The golden crunch of Green Mill Texas Toast adds the perfect crispy foundation, while a generous sprinkle of shredded cheddar cheese ties everything together in gooey perfection. Whether you’re feeding the family or indulging in some solo comfort food, this dish promises to deliver flavor and nostalgia in every bite.

Why You’ll Love This Recipe

Quick and Easy: Simple ingredients and minimal prep make this a go-to meal for busy evenings.

Flavorful Layers: The balance of savory, tangy, and sweet flavors creates an unforgettable taste.

Customizable: Add toppings like jalapeños, pickles, or even a fried egg for a personalized twist.

Ingredients

Lean ground beef: 1 lb

Onion: 2 ½ cups, chopped

Garlic powder: ½ tsp

Ketchup: ¾ cup

Tomato paste: 2 tsp

Worcestershire sauce: ½ tsp

Brown sugar: 2 ½ tsp

Salt & Pepper: To taste

Green Mill Texas Toast: 4 slices

Cheddar cheese: 1 oz, shredded

Instructions

Step 1: Preheat the Oven

• Set your oven to 375°F (190°C).

Step 2: Cook the Ground Beef

• In a skillet over medium heat, cook the ground beef and chopped onion until the beef is browned and the onion is softened. Drain any excess grease.

Step 3: Create the Sloppy Joe Mixture

• Add the garlic powder, ketchup, tomato paste, Worcestershire sauce, brown sugar, salt, and pepper to the skillet.

• Stir well to combine, then cook over medium heat until the mixture thickens to your desired consistency.

Step 4: Prepare the Texas Toast

• Arrange the Green Mill Texas Toast slices on a baking sheet and bake in the preheated oven for 5–6 minutes or until golden brown.

Step 5: Assemble the Sloppy Joes

• Place a generous scoop of the Sloppy Joe mixture on top of each golden-brown Texas toast slice.

• Sprinkle ¼ oz of shredded cheddar cheese over the top of each piece.

Step 6: Serve and Enjoy

• Serve immediately, optionally garnished with fresh parsley or a dollop of sour cream for added flair.

Tips

For Extra Flavor: Add a splash of hot sauce or a pinch of chili powder to the meat mixture.

Make It Lighter: Swap the Texas toast for whole-grain bread or lettuce wraps.

Storage Options

Refrigerate: Store leftover Sloppy Joe mixture in an airtight container for up to 3 days. Reheat before serving.

Freeze: Freeze the mixture for up to 2 months in a freezer-safe container.

This Texas Toast Sloppy Joe recipe transforms a nostalgic classic into a crispy, cheesy delight, making it a family favorite that’s bound to be on repeat!

Crispy Cauliflower Bites

0

Crispy cauliflower bites are the perfect combination of crunchy, savory, and satisfying. These versatile bites can be served as an appetizer, snack, or even a side dish. Coated in a seasoned batter and cooked to golden perfection, each bite offers a delightful crunch followed by the natural tenderness of roasted or fried cauliflower. The optional panko or breadcrumbs add an extra layer of texture, making these bites irresistibly crispy. Whether you’re hosting a party or looking for a way to elevate your veggie game, this recipe is guaranteed to be a hit.

Pairing these bites with a smoky and tangy dipping sauce takes them to the next level. The sauce, a blend of mayonnaise, ketchup, smoked paprika, and lemon juice, complements the cauliflower’s earthy flavor perfectly. Easy to make and even easier to devour, these crispy cauliflower bites prove that healthy-ish snacks can still feel indulgent.

Why You’ll Love This Recipe

Crispy and Flavorful: The seasoned batter ensures every bite is packed with flavor.

Flexible Cooking Options: Whether you bake or fry, these bites are guaranteed to turn out crispy and delicious.

Dipping Sauce Delight: The smoky, tangy sauce elevates these bites to a gourmet snack.

Ingredients

For the Cauliflower Bites:

• 1 medium cauliflower head (cut into florets)

• 1 cup all-purpose flour

• 1 cup water (or milk for a richer coating)

• 1 teaspoon garlic powder

• 1 teaspoon paprika

• 1 teaspoon salt

• ½ teaspoon black pepper

• 1 cup breadcrumbs or panko (optional for extra crispiness)

• Cooking oil spray or oil for frying

• Fresh parsley for garnish (optional)

For the Dipping Sauce:

• ½ cup mayonnaise

• 1 tablespoon ketchup

• 1 teaspoon smoked paprika

• 1 teaspoon lemon juice

• Salt and pepper to taste

Instructions

Step 1: Preheat the Oven or Heat Oil

For Baking: Preheat your oven to 400°F (200°C) and line a baking sheet with parchment paper. Spray lightly with oil.

For Frying: Heat about 1-2 inches of oil in a deep pan over medium heat until it reaches 350°F (175°C).

Step 2: Prepare the Batter

• In a mixing bowl, whisk together the flour, water (or milk), garlic powder, paprika, salt, and pepper until smooth.

• If using breadcrumbs or panko for added crunch, place them in a separate shallow bowl.

Step 3: Coat the Cauliflower

• Dip each cauliflower floret into the batter, ensuring it’s fully coated.

• For extra crispiness, roll the battered cauliflower in the breadcrumbs or panko, pressing lightly to adhere.

Step 4: Cook the Cauliflower

For Baking: Arrange the coated florets on the prepared baking sheet, leaving space between each piece. Spray lightly with oil. Bake for 20-25 minutes, flipping halfway through, until golden brown and crispy.

For Frying: Fry the florets in batches, ensuring they don’t overcrowd the pan. Cook for 3-5 minutes until golden brown and crispy. Transfer to a paper towel-lined plate to drain excess oil.

Step 5: Make the Sauce

• In a small bowl, mix mayonnaise, ketchup, smoked paprika, lemon juice, salt, and pepper until smooth. Adjust seasoning to taste.

Step 6: Serve

• Transfer the crispy cauliflower bites to a serving plate and garnish with fresh parsley. Serve warm with the prepared dipping sauce on the side.

Tips

Uniform Sizes: Cut the cauliflower florets into similar sizes to ensure even cooking.

Oil Temperature: If frying, maintain the oil temperature for consistent crispiness.

Spice It Up: Add a pinch of cayenne or chili powder to the batter for a spicy kick.

Storage Options

Refrigerate: Store leftover bites in an airtight container in the refrigerator for up to 3 days. Reheat in the oven or air fryer to restore crispiness.

Freeze: Freeze cooked bites in a single layer before transferring them to a freezer-safe bag. Reheat directly from frozen in the oven or air fryer.

Crispy cauliflower bites are a crowd-pleasing favorite that are as fun to make as they are to eat. Whether baked or fried, they offer the perfect crunch with every bite!