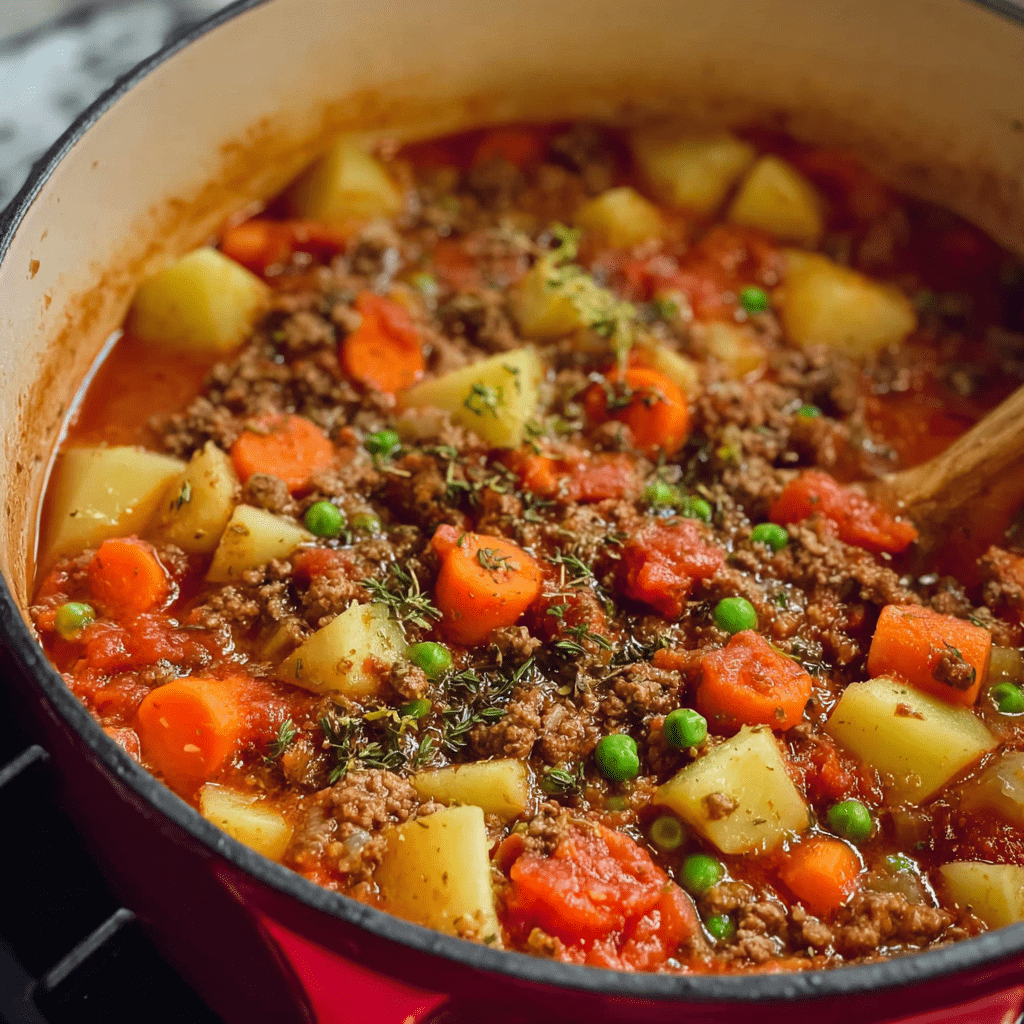
Mango Smoothie

0

Smoothies are the ultimate blend of nutrition and taste, and this Mango Smoothie is a tropical delight that brings sunshine to your glass. Packed with the natural sweetness of mango and banana, this smoothie is both refreshing and energizing. The addition of Greek yogurt not only enhances the creaminess but also provides a boost of protein, making it a fantastic option for breakfast, post-workout recovery, or a midday pick-me-up. The subtle tang from the lemon juice balances the sweetness, adding a refreshing zing that awakens your taste buds.

What makes this Mango Smoothie so special is its simplicity and versatility. With just a handful of wholesome ingredients, you can whip up a nutritious drink in minutes. Whether you’re trying to sneak in more fruit into your diet, cool off on a warm day, or enjoy a guilt-free treat, this recipe has you covered. Customize it with your preferred milk or add your favorite toppings for a smoothie experience that’s uniquely yours.

Why You’ll Love This Recipe

Tropical Flavor: The combination of mango and banana offers a naturally sweet and exotic taste.

Creamy Texture: Greek yogurt gives it a luscious, creamy consistency.

Quick and Easy: Ready in under 5 minutes with no complicated steps.

Ingredients

• 2 cups frozen mango, cubed

• 1 banana, peeled and chunked

• 1/2 cup plain Greek yogurt

• 3/4 cup sugar-free almond milk (or milk of choice)

• 2 tablespoons lemon juice

Optional: Lemon slices for garnish

Instructions

Step 1: Combine Ingredients

In a blender, add the frozen mango, banana, Greek yogurt, almond milk, and lemon juice.

Step 2: Blend Until Smooth

Blend the mixture on high speed until the ingredients are fully combined and the texture is smooth and creamy. If the smoothie is too thick, add more milk, a little at a time, until it reaches your desired consistency.

Step 3: Serve and Garnish

Pour the smoothie into glasses. For a fun presentation, garnish with a lemon slice on the rim of each glass.

Step 4: Enjoy

Serve immediately and savor the refreshing taste of this tropical treat.

Tips

Ripeness Matters: Use a ripe banana for added natural sweetness.

Customize Milk: Swap almond milk for any milk alternative or regular milk based on your preference.

Adjust Sweetness: If you like your smoothie sweeter, add a teaspoon of honey or a splash of vanilla extract.

Storage Options

Refrigerate: Store leftovers in an airtight container in the refrigerator for up to 1 day. Stir or re-blend before serving.

Freeze: Pour the smoothie into popsicle molds and freeze for a fun, icy treat.

This Mango Smoothie is the perfect way to kickstart your day or cool down in the afternoon, delivering a delicious blend of flavors with every sip.

Garlic Parmesan Chicken Tenders

0

Garlic Parmesan Chicken Tenders are a flavor-packed upgrade to your standard chicken tenders. Infused with a buttermilk marinade, coated with a crispy parmesan and panko breading, and drizzled with luscious garlic butter, these tenders are the perfect combination of juicy, crunchy, and savory. Whether you’re serving them as a family-friendly meal, a game-day snack, or a crowd-pleasing appetizer, these chicken tenders are guaranteed to disappear fast.

What makes this recipe special is the layers of flavor in every bite. The buttermilk marinade ensures the chicken stays moist and tender, while the garlic and parmesan in the breading and butter topping deliver bold, satisfying flavors. The crispy golden crust pairs perfectly with the tender, juicy chicken, creating a dish that’s as easy to make as it is to devour.

Why You’ll Love This Recipe

Perfectly Crispy: The panko and parmesan coating ensures a golden, crunchy exterior.

Garlic Butter Finish: The garlic butter drizzle elevates the flavor to gourmet status.

Versatile: Ideal for snacks, main dishes, or party platters.

Ingredients

Chicken:

• 1 ½ pounds boneless, skinless chicken tenderloins

• 1 cup (245 g) buttermilk

• 1 teaspoon kosher salt

• ½ teaspoon ground black pepper

Breading:

• 1 cup (125 g) all-purpose flour

• 2 tablespoons cornstarch

• 1 teaspoon kosher salt

• ½ teaspoon garlic powder

• 2 large eggs, room temperature

• 1 tablespoon water

• 2 cups (216 g) plain panko bread crumbs

• 1 cup (100 g) Parmesan cheese, finely grated

• Vegetable oil, for frying

Garlic Butter:

• ½ cup (1 stick / 113 g) unsalted butter

• 1 tablespoon garlic, minced

• ½ teaspoon kosher salt

• 2 teaspoons parsley, chopped

Instructions

Chicken Marinade

1. In a large bowl, combine the chicken tenderloins, buttermilk, salt, and pepper. Ensure the chicken is fully submerged.

2. Cover the bowl and refrigerate for at least 3 hours or overnight for maximum flavor and tenderness.

Prepare the Breading

1. Remove the marinated chicken from the refrigerator and allow it to come to room temperature while preparing the breading.

2. Set up three shallow plates:

• Plate 1: Mix flour, cornstarch, salt, and garlic powder.

• Plate 2: Whisk eggs with water until smooth.

• Plate 3: Combine panko bread crumbs and grated Parmesan cheese.

Coat the Chicken

1. Line a large baking sheet with parchment paper.

2. Remove a piece of chicken from the buttermilk, allowing excess liquid to drip off.

3. Dredge the chicken in the flour mixture, then coat it in the egg mixture, and finally press it into the panko-parmesan mixture. Ensure even coverage at each step.

4. Place the coated chicken on the prepared baking sheet. Repeat with remaining tenderloins.

Fry the Chicken

1. Heat 2 inches of vegetable oil in a large pot over medium-low heat until it reaches 350°F (175°C).

2. Fry the chicken tenders in batches of 3-4 pieces for 4-5 minutes, or until golden brown and crispy. Check that the internal temperature reaches 165°F (74°C).

3. Remove the cooked tenders with a slotted spoon and drain on a paper towel-lined plate.

4. Monitor the oil temperature between batches, ensuring it stays hot for consistent results.

Prepare the Garlic Butter

1. In a small saucepan over low heat, melt the butter. Add the minced garlic and salt.

2. Once the butter is fully melted and aromatic, remove it from heat and stir in chopped parsley.

Serve

1. Arrange the chicken tenders on a serving platter and drizzle the warm garlic butter over them.

2. Serve immediately, pairing with dipping sauces like ranch or marinara if desired.

Tips

Even Coating: Press the breading mixture firmly onto the chicken to ensure a crispy coating.

Monitor Oil Temperature: Use a thermometer to maintain consistent oil heat for perfectly fried tenders.

Make It Your Own: Add a pinch of paprika or cayenne to the breading for a spicy kick.

Storage and Reheating

Refrigerator: Store leftovers in an airtight container for up to 3 days.

Reheating: Reheat in an air fryer or oven at 375°F until crispy and heated through.

These Garlic Parmesan Chicken Tenders are an irresistible combination of crispy, cheesy, and garlicky goodness. Perfect for any occasion, they’re sure to become a family favorite!

No-Bake Strawberry Crunch Cheesecake

0

This No-Bake Strawberry Crunch Cheesecake is a vibrant and delightful dessert that combines the nostalgic flavors of strawberry shortcake with the creamy decadence of cheesecake. With its buttery vanilla cream cookie crust, luscious cream cheese filling infused with strawberry jello, and a crunchy topping of crushed strawberry wafer cookies, this cheesecake is the epitome of indulgence. Best of all, it requires no baking, making it the perfect dessert for warm days or when you’re short on time but still want to impress your guests.

The beauty of this cheesecake lies in its layers of flavor and texture. The crisp cookie crust provides a sturdy base, while the creamy filling melts in your mouth, and the crunchy topping adds a satisfying bite. It’s a dessert that’s not only visually stunning but also irresistibly delicious. Whether you’re celebrating a special occasion or simply treating yourself, this cheesecake will be the highlight of your table.

Why You’ll Love This Recipe

No Oven Required: A refreshing dessert option that’s easy to make without heating up the kitchen.

Perfectly Layered: Combines a buttery crust, creamy filling, and crunchy topping for a symphony of textures.

Customizable: Easy to tweak by swapping strawberry jello and wafers for other fruity flavors.

Ingredients

For the Crust:

• 1 lb vanilla cream cookies (about 34 cookies, some reserved for topping)

• 6 tbsp butter, melted

For the Filling:

• 3.3 oz Strawberry Jello (1 small box)

• 1 cup boiling water (for dissolving Jello)

• 16 oz cream cheese, softened

• 3/4 cup granulated sugar

• 2 cups heavy whipping cream

• 1/2 cup powdered sugar

• 10 strawberry wafer cookies (about 4 oz)

For Garnish:

• 1/2 small tub whipped topping, thawed

• Crushed vanilla cream cookies and strawberry wafers

Instructions

Step 1: Make the Crust

1. Crush Cookies: Place 26 vanilla cream cookies in a food processor and pulse until fine crumbs form.

2. Combine with Butter: In a mixing bowl, stir together cookie crumbs and melted butter until the mixture resembles wet sand.

3. Form the Base: Press the crumb mixture firmly into the bottom of a greased 10-inch springform pan. Freeze for 15 minutes to set.

Step 2: Prepare the Filling

1. Dissolve Jello: In a medium bowl, dissolve the strawberry jello in 1 cup of boiling water, stirring until completely dissolved. Let it cool to room temperature.

2. Cream Cheese Base: In a large bowl, beat softened cream cheese with granulated sugar until smooth and creamy.

3. Whip Cream: In a separate bowl, whip heavy cream with powdered sugar until stiff peaks form. Gently fold the whipped cream into the cream cheese mixture.

4. Incorporate Jello: Gradually fold the cooled jello into the cream cheese mixture until fully combined.

5. Add Texture: Crush the strawberry wafer cookies and fold them into the filling for added crunch.

Step 3: Assemble the Cheesecake

1. Layer the Filling: Remove the crust from the freezer. Spread half of the cheesecake filling evenly over the crust. Freeze for 15 minutes to firm up the layer, then spread the remaining filling on top.

2. Add Topping: Crush the reserved vanilla cream cookies and strawberry wafers. Sprinkle the mixture evenly over the top of the cheesecake, pressing gently to adhere.

Step 4: Chill and Garnish

1. Chill: Refrigerate the cheesecake for at least 4 hours, or overnight, to allow it to fully set.

2. Decorate: Before serving, pipe decorative swirls of whipped topping around the edge of the cheesecake for a polished look.

Tips

Room Temperature Cream Cheese: Ensures a smooth filling without lumps.

Cool Jello Thoroughly: Avoid adding hot jello to the filling, as it may cause the mixture to curdle.

Firm Layers: Freezing each layer briefly helps maintain a clean, defined appearance.

Storage

Refrigerator: Store leftover cheesecake in an airtight container for up to 4 days.

Freezer: For longer storage, wrap the cheesecake tightly in plastic wrap and freeze for up to 2 months. Thaw in the refrigerator before serving.

With its bright strawberry flavor and creamy texture, this No-Bake Strawberry Crunch Cheesecake is a showstopping dessert that’s as easy to make as it is delicious!

Baked Chicken Ricotta Meatballs

0

Baked Chicken Ricotta Meatballs are a savory and satisfying dish that elevates classic meatballs to a gourmet experience. The addition of creamy ricotta cheese and finely chopped sun-dried tomatoes enhances the flavor and texture, creating a tender and flavorful bite every time. Paired with a rich Alfredo sauce infused with fresh spinach, this dish is both comforting and sophisticated.

Perfect for a weeknight dinner or an elegant gathering, these meatballs are versatile and easy to prepare. Whether served over a bed of jasmine rice, pasta, or even zucchini noodles, they are sure to impress. The combination of Italian herbs, fresh parsley, and Parmesan cheese brings a traditional yet fresh taste to the table, making this recipe a new favorite in your meal rotation.

Why You’ll Love This Recipe

Rich and Creamy: Ricotta and Alfredo sauce create a luxurious texture and flavor.

Elevated Comfort Food: Classic meatballs with an Italian-inspired twist.

Easy to Make: Straightforward steps make this dish perfect for any home cook.

Ingredients

• ½ cup seasoned breadcrumbs

• ½ cup milk

• 1 finely chopped onion

• 3 cloves minced garlic

• ¼ cup freshly chopped parsley

• ¼ cup finely chopped sun-dried tomatoes

• 1½ pounds ground chicken or turkey

• ¾ cup ricotta cheese

• 1 large egg

• ⅓ cup freshly grated Parmesan cheese

• ¾ teaspoon Italian seasoning

• ½ teaspoon salt

• ¼ teaspoon freshly ground black pepper

• 1 jar prepared Alfredo sauce

• 6 ounces fresh spinach

Instructions

Step 1: Prepare the Oven and Soak the Breadcrumbs

1. Preheat your oven to 450°F (230°C).

2. In a medium bowl, combine the breadcrumbs with milk and let them soak for about 2 minutes. This step ensures the meatballs are moist and tender.

Step 2: Mix the Meatball Ingredients

1. In a large mixing bowl, combine the soaked breadcrumb mixture, ground chicken, onion, garlic, parsley, sun-dried tomatoes, ricotta cheese, egg, Parmesan cheese, Italian seasoning, salt, and black pepper.

2. Gently mix the ingredients until just combined. Avoid overmixing, as this can result in dense meatballs.

Step 3: Shape and Bake the Meatballs

1. Shape the mixture into evenly sized meatballs (approximately 1-1½ inches in diameter).

2. Arrange the meatballs on a parchment-lined baking sheet lightly sprayed with nonstick cooking spray.

3. Bake in the preheated oven for 15-20 minutes, or until the meatballs are golden brown and cooked through.

Step 4: Prepare the Sauce

1. While the meatballs are baking, heat the Alfredo sauce in a large skillet over medium heat.

2. Add the fresh spinach to the sauce, stirring frequently, and cook until the spinach has wilted and is fully incorporated into the sauce.

Step 5: Assemble the Dish

1. Once the meatballs are done, transfer them to the skillet with the Alfredo sauce and spinach.

2. Simmer for a few minutes to allow the flavors to meld and the sauce to thicken slightly.

Step 6: Serve and Enjoy

1. Serve the meatballs and sauce over jasmine rice, pasta, or your preferred base.

2. Garnish with additional Parmesan cheese or parsley for a finishing touch.

Tips

Customize the Flavor: Add red pepper flakes to the sauce for a spicy kick or mix in other herbs like basil or thyme for extra depth.

Make Ahead: Prepare the meatballs ahead of time and freeze them for easy weeknight meals. Simply bake from frozen and add to the sauce.

Lighter Option: Swap the Alfredo sauce for a marinara or a light tomato-based sauce for a lower-calorie dish.

Storage Options

Refrigerator: Store leftovers in an airtight container for up to 3 days.

Freezer: Freeze baked meatballs (without sauce) in a single layer, then transfer to a freezer bag. Store for up to 3 months. Reheat and add to the sauce when ready to serve.

Baked Chicken Ricotta Meatballs are a delightful blend of creamy, savory, and hearty flavors. Perfectly cooked and generously coated in a rich spinach Alfredo sauce, they are a satisfying meal that brings comfort and a touch of elegance to your dining table.

Coconut Pineapple Banana Bread

0

Coconut Pineapple Banana Bread combines tropical flavors into a moist and tender loaf that’s perfect for any occasion. This delightful bread features the sweetness of crushed pineapple, the creaminess of ripe bananas, and the nutty texture of shredded coconut, all baked into a soft and aromatic loaf. Whether you’re looking for a satisfying breakfast, a midday snack, or a sweet treat to enjoy with coffee or tea, this bread hits all the right notes.

With its rich combination of tropical ingredients, this banana bread offers a refreshing twist on the classic recipe. The addition of coconut adds an extra layer of texture and flavor, while the natural sweetness from the pineapple and banana ensures every bite is irresistibly delicious.

Why You’ll Love This Recipe

Tropical Flavors: A perfect balance of banana, pineapple, and coconut.

Moist and Tender: Crushed pineapple and ripe banana ensure a soft and moist loaf.

Simple to Make: Easy steps and common ingredients make this recipe accessible to everyone.

Ingredients

• ½ cup butter, softened

• 1 cup granulated sugar

• 2 large eggs

• 1 very ripe banana, mashed

• 1 cup crushed pineapple, undrained

• 2 cups all-purpose flour

• 1 teaspoon baking powder

• ½ teaspoon baking soda

• ¼ teaspoon salt

• ¼ cup shredded coconut

Instructions

Step 1: Preheat the Oven

1. Preheat your oven to 350°F (175°C).

2. Grease a 9×5-inch loaf pan or line it with parchment paper for easy removal.

Step 2: Cream Butter and Sugar

1. In a large mixing bowl, use an electric mixer to cream together the softened butter and sugar.

2. Beat until the mixture is light and fluffy, introducing air into the batter for a well-risen bread.

Step 3: Add Eggs and Fruits

1. Add the eggs one at a time, beating well after each addition to ensure full incorporation.

2. Stir in the mashed banana and undrained crushed pineapple. Mix until evenly combined.

Step 4: Combine Dry Ingredients

1. In a separate medium-sized bowl, sift together the flour, baking powder, baking soda, and salt.

2. Gradually add the dry ingredients to the wet mixture, stirring gently until just combined. Avoid overmixing to maintain a light texture.

Step 5: Fold in the Coconut

1. Gently fold the shredded coconut into the batter, ensuring it is evenly distributed for a burst of tropical flavor in every slice.

Step 6: Bake the Bread

1. Pour the batter into the prepared loaf pan, spreading it evenly.

2. Place the pan in the preheated oven and bake for about 60 minutes, or until a toothpick inserted into the center comes out clean.

3. If the top begins to brown too quickly, cover it loosely with foil during the last 15 minutes of baking.

Step 7: Cool and Serve

1. Remove the bread from the oven and let it cool in the pan for 10 minutes.

2. Transfer to a wire rack to cool completely before slicing.

Tips

Use Ripe Bananas: The riper the bananas, the sweeter and more flavorful your bread will be.

Extra Coconut Flavor: Toast the shredded coconut before adding it to the batter for a nuttier flavor.

Add a Drizzle: Top the cooled loaf with a glaze made of powdered sugar and pineapple juice for extra sweetness.

Storage Options

Room Temperature: Store in an airtight container for up to 3 days.

Refrigerator: Keep in the fridge for up to 1 week.

Freezer: Wrap slices individually in plastic wrap and freeze for up to 3 months. Thaw at room temperature before serving.

This Coconut Pineapple Banana Bread is a tropical escape in every bite, offering a flavorful twist on a beloved classic. Perfectly moist, deliciously sweet, and incredibly easy to make, this recipe will quickly become a favorite!

Creamy Garlic Pesto Chicken

0

Creamy Garlic Pesto Chicken is a flavorful and versatile dish that combines tender chicken strips with a rich, creamy sauce infused with basil pesto, garlic, and sun-dried tomatoes. Vibrant bell peppers add a pop of color and a hint of sweetness, while freshly grated Parmesan and basil provide the perfect finishing touch.

This dish is simple to prepare and pairs beautifully with pasta, rice, or crusty bread, making it an ideal choice for a weeknight dinner or an elegant meal to impress guests.

Why You’ll Love This Recipe

Rich and Flavorful: The creamy pesto sauce is perfectly balanced with garlic and sun-dried tomatoes.

Versatile: Serve it over pasta, rice, or as a standalone dish.

Easy and Quick: Ready in under 30 minutes with simple ingredients.

Ingredients

• 2 tablespoons olive oil, divided

• 1 pound boneless, skinless chicken breasts, sliced into strips

• ½ teaspoon Italian seasoning

• Salt and freshly ground black pepper, to taste

• 1 small yellow onion, finely diced

• 3 cloves garlic, minced

• ½ cup sun-dried tomatoes (preserved in oil), drained and finely chopped

• 2 small bell peppers (any color), sliced into thin strips

• ½ cup heavy cream

• ½ cup low-sodium chicken broth

• 3 tablespoons basil pesto

• Fresh basil, chopped, for garnish

• Parmesan cheese, grated, for garnish

Instructions

Step 1: Cook the Chicken

1. Heat 1 tablespoon of olive oil in a large, 12-inch nonstick skillet over medium heat.

2. Season the chicken strips with Italian seasoning, salt, and black pepper.

3. Add the seasoned chicken to the skillet and cook for 7–8 minutes, or until thoroughly cooked.

4. Remove the chicken from the skillet and set aside.

Step 2: Prepare the Sauce

1. In a small mixing bowl, whisk together the heavy cream, chicken broth, and basil pesto until well blended. Set aside.

Step 3: Sauté the Aromatics

1. Return the skillet to the stove and heat the remaining 1 tablespoon of olive oil over medium heat.

2. Add the diced onions and sauté for about 2 minutes, until softened.

3. Stir in the minced garlic and chopped sun-dried tomatoes, cooking for an additional 30 seconds, until fragrant.

Step 4: Cook the Vegetables

1. Add the sliced bell peppers to the skillet and cook for approximately 4 minutes, or until tender.

Step 5: Simmer the Sauce

1. Pour the prepared pesto sauce mixture into the skillet, stirring to combine.

2. Bring the sauce to a simmer, allowing the flavors to meld.

Step 6: Finish the Dish

1. Return the cooked chicken to the skillet.

2. Simmer for an additional 2 minutes, or until the chicken is heated through and the sauce has slightly thickened.

3. Adjust seasoning with additional salt and pepper, if needed.

Step 7: Serve and Garnish

1. Garnish the dish with freshly grated Parmesan cheese and chopped basil.

2. Serve hot, either on its own or with pasta, rice, or crusty bread.

Tips

Pasta Pairing: Serve over linguine or fettuccine for a restaurant-style meal.

Vegetarian Option: Substitute chicken with sautéed mushrooms or tofu.

Make Ahead: Prep the vegetables and sauce mixture ahead of time for a quicker meal.

Customize: Add crushed red pepper flakes for a spicy kick or toss in baby spinach for extra greens.

Storage Options

Refrigerator: Store leftovers in an airtight container for up to 3 days. Reheat gently in a skillet over low heat to prevent the sauce from separating.

Freezer: Freeze the cooked chicken and sauce in a freezer-safe container for up to 2 months. Thaw in the refrigerator overnight and reheat before serving.

Creamy Garlic Pesto Chicken is a rich and satisfying dish that combines classic flavors with a creamy, modern twist. It’s a versatile and crowd-pleasing meal that’s perfect for any occasion!

Olive Garden Slow Cooker Pasta Fagioli

0

Pasta Fagioli is a comforting Italian-American soup loaded with hearty ingredients like beans, vegetables, and pasta in a rich, flavorful broth. This slow cooker version captures the essence of the Olive Garden classic while making it easy to prepare. Perfect for a cozy meal, this soup is a wholesome option for family dinners or meal prep.

This dish pairs perfectly with a side of crusty bread or a fresh salad, offering a balance of textures and flavors. It’s a hearty, satisfying meal that warms you up on chilly days.

Why You’ll Love This Recipe

Slow Cooker Convenience: Minimal hands-on cooking makes it ideal for busy days.

Hearty and Nutritious: Packed with protein, fiber, and vegetables.

Customizable: Adjust spices and pasta types to suit your taste.

Ingredients

• 1 pound extra lean ground beef, browned and drained

• 1 cup chopped onion

• 1 cup chopped carrots

• ½ cup chopped celery

• 1 can diced tomatoes (14–16 oz) with juice

• 1 can kidney beans (14–15 oz), rinsed and drained

• 1 can white beans (14–15 oz), rinsed and drained

• 4 cups beef broth

• 1 jar tomato-basil marinara sauce (24–26 oz)

• 1½ tsp oregano

• ¾ tsp hot pepper sauce (optional)

• ½ tsp salt

• ½ tsp black pepper

• 1¼ cups dry pasta (fusilli, shells, or ditalini), cooked separately

• ¼ cup chopped fresh parsley (optional)

• Grated Parmesan (optional, for garnish)

Instructions

Step 1: Prepare the Ingredients

1. Heat a skillet over medium heat and cook the ground beef until browned. Drain excess fat.

2. Transfer the cooked beef to a 6-7 quart slow cooker.

Step 2: Add Vegetables and Base Ingredients

1. Finely chop the onion, carrots, and celery. Add them to the slow cooker.

2. Add diced tomatoes (with juice), kidney beans, white beans, beef broth, and marinara sauce.

3. Stir in oregano, hot pepper sauce (if using), salt, and black pepper. Mix everything well.

Step 3: Slow Cook

1. Cover the slow cooker and cook on LOW for 5–7 hours, or until the vegetables are tender.

Step 4: Cook the Pasta

1. About 15–20 minutes before the soup is done, cook the dry pasta according to the package instructions.

2. Drain the pasta and set it aside.

Step 5: Combine and Adjust Seasoning

1. Stir the cooked pasta into the soup in the slow cooker.

2. Taste the soup and adjust seasoning with additional salt, pepper, or hot sauce, if needed.

Step 6: Serve and Garnish

1. Ladle the soup into bowls and garnish with chopped parsley and grated Parmesan, if desired.

2. Serve hot with a side of crusty bread or salad.

Tips

Meat Options: Swap ground beef for Italian sausage, ground turkey, or a plant-based alternative.

Vegetarian Version: Use vegetable broth and omit the ground beef for a vegetarian-friendly soup.

Pasta Precaution: Cook pasta separately to prevent it from absorbing too much liquid and becoming mushy in the soup.

Make Ahead: Prepare the soup in advance and store the pasta separately. Combine just before serving.

Storage Options

Refrigerator: Store in an airtight container for up to 3 days. Keep the pasta separate for best results.

Freezer: Freeze the soup (without pasta) for up to 3 months. Thaw overnight in the refrigerator and reheat. Cook fresh pasta before serving.

This Olive Garden Slow Cooker Pasta Fagioli is a rich, hearty soup that’s easy to prepare and full of comforting flavors. It’s a family favorite that will leave everyone asking for seconds!

Cheesesteak Taco Fries

0

Cheesesteak Taco Fries are a fun, flavorful twist on loaded fries. Combining crispy waffle fries, seasoned ground beef, melted cheese, and fresh toppings, this dish is a perfect crowd-pleaser for game days, casual gatherings, or a hearty snack.

With layers of savory beef, gooey cheese, and fresh vegetables, every bite is loaded with bold flavors and textures. This easy-to-make recipe transforms simple ingredients into a mouthwatering comfort food experience.

Why You’ll Love This Recipe

Quick and Easy: Ready in under 30 minutes with minimal prep.

Crowd-Pleaser: Perfect for sharing at parties, game nights, or casual dinners.

Customizable: Add your favorite taco toppings to make it your own.

Ingredients

• 1 bag frozen waffle fries

• 1 lb ground beef

• 1 onion, chopped

• 1 packet taco seasoning

• 2 cups shredded cheddar jack cheese

• ½ cup chopped green onions

• 1 tomato, diced

Instructions

Step 1: Cook the Waffle Fries

1. Preheat the oven to 450°F (230°C).

2. Spread the frozen waffle fries in a single layer on a parchment-lined baking sheet.

3. Bake for 20–25 minutes, or until crispy and golden brown.

Step 2: Prepare the Taco Meat

1. While the fries are baking, heat a skillet over medium-high heat.

2. Add the ground beef and chopped onion to the skillet. Cook until the beef is browned and the onions are softened, about 7–8 minutes.

3. Drain any excess grease from the skillet.

4. Lower the heat to low and stir in the taco seasoning. Cook for another 2–3 minutes, stirring to combine.

Step 3: Assemble the Fries

1. Remove the cooked waffle fries from the oven.

2. Top the fries with the seasoned beef mixture, spreading it evenly.

3. Sprinkle the shredded cheddar jack cheese over the beef.

Step 4: Melt the Cheese

1. Return the loaded fries to the oven and bake for an additional 5–10 minutes, or until the cheese is fully melted and bubbly.

Step 5: Add Fresh Toppings

1. Once out of the oven, sprinkle the fries with chopped green onions and diced tomatoes.

Step 6: Serve and Enjoy

1. Serve the Cheesesteak Taco Fries hot, with optional toppings like sour cream, guacamole, or salsa.

Tips

Add Heat: Sprinkle diced jalapeños or hot sauce over the top for a spicy kick.

Extra Toppings: Include black olives, shredded lettuce, or crumbled queso fresco for added layers of flavor.

Cheese Options: Swap cheddar jack for pepper jack, mozzarella, or a taco blend cheese.

Make It a Meal: Serve with a side of refried beans or a fresh salad.

Storage Options

Refrigerator: Store leftovers in an airtight container for up to 2 days. Reheat in the oven at 350°F (175°C) until warm and crispy.

Not Freezer-Friendly: Fries may lose their crispiness when frozen and reheated.

Cheesesteak Taco Fries are a delightful, indulgent dish that combines the best of comfort food and taco flavors. Perfect for any occasion, they’re sure to be a hit with family and friends!

Snickerdoodle Muffins Recipe

0

Snickerdoodle Muffins are a delightful fusion of the classic cookie’s cinnamon-sugar charm with the soft, fluffy texture of a muffin. Perfect for breakfast, brunch, or a snack, these muffins deliver a cozy, warm flavor that feels like a comforting hug in every bite.

The buttery muffin base is enriched with vanilla and sour cream for a tender crumb, while the cinnamon-sugar topping provides a sweet and spiced finish that’s irresistible. Whether served warm or at room temperature, these muffins are sure to be a crowd-pleaser.

Why You’ll Love This Recipe

Classic Snickerdoodle Flavor: Cinnamon and sugar blend perfectly to capture the essence of the beloved cookie.

Soft and Moist: The addition of sour cream ensures a tender and moist muffin.

Easy to Make: Simple ingredients and straightforward steps make this recipe approachable for all skill levels.

Ingredients

For the Muffins:

• ½ cup unsalted butter, softened

• ⅔ cup granulated sugar

• 1 large egg

• 1½ tsp vanilla extract

• ½ cup milk

• ¼ cup sour cream

• 1⅔ cups all-purpose flour

• 1½ tsp baking powder

• ¼ tsp baking soda

• ½ tsp ground cinnamon

• ½ tsp salt

For the Topping:

• 3 tbsp melted butter

• ⅓ cup granulated sugar

• 2 tsp ground cinnamon

Instructions

Step 1: Preheat and Prepare the Pan

1. Preheat the oven to 375°F (190°C).

2. Generously grease a standard muffin pan with non-stick cooking spray and set aside.

Step 2: Make the Muffin Batter

1. In a large mixing bowl, cream together the softened butter and granulated sugar using a hand mixer or stand mixer for about 2 minutes, until smooth and well combined.

2. Add the egg, vanilla extract, milk, and sour cream. Mix until the ingredients are evenly incorporated.

3. Gradually add the flour, baking powder, baking soda, cinnamon, and salt to the wet ingredients.

4. Using a rubber spatula, gently fold the dry ingredients into the wet mixture until just combined. Avoid overmixing to ensure soft and tender muffins.

Step 3: Fill the Muffin Pan

1. Spoon the batter into the prepared muffin pan, filling each cup about two-thirds full.

2. Insert a toothpick into the center of each batter-filled cup to help prevent the tops from puffing unevenly.

Step 4: Bake the Muffins

1. Place the muffin pan in the preheated oven and bake for about 25 minutes, or until a toothpick inserted into the center of a muffin comes out clean.

2. Remove the muffins from the oven and let them cool in the pan for 1–2 minutes before transferring to a wire cooling rack.

Step 5: Add the Topping

1. Melt the butter for the topping in a small container.

2. In a separate container, mix the granulated sugar and ground cinnamon until evenly blended.

3. While the muffins are still warm, use a pastry brush to apply a thin layer of melted butter over each muffin.

4. Generously sprinkle the cinnamon-sugar mixture over the buttered tops for a sweet, spiced finish.

Step 6: Serve and Enjoy

1. Serve the muffins warm for the best flavor, or let them cool completely and store for later.

Tips

Sour Cream Substitute: Use plain yogurt if you don’t have sour cream on hand.

Even Baking: Rotate the muffin pan halfway through baking to ensure even cooking.

Customization: Add a pinch of nutmeg to the batter for an extra layer of warmth.

Presentation: Top the muffins with a dusting of powdered sugar for a decorative touch.

Storage Options

Room Temperature: Store muffins in an airtight container at room temperature for up to 2 days.

Refrigerator: Keep in the refrigerator for up to 5 days. Reheat in the microwave for 10–15 seconds before serving.

Freezing: Freeze unbuttered and unsugared muffins in a freezer-safe bag for up to 2 months. Thaw and add the topping before serving.

Snickerdoodle Muffins are a delightful treat that combines nostalgia with indulgence. Their soft texture and warm cinnamon flavor make them a must-try recipe for any occasion!

Chicken Bacon Ranch Pinwheels

0

Chicken Bacon Ranch Pinwheels are a quick and easy appetizer or snack that’s packed with flavor. With a creamy, cheesy filling loaded with chicken, bacon, and ranch seasoning, these pinwheels are the perfect bite-sized treat for parties, picnics, or a satisfying lunch. The flavored tortillas not only add a pop of color but also complement the savory filling beautifully.

These pinwheels are easy to make ahead, making them a stress-free option for entertaining or meal prep. Their versatility and crowd-pleasing flavor make them a hit for any occasion.

Why You’ll Love This Recipe

Quick and Easy: Simple ingredients and straightforward preparation.

Versatile: Great for parties, lunches, or on-the-go snacks.

Packed with Flavor: Chicken, bacon, cheddar, and ranch come together in a creamy filling.

Ingredients

• 2 cups shredded cooked chicken (e.g., rotisserie chicken)

• 8 oz cream cheese, softened

• 1 cup shredded cheddar cheese

• ½ cup crumbled cooked bacon

• 1–2 tbsp ranch seasoning mix (adjust to taste)

• 1 tbsp milk (optional, for smoother mixture)

• 4 large flavored tortillas (e.g., spinach, sun-dried tomato)

Instructions

Step 1: Prepare the Filling

1. In a large mixing bowl, combine shredded chicken, softened cream cheese, cheddar cheese, bacon, ranch seasoning, and milk (if using).

2. Mix thoroughly until smooth and well combined. Adjust the ranch seasoning to taste.

Step 2: Lay Out the Tortillas

1. Place one tortilla flat on a clean surface.

Step 3: Spread the Filling

1. Spread a portion of the chicken mixture evenly across the tortilla, leaving a small border (about ½ inch) around the edges.

Step 4: Roll the Tortilla

1. Starting at one edge, tightly roll the tortilla to encase the filling.

Step 5: Repeat the Process

1. Repeat the spreading and rolling process with the remaining tortillas.

Step 6: Wrap and Chill

1. Wrap each rolled tortilla tightly in plastic wrap.

2. Chill in the refrigerator for at least 2 hours, or overnight, to allow the filling to firm up and the flavors to meld.

Step 7: Slice into Pinwheels

1. Remove the plastic wrap and slice each roll into ½-inch thick pinwheels.

Step 8: Serve

1. Arrange the pinwheels on a serving platter.

2. Garnish with chopped green onions or fresh herbs if desired. Serve immediately.

Tips

Room Temperature Cream Cheese: Ensure the cream cheese is softened for easier mixing.

Chill Time: Don’t skip the chilling step—it makes slicing easier and keeps the pinwheels intact.

Customizable: Add diced green onions, diced jalapeños, or chopped herbs for extra flavor.

Make Ahead: Prepare the rolls the day before and slice just before serving for a stress-free appetizer.

Storage Options

Refrigerator: Store leftover pinwheels in an airtight container in the refrigerator for up to 3 days.

Freezing: Freeze the uncut rolls tightly wrapped in plastic wrap. Thaw in the refrigerator overnight and slice before serving.

Chicken Bacon Ranch Pinwheels are a flavorful, bite-sized treat that’s easy to prepare and perfect for any gathering. With their creamy filling and colorful presentation, they’re sure to impress!