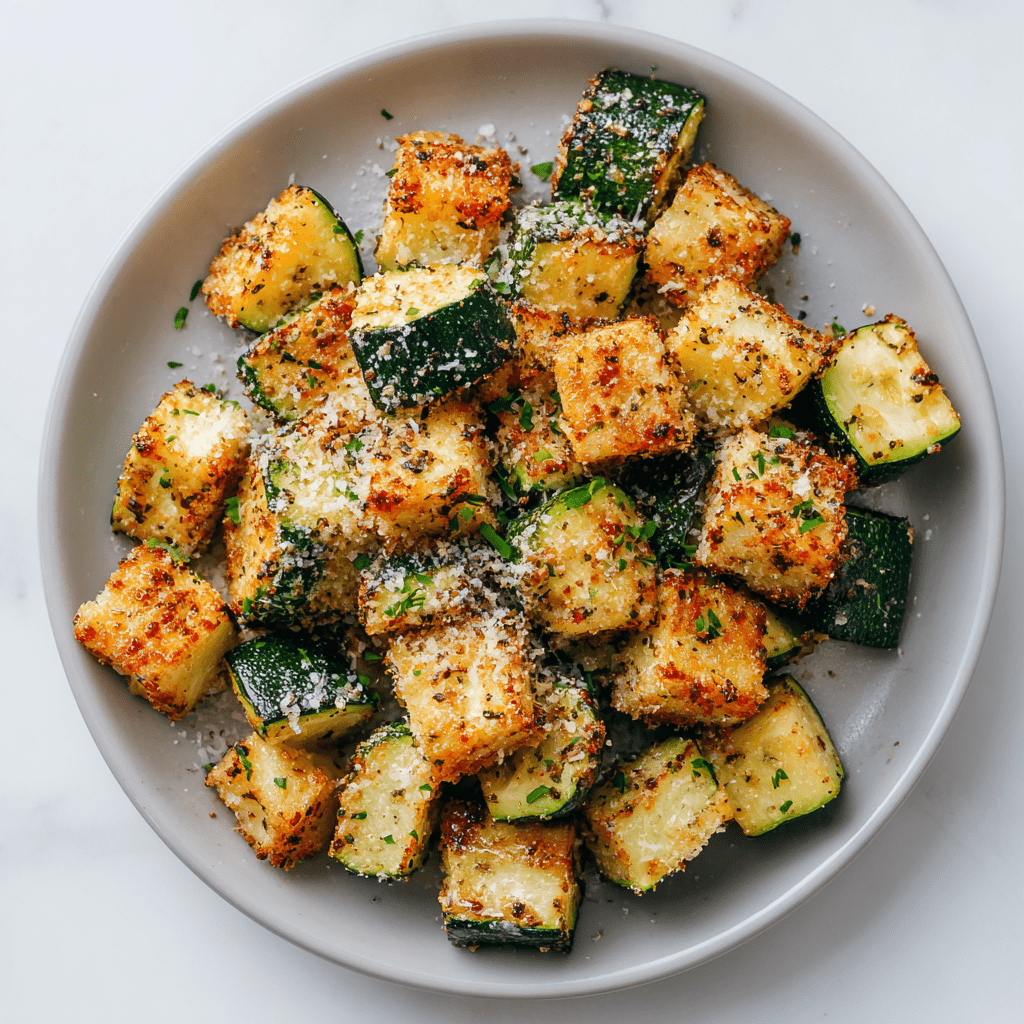
Egg Roll in a Bowl

0

Egg Roll in a Bowl is a delicious, low-carb alternative to traditional egg rolls, bringing all the flavors of the popular appetizer without the deep-fried wrapper. This quick and easy meal is packed with tender pork sausage, crisp vegetables, and flavorful seasonings like garlic, ginger, and soy sauce. It’s a satisfying dish perfect for keto, paleo, or gluten-free diets, and it comes together in under 20 minutes—making it a great option for busy weeknights or meal prep.

What makes this dish shine is the combination of bold umami flavors and a balance of textures, from the tender ground pork to the crunchy cabbage and carrots. The sesame oil adds a rich, toasty note, while rice vinegar brings a touch of brightness. Whether served on its own, paired with cauliflower rice, or accompanied by a bowl of egg drop soup, this is a meal that’s both nourishing and comforting without the guilt of deep frying.

Why You’ll Love This Recipe

Low-Carb & Keto-Friendly: All the flavors of egg rolls without the wrapper.

Quick & Easy: Ready in 20 minutes with just one pan for easy cleanup.

Customizable: Swap in different proteins like ground turkey or beef.

Ingredients

Main Dish:

• 1 ½ tablespoons sesame oil

• 1 lb ground pork or bulk pork sausage

• 1 medium sweet onion, chopped

• 2 cloves garlic, minced

• 1 tablespoon fresh ginger or ginger paste

• 1 medium head green cabbage, finely shredded

• 2 carrots, cut into thin matchsticks

Seasonings & Garnish:

• 1 tablespoon rice vinegar

• 1 tablespoon low-sodium soy sauce

• Kosher salt and freshly ground black pepper, to taste

• 2 green onions, sliced

Instructions

Step 1: Cook the Meat

1. Add ½ tablespoon of sesame oil to a large skillet or wok and place it over medium heat.

2. Add the ground pork or sausage and cook until it’s about halfway browned, breaking it apart with a spatula.

Step 2: Add Onions and Aromatics

1. Add the chopped onion to the skillet and continue cooking until the sausage is fully browned and the onions are soft.

2. Reduce the heat to low and add the minced garlic and fresh ginger.

3. Stir constantly for 1-2 minutes until fragrant. Remove the mixture from the skillet and set it aside.

Step 3: Cook the Vegetables

1. Add the remaining 1 tablespoon of sesame oil to the skillet and raise the heat back to medium.

2. Add the shredded cabbage and matchstick carrots.

3. Cook, stirring frequently, until the vegetables are just starting to wilt, about 8 minutes.

Step 4: Combine and Season

1. Stir in the rice vinegar and low-sodium soy sauce.

2. Add the cooked pork mixture back into the skillet and stir everything together.

3. Season with salt and black pepper to taste.

4. Heat for an additional 1-2 minutes until everything is warmed through.

Step 5: Garnish and Serve

1. Remove from heat and sprinkle with sliced green onions for a fresh and vibrant garnish.

2. Serve immediately on its own or with a side of cauliflower rice for a more filling meal.

Tips

Use Fresh Ginger: Fresh ginger adds a stronger, more aromatic flavor than dried alternatives.

Cut Veggies Evenly: Thin, evenly sized cuts ensure quick and even cooking.

Adjust the Spice Level: Add sriracha, red pepper flakes, or chili oil for an extra kick.

Swap Proteins: Ground turkey, chicken, or even tofu can be used for a lighter version.

Storage Options

Refrigeration: Store leftovers in an airtight container for up to 3 days in the refrigerator.

Freezing: Freeze in a sealed container for up to 3 months. Thaw overnight in the fridge and reheat in the microwave or on the stovetop.

Reheat: Warm on low heat in a skillet or use the microwave on reduced power to avoid overcooking the vegetables.

Serving Suggestions

With Cauliflower Rice: A perfect low-carb side to round out your meal.

With Egg Drop Soup: Adds a warm and comforting element to your dinner.

With Steamed Broccoli: Lightens up the meal and complements the flavors perfectly.

Frequently Asked Questions

Can I use prepackaged coleslaw mix?

Yes, a 12-14 ounce bag of coleslaw or broccoli slaw mix works perfectly and saves time.

Can I use a different type of meat?

Absolutely! Ground beef, turkey, or chicken can be used instead of pork sausage for a leaner version.

Is this recipe gluten-free?

Use tamari or coconut aminos in place of soy sauce for a gluten-free option.

Chopped Italian Sandwiches

0

Italian sandwiches are known for their bold flavors, fresh ingredients, and satisfying textures. This chopped Italian sandwich takes the classic deli-style hoagie and transforms it into a chopped masterpiece, ensuring that every bite delivers the perfect balance of flavors. Instead of layering the meats, cheeses, and vegetables in a traditional hoagie, this method involves finely chopping all the ingredients and mixing them together with a flavorful dressing. The result? A sandwich with even distribution of ingredients, ensuring no single bite is overwhelmed by one element.

This sandwich is perfect for a quick lunch, game-day snack, or even a light dinner. The combination of savory meats, tangy banana peppers, crisp lettuce, and creamy provolone cheese makes it a well-rounded and delicious meal. The Italian dressing adds just the right amount of zest, while the hoagie bun provides a sturdy base for the chopped mixture. Whether you serve it warm or cold, this chopped Italian sandwich is a fun and tasty twist on a deli favorite.

Why You’ll Love This Recipe

Perfectly Balanced Flavors: Every bite has an even mix of meats, cheese, and veggies.

Quick and Easy: Ready in just minutes with minimal prep work.

Customizable: Add or swap ingredients based on your preference.

Ingredients

Sandwich:

• 1 hoagie bun

• 4 slices ham

• 8 slices pepperoni

• 6 slices salami

• 4 slices provolone cheese

• ¼ cup banana peppers, sliced

• 4 lettuce leaves, chopped

• 1 tomato, diced

• ¼ cup red onion, finely chopped

Dressing:

• 2 tablespoons mayonnaise

• 2 tablespoons Italian dressing

Instructions

Step 1: Warm the Meat

1. Preheat your oven to 350°F (175°C).

2. Lay the ham, pepperoni, and salami on a baking sheet and warm them in the oven for 3-5 minutes, just until slightly crispy.

Step 2: Chop the Ingredients

1. While the meats are warming, finely chop the lettuce, tomato, banana peppers, and red onion.

2. Once the meats are heated, chop them into small pieces as well.

Step 3: Mix the Filling

1. In a large mixing bowl, combine the chopped meats, vegetables, and provolone cheese.

2. Add the mayonnaise and Italian dressing, then toss everything together until well coated.

Step 4: Assemble the Sandwich

1. Slice the hoagie bun horizontally, leaving one side connected.

2. Spoon the chopped mixture evenly onto the bottom half of the bun.

3. Gently press the top half of the hoagie down to help the flavors meld together.

Step 5: Serve and Enjoy

1. Slice the sandwich in half for easy serving.

2. Enjoy immediately, or wrap it up for a delicious meal on the go.

Tips

For a Toasted Bun: Lightly toast the hoagie before assembling for added crunch.

Add a Spicy Kick: Sprinkle in some crushed red pepper or drizzle hot sauce over the filling.

Make it Extra Creamy: Mix in an extra tablespoon of mayo for a richer texture.

Storage Options

Refrigeration: Store leftover chopped filling in an airtight container for up to 2 days. Assemble the sandwich fresh when ready to eat.

Meal Prep: Prepare the filling in advance for a quick and easy sandwich option throughout the week.

Butter Swim Biscuits

0

Butter Swim Biscuits are the easiest homemade biscuits you’ll ever make, requiring no rolling, no kneading, and no biscuit cutter. These biscuits get their name because they literally swim in melted butter as they bake, resulting in crisp, golden edges and an ultra-soft, fluffy interior. The buttermilk adds a slight tang to the biscuits, complementing the rich butter flavor perfectly.

The simplicity of this recipe makes it an ideal choice for breakfast, brunch, or a comforting side dish for any meal. Serve these biscuits warm with jam, honey, or gravy, or enjoy them straight from the pan—either way, they are absolutely irresistible.

Why You’ll Love This Recipe:

Crispy & Buttery: Baked in butter for a golden crust and rich flavor.

Soft & Fluffy: Buttermilk makes them tender with a perfect crumb.

No Special Equipment Needed: Just mix, spread, and bake!

Ingredients

2 ½ cups (312.5 g) all-purpose flour

4 teaspoons baking powder

1 tablespoon granulated sugar

2 teaspoons kosher salt

2 cups (490 g) buttermilk

½ cup (1 stick / 113 g) unsalted butter, melted

Instructions

Step 1: Preheat the Oven

1. Preheat the oven to 450°F (230°C).

2. Lightly grease or butter an 8×8-inch baking dish (or use a non-stick pan).

Step 2: Mix the Biscuit Dough

1. In a medium bowl, whisk together flour, baking powder, sugar, and salt to evenly distribute the ingredients.

2. Pour in the buttermilk and stir gently until mostly combined—be careful not to overmix, as this can make the biscuits dense.

Step 3: Assemble the Biscuits

1. Pour the melted butter into the baking dish, ensuring it coats the bottom evenly.

2. Place the biscuit dough directly on top of the melted butter.

3. Use a spatula or your hands to spread the dough evenly to the edges of the pan.

4. Cut the unbaked dough into 9 squares using a knife (a 3×3 pattern).

Step 4: Bake the Biscuits

1. Place the dish in the preheated oven and bake for 28 minutes, or until the tops are golden brown and crispy.

2. Remove from the oven and let the biscuits sit for a few minutes to absorb any remaining butter.

Step 5: Serve and Enjoy!

1. Cut the biscuits along the pre-marked lines and serve warm.

2. Enjoy with honey, jam, gravy, or butter for a classic Southern treat!

Tips for Perfect Biscuits

Use Cold Buttermilk – Cold liquid helps create a lighter, fluffier biscuit texture.

Don’t Overmix the Dough – Stir just until combined to keep the biscuits soft.

Try a Cast-Iron Skillet – Baking in a cast-iron pan gives the biscuits extra crispy edges.

Want Extra Flavor? – Add garlic powder, shredded cheese, or fresh herbs to the dough.

Storage & Reheating

Room Temperature: Store in an airtight container for up to 2 days.

Refrigeration: Keep in the fridge for up to 5 days.

Freezing: Wrap biscuits individually and freeze for up to 3 months.

Reheating: Warm in a 350°F (175°C) oven for 5-10 minutes or microwave for 20-30 seconds.

Serving Suggestions

With Breakfast – Serve alongside eggs, bacon, or sausage gravy.

With Dinner – Pairs well with soups, stews, or roasted meats.

As a Snack – Enjoy with butter, jam, or honey for a sweet treat.

These Butter Swim Biscuits are simple, delicious, and a must-try for biscuit lovers. Whether you serve them with breakfast, lunch, or dinner, their crispy, golden edges and buttery, melt-in-your-mouth texture make them completely irresistible! 🧈🥐✨

Hobo Casserole – Rustic Ground Beef and Potato Bake

0

Hobo Casserole is a hearty, rustic, and comforting dish that brings together savory ground beef, tender potatoes, and a creamy, cheesy sauce, all baked to golden perfection. This old-fashioned casserole is a simple yet satisfying meal that’s perfect for busy weeknights or a cozy family dinner. The layers of sliced Russet potatoes soak up all the rich flavors from the beef and creamy mushroom sauce, while a crispy topping of French fried onions adds the perfect crunch.

What makes this dish truly special is its combination of textures and flavors—the creaminess of the soup and sour cream mixture balances the savory beef and vegetables, while melted cheddar cheese brings everything together. The best part? It’s easy to make with simple, pantry-friendly ingredients, and can be customized with your favorite seasonings or extra toppings.

Why You’ll Love This Recipe:

Comfort Food Classic: A warm, filling casserole perfect for family meals.

Easy and Budget-Friendly: Made with simple, affordable ingredients.

Customizable: Add extra veggies or swap cheeses for variety.

Ingredients

Main Casserole:

• 1 lb lean ground beef

• ½ cup yellow onion, diced

• 1 green bell pepper, diced

• 2 cloves garlic, minced

• 2-3 medium-sized Russet potatoes, peeled and thinly sliced

• 1 can condensed cream of mushroom soup (10.75 oz)

• 1 cup sour cream

• 1 cup shredded cheddar cheese

• Salt and pepper, to taste

Topping & Garnish:

• French fried onions (for topping)

• Sliced green onions (optional, for garnish)

• Chopped fresh parsley (optional, for garnish)

Instructions

Step 1: Preheat and Prepare Baking Dish

1. Preheat your oven to 375°F (190°C).

2. Lightly grease a 9×13-inch casserole dish with cooking spray or butter.

Step 2: Cook the Ground Beef and Vegetables

1. In a large skillet, cook the ground beef over medium heat, breaking it up with a spatula as it cooks.

2. Cook for 7-10 minutes, or until the beef is browned.

3. Add the diced onion, green bell pepper, and minced garlic to the skillet.

4. Sauté for 5 minutes, until the vegetables are soft and fragrant.

Step 3: Make the Cream Sauce

1. In a medium bowl, combine the condensed cream of mushroom soup and sour cream.

2. Stir until smooth, then season with salt and pepper to taste.

Step 4: Assemble the Casserole

1. Peel and thinly slice the potatoes, ensuring they are cut evenly for even cooking.

2. Arrange the potato slices in two layers in the bottom of the greased baking dish.

3. Lightly season each layer with salt and pepper.

4. Spoon the cooked ground beef and vegetable mixture evenly over the potatoes.

5. Pour the cream sauce over the beef and vegetables, spreading it evenly with a spatula.

Step 5: Bake the Casserole

1. Sprinkle the shredded cheddar cheese evenly over the top.

2. Bake in the preheated oven for 30-35 minutes, or until the potatoes are tender and the top is golden brown.

Step 6: Add Crispy Topping & Finish Baking

1. Remove the casserole from the oven and sprinkle French fried onions over the top.

2. Return to the oven for an additional 5 minutes, until the onions are crispy.

3. Let the casserole cool for a few minutes before serving.

Step 7: Garnish and Serve

1. Garnish with sliced green onions or chopped fresh parsley, if desired.

2. Serve warm with a side of crusty bread or a fresh green salad.

Tips

For Extra Flavor: Add ½ teaspoon smoked paprika or Worcestershire sauce to the ground beef while cooking.

Make It Cheesier: Use a blend of cheddar and mozzarella for a richer cheese pull.

Speed Up Cooking Time: Parboil the potato slices for 5 minutes before assembling the casserole to reduce bake time.

Storage Options

Refrigeration: Store in an airtight container for up to 3 days.

Freezing: Freeze unbaked for up to 3 months; thaw overnight in the fridge before baking.

Reheating: Warm in a 350°F (175°C) oven for 15 minutes, or microwave in short bursts.

Blueberry Sour Cream Coffee Cake

0

Blueberry Sour Cream Coffee Cake is a rich, moist, and buttery cake packed with fresh blueberries and layered with a cinnamon-pecan streusel. The addition of sour cream makes the crumb incredibly tender, while the blueberries add a burst of freshness in every bite. This cake is baked in a Bundt pan, giving it an elegant shape that’s perfect for special occasions, brunch, or an indulgent morning treat with coffee.

What sets this coffee cake apart is the swirl of brown sugar, cinnamon, and chopped pecans that runs through the center and tops the cake. The crunchy, caramelized streusel complements the soft, moist cake perfectly. A final dusting of confectioners’ sugar enhances both the flavor and presentation, making it irresistibly inviting. Whether served warm or at room temperature, this cake is a crowd-pleaser that will keep everyone coming back for more.

Why You’ll Love This Recipe:

Moist and Tender: The sour cream adds richness and softness to the cake.

Deliciously Layered: A cinnamon-pecan streusel runs through the middle and on top.

Perfect for Any Occasion: Ideal for brunch, dessert, or a cozy coffee break.

Ingredients

Cake Batter:

• 1 cup butter, softened

• 2 cups white sugar

• 2 eggs

• 1 cup sour cream

• 1 teaspoon vanilla extract

• 1 ⅝ cups all-purpose flour

• 1 teaspoon baking powder

• ¼ teaspoon salt

• 1 cup fresh blueberries

Streusel Filling & Topping:

• ½ cup brown sugar

• 1 teaspoon ground cinnamon

• ½ cup chopped pecans

Finishing Touch:

• 1 tablespoon confectioners’ sugar (for dusting)

Instructions

Step 1: Preheat and Prepare the Pan

1. Preheat the oven to 350°F (175°C).

2. Grease and flour a 9-inch Bundt pan to prevent sticking.

Step 2: Make the Cake Batter

1. In a large bowl, cream together the butter and sugar until light and fluffy.

2. Add the eggs, one at a time, beating well after each addition.

3. Stir in the sour cream and vanilla extract, mixing until smooth.

4. In a separate bowl, whisk together the flour, baking powder, and salt.

5. Gradually stir the dry ingredients into the wet ingredients, mixing just until combined.

6. Gently fold in the blueberries, ensuring they are evenly distributed.

Step 3: Prepare the Streusel

1. In a small bowl, mix together the brown sugar, cinnamon, and chopped pecans.

Step 4: Assemble the Cake

1. Spoon half of the batter into the prepared Bundt pan, spreading it evenly.

2. Sprinkle half of the streusel mixture over the batter.

3. Add the remaining batter on top, then sprinkle the remaining streusel over the top layer.

4. Use a knife or thin spatula to gently swirl the cinnamon-sugar layer into the cake.

Step 5: Bake the Cake

1. Place in the preheated oven and bake for 55-60 minutes, or until a knife inserted into the center comes out clean.

2. Let the cake cool in the pan for about 15 minutes before inverting it onto a wire rack.

Step 6: Finish and Serve

1. Once the cake has cooled completely, transfer it to a serving plate.

2. Dust the top lightly with confectioners’ sugar for a decorative touch.

3. Slice and enjoy warm or at room temperature with a cup of coffee or tea.

Tips

Prevent Blueberries from Sinking: Toss the blueberries in 1 tablespoon of flour before folding them into the batter.

For Extra Crunch: Toast the pecans before adding them to the streusel mixture.

Make It Sweeter: Drizzle with a simple vanilla glaze instead of dusting with sugar.

Storage Options

Room Temperature: Store in an airtight container for up to 2 days.

Refrigeration: Keeps well in the fridge for up to 5 days—just bring it to room temperature before serving.

Freezing: Wrap slices individually in plastic wrap and freeze for up to 3 months. Thaw at room temperature before serving.

Baked Cream Cheese Chicken

0

Baked Cream Cheese Chicken is a rich, creamy, and irresistibly delicious dish that transforms simple chicken breasts into a comforting, indulgent meal. The combination of cream cheese, sour cream (or Greek yogurt), mozzarella, and Parmesan creates a luscious topping that keeps the chicken moist while adding incredible depth of flavor. Infused with garlic, lemon, and fresh herbs, this dish is the perfect blend of creamy, cheesy goodness with a touch of freshness.

The best part? It’s easy to make and requires just a few simple ingredients. With minimal prep and only 30 minutes in the oven, you’ll have a decadent, restaurant-quality meal ready to serve. This dish pairs beautifully with roasted vegetables, pasta, rice, or a simple side salad, making it a versatile option for both weeknight dinners and special occasions.

Why You’ll Love This Recipe:

Ultra-Creamy and Cheesy: A decadent topping of cream cheese, mozzarella, and Parmesan.

Easy and Quick: Simple steps with minimal prep and only 30 minutes of baking.

Family-Friendly: A crowd-pleasing dish that pairs well with a variety of sides.

Ingredients

Chicken:

• 4 boneless, skinless chicken breasts

• ½ teaspoon salt

• ¼ teaspoon black pepper

• ½ teaspoon paprika (optional, for color)

• 1 tablespoon olive oil or melted butter

• Cooking spray or extra oil for greasing the baking dish

Cream Cheese Mixture:

• 8 oz cream cheese, softened

• ½ cup sour cream or Greek yogurt

• ½ cup shredded mozzarella cheese

• ¼ cup grated Parmesan cheese

• 2 cloves garlic, minced

• 1 tablespoon lemon juice

• 1 teaspoon onion powder

• ½ teaspoon salt

• 2 tablespoons fresh parsley or chives, chopped (plus extra for garnish)

Instructions

Step 1: Prepare the Chicken

1. Preheat your oven to 375°F (190°C).

2. Lightly grease a 9×13-inch baking dish with cooking spray or a bit of olive oil.

3. Pat the chicken breasts dry with paper towels to remove excess moisture.

4. Season the chicken with salt, black pepper, and paprika (if using).

5. Arrange the seasoned chicken breasts in the prepared baking dish in a single layer.

Step 2: Make the Cream Cheese Mixture

1. In a medium bowl, combine the softened cream cheese, sour cream (or Greek yogurt), shredded mozzarella, Parmesan cheese, minced garlic, lemon juice, onion powder, salt, and chopped parsley or chives.

2. Mix well using a spoon or hand mixer until the ingredients are smooth and well blended.

Step 3: Assemble the Dish

1. Evenly spread the cream cheese mixture over the chicken breasts, ensuring they are fully coated.

2. Drizzle the top with olive oil or melted butter to help with browning and enhance the flavor.

Step 4: Bake the Chicken

1. Place the baking dish in the preheated oven and bake for 25-30 minutes, or until the chicken reaches an internal temperature of 165°F (74°C).

2. To check for doneness, cut into the thickest part of a chicken breast—there should be no pink inside, and the juices should run clear.

3. For a golden, bubbly top, switch the oven to broil mode for the last 2-3 minutes of cooking (watch closely to avoid burning).

Step 5: Garnish and Serve

1. Remove the baked chicken from the oven and let it rest for 5 minutes to allow the juices to settle.

2. Garnish with extra chopped parsley or chives for a burst of color and freshness.

3. Serve warm with roasted vegetables, a fresh salad, steamed rice, pasta, or crusty bread to soak up the creamy sauce.

Tips

For Extra Flavor: Add ½ teaspoon Italian seasoning or red pepper flakes to the cream cheese mixture.

For a Crispier Topping: Sprinkle panko breadcrumbs mixed with Parmesan over the cheese topping before baking.

To Make Ahead: Assemble the dish up to a day in advance, store in the fridge, and bake when ready.

Storage Options

Refrigeration: Store leftovers in an airtight container for up to 3 days.

Freezing: Freeze the assembled (but unbaked) dish for up to 3 months. Thaw overnight in the fridge before baking.

Reheating: Warm in the oven at 300°F (150°C) for 10-15 minutes or microwave in short bursts until heated through.

Classic Egg Salad Sandwich

0

A Classic Egg Salad Sandwich is the perfect balance of creamy, tangy, and fresh flavors wrapped between slices of soft or toasted bread. Made with simple, wholesome ingredients, this sandwich is a go-to option for a quick lunch, light dinner, or picnic favorite. The combination of hard-boiled eggs, mayonnaise, Dijon mustard, and lemon juice creates a smooth, flavorful filling, while chopped chives add a hint of freshness.

Egg salad sandwiches have been a staple for generations because they are easy to prepare, highly customizable, and deliciously satisfying. The eggs provide protein and richness, the mustard and lemon juice give a touch of acidity, and the mayonnaise ties everything together with a creamy texture. For a heartier sandwich, serve it on sourdough or whole-grain bread, toasted lightly with butter for an added crunch. Whether enjoyed as a simple weekday lunch or an elegant tea sandwich, this recipe never disappoints.

Why You’ll Love This Recipe:

Creamy and Flavorful: Perfectly seasoned with mustard, lemon, and chives.

Quick & Easy: Ready in minutes with minimal ingredients.

Perfect for Meal Prep: Stays fresh in the fridge for up to 3 days.

Ingredients

Egg Salad:

• 6 large eggs, hard-boiled and chopped 🥚

• 3 tablespoons mayonnaise 🥄

• 1 teaspoon Dijon mustard 🌿

• 1 teaspoon lemon juice 🍋

• ¼ teaspoon salt 🧂

• ¼ teaspoon black pepper 🌶️

• 1 tablespoon chopped chives 🌱

Sandwich Assembly:

• 2 slices of whole-grain or sourdough bread 🍞

• 1 teaspoon butter (optional, for toasting) 🧈

Instructions

Step 1: Prepare the Eggs

1. Place the eggs in a pot of cold water and bring to a boil.

2. Let them boil for 10-12 minutes, then transfer to an ice bath for 5 minutes to stop the cooking process.

3. Peel the eggs and chop them into small pieces.

Step 2: Make the Egg Salad

1. In a mixing bowl, combine the chopped eggs, mayonnaise, Dijon mustard, lemon juice, salt, and black pepper.

2. Stir until well blended, ensuring all ingredients are evenly distributed.

Step 3: Add Fresh Herbs

1. Fold in the chopped chives to enhance the flavor and add a touch of freshness.

Step 4: Prepare the Bread

1. If desired, lightly toast the bread slices with a thin layer of butter for extra crispiness.

Step 5: Assemble the Sandwich

1. Spread the egg salad mixture evenly over one slice of bread.

2. Place the second slice of bread on top and press gently.

3. Slice in half and serve immediately.

Tips

For Extra Creaminess: Add an extra tablespoon of mayonnaise or Greek yogurt for a tangy twist.

Make It Heartier: Add lettuce, tomato, or avocado slices for extra texture and nutrition.

Customize the Flavor: Swap chives for dill, parsley, or green onions for a different herbaceous touch.

Storage Options

Refrigeration: Store leftover egg salad in an airtight container for up to 3 days.

Make Ahead: Prepare the egg salad in advance and assemble fresh sandwiches when ready to eat.

Avoid Freezing: Egg salad does not freeze well due to its creamy texture.

Teriyaki Chicken and Rice Casserole

0

This Teriyaki Chicken and Rice Casserole is the perfect mix of savory, sweet, and satisfying, all in one dish. Juicy shredded chicken is baked in a homemade teriyaki sauce, then combined with tender vegetables, pineapple tidbits, and brown rice for a well-balanced, hearty meal. The flavors of soy sauce, honey, brown sugar, and ginger blend beautifully to create an irresistible sauce that coats every bite.

This recipe is a great option for meal prep, easy weeknight dinners, or family gatherings. Since it’s all baked in one dish, it cuts down on cleanup while packing in flavor. The homemade teriyaki sauce gives it a fresh, authentic taste, and the pineapple adds a subtle sweetness that complements the dish perfectly. Serve this casserole as-is, or add an extra drizzle of sauce for even more bold teriyaki flavor!

Why You’ll Love This Recipe:

One-Dish Wonder: Everything is cooked and assembled in a single casserole dish.

Homemade Teriyaki Sauce: Fresh and flavorful, better than store-bought.

Perfect for Meal Prep: Tastes great the next day and reheats well.

Ingredients

Teriyaki Sauce:

• ¾ cup low-sodium soy sauce

• ½ cup water

• ⅓ cup packed brown sugar

• 1 tablespoon honey

• ¾ teaspoon ground ginger

• 1 teaspoon olive oil

• ½ teaspoon minced garlic

• 2 tablespoons cornstarch (for slurry)

• 2 tablespoons water (for slurry)

Chicken and Casserole:

• 1.5 pounds boneless, skinless chicken breasts

• 32 oz frozen mixed vegetables (unsauced, Asian variety)

• 1 cup pineapple tidbits (drained, packed in juice)

• 3 cups cooked brown rice

Instructions

Step 1: Make the Teriyaki Sauce

1. In a small saucepan, combine soy sauce, ½ cup water, brown sugar, honey, ginger, olive oil, and garlic.

2. Stir until the sugar is dissolved, then cover and bring to a boil over medium heat.

3. In a small bowl, mix cornstarch and 2 tablespoons of water to create a slurry.

4. Gradually add the slurry to the boiling sauce, stirring constantly until the sauce thickens.

5. Remove from heat and set aside.

Step 2: Bake the Chicken

1. Preheat the oven to 350°F (175°C).

2. Place the chicken breasts in a 9×13-inch casserole dish.

3. Pour 1 cup of the teriyaki sauce over the chicken, ensuring it’s evenly coated.

4. Bake for 30-35 minutes, or until the internal temperature reaches 165°F (74°C).

5. Remove from the oven and shred the chicken directly in the dish using two forks.

Step 3: Prepare the Vegetables and Rice

1. While the chicken is baking, steam or cook frozen vegetables according to package instructions.

2. Prepare brown rice as per package directions.

Step 4: Assemble the Casserole

1. Add the shredded chicken, cooked vegetables, pineapple, and brown rice to the casserole dish.

2. Pour most of the remaining teriyaki sauce over the mixture, reserving a little for a final drizzle.

3. Stir everything together until evenly combined.

Step 5: Bake Again

1. Return the casserole to the oven and bake at 350°F (175°C) for 15 minutes, until heated through.

2. Drizzle with the remaining teriyaki sauce just before serving.

Tips

For Extra Flavor: Marinate the chicken in ½ cup teriyaki sauce for 1-2 hours before baking.

Make It Spicy: Add red pepper flakes or Sriracha for some heat.

Use Fresh Vegetables: If using fresh veggies, lightly sauté them before adding them to the casserole.

Storage Options

Refrigeration: Store leftovers in an airtight container for up to 4 days.

Freezing: Freeze in portioned containers for up to 3 months.

Reheating: Warm in the microwave or oven at 300°F (150°C) until heated through. Add a splash of water if needed.

Pecan Cheesecake

0

Pecan Cheesecake is the perfect combination of three decadent layers—a buttery pecan shortbread crust, a creamy vanilla cheesecake filling, and a rich pecan pie topping. This dessert brings together the best of both worlds, combining the smooth texture of cheesecake with the sweet, nutty crunch of classic pecan pie. The balance of flavors creates a treat that’s luxurious yet simple to prepare, making it a show-stopping choice for holiday gatherings, celebrations, or a comforting homemade dessert.

The shortbread crust provides a crisp, slightly sweet foundation with finely chopped pecans adding extra depth. The cheesecake layer is smooth, slightly tangy, and lightly sweetened, making it the perfect contrast to the pecan topping. Finally, the pecan pie topping features caramelized brown sugar, corn syrup, and buttery pecans that form a sticky, gooey layer with a crisp, golden finish. Every bite delivers the richness of cheesecake, the crunch of pecans, and the deep caramel flavors of pecan pie.

Why You’ll Love This Recipe:

Three Layers of Perfection: Buttery shortbread, smooth cheesecake, and gooey pecan pie filling.

Rich and Decadent: The ultimate indulgent dessert for special occasions.

Easy to Make: Simple steps for a bakery-worthy treat.

Ingredients

Shortbread Crust:

• 1 cup all-purpose flour

• 1 cup light brown sugar, packed

• 1 cup softened butter

• 1 cup finely chopped pecans

Cheesecake Layer:

• 16 oz (2 packages) cream cheese, softened

• ½ cup granulated sugar

• ½ cup milk

• 2 teaspoons vanilla extract

Pecan Pie Topping:

• 1 cup brown sugar, packed

• ½ cup light corn syrup

• 1 cup melted butter, slightly cooled

• 3 large eggs, lightly beaten

• ½ teaspoon salt

• ½ teaspoon vanilla extract

• 1 cup pecans

Instructions

Step 1: Preheat and Prepare the Crust

1. Preheat oven to 350°F (175°C).

2. In a medium bowl, combine flour and ¾ cup brown sugar.

3. Cut in the butter using a pastry mixer or a fork until the mixture resembles coarse crumbs.

4. Stir in ½ cup chopped pecans.

5. Press the mixture evenly into the bottom of a greased 9×13-inch baking pan.

6. Bake for 10 minutes, then remove from the oven and let it cool slightly (about 10 minutes).

Step 2: Make the Cheesecake Layer

1. In a large mixing bowl, beat the cream cheese until smooth.

2. Add sugar, then mix in the milk and vanilla extract until well blended.

3. Pour the cheesecake mixture over the cooled crust.

4. Bake for 15 minutes, then remove from the oven and let it cool slightly (about 10 minutes).

Step 3: Prepare the Pecan Pie Topping

1. In a medium bowl, whisk together the remaining ¾ cup brown sugar, corn syrup, and melted butter until well combined.

2. Slowly add the eggs, salt, and remaining vanilla, stirring continuously.

3. Stir in the pecans, ensuring they are evenly distributed.

4. Pour the pecan mixture over the cooled cheesecake layer.

Step 4: Bake and Cool

1. Return the baking pan to the oven and bake for 35-40 minutes, or until the pecan pie layer is set and golden brown.

2. Remove from the oven and let cool completely before slicing.

Step 5: Slice and Serve

1. Once fully cooled, cut into squares or slices.

2. Serve at room temperature or chilled for a firmer texture.

Tips

For Extra Crunch: Toast the pecans before adding them to the topping.

For a Firmer Cheesecake: Chill in the refrigerator for at least 2 hours before serving.

Serving Suggestion: Drizzle with caramel sauce or serve with whipped cream for an extra indulgent touch.

Storage Options

Refrigeration: Store in an airtight container in the fridge for up to 5 days.

Freezing: Wrap slices tightly in plastic wrap and freeze for up to 3 months. Thaw in the refrigerator before serving.

Reheating: Warm individual slices in the microwave for 10-15 seconds if you prefer a gooey texture.

Chocolate Zucchini Cake

0

Chocolate Zucchini Cake is a rich, moist, and deeply chocolatey dessert that proves vegetables and sweets can be a perfect match. The addition of grated zucchini ensures an incredibly soft texture without making the cake taste like vegetables. Instead, it blends seamlessly into the batter, adding natural moisture while enhancing the deep cocoa flavor. This cake is studded with semi-sweet chocolate chips for an extra layer of indulgence, making it an irresistible treat for chocolate lovers.

What makes this cake truly special is its smooth chocolate ganache topping, which adds a luxurious finish. The ganache, made with just two ingredients—semi-sweet chocolate chips and heavy cream—creates a glossy, melt-in-your-mouth layer that complements the moist cake perfectly. Whether you’re making this cake for a family gathering, a potluck, or just as a way to use up an abundance of zucchini, it’s sure to be a crowd-pleaser. Serve it chilled for a fudgier texture, or at room temperature for a soft, melt-in-your-mouth experience.

Why You’ll Love This Recipe:

Ultra-Moist Texture: The zucchini keeps the cake soft without making it soggy.

Rich Chocolate Flavor: A perfect balance of cocoa, chocolate chips, and ganache.

Easy to Make: No complicated steps, just mix, bake, and top with ganache.

Ingredients

Chocolate Zucchini Cake:

• 2 cups all-purpose flour

• ¾ cup unsweetened cocoa powder

• 2 teaspoons baking soda

• 1 teaspoon baking powder

• ½ teaspoon salt

• 3 large eggs, room temperature

• 1 ¼ cups vegetable oil

• ¾ cup granulated sugar

• ¾ cup packed light brown sugar

• 2 teaspoons vanilla extract

• 3 cups grated zucchini

• 1 cup semi-sweet chocolate chips

Chocolate Ganache:

• 1 ½ cups semi-sweet chocolate chips

• 1 cup heavy whipping cream

Instructions

Step 1: Preheat and Prepare the Pan

1. Preheat your oven to 350°F (175°C).

2. Grease a 9×13-inch baking pan or line it with parchment paper for easy removal.

Step 2: Mix the Dry Ingredients

1. In a medium bowl, whisk together the flour, cocoa powder, baking soda, baking powder, and salt until well combined.

Step 3: Prepare the Wet Ingredients

1. In a large bowl, mix the eggs, vegetable oil, granulated sugar, brown sugar, vanilla extract, and grated zucchini until fully incorporated.

Step 4: Combine the Batter

1. Gradually add the dry ingredients to the wet mixture, stirring until just combined. Avoid overmixing to keep the cake light and tender.

2. Gently fold in the chocolate chips for an extra layer of chocolatey goodness.

Step 5: Bake the Cake

1. Pour the batter into the prepared baking pan, spreading it evenly.

2. Bake for 30-35 minutes, or until a toothpick inserted in the center comes out with no wet batter (a few moist crumbs or melted chocolate from the chips is fine).

3. Let the cake cool in the pan for 15 minutes before transferring it to a wire rack to cool completely.

Step 6: Make the Chocolate Ganache

1. Place the chocolate chips in a medium bowl.

2. In a small saucepan, heat the heavy cream over low heat until small fine bubbles appear around the edges (do not let it boil).

3. Pour the warm cream over the chocolate chips, cover the bowl with plastic wrap, and let it sit for 10 minutes to melt the chocolate.

4. After 10 minutes, stir the mixture thoroughly until it becomes smooth and glossy. This may take a few minutes of stirring.

Step 7: Assemble the Cake

1. Allow the ganache to cool for about 15 minutes so it thickens slightly before pouring it over the cake.

2. Spread the ganache evenly with a spatula, ensuring a smooth finish.

3. Let the ganache set for 30 minutes at room temperature before refrigerating the cake.

Step 8: Serve and Enjoy

1. For best results, chill the cake in the refrigerator for at least 1 hour before slicing.

2. Serve chilled for a fudgy texture, or let it sit at room temperature for 15 minutes for a softer, melt-in-your-mouth consistency.

Tips

Shredding the Zucchini: Use the fine side of a grater to ensure the zucchini blends into the cake without noticeable strands.

Prevent Overmixing: Stir just until the flour disappears—overmixing can make the cake dense.

For a Sweeter Ganache: Use milk chocolate chips instead of semi-sweet.

Extra Toppings: Sprinkle with chopped nuts, chocolate shavings, or a dusting of cocoa powder for decoration.

Storage Options

Refrigeration: Store in an airtight container for up to 5 days. The ganache sets beautifully in the fridge.

Freezing: Wrap individual slices in plastic wrap and freeze for up to 3 months. Thaw in the refrigerator before serving.

Reheating: If you prefer a warm slice, microwave it for 10-15 seconds for a softer texture.