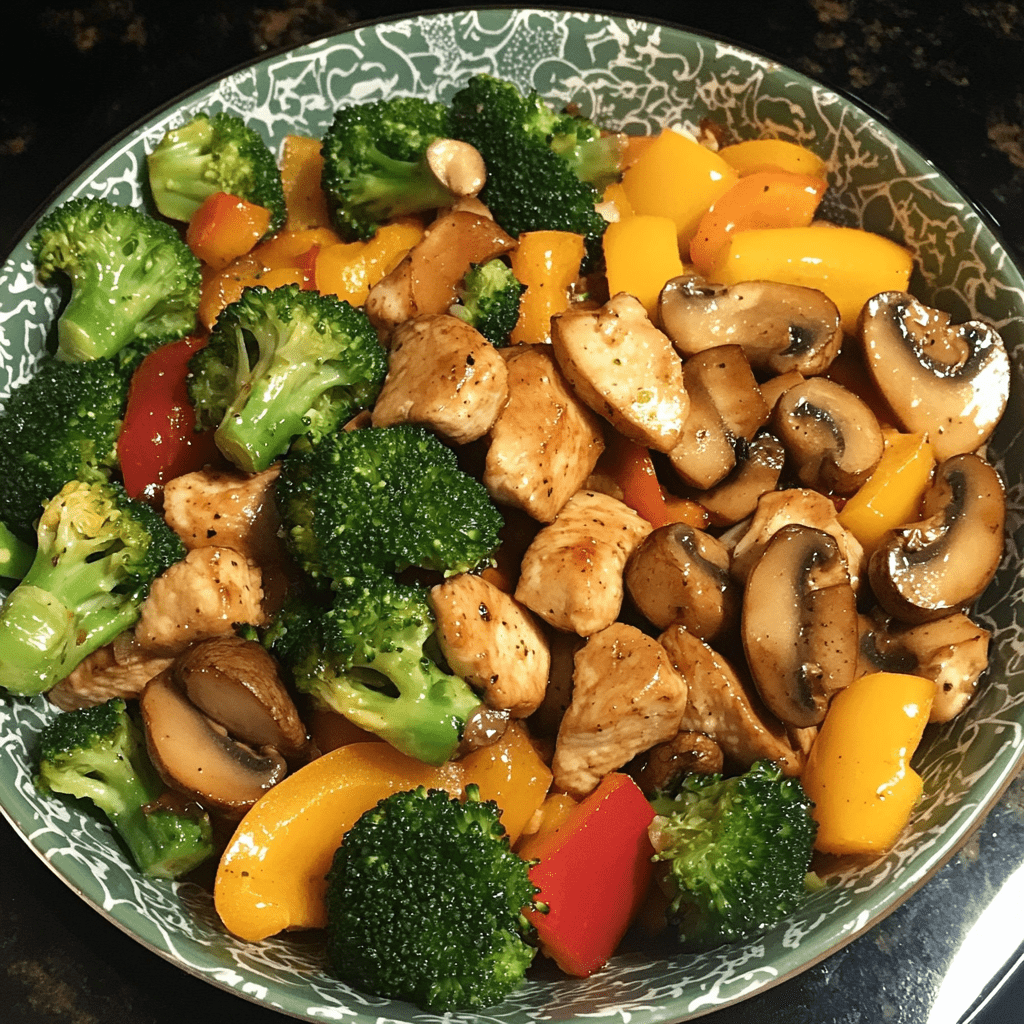
Beef Bourguignon

0

Beef Bourguignon is a rich, flavorful French stew made with tender chunks of beef, crisp bacon, hearty vegetables, and a deep, red wine sauce. This slow-cooked dish is the epitome of comfort food, offering layers of savory flavors that develop as the stew gently simmers for hours. It’s a perfect dish for cozy family dinners, special gatherings, or whenever you’re craving a warming, hearty meal that feels gourmet without being overly complicated.

This recipe allows you to experience classic French cooking with easy-to-find ingredients. The combination of bacon, beef, red wine, and aromatic herbs creates a deep, rich flavor that makes every bite incredibly satisfying.

Why You’ll Love This Recipe:

Tender, Fall-Apart Beef: The long, slow cooking process ensures that the beef becomes melt-in-your-mouth tender.

Rich, Savory Sauce: The red wine and beef stock create a deep, flavorful sauce that’s perfect for serving over mashed potatoes, rice, or buttered noodles.

A Classic French Dish: Impress guests or treat yourself with this elegant, comforting meal.

Ingredients:

• 1 tbsp extra-virgin olive oil

• 6 oz bacon, roughly chopped

• 3 lb beef brisket, chuck steak, or stewing beef, cut into 2-inch chunks

• 1 large carrot, sliced ½-inch thick

• 1 large white onion, diced

• 6 cloves garlic, minced, divided

• 1 pinch coarse salt

• 1 pinch ground pepper

• 2 tbsp flour (for thickening the stew)

• 12 pearl onions (optional)

• 3 cups red wine (like Merlot, Pinot Noir, or Chianti)

• 2-3 cups beef stock (use 3 cups if using 2 cups of wine)

• 2 tbsp tomato paste

• 1 beef bouillon cube, crushed

• 1 tsp fresh thyme, finely chopped

• 2 tbsp fresh parsley, finely chopped, divided

• 2 bay leaves

• 1 lb white or brown mushrooms, quartered

• 2 tbsp butter (for sautéing mushrooms)

Instructions:

Preheat the Oven:

• Preheat your oven to 350°F (175°C). Heat olive oil in a large Dutch oven or heavy-based pot over medium heat.

Cook the Bacon:

• Add the chopped bacon to the hot oil and sauté for about 3 minutes until crispy and browned. Use a slotted spoon to transfer the bacon to a plate, leaving the rendered fat in the pot.

Sear the Beef:

• Pat the beef chunks dry with paper towels and season with salt and pepper. Sear the beef in batches in the hot oil and bacon fat, browning all sides, about 2-3 minutes per side. Once seared, remove the beef and place it on the plate with the bacon.

Sauté the Vegetables:

• In the same pot, add the sliced carrots and diced onions. Sauté for about 3 minutes until they begin to soften. Add 4 cloves of minced garlic and cook for another minute until fragrant. Drain any excess fat, leaving about 1 tablespoon in the pot.

Thicken the Stew:

• Return the bacon and seared beef to the pot with the vegetables. Season with a pinch of salt and pepper. Sprinkle flour over the mixture, tossing well to coat the meat and vegetables. Cook for 4-5 minutes, allowing the flour to brown slightly.

Add the Liquid:

• Add the pearl onions (if using), red wine, and enough beef stock to barely cover the meat. Stir in the tomato paste, crushed beef bouillon cube, thyme, and bay leaves. Bring the mixture to a gentle simmer on the stove.

Bake the Stew:

• Cover the pot with a lid and transfer it to the lower part of the oven. Let it cook for 2 to 3 hours, or until the meat is fall-apart tender. Check occasionally to ensure the liquid is simmering gently—adjust the heat if necessary.

Prepare the Mushrooms:

• In the last 5 minutes of cooking, melt butter in a medium skillet over medium heat. When the butter begins to foam, add the remaining 2 cloves of minced garlic and sauté for about 30 seconds until fragrant. Add the quartered mushrooms and cook for 5-6 minutes until browned. Set aside.

Finish the Stew:

• Remove the Dutch oven from the oven and carefully pour its contents into a colander set over a large pot to separate the sauce from the meat and vegetables. Discard the bay leaves and any herb sprigs.

• Return the beef, bacon, and vegetables back into the Dutch oven. Skim off any excess fat from the sauce and pour it back over the meat mixture. Add the prepared mushrooms on top of the meat.

Simmer and Serve:

• Simmer the sauce for a minute or two to heat through, skimming off any additional fat that rises to the surface. Adjust the consistency by adding a few tablespoons of stock if the sauce is too thick, or simmer longer if too thin.

• Taste for seasoning and adjust with salt and pepper if needed. Garnish with fresh parsley and serve the Beef Bourguignon hot over mashed potatoes, rice, or buttered egg noodles.

Storage Options:

Refrigerator: Store leftovers in an airtight container in the fridge for up to 4 days. Reheat on the stove over low heat.

Freezer: Beef Bourguignon freezes well. Store in a freezer-safe container for up to 3 months. Thaw in the fridge overnight and reheat gently on the stove.

Tips:

Wine Choice: Use a wine you enjoy drinking, as the flavor will concentrate in the stew.

Make-Ahead: This dish tastes even better the next day, making it a perfect make-ahead option.

Serving Suggestions: Serve with crusty French bread to soak up the delicious sauce.

This Beef Bourguignon is the ultimate comfort food, with rich, bold flavors that develop slowly during cooking. Whether for a special occasion or a cozy dinner, this dish is sure to impress and satisfy.

Beef Lombardi Casserole

0

Beef Lombardi Casserole is a hearty, comforting dish that blends rich beefy flavors with creamy noodles and a topping of melted cheese. This casserole is perfect for feeding a crowd or for a cozy family dinner. The combination of seasoned beef, tangy tomatoes, and soft noodles, all topped with a cheesy golden crust, makes this casserole a favorite comfort food. It’s easy to prepare, and with a few pantry staples, you can create a delicious meal that’s sure to please everyone at the table.

The casserole comes together quickly and bakes to bubbly perfection in the oven. The layers of seasoned beef sauce, creamy noodles, and cheese offer a satisfying balance of flavors and textures, making this dish a crowd-pleaser. It’s also a great make-ahead meal that reheats beautifully, making it perfect for leftovers or meal prep.

Why You’ll Love This Recipe:

Hearty and Satisfying: Packed with ground beef, tomatoes, and noodles, this casserole is a filling and flavorful meal.

Cheesy Goodness: With a triple-cheese topping of cheddar, Parmesan, and mozzarella, it’s hard to resist the gooey, golden-brown crust.

Great for Leftovers: This dish tastes even better the next day, making it perfect for meal prepping or reheating for busy nights.

Ingredients:

• 1 lb ground beef

• 1 can diced tomatoes (14.5 oz, with juice)

• 1 can Rotel diced tomatoes and green chilies (10 oz, with juice)

• 1 tsp salt

• 1/4 tsp black pepper

• 1/4 tsp onion powder

• 1/4 tsp garlic powder

• 1 can tomato paste (6 oz)

• 1 package medium egg noodles (6 oz)

• 1 cup sour cream

• 1 cup shredded cheddar cheese

• 1 cup grated Parmesan cheese

• 1 cup shredded mozzarella cheese

Instructions:

Prepare the Oven and Baking Dish:

• Preheat your oven to 350°F (175°C). Lightly spray a 9×13-inch baking dish with cooking spray and set it aside.

Cook the Beef:

• In a large skillet over medium heat, cook the ground beef, breaking it into crumbles as it cooks, until it is no longer pink. Drain any excess fat.

Prepare the Meat Sauce:

• Stir the diced tomatoes with juice, Rotel diced tomatoes and green chilies with juice, salt, black pepper, onion powder, garlic powder, and tomato paste into the cooked ground beef. Mix everything together until well combined.

• Reduce the heat to low and allow the sauce to simmer for 20 minutes, stirring occasionally. The sauce should thicken slightly as the flavors meld together.

Cook the Noodles:

• While the meat sauce simmers, bring a large pot of salted water to a boil. Add the medium egg noodles and cook according to the package directions until al dente. Drain the noodles well and transfer them to a large mixing bowl.

Prepare the Noodle Layer:

• Add the sour cream to the hot noodles and stir until the noodles are evenly coated with the sour cream.

Assemble the Casserole:

• Spread the sour cream-coated noodles evenly across the bottom of the prepared baking dish.

• Spoon the meat sauce over the noodles, spreading it out with a spatula to ensure it covers the noodles evenly.

Add the Cheese Topping:

• In a small bowl, mix together the shredded cheddar cheese, grated Parmesan cheese, and shredded mozzarella cheese.

• Sprinkle the cheese mixture evenly over the top of the meat sauce.

Bake the Casserole:

• Cover the baking dish with aluminum foil and bake in the preheated oven for 35 minutes, or until the casserole is hot and bubbly.

• Remove the foil and bake for an additional 5-10 minutes, allowing the cheese to melt completely and turn golden brown on top.

Serve:

• Once baked, remove the casserole from the oven and let it rest for about 5 minutes before serving.

• Serve hot with garlic bread, a fresh green salad, or steamed vegetables.

Storage Options:

Refrigerator: Store leftovers in an airtight container in the fridge for up to 4 days.

Freezer: Beef Lombardi Casserole freezes well. Store in a freezer-safe container for up to 3 months. Thaw in the refrigerator overnight and reheat in the oven until hot.

Tips:

Make-Ahead Option: You can assemble the casserole ahead of time and store it in the refrigerator for up to 24 hours before baking.

Spice It Up: For a spicier version, add extra Rotel or diced jalapeños to the meat sauce.

Cheese Substitutions: Feel free to mix up the cheese topping with other varieties like Monterey Jack or Colby for a different flavor profile.

This Beef Lombardi Casserole is the perfect combination of creamy, cheesy, and savory. It’s a comforting dish that will have everyone coming back for seconds, whether you’re serving it for a family meal or saving some for easy weekday leftovers.

Wendy’s Chili Copycat Recipe

0

This homemade version of Wendy’s classic chili brings all the comfort and flavor of the original fast-food favorite to your kitchen. Packed with hearty ground beef, a variety of beans, and a flavorful blend of spices, this chili is perfect for a cozy family dinner, game day, or a quick meal that satisfies your craving for something warm and filling. Whether you cook it on the stove or in a slow cooker, this recipe delivers a satisfying bowl of chili that’s easy to make and even easier to enjoy.

What makes this chili so beloved is its combination of simplicity and robust flavor. The ground beef provides a hearty base, while the tomato juice and purée give it a rich and slightly tangy tomato flavor. Beans add texture and make it a filling, nutritious meal. Spices like chili powder, cumin, and garlic powder ensure every bite is packed with warmth and a little kick.

Why You’ll Love This Recipe:

Classic Comfort Food: This chili is a classic dish that provides warmth and satisfaction, perfect for any day of the week.

Hearty and Filling: With ground beef, beans, and plenty of vegetables, this chili is a complete meal in itself.

Great for Meal Prep: Make a large batch, and you’ll have leftovers to enjoy for days. It even freezes well!

Ingredients:

• 2 pounds fresh ground beef

• 1 quart tomato juice

• 1 (29-ounce) can tomato purée

• 1 (15-ounce) can red kidney beans, drained

• 1 (15-ounce) can pinto beans, drained

• 1 medium-large onion, chopped (about 1 1/2 cups)

• 1/2 cup diced celery

• 1/4 cup diced green bell pepper

• 1/4 cup chili powder (use less for milder chili)

• 1 teaspoon ground cumin (use more for a stronger flavor)

• 1 1/2 teaspoons garlic powder

• 1 teaspoon salt

• 1/2 teaspoon ground black pepper

• 1/2 teaspoon dried oregano

• 1/2 teaspoon sugar

• 1/8 teaspoon cayenne pepper

Instructions:

Browning the Beef:

• In a large skillet, brown the ground beef over medium heat. Break the beef into small pieces as it cooks, ensuring it browns evenly.

• Once the beef is fully cooked, drain off any excess fat.

Combining Ingredients:

• Transfer the browned beef into a large 6-quart pot.

• Add the tomato juice, tomato purée, drained kidney beans, and drained pinto beans.

• Stir in the chopped onion, diced celery, and diced green bell pepper.

• Sprinkle in the chili powder, ground cumin, garlic powder, salt, ground black pepper, dried oregano, sugar, and cayenne pepper.

Simmering:

• Cover the pot with a lid and bring the mixture to a simmer over medium heat.

• Reduce the heat to low and let the chili simmer for 1 to 1 1/2 hours, stirring every 15 minutes to prevent sticking and to ensure the flavors meld together.

Slow Cooker Option:

• If you prefer using a slow cooker, simply add the browned beef and all the remaining ingredients to the slow cooker.

• Cook on low for 3 to 4 hours, stirring occasionally.

Storage Options:

Refrigerator: Store any leftovers in an airtight container in the fridge for up to 4 days.

Freezer: Chili freezes wonderfully. Store it in freezer-safe containers for up to 3 months. Thaw in the fridge overnight and reheat on the stove or in the microwave.

Tips:

Adjusting the Spice Level: If you prefer a milder chili, reduce the amount of chili powder and cayenne pepper. For a spicier version, you can increase the cayenne or add diced jalapeños.

Optional Toppings: Serve your chili with toppings like shredded cheese, sour cream, diced onions, or tortilla chips for extra texture and flavor.

Serving Suggestions: Pair with a side of cornbread or warm crusty bread for a complete, comforting meal.

This Wendy’s Chili copycat recipe is a perfect way to enjoy the flavors of a fast-food favorite in the comfort of your own home. Whether you serve it for dinner, meal prep for the week, or save some in the freezer for later, this chili is sure to become a go-to recipe that you’ll come back to again and again.

Cinnamon Roll French Toast Rolls

0

Cinnamon Roll French Toast Rolls combine the delightful flavors of cinnamon rolls and the texture of French toast into an easy-to-make breakfast treat. This recipe transforms simple white bread into something spectacular with a sweet cinnamon-sugar coating and a soft, custardy interior. Perfect for a leisurely weekend breakfast or a special brunch, these rolls are sure to please anyone with a sweet tooth and a love for comforting, warm breakfasts.

The beauty of this recipe lies in its simplicity and the quick transformation of everyday ingredients into a delicious dish that looks as impressive as it tastes. Serve these cinnamon-infused delights with a drizzle of maple syrup or a dusting of powdered sugar for a truly indulgent experience.

Why You’ll Love This Recipe:

  • Fun and Easy to Make: Enjoy the process of rolling and dipping these treats, which is simple enough for cooks of all skill levels.
  • Delightfully Sweet: The cinnamon-sugar coating adds a crunch that perfectly complements the soft, fluffy texture inside.
  • Versatile Serving Options: These rolls are delicious on their own or can be dressed up with syrup, powdered sugar, or even fruit for extra flair.

Ingredients:

  • 8 slices white bread, crusts removed
  • 2 large eggs
  • 1/4 cup milk
  • 1 tsp vanilla extract
  • 2 tbsp unsalted butter, melted
  • 1/4 cup granulated sugar
  • 1 tbsp ground cinnamon
  • 2 tbsp unsalted butter, for frying
  • Maple syrup or powdered sugar, for serving

Instructions:

Prepare the Bread:

  • Start by removing the crusts from the bread slices. Flatten each slice with a rolling pin to thin them out, which makes them easier to roll.

Cinnamon-Sugar Mixture:

  • In a small bowl, combine the granulated sugar and ground cinnamon. Mix well and set aside for coating the rolls later.

Egg Mixture:

  • In a shallow bowl, whisk together the eggs, milk, and vanilla extract until smooth. This mixture will help create the custardy texture inside the rolls.

Assembly:

  • Brush each flattened bread slice with melted butter. This helps to add flavor and assists in sealing the rolls.
  • Carefully roll each slice into a tight log, ensuring they do not unroll during the cooking process.

Cooking:

  • Heat 2 tablespoons of unsalted butter in a skillet over medium heat.
  • Dip each bread roll in the egg mixture, ensuring it is fully coated.
  • Place the rolls in the skillet and fry for 2-3 minutes per side, turning occasionally, until each side is golden brown and crisp.

Finishing Touches:

  • As soon as you remove the rolls from the skillet, roll them in the cinnamon-sugar mixture until fully coated.
  • Serve the rolls warm, with maple syrup or a sprinkle of powdered sugar on top.

Storage Options:

  • Refrigerator: Store any leftovers in an airtight container in the refrigerator for up to 2 days. Reheat in the oven or microwave before serving.
  • Freezer: For longer storage, freeze the rolls on a baking sheet, then transfer to a freezer bag. Reheat in the oven directly from frozen until warm.

Tips:

  • Butter Management: Make sure the skillet isn’t too hot, as this can cause the butter to burn. Adjust the heat as necessary to keep the rolls cooking evenly.
  • Alternative Flavors: Add a touch of nutmeg or cardamom to the cinnamon-sugar mix for a different flavor twist.
  • Serving Suggestion: These rolls pair wonderfully with a side of fresh fruit or a dollop of whipped cream for a more decadent breakfast.

These Cinnamon Roll French Toast Rolls are a delightful twist on classic breakfast dishes, offering a unique and tasty way to start your day or enjoy a special brunch. Their sweet, cinnamon-spiced flavor and satisfying texture make them a new favorite that you’ll want to revisit again and again.

No-Bake Chocolate Lasagna Dessert

0

Easy Chocolate Lasagna is a decadent, multi-layered no-bake dessert that combines some of the most beloved flavors and textures in one delicious treat. This dessert features a crunchy Oreo base, a creamy cheesecake middle layer, a rich chocolate pudding layer, and is topped with fluffy whipped cream and chocolate garnishes. It’s an irresistible dessert that’s surprisingly simple to make and perfect for any occasion where you want to impress without the hassle of baking.

This dessert is especially popular for its ease of preparation and the rich, indulgent experience it offers. Each layer complements the others perfectly, making for a harmonious blend of textures and flavors that chocolate lovers will find absolutely delightful. It’s ideal for gatherings, potlucks, or as a special treat for holidays and celebrations.

Why You’ll Love This Recipe:

  • No-Bake Convenience: No oven needed, which makes it perfect for warm weather or when the oven is busy with other dishes.
  • Layered Delight: Each layer offers a different texture and taste, coming together in a symphony of Chocolatey goodness.
  • Crowd-Pleaser: Its appealing look and delicious taste make it a favorite among both kids and adults.

Ingredients:

  • 36 Oreo cookies (one 14.3oz package)
  • 6 tablespoons butter, melted
  • 8 oz cream cheese, room temperature
  • ¼ cup granulated sugar
  • 2 tablespoons milk
  • 16 oz Cool Whip (two 8oz containers, separated)
  • 8 oz INSTANT chocolate pudding mix (two 3.9oz boxes)
  • 3 ¼ cups milk
  • Optional garnishes: chocolate shavings, mini chocolate chips, or Oreo crumbs

Instructions:

Oreo Crust:

  • Process the Oreos in a food processor until they turn into fine crumbs. (Include the cream centers.)
  • Mix the Oreo crumbs with melted butter until well combined.
  • Press the mixture into an even layer in a 9”x13” baking dish.
  • Refrigerate or freeze the crust while you prepare the next layer to help it set faster.

Cheesecake Layer:

  • In a mixing bowl, beat the cream cheese with 2 tablespoons of milk and the granulated sugar until the mixture is smooth and creamy.
  • Gently fold in one container of Cool Whip.
  • Carefully spread this mixture over the chilled Oreo crust.
  • Return to the refrigerator or freezer to chill while you prepare the pudding layer.

Chocolate Pudding Layer:

  • In another bowl, whisk the instant chocolate pudding mix with 3 ¼ cups of cold milk until the pudding thickens.
  • Spread the pudding carefully over the set cheesecake layer.
  • Allow this to set in the refrigerator for about 5-10 minutes.

Final Layer:

  • Spread the second container of Cool Whip over the set pudding layer.
  • Top with your choice of chocolate shavings, mini chocolate chips, or additional Oreo crumbs for garnish.

Chilling:

  • Cover the dish with plastic wrap and refrigerate for at least 4 hours, or overnight for best results. This allows the layers to firm up and the flavors to meld beautifully.
  • Optionally, you can freeze the dessert for 1-2 hours before slicing to make cutting easier.

Storage Options:

  • Refrigerator: Keep the dessert covered in the refrigerator and enjoy within 4-5 days.
  • Freezer: Freeze for up to a month. Thaw in the refrigerator before serving.

Tips:

  • Crust Options: For a less sweet option, you can use plain chocolate wafer cookies instead of Oreos.
  • Lighter Version: Substitute lower-fat versions of cream cheese and Cool Whip, and use skim milk.
  • Serving Tip: Dip your knife in hot water before slicing for clean cuts that show off the layers.

This Easy Chocolate Lasagna is a perfect example of how simple ingredients can be transformed into a stunning and delicious dessert that’s sure to wow anyone who tries it. Enjoy the process of layering and the even better experience of digging into this chocolaty, creamy creation.

Strawberry Cream-Filled Donuts

0

Strawberry Cream-Filled Donuts are a delightful treat that combines fluffy, golden donuts with a sweet and creamy filling. Each bite offers the soft texture of fried dough complemented by the lightness of whipped cream and the fresh, juicy sweetness of strawberries. This recipe is perfect for those who enjoy homemade pastries and are looking for a delicious way to bring a touch of gourmet flair to their baking repertoire.

These donuts are not only irresistible due to their appealing flavors but also offer a visually stunning presentation, making them ideal for special occasions or as a sophisticated upgrade to your regular weekend breakfast. The process of making these donuts from scratch provides a rewarding baking experience, with the end result being as satisfying to look at as they are to eat.

Why You’ll Love This Recipe:

  • Decadently Delicious: The combination of soft donuts with creamy, fruity filling is pure indulgence.
  • Perfect for Special Occasions: Impress guests at brunch or treat someone special with these beautiful homemade donuts.
  • Engaging Baking Project: Enjoy the process of making dough from scratch and filling your donuts with homemade whipped cream.

Ingredients:

For the donuts:

  • 1 cup milk, warmed
  • 2 teaspoons active dry yeast
  • 1/3 cup sugar
  • 2 large eggs
  • 4 cups all-purpose flour
  • 1/2 teaspoon salt
  • 6 tablespoons unsalted butter, softened
  • Oil for frying

For the filling:

  • 1 cup heavy whipping cream
  • 2 tablespoons powdered sugar
  • 1 teaspoon vanilla extract
  • 1 cup fresh strawberries, thinly sliced

For garnish:

  • Additional powdered sugar for dusting

Instructions:

Dough Preparation:

  • In a small bowl, dissolve the yeast in the warm milk and allow it to sit until frothy, about 5 minutes.
  • In a large bowl, combine sugar, eggs, flour, and salt. Add the frothy yeast mixture and butter, and knead the dough until smooth and elastic, about 8-10 minutes.

First Rise:

  • Place the kneaded dough in a greased bowl, cover with a cloth, and let it rise in a warm place until it has doubled in size, approximately 1 hour.

Shaping the Donuts:

  • After the first rise, punch down the dough and roll it out on a floured surface to about 1/2 inch thickness.
  • Cut out rounds using a donut cutter or a large cookie cutter. Let the cut dough rounds rise again until puffy, about 30 minutes.

Frying:

  • Heat oil in a deep skillet over medium heat. Fry the donuts until golden on each side, approximately 2 minutes per side. Remove from the oil and drain on paper towels.

Preparing the Filling:

  • Whip the cream with powdered sugar and vanilla extract until it forms stiff peaks.

Assembly:

  • Slice each donut in half horizontally. Fill with a generous layer of whipped cream and arrange sliced strawberries on the cream.
  • Replace the top half of the donut, press gently to secure, and dust with powdered sugar.

Storage Options:

  • Refrigerator: Assembled donuts can be kept in the refrigerator for up to 24 hours, covered.
  • Freezer: Unfilled donuts can be frozen for up to 1 month. Thaw and reheat gently before filling.

Tips:

  • Ensure Oil Temperature: Keep the frying oil at a consistent medium heat to prevent the donuts from absorbing too much oil or burning.
  • Customize Your Filling: Experiment with other fruits or flavored creams to suit your taste preferences.
  • Serving Suggestion: These donuts are best enjoyed fresh, but if storing, a quick warm-up in the oven can rejuvenate the texture.

These Strawberry Cream-Filled Donuts are sure to delight anyone who tries them, offering a perfect blend of textures and flavors that are both refreshing and satisfying. Whether you’re hosting a brunch or simply indulging in a weekend baking project, these donuts will be a delightful addition to any table.

Classic French Baguettes

0

Classic French Baguettes represent the quintessence of French baking, characterized by their crispy crust and soft, airy interior. This recipe captures the traditional art of making authentic baguettes at home, using simple ingredients that yield exceptional results. The process involves a double rise, which ensures the development of a light, chewy texture and the distinctive, delightful aroma that one expects from a freshly baked loaf. Baking baguettes can be a rewarding experience, offering a taste of France right in your own kitchen.

The allure of homemade French baguettes lies in their versatility. They can be served as a side to a myriad of dishes, used for sandwiches, or simply enjoyed with a pat of butter. The crispy golden crust and tender crumb make them a favorite at any meal, enhancing the overall dining experience. Making baguettes at home allows for control over the ingredients, ensuring a healthier option than store-bought breads that may contain preservatives.

Why You’ll Love This Recipe:

  • Authentic Taste: Achieve the classic taste and texture of a French bakery.
  • Simplicity: Requires only a few basic ingredients found in most kitchens.
  • Versatility: Perfect for sandwiches, as a side to soups, or simply dipped in olive oil.

Ingredients:

  • 4 cups all-purpose flour
  • 1 tablespoon salt
  • 1 tablespoon sugar
  • 2 teaspoons instant yeast
  • 1 1/2 cups warm water

Instructions:

Prepare the Dough:

  • In a large mixing bowl, combine the flour, salt, sugar, and yeast. Gradually add the warm water and mix until a sticky dough forms.
  • Turn the dough out onto a floured surface and knead for about 10 minutes, until it becomes smooth and elastic. Incorporate small amounts of flour as needed to keep the dough from sticking.

First Rise:

  • Transfer the dough to a lightly oiled bowl, cover it with a damp cloth, and let it rise in a warm place until it has doubled in size, approximately 1 hour.

Shape the Baguettes:

  • After the first rise, punch down the dough and turn it onto a lightly floured surface. Divide the dough into three equal pieces.
  • Shape each piece into a long, thin cylinder, roughly 14 inches long, tapering the ends slightly.
  • Arrange the dough cylinders on a baking sheet lined with parchment paper or a lightly floured baker’s linen.

Second Rise:

  • Cover the shaped baguettes with a damp cloth and let them rise again until they are puffy and nearly doubled in size, about 45 minutes.

Baking:

  • Preheat the oven to 475°F (245°C). Place a baking dish filled with water on the bottom rack to create steam.
  • Just before baking, make several diagonal slashes on the top of each baguette with a sharp knife.
  • Bake the baguettes for 20 to 25 minutes, or until they are golden brown and sound hollow when tapped.

Storage Options:

  • Room Temperature: Store the baguettes wrapped in a cloth in a bread box for up to 2 days.
  • Freezer: Freeze wrapped tightly in foil and plastic for up to 3 months. Thaw and reheat in the oven at 375°F (190°C) for about 10 minutes.

Tips:

  • Water Tray for Crispness: The tray of water in the oven helps create a steamy environment, crucial for achieving a crispy crust.
  • Scoring the Dough: The slashes on the dough allow it to expand during baking and help achieve the characteristic appearance of a baguette.
  • Variations in Flour: For a heartier texture and flavor, substitute half of the all-purpose flour with whole wheat flour.

These classic French baguettes bring the artisanal experience of traditional French baking into your home, perfect for both novice and experienced bakers looking to impress with minimal effort. Enjoy the delightful crunch and tender interior of your very own freshly baked bread.

Classic Banana Pudding with Meringue Topping

0

Banana pudding is a cherished dessert that combines the creamy texture of pudding with the natural sweetness of bananas, all accented with a light, fluffy meringue. This Classic Banana Pudding with Meringue Topping recipe builds on the traditional Southern comfort food by incorporating a rich, velvety texture and a beautifully browned meringue that adds both taste and textural contrasts. Each layer of the pudding works harmoniously to offer a comforting treat that’s perfect for any occasion, whether it be a family gathering, a holiday feast, or a casual dessert at home.

The addition of a meringue topping to the classic banana pudding not only elevates the aesthetic appeal but also enhances the flavor profile, giving it a sweet, toasted topping that complements the velvety pudding and soft bananas beneath. This recipe is both a nod to tradition and a testament to the versatility of simple ingredients coming together to create something spectacular. Whether you are a seasoned baker or a novice in the kitchen, this dessert is impressively easy to master and delivers a taste that’s sure to evoke nostalgia while satisfying your sweet tooth.

Why You’ll Love This Recipe:

  • Comforting and Decadent: The classic flavors of banana and vanilla are enhanced by the creamy texture of the pudding and the light, airy meringue.
  • Visually Impressive: This dessert looks as good as it tastes, making it perfect for special occasions or as a weekend treat.
  • Simple Ingredients, Big Flavor: With easily accessible ingredients, this dessert is straightforward to assemble but doesn’t skimp on flavor.

Ingredients:

  • 2 bags Vanilla Wafers
  • 6 to 8 ripe bananas, sliced
  • 2 cups whole milk
  • 1 (5 oz.) box instant French Vanilla pudding
  • 1 (8 oz.) package cream cheese, softened
  • 1 (14 oz.) can sweetened condensed milk
  • 1 (12 oz.) container frozen whipped topping, thawed, or equal amount sweetened whipped cream
  • For the Meringue Topping:
  • 4 large egg whites
  • 1/4 teaspoon cream of tartar
  • 1/2 cup granulated sugar
  • 1 teaspoon vanilla extract

Instructions:

Assemble the Banana Pudding:

  1. Prepare the Base:
  • Line the bottom of a 13×9 inch baking dish with Vanilla Wafers to form a solid foundation.
  1. Layer Bananas:
  • Arrange the sliced bananas evenly over the cookie layer, creating a dense layer of fruit.
  1. Mix and Add Pudding:
  • In a mixing bowl, combine the whole milk and instant pudding mix with a whisk until smooth and thickened.
  • Pour one-third of this pudding mixture over the bananas and wafers, gently spreading to cover them.

Create Creamy Filling:

  1. Mix Cream Cheese and Condensed Milk:
  • In a separate bowl, blend the softened cream cheese with the condensed milk until smooth and creamy.
  1. Fold in Whipped Topping:
  • Gently fold the whipped topping into the cream cheese mixture, maintaining a light texture.
  1. Layer the Mixture:
  • Pour half of the cream cheese mixture over the pudding layer in the dish.
  • Repeat layers of wafers, bananas, and the remaining pudding and cream cheese mixtures.

Prepare Meringue Topping:

  1. Whip Egg Whites:
  • Beat the egg whites with cream of tartar until foamy. Gradually add sugar, continuing to beat until stiff peaks form and the mixture is glossy.
  • Fold in vanilla extract.
  1. Top the Pudding:
  • Spread the meringue evenly over the top, ensuring it reaches the edges to seal the dessert.

Baking and Finishing Touches:

  • Bake in a preheated oven at 350°F (175°C) for 25 minutes, or until the meringue is golden.
  • Cool and Serve: Allow to cool slightly before serving to let the layers set.

Storage Options:

  • Refrigerate any leftovers covered, for up to 3 days. Note that the meringue may soften over time.
  • Freezing is not recommended as it will affect the texture of the meringue and pudding.

Tips for Perfect Banana Pudding:

  • Banana Ripeness: Use ripe but firm bananas for the best texture and flavor.
  • Serving Suggestions: Serve chilled for a refreshing dessert experience.
  • Presentation: For an extra touch, garnish with banana slices or crumbled vanilla wafers before serving.

This Classic Banana Pudding with Meringue Topping is sure to be a hit, providing a perfect blend of flavors and textures that make this traditional dessert a beloved choice in any culinary repertoire. Enjoy the process of creating and sharing this delightful treat!

Classic Butternut Cookies

0

Butternut Cookies are a timeless treat, perfect for those who appreciate a delicate blend of buttery goodness and nutty flavors in their desserts. These cookies embody simplicity and elegance, offering a crumbly texture that dissolves delightfully in your mouth with each bite. Infused with the rich taste of walnuts and dusted with a gentle coat of powdered sugar, these cookies are ideal for any occasion, whether it’s a casual gathering, a festive holiday event, or a comforting snack to enjoy with your afternoon tea.

The magic of Butternut Cookies lies in their simplicity and the satisfaction they deliver. Unlike other heavier cookie varieties, these are light yet indulgent, making them easy to enjoy without feeling too guilty. Each cookie is a small bite of heaven with a texture that’s both tender and satisfyingly dense, thanks to the finely chopped walnuts which add both flavor and a bit of crunch. This recipe guides you through crafting these exquisite cookies, which are sure to become a quick favorite in your baking repertoire.

Why You’ll Love This Recipe:

  • Unmatched Flavor and Texture: The combination of creamy butter, rich walnuts, and a hint of vanilla creates a flavor profile that is both rich and comforting. The cookies’ texture is perfectly balanced between soft and crumbly.
  • Simple Ingredients and Preparation: Made with straightforward ingredients that are staples in many kitchens, these cookies come together quickly and without fuss.
  • Versatile for Any Occasion: Butternut Cookies are perfect for all types of events and celebrations. They can be dressed up for holidays or served plain for a simple treat.

Ingredients:

  • 1 cup (2 sticks) unsalted butter, softened
  • 1/2 cup powdered sugar, plus more for rolling
  • 2 cups all-purpose flour
  • 1 cup finely chopped walnuts
  • 1 teaspoon vanilla extract
  • Pinch of salt
  • Additional powdered sugar for dusting

Instructions:

Prepare the Dough:

  • Start by creaming together the softened butter and 1/2 cup of powdered sugar in a large mixing bowl until the mixture is light and fluffy. This not only combines these key ingredients but also introduces air into the mixture, which helps to produce a lighter cookie texture.
  • Enhance the flavor of the dough by adding vanilla extract, which provides a subtle depth of flavor that complements the richness of the butter and nuts.

Combine Dry Ingredients:

  • In a separate medium-sized bowl, whisk together the all-purpose flour and a pinch of salt. This step ensures that the salt is evenly distributed throughout the flour, which is crucial for achieving a balanced taste in your cookies.

Integrate the Walnuts:

  • Finely chop the walnuts to ensure that each bite of cookie has a consistent texture and nutty flavor. Gently fold these into the creamed butter mixture. The nuts not only add flavor but also contribute to the cookies’ delightful texture.

Mix to Form Dough:

  • Gradually mix the dry ingredients into the wet ingredients, stirring just until the dough comes together. Be careful not to overmix, as doing so can lead to tough cookies.

Chill the Dough:

  • Wrap the dough in plastic wrap and refrigerate it for at least 30 minutes. This chilling step is crucial as it solidifies the fat in the dough, making it easier to handle and helping the cookies maintain their shape during baking.

Shape and Sugar Coat:

  • Once chilled, remove the dough from the refrigerator. Using your hands, form the dough into 1-inch balls. Roll each ball in powdered sugar until well-coated. This not only adds a sweet finish but also gives the cookies their characteristic snowy appearance.

Bake:

  • Arrange the sugared dough balls on a parchment-lined baking sheet, spacing them about 2 inches apart to allow for spreading.
  • Bake in a preheated oven at 375°F (190°C) for 12 to 15 minutes, or until the edges are lightly golden. Watch the cookies carefully to prevent overbaking, which could dry them out.

Cool and Serve:

  • Allow the cookies to cool on the baking sheet for a few minutes before transferring them to a wire rack to cool completely. This resting stage helps the cookies set up properly.

Storage Options:

  • Room Temperature: Keep the cookies in an airtight container at room temperature where they will stay fresh for up to one week.
  • Freezer: For longer storage, freeze the cookies in a sealed container for up to three months. Thaw at room temperature before serving.

Tips:

  • Uniformity: Use a cookie scoop to ensure all your cookies are the same size. This helps them bake evenly and look more professional.
  • Serving Suggestion: These cookies pair wonderfully with coffee or tea, making them a great choice for afternoon gatherings.

Enjoy creating and indulging in these Classic Butternut Cookies, where every bite brings a burst of buttery, nutty flavor that is sure to delight any palate.

Perfectly Seared Ribeye Steak

0

A perfectly cooked Ribeye Steak is one of life’s simplest and most satisfying pleasures, known for its rich marbling and superb flavor. This recipe highlights the natural deliciousness of a high-quality ribeye, accentuated with just the right touch of seasoning and aromatic herbs. Whether you’re celebrating a special occasion or simply want to treat yourself to a luxurious dinner, mastering the art of cooking a ribeye steak will set you up for a memorable meal.

Cooking a ribeye steak to perfection involves paying attention to timing and temperature, both of which are crucial for achieving that ideal tender texture and juicy interior. The addition of butter, thyme, and garlic during the cooking process not only enhances the steak’s flavor but also introduces an element of gourmet finesse. Follow this recipe for a restaurant-quality steak that you can enjoy in the comfort of your own home.

Why You’ll Love This Recipe:

  • Flavorful and Juicy: The natural richness of the ribeye is enhanced by simple, yet powerful seasonings and basting techniques.
  • Easy to Prepare: With minimal preparation and ingredients, you can create a luxurious dish with ease.
  • Versatile: This steak pairs wonderfully with a variety of sides, from classic roasted potatoes to a fresh garden salad.

Ingredients:

  • 1 ribeye steak, approximately 1-inch thick
  • Sea salt flakes, to taste
  • Freshly ground black pepper, to taste
  • 50g unsalted butter
  • 2 sprigs of thyme
  • 1 clove of garlic, crushed with its skin

Instructions:

Preparation:

  • Take the ribeye steak out of the refrigerator at least 30 minutes before you plan to cook it. This ensures the steak will cook evenly and reach the desired internal temperature effectively.

Season the Steak:

  • Season the steak generously on both sides with sea salt flakes and freshly ground black pepper. Ensure even coverage for the best flavor.

Cook the Steak:

  • Heat a heavy frying pan over medium-high heat until hot. If cooking two steaks, use a pan that can comfortably fit both or use two pans.
  • Place the steak in the hot pan. Sear for 2 to 3 minutes on each side for medium-rare, adjusting the time slightly depending on the thickness of the steak and your preferred doneness.
  • As a guideline, aim for an internal temperature of 50°C (122°F) for rare, 60°C (140°F) for medium, and 70°C (158°F) for well-done, using a meat thermometer to check.

Baste the Steak:

  • After turning the steak for the first time, add the butter, thyme, and garlic to the pan. As the butter melts, tilt the pan towards you, allowing the butter to pool. Use a spoon to continuously baste the steak with the melted butter for about one minute. This process will enrich the steak with flavors and help in cooking it evenly.

Rest the Steak:

  • Remove the steak from the skillet and let it rest on a cutting board for at least 5 minutes. Resting is crucial as it allows the juices to redistribute throughout the steak, ensuring it remains juicy and flavorful when cut.

Serve:

  • Slice the steak against the grain into strips. Give a final seasoning with a bit more salt and pepper if desired.
  • Serve immediately with your choice of sides and sauces.

Storage Options:

  • Refrigerator: If you have leftovers, store them in an airtight container in the refrigerator for up to 3 days.
  • Reheating: For best results, gently reheat the steak in a skillet over low heat to preserve its juiciness.

Tips:

  • Choosing the Right Pan: Use a cast-iron skillet if possible, as it retains heat well and distributes it evenly.
  • Monitoring Temperature: Invest in a good-quality meat thermometer to ensure your steak is cooked to your liking.

Enjoy your culinary creation of a beautifully seared Ribeye Steak, which promises not only a feast for the taste buds but also an impressive addition to your cooking repertoire.