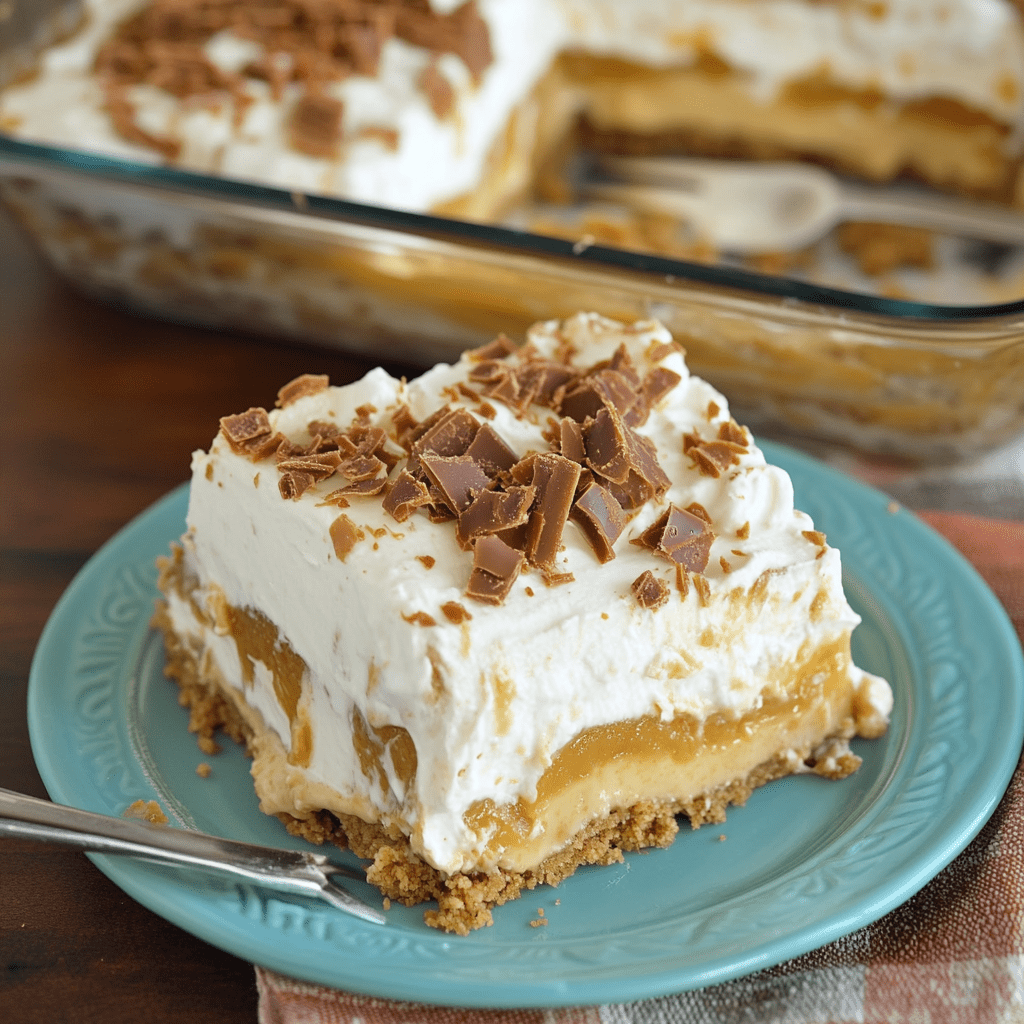
Marinated Cucumbers, Onions, and Tomatoes

0

This simple yet flavorful salad is the perfect side dish to complement a variety of meals. With its crisp cucumbers, juicy tomatoes, and tangy onions, this dish bursts with freshness and is packed with a zesty marinade that ties everything together beautifully. It’s a light and refreshing option that works wonderfully for summer barbecues, potlucks, or as a quick and easy weeknight side.

The magic lies in the marinade, a harmonious blend of vinegar, oil, and sugar that strikes a perfect balance between tangy and sweet. This dish not only tastes amazing but also requires minimal prep, making it an ideal choice for when you want to add a healthy, vibrant option to your meal spread without much effort.

Why You’ll Love This Recipe

Refreshing and Light: A crisp and tangy salad that’s perfect for warm weather.

Quick and Easy: Requires only a few ingredients and minimal prep time.

Versatile: A great side dish for grilled meats, sandwiches, or even as a standalone snack.

Ingredients

• 1 cup water

• ½ cup distilled white vinegar or apple cider vinegar

• ¼ cup vegetable oil

• ¼ cup sugar

• 2 teaspoons salt

• 1 tablespoon freshly ground black pepper

• 3 cucumbers, peeled and sliced into ¼-inch thick rounds

• 3 tomatoes, cut into wedges

• 1 onion, sliced into rings

Instructions

Step 1: Prepare the Marinade

1. In a large mixing bowl, combine the water, vinegar, vegetable oil, sugar, salt, and black pepper.

2. Whisk the ingredients together until the sugar and salt are fully dissolved, forming a smooth marinade.

Step 2: Add the Vegetables

1. Add the sliced cucumbers, tomato wedges, and onion rings to the bowl.

2. Gently toss the vegetables in the marinade to ensure they are evenly coated.

Step 3: Marinate

1. Cover the bowl with plastic wrap or a lid to keep the salad fresh.

2. Refrigerate for at least 2 hours to allow the vegetables to soak up the flavors of the marinade.

Step 4: Serve

1. Before serving, stir the salad to redistribute the marinade.

2. Serve chilled as a side dish, garnished with fresh herbs like parsley or dill if desired.

Tips for the Best Marinated Salad

Customize the Vegetables: Add bell peppers, radishes, or fresh herbs for extra flavor and color.

Adjust the Sweetness: If you prefer a less sweet salad, reduce the sugar or skip it altogether.

Let it Sit: While 2 hours is sufficient, marinating overnight enhances the flavors even more.

Storage Options

Refrigeration: Store leftovers in an airtight container in the refrigerator for up to 3 days. Stir before serving to ensure even coating of the marinade.

Not Freezer-Friendly: The vegetables may lose their texture if frozen.

Marinated Cucumbers, Onions, and Tomatoes is a timeless recipe that brings a burst of flavor and freshness to any meal. Its simple preparation and versatility make it a staple in any kitchen. Enjoy this crisp and tangy side dish that’s sure to be a hit at your table! 🥒🍅🧅✨

7 Minute Frosting

0

7 Minute Frosting is a timeless classic, known for its fluffy, marshmallow-like texture and glossy finish. This light and airy frosting is perfect for topping cakes and cupcakes, creating a smooth surface with elegant swirls and peaks. The best part? It’s surprisingly simple to make, requiring just a handful of pantry staples and a little patience.

The magic happens by cooking the ingredients gently over simmering water while whipping them into a thick, glossy meringue. This technique ensures the sugar dissolves completely, creating a silky texture that spreads effortlessly. Its delicate sweetness makes it the perfect complement to rich cakes, adding a beautiful contrast in both flavor and appearance.

Why You’ll Love This Recipe

Light and Fluffy: A marshmallow-like consistency that’s irresistible.

Quick to Make: Ready in just about 7 minutes of active whipping time.

Classic Appeal: A versatile frosting that’s perfect for cakes, cupcakes, and even cookies.

Ingredients

• 1½ cups sugar

• ⅓ cup cold water

• 2 egg whites

• 1 pinch salt

• 1 teaspoon vanilla extract

• ½ teaspoon cream of tartar

Instructions

Step 1: Gather Ingredients

1. Measure all ingredients in advance: sugar, cold water, egg whites, salt, vanilla extract, and cream of tartar. Having everything ready will streamline the process.

Step 2: Combine Ingredients

1. In a medium heatproof bowl, mix together the sugar, water, egg whites, salt, and cream of tartar.

2. Stir gently until the sugar begins to dissolve.

Step 3: Prepare a Double Boiler

1. Bring a medium saucepan with a few inches of water to a simmer.

2. Place the bowl with the egg white mixture over the saucepan, ensuring the bottom of the bowl does not touch the simmering water.

Step 4: Beat the Mixture

1. Using an electric mixer on high speed, beat the egg white mixture over the simmering water for approximately 7 minutes.

2. Continue beating until the mixture becomes thick, glossy, and forms stiff peaks.

Step 5: Add Vanilla

1. Remove the bowl from the heat and stir in the vanilla extract.

2. Beat for an additional 2 minutes to ensure the frosting is smooth and silky.

Step 6: Frost Immediately

1. Spread the frosting over cakes or cupcakes immediately after preparation.

2. Use a spatula to create decorative swirls or peaks. The frosting will set quickly, forming a delicate crust.

Tips for Perfect 7 Minute Frosting

Simmer, Not Boil: Ensure the water in the saucepan is simmering, not boiling, to avoid cooking the egg whites too quickly.

Room Temperature Egg Whites: Using room temperature egg whites helps them whip up more efficiently.

Serve Fresh: This frosting is best used and served on the same day, as it may lose its texture over time.

Storage Options

Short-Term: Store frosted cakes or cupcakes in a cool, dry place for up to 1 day.

Refrigeration: While the frosting may lose some of its fluffiness, you can refrigerate it for up to 2 days.

7 Minute Frosting is a beautiful, nostalgic choice for decorating desserts. Its simple elegance and delicate sweetness make it a go-to recipe for bakers of all skill levels. Enjoy creating and indulging in this classic treat! 🎂✨

4-Ingredient Christmas Shortbread Cookies

0

These 4-Ingredient Christmas Shortbread Cookies are the perfect addition to your holiday baking repertoire. With their buttery, melt-in-your-mouth texture and delicate sweetness, they’re simple yet festive. The minimal ingredients make them a breeze to prepare, while their versatility allows for endless customization. Whether you shape them into traditional rounds or use cookie cutters for fun holiday designs, these cookies are guaranteed to bring joy to your Christmas celebrations.

The secret to these cookies lies in their simplicity: a balanced combination of butter, sugar, and flour with the addition of cornstarch for that signature shortbread tenderness. Decorate with festive sprinkles, a drizzle of chocolate, or enjoy them plain for a classic treat that pairs wonderfully with a warm cup of tea or coffee.

Why You’ll Love This Recipe

Simple Ingredients: Made with pantry staples for easy holiday baking.

Versatile: Shape them as desired and decorate to match the season.

Perfect Texture: Light, buttery, and delicately sweet.

Ingredients

• 1 cup butter, softened

• ½ cup confectioners’ sugar

• ¼ cup cornstarch

• 1½ cups all-purpose flour

Instructions

Step 1: Preheat the Oven

1. Preheat your oven to 350°F (175°C). Line a baking sheet with parchment paper for easy cleanup.

Step 2: Cream the Butter and Sugar

1. In a large mixing bowl, use a hand mixer or stand mixer to beat the softened butter and confectioners’ sugar until light and fluffy, about 2–3 minutes.

Step 3: Add the Dry Ingredients

1. Sift in the cornstarch and all-purpose flour.

2. Mix on low speed until the ingredients are just combined, forming a soft dough. Avoid overmixing to maintain the delicate texture.

Step 4: Shape the Cookies

1. Choose your shaping method:

Option 1: Roll the dough into 1-inch balls and place them 2 inches apart on the prepared baking sheet.

Option 2: Roll out the dough on a lightly floured surface to ¼-inch thickness. Use holiday cookie cutters to cut out shapes and transfer them to the baking sheet.

Step 5: Bake

1. Bake in the preheated oven for 20 minutes or until the edges are just starting to turn golden.

Step 6: Cool

1. Let the cookies cool on the baking sheet for 5 minutes to set, then transfer them to a wire rack to cool completely.

Tips for Perfect Shortbread Cookies

Softened Butter: Ensure the butter is softened for easy creaming and a smooth dough.

Even Thickness: Roll the dough evenly to ensure consistent baking.

Decorate with Festivity: Add holiday sprinkles, powdered sugar dusting, or a drizzle of white chocolate for a festive touch.

Storage Options

Room Temperature: Store cookies in an airtight container at room temperature for up to 1 week.

Freezing: Freeze unbaked dough or baked cookies for up to 2 months. Thaw at room temperature before serving.

These 4-Ingredient Christmas Shortbread Cookies are a timeless holiday treat that’s sure to delight family and friends. Their classic flavor and customizable design make them a must-have for cookie trays, gift boxes, or simply enjoying during the festive season. 🎄🍪✨

Loaded Baked Potato Salad

0

Loaded Baked Potato Salad is the perfect side dish for any barbecue, potluck, or casual family dinner. With all the classic toppings of a loaded baked potato—crispy bacon, cheddar cheese, and chives—combined into a creamy and satisfying salad, it’s a guaranteed crowd-pleaser. This dish offers the hearty comfort of baked potatoes with the cool tanginess of a creamy dressing, making it versatile for any season or occasion.

The key to this salad is its balance of flavors: smoky bacon, sharp cheddar cheese, and the subtle tang of yogurt or the richness of mayonnaise. Whether served warm or chilled, it’s an irresistible companion to grilled meats or even as a standalone dish.

Why You’ll Love This Recipe

Hearty and Flavorful: Combines the best parts of a loaded baked potato in a convenient, shareable dish.

Customizable: Easily adjust the ingredients to fit your taste preferences.

Perfect for Any Occasion: Great for barbecues, potlucks, or as a side dish for weeknight dinners.

Ingredients

• 8 medium Russet potatoes, washed and cubed

• 1 cup plain yogurt (or ½ cup mayonnaise for richness)

• 1 pack bacon strips, cut into smaller pieces and baked until crispy

• 1 onion, minced

• Chives, chopped (amount to your liking)

• 1½ cups shredded cheddar cheese

• Salt and pepper, to taste

Instructions

Step 1: Prepare the Potatoes

1. Rinse the Russet potatoes thoroughly under cold water to remove any dirt.

2. Cut the potatoes into small, uniform cubes for even cooking.

3. Bring a large pot of water to a boil and add the cubed potatoes. Boil for 20–25 minutes or until the potatoes are fork-tender.

4. Drain the potatoes and let them cool to prevent mushiness.

Step 2: Prepare the Dressing

1. In a large bowl, combine plain yogurt (or mayonnaise) with a pinch of salt and pepper. Adjust the ratio based on your preference: use more yogurt for tanginess or more mayonnaise for a richer flavor.

2. Mix until smooth and well-combined.

Step 3: Combine Ingredients

1. Once the potatoes are cool, gently fold them into the prepared dressing. Be careful not to mash the potatoes.

2. Add the minced onion and chopped chives, stirring gently to incorporate the flavors evenly.

Step 4: Add the Cheese

1. Stir in 1½ cups of shredded cheddar cheese. The warmth of the potatoes will slightly melt the cheese, creating gooey, delicious pockets of flavor.

Step 5: Top with Bacon and Garnish

1. Sprinkle crispy bacon bits over the top of the salad.

2. Add additional shredded cheddar cheese and a generous garnish of chopped chives for a fresh, vibrant finish.

Step 6: Serve

1. Serve the salad warm or at room temperature for a comforting side dish.

2. Alternatively, refrigerate for a few hours before serving to allow the flavors to meld beautifully.

Tips for Perfect Loaded Baked Potato Salad

Cooking Potatoes: Avoid overcooking the potatoes to keep them from becoming mushy. Fork-tender is the goal.

Cheese Selection: Use freshly shredded cheddar for the best flavor and texture.

Make It Your Own: Add sour cream, green onions, or even diced jalapeños for extra flavor.

Storage Options

Refrigeration: Store leftovers in an airtight container in the fridge for up to 3 days. Stir before serving.

Freezing: Not recommended, as the texture of the potatoes and dressing may change.

Loaded Baked Potato Salad is a versatile and delicious dish that brings together the comforting flavors of a baked potato in an easy-to-serve format. Whether enjoyed warm or chilled, this salad is sure to be a hit at your next gathering. Serve it alongside grilled meats, burgers, or as a hearty addition to any meal. Enjoy! 🥔🧀🥓

Italian Sausage Pasta

0

Italian Sausage Pasta is a rich, hearty dish that combines savory sausage, aromatic herbs, and a creamy Parmesan sauce with tender rigatoni. Packed with vibrant sun-dried tomatoes and fresh spinach, this recipe offers a perfect balance of flavors and textures. It’s an easy-to-make one-skillet dish that feels indulgent yet comforting, ideal for weeknight dinners or casual gatherings.

The star of this dish, Italian sausage, is paired with a medley of herbs and a luscious cream sauce that clings beautifully to the pasta. The addition of sun-dried tomatoes adds a burst of tangy sweetness, while baby spinach lends a pop of color and freshness. Each bite is a symphony of bold flavors that will leave everyone asking for seconds.

Why You’ll Love This Recipe

Rich and Creamy: A velvety Parmesan sauce perfectly coats the pasta and sausage.

Quick and Easy: A flavorful meal ready in under an hour.

Customizable: Swap rigatoni for your favorite pasta shape or add more veggies like mushrooms or zucchini.

Ingredients

• 1 lb. Italian sausage

• 1 small onion, finely chopped

• 3 cloves garlic, minced

• 1 teaspoon dried marjoram

• ½ teaspoon freshly ground black pepper

• ¼ teaspoon crushed rosemary

• ¼ teaspoon dried thyme leaves

• ¼ teaspoon red pepper flakes

• 12 ounces uncooked rigatoni

• ½ cup low-sodium chicken broth

• 1¼ cups heavy cream

• ⅔ cup freshly grated Parmesan cheese

• ⅔ cup sun-dried tomatoes, julienne-cut, packed in oil and drained

• 4–5 cups baby spinach

• Salt, to taste

Instructions

Step 1: Cook the Sausage and Onions

1. Heat a large skillet over medium heat. Add the Italian sausage and cook for 3–4 minutes.

2. Add the chopped onion and continue cooking until the sausage is browned and the onions are soft, about 5–7 minutes.

3. Reduce the heat to low and stir in the garlic, marjoram, black pepper, rosemary, thyme, and red pepper flakes. Cook for 1 minute while stirring constantly to bloom the spices.

4. Remove the sausage mixture from the skillet, plate it, and cover with foil to keep warm.

Step 2: Cook the Pasta

1. While the sausage is cooking, bring a large pot of salted water to a boil.

2. Cook the rigatoni according to the package directions until al dente. Drain well and set aside.

Step 3: Prepare the Sauce

1. Return the skillet to medium heat and add the chicken broth. Use a wooden spoon to deglaze the pan, scraping up the browned bits.

2. Stir in the heavy cream and bring the mixture to a gentle boil. Reduce the heat to a simmer and let it reduce by half, about 5 minutes.

Step 4: Combine and Finish

1. Turn the heat to low and stir in the Parmesan cheese, sun-dried tomatoes, and spinach. Cook until the cheese is melted and the spinach is wilted, about 2–3 minutes.

2. Return the sausage mixture and cooked pasta to the skillet. Toss everything together until well coated in the sauce.

3. Season with salt and additional black pepper to taste.

Step 5: Serve

1. Heat the pasta dish over low heat for a few minutes to ensure it is warmed through.

2. Serve immediately, garnished with extra Parmesan cheese and fresh herbs if desired.

Tips for Success

Fresh Parmesan: Use freshly grated Parmesan for the best flavor and a smoother sauce.

Deglazing the Pan: Don’t skip this step—it adds depth of flavor by incorporating the browned bits into the sauce.

Customization: Feel free to add your favorite vegetables or swap spinach for kale or arugula.

Storage Options

Refrigeration: Store leftovers in an airtight container in the fridge for up to 3 days. Reheat gently on the stovetop or in the microwave, adding a splash of cream or broth to loosen the sauce.

Freezing: This dish is best enjoyed fresh, as the cream sauce may separate when frozen.

Italian Sausage Pasta is a restaurant-quality dish you can make at home with ease. With its comforting flavors and creamy texture, this recipe is sure to become a family favorite. Serve it with crusty bread or a fresh salad for a complete meal. Enjoy! 🍝✨

Chicken Gnocchi Soup

0

Chicken Gnocchi Soup is a comforting, creamy dish packed with tender chicken, fluffy gnocchi, and hearty vegetables like spinach, carrots, and celery. Perfect for a cozy dinner or lunch, this soup combines rich flavors and satisfying textures, making it a favorite for all ages.

The creamy base made with half-and-half and chicken broth is seasoned with thyme and a hint of garlic, providing a depth of flavor that elevates the dish. This one-pot meal is both delicious and easy to prepare, making it ideal for busy weeknights or when you crave a warm, homemade bowl of goodness.

Why You’ll Love This Recipe

Creamy and Hearty: A rich, velvety broth filled with gnocchi and chicken makes for a satisfying meal.

Quick and Easy: Ready in under an hour, perfect for a comforting dinner.

Versatile: Easily adaptable by adding mushrooms, substituting kale for spinach, or using rotisserie chicken for convenience.

Ingredients

• 3 tablespoons butter

• 1 small yellow onion, chopped

• 2 celery ribs, chopped

• 2 medium carrots, peeled and chopped

• 3 cloves garlic, minced

• 3 tablespoons all-purpose flour

• 2 cups half-and-half

• 4 cups low-sodium chicken broth

• 2 teaspoons chopped fresh thyme

• 2½ cups diced cooked chicken (bite-size pieces)

• 16 ounces potato gnocchi

• 3 cups fresh baby spinach (long stems trimmed)

• Red pepper flakes (optional)

• Salt and freshly ground black pepper, to taste

Instructions

Step 1: Sauté the Vegetables

1. In a Dutch oven or large pot, melt the butter over medium heat.

2. Add the chopped onion, celery, and carrots. Cook, stirring occasionally, until the onion and celery are tender, about 7–8 minutes.

3. Reduce the heat to low and add the minced garlic. Stir and cook for 1 minute.

Step 2: Create the Base

1. Sprinkle the flour over the vegetables and stir to coat. Cook for 2 minutes to eliminate the raw flour taste.

2. Gradually stir in the half-and-half and chicken broth, alternating between the two to create a smooth base.

Step 3: Simmer

1. Bring the mixture to a gentle boil, then reduce the heat and simmer until thickened, about 10 minutes.

Step 4: Add Chicken and Gnocchi

1. Stir in the fresh thyme, diced cooked chicken, and potato gnocchi.

2. Simmer for about 5 minutes, allowing the gnocchi to cook through and absorb the flavors.

Step 5: Finish with Spinach and Seasoning

1. Add the fresh spinach and optional red pepper flakes. Stir until the spinach wilts, about 2–3 minutes.

2. Taste and season with salt and freshly ground black pepper as needed.

Step 6: Serve and Enjoy

1. Ladle the soup into bowls and serve hot. Pair with crusty bread or a side salad for a complete meal.

Tips for Perfect Chicken Gnocchi Soup

Use Fresh Gnocchi: Fresh gnocchi cooks faster and has a softer texture.

Rotisserie Chicken Shortcut: Save time by using pre-cooked rotisserie chicken.

Adjust Consistency: Add more broth for a thinner soup or simmer longer for a thicker texture.

Storage Options

Refrigeration: Store in an airtight container in the fridge for up to 3 days. Reheat gently over medium heat, adding a splash of broth or water if needed.

Freezing: Freeze without the gnocchi and spinach for up to 2 months. Add them fresh when reheating.

Chicken Gnocchi Soup is a warm, comforting dish that’s both hearty and flavorful. Whether served for a family dinner or enjoyed as leftovers, it’s a timeless recipe that everyone will love. Bon appétit!

Strawberry Shortbread Cookies

0

Strawberry Shortbread Cookies are a delightful fusion of buttery, melt-in-your-mouth shortbread with the vibrant flavor of freeze-dried strawberries. These cookies are not only visually stunning with their soft pink hue but also carry the natural sweetness and tanginess of real strawberries. Topped with a delicate glaze infused with strawberry powder, they offer a perfectly balanced treat that’s as beautiful as it is delicious.

Perfect for special occasions, afternoon tea, or simply indulging your sweet tooth, these cookies are easy to prepare and even easier to enjoy. The use of freeze-dried strawberries ensures an intense flavor without excess moisture, making the dough easy to work with while delivering a concentrated strawberry essence.

Why You’ll Love This Recipe

Intense Strawberry Flavor: Made with freeze-dried strawberries for a natural and vibrant taste.

Buttery and Tender: Classic shortbread texture with a fruity twist.

Versatile: Perfect for holidays, gifting, or a delightful snack any time.

Ingredients

For the Cookies:

• 1-ounce package of freeze-dried strawberries

• 2 cups all-purpose flour

• 1 cup (2 sticks) unsalted butter, softened

• ½ cup powdered sugar

• 1 teaspoon pure vanilla extract

For the Glaze:

• 1 cup powdered sugar

• 2 tablespoons milk

• 1 teaspoon reserved strawberry powder (optional)

Instructions

Step 1: Prepare the Strawberry Powder

1. Place the freeze-dried strawberries into a high-speed blender or food processor.

2. Pulse until the strawberries turn into a fine powder, resembling powdered sugar.

3. Optional: Reserve 1 teaspoon of the powder for the glaze.

Step 2: Mix the Dry Ingredients

1. Transfer the remaining strawberry powder to a medium mixing bowl.

2. Add the all-purpose flour and whisk until well combined.

Step 3: Cream Butter and Sugar

1. In a stand mixer fitted with the paddle attachment, cream the softened butter and powdered sugar on medium speed until light and fluffy, about 1 minute.

Step 4: Form the Dough

1. Reduce the mixer speed to low and gradually add the strawberry-flour mixture to the creamed butter and sugar.

2. Mix until the dough comes together, ensuring all ingredients are fully incorporated.

Step 5: Chill the Dough

1. Shape the dough into a disc, wrap it tightly in plastic wrap, and refrigerate for 15 minutes.

Step 6: Roll and Cut the Dough

1. Roll the chilled dough on a lightly floured surface to ¼-inch thickness.

2. Use cookie cutters to cut out shapes and place them on a parchment-lined baking sheet.

Step 7: Chill Again

1. Chill the cut cookies on the baking sheet in the refrigerator for 15 minutes.

Step 8: Bake

1. Preheat the oven to 350°F (175°C).

2. Bake the cookies for 15–17 minutes, or until the centers are set. Avoid over-baking to maintain their tender texture.

Step 9: Prepare the Glaze

1. In a small bowl, whisk together powdered sugar and milk until smooth.

2. Add the reserved strawberry powder for extra flavor and color, if desired.

Step 10: Decorate the Cookies

1. Once the cookies are fully cooled, drizzle or dip them into the glaze.

2. Sprinkle with additional freeze-dried strawberry crumbs, if desired.

Step 11: Set the Glaze

1. Allow the glaze to set completely, about 15 minutes, before serving or storing.

Tips for Perfect Strawberry Shortbread Cookies

Chill the Dough: Proper chilling prevents the cookies from spreading during baking.

Customize the Glaze: Add a few drops of vanilla or lemon extract to the glaze for a flavor twist.

Storage: Store cookies in an airtight container at room temperature for up to 5 days.

Strawberry Shortbread Cookies are a delightful addition to your dessert repertoire. Their buttery texture, fruity flavor, and stunning appearance make them a treat everyone will adore. Whether for a party, a gift, or a personal indulgence, these cookies are a guaranteed hit. Enjoy! 🍓🍪

The Pioneer Woman’s Sausage Gravy

0

The Pioneer Woman’s Sausage Gravy is the epitome of comfort food, offering a rich and creamy Southern-style gravy that pairs perfectly with warm, flaky biscuits. Made with breakfast sausage, a hint of seasoned salt, and freshly ground black pepper, this recipe is simple yet indulgent, making it ideal for breakfast or brunch.

The beauty of this dish lies in its versatility and ease of preparation. Whether you’re serving a crowd or enjoying a quiet morning at home, sausage gravy over biscuits is always a winner. The savory flavor of the sausage combined with the creamy texture of the gravy creates a satisfying dish that’s as nostalgic as it is delicious.

Why You’ll Love This Recipe

Classic Comfort Food: A timeless recipe that hits all the right notes.

Quick and Easy: Ready in under 30 minutes, perfect for busy mornings.

Customizable: Adjust the seasoning or add a spicy kick with hot sausage.

Ingredients

• 1 pound breakfast sausage (hot or mild)

• 1/3 cup all-purpose flour

• 3–4 cups whole milk (more to taste)

• 1/2 teaspoon seasoned salt

• 2 teaspoons freshly ground black pepper (more to taste)

• 12 cooked biscuits, warmed, for serving

Instructions

Step 1: Cook the Sausage

1. Heat a large skillet over medium-high heat.

2. Tear the sausage into small pieces and add to the skillet.

3. Cook until browned and no longer pink, breaking it up with a wooden spoon. Reduce the heat to medium-low.

Step 2: Add the Flour

1. Sprinkle half of the flour over the cooked sausage and stir to coat.

2. Gradually add the remaining flour, stirring constantly to combine.

3. Cook for 1–2 minutes to remove the raw flour taste.

Step 3: Incorporate the Milk

1. Slowly pour in the milk, stirring constantly to prevent lumps.

2. Cook over medium heat, stirring frequently, until the gravy thickens, about 10–12 minutes.

3. Add additional milk if needed to reach your desired consistency.

Step 4: Season the Gravy

1. Sprinkle in the seasoned salt and freshly ground black pepper.

2. Taste the gravy and adjust the seasoning as needed.

3. Cook for another 2–3 minutes to allow the flavors to meld.

Step 5: Serve

1. Split the warm biscuits in half.

2. Spoon the sausage gravy generously over the biscuits.

3. Garnish with freshly ground black pepper or chopped parsley, if desired.

Tips for Perfect Sausage Gravy

Choose Your Sausage: Use hot sausage for a spicier kick or mild sausage for a classic flavor.

Consistency: Adjust the amount of milk to control the thickness of the gravy.

Make It Your Own: Add a pinch of cayenne or red pepper flakes for extra heat.

Storage Options

Refrigeration: Store leftover gravy in an airtight container for up to 3 days. Reheat gently on the stovetop, adding a splash of milk to loosen the consistency.

Freezing: Sausage gravy can be frozen for up to 2 months. Thaw in the refrigerator overnight before reheating.

Sausage gravy over warm biscuits is a timeless dish that brings comfort and joy to any table. This recipe’s simple preparation and rich flavors make it a go-to choice for breakfast or brunch. Serve it with fresh fruit, coffee, or juice for a complete meal. Enjoy this Southern classic!

Heaven on Earth Cake

0

Heaven on Earth Cake is a delightful dessert that layers sweet and fluffy angel food cake with creamy cheesecake pudding, tangy cherry pie filling, and light whipped topping. It’s an easy-to-make, no-bake dessert that tastes as heavenly as its name suggests. Perfect for any occasion, this cake combines textures and flavors in every bite, creating a dessert that is both refreshing and indulgent.

The tartness of the cherry pie filling contrasts beautifully with the sweet and creamy pudding layer, while the angel food cake provides a light and spongy base. A sprinkle of roasted almonds adds a subtle crunch for the perfect finishing touch. Whether for a family gathering, potluck, or just a sweet treat at home, this cake is sure to be a hit.

Why You’ll Love This Recipe

No Baking Required: Quick to assemble and perfect for hot weather.

Versatile and Customizable: Swap out cherry pie filling for other fruit flavors.

Make-Ahead Friendly: Best served chilled, making it an ideal dessert to prepare ahead of time.

Ingredients

• 1 prepared angel food cake, cut into cubes

• 1 package (3.4 oz) instant cheesecake pudding mix

• 1½ cups milk

• 1 cup sour cream (or plain Greek yogurt)

• 1 teaspoon vanilla extract

• 1 can (30 oz) cherry pie filling

• 1 container (8 oz) whipped topping, thawed

• 1 tablespoon roasted almond slices (optional, for garnish)

Instructions

Step 1: Prepare the Cake Base

1. Cut the prepared angel food cake into bite-sized cubes and set aside.

Step 2: Make the Pudding Mixture

1. In a mixing bowl, whisk together the instant cheesecake pudding mix, milk, sour cream, and vanilla extract until smooth and thickened. Set aside.

Step 3: Assemble the Layers

1. In a 9×13-inch baking dish, layer half of the angel food cake cubes evenly across the bottom.

2. Spoon half of the cherry pie filling over the cake cubes, spreading it out evenly.

3. Repeat the layers with the remaining cake cubes and cherry pie filling.

Step 4: Add the Pudding Layer

1. Pour the prepared pudding mixture over the top of the layered cake and cherry filling, spreading it evenly to cover.

Step 5: Top with Whipped Topping

1. Spoon the whipped topping over the pudding layer, spreading it evenly across the surface.

Step 6: Chill the Cake

1. Cover the dish with plastic wrap and refrigerate for at least 4 hours, or overnight, to allow the layers to set and flavors to meld.

Step 7: Garnish and Serve

1. Before serving, sprinkle roasted almond slices on top for added texture and flavor.

Tips

Customize the Fruit: Substitute the cherry pie filling with blueberry, strawberry, or peach pie filling for variety.

Lighter Version: Use light whipped topping and Greek yogurt instead of sour cream for a lower-calorie option.

Single Servings: Assemble the layers in small mason jars or dessert glasses for individual portions.

Storage Options

Refrigeration: Store leftovers in an airtight container in the fridge for up to 3 days.

Freezing: This dessert does not freeze well due to the whipped topping, so enjoy it fresh.

Heaven on Earth Cake is a foolproof dessert that will impress everyone with its creamy, fruity, and light-as-air layers. Whether served for a celebration or just a sweet treat, it’s bound to be a favorite. Enjoy this heavenly creation!

Italian Meat Sauce

0

Italian Meat Sauce is a hearty and versatile dish bursting with rich flavors. Combining lean ground beef, ground pork, and a medley of herbs, this sauce simmers to perfection with tomatoes, red wine, and a hint of brown sugar. Perfect over pasta or served with crusty bread, this sauce elevates any meal with its deep, complex flavors.

What makes this recipe special is the balance between the robust meat and the aromatic blend of parsley, oregano, basil, marjoram, and nutmeg. A touch of Chianti or red wine adds sophistication, while brown sugar rounds out the acidity of the tomatoes. Whether for a family dinner or a special occasion, this Italian Meat Sauce is a comforting and crowd-pleasing favorite.

Why You’ll Love This Recipe

Rich and Flavorful: The combination of meats and slow-simmered spices creates a deeply satisfying sauce.

Customizable: Easily adjust spices and wine to suit your taste.

Make-Ahead Friendly: Tastes even better the next day, making it perfect for meal prep.

Ingredients

• 1.5 lbs lean ground beef

• 1 lb ground pork (not sausage)

• Olive oil (a good swirl for sautéing)

• 1 red onion, chopped

• 2 tsp minced garlic

• 1 (15 oz) can tomato sauce

• 1 (12 oz) can tomato paste

• 2 (28 oz) cans crushed tomatoes (preferably Contadina)

• 4 cups chicken broth

• 4 tsp dried parsley

• 4 tsp dried oregano

• 2 tsp dried basil

• 2 tsp dried marjoram

• 2 dashes ground nutmeg

• ¼ cup brown sugar

• ½ cup Chianti or good dry red wine

• Salt and pepper to taste

Instructions

Step 1: Prepare Ingredients

1. Chop the red onion and mince the garlic.

2. Measure out all other ingredients to streamline the cooking process.

Step 2: Sauté the Meat and Onions

1. Heat a swirl of olive oil in a large pot over medium-high heat.

2. Sauté the chopped red onion for 5 minutes until translucent.

3. Add the ground beef and ground pork. Cook for 8–10 minutes until browned.

4. Stir in the minced garlic and cook for 1 minute until fragrant.

5. Drain any excess grease.

Step 3: Season the Meat

1. Add parsley, oregano, basil, marjoram, nutmeg, salt, and pepper to the meat mixture.

2. Stir to combine and cook for 1 minute to release the flavors.

Step 4: Incorporate Tomato Mixture

1. In a separate bowl, mix the tomato sauce, tomato paste, crushed tomatoes, brown sugar, and chicken broth.

2. Pour the tomato mixture into the pot with the seasoned meat and stir thoroughly.

Step 5: Simmer the Sauce

1. Bring the sauce to a gentle simmer over medium-low heat.

2. Reduce the heat to low, partially cover the pot, and simmer for 30 minutes, stirring occasionally.

Step 6: Add Wine and Final Simmer

1. Stir in the Chianti or red wine and simmer for an additional 10–15 minutes to meld the flavors.

Step 7: Adjust and Serve

1. Taste the sauce and adjust seasoning if needed—add more salt, pepper, or sugar to balance flavors.

2. If the sauce is too thick, stir in additional chicken broth until desired consistency is achieved.

3. Serve hot over pasta, with crusty bread, or as a base for lasagna.

Tips

Wine Substitute: If you prefer not to use wine, substitute with an equal amount of chicken broth.

Enhance Flavor: Add a bay leaf during simmering for extra depth.

Freeze It: This sauce freezes beautifully; portion into containers for quick meals.

Storage Options

Refrigeration: Store in an airtight container in the fridge for up to 4 days.

Freezing: Freeze in freezer-safe containers for up to 3 months. Thaw in the fridge overnight before reheating.

Italian Meat Sauce is a classic, flavorful recipe that’s easy to make and versatile enough for various dishes. From spaghetti dinners to baked casseroles, this rich sauce will become a staple in your kitchen. Enjoy the comforting taste of homemade Italian cuisine!