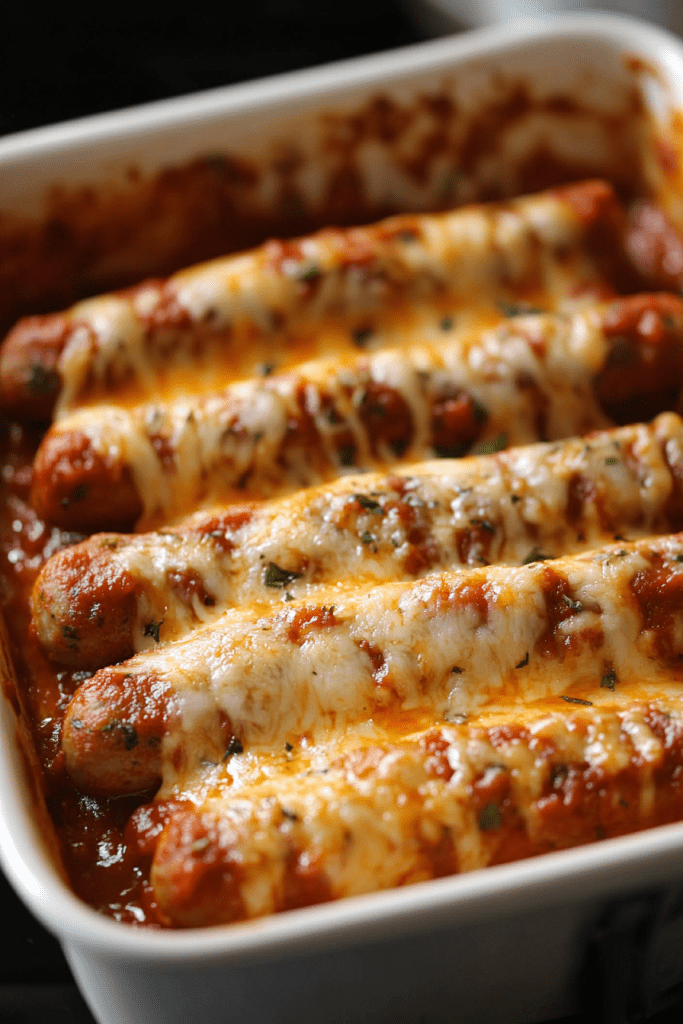
This Cheesy Italian Sausage recipe is a simple yet flavorful dish that delivers a delicious combination of melted mozzarella and savory sausage, all baked in rich marinara sauce. It’s a low-carb, high-protein meal that requires minimal ingredients and effort, making it perfect for a quick dinner or a satisfying appetizer.
By stuffing Italian sausages with gooey mozzarella and baking them in marinara sauce, this dish creates a comforting, cheesy, and slightly smoky flavor. Whether served on its own, over pasta, or with a side of crusty garlic bread, it’s a dish that’s guaranteed to be a crowd-pleaser.
Why You’ll Love This Recipe
• Simple & Quick: Only three ingredients and minimal prep time.
• Cheesy & Savory: Mozzarella melts into the sausage, making every bite irresistible.
• Versatile Dish: Serve over pasta, with a salad, or on its own.
Ingredients
• 6 Italian sausage links, uncooked
• 6 mozzarella cheese sticks
• 1 ½ cups marinara sauce
Instructions
Step 1: Prep the Dish
1. Preheat the oven to 350°F (175°C).
2. Lightly spray an 8×8-inch baking dish with nonstick cooking spray.
Step 2: Prepare the Sausages
1. Using a sharp knife, slice each Italian sausage lengthwise about halfway through, making sure not to cut all the way through.
2. Insert one mozzarella cheese stick into the slit of each sausage.
Step 3: Assemble & Bake
1. Place the stuffed sausages into the prepared baking dish.
2. Pour marinara sauce evenly over the sausages.
3. Cover the dish with aluminum foil and bake for 30 minutes.
4. Remove the foil and bake uncovered for an additional 10 minutes, or until the sausages are fully cooked and the cheese is melted.
Step 4: Serve & Enjoy
1. Let the dish rest for a few minutes before serving.
2. Serve hot, either on its own or with pasta, salad, or garlic bread.
Tips for Success
• Use high-quality sausage for the best flavor.
• For extra cheese, sprinkle shredded mozzarella or Parmesan on top before baking.
• Add spice with crushed red pepper flakes in the marinara sauce.
Storage Options
• Refrigerator: Store in an airtight container for up to 3 days.
• Reheat: Warm in the oven at 350°F (175°C) for 10 minutes.
• Freezing: Freeze before baking for up to 2 months. Thaw overnight before cooking.
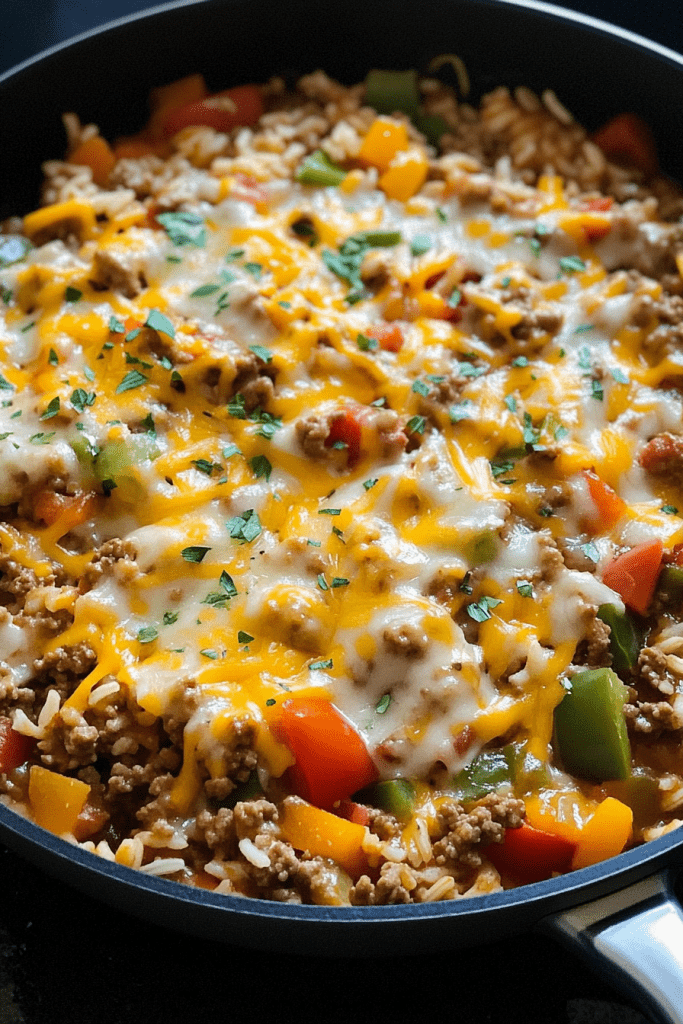
This Ground Beef and Peppers Skillet is a quick and satisfying one-pan meal perfect for busy weeknights. With hearty ground beef, colorful bell peppers, and tender rice simmered in a flavorful broth, this dish delivers a balance of savory and slightly sweet flavors. Topped with melted cheddar cheese, it’s a comforting and delicious meal that comes together in under 30 minutes.
The combination of bell peppers not only adds vibrant color but also a fresh and slightly smoky sweetness that complements the rich beef. Cooking everything in one pan allows the flavors to meld beautifully while keeping cleanup to a minimum. Whether served on its own or paired with a simple side salad or crusty bread, this skillet meal is sure to be a family favorite.
Why You’ll Love This Recipe
• One-Pan Meal: Easy preparation and cleanup.
• Loaded with Flavor: Bell peppers, herbs, and beef broth create a delicious depth of taste.
• Cheesy and Hearty: The melted cheddar makes it extra comforting.
Ingredients
• 1 onion, chopped
• ½ red bell pepper, chopped
• ½ green bell pepper, chopped
• ½ yellow bell pepper, chopped
• 2 tsp minced garlic
• ½ tsp dried oregano
• ½ tsp dried basil
• Salt and pepper, to taste
• 1 (14.5 oz) can diced tomatoes
• 2 cups beef broth
• ⅔ cup rice
• 1 ½ cups shredded cheddar cheese
Instructions
Step 1: Cook the Beef & Vegetables
1. Heat a large skillet over medium-high heat.
2. Add the ground beef, onion, and bell peppers to the skillet.
3. Cook until the vegetables soften and the beef is fully browned.
4. Drain any excess fat.
Step 2: Season the Mixture
1. Stir in the minced garlic, oregano, basil, salt, and pepper.
2. Cook for 30 seconds to release the flavors.
Step 3: Add Rice & Simmer
1. Stir in the diced tomatoes, beef broth, and rice.
2. Bring the mixture to a light boil, then reduce the heat to low.
3. Cover and simmer for 20 minutes, or until the rice is tender.
Step 4: Melt the Cheese
1. Sprinkle the shredded cheddar cheese over the skillet.
2. Cover and cook for 2-3 more minutes, until the cheese is melted.
Step 5: Serve & Enjoy
1. Remove from heat and let sit for a few minutes.
2. Serve warm, garnished with fresh parsley if desired.
Tips for Success
• Use any bell peppers you like for different flavor combinations.
• For extra spice, add crushed red pepper flakes or a dash of hot sauce.
• For a low-carb option, replace rice with cauliflower rice and reduce broth slightly.
Storage Options
• Refrigerator: Store leftovers in an airtight container for up to 3 days.
• Reheat: Warm in a skillet over low heat, adding a splash of broth if needed.
• Freezing: Freeze for up to 2 months. Thaw overnight before reheating.
This Cheesy Hamburger Potato Casserole is the ultimate comfort food, combining layers of seasoned ground beef, tender potatoes, and a creamy, cheesy sauce. The balance of flavors makes it a satisfying meal that’s perfect for family dinners, potlucks, or meal prep. With its rich, hearty layers, this casserole is a delicious way to turn simple ingredients into a comforting and filling dish.
What makes this casserole even better is the homemade creamy sauce that brings everything together. Instead of relying on canned soups, this recipe includes a smooth and flavorful sauce made with Greek yogurt, beef broth, and a touch of butter. The final layer of melted mozzarella and sharp cheddar creates a golden, bubbly crust that adds even more flavor. Whether served alone or paired with a crisp green salad or garlic bread, this dish is sure to become a favorite.
Why You’ll Love This Recipe
• Layers of Flavor: Creamy sauce, melted cheese, and seasoned beef make every bite delicious.
• Hearty & Filling: Potatoes and protein-rich beef make this a full meal.
• Make-Ahead Friendly: Can be assembled ahead and baked when ready.
Ingredients
Main Casserole:
• 2 lbs ground beef (93% lean, 7% fat)
• 1 ¼ cup onion, chopped
• 3 cloves garlic, minced
• 3 Russet potatoes, sliced into ¼” rounds (skin on)
• 1 cup mozzarella cheese, shredded
• 1 cup sharp cheddar cheese, shredded
• 2 tsp Worcestershire sauce
• 1 tsp garlic powder
• ½ tsp onion powder
• 1 tsp paprika
• Salt and pepper, to taste
Creamy Sauce:
• 1 cup milk (plant-based or whole)
• ½ cup beef broth
• ¾ cup Greek yogurt
• 2 ½ tbsp butter
• 2 ½ tbsp gluten-free all-purpose flour
• Salt and pepper, to taste
Instructions
Step 1: Prepare the Ingredients
1. Preheat oven to 375°F (190°C). Grease a 9×13-inch baking dish with cooking spray or butter.
2. Slice the potatoes into ¼-inch rounds and set aside.
Step 2: Cook the Ground Beef Mixture
1. In a large skillet over medium heat, brown the ground beef, breaking it apart as it cooks.
2. Drain excess fat, then add the chopped onion and garlic. Cook until the onions soften.
3. Stir in Worcestershire sauce, garlic powder, onion powder, paprika, salt, and pepper. Mix well and remove from heat.
Step 3: Make the Cream Sauce
1. In a medium saucepan, melt the butter over medium heat.
2. Whisk in the gluten-free all-purpose flour, stirring constantly to make a roux.
3. Slowly whisk in milk and beef broth, continuing to stir until the sauce thickens.
4. Remove from heat and stir in the Greek yogurt, seasoning with salt and pepper.
Step 4: Assemble the Casserole
1. Layer half of the sliced potatoes in the bottom of the prepared baking dish.
2. Spread half of the ground beef mixture evenly over the potatoes.
3. Pour half of the cream sauce over the beef.
4. Repeat the layers with the remaining potatoes, beef, and cream sauce.
Step 5: Bake the Casserole
1. Sprinkle mozzarella and sharp cheddar cheese over the top.
2. Cover with aluminum foil and bake for 45-50 minutes, until the potatoes are tender.
3. Remove the foil and bake for 10-15 more minutes, until the cheese is melted and bubbly.
4. For a crispy top, broil for 2-3 minutes.
Step 6: Serve & Enjoy
1. Let the casserole rest for a few minutes before slicing.
2. Serve warm with a side salad or garlic bread.
Tips for Success
• Slice potatoes evenly for uniform cooking.
• Let the casserole rest before serving to allow flavors to meld.
• For extra richness, add a sprinkle of Parmesan cheese on top before baking.
Storage Options
• Refrigerate: Store leftovers in an airtight container for up to 3 days.
• Reheat: Warm in the oven at 350°F (175°C) for 10-15 minutes.
• Freeze: Wrap tightly and freeze for up to 2 months. Thaw before baking.
A rich and indulgent layered dessert featuring fudgy brownies, creamy peanut butter pudding, and layers of Reese’s and whipped topping. Perfect for chocolate and peanut butter lovers! Best Heaven in a Bowl
Why You’ll Love This Recipe
• Decadent & Creamy: A perfect mix of fudgy brownies and smooth pudding.
• Easy to Make: Uses simple ingredients with effortless layering.
• Crowd-Pleaser: Ideal for potlucks, parties, or special occasions.
Ingredients
• 1 package fudge brownie mix (prepared as directed)
• 2 packages mini Reese’s cups (halved)
• 4 cups cold milk (preferably 2%)
• 2 packages instant vanilla pudding mix
• 1 cup creamy peanut butter
• 4 tsp vanilla extract
• 16 oz Cool Whip, thawed
Instructions
1. Bake the Brownies
• Prepare the brownie batter according to the package instructions.
• Pour into a buttered 9×12-inch pan and bake at 350°F (175°C) for 20-25 minutes.
• Let cool completely, then cut into small squares.
2. Prepare the Peanut Butter Pudding
• In a large bowl, whisk together the milk and pudding mix for 2 minutes until thick.
• Add vanilla extract and peanut butter, mixing until smooth.
• Fold in 1 ½ cups of Cool Whip.
3. Assemble the Layers
• In a large glass trifle bowl (5 quarts), place ⅓ of the brownie pieces at the bottom.
• Sprinkle ⅓ of the halved Reese’s cups on top.
• Spread ⅓ of the pudding mixture evenly over the brownies.
• Repeat the layers two more times.
4. Top & Chill
• Spread the remaining Cool Whip on top.
• Garnish with extra Reese’s cups.
• Refrigerate for at least 30 minutes before serving.
Tips for Success
• Chill overnight for even better flavor and texture.
• Use homemade brownies for an extra rich taste.
• For crunch, add chopped peanuts or crushed Oreos between layers.
Storage Options
• Refrigerate: Store in an airtight container for up to 3 days.
• Freeze: Not recommended, as the pudding texture may change.
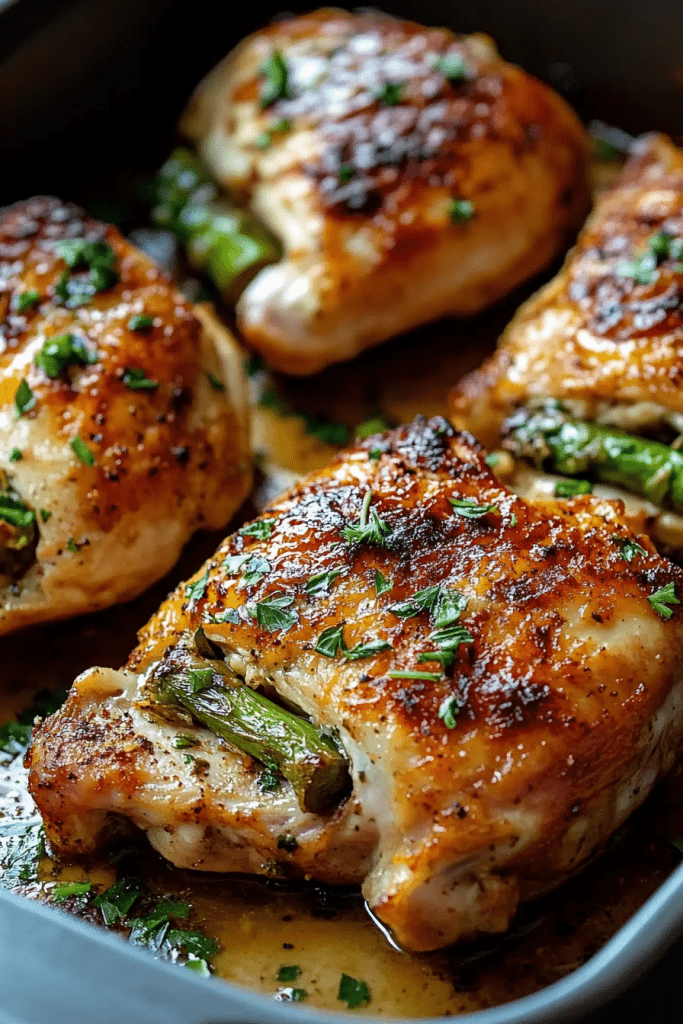
Juicy, tender chicken breasts stuffed with melted mozzarella, crisp asparagus, and flavorful sun-dried tomatoes make this dish both delicious and elegant. The combination of cheesy, savory flavors with the fresh crunch of asparagus creates the perfect balance in every bite.
This recipe is great for a healthy, protein-packed meal that looks and tastes restaurant-quality. It’s easy enough for a weeknight dinner but impressive enough to serve to guests.
Why You’ll Love This Recipe
• Flavorful & Juicy: The perfect mix of melty cheese, tender chicken, and smoky seasoning.
• Healthy & Low Carb: Packed with protein and nutrients without unnecessary carbs.
• Easy to Make: Simple ingredients and straightforward steps.
Ingredients
• 4 skinless, boneless chicken breasts (about 1 ½ lb)
• 1 tsp Italian seasoning mix
• 1 tsp garlic powder
• 1 tsp smoked paprika
• Sea salt, to taste
• Ground black pepper, to taste
• 12 asparagus stalks, ends trimmed
• 1 oz sun-dried tomatoes, chopped
• 4 slices mozzarella cheese
• 1 tbsp olive oil
Instructions
1. Preheat the Oven: Set your oven to 400°F (200°C).
2. Season the Chicken:
• Lay the chicken breasts flat on a cutting board.
• Sprinkle both sides evenly with Italian seasoning, garlic powder, smoked paprika, sea salt, and black pepper.
3. Create a Pocket:
• Using a sharp knife, carefully slice a pocket into the side of each chicken breast, ensuring you don’t cut all the way through.
4. Prepare the Filling:
• Lay out the mozzarella slices.
• Place 3 asparagus stalks and chopped sun-dried tomatoes on each.
• Roll the mozzarella around the asparagus and tomatoes to create a compact bundle.
5. Stuff the Chicken:
• Place the mozzarella bundle inside each chicken pocket.
• Secure the edges with toothpicks to keep the filling in place.
6. Sear the Chicken:
• Heat olive oil in an oven-safe skillet over medium-high heat.
• Sear the chicken for 3-5 minutes per side until golden brown.
7. Bake to Perfection:
• Transfer the skillet to the preheated oven and bake for 15-20 minutes or until the chicken reaches an internal temperature of 165°F (74°C).
These crispy, golden egg rolls take the classic flavors of crab rangoon and wrap them in a crunchy shell. The combination of creamy, seasoned crab filling and a crispy egg roll wrapper makes them an irresistible appetizer or snack. Perfectly fried to a golden brown, they pair well with sweet and sour sauce, hot mustard, or soy sauce.
Whether you’re hosting a gathering or just craving a restaurant-style treat at home, these egg rolls are easy to make and packed with flavor. The creamy filling, enhanced by Worcestershire sauce and garlic, delivers a delicious contrast to the crispy exterior.
Why You’ll Love This Recipe:
• Crunchy & Creamy: The perfect balance of textures.
• Restaurant Quality: Tastes just like your favorite takeout.
• Easy to Make: Simple steps for a delicious appetizer.
Ingredients
• 8 ounces fresh, cooked, and flaked crab meat
• 3 green onions, finely chopped
• ½ tsp onion powder
• ½ tsp garlic powder
• 2 tbsp Worcestershire sauce
• 16 ounces cream cheese, softened
• 8 egg roll wrappers
• Oil for frying
Instructions
1. Heat the Oil: In a large pan, heat 2 inches of oil to 350°F–375°F (175°C–190°C).
2. Prepare the Filling: In a large mixing bowl, combine cream cheese, Worcestershire sauce, onion powder, garlic powder, and chopped green onions. Mix until smooth.
3. Add Crab Meat: Gently fold in the flaked crab meat until evenly combined.
4. Assemble the Egg Rolls:
• Lay out the egg roll wrappers on a clean surface.
• Place a spoonful of the crab mixture in the center, shaping it into a small log.
• Fold the sides of the wrapper inward, then roll tightly.
• Dab a little water on the edge to seal.
5. Fry the Egg Rolls:
• Carefully place the egg rolls seam side down in the hot oil.
• Fry, turning occasionally, until golden brown on all sides (about 2-3 minutes per side).
6. Drain & Serve:
• Remove egg rolls with a slotted spoon and place them on a paper towel-lined rack to drain excess oil.
• Serve hot with duck sauce, sweet and sour sauce, hot mustard, or soy sauce.
Tips for Success
• Seal properly: Use water on the edges of the wrappers to prevent them from opening while frying.
• Don’t overcrowd the pan: Fry in batches to maintain an even temperature.
• Air Fryer Option: Spray egg rolls with oil and air fry at 375°F (190°C) for 8–10 minutes, flipping halfway.
Storage Options
• Refrigerate: Store leftovers in an airtight container for up to 3 days.
• Reheat: Crisp up in an oven at 350°F (175°C) for 5–7 minutes.
• Freeze: Freeze uncooked egg rolls for up to 3 months. Fry directly from frozen, adding a couple of minutes to the cooking time.
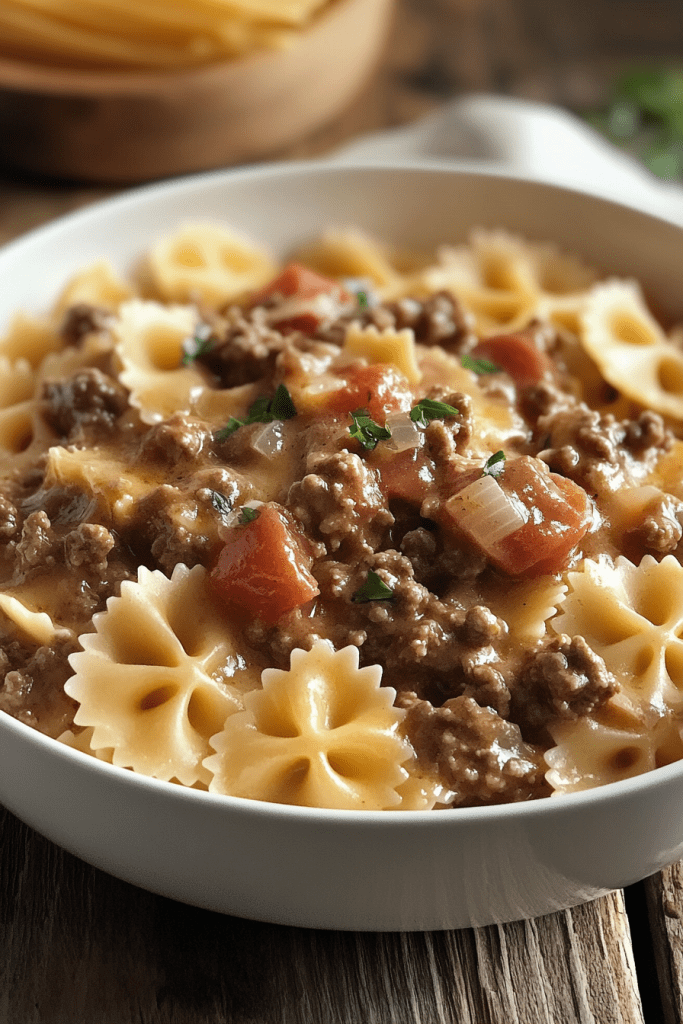
This comforting pasta dish is a creamy, cheesy delight that comes together quickly with simple ingredients. The combination of tender bowtie pasta, seasoned ground beef, and rich Velveeta cheese creates a dish that’s both satisfying and easy to prepare. A touch of diced tomatoes adds a tangy contrast, while garlic and Italian herbs bring depth to the flavor.
Whether you’re making this for a weeknight dinner or a cozy family meal, it’s a guaranteed crowd-pleaser. The creamy sauce perfectly coats the pasta, making every bite rich and indulgent. Plus, it’s a one-pan wonder that saves on cleanup!
Why You’ll Love This Recipe:
• Quick & Easy: Ready in about 30 minutes with minimal effort.
• Creamy & Cheesy: Velveeta creates a smooth, velvety sauce.
• Family Favorite: A kid-friendly meal that’s great for busy nights.
Ingredients
• 12 oz bowtie (farfalle) pasta
• 1 lb lean ground beef
• 1 small onion, diced
• 2 cloves garlic, minced
• 1 (14.5 oz) can diced tomatoes, drained
• 1 tsp Italian seasoning
• ½ tsp salt
• ½ tsp black pepper
• 8 oz Velveeta cheese, cubed
Instructions
1. Cook the Pasta: Bring a large pot of salted water to a boil. Cook bowtie pasta until al dente, according to package instructions. Drain and set aside.
2. Brown the Beef: In a large skillet over medium heat, cook ground beef with diced onion and garlic until beef is fully browned. Drain excess fat.
3. Add Tomatoes & Seasonings: Stir in diced tomatoes, Italian seasoning, salt, and black pepper. Simmer for 5 minutes to blend flavors.
4. Melt the Cheese: Add cubed Velveeta cheese, stirring until fully melted and the sauce is smooth.
5. Combine: Add the cooked pasta to the skillet, tossing everything together until evenly coated.
6. Serve: Dish up hot and enjoy! Optional: Garnish with fresh parsley or grated Parmesan.
Tips for Success
• Use freshly minced garlic for a stronger, more aromatic flavor.
• Avoid overcooking the pasta to keep its firm texture in the dish.
• For a spicier twist, add a pinch of red pepper flakes or diced jalapeños.
Storage Options
• Refrigerator: Store leftovers in an airtight container for up to 3 days.
• Reheat: Warm in a skillet over low heat, adding a splash of milk if needed.
• Freezing: Not recommended, as the cheese sauce may become grainy when thawed.
Corn Dip is a creamy, cheesy, and flavorful appetizer that’s perfect for parties, game nights, or casual gatherings. Whether served hot and bubbly straight from the oven or cold and refreshing from the fridge, this dip is packed with fire-roasted corn, peppers, and a blend of spices that create a delicious balance of smoky and mildly spicy flavors. Pair it with tortilla chips, Fritos, or crunchy crackers for the ultimate snack that will keep everyone coming back for more.
The best part about this recipe is its versatility—you can bake it for a warm, gooey dip or serve it chilled for a lighter, refreshing option. With a mix of cheddar and Monterey Jack cheese, a hint of jalapeño heat, and a touch of chili powder and paprika, every bite is rich and satisfying. Plus, the prep is simple, making this a go-to appetizer for any occasion.
Why You’ll Love This Recipe:
• Two Ways to Enjoy: Serve it hot and melty or cold and refreshing.
• Loaded with Flavor: A mix of spices, cheese, and fire-roasted corn for bold taste.
• Crowd-Pleasing Appetizer: Perfect for parties, BBQs, and game days.
Ingredients
• 1 tbsp olive oil
• 1 small yellow onion, chopped
• ¾ cup chopped green and red bell peppers
• ½ tsp kosher salt
• ½ tsp fresh ground black pepper
• 2 cloves garlic, minced
• 2 (15 oz) cans corn (preferably fire-roasted)
• ¾ cup mayonnaise
• 1 cup sour cream
• ½ cup chopped green onions
• 1 small jalapeño, minced (see notes)
• 1 tsp chili powder
• ½ tsp paprika
• ¼ tsp ground cayenne pepper
• 2 cups shredded cheddar and Monterey Jack cheese
• Green onions or fresh cilantro, chopped (for garnish)
• Fritos and tortilla chips (for serving, optional)
Instructions
Hot Dip Version
1. Preheat Oven: Set oven to 375°F (190°C).
2. Cook Vegetables: Heat olive oil in a medium skillet over medium-high heat. Add onions and bell peppers, cooking until softened.
3. Add Seasonings: Reduce heat to low, then stir in salt, black pepper, and garlic. Cook for 1 minute, then remove from heat and let cool slightly.
4. Mix Ingredients: In a large bowl, combine the cooked veggies with corn, mayonnaise, sour cream, green onions, jalapeño, chili powder, paprika, cayenne pepper, cheddar, and Monterey Jack cheese.
5. Bake: Transfer mixture to a baking dish and bake for 20–25 minutes, until golden brown and bubbly.
6. Serve: Garnish with chopped green onions or cilantro. Serve warm with Fritos or tortilla chips.
Cold Dip Version
1. Cook Vegetables: Follow steps 2 and 3 from the hot dip version, then allow the mixture to cool completely.
2. Mix Ingredients: In a large bowl, combine the cooled veggie mixture with corn, mayonnaise, sour cream, green onions, jalapeño, chili powder, paprika, cayenne, cheddar, and Monterey Jack cheese.
3. Chill: Cover and refrigerate for at least 1 hour to allow the flavors to meld.
4. Serve: Garnish with fresh green onions or cilantro. Serve chilled with tortilla chips, crackers, or crostini.
Tips
• Control the Heat: Remove jalapeño seeds for a milder dip or add extra cayenne for more spice.
• Make It Ahead: Prepare in advance and refrigerate; reheat in the oven if serving hot.
• Fire-Roasted Corn Alternative: If unavailable, use regular canned or frozen corn and char it in a dry skillet for a smoky flavor.
Storage Options
• Refrigerator: Store leftovers in an airtight container for up to 3 days.
• Freezer: Not recommended, as dairy-based dips can become grainy when thawed.
Strawberry Slab Pie is a delightful dessert that brings together the sweetness of fresh strawberries with a light, crisp crust and a glossy fruit glaze. This pie is perfect for serving at large gatherings, whether it’s a summer picnic, a holiday celebration, or a casual family dinner. The combination of juicy strawberries and a slightly tangy lemon-lime filling makes each bite refreshing and flavorful. Unlike traditional round pies, this slab version is baked in a rectangular pan, making it easy to cut into squares for sharing.
The preparation is simple, using a refrigerated pie crust as a shortcut while keeping the homemade taste intact. The filling is made with real strawberries and a gelatin mixture that sets into a beautiful, firm layer, ensuring the pie holds its shape when sliced. After chilling for a few hours, this pie becomes a cool and satisfying treat, perfect for warm weather. Top it with a dollop of whipped cream for an extra touch of indulgence.
Why You’ll Love This Recipe:
• Easy to Make: Uses refrigerated pie crust for convenience.
• Bright & Refreshing: Fresh strawberries and a zesty lemon-lime glaze.
• Great for Gatherings: A perfect make-ahead dessert for parties.
Ingredients
• 1 package refrigerated pie crust (11 oz)
• 32 oz fresh strawberries, hulled and sliced
• 2 ½ cups lemon-lime soda (e.g., Sprite)
• 6 oz strawberry jello
• 1 ¼ cups sugar
• ⅓ cup cornstarch
• 1 tbsp lemon juice
• Whipped topping or whipped cream, for garnish
Instructions
Step 1: Prepare the Crust
1. Preheat oven to 450°F (232°C).
2. Lightly dust a work surface with flour and roll out both pie crusts into a 12×17-inch rectangle.
3. Transfer the crust to a 10×15-inch baking sheet, crimp the edges, and prick the surface with a fork.
4. Bake for 9–11 minutes until golden brown. Let cool completely.
Step 2: Make the Strawberry Glaze
1. In a large saucepan, whisk together the jello, sugar, and cornstarch.
2. Stir in the lemon-lime soda and lemon juice.
3. Cook over medium heat, stirring constantly, until the mixture thickens (about 2–3 minutes).
4. Remove from heat and let cool for 10–15 minutes.
Step 3: Assemble & Chill
1. Arrange the sliced strawberries evenly over the cooled crust.
2. Slowly pour the cooled jello mixture over the strawberries, making sure to cover them completely.
3. Refrigerate for at least 2 hours, or until fully set.
Step 4: Serve
1. Slice the pie into squares or rectangles.
2. Top each piece with whipped cream or frozen whipped topping.
3. Serve chilled and enjoy!
Tips
• Prevent a Soggy Crust: Let the crust cool completely before adding the filling.
• Make It Extra Fruity: Add blueberries or raspberries for a colorful twist.
• For a Crispier Crust: Brush with a beaten egg before baking.
Storage Options
• Refrigerator: Store in an airtight container for up to 3 days.
• Freezer: Freeze without the whipped topping for up to 1 month. Thaw in the fridge before serving.
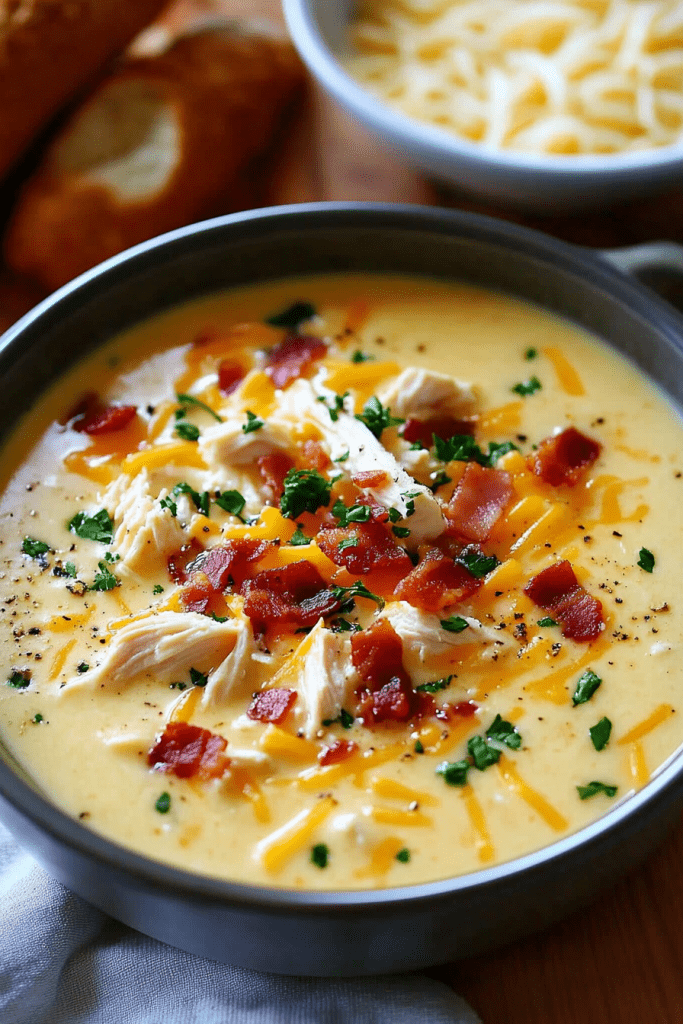
Rich, creamy, and packed with flavor, Crack Chicken Soup is the ultimate comfort dish for chilly days or whenever you crave something warm and satisfying. This hearty soup brings together tender shredded chicken, crispy bacon, and a creamy, cheesy broth infused with ranch seasoning. The balance of flavors creates a savory and indulgent experience, making each spoonful irresistible. Whether you’re feeding a crowd or preparing a cozy meal for yourself, this soup is guaranteed to be a hit.
One of the best things about this recipe is its simplicity. It uses everyday ingredients that come together effortlessly, making it perfect for both weeknight dinners and special occasions. The chicken and bacon provide a rich, smoky depth, while the vegetables add a touch of sweetness and freshness. A combination of cream cheese, cheddar, and a can of condensed soup ensures a smooth, velvety consistency that coats every bite. With the addition of angel hair pasta, this soup becomes a complete, satisfying meal that’s easy to prepare and even easier to enjoy.
Why You’ll Love This Recipe:
• Incredibly Creamy: The blend of cream cheese, milk, and cheddar creates a luxuriously smooth texture.
• Loaded with Flavor: Smoky bacon, ranch seasoning, and garlic make every bite packed with deliciousness.
• Hearty and Satisfying: With shredded chicken and pasta, this soup is filling enough to be a meal on its own.
Ingredients
Soup Base:
• 3 cups cooked, shredded chicken breast
• 10.5 oz condensed cream of chicken soup (1 can)
• 6 cups low-sodium chicken stock
• 1 cup whole milk
• 8 oz cream cheese, softened
• ½ tsp garlic powder
• 2 tbsp Ranch seasoning mix
Vegetables:
• ½ cup diced carrots
• ½ cup diced celery
• 1 small onion, chopped
• 3 cloves garlic, minced
Add-Ins:
• 10 strips bacon, cooked and diced
• 2 cups shredded cheddar cheese
• 8 oz angel hair pasta, broken into smaller lengths
Instructions
Step 1: Prepare the Bacon and Chicken
1. Preheat the oven to 350°F (175°C).
2. Lay bacon strips on a baking sheet lined with parchment paper. Bake for 12–15 minutes or until crispy. Transfer to a plate lined with paper towels to drain excess grease, then chop into small pieces.
3. If the chicken isn’t cooked yet, boil or bake it, then shred using two forks. Set aside.
Step 2: Sauté the Vegetables
1. In a large stockpot, heat 1 tbsp olive oil or butter over medium heat.
2. Add the chopped onion, celery, and carrots, sautéing for 5–6 minutes until softened.
3. Stir in the minced garlic and cook for another minute until fragrant.
Step 3: Create the Creamy Broth
1. In a bowl, whisk together the condensed cream of chicken soup and whole milk until smooth.
2. Pour the mixture into the stockpot along with the chicken stock, Ranch seasoning, garlic powder, and cream cheese.
3. Stir continuously over medium heat until the cream cheese is fully melted and the broth is smooth.
Step 4: Add the Chicken and Bacon
1. Stir in the shredded chicken and chopped bacon, reserving a small amount of bacon for garnish.
2. Reduce the heat to low and let the soup simmer for 5–7 minutes to allow the flavors to develop.
Step 5: Cook the Pasta and Add Cheese
1. Add the broken angel hair pasta to the pot, stirring frequently to prevent it from sticking together.
2. Cook for 6–8 minutes until the pasta is tender.
3. Stir in the shredded cheddar cheese, allowing it to melt into the soup for a rich, cheesy finish.
Step 6: Serve and Enjoy
1. Ladle the hot soup into bowls and garnish with extra bacon bits or fresh herbs, if desired.
2. Serve immediately with crusty bread or a side salad for a complete meal.
Tips
• Use Rotisserie Chicken: For an even quicker version, shred a store-bought rotisserie chicken instead of cooking your own.
• Don’t Overcook the Pasta: Since the noodles will continue to soften in the broth, remove from heat as soon as they reach al dente.
• Adjust the Thickness: If the soup is too thick, add a bit more chicken stock to loosen it up. If it’s too thin, let it simmer for a few extra minutes to reduce.
• Make It Spicy: Add a pinch of red pepper flakes or a dash of hot sauce for a little heat.
Storage Options
• Refrigerator: Store in an airtight container for up to 4 days. Reheat gently on the stove, adding a splash of broth or milk if needed.
• Freezer: This soup freezes well without the pasta. If planning to freeze, omit the noodles and add fresh pasta when reheating. Store in a freezer-safe container for up to 3 months.
• Reheating: Warm leftovers on the stove over low heat, stirring occasionally. If reheating from frozen, let it thaw in the fridge overnight before warming.