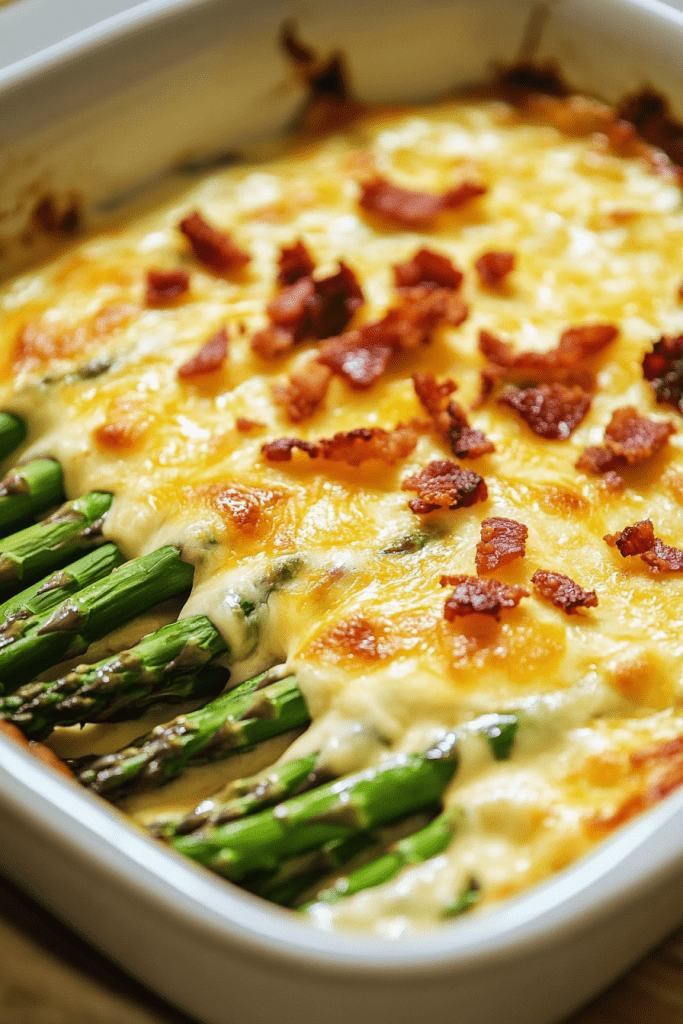
Mexicorn and Cheese Dip Recipe

0

Dive into this creamy, cheesy Mexicorn Dip, a delightful party favorite that’s as easy to make as it is delicious to eat. Combining sweet Mexicorn with zesty Rotel tomatoes, rich cheese, and a creamy base, this dip is a guaranteed hit for any gathering or game day celebration.

Why You’ll Love This Recipe:

  • Quick and Easy: Just mix the ingredients, and it’s ready to serve.
  • Versatile: Adjust the spice level to suit your preference, making it perfect for all palates.
  • Crowd-Pleaser: The combination of sweet, savory, and tangy flavors makes this dip irresistible.

Ingredients:

  • 2 cans of Mexicorn, drained
  • 1 can of Rotel (mild or spicy, depending on preference), drained
  • 2 generous cups of shredded cheddar cheese
  • 8 spring onions, finely chopped
  • A good handful of cilantro, minced
  • 1 cup of smooth mayonnaise
  • 1 cup of tangy sour cream
  • Chips for serving, Fritos Scoops recommended

Instructions:

Step 1: Combine the Ingredients

  1. Prepare the Vegetables: Begin by draining the cans of Mexicorn and Rotel to remove any excess liquid. This helps prevent the dip from becoming too watery.
  2. Mix Corn and Rotel: In a large mixing bowl, combine the drained Mexicorn and Rotel with the shredded cheddar cheese, chopped spring onions, and minced cilantro. Mixing these first helps distribute the flavors evenly before adding the creamy elements.

Step 2: Add Creaminess

  1. Incorporate Mayo and Sour Cream: Fold in the mayonnaise and sour cream into the corn mixture. Stir until everything is well combined and the mixture achieves a creamy consistency. This step is crucial for binding all the ingredients together and making the dip smooth and spreadable.

Step 3: Serve and Enjoy

  1. Final Adjustments: Taste the dip and adjust seasoning with additional salt or spices if needed. Sometimes the acidity from the Rotel can vary, so tasting and adjusting is key.
  2. Serve: Transfer the dip to a serving bowl. For a festive touch, you can garnish with extra chopped cilantro or a sprinkle of paprika for color.
  3. Dipping: Serve with Fritos Scoops or your choice of chips. The dip is hearty enough to hold up well with sturdy chips like Fritos, which are perfect for scooping.

Additional Tips:

  • Make Ahead: You can prepare this dip a few hours before serving and refrigerate it to let the flavors meld together. Just give it a good stir before serving.
  • Serving Size: This recipe serves a crowd, making it perfect for parties or large family gatherings.
  • Variations: For a lighter version, you can use low-fat mayonnaise and sour cream, or add a kick with diced jalapeños or a dash of hot sauce.

Storage:

  • Store any leftover dip in an airtight container in the refrigerator for up to 3 days. Stir well before serving again, as some separation might occur.

Enjoy your Mexicorn and Cheese Dip, a simple yet flavorful option that’s sure to make your next party a big hit!

Hearty Bistro Beef Soup with Cheese Crusted Bread

0

Experience the warmth and depth of flavor in this Hearty Bistro Beef Soup, accompanied by Cheese Crusted Bread. This meal is a blend of rich beefy broth, tender short ribs, and aromatic vegetables, topped off with crunchy, Gruyère-topped baguette slices. It’s a luxurious yet comforting dish perfect for chilly evenings or when you want something satisfying and gourmet.

Why You’ll Love This Recipe:

  • Deeply Flavorful: The combination of caramelized onions, short ribs, and white wine creates a rich and complex broth.
  • Comforting: This soup is like a warm hug in a bowl, with its hearty ingredients and succulent meat.
  • Impressive yet Easy: While the recipe is straightforward, the result is impressive enough for special occasions or entertaining guests.

Ingredients:

For the Soup:

  • 2 lbs short ribs (bone-in)
  • 2 tbsp olive oil
  • 2 large onions, thinly sliced
  • 4 cloves garlic, minced
  • 1 tsp sugar
  • 4 cups beef broth
  • 1 cup dry white wine (or more broth)
  • 2 tbsp soy sauce
  • 1 tsp fresh thyme (or ½ tsp dried)
  • 1 bay leaf
  • Salt and pepper, to taste

For the Gruyère Toast:

  • 1 baguette, sliced
  • 2 cups Gruyère cheese, grated
  • 1 tbsp olive oil
  • 1 clove garlic, halved (for rubbing on bread)

Instructions:

For the Soup:

  1. Brown the Short Ribs: In a large pot or Dutch oven, heat olive oil over medium-high heat. Season the short ribs with salt and pepper. Brown on all sides, about 5-7 minutes, then remove and set aside.
  2. Cook the Onions: In the same pot, reduce heat to medium. Add the onions and cook, stirring frequently, until caramelized, about 20-25 minutes. Stir in the garlic and sugar, cooking an additional 2-3 minutes.
  3. Deglaze: Pour in the white wine (or additional broth), scraping up any browned bits from the bottom of the pot. Allow simmering for a few minutes to reduce slightly.
  4. Combine Ingredients: Return the short ribs to the pot. Add beef broth, soy sauce, thyme, and bay leaf. Season with additional salt and pepper to taste. Bring to a simmer.
  5. Slow Cook: Cover and let it simmer on low heat for about 2-3 hours, or until the short ribs are tender and the meat easily pulls apart. Alternatively, transfer to a slow cooker on low for 6-8 hours.
  6. Shred the Meat: Remove the short ribs, shred the meat, discarding the bones and any excess fat. Return the shredded meat to the pot. Adjust seasoning as needed.

For the Gruyère Toast:

  1. Prepare the Bread: Preheat your oven to 400°F (200°C). Brush baguette slices with olive oil and rub with the halved garlic clove.
  2. Add Cheese: Top each slice with a generous amount of grated Gruyère cheese.
  3. Bake: Place the baguette slices on a baking sheet and bake until the cheese is melted and slightly golden, about 5-7 minutes.

To Serve:

  • Ladle the soup into bowls, ensuring each serving is rich with broth, onions, and shredded beef.
  • Serve with the warm, cheesy Gruyère toast on the side for dipping into the soup.

Serving Suggestions:

  • Enhance this meal with a side of a crisp green salad or a glass of your favorite red wine for a complete bistro experience.

Storage Tips:

  • The soup can be stored in an airtight container in the refrigerator for up to 3 days or frozen for up to 2 months. Reheat on the stove over medium heat until hot.

Enjoy this delightful bistro-inspired meal that brings the essence of a cozy, gourmet restaurant into your home, perfect for impressing guests or treating yourself to a special dinner.

Simply Savory Ground Beef Recipe

0

Master the basics of cooking ground beef with this simple yet versatile recipe. Perfectly seasoned and cooked to a delicious sear, this Simply Savory Ground Beef can be the foundation for countless dishes—from tacos and spaghetti to casseroles and burgers. Whether you’re a beginner cook or just looking for a quick protein addition to your meals, this recipe ensures flavorful and juicy ground beef every time.

Why You’ll Love This Recipe:

  • Quick and Easy: Ready in just minutes, this ground beef is perfect for busy weeknights.
  • Customizable: Easily adaptable, you can adjust the seasonings to suit your taste or incorporate it into a variety of dishes.
  • Healthy Option: Choose lean ground beef for a healthier dish, or drain the fat for a lighter version.

Ingredients:

  • 1 lb ground beef (choose your preferred fat content)
  • Salt, to taste
  • Black pepper, to taste
  • 1/2 teaspoon garlic powder (optional)
  • 1/2 teaspoon onion powder (optional)

Instructions:

Step 1: Heat the Skillet

  1. Place a skillet over medium-high heat. Let it heat up thoroughly to ensure proper searing of the beef.

Step 2: Cook the Ground Beef

  1. Add the ground beef to the hot skillet. Allow it to sear for a minute or two without moving it. This helps in developing a nice, brown crust.
  2. Begin breaking the beef apart with a wooden spoon or spatula. Continue to cook, stirring and breaking it apart, until it’s fully browned and crumbly, about 6-8 minutes.

Step 3: Season the Beef

  1. When the beef is nearly cooked through, season it with salt, black pepper, garlic powder, and onion powder. These add depth to the beef’s flavor but are optional based on your dietary preferences.
  2. Stir well to ensure the seasoning is evenly distributed throughout the beef.

Step 4: Drain the Fat

  1. If desired, drain excess fat by tilting the skillet and using the spoon to keep the beef on one side. This step is optional and depends on your health preferences and the fat content of the meat.

Step 5: Final Touches

  1. Give the beef a final stir and adjust any seasonings if necessary.
  2. Remove the skillet from heat. Your savory ground beef is now ready to be used in your favorite recipes.

Serving Suggestions:

  • Use this ground beef in tacos, as a topping for homemade pizzas, in pasta sauces, or as a filling for wraps and sandwiches.
  • Combine with sautéed vegetables for a quick and nutritious stir-fry.

Storage:

  • Store any leftover cooked ground beef in an airtight container in the refrigerator for up to 3 days.
  • For longer storage, freeze it in a sealed container or zip-lock bag for up to 3 months. Thaw in the refrigerator before reheating.

Enjoy the convenience and deliciousness of this Simply Savory Ground Beef, a staple recipe that’s bound to make your meal preparations easier and tastier!

Mississippi Mud Cake Recipe

0

Indulge in the decadent and gooey goodness of Mississippi Mud Cake, a beloved Southern dessert known for its rich chocolate flavor layered with marshmallows and topped with a velvety icing. This cake combines the best of all dessert worlds with its moist cake base, melty marshmallow middle, and luscious chocolate icing.

Why You’ll Love This Recipe:

  • Decadently Chocolatey: This cake is a chocolate lover’s dream, featuring a rich cocoa-infused batter and a smooth chocolate icing.
  • Perfect for Gatherings: Ideal for potlucks, family dinners, or any festive occasion, this cake is sure to impress.
  • Simple Ingredients: Uses straightforward pantry staples that you likely have on hand.

Ingredients:

For the Cake:

  • 1 cup unsalted butter, softened
  • 1 ½ cups granulated sugar
  • 4 large eggs
  • 1 ½ cups all-purpose flour
  • ½ cup cocoa powder
  • 2 teaspoons vanilla extract
  • 1 cup chopped pecans
  • 4 cups mini marshmallows

For the Icing:

  • 16 ounces confectioners’ sugar
  • ½ cup cocoa powder
  • ¼ cup unsalted butter, softened
  • ½ cup whole milk

Instructions:

Preheat and Prepare:

  1. Preheat your oven to 350°F (175°C). Grease a 9×13 inch baking dish thoroughly.

Make the Cake Batter:

  1. Beat butter and sugar: In a large mixing bowl, cream together the softened butter and granulated sugar until light and fluffy.
  2. Add eggs: Incorporate the eggs one at a time, mixing well after each addition.
  3. Mix in dry ingredients: Gradually add the flour and cocoa powder to the creamed mixture, ensuring everything is well combined without overmixing.
  4. Add vanilla and pecans: Stir in the vanilla extract and fold in the chopped pecans.
  5. Bake: Pour the batter into the prepared baking dish, spreading evenly. Bake for about 25 minutes or until a toothpick inserted into the center comes out clean.

Add the Marshmallows:

  1. Add marshmallows: Immediately after taking the cake out of the oven, evenly sprinkle the mini marshmallows over the hot cake. Allow them to soften for a few minutes, then gently spread them across the cake to form a sticky layer.

Prepare the Icing:

  1. Combine icing ingredients: In a medium bowl, mix the confectioners’ sugar and cocoa powder. Add the softened butter and mix until crumbly.
  2. Add milk: Gradually pour in the milk while stirring, until the icing is smooth and creamy.

Finish the Cake:

  1. Ice the cake: Once the cake has cooled slightly and the marshmallows have set, pour the icing over the marshmallow layer, spreading evenly.
  2. Set: Allow the cake to cool completely in the pan on a wire rack, letting the icing set before serving.

Serving Suggestions:

  • Serve slices of this cake with a scoop of vanilla ice cream or a dollop of whipped cream for an extra indulgent treat.
  • Coffee or a cold glass of milk makes great accompaniments to cut through the richness.

Storage:

  • Store leftover Mississippi Mud Cake in an airtight container at room temperature for up to 3 days, or refrigerate if preferred.

Enjoy the melt-in-your-mouth texture and rich flavors of this classic Mississippi Mud Cake, a dessert that promises to bring a little Southern charm to your table.

Polish Sausage Sauerkraut And Potatoes Crockpot

0

Dive into the hearty and comforting flavors of Eastern Europe with this simple Crockpot Polish Sausage and Sauerkraut recipe. This dish is a perfect blend of tangy sauerkraut, savory sausage, and tender potatoes, all cooked slowly to perfection. It’s an ideal meal for any day of the week when you need a filling and flavorful dinner with minimal effort.

Why You’ll Love This Recipe:

  • Minimal Prep: Set it in the morning and come home to a cooked meal.
  • Flavorful: The combination of sauerkraut and caraway seeds offers a unique and delicious taste.
  • Comforting: Warm and filling, perfect for colder weather or any time you need a comfort food fix.

Ingredients:

  • 6 medium gold potatoes, cut into large chunks
  • 16 oz sauerkraut, drained
  • 1 ½ lbs Polish sausage, sliced
  • ½ cup chicken broth
  • 1 tsp caraway seeds
  • 1 bay leaf
  • Salt and pepper to taste

Instructions:

Step 1: Layer the Crockpot

  1. Begin by placing the sauerkraut at the bottom of the crockpot. This helps to flavor everything above it and absorbs the juices as it cooks.
  2. Layer the potato chunks next, followed by the sliced Polish sausage. The order of layering ensures that the flavors meld well as the heat comes from the bottom.

Step 2: Mix the Broth

  1. In a small bowl, combine the chicken broth, caraway seeds, and bay leaf. These spices will infuse the broth with additional flavors that are characteristic of Polish cuisine.
  2. Pour the seasoned broth mixture over the potatoes, sausage, and sauerkraut in the crockpot. This liquid will steam up during cooking, tenderizing the potatoes and sausage while enhancing the sauerkraut.

Step 3: Season

  1. Sprinkle salt and pepper across the top of the ingredients, adjusting the amount to suit your taste preferences.

Step 4: Cook

  1. Cover the crockpot and set it to cook on high for 4 hours. This duration is typically sufficient for the potatoes to become tender and the flavors to integrate fully.

Step 5: Serve

  1. Before serving, remove the bay leaf as it has done its job of adding flavor.
  2. Give the dish a gentle stir to ensure the layers are evenly mixed.
  3. Serve hot, making sure each portion has a good mix of sausage, potatoes, and sauerkraut.

Serving Suggestions:

  • Pair this dish with a side of dark rye bread or a warm pretzel for an authentic experience.
  • A dollop of sour cream or a sprinkle of fresh dill can be added to each serving for extra flavor.

Storage Tips:

  • Store leftovers in an airtight container in the refrigerator for up to 3 days. Reheat in the microwave or on the stovetop until thoroughly warmed.

Enjoy your Crockpot Polish Sausage and Sauerkraut, a simple yet satisfying dish that brings traditional flavors to your dinner table with ease!

Berry Citrus Bars

0

Indulge in the delightful harmony of strawberries and lemons with these Strawberry Lemon Blondies. This recipe features a soft, chewy base bursting with fresh strawberries and a hint of lemon, topped with a sweet strawberry lemon glaze that enhances the fruit flavors. Perfect for summer picnics, afternoon snacks, or as a refreshing dessert, these blondies offer a vibrant twist on traditional blondie recipes.

Why You’ll Love This Recipe:

  • Fresh and Fruity: Utilizes fresh strawberries and lemon zest for a bright, natural flavor.
  • Perfect Texture: Achieves a soft, chewy texture with a crisp edge, ideal for blondie lovers.
  • Visually Appealing: The vibrant red of the strawberries and the glossy glaze make these treats as beautiful as they are delicious.
  • Easy to Make: Simple ingredients and straightforward instructions ensure anyone can create these delightful treats.

Ingredients:

For the Blondies:

  • 1 cup (6 ounces) fresh strawberries
  • 1 cup (227 grams) unsalted butter, melted and cooled
  • 3/4 cup granulated sugar
  • 1/2 cup light brown sugar
  • 2 large eggs, room temperature
  • 1/4 cup freshly squeezed lemon juice (approximately one large lemon)
  • 1 teaspoon vanilla extract
  • 1 tablespoon lemon zest (from roughly one lemon)
  • 2 1/4 cups (270 grams) all-purpose flour
  • 1 teaspoon cornstarch
  • 1/2 teaspoon baking powder
  • 1/2 teaspoon salt

For the Strawberry Lemon Glaze:

  • 1 cup powdered sugar
  • 1 tablespoon strawberry puree (from about 2 strawberries)
  • 1 tablespoon lemon juice

Instructions:

Oven and Pan Preparation:

  1. Preheat your oven to 350°F (175°C). Line a 9×9 inch baking pan with parchment paper, allowing an overhang on the sides to facilitate easy removal of the blondies.

Strawberry Preparation:

  1. Wash, pat dry, hull, and dice the strawberries into small pieces. Spread them on a paper towel-lined plate in a single layer to air dry, reducing excess moisture.

Batter Preparation:

  1. In a large mixing bowl, whisk together the melted butter, granulated sugar, and brown sugar until smooth. Add the eggs, lemon juice, vanilla extract, and lemon zest, mixing well to combine.
  2. In a separate bowl, sift together the flour, cornstarch, baking powder, and salt. Gradually fold these dry ingredients into the wet mixture until half combined to avoid overmixing.

Incorporating Strawberries:

  1. Gently fold the prepared strawberries into the batter, ensuring even distribution without overworking the batter.

Baking:

  1. Pour the batter into the prepared baking pan, spreading evenly. Bake for 30-35 minutes, or until the edges are lightly browned and a toothpick inserted in the center comes out with a few moist crumbs.

Cooling:

  1. Allow the blondies to cool completely in the pan on a wire rack.

Glaze Preparation:

  1. For the glaze, whisk together powdered sugar, strawberry puree, and lemon juice until smooth.
  2. Drizzle the glaze over the cooled blondies, spreading evenly. Allow the glaze to set for about 15 minutes.

Serving:

  1. Once set, lift the blondies from the pan using the parchment overhang, cut into squares, and serve.

Storage Options:

  • Room Temperature: Keep in an airtight container for up to 3 days.
  • Refrigerator: Store in the refrigerator if preferred for a firmer texture.

Tips:

  • Strawberry Handling: Ensure strawberries are well dried to minimize additional moisture which can affect the texture.
  • Glaze Consistency: If the glaze is too thick, add a little more lemon juice; if too thin, add more powdered sugar.

Enjoy these Strawberry Lemon Blondies as a light, fruity dessert that’s sure to captivate with its delightful flavors and textures. Perfect for sharing, these blondies will bring a taste of summer to any table.

PHILLY CHEESE STEAK SLOPPY JOES

0

Bring the classic flavors of a Philly Cheese Steak into your kitchen with a fun twist! These Philly Cheese Steak Sloppy Joes combine the delicious elements of a traditional cheese steak sandwich with the hearty, comforting appeal of sloppy joes. It’s a perfect meal for those who love a good, messy sandwich filled with melted cheese, tender beef, and savory vegetables.

Why You’ll Love This Recipe:

  • Flavorful: Packed with the robust flavors of sautéed vegetables, seasoned beef, and melted Provolone.
  • Quick and Easy: Ready in about 30 minutes, making it ideal for a busy weeknight dinner.
  • Kid-Friendly: A hit with kids and adults alike due to its cheesy, meaty filling and soft brioche buns.

Ingredients:

  • 1 pound lean ground beef
  • 2 tablespoons butter
  • 1 small yellow onion, diced
  • 1 small green bell pepper, diced
  • 8 ounces brown mushrooms, minced
  • 2 tablespoons ketchup
  • 1 tablespoon Worcestershire sauce
  • ½ teaspoon Kosher salt
  • ½ teaspoon fresh ground black pepper
  • 1 tablespoon cornstarch
  • 1 cup beef broth
  • 8 ounces Provolone cheese slices, chopped (use 6 oz if you prefer less cheesy)
  • 6 brioche hamburger buns

Instructions:

Step 1: Brown the Ground Beef

  1. Heat a large cast iron skillet over medium-high heat. Add the ground beef and allow it to brown without stirring initially to form a deep crust.
  2. Break the beef apart and continue to cook until about 50% of it has developed a deep crust.

Step 2: Sauté the Vegetables

  1. Remove the beef from the skillet, leaving behind any fat. Add butter to the skillet.
  2. Sauté the diced onion, bell pepper, and minced mushrooms until browned and tender.

Step 3: Combine Ingredients

  1. Return the beef to the skillet with the sautéed vegetables.
  2. In a small bowl, dissolve the cornstarch in the beef broth and then pour into the skillet. Add ketchup, Worcestershire sauce, salt, and pepper.
  3. Stir everything together and let simmer until the mixture thickens, ensuring most of the beef is above the liquid level.

Step 4: Add the Cheese

  1. Turn off the heat. Stir in the chopped Provolone cheese until it’s melted and the mixture is creamy.

Step 5: Toast the Buns

  1. Toast the brioche buns under a broiler or in a separate skillet until they are golden brown.

Step 6: Assemble and Serve

  1. Spoon the beef and cheese mixture onto the toasted buns.
  2. Serve hot, ensuring each sandwich is loaded with the savory filling.

Serving Suggestions:

  • Pair these Sloppy Joes with a side of crispy fries, onion rings, or a fresh salad to balance out the meal.
  • Consider adding a spicy element like jalapeño slices or a dash of hot sauce for those who enjoy a bit of heat.

Storage Tips:

  • Refrigerate any leftovers in an airtight container for up to 3 days. Reheat in a skillet over medium heat or briefly in the microwave.

Enjoy your Philly Cheese Steak Sloppy Joes, a satisfying and delicious twist on two American classics that’s sure to become a new favorite at your dinner table!

Sweet Hawaiian Crockpot Chicken

0

Treat yourself to the tropical flavors of Slow Cooker Pineapple Chicken, an easy and delicious meal that combines tender chicken chunks with the sweet and tangy taste of pineapple and a savory soy sauce-based marinade. This dish is perfect for those who want a flavorful, hands-off meal that cooks itself while you go about your day.

Why You’ll Love This Recipe:

  • Effortless Cooking: Just set up your slow cooker and let it do the work for you.
  • Flavorful: The combination of pineapple, soy sauce, and brown sugar creates a rich, flavorful sauce that’s both sweet and savory.
  • Versatile: Serve over rice for a satisfying meal or use as a filling for tacos or wraps for a fun twist.

Ingredients:

  • 2 lb chicken (white or dark meat), cut into chunks
  • 1 cup pineapple juice
  • 1/4 cup packed brown sugar
  • 1/3 cup soy sauce (low sodium recommended)
  • 1 medium can pineapple chunks (optional)
  • 1 small onion, chopped (optional, Vidalia recommended)
  • 1 green bell pepper, cut into chunks (optional)

Instructions:

Step 1: Prepare the Ingredients

  1. Cut the chicken into bite-sized chunks. If using, chop the onion and cut the green bell pepper into chunks.

Step 2: Mix the Sauce

  1. In a slow cooker, combine the pineapple juice, brown sugar, and soy sauce. Stir well until the sugar is completely dissolved.

Step 3: Add Ingredients to Slow Cooker

  1. Place the chicken chunks into the slow cooker. Add the pineapple chunks, chopped onion, and green bell pepper. Stir to ensure that all ingredients are well coated with the sauce.

Step 4: Cook

  1. Cover the slow cooker and set it to cook on low for 6-8 hours or on high for 3-4 hours. The chicken should be tender and fully cooked when done.

Step 5: Serve

  1. Towards the end of the cooking time, prepare rice according to package instructions.
  2. Serve the pineapple chicken over cooked rice, making sure to spoon plenty of the sauce and vegetables onto each plate.

Step 6: Garnish and Enjoy

  1. Optionally, garnish with freshly chopped green onions or a sprinkle of sesame seeds before serving.

Serving Suggestions:

  • Serve this dish with a side of steamed vegetables or a fresh salad to round out the meal.
  • For a low-carb option, serve over cauliflower rice or alongside zucchini noodles.

Storage and Reheating Tips:

  • Storage: Store leftovers in an airtight container in the refrigerator for up to 3 days.
  • Reheat: Warm up in a microwave or on the stovetop until heated through. Add a little water or additional pineapple juice if the sauce thickens too much upon reheating.

Enjoy your Slow Cooker Pineapple Chicken, a hassle-free meal that brings a taste of the tropics to your dinner table, making it a perfect dish for both weeknights and special occasions alike.

Cream Cheese Danish Recipe

0

Delight in the homemade simplicity of this Cream Cheese Danish recipe, featuring a soft, flaky pastry filled with a sweet cream cheese mixture. These danishes are perfect for a leisurely breakfast, brunch, or as a sweet treat throughout your day. With ingredients easily assembled from ready-made crescent dough and a few additional pantry staples, this recipe combines convenience with the joy of baking from scratch.

Why You’ll Love This Recipe:

  • Simple Ingredients: Utilizes ready-made crescent rolls for convenience without compromising on taste.
  • Customizable: Easy to add your favorite fruit toppings or flavorings to the cream cheese mixture.
  • Perfect for Any Occasion: Ideal for a family breakfast, a gathering with friends, or as a delightful dessert.

Ingredients:

Danish Components:

  • Two 8-ounce tubes of crescent rolls
  • One 8-ounce package of cream cheese, at room temperature
  • ¼ cup granulated white sugar
  • 1 teaspoon pure vanilla extract
  • 2 tablespoons salted butter, melted
  • 8 tablespoons light brown sugar

Glaze Components:

  • ½ cup powdered sugar
  • 1 teaspoon pure vanilla extract
  • 4 teaspoons of milk

Instructions:

Step 1: Preheat the Oven and Prepare the Filling

  1. Preheat your oven to 350°F (177°C).
  2. In a medium-sized mixing bowl, blend the room temperature cream cheese with white sugar and vanilla extract until smooth.

Step 2: Prepare the Dough

  1. Carefully unroll the crescent dough from the tubes. Press the dough into four rectangles per tube, sealing the perforations to prevent splitting.
  2. Brush the melted butter evenly over each piece of dough.
  3. Sprinkle about 1 tablespoon of brown sugar evenly over each rectangle.

Step 3: Shape the Danishes

  1. Start rolling each rectangle tightly from the long side, sealing the edges to keep the filling inside.
  2. Carefully coil each rolled rectangle into a spiral shape.
  3. Press the center down to create a well for the filling.

Step 4: Add Filling and Bake

  1. Place the shaped dough on a baking sheet lined with nonstick spray.
  2. Spoon about 2 tablespoons of the cream cheese mixture into the center of each Danish.
  3. Bake in the preheated oven for 15-18 minutes, or until the pastries are golden brown.

Step 5: Prepare the Glaze and Finish

  1. While the danishes bake, prepare the glaze by mixing powdered sugar, vanilla extract, and milk in a small bowl until smooth.
  2. Remove the baked danishes from the oven and allow them to cool slightly.
  3. Drizzle the glaze over the warm danishes.

Serving Suggestions:

  • Serve the Cream Cheese Danishes warm for the best flavor and texture.
  • For a festive touch, add a sprinkle of powdered sugar or top with fresh berries or lemon zest before serving.

Storage Tips:

  • Store leftover danishes in an airtight container at room temperature for up to 2 days or refrigerate for up to 5 days.
  • Reheat in the oven or microwave for best results before serving.

Enjoy your homemade Cream Cheese Danishes as a special treat that brings a touch of bakery-style indulgence to your kitchen table. Whether for a special occasion or a delightful start to any day, these danishes are sure to impress.

Mocha Espresso Cream Layer Cake

0

Experience the indulgence of the Mocha Espresso Cream Layer Cake, a decadent treat that combines the rich flavors of chocolate and the bold notes of espresso. This cake is perfect for coffee lovers and chocolate aficionados alike, making it an ideal choice for special occasions or as a luxurious weekend treat.

Why You’ll Love This Recipe:

  • Rich Flavor: The combination of cocoa, coffee, and chocolate ganache offers a deep, rich taste.
  • Elegant Presentation: With its glossy mocha ganache and sophisticated garnishes, this cake is a showstopper.
  • Perfect for Celebrations: Whether it’s a birthday, anniversary, or just a special gathering, this cake is sure to impress.

Ingredients:

For the Cake:

  • 1 ¾ cups all-purpose flour
  • 1 ¾ cups granulated sugar
  • ¾ cup unsweetened cocoa powder
  • 1 ½ teaspoons baking powder
  • 1 ½ teaspoons baking soda
  • ½ teaspoon salt
  • 2 large eggs
  • 1 cup strong brewed coffee, cooled
  • ½ cup vegetable oil
  • 1 teaspoon vanilla extract

For the Espresso Cream Filling:

  • 1 cup heavy cream
  • ¼ cup espresso or strong coffee
  • ¼ cup powdered sugar
  • 1 teaspoon vanilla extract

For the Mocha Ganache:

  • 8 oz semi-sweet chocolate, chopped
  • 1 cup heavy cream
  • 2 tablespoons unsalted butter
  • 2 tablespoons brewed coffee

For Garnish:

  • Chocolate shavings
  • Espresso beans (optional)

Instructions:

Preheat and Prepare:

  1. Preheat your oven to 350°F (175°C). Grease and flour two 9-inch round cake pans.

Make the Cake:

  1. In a large bowl, whisk together the flour, sugar, cocoa, baking powder, baking soda, and salt.
  2. Add eggs, cooled coffee, oil, and vanilla extract. Mix until the batter is smooth.
  3. Divide the batter evenly between the two prepared pans.
  4. Bake for 30-35 minutes, or until a toothpick inserted into the center comes out clean.
  5. Allow to cool in pans for 10 minutes, then transfer to wire racks to cool completely.

Prepare the Espresso Cream Filling:

  1. In a mixing bowl, beat heavy cream, espresso, powdered sugar, and vanilla extract until soft peaks form.

Prepare the Mocha Ganache:

  1. Heat the heavy cream in a saucepan until just boiling. Remove from heat and pour over chopped chocolate. Let sit for 2 minutes.
  2. Stir until the chocolate is melted and the mixture is smooth and glossy. Mix in the butter and brewed coffee. Allow to cool slightly.

Assemble the Cake:

  1. Place one cake layer on a serving plate. Spread the espresso cream filling evenly over the top.
  2. Place the second cake layer on top of the filling.
  3. Pour the mocha ganache over the top cake layer, allowing it to drip down the sides.

Garnish and Serve:

  1. Garnish with chocolate shavings and optional espresso beans.
  2. Let the cake set slightly before serving to allow the ganache to firm up a bit.

Tips:

  • Cake Texture: For an even moister cake, you can brush each cake layer with a little extra brewed coffee before assembling.
  • Serving: This cake pairs wonderfully with a cup of coffee or espresso to enhance the coffee flavors in the dessert.

Enjoy the luxurious taste of this Mocha Espresso Cream Layer Cake, where every bite offers a delightful combination of chocolate and espresso!