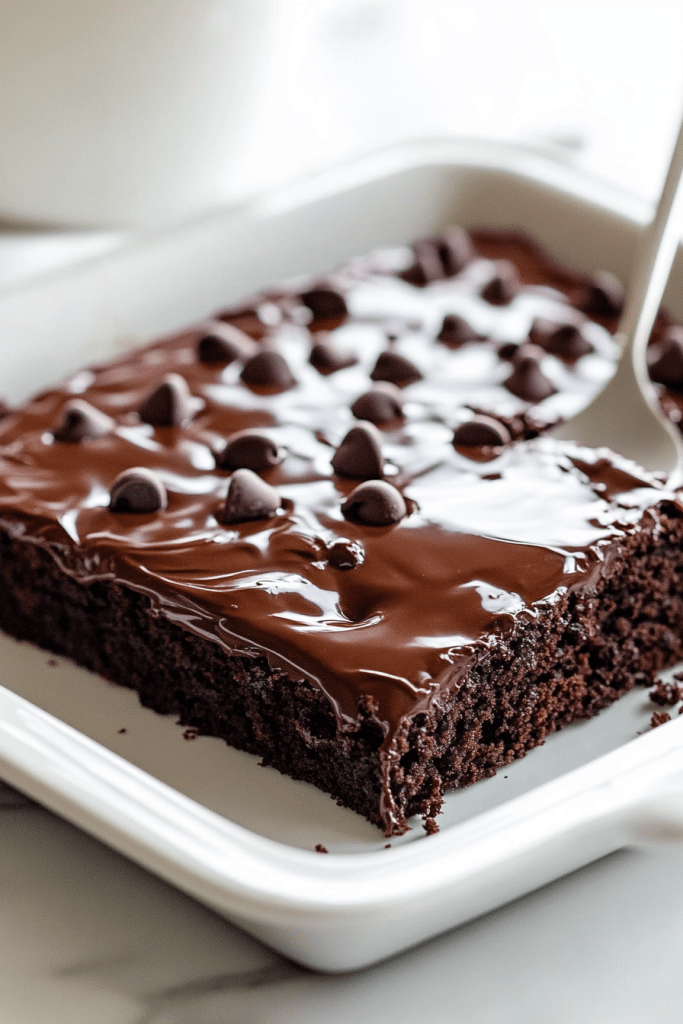
Parmesan Crusted Chicken

0

Savor the delectable taste of Parmesan Crusted Chicken, an easy-to-prepare dish that offers a wonderful blend of creamy and savory flavors. This recipe features chicken breasts topped with a rich coating of either mayonnaise or Greek yogurt mixed with Parmesan cheese and spices, baked to golden perfection. It’s a versatile dish that can be adapted to fit a healthier profile or indulge in a creamier texture, making it perfect for family dinners or special occasions.

Why You’ll Love This Recipe:

  • Flavorful and Moist: The mayonnaise or Greek yogurt creates a moist, flavorful crust that keeps the chicken juicy and delicious.
  • Easy Preparation: With minimal prep and simple ingredients, this dish is incredibly straightforward to make.
  • Customizable: Choose between mayonnaise for richness or Greek yogurt for a lighter fare, adjusting spices to your preference.
  • Perfect for Any Occasion: Whether it’s a weeknight dinner or a gathering with friends, this chicken dish is sure to impress.

Ingredients:

  • 4 boneless, skinless chicken breasts (ensure they are fully thawed if previously frozen)
  • 1 cup mayonnaise or Greek yogurt (depending on preference)
  • 1/2 cup Parmesan cheese, freshly grated preferred
  • 1 teaspoon seasoning salt (adjust to taste)
  • 1/2 teaspoon black pepper, freshly ground for better flavor
  • 1/2 teaspoon garlic powder

Instructions:

Preheat the Oven:

  • Heat your oven to 375°F (190°C).

Mix the Topping:

  • In a mixing bowl, combine the mayonnaise or Greek yogurt, Parmesan cheese, seasoning salt, black pepper, and garlic powder. Stir until the mixture is smooth and well combined.

Prepare the Chicken:

  • Place the chicken breasts in a baking dish. Spread the mayonnaise or yogurt mixture evenly over each chicken breast, ensuring to cover them generously.

Bake:

  • Transfer the baking dish to the preheated oven. Bake for about 45 minutes, or until the chicken is thoroughly cooked and the topping is golden and crusty. The chicken should reach an internal temperature of 165°F (74°C).

Rest and Serve:

  • Remove the chicken from the oven and let it rest for a few minutes before serving to allow the juices to redistribute.

Storage Options:

  • Refrigerator: Store leftovers in an airtight container for up to 3 days.
  • Freezer: Freeze individual portions in freezer-safe containers for up to 2 months. Thaw in the refrigerator overnight before reheating.

Tips:

  • Ensure Even Cooking: Pound the chicken breasts to an even thickness before topping with the mixture to ensure they cook evenly.
  • Serving Suggestions: Serve with a side of steamed vegetables, a light salad, or over a bed of pasta or rice to complete the meal.
  • For a Crispier Topping: Broil the chicken for the last few minutes of cooking to achieve a more golden and crispy topping.

Enjoy your delicious Parmesan Crusted Chicken, a simple yet satisfying dish that’s bound to become a new favorite in your recipe collection!

Garlic Mozzarella Biscuit Bombs

0

Experience the delightful combination of garlic, cheese, and buttery biscuits with these Garlic Mozzarella Biscuit Bombs. This simple, yet incredibly tasty recipe transforms ordinary buttermilk biscuits into a mouth-watering treat filled with gooey mozzarella cheese, making it a perfect snack for gatherings, parties, or as a comforting side dish.

Why You’ll Love This Recipe:

  • Quick and Easy: Using pre-made biscuit dough cuts down preparation time significantly, allowing you to whip up these treats with minimal effort.
  • Cheesy Goodness: Each biscuit bomb is stuffed with melty mozzarella cheese, offering a delicious surprise with each bite.
  • Garlicky Flavor: The combination of fresh garlic and parsley in the butter glaze adds a burst of flavor that enhances the biscuits beautifully.
  • Versatile: Serve these as an appetizer, snack, or alongside your favorite pasta dish or soup.

Ingredients:

  • One 8-count package of Pillsbury Grands buttermilk biscuits
  • Four sticks of mozzarella string cheese, each cut into eight equal parts
  • Four tablespoons of unsalted butter, melted
  • One tablespoon of finely minced garlic
  • Two tablespoons of finely chopped parsley
  • A pinch of fine sea salt

Instructions:

Preheat the Oven:

  • Start by preheating your oven to 400°F (204°C) to ensure it reaches the proper temperature for baking.

Prepare the Dough:

  • Open the package of biscuits and separate each biscuit. Divide each biscuit in half and use a rolling pin or your hands to flatten each piece to about a quarter inch thick, maintaining a roughly rounded shape.

Combine the Seasonings:

  • In a small mixing bowl, combine the melted butter, minced garlic, chopped parsley, and sea salt. This mixture will serve as both a flavor enhancer and a glaze for the biscuits.

Assemble the Biscuits:

  • Place two pieces of the sliced mozzarella cheese in the center of each flattened biscuit piece. Fold the dough over the cheese, pinching the edges together to seal and form a sealed ball. Place each ball seam side down on a lightly colored baking sheet to prevent overcooking the bottoms.

Bake:

  • Brush each biscuit bomb generously with the garlic butter mixture. Place the baking sheet in the oven and bake for 8-10 minutes, or until the biscuits are golden brown on top.

Final Glaze and Serve:

  • As soon as you remove the biscuits from the oven, brush them with the remaining garlic butter mixture for added flavor and a glossy appearance. Serve warm to enjoy the gooey mozzarella filling at its best.

Storage Options:

  • Room Temperature: Best enjoyed fresh, but can be kept at room temperature for a few hours.
  • Refrigerator: Store in an airtight container for up to 2 days and reheat in the oven or microwave until warm.

Tips:

  • Sealing the Dough: Ensure that the dough is completely sealed around the cheese to prevent it from leaking out during baking.
  • Serving Suggestions: These biscuit bombs can be served with marinara sauce for dipping or alongside a salad for a light meal.
  • Variations: Add some chopped pepperoni or cooked sausage inside with the cheese for an extra flavor twist.

Enjoy your delicious Garlic Mozzarella Biscuit Bombs, a guaranteed hit for any occasion that calls for a cheesy, garlicky treat!

Strawberry Cream Pie

0

Dive into the delightful and refreshing flavors of this Strawberry Cream Pie, a perfect dessert for warm weather gatherings. This recipe features a buttery homemade crust, a light and fluffy cream cheese filling, and a vibrant strawberry glaze topped with fresh berries. It’s an elegant dessert that balances sweetness and tartness beautifully.

Why You’ll Love This Recipe:

  • Fresh and Fruity: The use of fresh strawberries not only provides a bright, natural flavor but also makes this pie visually appealing.
  • Creamy Texture: The combination of whipped cream and cream cheese creates a luxuriously smooth filling that complements the crisp pie crust.
  • Versatile: This pie is perfect for any occasion, from summer picnics to formal dinners.
  • Make-Ahead Friendly: Prepare this pie ahead of time and let it set in the fridge, making it a convenient option for entertaining.

Ingredients:

For the Crust:

  • 1 1/4 cups all-purpose flour
  • 1/4 teaspoon salt
  • 1/2 cup unsalted butter, chilled and diced
  • 3-5 tablespoons ice water

For the Cream Filling:

  • 1 cup heavy cream
  • 1/2 cup powdered sugar
  • 1 teaspoon vanilla extract
  • 8 ounces cream cheese, softened

For the Strawberry Glaze:

  • 4 cups fresh strawberries, hulled and halved
  • 1 cup granulated sugar
  • 2 tablespoons cornstarch
  • 1/2 cup water
  • 1 teaspoon lemon juice

For Garnish:

  • Whipped cream

Equipment:

  • 9-inch pie dish
  • Medium saucepan
  • Electric mixer
  • Rolling pin

Instructions:

Prepare the Pie Crust:

  1. In a mixing bowl, combine the flour and salt. Cut in the chilled butter until the mixture resembles coarse crumbs.
  2. Gradually add ice water, stirring until the dough forms a ball. Wrap in plastic wrap and refrigerate for at least 30 minutes.
  3. Roll out the dough on a floured surface to fit a 9-inch pie dish. Place the crust in the dish, trim the excess, and crimp the edges. Prick the bottom with a fork to prevent bubbling.
  4. Bake in a preheated oven at 425°F (220°C) for 12-15 minutes until golden. Let cool.

Make the Cream Filling:

  1. In a bowl, using an electric mixer, beat the heavy cream with powdered sugar and vanilla extract until stiff peaks form.
  2. In another bowl, whip the cream cheese until smooth. Gently fold the whipped cream into the cream cheese.
  3. Spread this mixture evenly into the cooled crust.

Prepare the Strawberry Glaze:

  1. In a medium saucepan, combine half the strawberries, granulated sugar, cornstarch, water, and lemon juice. Cook over medium heat, stirring frequently, until the mixture thickens and becomes clear.
  2. Remove from heat and cool slightly. Stir in the remaining strawberries.

Assemble the Pie:

  1. Pour the glazed strawberry mixture over the cream filling, arranging some of the strawberry halves for a decorative top layer.

Chill and Serve:

  1. Refrigerate the pie until set, about 3-4 hours.
  2. Serve each slice with a dollop of whipped cream.

Storage Options:

  • Refrigerator: Keep the pie refrigerated and consume within 3 days for best freshness and texture.
  • Freezer: It is not recommended to freeze this pie as the filling and glaze may separate upon thawing.

Tips:

  • Crust Tip: Keep the dough chilled while working with it to ensure a flakier crust.
  • Filling Tip: Ensure all ingredients for the filling are at room temperature to achieve a smoother texture.
  • Glaze Tip: Allow the cooked glaze to cool slightly before adding the raw strawberries to prevent them from overcooking and losing their texture.

Enjoy your beautiful and tasty Strawberry Cream Pie, a dessert that’s sure to please both the eye and the palate!

Banana Cream Cheese Bread

0

Indulge in the deliciously moist and flavorful Banana Cream Cheese Bread, a delightful twist on the classic banana bread. This recipe features a luscious cream cheese layer nestled between rich banana batter, offering a perfect blend of sweetness and tangy cream cheese in every slice. It’s ideal for a cozy breakfast, a midday snack, or even as a dessert.

Why You’ll Love This Recipe:

  • Moist and Flavorful: The combination of ripe bananas and sour cream ensures that this bread stays exceptionally moist and flavorful.
  • Cream Cheese Surprise: The layer of cream cheese adds a creamy texture and a tangy contrast to the sweet banana flavor.
  • Simple Ingredients: Made with pantry staples, this bread is easy to whip up without a need for any fancy ingredients.
  • Versatile: Serve it warm for breakfast, pack it for a snack, or dress it up with a dollop of whipped cream for a decadent dessert.

Ingredients:

  • 1 1/2 cups all-purpose flour
  • 1 teaspoon baking soda
  • 1/2 teaspoon salt
  • 1/4 teaspoon ground cinnamon
  • 1/2 cup unsalted butter, softened
  • 1 cup granulated sugar
  • 2 large eggs
  • 1 teaspoon vanilla extract
  • 3 ripe bananas, mashed
  • 1/4 cup sour cream
  • 4 ounces cream cheese, softened

Instructions:

Preheat Oven:

  • Preheat your oven to 350°F (175°C). Grease a 9×5-inch loaf pan and set aside.

Mix Dry Ingredients:

  • In a medium bowl, whisk together the flour, baking soda, salt, and cinnamon. Set aside.

Cream Butter and Sugar:

  • In a large bowl, using an electric mixer, cream the softened butter and sugar until light and fluffy.
  • Beat in the eggs one at a time, then mix in the vanilla extract until well combined.

Combine Wet Ingredients:

  • Add the mashed bananas and sour cream to the butter mixture. Stir until well blended.

Prepare Cream Cheese Layer:

  • In a separate bowl, beat the softened cream cheese until smooth and creamy. Set aside.

Assemble the Bread:

  • Pour half of the banana batter into the prepared loaf pan.
  • Gently spread the cream cheese layer evenly over the batter.
  • Carefully top with the remaining banana batter, smoothing out the top.

Bake:

  • Place in the oven and bake for 60-70 minutes, or until a toothpick inserted into the center comes out clean.

Cool and Serve:

  • Allow the bread to cool in the pan for about 10 minutes, then transfer to a wire rack to cool completely.

Storage Options:

  • Room Temperature: Keep covered in plastic wrap or in an airtight container for up to 3 days.
  • Refrigerate: For longer storage, refrigerate for up to 1 week.
  • Freeze: Wrap tightly with aluminum foil or plastic freezer wrap, and freeze for up to 3 months.

Tips:

  • Ensure Ingredients are at Room Temperature: This helps to mix the batter more evenly and achieve a smoother texture.
  • Do Not Overmix: Mix the ingredients just until combined to keep the bread tender.
  • Check for Doneness: Oven temperatures can vary, so start checking the bread at 60 minutes to prevent overbaking.

This Banana Cream Cheese Bread promises to be a new favorite, perfect for those who love banana bread but are looking for something a little extra. Its creamy, tangy layer makes every slice a special treat!

Beef and Cheese Stuffed Pasta Shells

0

Savor the richness of Beef and Cheese Stuffed Pasta Shells, a comforting and hearty meal perfect for any day of the week. This dish features large pasta shells filled with a delicious blend of lean ground beef, creamy ricotta, and melted cheeses, topped with a flavorful tomato basil sauce. It’s a crowd-pleaser that’s sure to satisfy both kids and adults alike.

Why You’ll Love This Recipe:

  • Rich and Flavorful: The combination of seasoned beef, three types of cheese, and aromatic herbs makes each bite incredibly tasty.
  • Perfect for Gatherings: These stuffed shells are ideal for family dinners or hosting friends, as they can be prepared ahead of time and baked just before serving.
  • Customizable: Easily adapt the filling by adding vegetables or different spices to suit your taste preferences.
  • Visually Appealing: The stuffed shells make a beautiful presentation, perfect for special occasions or casual dining.

Ingredients:

  • 20 large pasta shells
  • 1 lb lean ground beef
  • 1 cup ricotta cheese
  • 1 ½ cups shredded mozzarella cheese, divided
  • ½ cup grated Pecorino Romano cheese
  • 1 large egg, beaten
  • 2 ½ cups tomato basil sauce
  • 1 tsp dried oregano
  • 2 cloves garlic, minced
  • Salt and black pepper to taste
  • Fresh parsley, chopped (for garnish)

Instructions:

Preheat Oven:

  • Heat your oven to 375°F (190°C).

Cook Pasta:

  • Boil the pasta shells in salted water until al dente. Drain and set aside to cool.

Prepare Filling:

  • In a skillet over medium heat, brown the ground beef. Once browned, add the minced garlic and dried oregano, cooking until fragrant. Remove from heat and allow to cool slightly.

Mix the Filling:

  • In a large mixing bowl, combine the cooled beef, ricotta cheese, 1 cup of shredded mozzarella, Pecorino Romano cheese, beaten egg, salt, and black pepper. Mix thoroughly until the ingredients are well combined.

Stuff and Assemble:

  • Spread 1 cup of tomato basil sauce in the bottom of a 9×13 inch baking dish.
  • Fill each cooked pasta shell with the beef and cheese mixture and arrange them in the dish.
  • Pour the remaining 1 ½ cups of tomato basil sauce over the stuffed shells.
  • Sprinkle the remaining ½ cup of shredded mozzarella cheese on top.

Bake:

  • Cover the dish with aluminum foil and bake for 25 minutes.
  • Remove the foil and continue baking for an additional 10 minutes, or until the cheese is golden and bubbly.

Serve:

  • Garnish with freshly chopped parsley before serving.

Storage Options:

  • Refrigerator: Store leftovers in an airtight container in the refrigerator for up to 3 days.
  • Freezer: Freeze the prepared but unbaked stuffed shells for up to 2 months. Bake from frozen, adding extra time as necessary.

Tips:

  • Pasta Preparation: To prevent the shells from sticking together after boiling, toss them with a little olive oil before filling.
  • Cheese Selection: For a richer flavor, consider using full-fat ricotta or adding a blend of Italian cheeses.
  • Serving Suggestion: Serve these stuffed shells with a side of garlic bread and a crisp green salad for a complete meal.

Enjoy crafting this delightful dish of Beef and Cheese Stuffed Pasta Shells, which promises to bring comfort and joy to your table with its rich flavors and satisfying textures.

Pecan Cream Pie

0

Celebrate the sweet essence of the South with this Pecan Cream Pie, an indulgent dessert featuring a buttery crust, rich pecan filling, and a luxurious whipped cream topping. This pie combines traditional flavors and textures to create a delightful treat perfect for any gathering or special occasion.

Why You’ll Love This Recipe:

  • Classic Flavor: The rich, nutty flavor of pecans is perfectly balanced with the sweetness of the syrup and sugar, making each bite satisfying.
  • Homemade Pie Crust: Nothing beats a flaky, buttery homemade crust that adds the perfect base to the lush filling.
  • Versatility: This pie is ideal for holidays, family gatherings, or as a special treat to brighten any day.
  • Elegant Presentation: Topped with homemade whipped cream, this pie not only tastes delicious but also looks impressive on any dessert table.

Ingredients:

For the Pie Crust:

  • 1 1/4 cups all-purpose flour
  • 1/2 cup unsalted butter, cold and cut into small cubes
  • 1/4 cup granulated sugar
  • 1/4 teaspoon salt
  • 2-3 tablespoons ice water

For the Pecan Filling:

  • 1 cup pecan halves
  • 3 large eggs
  • 1 cup light corn syrup
  • 1/2 cup granulated sugar
  • 1/4 cup unsalted butter, melted
  • 1 teaspoon vanilla extract
  • 1/4 teaspoon salt

For the Whipped Cream Topping:

  • 1 cup heavy cream
  • 2 tablespoons powdered sugar
  • 1/2 teaspoon vanilla extract

Instructions:

Prepare the Pie Crust:

  1. In a food processor, pulse together the flour, sugar, and salt.
  2. Add the cold, cubed butter and pulse until the mixture resembles coarse crumbs.
  3. Gradually add ice water, one tablespoon at a time, pulsing until the dough just comes together.
  4. Form the dough into a disk, wrap in plastic, and refrigerate for at least 30 minutes.

Prebake the Crust:

  1. Preheat your oven to 375°F (190°C).
  2. Roll out the chilled dough on a floured surface to fit into a 9-inch pie dish. Trim and crimp the edges.
  3. Line the crust with parchment paper, fill with pie weights or dried beans, and bake for 15 minutes. Remove the weights and parchment and bake for another 5-7 minutes until golden. Let cool.

Prepare the Pecan Filling:

  1. Arrange pecan halves in the cooled prebaked crust.
  2. In a bowl, whisk together eggs, corn syrup, sugar, melted butter, vanilla extract, and salt until smooth.
  3. Pour the filling over the pecans.

Bake the Pie:

  1. Reduce the oven temperature to 350°F (175°C).
  2. Bake for 40-45 minutes, or until the filling is set and slightly puffed. Cool on a wire rack.

Prepare the Whipped Cream Topping:

  1. In a bowl, whip the heavy cream with powdered sugar and vanilla extract until stiff peaks form.

Serve:

  1. Once the pie has cooled, slice and serve each piece with a dollop of whipped cream on top.

Storage Options:

  • Refrigerator: Store the pie in the refrigerator for up to 4 days. Cover loosely with foil or plastic wrap.
  • Freezer: Freeze the pie without the whipped cream for up to 2 months. Thaw in the refrigerator overnight and top with fresh whipped cream before serving.

Tips:

  • Pie Crust: For an extra flaky crust, chill the rolled-out dough in the pie dish before filling and baking.
  • Filling: To prevent the pecans from burning, tent the pie with aluminum foil if the top darkens too quickly during baking.
  • Serving: For a festive touch, sprinkle some toasted pecan pieces or drizzle caramel sauce over the whipped cream.

Enjoy the delightful flavors and textures of this Pecan Cream Pie, a recipe that’s sure to become a cherished addition to your dessert repertoire.

Ultimate Chocolate Brownies

0

Step into chocolate heaven with these Ultimate Chocolate Brownies, designed to deliver the richest, most indulgent chocolate experience. Featuring a combination of melted dark chocolate and butter, these brownies are dense, fudgy, and perfect for any chocolate enthusiast. This recipe simplifies the baking process, ensuring that even beginners can create delicious treats that taste professionally made.

Why You’ll Love This Recipe:

  • Deep Chocolate Flavor: The use of dark chocolate enriches these brownies with a profound chocolate taste that’s both bold and satisfying.
  • Fudgy Texture: The perfect ratio of flour to chocolate keeps these brownies moist and fudgy, with just the right amount of chewiness.
  • Simple Ingredients: Made with common pantry staples, these brownies are easy to whip up on a whim.
  • Versatile and Customizable: Add nuts, chocolate chips, or a drizzle of caramel to elevate them to your personal preference.

Ingredients:

  • Melted butter (for greasing)
  • 200 g dark chocolate, chopped
  • 100 g unsalted butter
  • 3 large eggs
  • 150 g granulated sugar
  • 50 g brown sugar
  • 70 g all-purpose flour
  • 30 g cocoa powder

Ingredient Tips:

  • Chocolate: Choose a high-quality dark chocolate for the best flavor and melting properties. A cocoa content of 60-70% is ideal for that deep, rich taste.
  • Butter: Using unsalted butter allows you to control the amount of salt in the recipe, balancing the sweetness.

Instructions:

Step 1: Prep the Pan

  • Brush the inside of an 8-inch square baking pan with melted butter. Line the pan with parchment paper, letting the edges overhang for easy removal of the brownies once baked.

Step 2: Melt Chocolate and Butter

  • In a heatproof bowl, combine the dark chocolate and unsalted butter. Melt over a pan of simmering water (double boiler method), stirring occasionally until smooth. Remove from heat and let cool slightly.

Step 3: Whisk Eggs and Sugars

  • In a separate large bowl, beat the eggs with the granulated sugar and brown sugar until smooth. For a more refined texture, place the bowl over a pot of boiling water and continue to mix until the sugar begins to dissolve.

Step 4: Combine Chocolate with Egg Mixture

  • Gradually pour the melted chocolate mixture into the egg and sugar mixture, stirring continuously until fully incorporated.

Step 5: Mix in Dry Ingredients

  • Sift together the all-purpose flour and cocoa powder. Fold into the chocolate mixture gently to avoid deflating the mixture, until no dry streaks remain.

Step 6: Bake

  • Pour the batter into the prepared pan, smoothing the top with a spatula. Bake in a preheated oven at 170°C (338°F) for about 25 minutes, or until the top is set and a toothpick inserted into the center emerges with a few moist crumbs attached.

Step 7: Cool and Serve

  • Allow the brownies to cool in the pan for at least 10 minutes before lifting out using the overhanging parchment paper. Cut into squares and serve.

Storage Options:

  • Room Temperature: Store the brownies in an airtight container at room temperature for up to 4 days.
  • Refrigerate: For a firmer texture, refrigerate for up to 1 week.
  • Freeze: Freeze brownies for up to 3 months in airtight containers. Thaw at room temperature before serving.

Tips:

  • For a special touch, sprinkle sea salt over the brownies before baking to enhance the chocolate flavor.
  • Pair with a glass of cold milk or a cup of hot coffee for a perfect snack or dessert.

These Ultimate Chocolate Brownies are not only a treat to eat but also a joy to make, bringing simplicity and decadence into your kitchen with each batch. Enjoy the rich, chocolatey goodness in every bite!

Baked Sausage and Pepper Jack Wontons

0

Baked Sausage and Pepper Jack Wontons are crispy, savory bites filled with a delightful blend of ground sausage, Pepper Jack cheese, and fresh vegetables. These appetizers are perfect for parties or as a delicious snack any time of day.

Why You’ll Love This Recipe:

  • Crispy and Flavorful: The wonton wrappers bake to a golden perfection, providing a crunchy contrast to the creamy, cheesy filling.
  • Easy to Make: Simple steps ensure that anyone can whip up these wontons in no time.
  • Versatile: Serve them with your favorite dipping sauces for a customizable flavor experience.
  • Perfect Party Food: These wontons are great for entertaining guests or enjoying as a quick snack.

Ingredients:

  • 1/2 pound ground sausage
  • 1 cup shredded Pepper Jack cheese
  • 24 wonton wrappers
  • 1/4 cup chopped green onions
  • 1/4 cup finely chopped red bell pepper
  • 1 teaspoon garlic powder
  • 1 teaspoon onion powder
  • Salt and pepper to taste
  • 1 egg, beaten (for sealing wontons)
  • Cooking spray

Instructions:

Step 1: Preheat the Oven

  • Preheat your oven to 400°F (200°C). Line a baking sheet with parchment paper.

Step 2: Cook the Sausage

  • In a medium skillet, cook the ground sausage over medium heat until fully browned and cooked through. Drain any excess grease and let the sausage cool slightly.

Step 3: Prepare the Filling

  • In a mixing bowl, combine the cooked sausage, shredded Pepper Jack cheese, chopped green onions, red bell pepper, garlic powder, onion powder, salt, and pepper. Mix until evenly distributed.

Step 4: Assemble the Wontons

  • Place a wonton wrapper on a clean surface. Spoon about 1 tablespoon of the sausage mixture into the center of the wrapper.
  • Lightly brush the edges of the wonton wrapper with beaten egg. Fold the wrapper over to form a triangle or pouch, pressing the edges tightly to seal. Repeat with the remaining wrappers and filling.

Step 5: Bake to Golden Perfection

  • Arrange the filled wontons on the prepared baking sheet, ensuring they are not touching each other.
  • Lightly spray the tops of the wontons with cooking spray to help them crisp up.
  • Bake in the preheated oven for 12-15 minutes, or until the wontons are golden brown and crispy.

Step 6: Serve and Enjoy

  • Allow the wontons to cool slightly before serving. Serve them warm with your favorite dipping sauces such as marinara, ranch, or sriracha mayo.

Storage Tips:

  • These wontons are best served fresh and crispy. If you have leftovers, store them in an airtight container in the refrigerator for up to 2 days. Reheat in the oven to maintain their crispiness.

Tips:

  • Customize the filling by adding different cheeses or adjusting the spices to your taste preference.
  • Experiment with different dipping sauces to find your favorite pairing with these delicious wontons.

Enjoy your Baked Sausage and Pepper Jack Wontons! If you have any more recipes or need further assistance, feel free to ask.

Beef and Cheese Dip

0

Beef and Cheese Dip is a savory, hearty dish perfect for gatherings or game day snacks. It features ground beef, black beans, diced tomatoes with green chiles, and creamy Velveeta cheese, all blended together for a deliciously comforting dip.

Why You’ll Love This Recipe:

  • Easy Preparation: Simple steps make this dip quick to prepare and perfect for serving a crowd.
  • Rich and Creamy: The creamy Velveeta cheese sauce coats the beef and beans, creating a satisfying texture.
  • Flavorful Ingredients: Spices like chili powder and cumin add depth, while jalapeños and cilantro provide a fresh, spicy kick.
  • Versatile Serving: Enjoy with tortilla chips for dipping or as a topping for nachos.

Ingredients:

  • 1 lb ground beef
  • 1 onion, finely chopped
  • 2 cloves garlic, minced
  • 1 can (15 oz) black beans, drained and rinsed
  • 1 can (10 oz) diced tomatoes with green chiles, undrained
  • 1 teaspoon chili powder
  • 1/2 teaspoon cumin
  • Salt and pepper to taste
  • 1 lb Velveeta cheese, cut into cubes
  • 1/2 cup milk
  • 1/4 cup chopped fresh cilantro
  • 1 jalapeño, sliced
  • Tortilla chips, for serving

Instructions:

Cook the Beef:

  1. In a large skillet over medium heat, cook the ground beef until browned. Drain any excess grease.
  2. Add the chopped onion and garlic to the skillet and cook until softened, about 5 minutes.

Add Flavors and Beans:

  1. Stir in the black beans, diced tomatoes with green chiles, chili powder, and cumin. Season with salt and pepper.
  2. Cook the mixture for about 5-7 minutes until everything is heated through and well combined.

Make the Cheese Sauce:

  1. In a saucepan, combine the cubed Velveeta and milk. Cook over low heat, stirring constantly, until the cheese has melted and the sauce is smooth.

Combine and Simmer:

  1. Add the melted cheese to the beef and bean mixture. Stir until everything is well coated with cheese.
  2. Let the dip simmer for an additional 2-3 minutes, stirring occasionally to prevent sticking.

Garnish and Serve:

  1. Remove the dip from heat and transfer to a serving dish.
  2. Garnish with chopped cilantro and sliced jalapeños.
  3. Serve hot with tortilla chips for dipping.

Storage Options:

  • Store any leftover dip in an airtight container in the refrigerator for up to 3 days. Reheat gently on the stovetop or in the microwave before serving.

Tips:

  • Customize the spice level by adjusting the amount of jalapeño or adding hot sauce.
  • Substitute ground turkey or chicken for a leaner option.
  • Add a dollop of sour cream or guacamole as additional toppings for extra flavor.

Enjoy your Beef and Cheese Dip! If you have any more recipes or need further assistance, feel free to ask.

Texas Sheet Cake with Chocolate Frosting and Pecans

0

Texas Sheet Cake is a classic dessert known for its rich chocolate flavor and easy preparation. This recipe yields a large, decadent cake topped with a luscious chocolate frosting and toasted pecans.

Why You’ll Love This Recipe:

  • Rich Chocolate Flavor: The combination of cocoa powder and buttermilk creates a deeply chocolatey cake.
  • Simple Preparation: Made in a large sheet pan, this cake is easy to bake and perfect for feeding a crowd.
  • Delicious Frosting: The warm chocolate frosting poured over the warm cake creates a smooth and fudgy topping.
  • Crunchy Pecan Topping: Toasted pecans add a delightful crunch and nutty flavor, complementing the chocolate perfectly.

Ingredients:

For the Cake:

  • 2 cups all-purpose flour
  • 2 cups granulated sugar
  • 1/4 teaspoon salt
  • 1/2 cup buttermilk
  • 2 large eggs
  • 1 teaspoon vanilla extract
  • 1 teaspoon baking soda
  • 1 cup unsalted butter
  • 1/3 cup unsweetened cocoa powder
  • 1 cup water

For the Frosting:

  • 1/2 cup unsalted butter
  • 1/3 cup milk
  • 1/4 cup unsweetened cocoa powder
  • 3 1/2 cups powdered sugar, sifted
  • 1 teaspoon vanilla extract

For the Pecan Topping:

  • 1/2 cup pecans, toasted and halved

Instructions:

Prepare the Cake:

  1. Preheat your oven to 350°F (175°C). Grease a large sheet pan (about 18×13 inches) and set aside.
  2. In a large bowl, whisk together flour, sugar, and salt.
  3. In another bowl, mix buttermilk, eggs, vanilla extract, and baking soda.
  4. In a saucepan over medium heat, melt the butter. Add cocoa powder and water, stirring until the mixture boils. Remove from heat and pour over the dry ingredients, mixing until well combined.
  5. Add the buttermilk mixture to the batter and stir until smooth. Pour into the prepared sheet pan.
  6. Bake for 20-22 minutes or until a toothpick inserted into the center comes out clean. Allow to cool slightly.

Make the Frosting:

  1. In a saucepan, combine butter, milk, and cocoa powder. Heat until the butter melts and the mixture starts to boil.
  2. Remove from heat and immediately stir in powdered sugar and vanilla extract until smooth.
  3. Pour the warm frosting over the slightly cooled cake, spreading it out evenly.

Add the Pecan Topping:

  • Sprinkle the toasted pecan halves evenly over the frosted cake while it’s still warm. The warmth of the frosting will help the pecans adhere and set into the cake.

Serve:

  • Allow the cake to fully cool and the frosting to set before cutting into squares. This cake is best served at room temperature or slightly chilled.

Storage Options:

  • Store leftover cake in an airtight container at room temperature for up to 3 days, or in the refrigerator for longer storage.

Tips:

  • For extra richness, you can add a pinch of cinnamon or espresso powder to the cake batter.
  • Ensure the pecans are toasted just until fragrant to enhance their flavor without burning them.

Enjoy baking and savoring this delicious Texas Sheet Cake with Chocolate Frosting and Pecans! Let me know if there’s anything else you’d like to explore or if you have more recipes in mind!