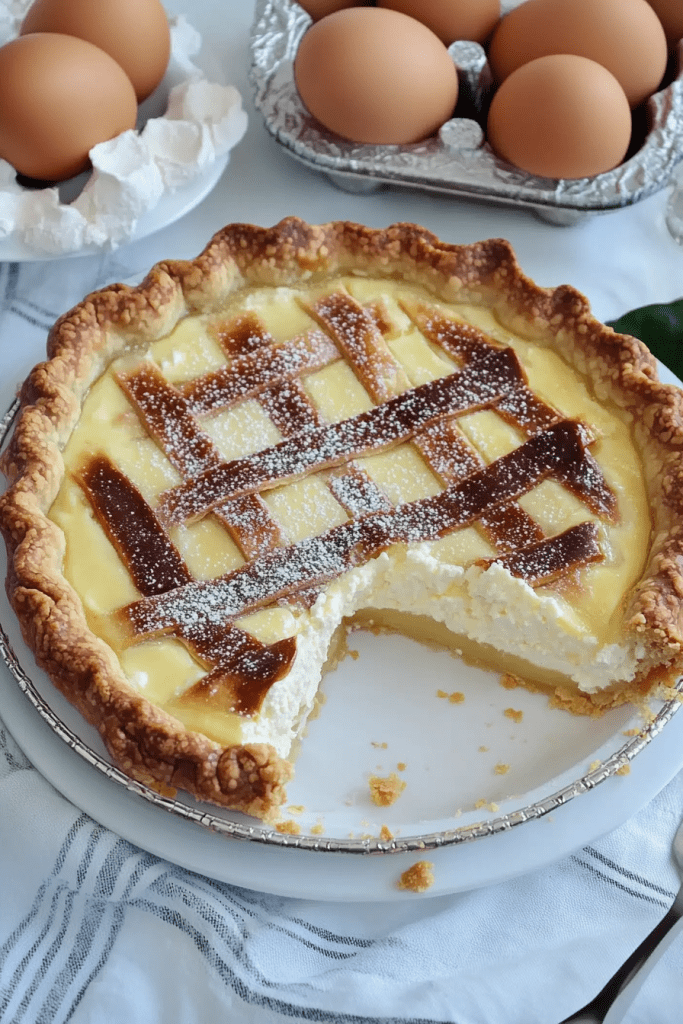
Cinnamon Rolls with Cream Cheese Icing

0

These Cinnamon Rolls with Cream Cheese Icing are a decadent treat, perfect for breakfast or a sweet indulgence. Soft, fluffy rolls swirled with cinnamon sugar and topped with a rich cream cheese icing, they are sure to become a favorite for any occasion.

Why You’ll Love This Recipe:

  • Soft and Fluffy Dough: Made with a buttery dough that rises beautifully, resulting in tender cinnamon rolls.
  • Irresistible Cinnamon Filling: A blend of brown sugar and cinnamon creates a sweet and spicy swirl inside each roll.
  • Cream Cheese Icing: Rich and creamy icing made with cream cheese, butter, powdered sugar, and vanilla adds the perfect finishing touch.
  • Homemade Goodness: Enjoy the aroma of freshly baked cinnamon rolls straight from your oven, bringing warmth and comfort to your kitchen.

Ingredients:

Dough:

  • 2 and 3/4 cups (344g) all-purpose flour (spooned & leveled)
  • 1/4 cup (50g) granulated sugar
  • 1/2 teaspoon salt
  • 3/4 cup (180ml) whole milk
  • 3 tablespoons (43g) unsalted butter
  • 1 standard packet (2 and 1/4 teaspoons) instant yeast
  • 1 large egg, at room temperature

Filling:

  • 3 tablespoons (43g) unsalted butter, softened
  • 1/3 cup (67g) packed light or dark brown sugar
  • 1 tablespoon ground cinnamon

Cream Cheese Icing:

  • 4 ounces (113g) full-fat block cream cheese, softened to room temperature
  • 2 tablespoons (28g) unsalted butter, softened to room temperature
  • 2/3 cup (80g) confectioners’ sugar
  • 1 teaspoon pure vanilla extract

Instructions:

Make the Dough:

  1. In a large bowl, whisk together the flour, granulated sugar, and salt. Set aside.
  2. In a heatproof bowl, combine the milk and butter. Microwave or heat on the stove until the mixture is warm to the touch (about 110°F/43°C), and the butter has melted. Stir in the instant yeast until dissolved.
  3. Pour the milk mixture into the dry ingredients. Add the egg. Stir with a sturdy spatula or use a stand mixer with a paddle attachment on medium speed until a soft dough forms.
  4. Transfer the dough to a lightly floured surface. Knead for 3-5 minutes until smooth, adding more flour if necessary. Place the dough in a lightly greased bowl, cover loosely, and let rest for 10 minutes.

Fill the Rolls:

  1. After resting, roll the dough out into a 14×8-inch (36×20-cm) rectangle. Spread softened butter over the dough.
  2. In a small bowl, mix together brown sugar and cinnamon. Sprinkle evenly over the buttered dough.
  3. Roll up the dough tightly into a 14-inch log. Cut into 10-12 even rolls and place them in a lightly greased 9- or 10-inch round cake pan, pie dish, or square baking pan.

Rise:

  1. Cover the pan with aluminum foil, plastic wrap, or a clean kitchen towel. Allow the rolls to rise in a warm place for 60-90 minutes or until doubled in size.

Bake the Rolls:

  1. Preheat the oven to 375°F (190°C). Bake the rolls for 24-27 minutes, or until lightly browned. If the tops brown too quickly, tent loosely with foil. The internal temperature should reach 195–200°F (91–93°C).
  2. Remove from the oven and place on a wire rack to cool slightly.

Make the Cream Cheese Icing:

  1. In a medium bowl, beat the softened cream cheese on high speed until smooth. Add the softened butter and beat until combined.
  2. Gradually add the confectioners’ sugar and vanilla, beating until smooth and creamy.

Serve:

  1. Spread the warm rolls with cream cheese icing using a knife or icing spatula. Serve immediately and enjoy the deliciousness!

Storage Options:

  • Store leftover rolls tightly covered at room temperature for up to 2 days, or in the refrigerator for up to 5 days.

Tips:

  • For a quicker rise, place the covered rolls in a slightly warmed oven or near a warm stovetop.
  • Customize with chopped nuts or raisins in the filling for added texture and flavor.
  • Reheat leftover rolls briefly in the microwave or toaster oven before serving for a warm, fresh taste.

Enjoy baking and savoring these homemade Cinnamon Rolls with Cream Cheese Icing! If you have any more questions or need further assistance, feel free to ask.

Caramelitas

0

Caramelitas are irresistible dessert bars that combine a buttery oatmeal cookie-like base with layers of gooey caramel, chocolate chips, and optional nuts. Baked to golden perfection, they are a delightful treat for any occasion, blending sweet flavors and satisfying textures in every bite.

Why You’ll Love This Recipe:

  • Decadent Layers: From the chewy oatmeal crust to the rich caramel and chocolate layers, each bite offers a symphony of flavors and textures.
  • Easy Preparation: Simple ingredients and straightforward steps make these bars accessible for baking enthusiasts of all levels.
  • Perfect for Sharing: Ideal for potlucks, parties, or family gatherings, Caramelitas are sure to impress with their homemade charm and deliciousness.
  • Versatile: Customize with your favorite nuts or even a sprinkle of sea salt for a gourmet touch.

Ingredients:

  • 1 cup (2 sticks) unsalted butter, melted
  • 2 cups old-fashioned rolled oats
  • 2 cups all-purpose flour
  • 1 1/2 cups packed brown sugar
  • 1 teaspoon baking soda
  • 1/2 teaspoon salt
  • 1 teaspoon vanilla extract
  • 1 cup semisweet chocolate chips
  • 1 cup caramel sauce (store-bought or homemade)
  • 1/4 cup chopped nuts, such as pecans or walnuts (optional)

Instructions:

Step 1: Prepare and Preheat

  1. Preheat your oven to 350°F (175°C). Grease a 9×13-inch baking pan with butter or cooking spray.

Step 2: Mix the Base

  1. In a large mixing bowl, combine the melted butter, rolled oats, flour, brown sugar, baking soda, salt, and vanilla extract. Mix until the mixture resembles coarse crumbs.

Step 3: Form the Crust

  1. Press half of the oat mixture evenly into the bottom of the prepared baking pan to form a firm crust.

Step 4: Bake the Crust

  1. Bake the crust in the preheated oven for about 10 minutes, or until lightly golden.

Step 5: Layer the Fillings

  1. Remove the crust from the oven. Sprinkle the chocolate chips and chopped nuts (if using) evenly over the hot crust.
  2. Pour the caramel sauce evenly over the chocolate chips and nuts.

Step 6: Add the Topping

  1. Crumble the remaining oat mixture evenly over the top as a crumbly topping.

Step 7: Bake Until Golden

  1. Return the pan to the oven and bake for an additional 15-20 minutes, or until the edges are golden brown and the caramel is bubbling.

Step 8: Cool and Serve

  1. Allow the Caramelitas to cool completely in the pan on a wire rack. Once cooled, cut into squares using a sharp knife.

Storage Options:

  • Room Temperature: Store Caramelitas in an airtight container at room temperature for up to 5 days.
  • Refrigerator: For longer storage, refrigerate in an airtight container for up to 2 weeks.
  • Freezer: Wrap tightly in plastic wrap and store in a freezer-safe container for up to 3 months. Thaw in the refrigerator before serving.

Tips:

  • For easier cutting, chill Caramelitas in the refrigerator for about 30 minutes before slicing.
  • Drizzle additional caramel sauce over each serving for an extra decadent touch.
  • Experiment with different types of nuts or add a sprinkle of sea salt over the caramel layer for a gourmet twist.

Enjoy baking and indulging in these delicious Caramelitas! Let me know if you have any more recipe requests or questions.

Wonton Soup

0

Wonton Soup features delicate wontons filled with seasoned ground pork, swimming in a clear, flavorful broth infused with ginger, soy sauce, sesame oil, and garlic. This dish offers a comforting and satisfying meal, perfect for warming up on chilly days or enjoying as a light and flavorful appetizer.

Why You’ll Love This Recipe:

  • Flavorful Wonton Filling: Ground pork seasoned with soy sauce, sesame oil, and ginger creates savory wontons bursting with delicious flavors.
  • Clear and Intense Broth: Chicken broth enriched with ginger, soy sauce, and sesame oil provides a comforting and aromatic base for the wontons.
  • Quick and Easy Preparation: Simple steps for making and cooking wontons, combined with a straightforward broth preparation, make this soup accessible for home cooks.
  • Versatile Dish: Serve as a comforting main meal or as a delightful starter for a larger Asian-inspired feast.

Ingredients:

  • 30 Wonton Wrappers

Wonton Filling:

  • 8 ounces ground pork
  • 2 green onions, finely chopped
  • 1 tablespoon soy sauce
  • 1 teaspoon sesame oil
  • 1 teaspoon freshly grated ginger
  • 1 ½ teaspoons cornstarch

Broth:

  • 8 cups chicken broth
  • 2 whole garlic cloves
  • 2 slices ginger, approximately 1/4-inch thick
  • 2 tablespoons soy sauce
  • 1 teaspoon sesame oil
  • 2 green onions, sliced

Instructions:

Wontons:

  1. In a large bowl, combine ground pork, finely chopped green onions, soy sauce, sesame oil, grated ginger, and cornstarch. Mix well until evenly combined.
  2. Place one teaspoon of the pork filling in the center of a wonton wrapper. Wet the edges of the wrapper with water.
  3. Fold the wonton wrapper over the filling to create a triangle, pressing out any air around the filling. Wet the two longer ends of the triangle and bring them together, pressing to seal.
  4. Dip the bottom of the wonton in flour to prevent sticking and place it on a parchment-lined tray. Repeat with the remaining wonton wrappers and filling.

Soup:

  1. In a large pot, bring chicken broth, whole garlic cloves, ginger slices, soy sauce, and sesame oil to a boil over medium-high heat.
  2. Reduce heat to low and simmer for 10 minutes to allow the flavors to meld.
  3. Remove the garlic cloves and ginger slices from the broth and discard them.
  4. Carefully add the prepared wontons to the simmering broth. Cook for 4-6 minutes, or until the wontons float to the surface and the pork filling is cooked through.
  5. Serve the savory Wonton Soup hot, garnished with sliced green onions for an extra burst of freshness.

Storage Options:

  • Refrigerator: Store leftover soup in an airtight container in the refrigerator for up to 3-4 days.
  • Freezer: Freeze cooled soup in freezer-safe containers for up to 2 months. Thaw overnight in the refrigerator before reheating.

Tips:

  • Ensure the wontons are sealed tightly to prevent them from opening during cooking.
  • Customize the broth by adding chili oil or a dash of rice vinegar for added depth of flavor.
  • Serve with a side of steamed vegetables or a simple green salad for a balanced meal.

Creamy Slow Cooker Beef Pasta

0

Creamy Slow Cooker Beef Pasta is a comforting dish that combines tender beef stew meat with a rich, creamy mushroom sauce and pasta. This recipe is perfect for a hearty, satisfying meal that cooks slowly to enhance flavors and tenderize the meat.

Why You’ll Love This Recipe:

  • Tender Beef: Slow cooking ensures the beef stew meat becomes tender and flavorful, infused with the creamy mushroom sauce.
  • Creamy Mushroom Sauce: The combination of cream of mushroom soup, beef broth, and heavy cream creates a rich and luxurious sauce that coats the pasta perfectly.
  • Easy Preparation: Simply combine ingredients in the slow cooker and let it cook low and slow, making it ideal for busy days.
  • Family-Friendly: A crowd-pleasing dish that everyone will enjoy, especially with the added Parmesan cheese for extra richness.

Ingredients:

  • 1 pound beef stew meat, cut into bite-sized pieces
  • 1 small onion, diced
  • 4 cloves garlic, minced
  • 1 can cream of mushroom soup (10.5 oz)
  • 1 cup beef broth
  • 1 cup heavy cream
  • 1 teaspoon dried basil
  • 1 teaspoon dried oregano
  • Salt and pepper, to taste
  • 8 ounces pasta (penne or your favorite shape)
  • 1 cup grated Parmesan cheese
  • Fresh parsley, chopped (optional, for garnish)

Ingredient Tips:

  • Beef Stew Meat: Ensure the pieces are cut into bite-sized pieces for even cooking and tender results.
  • Cream of Mushroom Soup: Choose a quality soup for the best flavor. You can use low-sodium or homemade mushroom soup as well.
  • Pasta: Use your favorite pasta shape such as penne or farfalle. Cook until al dente for the best texture.

Instructions:

Step 1: Prepare the Beef Base

  • In a slow cooker, combine beef stew meat, diced onion, and minced garlic.

Step 2: Mix the Sauce

  • In a separate bowl, whisk together cream of mushroom soup, beef broth, heavy cream, dried basil, and dried oregano until smooth. Pour this creamy mixture over the beef in the slow cooker, stirring to coat evenly.

Step 3: Cook Low and Slow

  • Cover the slow cooker and cook on low for 6-8 hours, or until the beef is tender and cooked through.

Step 4: Cook the Pasta

  • About 30 minutes before serving, cook pasta according to package instructions until al dente. Drain and set aside.

Step 5: Combine and Season

  • Stir cooked pasta into the slow cooker with the beef and sauce mixture. Add grated Parmesan cheese and season with salt and pepper to taste. Mix well to ensure the pasta is coated evenly.

Step 6: Finish Cooking

  • Let the pasta cook in the slow cooker for an additional 10-15 minutes to absorb the sauce and meld flavors together.

Step 7: Serve

  • Dish up the creamy beef pasta hot, garnished with fresh parsley for a pop of color and added freshness if desired.

Storage Options:

  • Refrigerator: Store leftovers in an airtight container in the refrigerator for up to 3-4 days.
  • Freezer: Freeze cooled portions in a freezer-safe container for up to 2 months. Thaw overnight in the refrigerator before reheating.

Tips:

  • Customize with additional herbs or vegetables like mushrooms or spinach for added flavor and nutrition.
  • Serve with a side of garlic bread or a green salad for a complete meal.
  • Double the recipe for larger gatherings or to have leftovers for future meals.

Enjoy preparing and savoring this Creamy Slow Cooker Beef Pasta! If you have any more recipes or need further assistance, feel free to ask.

Slow Cooker Cheesy Mozzarella Chicken

0

Slow Cooker Cheesy Mozzarella Chicken is a comforting and flavorful dish that combines tender chicken breasts slow-cooked in marinara sauce and topped with a generous layer of melted mozzarella and Parmesan cheeses. This easy-to-make recipe is perfect for busy days when you want a delicious meal ready with minimal effort.

Why You’ll Love This Recipe:

  • Flavorful and Tender Chicken: Slow cooking ensures the chicken breasts are juicy and infused with the rich flavors of marinara sauce and Italian seasoning.
  • Cheesy and Creamy: The melted mozzarella and Parmesan cheeses create a gooey and satisfying topping that pairs perfectly with the savory chicken.
  • Simple Preparation: Just a few ingredients and steps are needed to create this impressive dish in your slow cooker.
  • Versatile Serving Options: Serve over pasta, rice, or with a side of vegetables for a complete meal.

Ingredients:

  • 4 boneless, skinless chicken breasts
  • 2 teaspoons garlic powder
  • Salt and pepper to taste
  • 1 cup chicken broth
  • 1 cup marinara sauce
  • 2 teaspoons Italian seasoning
  • 1 cup shredded mozzarella cheese
  • 1/4 cup freshly grated Parmesan cheese
  • 1 tablespoon chopped fresh basil for garnish

Ingredient Tips:

  • Chicken Breasts: Choose medium-sized chicken breasts for even cooking. Alternatively, chicken thighs can be used for a juicier option.
  • Marinara Sauce: Opt for a low-sugar, high-quality marinara sauce or use homemade for the best flavor.
  • Cheese: Use freshly shredded mozzarella for optimal melting. Pre-shredded cheese may contain anti-caking agents that affect melting.
  • Italian Seasoning: If you don’t have Italian seasoning, mix equal parts dried oregano, basil, and thyme.

Instructions:

Step 1: Season the Chicken

  • Season the chicken breasts with garlic powder, salt, and pepper. Ensure even coverage by massaging the seasoning into the chicken.

Step 2: Prepare the Slow Cooker

  • Place the seasoned chicken breasts in a single layer at the bottom of your slow cooker.

Step 3: Mix the Sauce

  • In a medium bowl, whisk together chicken broth, marinara sauce, and Italian seasoning. Pour the sauce evenly over the chicken in the slow cooker.

Step 4: Slow Cook the Chicken

  • Cover the slow cooker and cook on low for 6 hours or on high for 3 hours until the chicken is tender and cooked through.

Step 5: Add the Cheese

  • About 30 minutes before the cooking time is up, sprinkle mozzarella and Parmesan cheeses over the chicken. Cover and let the cheese melt and become bubbly.

Step 6: Garnish and Serve

  • Once the cheese is melted, turn off the slow cooker and let the dish rest for a few minutes. Garnish with chopped fresh basil for added flavor and color.

Step 7: Enjoy!

  • Serve the cheesy mozzarella chicken hot, alongside your favorite side dishes like pasta, rice, or vegetables.

Storage Options:

  • Refrigerator: Store any leftovers in an airtight container in the refrigerator for up to 3-4 days.
  • Freezer: Allow the dish to cool completely before freezing in a freezer-safe container for up to 2 months. Thaw overnight in the refrigerator before reheating.

Tips:

  • Customize with additional vegetables like bell peppers or spinach for extra flavor and nutrients.
  • Serve over cooked pasta or with crusty bread to soak up the delicious sauce.
  • Double the recipe for larger gatherings or to have leftovers for future meals.

Enjoy making and sharing this Slow Cooker Cheesy Mozzarella Chicken! If you have any more recipes or need further assistance, feel free to ask.

Ground Beef Chow Mein Casserole

0

Ground Beef Chow Mein Casserole is a hearty dish that combines savory ground beef, a variety of vegetables, noodles, and a flavorful sauce, all baked to perfection with a cheesy topping. This comforting casserole is perfect for family dinners or gatherings, offering a delicious blend of textures and flavors in every bite.

Why You’ll Love This Recipe:

  • Flavorful and Versatile: Packed with a mix of vegetables, tender beef, and noodles, all coated in a savory sauce.
  • Easy to Make: Simple steps make this casserole accessible for any home cook.
  • Perfect for Sharing: Ideal for feeding a crowd or meal prepping for the week ahead.
  • Customizable: Adjust the vegetables and spices to suit your taste preferences or dietary needs.
  • Freezer-Friendly: Prepare ahead and freeze for a convenient meal option.

Ingredients:

  • 1 pound ground beef
  • 1 medium onion, diced
  • 2 cloves garlic, minced
  • 1 tablespoon ginger, freshly grated
  • 1 cup celery, chopped
  • 1 cup carrots, julienned
  • 3 cups cabbage, thinly sliced
  • 8 ounces mushrooms, sliced
  • 8 ounces cooked Chow Mein noodles or cooked spaghetti
  • 3 tablespoons soy sauce
  • 1 tablespoon oyster sauce (optional)
  • 1 teaspoon sesame oil
  • 2 tablespoons vegetable oil
  • 1 cup beef broth
  • 1 tablespoon cornstarch
  • 1 cup cheddar cheese, grated (optional)
  • Salt and pepper to taste
  • Green onions or chives, chopped (for garnish)

Instructions:

Preparation:

  1. Preheat your oven to 350°F (175°C). Grease a 9×13-inch baking dish with cooking spray or a little oil and set aside.

Cooking:

  1. In a large skillet, heat the vegetable oil over medium heat. Add the ground beef and cook until browned, breaking it up with a spatula as it cooks. Drain any excess fat if necessary.
  2. Stir in the diced onions, minced garlic, and grated ginger. Cook for 2-3 minutes until the onions are translucent and fragrant.
  3. Add the chopped celery and julienned carrots, cooking for another 3-4 minutes until they start to soften. Add the sliced cabbage and mushrooms, cooking until all the vegetables are tender-crisp.

Prepare the Sauce:

  1. In a small bowl, whisk together the beef broth, soy sauce, oyster sauce (if using), sesame oil, and cornstarch until smooth. Pour this sauce over the cooked beef and vegetables, stirring well to combine. Bring the mixture to a simmer and cook until the sauce thickens slightly, about 2-3 minutes.

Combine and Bake:

  1. Add the cooked noodles to the skillet with the beef and vegetable mixture, tossing gently to ensure everything is well combined and coated with the sauce.
  2. Transfer the entire mixture into the prepared baking dish. If using cheese, top evenly with the grated cheddar cheese.
  3. Bake in the preheated oven for 20-25 minutes, or until the cheese is bubbly and begins to brown.

Garnish and Serve:

  1. Remove from the oven and let cool for a few minutes. Garnish with chopped green onions or chives before serving for a fresh burst of flavor.

Storage Options:

  • Refrigerator: Store leftovers in an airtight container in the refrigerator for up to 3-4 days.
  • Freezer: Allow the casserole to cool completely, then freeze in portions in freezer-safe containers or bags for up to 3 months. Thaw overnight in the refrigerator before reheating.

Tips:

  • Customize the vegetables to suit your preferences or what you have on hand.
  • For a spicier dish, add red pepper flakes or hot sauce to taste.
  • Use gluten-free soy sauce, oyster sauce, and noodles to make this recipe gluten-free.

Enjoy preparing and sharing this delicious Ground Beef Chow Mein Casserole! If you have more recipes or need further assistance, feel free to ask.

Salted Caramel Bites

0

Salted Caramel Bites are a delightful treat featuring oyster crackers coated in a rich caramel sauce with a hint of vanilla and finished with a sprinkle of kosher salt. These bite-sized snacks are perfect for satisfying sweet and salty cravings, whether enjoyed as a dessert or a tasty snack.

Why You’ll Love This Recipe:

  • Quick and Easy: With just a few simple ingredients and straightforward steps, you can create a delicious treat in no time.
  • Addictive Flavor: The combination of buttery caramel, vanilla, and a touch of salt creates a perfect balance of sweetness and saltiness that’s hard to resist.
  • Versatile Snack: Enjoy these bites on their own, or use them to top ice cream, yogurt, or even as a crunchy addition to a dessert platter.
  • Great for Sharing: Ideal for parties, gatherings, or as homemade gifts, these bites are sure to impress with their homemade caramel goodness.
  • Kid-Friendly: Children and adults alike will love the crispy texture and rich caramel flavor of these addictive treats.

Ingredients:

  • 4 cups oyster crackers
  • 3/4 cup butter
  • 3/4 cup brown sugar
  • 2 teaspoons vanilla paste or extract
  • 1 teaspoon kosher salt

Instructions:

Preparation:

  1. Preheat your oven to 350 degrees Fahrenheit (175 degrees Celsius). Line a baking sheet with parchment paper or aluminum foil and lightly spray with non-stick cooking spray.
  2. Spread the oyster crackers evenly in a single layer on the prepared baking sheet.

Make the Caramel Sauce:

  1. In a large pan over medium heat, melt the butter. Add the brown sugar and vanilla paste or extract. Stir continuously until the brown sugar is fully dissolved and the mixture is smooth.
  2. Increase the heat to bring the mixture to a boil. Stir constantly for about 3-4 minutes until the mixture becomes bubbly and slightly lighter in color. The caramel sauce will thicken and develop a rich aroma.
  3. Remove the pan from the heat and quickly pour the caramel sauce over the oyster crackers on the baking sheet. Use a rubber spatula to gently mix and coat all of the crackers evenly with the caramel sauce.

Bake:

  1. Sprinkle the kosher salt evenly over the top of the caramel-coated crackers.
  2. Bake in the preheated oven for 8-10 minutes, watching closely to prevent burning. The crackers should become slightly toasted and the caramel should bubble.

Cool and Serve:

  1. Remove from the oven and let the Salted Caramel Bites cool completely on the baking sheet. The caramel will harden as it cools.
  2. Once cooled and hardened, break apart any clusters of crackers if desired and transfer to an airtight container for storage.

Storage Options:

  • Store the Salted Caramel Bites in an airtight container at room temperature for up to one week.
  • If kept in a cool, dry place, they will maintain their crispiness and delicious flavor.

Tips:

  • For extra flavor, you can sprinkle additional kosher salt over the caramel-coated crackers right after baking.

Enjoy making and sharing these irresistible Salted Caramel Bites! If you have more recipes or need further assistance, feel free to ask.

Spaghetti & Spinach with Sun-Dried Tomato Cream Sauce

0

Spaghetti & Spinach with Sun-Dried Tomato Cream Sauce combines the robust flavors of sun-dried tomatoes and spinach in a creamy, Parmesan-infused sauce, creating a comforting and satisfying pasta dish. This recipe is perfect for a quick weeknight meal or a cozy dinner with friends and family.

Why You’ll Love This Recipe:

  • Rich and Flavorful Sauce: The creamy sauce made with sun-dried tomatoes, Parmesan cheese, and sour cream offers a rich and indulgent flavor that pairs perfectly with pasta.
  • Nutrient-Packed Spinach: Fresh baby spinach adds a boost of nutrients and vibrant color to the dish, complementing the savory elements of the sauce.
  • Easy Preparation: With simple steps and readily available ingredients, this dish comes together quickly, making it ideal for busy days when you crave a homemade meal without the fuss.
  • Customizable: Adjust the spice level with crushed red pepper flakes and personalize it with additional garnishes like extra Parmesan cheese or fresh herbs.
  • Family-Friendly: Loved by both kids and adults, this pasta dish is sure to become a favorite for its delicious flavors and comforting appeal.

Ingredients:

  • Fresh Baby Spinach: 5 ounces, roughly chopped
  • Sun-Dried Tomatoes in Oil: ½ cup, slivered, plus 1 tablespoon of the oil from the jar for cooking
  • Onion: ½ cup, thinly sliced
  • Garlic: 3 cloves, finely minced
  • Crushed Red Pepper Flakes: ¼ teaspoon
  • Salt: ¼ teaspoon
  • Ground Black Pepper: ¼ teaspoon
  • Low-Sodium Broth (vegetable or chicken): 1 cup
  • Sour Cream: ½ cup
  • Grated Parmesan Cheese: ¼ cup
  • Unsalted Butter: 1 tablespoon
  • Whole-Wheat Spaghetti: 8 ounces, cooked al dente according to package instructions

Instructions:

Prepare the Pasta and Spinach:
Start by boiling a large pot of water. Once boiling, add the whole-wheat spaghetti and cook according to the package instructions for al dente texture.

Place the chopped baby spinach in a large colander. When the pasta is done, drain it over the spinach to wilt it naturally with the steam and hot water.

Make the Sauce:
In a large skillet, heat the tablespoon of oil reserved from the sun-dried tomatoes over medium heat.

Sauté the sliced onions and sun-dried tomatoes for about 3 minutes until the onions are soft. Add the minced garlic, crushed red pepper flakes, salt, and black pepper, and cook for another minute, stirring frequently.

Pour in the broth and increase the heat to medium-high, letting the mixture simmer and reduce by about half, which usually takes around 2 minutes.

Combine Ingredients:
Reduce the heat to low and stir in the sour cream, Parmesan cheese, and butter until the mixture is smooth and the cheese has melted.

Add the drained spaghetti and wilted spinach back into the skillet. Toss everything together to ensure the pasta and spinach are evenly coated with the creamy sauce.

Final Touches:
Adjust the seasoning as needed, adding more salt or pepper according to your taste preferences.

Serve the pasta hot, garnished with additional Parmesan cheese if desired.

Tips:

  • For added protein, you can incorporate grilled chicken or shrimp into the dish.
  • Make sure to use low-sodium broth to control the saltiness of the sauce.
  • This dish reheats well, making it a great option for leftovers the next day.

Storage Options:
Store any leftover pasta in an airtight container in the refrigerator for up to 3 days. Reheat gently in the microwave or on the stove with a splash of broth to maintain the creamy texture.


This format provides detailed instructions and tips to ensure a successful preparation of Spaghetti & Spinach with Sun-Dried Tomato Cream Sauce. Enjoy your meal! If you have more recipes or need further assistance, feel free to ask.

Biscuit Breakfast Casserole

0

Biscuit Breakfast Casserole is a hearty and comforting dish that combines fluffy biscuits with eggs, cheese, and bacon for a satisfying breakfast or brunch option. This easy-to-make casserole is perfect for feeding a crowd or preparing ahead for busy mornings.

Why You’ll Love This Recipe:

  • Quick and Easy: Using refrigerated biscuits cuts down on prep time, making this casserole ideal for busy mornings or lazy weekends.
  • Versatile: You can customize this dish with your favorite breakfast ingredients like bacon, cheese, and optional toppings such as green onions, hot sauce, or salsa.
  • Family-Friendly: Loved by both kids and adults, this casserole is a crowd-pleaser that can be enjoyed as a complete meal on its own.
  • Make-Ahead Option: Prepare the casserole the night before and bake it in the morning for a convenient breakfast solution.
  • Great for Potlucks: This dish travels well and can be easily reheated, making it a perfect choice for brunch gatherings or potluck meals.

Ingredients:

  • 1 can (16.3 oz) refrigerated biscuits
  • 6 large eggs
  • 1 cup shredded cheddar cheese
  • 1/2 cup milk
  • 6-8 strips of cooked bacon, crumbled
  • Salt and pepper to taste

Optional toppings:

  • Chopped green onions
  • Hot sauce
  • Salsa

Instructions:

Preheat and Prepare:
Preheat your oven to 350°F (175°C) and grease a 9×13-inch baking dish.

Prepare the Biscuits:
Separate the refrigerated biscuits and cut them into quarters. Place them evenly in the greased baking dish.

Mix the Egg Mixture:
In a mixing bowl, whisk together the eggs, milk, salt, and pepper until well combined. Pour this mixture evenly over the biscuit pieces in the baking dish.

Add Cheese and Bacon:
Sprinkle the shredded cheddar cheese evenly over the top of the egg and biscuit mixture. Scatter the crumbled bacon over the cheese.

Bake:
Bake in the preheated oven for 25-30 minutes, or until the eggs are set and the top is golden brown.

Cool and Serve:
Let the casserole cool for a few minutes before serving. Garnish with optional toppings like chopped green onions, hot sauce, or salsa according to your preference.

Tips:

  • Ensure the biscuits are evenly distributed in the baking dish for even cooking.
  • Experiment with different cheeses or add vegetables like diced bell peppers or spinach for extra flavor and nutrients.
  • Leftovers can be refrigerated and reheated in the oven or microwave for a quick breakfast option during the week.

Storage Options:
Store any leftover casserole covered in the refrigerator for up to 3 days. Reheat slices in the oven or microwave until warmed through before serving.


This format provides clear instructions and additional tips to ensure a successful Biscuit Breakfast Casserole every time. Enjoy your meal! If you have more recipes or need further assistance, feel free to ask.

Spinach and Cheese Quiche

0

Spinach and Cheese Quiche is a versatile dish that blends the freshness of spinach with creamy eggs and savory cheese, baked to perfection in a flaky crust-free pie dish. This recipe is ideal for breakfast, brunch, or a light dinner, offering a satisfying meal that’s both nutritious and delicious.

Why You’ll Love This Recipe:

  • Nutrient-Rich and Flavorful: Packed with fresh baby spinach, eggs, and cheese, this quiche provides a hearty dose of nutrients and a burst of flavors in every bite.
  • Customizable: Easily adaptable to your taste preferences, you can add ingredients like diced ham or mushrooms for extra texture and flavor.
  • Easy Preparation: Simple steps from sautéing vegetables to whisking the egg mixture make this quiche a breeze to prepare, even for novice cooks.
  • Perfect for Any Occasion: Whether served hot out of the oven or at room temperature, this quiche is suitable for any mealtime, from brunch gatherings to quick weekday dinners.
  • Make-Ahead Option: Prepare the quiche ahead of time and reheat slices for a quick, satisfying meal throughout the week.

Ingredients:

  • 1 tablespoon olive oil
  • 1/2 onion, finely chopped
  • 2 cloves garlic, minced
  • 5 cups baby spinach
  • 5 large eggs
  • 1/2 cup milk of your choice
  • 1/4 teaspoon ground nutmeg
  • 1/4 cup your choice of shredded cheese
  • Salt and freshly ground black pepper, to taste

Optional add-ins:

  • 2/3 cup cooked, diced ham
  • 3/4 cup sliced mushrooms

Instructions:

Preheat and Prepare:
Start by heating your oven to 375°F (190°C). Grease a 9-inch pie dish with a little olive oil or non-stick spray.

Cook the Vegetables:
Heat the olive oil in a large skillet over medium heat. Add the chopped onion and minced garlic, cooking until they become soft and fragrant. If using mushrooms, add them here and sauté until they’re nicely browned.

Wilt the Spinach:
Add the spinach to the skillet and stir until it wilts, which should take just a couple of minutes. If you’re including ham, toss it in to warm it up.

Mix the Base:
In a large mixing bowl, whisk together the eggs, milk, nutmeg, salt, and pepper. Add the cooked vegetable mixture from the skillet into the egg mixture and stir to combine everything evenly.

Assemble and Bake:
Pour the quiche mixture into the prepared pie dish. Sprinkle the shredded cheese evenly on top. Bake in the preheated oven for 25-30 minutes, or until the quiche is set in the center and the edges are golden brown.

Cool and Serve:
Allow the quiche to cool for a few minutes before slicing. This makes it easier to cut and serve.

Tips:

  • Ensure the spinach is well-drained after wilting to prevent excess moisture in the quiche.
  • Experiment with different cheeses such as cheddar, Swiss, or feta for varied flavors.
  • Serve with a side salad or fresh fruit for a complete meal.

Storage Options:
Leftover quiche can be refrigerated for up to 3 days. Reheat slices in the oven or microwave before serving.


This format provides comprehensive details and tips to ensure a successful outcome when making Spinach and Cheese Quiche. Enjoy your cooking! If you have more recipes or need further assistance, feel free to ask.