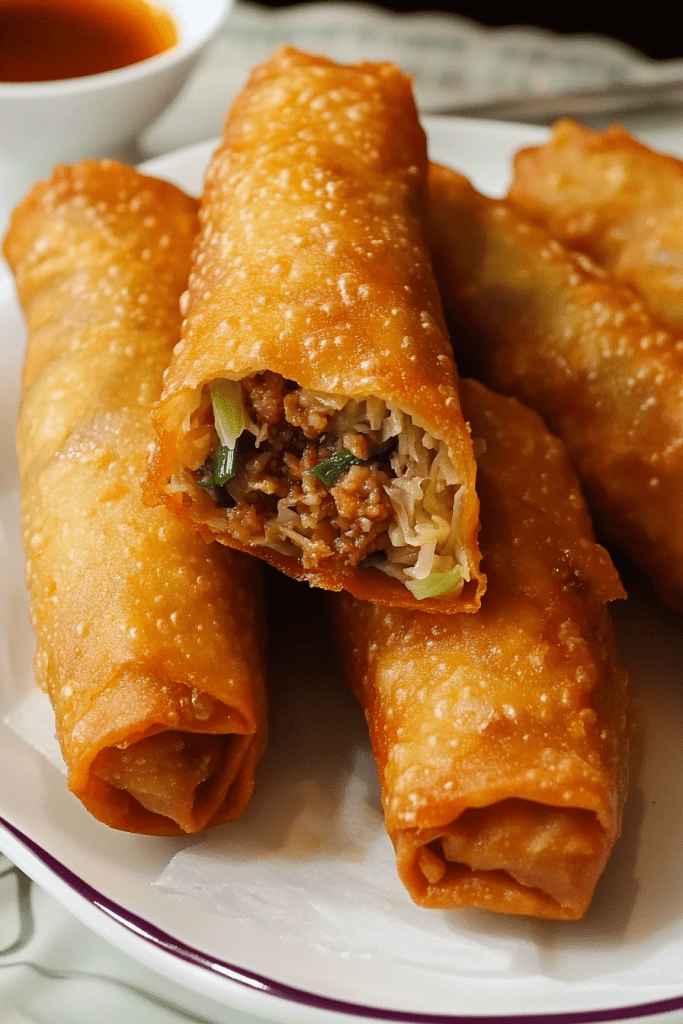
Cherry Cheesecake Egg Rolls

0

Cherry Cheesecake Egg Rolls are a fun and decadent twist on traditional egg rolls, bringing together the creamy richness of cheesecake and the sweet, fruity burst of cherry pie filling in a crisp, golden wrapper. Perfect as a unique dessert or a sweet treat for gatherings, these egg rolls are sure to impress with their delightful combination of textures and flavors.

These egg rolls are easy to assemble and fry, making them a go-to for when you want something quick yet indulgent. A hint of lemon in the cream cheese filling brightens the flavor, perfectly complementing the sweet cherries and buttery, crisp wrapper.

Why You’ll Love This Recipe:

Crispy and Creamy Contrast: The golden, crunchy wrapper envelops a smooth, tangy cheesecake filling with sweet cherries for the perfect balance of texture.

Quick to Make: With simple ingredients and minimal prep, these egg rolls come together in no time.

Perfect for Any Occasion: Ideal for parties, gatherings, or as an after-dinner dessert that’s sure to wow.

Ingredients:

• Oil suitable for frying

• 4 ounces cream cheese, softened to room temperature

• 1 teaspoon lemon zest

• 3 tablespoons granulated sugar

• ½ teaspoon lemon juice

• 1 can cherry pie filling

• 8 egg roll wrappers (6×6 size recommended)

Instructions:

Step 1: Prepare the Cheesecake Filling

• In a mixing bowl, combine the softened cream cheese, lemon zest, lemon juice, and granulated sugar.

• Use an electric mixer or a whisk to beat the mixture until it is smooth and free of lumps.

Step 2: Assemble the Egg Rolls

• Lay an egg roll wrapper on a clean, flat surface in a diamond shape.

• Spoon about 1 tablespoon of the cream cheese mixture into the center of the wrapper and spread it slightly.

• Add a spoonful of cherry pie filling on top of the cream cheese mixture, ensuring distinct layers for each filling.

Step 3: Seal the Wrappers

• Dampen the edges of the egg roll wrapper with water using your fingertips or a pastry brush.

• Fold the bottom corner up over the filling, then fold in the sides, and roll the wrapper up tightly to seal. Press the edges firmly to prevent leakage.

• Let the assembled egg rolls rest for 3-4 minutes to set the seal.

Step 4: Fry the Egg Rolls

• Preheat the oil in a deep skillet or fryer to 350°F (175°C).

• Carefully add the egg rolls in batches, avoiding overcrowding for even cooking.

• Fry for 2-3 minutes per side or until the egg rolls are golden brown and crisp.

Step 5: Serve

• Remove the fried egg rolls from the oil and place them on paper towels to drain excess oil.

• Serve warm, dusted with powdered sugar for an added touch of sweetness and visual appeal.

Tips:

Oil Temperature: Ensure the oil is at 350°F to achieve a crispy exterior without absorbing excess oil.

Filling Variations: For a different twist, try using blueberry or strawberry pie filling.

Sealing Technique: Make sure to seal the egg rolls tightly and let them rest before frying to prevent filling from leaking.

Storage Options:

Refrigerator: Store leftover egg rolls in an airtight container in the refrigerator for up to 3 days. Reheat in the oven at 350°F (175°C) for 10-15 minutes to regain crispiness.

Freezer: Freeze assembled but unfried egg rolls in a single layer on a baking sheet until solid, then transfer to a freezer-safe container for up to 2 months. Fry from frozen, adjusting frying time as needed.

Cherry Cheesecake Egg Rolls are a delightful, crowd-pleasing dessert that’s easy to make and perfect for any occasion. Enjoy the warm, creamy filling paired with the sweet, fruity cherry center encased in a crispy shell!

Sausage Tortellini Soup

0

Sausage Tortellini Soup is a hearty and flavorful dish that’s perfect for warming up on chilly days or as a comforting meal anytime. The rich taste of Italian sausage pairs beautifully with aromatic herbs, tender cheese tortellini, and a blend of fire-roasted tomatoes and broths. Finished with fresh arugula or spinach and a sprinkle of Parmesan cheese, this soup is both nutritious and indulgent.

This recipe is easy to prepare, making it ideal for weeknight dinners, but it’s also impressive enough for guests. The combination of spices and herbs enhances the robust flavors of the sausage, creating a cozy and satisfying bowl of soup that’s packed with layers of taste.

Why You’ll Love This Recipe:

Hearty and Satisfying: Filled with protein and cheese tortellini, it’s a complete meal in a bowl.

Rich and Flavorful Broth: The mix of beef and vegetable broths with tomato paste and herbs gives the soup a deep, savory flavor.

Easy to Make: With simple steps and a few key ingredients, this soup comes together quickly.

Ingredients:

• 1 lb. ground Italian sausage

• 1 medium onion, finely chopped

• 3 cloves garlic, minced

• 1 teaspoon dried basil

• 1 teaspoon dried oregano

• 1 teaspoon dried parsley

• ½ teaspoon dried thyme

• 2 pinches red pepper flakes

• 2 cups low sodium beef broth

• 1 ½ tablespoons tomato paste

• 1 (14.5 oz) can fire-roasted tomatoes

• 4 cups vegetable broth or low sodium chicken broth

• 10 oz refrigerated cheese tortellini

• 3 cups arugula or spinach

• Grated Parmesan cheese, for serving

• Fresh thyme (optional, for garnish)

• Fresh basil (optional, for garnish)

Instructions:

Step 1: Brown the Sausage and Onion

• In a Dutch oven or large stockpot over medium heat, brown the Italian sausage, breaking it up with a spoon as it cooks. When the sausage is about halfway cooked, add the chopped onion. Continue cooking until the sausage is fully browned and the onion is soft.

Step 2: Add Garlic and Herbs

• Reduce the heat to low and add the minced garlic, dried basil, oregano, parsley, thyme, and red pepper flakes. Stir and cook for 1 minute to release the aromatic flavors of the garlic and herbs.

Step 3: Create the Broth

• In a small bowl, whisk the tomato paste with about 1/2 cup of the beef broth to thin it out. Add the vegetable broth, remaining beef broth, fire-roasted tomatoes, and the tomato paste mixture to the pot. Increase the heat to medium and bring the soup to a gentle boil. Reduce the heat to a simmer and let it cook for a few minutes to blend the flavors.

Step 4: Add the Tortellini

• Add the cheese tortellini to the pot and simmer for 10-15 minutes, or until the tortellini is tender and cooked to your liking.

Step 5: Finish with Greens and Parmesan

• Remove the pot from the heat and stir in the arugula or spinach. Season the soup with salt and black pepper to taste.

• Ladle the soup into bowls and sprinkle each serving with 1-2 tablespoons of grated Parmesan cheese. Garnish with fresh thyme or basil if desired.

Tips:

Spice Level: Adjust the amount of red pepper flakes to make the soup more or less spicy to suit your taste.

Greens Choice: Substitute the arugula or spinach with kale or Swiss chard for a different texture and flavor.

Additions: For extra richness, add a splash of cream at the end of cooking or top with a dollop of ricotta.

Storage Options:

Refrigerator: Store any leftover soup in an airtight container in the refrigerator for up to 3 days. Reheat gently on the stovetop over low heat or in the microwave.

Freezer: Freeze the soup (without the tortellini, as it may become mushy) in a freezer-safe container for up to 2 months. Add fresh tortellini when reheating for the best texture.

Sausage Tortellini Soup is a cozy, hearty dish that’s perfect for any season. Enjoy the rich combination of Italian sausage, tender tortellini, and fresh greens in every bite!

Oven Fried Potatoes And Onions

0

Oven Fried Potatoes & Onions is a classic, hearty dish that combines crispy potatoes, savory bacon, and caramelized onions. The addition of butter ensures that the potatoes are rich and flavorful, while the broiler step adds a delightful crispness to the edges. This dish is perfect as a side for breakfast, lunch, or dinner and is easy enough for weeknight meals but delicious enough for special occasions.

The beauty of this recipe lies in its simplicity and versatility. You can easily customize it with your favorite seasonings or add vegetables like bell peppers for a pop of color and flavor.

Why You’ll Love This Recipe:

Crispy and Flavorful: The combination of baking and broiling creates perfectly crispy potatoes with deep flavor.

Simple Ingredients: Uses basic pantry staples that come together in a delicious way.

Perfect Side Dish: Complements a variety of main courses or can be enjoyed on its own.

Ingredients:

• 5 pounds red potatoes, thinly sliced or cut into cubes

• 1 onion, finely chopped

• 6 slices bacon, chopped

• ½ cup butter, diced

• Salt and pepper, to taste

Instructions:

Step 1: Preheat the Oven

• Preheat your oven to 400°F (200°C). Grease a 9×13-inch casserole dish to prevent sticking and ensure easy cleanup.

Step 2: Assemble the Ingredients in the Dish

• Place the thinly sliced or cubed potatoes in an even layer in the prepared casserole dish.

• Sprinkle the chopped onion and bacon evenly over the potatoes.

• Dot the surface with diced butter for rich flavor.

Step 3: Season and Cover

• Season generously with salt and pepper to taste. Adjust the amount based on your preference.

• Cover the dish with foil to allow the potatoes to cook evenly and retain moisture during baking.

Step 4: Bake

• Place the covered dish in the preheated oven and bake for 45 minutes. This initial baking period ensures the potatoes become tender and flavorful.

Step 5: Broil for Crispness

• Remove the foil and give the potatoes a good stir to redistribute the ingredients.

• Set the oven to broiler mode and return the dish to the oven. Broil for about 5 minutes, stirring every minute or so to achieve even browning and crispiness. Watch closely to prevent burning.

Step 6: Serve

• Once the potatoes are crispy and golden brown, remove the dish from the oven and serve immediately. Enjoy the rich combination of buttery potatoes, savory bacon, and sweet onions.

Tips:

Even Slices: For the best results, slice the potatoes uniformly so they cook evenly.

Add Seasonings: For extra flavor, sprinkle with garlic powder, paprika, or fresh herbs like rosemary before baking.

Crispier Texture: If you prefer extra-crispy potatoes, broil for an additional 1-2 minutes while keeping a close eye on them.

Storage Options:

Refrigerator: Store any leftovers in an airtight container in the refrigerator for up to 3 days. Reheat in the oven at 350°F (175°C) for 10-15 minutes for best results.

Freezer: Although potatoes can change texture when frozen, you can freeze leftovers in a freezer-safe container for up to 1 month. Thaw in the refrigerator before reheating.

These Oven Fried Potatoes & Onions are a comforting, crowd-pleasing dish that’s easy to prepare and packed with flavor. Enjoy them as a side dish for breakfast with eggs, as a complement to grilled meats, or on their own for a satisfying meal!

S’mores Oreo Brownies

0

S’mores Oreo Brownies are a decadent combination of gooey marshmallows, crunchy graham crackers, and rich brownie batter, punctuated by delightful Oreo pieces. This dessert is perfect for anyone who loves the classic flavors of a campfire s’more but with an indulgent, chocolatey twist. The layers of graham cracker, Oreos, and marshmallows nestled within the fudgy brownie create an irresistible treat that’s perfect for gatherings, parties, or a special weekend treat.

With the optional enhancements of chocolate chips, peanut butter swirls, or crushed nuts, you can customize these brownies to your taste. The final broiled marshmallow topping adds a beautifully caramelized finish, making these brownies not only delicious but also visually appealing.

Why You’ll Love This Recipe:

Layers of Flavor and Texture: Combines the crunch of graham crackers, the chewiness of marshmallows, and the fudgy richness of brownies.

Easy Customization: Add your favorite enhancements for a unique twist.

Perfect for Any Occasion: Great for potlucks, BBQs, or as a sweet treat to enjoy at home.

Ingredients:

• 1 box of brownie mix (your favorite brand or a gourmet mix for enhanced flavor)

• 7-9 graham crackers, broken into pieces

• 8 oz mini-Oreos

• 20 flat S’more marshmallows (or Jet-Puffed S’more Mallows)

Optional Enhancements:

• Chocolate chips for extra fudginess

• Peanut butter swirl for a rich, nutty flavor

• Sea salt flakes to balance the sweetness

• Crushed nuts for added texture

Instructions:

Step 1: Preheat the Oven

• Preheat your oven to 325°F (163°C). Ensuring the correct temperature is crucial for even baking and achieving that perfect fudgy texture.

Step 2: Prepare the Brownie Batter

• Follow the instructions on your brownie mix box to prepare the batter. Add any optional enhancements such as chocolate chips or a peanut butter swirl to elevate the flavor and texture.

Step 3: Layer the Base

• Line a 9×13-inch glass baking dish with parchment paper, ensuring the edges extend for easy lifting and cutting.

• Arrange the broken graham cracker pieces evenly across the bottom of the dish, creating a crunchy base.

• Spread half of the brownie batter over the graham cracker layer, smoothing it with a spatula to ensure even coverage.

Step 4: Add the Oreo Layer

• Sprinkle the mini-Oreos evenly over the brownie layer. This adds a delightful crunch and enhances the chocolate flavor of the brownies.

Step 5: Top with Marshmallows

• Halve the S’more marshmallows and place them over the Oreo layer. These will melt slightly during baking, creating a gooey, sweet center.

• Spread the remaining brownie batter over the marshmallows, smoothing the top layer for even baking.

Step 6: Bake the Brownies

• Place the baking dish in the preheated oven and bake for approximately 45 minutes. Begin checking the brownies at the 35-minute mark. Insert a toothpick into the center; it should come out with a few moist crumbs, not wet batter.

Step 7: Broil for a Golden Finish

• Remove the brownies from the oven and set the oven to broil on high.

• Add an additional layer of halved marshmallows on top of the baked brownies.

• Broil for 1-2 minutes, watching closely to achieve a golden-brown finish without burning.

Step 8: Cool and Serve

• Allow the brownies to cool completely in the baking dish for about 2 hours to set properly.

• Lift the brownies out of the pan using the parchment paper overhang and place on a cutting board.

• Cut into 24 squares and serve. Enjoy the gooey, crunchy, and chocolaty layers of this decadent treat.

Tips:

Keep an Eye on the Broiler: The marshmallow topping can burn quickly, so watch carefully and pull the dish out as soon as it turns golden brown.

Clean Cutting: Use a sharp knife and clean it between cuts to achieve neat brownie squares.

Add a Drizzle: For an extra indulgent touch, drizzle melted chocolate or caramel over the cooled brownies before serving.

Storage Options:

Room Temperature: Store in an airtight container at room temperature for up to 3 days.

Refrigerator: For longer storage, keep in the fridge for up to a week. Let the brownies come to room temperature before serving for the best texture.

Freezer: Wrap individual squares in plastic wrap and foil, and freeze for up to 2 months. Thaw at room temperature before enjoying.

These S’mores Oreo Brownies are an impressive, crowd-pleasing dessert that combines the best of s’mores, Oreos, and classic brownies into one indulgent treat. Enjoy!

Paula Deen’s 5-Minute Fudge

0

This quick and easy fudge recipe from Paula Deen is the perfect solution for a fast, no-fuss sweet treat. In just 5 minutes of cooking time, you can have rich, creamy chocolate fudge packed with gooey marshmallows and crunchy nuts. This old-fashioned dessert is perfect for holiday gifts, family gatherings, or when you’re simply craving something sweet without spending hours in the kitchen.

The combination of milk chocolate chips and evaporated milk creates a silky-smooth texture, while the marshmallows give the fudge a chewy softness. A touch of vanilla enhances the flavor, and chopped nuts add just the right amount of crunch. It’s a foolproof recipe that’s ideal for beginner and experienced bakers alike.

Why You’ll Love This Recipe

Quick & Easy: Only 5 minutes of cooking time and minimal prep work.

Rich and Creamy: Perfectly smooth chocolate flavor with a chewy bite.

Customizable: Swap nuts for dried fruit, or add a sprinkle of sea salt for a gourmet twist.

Ingredients

• 1 and ⅔ cups white sugar

• ⅔ cup evaporated milk

• 1 tablespoon unsalted butter

• ½ teaspoon salt

• 1 (6-ounce) package milk chocolate chips

• 16 large marshmallows

• 1 teaspoon pure vanilla extract

• 1 cup chopped nuts (pecans, walnuts, or your choice)

Instructions

Step 1: Prepare the Fudge Base

1. In a medium saucepan, combine the sugar, evaporated milk, butter, and salt.

2. Place the saucepan over medium heat and cook for 5 minutes, stirring constantly to prevent burning or sticking.

Step 2: Melt the Chocolate

1. Add the milk chocolate chips to the mixture while stirring continuously.

2. Keep stirring until the chocolate chips are fully melted and the mixture becomes smooth.

Step 3: Add Flavor and Texture

1. Remove the saucepan from the heat.

2. Stir in the marshmallows until melted and fully incorporated into the mixture.

3. Add the vanilla extract and chopped nuts, stirring until evenly distributed.

Step 4: Set the Fudge

1. Pour the hot fudge mixture into an 8-inch square pan. You can line the pan with parchment paper for easier removal later.

2. Use a spatula to spread the fudge evenly and smooth out the top.

3. Let the fudge cool at room temperature until firm. This will take about 1-2 hours.

Step 5: Cut and Serve

1. Once the fudge has set, cut it into small squares using a sharp knife.

2. Serve immediately, or store for later.

Tips

Use High-Quality Chocolate Chips: The better the chocolate, the richer your fudge will taste.

Toast the Nuts: Lightly toasting the nuts beforehand will enhance their flavor and add a deeper, nuttier taste.

Check for Doneness: The mixture should reach a soft-ball stage, around 234°F (112°C) on a candy thermometer, for perfect fudge texture.

Storage Options

Room Temperature: Store the fudge in an airtight container for up to 1 week.

Refrigeration: Keep in the fridge for up to 2 weeks for a firmer texture.

Freezing: Wrap individual squares in wax paper, then place them in a freezer-safe container. Fudge can be frozen for up to 3 months. Thaw at room temperature before serving.

Serving Suggestions

Holiday Treat: Wrap pieces in decorative paper for a festive holiday gift.

Party Platter: Add to a dessert platter alongside cookies and brownies for variety.

With Ice Cream: Crumble fudge pieces over vanilla ice cream for an indulgent dessert topping.

Crème Brûlée French Toast

0

Crème Brûlée French Toast is an indulgent breakfast dish that transforms classic French toast into a decadent, custardy delight. With its rich custard base and caramelized sugar topping, this recipe offers the luxurious flavors of crème brûlée in an easy-to-make breakfast format. The custard-soaked French bread becomes golden and puffy after baking, while the broiled sugar topping adds a delightful crunch.

Perfect for special brunches or lazy weekend mornings, this dish can be prepared the night before, making breakfast preparation simple and stress-free. Just pop it in the oven in the morning, and you’ll have a restaurant-worthy breakfast ready in no time.

Why You’ll Love This Recipe:

Make-Ahead Ease: Prepare it the night before and bake in the morning for minimal fuss.

Luxurious Texture: The rich, custard-soaked bread is soft and delicious, with a delightful caramelized top.

Simple Ingredients: Uses pantry and fridge staples for an easy yet impressive breakfast dish.

Ingredients:

• 1 loaf French bread, sliced into 1-inch thick pieces

• 5 large eggs

• 1 cup half-and-half

• 1 cup whole milk

• 1 teaspoon vanilla extract

• 2/3 cup granulated sugar, plus extra for the topping

• 1/4 teaspoon ground cinnamon

• 1/4 teaspoon ground nutmeg

• 1/4 cup unsalted butter, scattered on top before baking

• Maple syrup, for serving

Instructions:

Step 1: Prepare the Baking Dish and Bread

• Generously butter a 9×13-inch baking dish to prevent sticking.

• Arrange the French bread slices in a single layer in the prepared dish, ensuring they fit snugly without overlapping.

Step 2: Make the Custard Mixture

• In a large mixing bowl, whisk together the eggs, half-and-half, whole milk, vanilla extract, 2/3 cup of granulated sugar, cinnamon, and nutmeg until the mixture is smooth and well combined.

Step 3: Soak the Bread

• Pour the custard mixture evenly over the bread slices in the dish, ensuring each piece is soaked thoroughly. Use a spatula to gently press the bread down to help absorb the liquid.

• Cover the dish with plastic wrap and refrigerate overnight or for at least 4 hours to let the bread absorb the custard.

Step 4: Preheat and Prepare for Baking

• Preheat your oven to 350°F (175°C).

• Remove the baking dish from the refrigerator and scatter pieces of unsalted butter evenly over the soaked bread.

• Sprinkle a little extra granulated sugar on top for a lightly caramelized finish.

Step 5: Bake

• Place the dish in the preheated oven and bake for 35-40 minutes, or until the bread is puffed and golden. The center should be set but still slightly soft.

Step 6: Caramelize the Sugar Topping

• For an extra indulgent touch, sprinkle an additional layer of granulated sugar evenly over the top. Place the dish under the broiler for 1-2 minutes or until the sugar is melted and caramelized, watching carefully to avoid burning.

Step 7: Serve

• Let the French toast rest for a few minutes after baking. Serve warm with maple syrup on the side for drizzling.

Tips:

Choose the Right Bread: Day-old French bread works best as it absorbs the custard without becoming too soggy.

Broiling Safety: Keep a close eye on the broiler when caramelizing the sugar to prevent it from burning.

Customization: Add a pinch of orange zest to the custard for a citrusy twist or top with fresh berries for a pop of color and flavor.

Storage Options:

Refrigerator: Store leftovers in an airtight container in the fridge for up to 3 days. Reheat in the oven at 300°F (150°C) until warm.

Freezer: Wrap individual slices in plastic wrap and foil before freezing for up to 2 months. Reheat from frozen in a 325°F (160°C) oven.

Crème Brûlée French Toast brings together the comforting flavors of classic French toast and the indulgent, caramelized topping of crème brûlée. With its rich, custardy texture and sweet, crackly sugar top, it’s a perfect breakfast or brunch treat that will impress family and guests alike. Enjoy!

Pecan Praline Cake

0

Pecan Praline Cake is a rich, moist dessert that combines the flavors of a classic yellow cake with the sweet, nutty goodness of pecans and coconut pecan frosting mixed right into the batter. Topped with a warm, buttery praline topping made with sweetened condensed milk and pecans, this cake is indulgent and perfect for special occasions or whenever you crave a comforting, homemade dessert. The topping seeps into the cake, creating a luscious, caramel-like layer that’s truly irresistible.

This cake is simple to make using a boxed cake mix as a base, saving time while still delivering a homemade taste. The combination of pecans and sweetened condensed milk in the topping adds a delightful crunch and creaminess that complements the moist cake perfectly.

Why You’ll Love This Recipe:

Quick and Easy: Using a boxed cake mix and a pre-made frosting as ingredients saves prep time without sacrificing flavor.

Decadent Topping: The warm, buttery praline topping elevates the cake to a new level of deliciousness.

Perfect for Any Occasion: Great for potlucks, family gatherings, or special celebrations.

Ingredients:

For the Cake:

• 1 box yellow cake mix

• 1 container (about 16 oz) coconut pecan frosting

• ⅔ cup oil

• 1 cup water

• 4 large eggs

• ½ cup pecans, finely chopped

For the Topping:

• 2 tablespoons unsalted butter

• 1 (14 oz) can sweetened condensed milk

• 1 cup pecans, chopped

Instructions:

Step 1: Preheat the Oven

• Preheat your oven to 350°F (175°C). Grease a 9×13-inch baking dish to ensure the cake doesn’t stick.

Step 2: Prepare the Cake Batter

• In a large mixing bowl, blend together the yellow cake mix, coconut pecan frosting, oil, water, and eggs until the batter is smooth and well combined. Use an electric mixer for about 2 minutes on medium speed.

• Fold in the ½ cup of finely chopped pecans, making sure they are evenly distributed throughout the batter.

Step 3: Bake the Cake

• Pour the batter into the prepared 9×13-inch baking dish, spreading it evenly with a spatula.

• Bake in the preheated oven for 40 minutes, or until a toothpick inserted into the center comes out clean. The cake should be golden brown and set.

Step 4: Prepare the Praline Topping

• While the cake is baking, prepare the topping. In a saucepan over medium heat, combine the unsalted butter and the sweetened condensed milk. Stir continuously until the butter has melted and the mixture is smooth.

• Remove the saucepan from the heat and stir in the 1 cup of chopped pecans.

Step 5: Top the Cake

• Once the cake is done baking and still warm, pour the praline topping over the cake. Use a spatula to spread it evenly across the surface so that it seeps into the cake and creates a delicious, sticky layer.

Step 6: Serve and Enjoy

• Allow the cake to cool slightly before serving. The topping will set a bit as it cools, making it easier to cut and serve. Enjoy a slice warm or at room temperature.

Tips:

Extra Crunch: For added texture, sprinkle additional chopped pecans over the topping before it sets.

Storage Tip: If you prefer a slightly firmer topping, allow the cake to cool completely before serving.

Serving Suggestions: Pair with a scoop of vanilla ice cream or a dollop of whipped cream for an extra indulgent treat.

Storage Options:

Room Temperature: Store covered at room temperature for up to 2 days.

Refrigerator: For longer storage, cover and refrigerate for up to 5 days. Bring to room temperature or slightly warm individual slices in the microwave before serving.

This Pecan Praline Cake is rich, moist, and packed with flavor. The buttery pecan topping makes it an unforgettable dessert that will have everyone coming back for seconds. Enjoy the comforting taste of pecans, caramel, and coconut in every bite!

Easy Hot Fudge Pie

0

Easy Hot Fudge Pie is the perfect dessert for chocolate lovers who want a rich, decadent treat without the fuss. This pie has a velvety, gooey center that pairs beautifully with a crisp graham cracker crust, making each bite a delightful combination of textures. The simple ingredients and straightforward preparation make it a fantastic dessert to whip up for any occasion, from weeknight dinners to special gatherings. Serve it warm with a dollop of whipped cream or a scoop of vanilla ice cream for an indulgent experience.

With its deep chocolate flavor and melt-in-your-mouth consistency, this hot fudge pie is bound to become a favorite in your household. Whether you choose to make it with the optional graham cracker crust or go crustless for a more fudgy treat, this pie will not disappoint.

Why You’ll Love This Recipe:

Rich and Fudgy Texture: The pie has a gooey, decadent center that melts in your mouth.

Easy to Make: Simple ingredients and minimal preparation time mean you can enjoy this dessert with little effort.

Versatile: Serve it warm, at room temperature, or even chilled for different experiences.

Ingredients:

For the Filling:

• 1 stick (1/2 cup) unsalted butter, softened

• 1 cup granulated sugar

• 2 large eggs

• 1 teaspoon vanilla extract

• 3 tablespoons unsweetened cocoa powder

• 1 teaspoon salt

• 1/2 cup all-purpose flour

For the Optional Graham Cracker Crust:

• 1 package (about 14 ounces) graham cracker crumbs

• 1/4 cup melted butter

• 2 tablespoons sugar

Instructions:

Step 1: Preheat Your Oven

• Preheat your oven to 350°F (175°C) to ensure the pie bakes evenly.

Step 2: Prepare the Optional Graham Cracker Crust

• If using a crust, mix the graham cracker crumbs, melted butter, and sugar in a bowl until the mixture resembles wet sand.

• Press the mixture firmly into an 8-inch pie pan to form an even layer.

• Bake the crust for 8-10 minutes until lightly golden and let it cool while you prepare the filling.

Step 3: Cream Butter and Sugar

• In a large mixing bowl, use an electric mixer to cream together 1 stick of softened butter and 1 cup of granulated sugar. Beat for about 3 minutes until light and fluffy.

Step 4: Add Eggs and Vanilla

• Add the eggs one at a time, mixing well after each addition.

• Stir in 1 teaspoon of vanilla extract to add depth to the flavor.

Step 5: Incorporate Dry Ingredients

• Sift the cocoa powder, salt, and flour into the wet mixture. This step helps maintain a smooth texture by preventing lumps.

• Gently stir by hand until just combined. Avoid overmixing, which could result in a dense pie.

Step 6: Assemble the Pie

• Pour the chocolate filling into the prepared graham cracker crust or, if not using a crust, into a greased 8-inch pie pan.

Step 7: Bake

• Place the pie in the preheated oven and bake for 30-35 minutes. The center should be set but still slightly gooey, and a toothpick inserted should come out with moist crumbs (not wet batter).

Step 8: Cool and Serve

• Let the pie cool completely at room temperature, or refrigerate for quicker cooling.

• Slice into 8 pieces and serve with a dollop of whipped cream or a scoop of vanilla ice cream for an extra indulgent touch.

Tips:

Check for Doneness: The center should appear slightly underbaked when you remove it from the oven, as it will continue to set as it cools.

Enhance the Flavor: Add a sprinkle of sea salt on top before serving for a sophisticated sweet-and-salty contrast.

Serve Warm: For a gooier center, warm individual slices in the microwave for 10-15 seconds before serving.

Storage Options:

Room Temperature: Store the pie covered at room temperature for up to 2 days.

Refrigerator: Keep leftovers in an airtight container in the fridge for up to 5 days.

Freezer: Freeze individual slices wrapped in plastic wrap and foil for up to 2 months. Thaw in the refrigerator before reheating.

Easy Hot Fudge Pie is a simple yet irresistible dessert that’s perfect for any chocolate lover. With its rich, fudgy interior and optional crunchy crust, it’s sure to satisfy your sweet cravings every time. Enjoy!

Air Fryer Peanut Butter Cookies

0

Air Fryer Peanut Butter Cookies are the perfect treat for anyone who loves the classic taste of peanut butter. This simple, three-ingredient recipe makes it incredibly easy to enjoy homemade cookies with minimal effort and time. These cookies are soft on the inside and have a slight crisp on the outside, creating the perfect balance of textures. Best of all, using an air fryer means faster baking with no need to preheat an oven.

These cookies are great for a quick snack or when you’re craving something sweet but don’t want to spend too much time in the kitchen. With a rich, nutty flavor and a tender bite, these air-fried cookies will satisfy any sweet tooth.

Why You’ll Love This Recipe:

Minimal Ingredients: Just three simple ingredients—peanut butter, sugar, and an egg—make for an easy and fuss-free recipe.

Quick to Cook: The air fryer reduces baking time, so you can enjoy your cookies sooner.

Classic Flavor: These cookies capture the rich, satisfying taste of traditional peanut butter cookies.

Ingredients:

• 1 cup creamy peanut butter

• 3/4 cup granulated sugar

• 1 large egg

Instructions:

Step 1: Mix the Dough

• In a large mixing bowl, combine the creamy peanut butter, granulated sugar, and egg. Mix until the dough is smooth and well combined. The mixture should be soft and easy to handle.

Step 2: Shape the Cookies

• Scoop out about a tablespoon of the dough and roll it into a small ball with your hands. Repeat with the remaining dough.

Step 3: Prepare the Air Fryer Basket

• Line the air fryer basket with a piece of parchment paper or a silicone liner. Place the dough balls in the basket, spacing them about an inch apart to allow for spreading.

Step 4: Flatten the Cookies

• Use a fork to press each dough ball flat, making a crisscross pattern on the top of each cookie.

Step 5: Air Fry the Cookies

• Preheat the air fryer to 300°F (150°C) if your model requires preheating. Place the basket in the air fryer and cook for 7-8 minutes, or until the cookies are golden brown and set.

Step 6: Cool the Cookies

• Carefully remove the basket from the air fryer and let the cookies sit for 2-3 minutes to firm up. Then, use a spatula to transfer the cookies to a wire rack to cool completely.

Step 7: Repeat

• Repeat the process with the remaining dough until all cookies are baked.

Tips:

Spacing: Leave enough space between cookies in the air fryer to ensure even cooking and to prevent them from sticking together.

Avoid Overcooking: The cookies may appear slightly soft when you first remove them from the air fryer, but they will firm up as they cool.

Parchment Paper: Make sure to use parchment paper or a silicone liner to prevent sticking and make cleanup easier.

Storage Options:

Room Temperature: Store the cookies in an airtight container at room temperature for up to 5 days.

Freezer: Freeze the cookies in an airtight container or freezer bag for up to 2 months. Thaw at room temperature before serving.

These Air Fryer Peanut Butter Cookies are quick, easy, and packed with peanut butter flavor. Whether you’re making a batch for a weeknight snack or preparing a treat for guests, these cookies are sure to be a hit. Enjoy them with a glass of cold milk for the perfect pairing!

Triple Chocolate Brownies

0

Triple Chocolate Brownies are a decadent dessert perfect for any chocolate lover. These rich, fudgy brownies combine three types of chocolate—melted chocolate, cocoa powder, and chocolate chips—for a treat that’s intensely chocolatey and moist. The center is dense and chewy, while the edges are slightly crispy, offering the best of both worlds in every bite. Whether served warm with a scoop of ice cream or enjoyed at room temperature, these brownies are sure to satisfy any sweet tooth.

This recipe is ideal for gatherings, potlucks, or simply when you’re craving a homemade dessert with a deep chocolate flavor. The addition of chocolate chips ensures melty pockets of chocolate in each piece, making them even more irresistible. Simple to make with pantry staples, these brownies will quickly become a go-to dessert in your household.

Why You’ll Love This Recipe:

Ultra-Chocolatey Flavor: Combining melted chocolate, cocoa powder, and chocolate chips guarantees a rich, deep chocolate taste.

Perfect Texture: The brownies have a fudgy center and crispy edges, giving you the best of both textures.

Easy to Make: With simple steps and basic ingredients, these brownies come together quickly and effortlessly.

Ingredients:

• 1 cup unsalted butter

• 8 oz semi-sweet chocolate, chopped

• 1 1/2 cups granulated sugar

• 1/2 cup brown sugar, packed

• 4 large eggs, room temperature

• 1 teaspoon vanilla extract

• 1 cup all-purpose flour

• 1/2 cup cocoa powder

• 1/2 teaspoon salt

• 1 cup semi-sweet or dark chocolate chips

Instructions:

Step 1: Preheat the Oven and Prepare the Pan

• Preheat your oven to 350°F (175°C). Line a 9×13-inch baking pan with parchment paper, leaving an overhang on the sides for easy removal. Lightly grease the paper to prevent sticking.

Step 2: Melt the Chocolate and Butter

• In a heatproof bowl, melt the unsalted butter and chopped semi-sweet chocolate together over a double boiler or in the microwave in 20-second increments, stirring each time until smooth. Set aside to cool slightly.

Step 3: Combine the Sugars and Eggs

• In a large mixing bowl, combine the granulated sugar and brown sugar. Add the eggs one at a time, beating well after each addition. Stir in the vanilla extract until the mixture is thick and smooth.

Step 4: Mix in the Melted Chocolate

• Gradually pour the slightly cooled melted chocolate mixture into the egg and sugar mixture, folding gently to combine until smooth and glossy.

Step 5: Add the Dry Ingredients

• Sift the all-purpose flour, cocoa powder, and salt into the wet ingredients. Fold the dry ingredients gently into the batter until just combined. Be careful not to overmix, as this can lead to dense brownies.

Step 6: Fold in the Chocolate Chips

• Fold in the semi-sweet or dark chocolate chips to distribute evenly throughout the batter.

Step 7: Bake

• Pour the batter into the prepared baking pan, spreading it out evenly with a spatula. Bake in the preheated oven for 25-30 minutes, or until a toothpick inserted into the center comes out with a few moist crumbs (not wet batter).

Step 8: Cool and Serve

• Remove the pan from the oven and let the brownies cool completely in the pan. Use the parchment paper overhang to lift the brownies out of the pan, then cut them into squares and serve.

Tips:

Use High-Quality Chocolate: For the best flavor, use high-quality chocolate for both the melted chocolate and chocolate chips.

Room Temperature Eggs: Ensuring the eggs are at room temperature helps them blend more evenly into the batter, resulting in a better texture.

Check for Doneness: The toothpick should come out with a few moist crumbs—this ensures the brownies stay fudgy and not overbaked.

Storage Options:

Room Temperature: Store in an airtight container at room temperature for up to 3 days.

Refrigerator: For longer storage, keep the brownies in an airtight container in the refrigerator for up to a week. Bring to room temperature before serving.

Freezer: These brownies freeze well. Wrap individual squares in plastic wrap and store in a freezer-safe container for up to 3 months. Thaw at room temperature before enjoying.

These Triple Chocolate Brownies are the ultimate indulgence, perfect for chocolate enthusiasts who appreciate a rich, fudgy dessert. The blend of melted chocolate, cocoa powder, and chocolate chips ensures each bite is packed with intense chocolate flavor and a luscious texture. Whether enjoyed on their own or paired with a scoop of vanilla ice cream, these brownies are bound to become a household favorite!