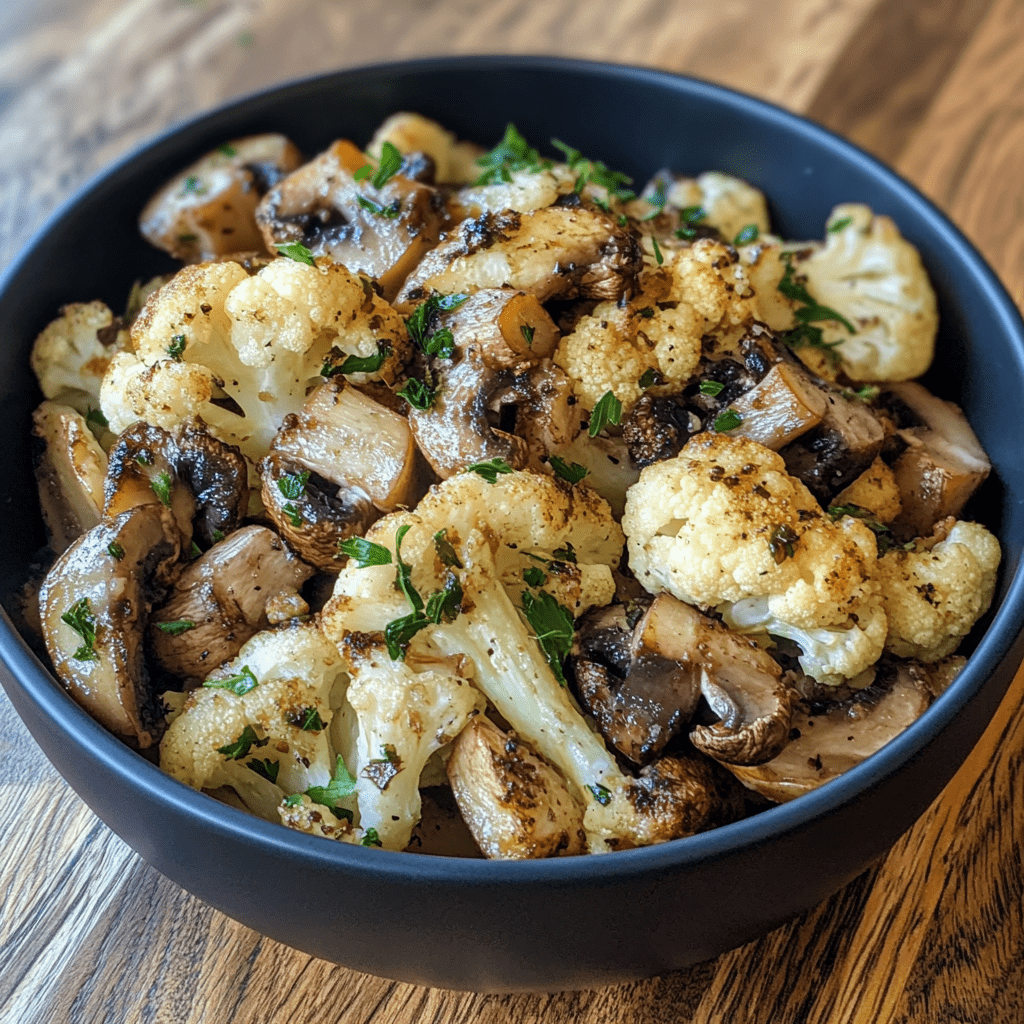
Praline French Toast Casserole

0

Praline French Toast Casserole is the ultimate indulgent breakfast or brunch dish, offering a delightful fusion of soft, custardy bread and a rich, caramelized praline topping. With its layers of buttery pecans and the warm flavors of vanilla and cinnamon, this casserole is as comforting as it is luxurious. Whether you’re hosting a festive brunch or simply treating your family to something special, this make-ahead recipe will undoubtedly steal the show.

What makes this dish a true standout is its versatility and ease of preparation. You can assemble it the night before, allowing the custard to soak into the bread and intensify its flavors. The next morning, all that’s left to do is pop it in the oven, making it perfect for stress-free entertaining or cozy weekend mornings.

Why You’ll Love This Recipe

Make-Ahead Convenience: Perfect for busy mornings or entertaining guests, as it can be prepped the night before.

Decadent Flavor: The praline topping combines caramelized pecans and a buttery sweetness that elevates every bite.

Crowd-Pleaser: A guaranteed hit with both kids and adults, making it ideal for family gatherings or special occasions.

Ingredients

Praline Topping

• 1 cup unsalted butter

• 1 cup packed light brown sugar

• 1 cup chopped pecans

French Toast Casserole

• 8–10 slices day-old French bread or brioche

• 8 large eggs

• 2 cups whole milk

• ½ cup heavy cream

• ½ cup granulated sugar

• 1 teaspoon vanilla extract

• ½ teaspoon ground cinnamon

• Pinch of salt

Instructions

Step 1: Prepare the Praline Topping

1. Melt Butter: In a medium saucepan, melt the butter over medium heat.

2. Combine Ingredients: Stir in the brown sugar until dissolved, then fold in the chopped pecans.

3. Thicken: Cook for 2-3 minutes, stirring continuously, until the mixture thickens slightly. Remove from heat and let it cool.

4. Spread in Dish: Grease a 9×13 inch baking dish and evenly spread half of the praline mixture across the bottom.

Step 2: Assemble the French Toast

1. Arrange Bread: Layer the slices of French bread or brioche in a single layer over the praline mixture in the baking dish.

2. Make Custard: In a large mixing bowl, whisk together the eggs, milk, heavy cream, granulated sugar, vanilla extract, cinnamon, and salt until smooth.

3. Soak Bread: Pour the custard mixture evenly over the bread, ensuring every slice is well-soaked.

4. Refrigerate: Cover the dish with plastic wrap and refrigerate overnight, or for at least 4 hours, to allow the bread to absorb the custard fully.

Step 3: Bake the Casserole

1. Preheat Oven: Preheat your oven to 350°F (175°C). Remove the casserole from the refrigerator and let it sit at room temperature while the oven heats.

2. Bake: Bake the casserole uncovered for 45-50 minutes, or until the top is golden brown and the custard is set.

3. Cool Slightly: Allow the dish to cool for 5-10 minutes before serving.

Step 4: Serve

1. Invert Slices: To serve, invert each slice onto a plate so the praline topping is on top.

2. Optional Garnishes: Sprinkle with powdered sugar or drizzle with maple syrup for an extra touch of sweetness.

Tips

Use Day-Old Bread: Slightly stale bread absorbs the custard better, resulting in a richer texture.

Customize Toppings: Add sliced bananas or a sprinkle of shredded coconut for a tropical twist.

Storage: Leftovers can be stored in an airtight container in the refrigerator for up to 3 days. Reheat individual portions in the microwave or oven.

Serving Suggestions

Pair this decadent casserole with fresh fruit or a side of crispy bacon for a balanced brunch spread. A hot cup of coffee or tea rounds out the experience beautifully.

Praline French Toast Casserole is an indulgence that turns any morning into a celebration. Its caramelized pecan topping and custardy bread are pure magic in every bite!

FRIED CABBAGE AND BACON WITH ONION

0

Fried Cabbage and Bacon with Onion is a classic comfort dish that marries smoky, savory, and sweet flavors in a hearty, simple preparation. With minimal ingredients and maximum taste, this dish is a go-to recipe for cozy family meals or as a flavorful accompaniment to any main course. The combination of crisp bacon, tender cabbage, and caramelized onions creates a delightful texture contrast that’s both satisfying and irresistibly delicious.

This recipe celebrates humble ingredients, turning them into a dish that’s packed with flavor and nourishment. Whether served as a robust side dish for a holiday feast or enjoyed as a stand-alone meal, this Fried Cabbage and Bacon recipe is sure to win over anyone who tastes it. Its versatility and ease of preparation make it a staple in kitchens looking for a hearty yet straightforward dish.

Why You’ll Love This Recipe

Smoky and Savory: The bacon lends a rich, smoky flavor that perfectly complements the natural sweetness of the cabbage and onions.

Easy to Prepare: With just a few ingredients and straightforward steps, this dish is perfect for busy weeknights.

Versatile: Works wonderfully as a side dish or a satisfying low-carb main course.

Ingredients

• 1 head of cabbage, chopped

• 1 onion, chopped

• 2 teaspoons minced garlic

• 5 slices of bacon, chopped

• ½ teaspoon onion powder

• ½ teaspoon garlic powder

• Salt and pepper to taste

Instructions

Step 1: Prep the Ingredients

1. Prepare the Cabbage: Slice the cabbage into quarters, removing the tough outer leaves and the hard core. Chop the quarters into large, bite-sized pieces.

2. Chop the Onion and Bacon: Dice the onion and chop the bacon into small pieces for easy cooking.

Step 2: Cook the Bacon and Onion

1. Fry the Bacon and Onion: In a large skillet, cook the chopped bacon over medium heat until it’s crispy. Add the chopped onion and sauté until soft and translucent, about 5 minutes.

2. Drain the Bacon and Onion: Using a slotted spoon, transfer the bacon and onion to a paper towel-lined plate, leaving the bacon fat in the skillet.

Step 3: Cook the Cabbage

1. Sauté the Cabbage: Place the chopped cabbage into the skillet with the reserved bacon fat. Cook undisturbed for 3–5 minutes, allowing the edges to brown slightly for added flavor.

2. Season the Cabbage: Add the garlic powder, onion powder, and minced garlic. Stir to combine and cook for another 2–3 minutes until fragrant.

3. Add Water: Pour a small amount of water into the skillet (about ¼ cup) to help steam the cabbage. Cover and cook for 10–15 minutes, stirring occasionally, until the cabbage is tender.

Step 4: Combine and Serve

1. Add Bacon and Onion: Once the cabbage is fully cooked, stir the crispy bacon and sautéed onions back into the skillet. Mix well to combine.

2. Adjust Seasoning: Taste and adjust with additional salt and pepper as needed.

Tips

Caramelization: Letting the cabbage brown slightly before adding water enhances its sweetness and adds depth to the dish.

Optional Additions: For extra flavor, add a splash of apple cider vinegar or a pinch of smoked paprika.

Storage: Leftovers can be refrigerated in an airtight container for up to 3 days. Reheat in a skillet for best results.

Serving Suggestions

This Fried Cabbage and Bacon dish pairs beautifully with roasted meats, grilled sausages, or buttery mashed potatoes. For a lighter option, serve alongside a fresh green salad or as a topping for baked potatoes.

Enjoy this hearty, smoky, and satisfying dish on its own or as part of a comforting meal. It’s a recipe you’ll find yourself returning to time and time again!

Crispy Air Fryer Zucchini Chips with Creamy Parmesan Dip Recipe

0

Crispy Air Fryer Zucchini Chips are a delightful snack or appetizer that combines light, crunchy textures with the subtle earthiness of fresh zucchini. Paired with a creamy Parmesan dip, this dish is not only incredibly satisfying but also a healthier alternative to traditional fried snacks.

Perfect for a family gathering, a casual snack, or even a party appetizer, these zucchini chips are easy to make and packed with flavor. The air fryer ensures they achieve that perfect golden crispness without the need for excessive oil, while the Parmesan dip adds a tangy, creamy complement to each bite.

Why You’ll Love This Recipe

Healthier Alternative: Air frying keeps these chips crispy and light with minimal oil.

Rich Flavors: The Parmesan and Italian seasoning elevate the taste of the chips and dip.

Easy to Make: Simple steps with everyday ingredients make this a breeze.

Ingredients

For the Zucchini Chips

• 2 large zucchinis, sliced into ¼-inch rounds

• 1 large egg

• 2 tablespoons milk

• ½ cup all-purpose flour

• 1 cup panko bread crumbs

• 1 cup grated Parmesan cheese

• ½ teaspoon garlic powder

• ½ teaspoon Italian seasoning

• Cooking spray

For the Creamy Parmesan Dip

• ½ cup sour cream

• 2 tablespoons grated Parmesan cheese

• ½ tablespoon Italian seasoning

• ½ teaspoon garlic powder

• ½ teaspoon dried dill

• Salt and pepper to taste

Instructions

Step 1: Prepare the Ingredients

1. Set Up Dipping Stations:

• Place flour in a shallow bowl.

• In another bowl, whisk together egg and milk.

• In a third bowl, mix panko bread crumbs, Parmesan cheese, garlic powder, and Italian seasoning.

Step 2: Coat the Zucchini

1. Flour: Dredge each zucchini slice in flour, ensuring full coverage.

2. Egg Wash: Dip the floured slices into the egg mixture, letting the excess drip off.

3. Breadcrumb Mixture: Press each slice into the breadcrumb mixture, coating thoroughly.

Step 3: Air Fry the Zucchini

1. Prepare Air Fryer: Lightly spray the air fryer basket with cooking spray to prevent sticking.

2. Arrange Zucchini: Place coated zucchini slices in a single layer in the air fryer basket. Avoid overcrowding for even cooking.

3. Cook:

• Set air fryer to 400°F (200°C).

• Cook for 8 minutes, flipping halfway through to ensure both sides crisp up evenly.

Step 4: Prepare the Dip

1. Combine Ingredients: In a small bowl, mix sour cream, Parmesan cheese, Italian seasoning, garlic powder, and dried dill.

2. Season: Add salt and pepper to taste. Adjust seasonings as desired.

Step 5: Serve

1. Enjoy: Serve the hot, crispy zucchini chips with the creamy Parmesan dip on the side.

Tips

Uniform Slicing: Ensure zucchini slices are evenly thick for consistent cooking.

Crispier Chips: Lightly spray the tops of the zucchini with cooking spray before air frying.

Gluten-Free Option: Swap all-purpose flour and panko bread crumbs with gluten-free alternatives.

Storage Options

Refrigerator: Store leftover zucchini chips in an airtight container for up to 2 days. Reheat in the air fryer for a few minutes to regain crispness.

Dip: Keep the dip in the refrigerator for up to 3 days in a sealed container.

These Crispy Air Fryer Zucchini Chips with Creamy Parmesan Dip are an irresistible treat that will quickly become a household favorite. They’re easy to make, packed with flavor, and perfect for any occasion!

Creamy Chicken Enchiladas Recipe

0

Creamy Chicken Enchiladas are the epitome of comfort food, combining tender, shredded chicken with a rich, cheesy sauce wrapped in soft flour tortillas. This dish is ideal for weeknight dinners, family gatherings, or potlucks, offering both simplicity and indulgent flavor.

The creamy sauce, made with sour cream and diced green chilies, adds a tangy kick that perfectly complements the savory chicken and Monterey Jack cheese filling. These enchiladas are a crowd-pleaser, sure to leave everyone asking for seconds!

Why You’ll Love This Recipe

Rich and Creamy: The luscious sauce coats every bite, making it irresistibly indulgent.

Simple and Quick: Using rotisserie chicken cuts down on prep time, making this a perfect weeknight meal.

Customizable: Add your favorite toppings or mix-ins like jalapeños, black beans, or corn to make it your own.

Ingredients

• 10 small soft flour tortillas

• 3 tablespoons all-purpose flour

• 2 cups chicken broth

• 1 cup sour cream

• 2½ cups shredded, cooked chicken (such as rotisserie chicken)

• 3 cups shredded Monterey Jack cheese

• 3 tablespoons butter

• 1 (4 oz) can diced green chilies

Instructions

Step 1: Prepare and Assemble the Enchiladas

1. Preheat the Oven: Preheat your oven to 350°F (175°C).

2. Mix the Filling: In a large bowl, combine the shredded chicken and 1 cup of the Monterey Jack cheese. Mix thoroughly.

3. Fill the Tortillas: Spoon a generous amount of the chicken and cheese mixture into the center of each tortilla. Roll the tortillas tightly and place them seam-side down in a lightly greased 9×13 inch baking dish.

Step 2: Make the Creamy Sauce

1. Create the Roux: Melt the butter in a medium saucepan over medium heat. Once melted, whisk in the flour, stirring constantly to form a smooth paste. Cook for 1 minute to eliminate the raw flour taste.

2. Add Chicken Broth: Slowly pour in the chicken broth while whisking continuously to avoid lumps. Cook until the sauce thickens and bubbles.

3. Incorporate Sour Cream and Chilies: Remove the pan from the heat and stir in the sour cream and diced green chilies. Mix until smooth and creamy. Adjust seasoning with salt and pepper if needed.

Step 3: Assemble and Bake the Enchiladas

1. Pour the Sauce: Evenly distribute the creamy sauce over the rolled enchiladas, ensuring they are completely covered.

2. Add Cheese: Sprinkle the remaining 2 cups of Monterey Jack cheese over the sauced enchiladas.

3. Bake: Place the dish in the preheated oven and bake for 20-23 minutes, or until the enchiladas are heated through and the cheese is melted and bubbly.

4. Broil for a Golden Finish (Optional): For a crispy, golden top, broil the enchiladas for 2-3 minutes. Keep a close eye to avoid burning.

Step 4: Serve and Enjoy!

1. Cool Slightly: Allow the enchiladas to rest for 5 minutes before serving to let the sauce thicken slightly.

2. Garnish and Serve: Serve warm, garnished with your favorite toppings like fresh cilantro, diced tomatoes, avocado slices, or a squeeze of lime juice.

Tips

Make Ahead: Prepare the enchiladas and sauce ahead of time, then refrigerate. Add the sauce and bake when ready to serve.

Spicy Kick: Add diced jalapeños or a splash of hot sauce to the sauce for an extra punch of heat.

Pairings: Serve with Mexican rice, refried beans, or a fresh green salad for a complete meal.

Storage Options

Refrigerator: Store leftovers in an airtight container for up to 3 days. Reheat in the oven or microwave.

Freezer: Freeze assembled but unbaked enchiladas for up to 3 months. Thaw overnight in the refrigerator and bake as directed.

Creamy Chicken Enchiladas are a comforting and flavorful meal that will quickly become a family favorite. Easy to make and packed with satisfying flavors, this dish is sure to impress!

Classic Beef Stir Fry Recipe

0

This Classic Beef Stir Fry is a quick, flavorful, and satisfying dish that brings tender beef, aromatic vegetables, and a savory sauce together in perfect harmony. Whether you’re looking for a speedy weeknight meal or an impressive dish to share, this recipe delivers a delicious and customizable experience.

The marinade and sauce add layers of flavor, while high-heat cooking seals in the beef’s juices and infuses the dish with a smoky wok essence. Paired with steamed rice, this stir fry makes for a balanced and wholesome meal.

Why You’ll Love This Recipe

Quick and Easy: Perfect for busy weeknights.

Rich in Flavor: A balance of savory, sweet, and umami notes.

Customizable: Adjust the ingredients to suit your preferences.

Ingredients

For the Stir Fry:

• 300 g sirloin steak (or rib eye, flank, or blade steak)

• ½ white or yellow onion, sliced

• 4–5 slices ginger

• 3 cloves garlic, minced or thinly sliced

• 1 stalk green onion, cut into 2-inch pieces

For the Marinade:

• 1 tbsp soy sauce

• ½ tbsp Shaoxing cooking wine

• 2 tbsp water

• 1 tsp sesame oil

• 1 tsp cornstarch (added after marinating)

• 1 tbsp oil (added after marinating)

For the Sauce:

• 1 tbsp low-sodium soy sauce

• 1 tbsp cornstarch

• 1 tsp sugar

• 1½ tbsp oyster sauce

• ½ tbsp hoisin sauce

• 1 tsp sesame oil

• ½ tbsp Shaoxing cooking wine (or dry sherry/rice wine)

• 1 tsp dark soy sauce (optional, for color)

• ½ cup water

Instructions

Step 1: Preparation

1. Peel and slice the onion into thin segments. Mince or slice the garlic and ginger. Cut the green onion into 2-inch segments, slicing the thicker white parts lengthwise.

Step 2: Marinate the Beef

1. Thinly slice the beef against the grain. For easier slicing, freeze the beef for 15 minutes.

2. In a bowl, mix soy sauce, Shaoxing wine, water, and sesame oil with the beef. Marinate for 15 minutes.

3. After marinating, stir in the cornstarch to coat the beef, then mix in the oil to lock in moisture.

Step 3: Prepare the Sauce

1. In a small bowl, blend the soy sauce and cornstarch until smooth.

2. Add sugar, oyster sauce, hoisin sauce, sesame oil, Shaoxing wine, dark soy sauce (if using), and water. Stir well and set aside.

Step 4: Stir Fry

1. Heat a large frying pan or wok over high heat. Add oil once hot.

2. Spread the marinated beef in the pan and sear until about 90% cooked (2–4 minutes). Remove and set aside.

3. Add more oil to the pan. Sauté the ginger slices until slightly browned. Add garlic and onions, cooking until softened and lightly browned.

Step 5: Combine Ingredients

1. Push the aromatics to the side of the pan. Stir the sauce to ensure the cornstarch is mixed, then pour it into the pan. Stir until the sauce thickens and darkens.

2. Mix the aromatics into the sauce. Return the beef to the pan and add the green onions. Stir fry everything together for about 1 minute until combined and heated through.

Step 6: Serve

1. Serve hot with steamed rice. Enjoy your flavorful stir fry!

Tips

Meat Options: Substitute chicken, pork, or tofu for the beef.

Vegetable Variations: Add bell peppers, broccoli, or snap peas for extra color and nutrients.

Sauce Adjustments: Sweeten the sauce with honey or add spice with chili flakes.

Storage Options

Refrigerator: Store leftovers in an airtight container for up to 3 days. Reheat in a hot skillet or microwave.

Freezer: Freeze portions in a freezer-safe container for up to 2 months. Thaw overnight in the refrigerator before reheating.

This Classic Beef Stir Fry combines simplicity and bold flavors, making it a go-to recipe for anyone craving a satisfying and wholesome meal!

Biscuits and Gravy Casserole Recipe

0

Biscuits and Gravy Casserole is the ultimate comfort breakfast dish, combining fluffy biscuits, savory sausage, creamy gravy, and cheesy eggs in one hearty bake. It’s a perfect choice for feeding a crowd during brunch, family gatherings, or holiday mornings. The layers of flavors and textures create a satisfying, homestyle meal that’s both filling and flavorful.

This casserole is easy to assemble and bakes to golden perfection, offering a rich and indulgent twist on the classic Southern favorite. Whether served on its own or alongside fresh fruit and coffee, this dish is bound to be a hit at any table.

Why You’ll Love This Recipe

Convenient and Quick: Uses simple ingredients like canned biscuits and packaged gravy mix for easy preparation.

Crowd-Pleasing Comfort Food: Perfect for brunches or family gatherings.

Customizable: Add veggies or spice it up with your favorite seasonings.

Ingredients

• 1 pound sausage

• 1 package Pioneer Brand Peppered Sausage Gravy Mix

• 1 cup cheddar cheese, shredded

• 6 eggs

• ½ cup milk

• Salt and black pepper, to taste

• 1 can Pillsbury Grands Biscuits

Instructions

Step 1: Prepare the Oven and Baking Dish

1. Preheat your oven to 375°F (190°C).

2. Lightly grease a 9×13 inch baking dish with butter or non-stick spray.

Step 2: Cook the Sausage

1. Heat a large skillet over medium-high heat.

2. Add the sausage and use a spatula to break it into small pieces.

3. Cook until browned and fully cooked.

Step 3: Make the Gravy

1. In a medium bowl, whisk the gravy mix with 1 cup of water until smooth.

2. Pour the gravy mixture into the skillet with the cooked sausage. Stir to combine.

3. Let the mixture simmer for 2-3 minutes until the gravy thickens.

Step 4: Add Cheese

1. Remove the skillet from heat.

2. Stir in the shredded cheddar cheese until melted and fully incorporated into the gravy.

Step 5: Prepare the Egg Mixture

1. In a separate bowl, whisk together the eggs, milk, salt, and black pepper until well blended.

Step 6: Assemble the Casserole

1. Spread the sausage and gravy mixture evenly into the bottom of the prepared baking dish.

2. Pour the egg mixture gently over the sausage and gravy layer.

3. Arrange the biscuits on top of the egg mixture.

Step 7: Bake

1. Place the casserole in the preheated oven.

2. Bake for 25-30 minutes, or until the biscuits are golden brown and the egg mixture is set.

Step 8: Serve

1. Let the casserole cool slightly for 5 minutes before slicing and serving.

2. Serve warm and enjoy the rich, savory flavors of this hearty dish.

Tips

Customizations: Add diced bell peppers, onions, or mushrooms to the sausage mixture for extra flavor.

Spice It Up: Sprinkle a pinch of cayenne pepper or crushed red pepper flakes into the gravy for a bit of heat.

Make Ahead: Assemble the casserole the night before, cover, and refrigerate. Bake fresh the next morning.

Storage Options

Refrigerator: Store leftovers in an airtight container for up to 3 days. Reheat in the oven or microwave.

Freezer: Freeze portions in a freezer-safe container for up to 2 months. Thaw in the refrigerator overnight before reheating.

This Biscuits and Gravy Casserole is a hearty, satisfying dish that brings the best of breakfast together in one pan. Perfectly layered and full of flavor, it’s a guaranteed crowd-pleaser!

Southern Caramel Cake

0

Southern Caramel Cake is a rich, indulgent dessert that embodies the essence of traditional Southern baking. With tender, buttery layers of cake and a luscious caramel frosting, this classic treat is the perfect centerpiece for any gathering or celebration. The combination of flavors and textures—a moist, slightly tangy cake paired with smooth, creamy caramel—creates a dessert that’s both comforting and decadent.

The cake itself is a testament to the magic of simple ingredients when prepared with care. The real showstopper, however, is the caramel frosting, crafted to perfection with a touch of old-fashioned technique. Whether served as a grand finale for a holiday meal or enjoyed as an afternoon indulgence, Southern Caramel Cake is sure to impress and satisfy.

Why You’ll Love This Recipe

Authentic Southern Flavor: Captures the essence of classic Southern desserts.

Irresistible Caramel: A rich, homemade caramel frosting takes this cake to the next level.

Perfect for Special Occasions: A beautiful and delicious centerpiece for any event.

Ingredients

For the Cake:

• Butter (for beating and greasing)

• Sugar

• Eggs

• Flour

• Buttermilk

• Vanilla extract

For the Caramel Frosting:

• Sugar

• Buttermilk

• Crisco (shortening)

• Butter

• Baking soda

Instructions

Step 1: Prepare the Cake

1. Preheat and Prepare:

Preheat your oven to 350°F (175°C). Grease three 9-inch cake pans with butter and line with optional parchment paper for easy removal.

2. Cream Butter and Sugar:

In a large mixing bowl, beat the butter until light and fluffy. Gradually add sugar, beating for about 5 minutes until the mixture is well aerated and creamy.

3. Add Eggs:

Add eggs one at a time, mixing thoroughly after each addition.

4. Alternate Dry and Wet Ingredients:

Gradually incorporate the flour and buttermilk into the butter mixture, alternating between the two. Begin and end with the flour, mixing well after each addition.

5. Flavor with Vanilla:

Stir in the vanilla extract, ensuring it is evenly distributed throughout the batter.

6. Bake:

Divide the batter evenly among the prepared cake pans. Bake for 25-30 minutes, or until a toothpick inserted into the center of each layer comes out clean.

7. Cool:

Allow the cakes to cool in their pans for 10 minutes before turning them out onto cooling racks. Let them cool completely before frosting.

Step 2: Prepare the Caramel Frosting

1. Combine Ingredients:

In a 3-4 quart cast iron Dutch oven, combine sugar, buttermilk, Crisco, butter, and baking soda. Stir well to create a smooth mixture.

2. Cook to Soft Ball Stage:

Heat the mixture over medium heat, swirling the pan occasionally to prevent scorching. Cook until it reaches the softball stage, between 235°F–245°F on a candy thermometer.

3. Cold Water Test (Optional):

If you don’t have a thermometer, use the cold water test. Drop a small amount of caramel into a cup of cold water. If it forms a soft ball that holds its shape, it’s ready.

4. Beat Until Creamy:

Remove the caramel from heat and beat with a wooden spoon until the mixture thickens and becomes creamy and spreadable.

Step 3: Assemble the Cake

1. Layer the Cake:

Place one cake layer on a serving plate. Spread a generous amount of caramel frosting over the top. Repeat with the second and third layers.

2. Frost the Cake:

Spread the remaining frosting evenly over the top and sides of the cake.

3. Cool and Serve:

Let the frosted cake sit for a few minutes to allow the frosting to set. Slice and serve to enjoy this Southern classic.

Tips

Patience is Key: Stir the caramel continuously to avoid burning and achieve a smooth texture.

Use a Candy Thermometer: This ensures the caramel reaches the perfect consistency for spreading.

Make Ahead: The cake layers can be baked a day ahead and stored tightly wrapped at room temperature. Frost just before serving for best results.

Storage Options

Refrigerator: Store in an airtight container for up to 5 days. Bring to room temperature before serving.

Freezer: Wrap unfrosted cake layers tightly in plastic wrap and freeze for up to 3 months. Thaw before frosting.

Southern Caramel Cake is a timeless treat that combines the best of traditional baking techniques with rich, comforting flavors. A true Southern gem, this cake is guaranteed to impress!

Pizza Casserole Recipe

0

Pizza Casserole combines the flavors of a classic pizza with the comforting heartiness of a baked pasta dish. This layered delight is perfect for feeding a crowd or satisfying your family’s cravings for something cheesy, saucy, and utterly irresistible. With layers of seasoned meat sauce, gooey mozzarella, savory pepperoni, and tender penne pasta, it’s a dish that everyone will love.

This recipe is as customizable as it is delicious. Whether you prefer ground beef, Italian sausage, or a combination of both, the result is sure to please. You can also add your favorite pizza toppings, like mushrooms, olives, or bell peppers, to make it your own. Easy to prepare and packed with classic Italian flavors, Pizza Casserole is a go-to comfort food that delivers big on taste and satisfaction.

Why You’ll Love This Recipe

Pizza Meets Pasta: All the flavors of pizza combined with the comfort of a baked pasta casserole.

Customizable: Add your favorite toppings to make it your own.

Perfect for Any Occasion: Great for weeknight dinners, potlucks, or family gatherings.

Ingredients

• 1 pound ground beef or Italian sausage

• 6 ounces pepperoni

• 3 cups mozzarella cheese

• One 28-ounce can (or two 15-ounce cans) crushed tomatoes

• 1 teaspoon garlic salt

• 1 tablespoon Italian seasoning

• 16 ounces penne pasta

• ¼ cup Parmesan cheese

Instructions

Step 1: Brown the Meat

1. In a large skillet over medium heat, brown the ground beef or Italian sausage until fully cooked.

2. Drain any excess grease and set the meat aside.

Step 2: Prepare the Sauce

1. In a pot, combine the crushed tomatoes, garlic salt, and Italian seasoning.

2. Add the cooked meat to the tomato mixture.

3. Simmer for a few minutes to let the flavors meld.

Step 3: Cook the Pasta

1. Bring a large pot of salted water to a boil.

2. Cook the penne pasta until al dente, according to package instructions.

3. Drain the pasta well.

Step 4: Assemble the Casserole

1. Preheat the oven to 350°F (175°C).

2. In a 9×13-inch baking dish, layer half of the cooked pasta.

3. Spread half of the meat sauce over the pasta.

4. Sprinkle half of the mozzarella cheese and arrange half of the pepperoni slices over the sauce.

5. Repeat the layering with the remaining pasta, meat sauce, mozzarella cheese, and pepperoni slices.

Step 5: Add the Final Touch

1. Sprinkle the Parmesan cheese evenly over the top layer.

Step 6: Bake

1. Cover the baking dish with foil and bake for 30 minutes.

2. Remove the foil and bake for an additional 15 minutes, or until the top is golden brown and the casserole is bubbly.

Step 7: Cool and Serve

1. Remove the casserole from the oven and let it rest for 5 minutes.

2. Serve warm, and enjoy the cheesy, saucy goodness!

Tips

Enhance the Flavor: Add diced onions, bell peppers, or mushrooms to the meat sauce for added depth.

Cheese Lovers: Mix in some ricotta or cream cheese for an even creamier casserole.

Make Ahead: Assemble the casserole ahead of time and refrigerate. Bake when ready to serve.

Storage Options

Refrigerator: Store leftovers in an airtight container for up to 3 days. Reheat in the oven or microwave.

Freezer: Freeze uncooked or cooked casserole in a freezer-safe dish for up to 3 months. Thaw in the refrigerator before reheating or baking.

Pizza Casserole is a delightful fusion of two favorites, bringing the best of pizza and pasta together in one dish. Easy to make and loved by all, it’s a recipe you’ll turn to time and again!

Crispy Cheese Crisps Recipe

0

Crispy Cheese Crisps are the ultimate treat for cheese lovers, offering a crunchy, savory snack that’s both simple to make and incredibly satisfying. These homemade crisps blend the bold, nutty flavor of Parmesan with the mild creaminess of mozzarella, creating a delightful balance of taste and texture. Whether you’re hosting a gathering, need a low-carb snack, or want an elegant garnish for soups and salads, these cheese crisps are versatile enough to suit any occasion. The addition of onion powder elevates their flavor, adding a subtle, aromatic touch that complements the natural richness of the cheeses.

What makes Crispy Cheese Crisps so appealing is their simplicity. With just four basic ingredients and minimal prep time, this recipe delivers big on flavor with little effort. You can customize them by adding your favorite seasonings, making each batch uniquely yours. Perfect for dipping, topping, or enjoying on their own, these crisps offer a satisfying crunch that pairs wonderfully with a variety of dishes. Best of all, they’re baked to perfection, creating a golden-brown, irresistible snack that everyone will love.

Why You’ll Love This Recipe

Quick and Easy: Just a few minutes of prep and baking.

Versatile: Great as a snack, appetizer, or topping for soups and salads.

Customizable: Add your favorite spices for unique flavors.

Ingredients

• 1 cup Parmesan cheese

• 1 cup mozzarella cheese

• 1 egg

• 1 tsp onion powder

Instructions

Step 1: Preheat the Oven

1. Preheat your oven to 350°F (175°C).

Step 2: Mix Ingredients

1. In a bowl, combine Parmesan cheese, mozzarella cheese, egg, and onion powder.

2. Stir until well combined, ensuring the egg is evenly distributed for binding.

Step 3: Prepare Baking Sheet

1. Line a baking sheet with parchment paper. This prevents sticking and ensures easy removal of the crisps.

Step 4: Spread the Mixture

1. Spoon the cheese mixture onto the parchment in small mounds for individual crisps or spread it into a single thin layer for rustic pieces.

2. Leave some space between mounds if making individual crisps to allow for spreading.

Step 5: Bake

1. Place the baking sheet in the preheated oven.

2. Bake for about 15 minutes, or until the edges turn golden brown and the center is bubbly.

Step 6: Cool and Serve

1. Remove the baking sheet from the oven and let the crisps cool for a few minutes. Cooling allows them to firm up and achieve maximum crispiness.

2. Break the cooled layer into pieces or remove individual rounds.

Tips

Extra Flavor: Sprinkle with garlic powder, paprika, or dried herbs before baking.

Uniform Thickness: Spread the mixture evenly to ensure consistent baking.

Storage: Store crisps in an airtight container at room temperature for up to 3 days.

Serving Suggestions

• Enjoy on their own as a crunchy snack.

• Pair with dips like marinara, guacamole, or sour cream.

• Use as a topping for Caesar salad or creamy soups.

Crispy Cheese Crisps are a delicious and versatile treat that’s sure to please cheese lovers. Perfectly crunchy and packed with cheesy goodness, these crisps are a delightful addition to any snack or meal.

S’mores Fried Dough Sandwiches Recipe

0

S’mores Fried Dough Sandwiches take the classic campfire treat to a whole new level by sandwiching gooey marshmallow cream, rich chocolate, and crunchy graham cracker crumbs between layers of crispy fried dough. These indulgent treats are perfect for a fun dessert or party snack, offering the nostalgic flavors of s’mores in a new and exciting form.

Why You’ll Love This Recipe

Elevated Comfort Food: Combines the irresistible appeal of s’mores with the decadence of fried dough.

Versatile Dessert: Perfect for gatherings, special occasions, or a unique family treat.

Easy to Customize: Swap in flavored chocolates or additional toppings for variety.

Ingredients

For the Dough:

• 2 cups all-purpose flour

• 2 tbsp granulated sugar

• ½ tsp salt

• ½ tsp baking powder

• 2 tbsp unsalted butter, cold and cubed

• ½ cup milk

• 1 egg

• Oil for frying

For the Filling:

• 1 jar marshmallow cream

• 1 cup chocolate chips or chocolate spread

• 1 cup graham cracker crumbs

For the Toppings:

• Powdered sugar

• Chocolate syrup

Instructions

Step 1: Prepare the Dough

1. In a large mixing bowl, combine the flour, sugar, salt, and baking powder.

2. Using a pastry cutter or fork, cut the cold butter into the dry ingredients until the mixture resembles coarse crumbs.

3. In a separate bowl, whisk together the milk and egg. Gradually add the wet ingredients to the dry mixture, stirring until a soft dough forms.

4. Turn the dough out onto a floured surface and knead gently for a few minutes.

5. Roll the dough to about ¼ inch thickness and cut into 3×3-inch rectangles or squares.

Step 2: Assemble the Sandwiches

1. Spread a generous layer of marshmallow cream on half of the dough pieces.

2. Top the marshmallow layer with chocolate chips or chocolate spread, then sprinkle with graham cracker crumbs.

3. Place another piece of dough on top to form a sandwich, pressing the edges together to seal.

Step 3: Fry the Sandwiches

1. Heat oil in a deep fryer or large pot to 350°F (175°C).

2. Carefully place the sandwiches in the hot oil, frying a few at a time.

3. Fry for 2–3 minutes on each side, or until golden brown.

4. Remove the sandwiches from the oil and place them on a wire rack or paper towels to drain.

Step 4: Add the Toppings

1. While still warm, sprinkle the sandwiches with powdered sugar.

2. Drizzle with chocolate syrup for an extra touch of indulgence.

Step 5: Serve

1. Stack the sandwiches on a serving plate for a stunning presentation.

2. Serve warm to enjoy the gooey, chocolatey filling in every bite.

Tips

Seal Well: Ensure the edges of the dough are tightly sealed to prevent the filling from leaking during frying.

Monitor Oil Temperature: Maintain consistent heat for even frying and to avoid oil absorption.

Extra Crunch: Add crushed graham crackers to the topping for added texture.

Storage Options

Refrigerator: Store leftovers in an airtight container for up to 2 days. Reheat in an oven at 350°F (175°C) to regain crispness.

Freezer: Not recommended, as the texture may change upon thawing.

S’mores Fried Dough Sandwiches bring a fun, creative twist to a classic treat, making them a must-try for dessert enthusiasts of all ages. Enjoy the gooey, crispy, chocolatey goodness in every bite!