No-Bake Chocolate Lasagna Dessert

0

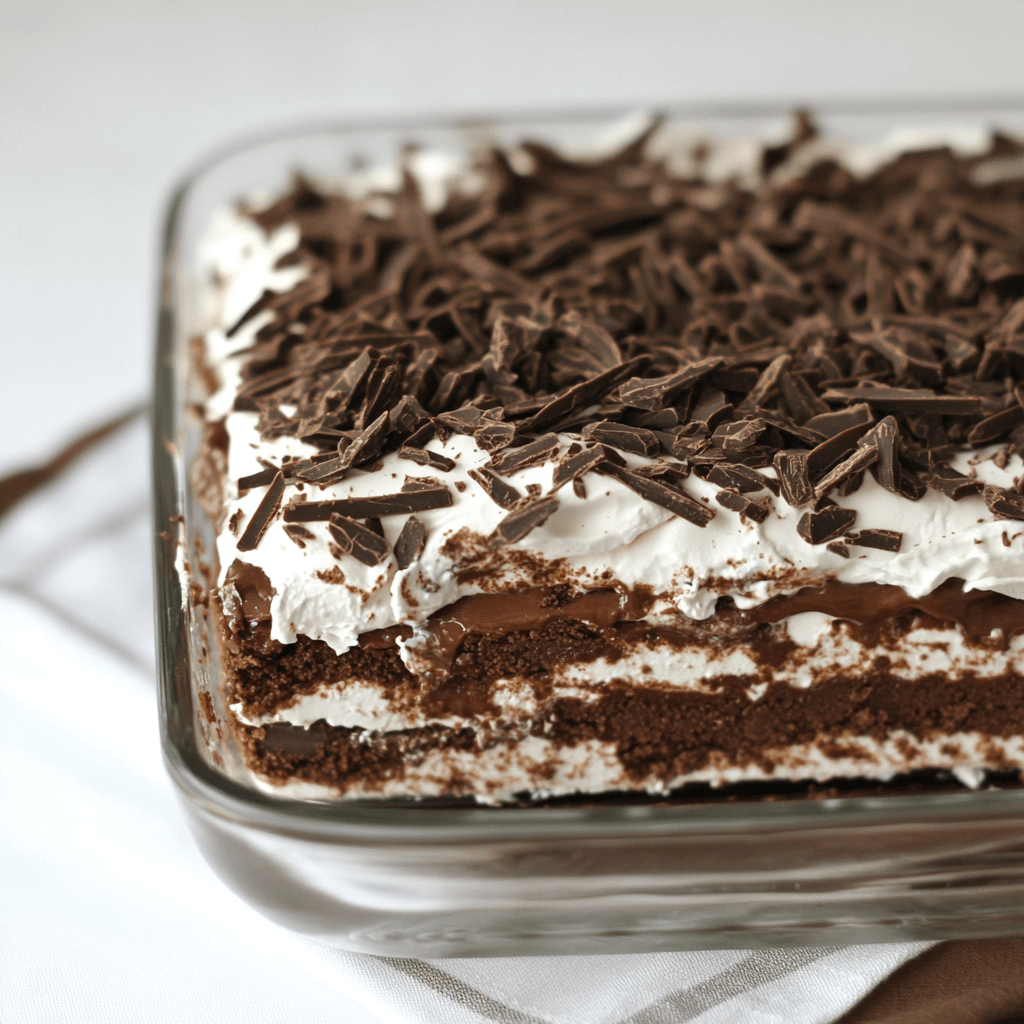
Easy Chocolate Lasagna is a decadent, multi-layered no-bake dessert that combines some of the most beloved flavors and textures in one delicious treat. This dessert features a crunchy Oreo base, a creamy cheesecake middle layer, a rich chocolate pudding layer, and is topped with fluffy whipped cream and chocolate garnishes. It’s an irresistible dessert that’s surprisingly simple to make and perfect for any occasion where you want to impress without the hassle of baking.

This dessert is especially popular for its ease of preparation and the rich, indulgent experience it offers. Each layer complements the others perfectly, making for a harmonious blend of textures and flavors that chocolate lovers will find absolutely delightful. It’s ideal for gatherings, potlucks, or as a special treat for holidays and celebrations.

Why You’ll Love This Recipe:

  • No-Bake Convenience: No oven needed, which makes it perfect for warm weather or when the oven is busy with other dishes.
  • Layered Delight: Each layer offers a different texture and taste, coming together in a symphony of Chocolatey goodness.
  • Crowd-Pleaser: Its appealing look and delicious taste make it a favorite among both kids and adults.

Ingredients:

  • 36 Oreo cookies (one 14.3oz package)
  • 6 tablespoons butter, melted
  • 8 oz cream cheese, room temperature
  • ¼ cup granulated sugar
  • 2 tablespoons milk
  • 16 oz Cool Whip (two 8oz containers, separated)
  • 8 oz INSTANT chocolate pudding mix (two 3.9oz boxes)
  • 3 ¼ cups milk
  • Optional garnishes: chocolate shavings, mini chocolate chips, or Oreo crumbs

Instructions:

Oreo Crust:

  • Process the Oreos in a food processor until they turn into fine crumbs. (Include the cream centers.)
  • Mix the Oreo crumbs with melted butter until well combined.
  • Press the mixture into an even layer in a 9”x13” baking dish.
  • Refrigerate or freeze the crust while you prepare the next layer to help it set faster.

Cheesecake Layer:

  • In a mixing bowl, beat the cream cheese with 2 tablespoons of milk and the granulated sugar until the mixture is smooth and creamy.
  • Gently fold in one container of Cool Whip.
  • Carefully spread this mixture over the chilled Oreo crust.
  • Return to the refrigerator or freezer to chill while you prepare the pudding layer.

Chocolate Pudding Layer:

  • In another bowl, whisk the instant chocolate pudding mix with 3 ¼ cups of cold milk until the pudding thickens.
  • Spread the pudding carefully over the set cheesecake layer.
  • Allow this to set in the refrigerator for about 5-10 minutes.

Final Layer:

  • Spread the second container of Cool Whip over the set pudding layer.
  • Top with your choice of chocolate shavings, mini chocolate chips, or additional Oreo crumbs for garnish.

Chilling:

  • Cover the dish with plastic wrap and refrigerate for at least 4 hours, or overnight for best results. This allows the layers to firm up and the flavors to meld beautifully.
  • Optionally, you can freeze the dessert for 1-2 hours before slicing to make cutting easier.

Storage Options:

  • Refrigerator: Keep the dessert covered in the refrigerator and enjoy within 4-5 days.
  • Freezer: Freeze for up to a month. Thaw in the refrigerator before serving.

Tips:

  • Crust Options: For a less sweet option, you can use plain chocolate wafer cookies instead of Oreos.
  • Lighter Version: Substitute lower-fat versions of cream cheese and Cool Whip, and use skim milk.
  • Serving Tip: Dip your knife in hot water before slicing for clean cuts that show off the layers.

This Easy Chocolate Lasagna is a perfect example of how simple ingredients can be transformed into a stunning and delicious dessert that’s sure to wow anyone who tries it. Enjoy the process of layering and the even better experience of digging into this chocolaty, creamy creation.

Strawberry Cream-Filled Donuts

0

Strawberry Cream-Filled Donuts are a delightful treat that combines fluffy, golden donuts with a sweet and creamy filling. Each bite offers the soft texture of fried dough complemented by the lightness of whipped cream and the fresh, juicy sweetness of strawberries. This recipe is perfect for those who enjoy homemade pastries and are looking for a delicious way to bring a touch of gourmet flair to their baking repertoire.

These donuts are not only irresistible due to their appealing flavors but also offer a visually stunning presentation, making them ideal for special occasions or as a sophisticated upgrade to your regular weekend breakfast. The process of making these donuts from scratch provides a rewarding baking experience, with the end result being as satisfying to look at as they are to eat.

Why You’ll Love This Recipe:

  • Decadently Delicious: The combination of soft donuts with creamy, fruity filling is pure indulgence.
  • Perfect for Special Occasions: Impress guests at brunch or treat someone special with these beautiful homemade donuts.
  • Engaging Baking Project: Enjoy the process of making dough from scratch and filling your donuts with homemade whipped cream.

Ingredients:

For the donuts:

  • 1 cup milk, warmed
  • 2 teaspoons active dry yeast
  • 1/3 cup sugar
  • 2 large eggs
  • 4 cups all-purpose flour
  • 1/2 teaspoon salt
  • 6 tablespoons unsalted butter, softened
  • Oil for frying

For the filling:

  • 1 cup heavy whipping cream
  • 2 tablespoons powdered sugar
  • 1 teaspoon vanilla extract
  • 1 cup fresh strawberries, thinly sliced

For garnish:

  • Additional powdered sugar for dusting

Instructions:

Dough Preparation:

  • In a small bowl, dissolve the yeast in the warm milk and allow it to sit until frothy, about 5 minutes.
  • In a large bowl, combine sugar, eggs, flour, and salt. Add the frothy yeast mixture and butter, and knead the dough until smooth and elastic, about 8-10 minutes.

First Rise:

  • Place the kneaded dough in a greased bowl, cover with a cloth, and let it rise in a warm place until it has doubled in size, approximately 1 hour.

Shaping the Donuts:

  • After the first rise, punch down the dough and roll it out on a floured surface to about 1/2 inch thickness.
  • Cut out rounds using a donut cutter or a large cookie cutter. Let the cut dough rounds rise again until puffy, about 30 minutes.

Frying:

  • Heat oil in a deep skillet over medium heat. Fry the donuts until golden on each side, approximately 2 minutes per side. Remove from the oil and drain on paper towels.

Preparing the Filling:

  • Whip the cream with powdered sugar and vanilla extract until it forms stiff peaks.

Assembly:

  • Slice each donut in half horizontally. Fill with a generous layer of whipped cream and arrange sliced strawberries on the cream.
  • Replace the top half of the donut, press gently to secure, and dust with powdered sugar.

Storage Options:

  • Refrigerator: Assembled donuts can be kept in the refrigerator for up to 24 hours, covered.
  • Freezer: Unfilled donuts can be frozen for up to 1 month. Thaw and reheat gently before filling.

Tips:

  • Ensure Oil Temperature: Keep the frying oil at a consistent medium heat to prevent the donuts from absorbing too much oil or burning.
  • Customize Your Filling: Experiment with other fruits or flavored creams to suit your taste preferences.
  • Serving Suggestion: These donuts are best enjoyed fresh, but if storing, a quick warm-up in the oven can rejuvenate the texture.

These Strawberry Cream-Filled Donuts are sure to delight anyone who tries them, offering a perfect blend of textures and flavors that are both refreshing and satisfying. Whether you’re hosting a brunch or simply indulging in a weekend baking project, these donuts will be a delightful addition to any table.

Classic French Baguettes

0

Classic French Baguettes represent the quintessence of French baking, characterized by their crispy crust and soft, airy interior. This recipe captures the traditional art of making authentic baguettes at home, using simple ingredients that yield exceptional results. The process involves a double rise, which ensures the development of a light, chewy texture and the distinctive, delightful aroma that one expects from a freshly baked loaf. Baking baguettes can be a rewarding experience, offering a taste of France right in your own kitchen.

The allure of homemade French baguettes lies in their versatility. They can be served as a side to a myriad of dishes, used for sandwiches, or simply enjoyed with a pat of butter. The crispy golden crust and tender crumb make them a favorite at any meal, enhancing the overall dining experience. Making baguettes at home allows for control over the ingredients, ensuring a healthier option than store-bought breads that may contain preservatives.

Why You’ll Love This Recipe:

  • Authentic Taste: Achieve the classic taste and texture of a French bakery.
  • Simplicity: Requires only a few basic ingredients found in most kitchens.
  • Versatility: Perfect for sandwiches, as a side to soups, or simply dipped in olive oil.

Ingredients:

  • 4 cups all-purpose flour
  • 1 tablespoon salt
  • 1 tablespoon sugar
  • 2 teaspoons instant yeast
  • 1 1/2 cups warm water

Instructions:

Prepare the Dough:

  • In a large mixing bowl, combine the flour, salt, sugar, and yeast. Gradually add the warm water and mix until a sticky dough forms.
  • Turn the dough out onto a floured surface and knead for about 10 minutes, until it becomes smooth and elastic. Incorporate small amounts of flour as needed to keep the dough from sticking.

First Rise:

  • Transfer the dough to a lightly oiled bowl, cover it with a damp cloth, and let it rise in a warm place until it has doubled in size, approximately 1 hour.

Shape the Baguettes:

  • After the first rise, punch down the dough and turn it onto a lightly floured surface. Divide the dough into three equal pieces.
  • Shape each piece into a long, thin cylinder, roughly 14 inches long, tapering the ends slightly.
  • Arrange the dough cylinders on a baking sheet lined with parchment paper or a lightly floured baker’s linen.

Second Rise:

  • Cover the shaped baguettes with a damp cloth and let them rise again until they are puffy and nearly doubled in size, about 45 minutes.

Baking:

  • Preheat the oven to 475°F (245°C). Place a baking dish filled with water on the bottom rack to create steam.
  • Just before baking, make several diagonal slashes on the top of each baguette with a sharp knife.
  • Bake the baguettes for 20 to 25 minutes, or until they are golden brown and sound hollow when tapped.

Storage Options:

  • Room Temperature: Store the baguettes wrapped in a cloth in a bread box for up to 2 days.
  • Freezer: Freeze wrapped tightly in foil and plastic for up to 3 months. Thaw and reheat in the oven at 375°F (190°C) for about 10 minutes.

Tips:

  • Water Tray for Crispness: The tray of water in the oven helps create a steamy environment, crucial for achieving a crispy crust.
  • Scoring the Dough: The slashes on the dough allow it to expand during baking and help achieve the characteristic appearance of a baguette.
  • Variations in Flour: For a heartier texture and flavor, substitute half of the all-purpose flour with whole wheat flour.

These classic French baguettes bring the artisanal experience of traditional French baking into your home, perfect for both novice and experienced bakers looking to impress with minimal effort. Enjoy the delightful crunch and tender interior of your very own freshly baked bread.

Classic Banana Pudding with Meringue Topping

0

Banana pudding is a cherished dessert that combines the creamy texture of pudding with the natural sweetness of bananas, all accented with a light, fluffy meringue. This Classic Banana Pudding with Meringue Topping recipe builds on the traditional Southern comfort food by incorporating a rich, velvety texture and a beautifully browned meringue that adds both taste and textural contrasts. Each layer of the pudding works harmoniously to offer a comforting treat that’s perfect for any occasion, whether it be a family gathering, a holiday feast, or a casual dessert at home.

The addition of a meringue topping to the classic banana pudding not only elevates the aesthetic appeal but also enhances the flavor profile, giving it a sweet, toasted topping that complements the velvety pudding and soft bananas beneath. This recipe is both a nod to tradition and a testament to the versatility of simple ingredients coming together to create something spectacular. Whether you are a seasoned baker or a novice in the kitchen, this dessert is impressively easy to master and delivers a taste that’s sure to evoke nostalgia while satisfying your sweet tooth.

Why You’ll Love This Recipe:

  • Comforting and Decadent: The classic flavors of banana and vanilla are enhanced by the creamy texture of the pudding and the light, airy meringue.
  • Visually Impressive: This dessert looks as good as it tastes, making it perfect for special occasions or as a weekend treat.
  • Simple Ingredients, Big Flavor: With easily accessible ingredients, this dessert is straightforward to assemble but doesn’t skimp on flavor.

Ingredients:

  • 2 bags Vanilla Wafers
  • 6 to 8 ripe bananas, sliced
  • 2 cups whole milk
  • 1 (5 oz.) box instant French Vanilla pudding
  • 1 (8 oz.) package cream cheese, softened
  • 1 (14 oz.) can sweetened condensed milk
  • 1 (12 oz.) container frozen whipped topping, thawed, or equal amount sweetened whipped cream
  • For the Meringue Topping:
  • 4 large egg whites
  • 1/4 teaspoon cream of tartar
  • 1/2 cup granulated sugar
  • 1 teaspoon vanilla extract

Instructions:

Assemble the Banana Pudding:

  1. Prepare the Base:
  • Line the bottom of a 13×9 inch baking dish with Vanilla Wafers to form a solid foundation.
  1. Layer Bananas:
  • Arrange the sliced bananas evenly over the cookie layer, creating a dense layer of fruit.
  1. Mix and Add Pudding:
  • In a mixing bowl, combine the whole milk and instant pudding mix with a whisk until smooth and thickened.
  • Pour one-third of this pudding mixture over the bananas and wafers, gently spreading to cover them.

Create Creamy Filling:

  1. Mix Cream Cheese and Condensed Milk:
  • In a separate bowl, blend the softened cream cheese with the condensed milk until smooth and creamy.
  1. Fold in Whipped Topping:
  • Gently fold the whipped topping into the cream cheese mixture, maintaining a light texture.
  1. Layer the Mixture:
  • Pour half of the cream cheese mixture over the pudding layer in the dish.
  • Repeat layers of wafers, bananas, and the remaining pudding and cream cheese mixtures.

Prepare Meringue Topping:

  1. Whip Egg Whites:
  • Beat the egg whites with cream of tartar until foamy. Gradually add sugar, continuing to beat until stiff peaks form and the mixture is glossy.
  • Fold in vanilla extract.
  1. Top the Pudding:
  • Spread the meringue evenly over the top, ensuring it reaches the edges to seal the dessert.

Baking and Finishing Touches:

  • Bake in a preheated oven at 350°F (175°C) for 25 minutes, or until the meringue is golden.
  • Cool and Serve: Allow to cool slightly before serving to let the layers set.

Storage Options:

  • Refrigerate any leftovers covered, for up to 3 days. Note that the meringue may soften over time.
  • Freezing is not recommended as it will affect the texture of the meringue and pudding.

Tips for Perfect Banana Pudding:

  • Banana Ripeness: Use ripe but firm bananas for the best texture and flavor.
  • Serving Suggestions: Serve chilled for a refreshing dessert experience.
  • Presentation: For an extra touch, garnish with banana slices or crumbled vanilla wafers before serving.

This Classic Banana Pudding with Meringue Topping is sure to be a hit, providing a perfect blend of flavors and textures that make this traditional dessert a beloved choice in any culinary repertoire. Enjoy the process of creating and sharing this delightful treat!

Classic Butternut Cookies

0

Butternut Cookies are a timeless treat, perfect for those who appreciate a delicate blend of buttery goodness and nutty flavors in their desserts. These cookies embody simplicity and elegance, offering a crumbly texture that dissolves delightfully in your mouth with each bite. Infused with the rich taste of walnuts and dusted with a gentle coat of powdered sugar, these cookies are ideal for any occasion, whether it’s a casual gathering, a festive holiday event, or a comforting snack to enjoy with your afternoon tea.

The magic of Butternut Cookies lies in their simplicity and the satisfaction they deliver. Unlike other heavier cookie varieties, these are light yet indulgent, making them easy to enjoy without feeling too guilty. Each cookie is a small bite of heaven with a texture that’s both tender and satisfyingly dense, thanks to the finely chopped walnuts which add both flavor and a bit of crunch. This recipe guides you through crafting these exquisite cookies, which are sure to become a quick favorite in your baking repertoire.

Why You’ll Love This Recipe:

  • Unmatched Flavor and Texture: The combination of creamy butter, rich walnuts, and a hint of vanilla creates a flavor profile that is both rich and comforting. The cookies’ texture is perfectly balanced between soft and crumbly.
  • Simple Ingredients and Preparation: Made with straightforward ingredients that are staples in many kitchens, these cookies come together quickly and without fuss.
  • Versatile for Any Occasion: Butternut Cookies are perfect for all types of events and celebrations. They can be dressed up for holidays or served plain for a simple treat.

Ingredients:

  • 1 cup (2 sticks) unsalted butter, softened
  • 1/2 cup powdered sugar, plus more for rolling
  • 2 cups all-purpose flour
  • 1 cup finely chopped walnuts
  • 1 teaspoon vanilla extract
  • Pinch of salt
  • Additional powdered sugar for dusting

Instructions:

Prepare the Dough:

  • Start by creaming together the softened butter and 1/2 cup of powdered sugar in a large mixing bowl until the mixture is light and fluffy. This not only combines these key ingredients but also introduces air into the mixture, which helps to produce a lighter cookie texture.
  • Enhance the flavor of the dough by adding vanilla extract, which provides a subtle depth of flavor that complements the richness of the butter and nuts.

Combine Dry Ingredients:

  • In a separate medium-sized bowl, whisk together the all-purpose flour and a pinch of salt. This step ensures that the salt is evenly distributed throughout the flour, which is crucial for achieving a balanced taste in your cookies.

Integrate the Walnuts:

  • Finely chop the walnuts to ensure that each bite of cookie has a consistent texture and nutty flavor. Gently fold these into the creamed butter mixture. The nuts not only add flavor but also contribute to the cookies’ delightful texture.

Mix to Form Dough:

  • Gradually mix the dry ingredients into the wet ingredients, stirring just until the dough comes together. Be careful not to overmix, as doing so can lead to tough cookies.

Chill the Dough:

  • Wrap the dough in plastic wrap and refrigerate it for at least 30 minutes. This chilling step is crucial as it solidifies the fat in the dough, making it easier to handle and helping the cookies maintain their shape during baking.

Shape and Sugar Coat:

  • Once chilled, remove the dough from the refrigerator. Using your hands, form the dough into 1-inch balls. Roll each ball in powdered sugar until well-coated. This not only adds a sweet finish but also gives the cookies their characteristic snowy appearance.

Bake:

  • Arrange the sugared dough balls on a parchment-lined baking sheet, spacing them about 2 inches apart to allow for spreading.
  • Bake in a preheated oven at 375°F (190°C) for 12 to 15 minutes, or until the edges are lightly golden. Watch the cookies carefully to prevent overbaking, which could dry them out.

Cool and Serve:

  • Allow the cookies to cool on the baking sheet for a few minutes before transferring them to a wire rack to cool completely. This resting stage helps the cookies set up properly.

Storage Options:

  • Room Temperature: Keep the cookies in an airtight container at room temperature where they will stay fresh for up to one week.
  • Freezer: For longer storage, freeze the cookies in a sealed container for up to three months. Thaw at room temperature before serving.

Tips:

  • Uniformity: Use a cookie scoop to ensure all your cookies are the same size. This helps them bake evenly and look more professional.
  • Serving Suggestion: These cookies pair wonderfully with coffee or tea, making them a great choice for afternoon gatherings.

Enjoy creating and indulging in these Classic Butternut Cookies, where every bite brings a burst of buttery, nutty flavor that is sure to delight any palate.

Perfectly Seared Ribeye Steak

0

A perfectly cooked Ribeye Steak is one of life’s simplest and most satisfying pleasures, known for its rich marbling and superb flavor. This recipe highlights the natural deliciousness of a high-quality ribeye, accentuated with just the right touch of seasoning and aromatic herbs. Whether you’re celebrating a special occasion or simply want to treat yourself to a luxurious dinner, mastering the art of cooking a ribeye steak will set you up for a memorable meal.

Cooking a ribeye steak to perfection involves paying attention to timing and temperature, both of which are crucial for achieving that ideal tender texture and juicy interior. The addition of butter, thyme, and garlic during the cooking process not only enhances the steak’s flavor but also introduces an element of gourmet finesse. Follow this recipe for a restaurant-quality steak that you can enjoy in the comfort of your own home.

Why You’ll Love This Recipe:

  • Flavorful and Juicy: The natural richness of the ribeye is enhanced by simple, yet powerful seasonings and basting techniques.
  • Easy to Prepare: With minimal preparation and ingredients, you can create a luxurious dish with ease.
  • Versatile: This steak pairs wonderfully with a variety of sides, from classic roasted potatoes to a fresh garden salad.

Ingredients:

  • 1 ribeye steak, approximately 1-inch thick
  • Sea salt flakes, to taste
  • Freshly ground black pepper, to taste
  • 50g unsalted butter
  • 2 sprigs of thyme
  • 1 clove of garlic, crushed with its skin

Instructions:

Preparation:

  • Take the ribeye steak out of the refrigerator at least 30 minutes before you plan to cook it. This ensures the steak will cook evenly and reach the desired internal temperature effectively.

Season the Steak:

  • Season the steak generously on both sides with sea salt flakes and freshly ground black pepper. Ensure even coverage for the best flavor.

Cook the Steak:

  • Heat a heavy frying pan over medium-high heat until hot. If cooking two steaks, use a pan that can comfortably fit both or use two pans.
  • Place the steak in the hot pan. Sear for 2 to 3 minutes on each side for medium-rare, adjusting the time slightly depending on the thickness of the steak and your preferred doneness.
  • As a guideline, aim for an internal temperature of 50°C (122°F) for rare, 60°C (140°F) for medium, and 70°C (158°F) for well-done, using a meat thermometer to check.

Baste the Steak:

  • After turning the steak for the first time, add the butter, thyme, and garlic to the pan. As the butter melts, tilt the pan towards you, allowing the butter to pool. Use a spoon to continuously baste the steak with the melted butter for about one minute. This process will enrich the steak with flavors and help in cooking it evenly.

Rest the Steak:

  • Remove the steak from the skillet and let it rest on a cutting board for at least 5 minutes. Resting is crucial as it allows the juices to redistribute throughout the steak, ensuring it remains juicy and flavorful when cut.

Serve:

  • Slice the steak against the grain into strips. Give a final seasoning with a bit more salt and pepper if desired.
  • Serve immediately with your choice of sides and sauces.

Storage Options:

  • Refrigerator: If you have leftovers, store them in an airtight container in the refrigerator for up to 3 days.
  • Reheating: For best results, gently reheat the steak in a skillet over low heat to preserve its juiciness.

Tips:

  • Choosing the Right Pan: Use a cast-iron skillet if possible, as it retains heat well and distributes it evenly.
  • Monitoring Temperature: Invest in a good-quality meat thermometer to ensure your steak is cooked to your liking.

Enjoy your culinary creation of a beautifully seared Ribeye Steak, which promises not only a feast for the taste buds but also an impressive addition to your cooking repertoire.

Gooey Chocolate Fudge Cookies

0

Indulge in the rich, decadent flavors of Gooey Chocolate Fudge Cookies, a dream come true for chocolate lovers. These cookies are not just ordinary treats; they are an intense chocolate experience, loaded with both semisweet chocolate chips and dark chocolate chunks that melt into a fudgy delight in every bite. The cookies emerge from the oven with irresistibly soft centers and crisp edges, making them the perfect indulgence for any occasion.

These Gooey Chocolate Fudge Cookies are designed to satisfy the deepest chocolate cravings. The dough, infused with a generous amount of cocoa powder and chocolate pieces, ensures that each cookie is packed with flavor. As they bake, the aroma of melting chocolate fills the kitchen, creating a warm, inviting atmosphere. These cookies are ideal for sharing at gatherings, gifting during the holidays, or simply treating yourself after a long day.

Why You’ll Love This Recipe:

  • Chocolate Intensity: With cocoa powder, chocolate chips, and chocolate chunks, these cookies offer a triple dose of chocolate that makes them incredibly rich and satisfying.
  • Perfect Texture: The outside is slightly crisp while the inside remains gooey and soft, creating a delightful contrast in each bite.
  • Easy to Make: This recipe follows simple baking steps and uses ingredients commonly found in the pantry, making it accessible for bakers of all skill levels.

Ingredients:

  • 1 cup all-purpose flour
  • 1/2 cup unsweetened cocoa powder
  • 1 teaspoon baking soda
  • 1/4 teaspoon salt
  • 1/2 cup unsalted butter, softened
  • 1 cup granulated sugar
  • 1/2 cup brown sugar, packed
  • 2 large eggs
  • 1 teaspoon vanilla extract
  • 1 cup semisweet chocolate chips
  • 1/2 cup dark chocolate chunks
  • Additional chocolate chunks or chips for topping

Instructions:

Prepare the Dry Ingredients:

  • In a medium bowl, whisk together the flour, cocoa powder, baking soda, and salt. This ensures that the dry ingredients are evenly distributed, contributing to a uniform texture in the cookies.

Cream Butter and Sugars:

  • In a large bowl, use an electric mixer to cream the butter, granulated sugar, and brown sugar until the mixture is light and fluffy. This process incorporates air into the dough, helping the cookies to rise properly.

Incorporate Eggs and Vanilla:

  • Beat in the eggs one at a time to the creamed mixture, ensuring each is fully incorporated before adding the next. Stir in the vanilla extract for an added depth of flavor.

Combine with Dry Ingredients:

  • Gradually mix the dry ingredients into the wet mixture, stirring until just combined to avoid overmixing, which can lead to tough cookies.

Fold in Chocolate:

  • Gently fold in the chocolate chips and dark chocolate chunks, distributing them evenly throughout the dough without breaking them up.

Chill the Dough:

  • Cover the dough with plastic wrap and refrigerate for at least 30 minutes. Chilling the dough prevents the cookies from spreading too much and enhances their flavor.

Preheat and Prepare:

  • Preheat the oven to 350°F (175°C) and line baking sheets with parchment paper to prevent sticking and ensure easy cleanup.

Form Cookies:

  • Scoop the dough using a cookie scoop or spoon, forming balls about the size of a golf ball. Place them on the prepared baking sheets, spacing them about 2 inches apart to allow for spreading.

Add Extra Chocolate:

  • Press additional chocolate chunks or chips into the top of each dough ball before baking for a gooey, chocolate-rich finish.

Bake:

  • Bake the cookies for 10-12 minutes. The edges should be set, but the centers should still be soft and puffy.

Cool and Serve:

  • Let the cookies cool on the baking sheet for 5 minutes before transferring them to a wire rack to cool completely. This resting period helps them set properly while retaining their gooey centers.

Storage Options:

  • Room Temperature: Store the cooled cookies in an airtight container at room temperature for up to 5 days.
  • Freezer: For longer storage, freeze the baked cookies for up to 3 months. Thaw at room temperature before serving.

Tips:

  • Cookie Size: Keep the cookies uniform for even baking.
  • Monitoring Baking Time: Watch the cookies closely as oven temperatures can vary; they should be removed when still soft in the center.

Layered Taco Dip

0

This Layered Taco Dip brings together all the vibrant flavors of a taco in a scoopable, party-perfect form. Each layer contributes a texture and taste that, when combined, create a harmonious blend that’s irresistible. Starting with a savory base of refried beans or seasoned ground beef, and building up with creamy sour cream, zesty salsa, rich cheese, and fresh veggies, this dip is both visually appealing and delicious. It’s an ideal dish for gatherings, potlucks, or as a special treat during a family game night.

What makes this dish a standout is its ability to be both a comfort food and a festive party favorite. The preparation is straightforward and allows for a lot of creativity in terms of adding layers or swapping ingredients according to your taste preferences or dietary needs. Whether served during a small family dinner or at a large party, this taco dip is sure to draw attention and compliments from all who try it.

Why You’ll Love This Recipe:

  • Versatile and Customizable: Easily adaptable, you can switch out ingredients to cater to various dietary preferences or to work with what you have on hand.
  • Perfect Party Food: It’s a great make-ahead option for gatherings, saving you time and stress on the day of the event.
  • Deliciously Layered: Each layer offers a unique flavor and texture, making every scoop a delightful experience.

Ingredients:

  • 1 can of refried beans or 1 lb of ground beef, seasoned and cooked
  • 1 cup of sour cream
  • 1 cup of salsa
  • 1 cup of shredded cheddar cheese
  • 1 cup of shredded lettuce
  • 1/2 cup of diced tomatoes
  • 1/2 cup of sliced black olives
  • 1/4 cup of chopped green onions
  • 1/2 teaspoon of ground cumin
  • 1/2 teaspoon of garlic powder
  • Salt and black pepper to taste
  • Tortilla chips, for serving

Instructions:

Prepare the Base:

  • Begin by deciding if you will use refried beans or ground beef as the base of your dip. If using ground beef, cook it until it’s browned and season with taco spices as desired.

Mix the Sour Cream Layer:

  • In a small bowl, combine the sour cream with ground cumin, garlic powder, salt, and black pepper. This mixture adds a creamy, spiced layer that complements the heartiness of the beans or beef.

Assemble the Dip:

  • Spread the refried beans or seasoned ground beef evenly in the bottom of a 9×13 inch dish. This creates a hearty base that holds up well to the layers added on top.
  • Layer the seasoned sour cream over the beans or beef, smoothing it out to create an even layer.
  • Carefully spread the salsa over the sour cream. The salsa introduces a juicy, tangy flavor that brightens the dish.
  • Sprinkle the shredded cheddar cheese evenly over the salsa layer. The cheese will melt slightly, adding a rich, gooey texture.

Add the Fresh Layers:

  • Add a layer of shredded lettuce next. The lettuce introduces a crisp freshness that contrasts the richer layers beneath.
  • Follow with a layer of diced tomatoes, which add a burst of freshness and a bit of acidity.
  • Finally, top with sliced black olives and chopped green onions for additional flavor and a pop of color.

Final Touches and Serving:

  • Refrigerate the dip for at least an hour before serving. This allows the flavors to meld together and the layers to set, making the dip easier to scoop.
  • Serve the dip with a large bowl of tortilla chips. Encourage guests to dig deep to get a bit of every layer.

Storage Options:

  • Refrigerator: If you have leftovers, cover the dish with plastic wrap and store in the refrigerator. Enjoy within 3 days for best quality.
  • Freezer: Freezing is not recommended as the fresh layers will not hold up well.

Tips:

  • Layer Visibility: Use a clear dish to showcase the layers of your taco dip. It adds to the visual appeal, especially at parties.
  • Serving Tip: Provide a variety of chip types for dipping, such as traditional tortilla chips, flavored tortilla chips, or even vegetable crisps for a healthier option.
  • Spice Adjustment: Customize the level of spice by choosing mild or hot salsa, and by adjusting the amount of cumin and black pepper in the sour cream mixture.

This Layered Taco Dip is a festive, flavorful, and fun dish that’s perfect for any occasion where you want to impress and satisfy your guests. Enjoy building and serving this delicious creation!

Apple Cinnamon Cake

0

This Apple Cinnamon Cake is a moist and tender delight, bursting with flavors of fresh apples and warm cinnamon. It’s the kind of cake that fills your kitchen with an irresistible aroma, making it a perfect treat for crisp autumn days or any time you crave a comforting dessert. Each bite combines the sweetness of apples with the spicy warmth of cinnamon, enhanced by a soft, fluffy texture that makes this cake a crowd-pleaser.

Whether you’re looking for a special dessert to serve at a holiday gathering or a cozy treat to accompany your morning coffee, this Apple Cinnamon Cake fits the bill. It’s simple to make but impressively delicious, with a homemade taste that far surpasses anything you could buy at the store. Topped with a sprinkle of powdered sugar or a dollop of whipped cream, this cake is sure to become a favorite.

Why You’ll Love This Recipe:

  • Full of Flavor: The cake is packed with chunks of juicy apples and rich cinnamon flavor.
  • Easy to Make: This straightforward recipe yields a delicious cake with common pantry ingredients.
  • Versatile: Perfect as a dessert, a treat for a brunch, or a sweet addition to a potluck.

Ingredients:

  • 2 cups all-purpose flour
  • 1 1/2 teaspoons baking powder
  • 1/2 teaspoon baking soda
  • 1 tablespoon ground cinnamon
  • 1/2 teaspoon salt
  • 1/2 cup unsalted butter, softened
  • 1 cup granulated sugar
  • 2 large eggs
  • 1 teaspoon vanilla extract
  • 1/2 cup sour cream
  • 1/4 cup milk
  • 2 cups peeled and chopped fresh apples (such as Granny Smith or Honeycrisp)
  • Optional: powdered sugar for dusting or a cinnamon-sugar mix for topping

Instructions:

Prepare for Baking:

  • Preheat your oven to 350°F (175°C). Grease and flour a 9-inch round cake pan or a 9×9 inch square pan.

Combine Dry Ingredients:

  • In a medium bowl, whisk together the flour, baking powder, baking soda, cinnamon, and salt. Set aside.

Cream Butter and Sugar:

  • In a large bowl, beat the softened butter and granulated sugar together until light and fluffy, about 2-3 minutes.

Add Eggs and Vanilla:

  • Add the eggs one at a time, beating well after each addition. Stir in the vanilla extract.

Incorporate Sour Cream and Milk:

  • Mix in the sour cream and milk until well combined. The batter should be creamy and smooth.

Mix Dry and Wet Ingredients:

  • Gradually add the dry ingredients to the wet mixture, mixing until just combined. Avoid overmixing to keep the cake light and fluffy.

Fold in Apples:

  • Gently fold in the chopped apples, ensuring they are evenly distributed throughout the batter.

Pour and Bake:

  • Pour the batter into the prepared cake pan and smooth the top with a spatula.
  • Bake for 35-40 minutes, or until a toothpick inserted into the center comes out clean.

Cool and Serve:

  • Allow the cake to cool in the pan for 10 minutes, then transfer to a wire rack to cool completely.
  • Dust with powdered sugar or sprinkle with a cinnamon-sugar mixture before serving, if desired.

Storage Options:

  • Room Temperature: Store the cooled cake in an airtight container for up to 3 days.
  • Refrigerator: For longer storage, keep the cake refrigerated for up to a week.
  • Freezer: Freeze slices of the cake wrapped in plastic wrap and aluminum foil for up to 3 months. Thaw at room temperature before serving.

Tips:

  • Choosing Apples: Use a mix of tart and sweet apples for a balanced flavor.
  • Checking for Doneness: Since this cake is very moist, make sure the toothpick really comes out clean to ensure it’s fully baked.

This Apple Cinnamon Cake is not just a dessert, it’s a comforting experience, perfect for enjoying on a chilly day or anytime you need a little sweetness in your life. Enjoy baking and sharing this delightful treat!

Ginger Molasses Cookies

0

These Ginger Molasses Cookies are the perfect treat for anyone who loves the deep, rich flavors of molasses complemented by the warm spices of ginger and cinnamon. Soft, chewy, and irresistibly spiced, these cookies offer a delightful taste experience that brings comfort and joy with every bite. Whether you’re setting up for a cozy evening, preparing for festive holiday gatherings, or just in the mood for a spicy-sweet snack, these cookies are sure to satisfy.

This recipe is a classic that balances the robust flavor of molasses with the bright, aromatic qualities of ginger and cinnamon. The cookies come out of the oven with a beautifully cracked surface, sparkling with sugar crystals that provide a satisfying crunch. They’re not only delicious but also visually appealing, making them a great addition to any dessert table or cookie exchange. The dough is straightforward to prepare and versatile, ideal for making ahead and baking fresh when needed.

Why You’ll Love This Recipe:

  • Flavorful: Each cookie bursts with the flavors of molasses, ginger, and cinnamon, offering a perfect balance of spice and sweetness.
  • Easy to Make: The dough is simple to mix and the cookies bake quickly, making this recipe a great option for bakers of all skill levels.
  • Perfect for Any Occasion: These cookies are wonderful for holidays, special occasions, or just a regular day when you crave something sweet and spiced.

Ingredients:

  • 2½ cups cake flour
  • ¾ cup margarine, softened
  • 1 large egg
  • ¼ cup molasses (or substitute with honey)
  • 1 cup sugar, plus 2 tablespoons for coating
  • 1 teaspoon bicarbonate of soda (baking soda)
  • ¼ teaspoon salt
  • 2 teaspoons ground ginger
  • ¾ teaspoon cinnamon
  • 1 tablespoon water

Instructions:

Preparation:

  • Preheat your oven to 175°C (350°F). This ensures your oven is hot enough to bake the cookies evenly.
  • Line a baking sheet with parchment paper or a silicone mat to prevent sticking and to make cleanup easier.

Combine Dry Ingredients:

  • In a medium bowl, sift together cake flour, ground ginger, cinnamon, salt, and bicarbonate of soda. Sifting helps to aerate the flour and evenly distribute the spices and leavening agents.

Cream Margarine and Sugar:

  • In a large mixing bowl, cream together the softened margarine and 1 cup of sugar until the mixture is light and fluffy. This process incorporates air into the dough, helping the cookies to have a lighter texture.

Incorporate Wet Ingredients:

  • Beat in the egg to the creamed sugar and margarine until fully incorporated.
  • Stir in the molasses and water until well combined. The molasses adds moisture and a deep, caramel-like sweetness to the cookies.

Form the Cookie Dough:

  • Gradually mix the dry ingredients into the wet ingredients, stirring until the dough comes together without any dry spots.

Shape and Sugar Coat:

  • Shape the dough into 24 balls, each about the size of a walnut.
  • Roll each dough ball in the remaining 2 tablespoons of sugar until well coated. This gives the cookies their signature sparkly appearance.

Bake:

  • Place the sugared dough balls on the prepared baking sheet, spacing them about 2 inches apart as they will spread slightly.
  • Flatten each ball slightly with the bottom of a glass to ensure they bake evenly.
  • Bake in the preheated oven for 10 to 15 minutes or until the cookies are golden brown and set around the edges but still soft in the center.

Cool and Serve:

  • Allow the cookies to cool on the baking sheet for a few minutes before transferring them to a wire rack to cool completely. This step helps them set up without becoming too hard.

Storage Options:

  • Room Temperature: Store the cooled cookies in an airtight container at room temperature for up to a week.
  • Freezer: For longer storage, freeze the baked cookies in an airtight container for up to 3 months. Thaw at room temperature before serving.

Tips:

  • Consistent Size: Use a cookie scoop to ensure all your cookies are the same size and bake evenly.
  • Molasses Substitute: If using honey instead of molasses, expect a milder, sweeter flavor.
  • Spice Variations: Feel free to adjust the amount of ginger and cinnamon to suit your taste preferences.

Enjoy these Ginger Molasses Cookies with their delightful crunch and soft, chewy centers, a true treat for any occasion that calls for a little sweetness and spice.