Cinnamon Roll Cheesecake

0

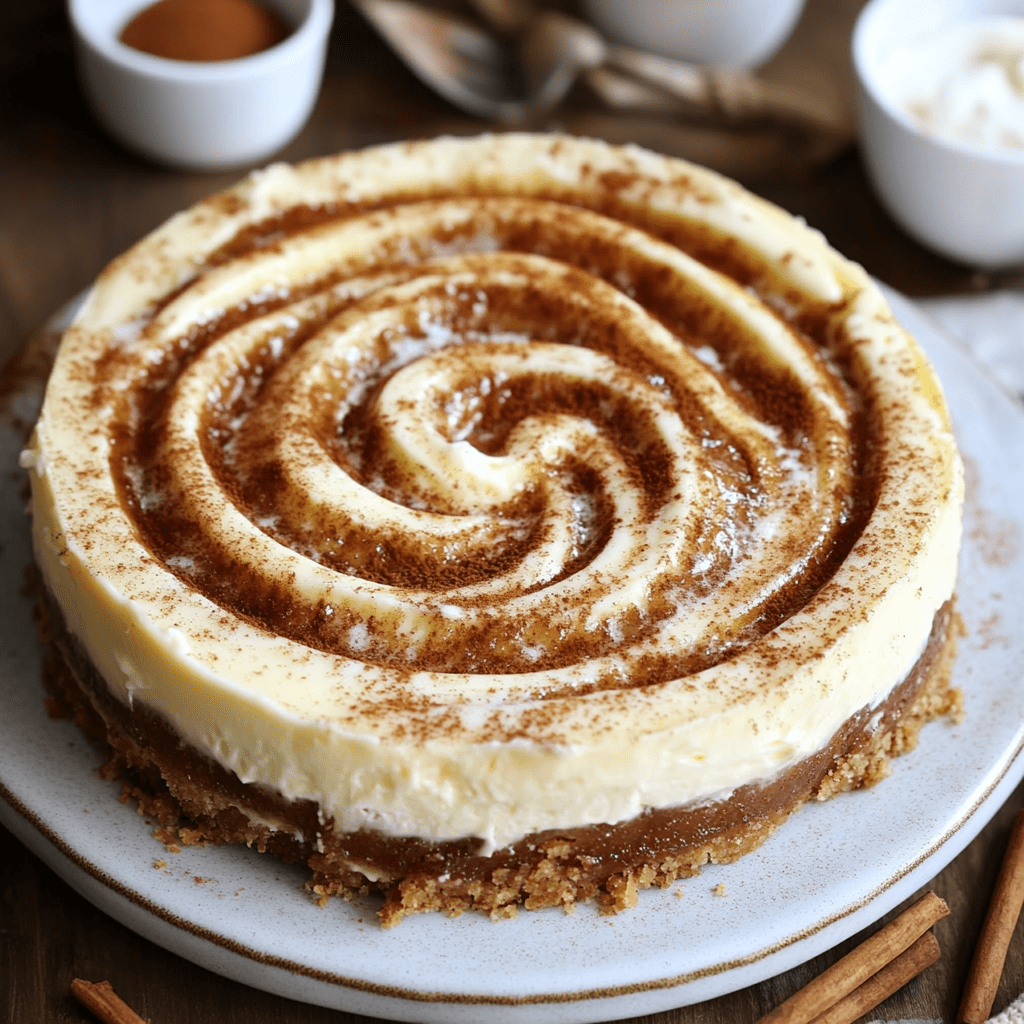
Indulge in the sumptuous delight of Cinnamon Roll Cheesecake, a dessert that beautifully marries the rich, creamy textures of cheesecake with the warm, inviting spices of a classic cinnamon roll. This dessert is perfect for those who adore the comforting taste of cinnamon rolls but crave the decadent richness that only a cheesecake can offer. With its luxurious cinnamon swirl and velvety cream cheese base, this cheesecake is a sophisticated upgrade from traditional desserts.

The creation of this cheesecake involves a meticulous process that ensures every layer contributes to an overall experience of indulgence and satisfaction. Starting with a buttery graham cracker crust infused with cinnamon, moving to a creamy cheesecake filling swirled with a rich cinnamon sugar mixture, and topped off with a fluffy cream cheese frosting, each component plays a vital role in crafting the ultimate dessert. The Cinnamon Roll Cheesecake is not just a treat for the palate but also a feast for the eyes, making it a perfect centerpiece for festive occasions and special celebrations.

Why You’ll Love This Recipe:

  • Decadent Flavor Combination: The classic flavors of a cinnamon roll blended into a rich, creamy cheesecake form create a dessert that’s both familiar and new.
  • Perfect Texture: From the crunchy crust to the smooth filling and the fluffy frosting, each bite offers a different texture, delighting the senses.
  • Show-Stopping Dessert: This cheesecake is guaranteed to impress at any gathering, making it a go-to recipe for those who love to host.

Ingredients:

For the Crust:

  • 1 1/2 cups graham cracker crumbs (or digestive biscuits/Biscoff cookies)
  • 1/4 cup brown sugar
  • 1/2 tsp ground cinnamon
  • 6 tbsp unsalted butter, melted

For the Cinnamon Swirl:

  • 1 cup brown sugar
  • 1/3 cup unsalted butter, melted
  • 1/3 cup all-purpose flour
  • 1 tbsp ground cinnamon

For the Cheesecake Batter:

  • 32 oz cream cheese, softened
  • 1 cup brown sugar
  • 1/4 cup granulated sugar
  • 1/2 cup sour cream
  • 1 tbsp vanilla extract
  • 4 large eggs, room temperature
  • 1/2 tsp salt

For the Frosting:

  • 6 tbsp cream cheese, softened
  • 1 cup powdered sugar
  • 1 tsp vanilla extract
  • 1 cup heavy whipping cream

For Finishing:

  • 1-2 tsp cinnamon powder for dusting

Instructions:

Prepare the Oven and Pan:
Preheat your oven to 325°F (160°C). Grease a 9-inch springform pan and line the bottom with parchment paper.

Make the Crust:
Mix graham cracker crumbs, brown sugar, and cinnamon. Add melted butter and stir until the mixture is evenly moistened. Press this mixture into the bottom of the prepared pan and slightly up the sides. Bake in the preheated oven for 8-10 minutes until set. Allow to cool.

Create the Cinnamon Swirl:
In a small bowl, combine brown sugar, melted butter, flour, and cinnamon until well mixed. Set this aside for later use.

Prepare the Cheesecake Batter:
In a large mixing bowl, beat the softened cream cheese until it’s smooth and free of lumps. Gradually add brown sugar and granulated sugar, beating until creamy. Incorporate sour cream, vanilla, and salt into the mixture. Add eggs one at a time, ensuring each is fully incorporated before adding the next.

Assemble the Cheesecake:
Pour half of the cheesecake batter over the cooled crust. Spoon half of the cinnamon swirl mixture in dollops over the batter, then use a knife to swirl it through. Repeat with the remaining batter and cinnamon swirl.

Bake the Cheesecake:
To prevent cracks, place the springform pan in a large baking dish and fill the dish with boiling water halfway up the sides of the pan (water bath method). Bake for 60-70 minutes or until the center is just set. Turn off the oven, open the oven door slightly, and let the cheesecake cool in the oven for 30 minutes.

Chill the Cheesecake:
After cooling in the oven, bring the cheesecake to room temperature, then refrigerate for at least 4 hours, preferably overnight.

Prepare the Frosting:
In a bowl, beat the softened cream cheese with powdered sugar and vanilla until smooth. In a separate bowl, whip the heavy cream to stiff peaks. Gently fold the whipped cream into the cream cheese mixture until well combined.

Finish and Serve:
Spread the frosting over the chilled cheesecake. Dust the top with cinnamon powder just before serving.

Storage Options:

  • Refrigerator: Store the cheesecake in the refrigerator, covered, for up to 5 days.
  • Freezer: This cheesecake can be frozen for up to 2 months. Thaw in the refrigerator overnight before serving.

Tips:

  • Water Bath: The water bath helps cook the cheesecake gently, ensuring a smooth, crack-free top.
  • Cooling: Allow the cheesecake to cool gradually, first in the oven and then at room temperature, to prevent it from sinking or cracking.
  • Frosting: Only frost the cheesecake when it is completely chilled to ensure the frosting keeps its form.

This Cinnamon Roll Cheesecake is a luxurious dessert that combines the comfort of cinnamon rolls with the elegance of cheesecake. Enjoy crafting this exquisite dessert that’s sure to captivate and delight any audience.

Classic Peanut Butter Cookies

0

These Classic Peanut Butter Cookies are the perfect blend of chewy and crispy, featuring the rich, nutty flavor of peanut butter complemented by the sweetness of brown and white sugars. This recipe is a timeless treat that brings simplicity and deliciousness together, creating cookies that are ideal for any occasion, whether it’s a family gathering, a school event, or just a cozy evening at home.

The magic of these cookies lies in their texture and flavor balance. The use of both brown and white sugars enhances the depth of flavor, ensuring each bite is packed with a delightful sweetness that perfectly matches the savory hint of peanut butter. These cookies are not only easy to make but are also a crowd-pleaser, guaranteeing smiles all around the table.

Why You’ll Love This Recipe:

  • Rich Peanut Butter Flavor: Each cookie is loaded with the hearty taste of peanut butter, making them irresistible to peanut butter lovers.
  • Perfectly Textured: Achieve a delightful mix of chewy middles with slightly crispy edges.
  • Simple Ingredients: Made with pantry staples, these cookies are simple to whip up on a whim.

Ingredients:

  • 1 1/2 cup all-purpose flour (180g)
  • 1/2 cup unsalted butter, room temperature (113g)
  • 1 cup peanut butter (250g)
  • 1/2 cup brown sugar, lightly packed (100g)
  • 1/2 cup sugar (100g)
  • 1 tsp vanilla extract (5mL)
  • 1 large egg, room temperature
  • 3/4 tsp baking powder (3g)
  • Optional: 1/4-1/2 tsp sea salt

Instructions:

Preheat the Oven:
Start by preheating your oven to 350°F (175°C).

Sift and Combine Dry Ingredients:
Sift the all-purpose flour and baking powder into a bowl, then whisk them together to ensure they are well combined.

Cream Butter and Sugars:
In a stand mixer fitted with a paddle attachment, cream the butter, brown sugar, and white sugar until the mixture is light and fluffy. You can add an optional 1/4-1/2 tsp of sea salt here if you like a slight salty kick to balance the sweetness.

Add Peanut Butter:
Mix in the peanut butter until it is fully incorporated into the butter and sugar mixture.

Incorporate Egg and Vanilla:
Add the egg and vanilla extract, mixing until everything is well combined.

Combine with Dry Ingredients:
Gradually add the flour mixture to the wet ingredients, beating just until the dough comes together without overmixing.

Shape and Prepare Cookies:
Roll the dough into one-inch balls and place them on a baking sheet lined with parchment paper. Flatten each cookie with a fork in a criss-cross pattern to give them their characteristic look.

Bake:
Bake the cookies for about 10 minutes, or until they are just set and slightly golden around the edges.

Cool:
Allow the cookies to cool completely on the baking sheet. They will continue to set as they cool, so it’s important not to move them too soon.

Tips:

  • For Soft Cookies: Be careful not to overbake; they should still be soft to the touch when removed from the oven.
  • Storage: Store these cookies in an airtight container at room temperature to keep them chewy and fresh.
  • Peanut Butter Options: For a different texture or flavor, experiment with chunky peanut butter or even add chopped peanuts for extra crunch.

Enjoy your baking adventure with these Classic Peanut Butter Cookies, which are sure to bring warmth and joy to any cookie lover’s day. Perfect for sharing or indulging on your own, these cookies are a delightful treat that never goes out of style.

Epic Beef Nachos Supreme

0

Indulge in the ultimate snack experience with this Epic Beef Nachos Supreme recipe. It’s a dish packed with layers of crunchy tortilla chips, savory ground beef, creamy refried beans, and a rich blend of cheeses, all topped with fresh vegetables for a burst of freshness. This recipe elevates the classic nachos to a supreme status, perfect for game days, family nights, or any time you crave something deliciously indulgent.

The heart of this dish lies in its combination of textures and flavors—from the crispy chips to the spiced meat and the melty cheese. Each component adds a layer of complexity, making every bite both satisfying and irresistible. With its easy preparation and crowd-pleasing appeal, this nachos recipe is sure to become a favorite for anyone who tries it.

Why You’ll Love This Recipe:

  • Loaded with Flavor: The mix of spices and hearty ingredients packs a powerful flavor punch.
  • Perfect for Sharing: Ideal for gatherings, this dish is designed to be enjoyed with friends and family.
  • Customizable: Easily adapt the toppings and spice levels to suit your taste preferences.

Ingredients:

  • 1 lb ground beef
  • 1/2 yellow onion, diced
  • 2 packages (16 oz each) sturdy tortilla chips
  • 1 can refried beans
  • 16 oz shredded cheese (cheddar and Monterey Jack mix)
  • 3 Roma tomatoes, diced
  • 2-3 green onions, sliced
  • 1 packet taco seasoning or a homemade blend: 1 tsp cumin, 1 tsp chili powder, 1/2 tsp garlic powder, 1/2 tsp onion powder, 1/2 tsp paprika
  • 3/4 cup water

Instructions:

Preheat the Oven:
Set your oven to 400°F (200°C).

Cook the Beef:
In a skillet over medium-high heat, brown the ground beef with diced onion until the meat is no longer pink, about 8 minutes. Drain any excess fat.

Season the Beef:
Return the beef to the skillet, sprinkle with taco seasoning, and add 3/4 cup of water. Simmer on low heat until most of the liquid evaporates, about 5 minutes.

Prepare the Baking Sheets:
Line two baking sheets with parchment paper. Spread a generous layer of tortilla chips on each sheet.

Add the Beans:
Dollop refried beans across the chips, using half the can for each sheet.

Layer the Beef:
Evenly distribute the seasoned ground beef over the chips on each baking sheet.

Top with Cheese:
Sprinkle the shredded cheese mixture over the beef and chips.

Bake:
Bake in the preheated oven for 15 minutes, or until the cheese is melted and bubbly.

Add Fresh Toppings:
Remove from the oven and immediately top with diced tomatoes and sliced green onions.

Serve:
Serve your Epic Beef Nachos Supreme hot and fresh for the best experience.

Tips:

  • Cheese Tips: For extra gooey nachos, mix in some processed cheese with the shredded cheese.
  • Spicy Kick: Add jalapeños or a drizzle of hot sauce for those who like it hot.
  • Serving Suggestion: Serve with sides of sour cream, guacamole, and salsa for dipping.

This Epic Beef Nachos Supreme recipe is not just a dish; it’s a festive, flavorful celebration of all the best components of classic nachos, enhanced and expanded to satisfy even the most intense cravings. Enjoy preparing this easy yet impressive dish, and watch it disappear as quickly as it came together!

Cinnamon Sugar Toast

0

Cinnamon Sugar Toast is a delightful treat that turns simple bread into a heavenly sweet snack. This recipe offers a perfect balance of sugary sweetness and warm cinnamon, topped on buttery toasted bread. It’s an incredibly easy and quick way to satisfy your sweet tooth or add a little special touch to your breakfast or tea time. This toast has the power to transform your ordinary mornings or afternoon breaks into moments of pure joy with its crisp, caramelized edges and soft, flavorful center.

This dish’s charm lies in its simplicity and the nostalgic joy it brings, reminiscent of childhood favorites. The cinnamon sugar melds with the butter to create a topping that caramelizes under the broiler, resulting in a toast that is irresistibly crunchy and glazed with a shiny, sweet coating. Whether you’re serving it as a quick breakfast, a snack for kids, or as a comforting treat for yourself, Cinnamon Sugar Toast is bound to be a delightful addition to your culinary repertoire.

Why You’ll Love This Recipe:

  • Quick and Easy: With a few common ingredients and a couple of simple steps, you can whip up this treat in no time.
  • Delightfully Sweet: The perfect amount of sweetness paired with the warmth of cinnamon makes this toast a comforting snack.
  • Versatile: Serve it as breakfast, a snack, or alongside your favorite tea or coffee.

Ingredients:

  • 1/4 cup unsalted butter, well softened
  • 1/4 cup sugar
  • 1 teaspoon ground cinnamon
  • A pinch of salt
  • 4 slices of bread

Instructions:

Preheat the Oven:
Start by preheating your oven to 350°F (175°C).

Prepare the Spread:
In a small bowl, combine the softened butter, sugar, cinnamon, and salt. Mix them well until fully combined. The butter needs to be very soft to create a smooth mixture.

Spread the Mixture:
Take each slice of bread and spread the cinnamon sugar mixture evenly over one side. Make sure to cover every inch of the surface, right up to the edges.

Bake the Bread:
Place the bread slices on a baking sheet. Bake in the preheated oven for about 10 minutes.

Broil for Perfection:
After baking, turn on the broiler and broil the toast for a few minutes until it is deep golden brown and the sugar starts to bubble. Keep a close eye on it to prevent burning, preferably watching it with the oven door slightly open.

Serve:
Once done, you can slice the toast into halves if desired. Serve warm for the best flavor and texture.

Tips:

  • Bread Selection: While any bread will work, choosing a thicker slice or artisan bread can elevate this simple treat.
  • Watching Closely: Broiling can quickly go from perfect to burnt, so it’s important to watch the toast closely during this stage.
  • Serving Options: For an extra indulgence, serve with a scoop of vanilla ice cream or a drizzle of honey.

Enjoy the sweet, spicy flavors and the crispy, buttery texture of this Cinnamon Sugar Toast, a simple pleasure that’s sure to brighten your day or night!

Cheesy Bacon Tater Tot Casserole

0

This Cheesy Bacon Tater Tot Casserole is the ultimate comfort food, combining hearty ground beef, crispy bacon, and golden tater tots under a blanket of creamy cheese. It’s a crowd-pleasing dish perfect for family dinners, potlucks, or any gathering where you want to bring a touch of home-cooked warmth. With its rich flavors and satisfying textures, this casserole is designed to fill your kitchen with inviting aromas and your belly with wholesome goodness.

The beauty of this dish lies in its delightful combination of simple ingredients that work together to create a truly comforting meal. From the savory ground beef and crispy bacon to the creamy cheese and the crispy-on-the-outside, soft-on-the-inside tater tots, every layer adds its own unique flavor and texture. This casserole is not just a dish but a hearty embrace that promises to satisfy all your comfort food cravings.

Why You’ll Love This Recipe:

  • Hearty and Satisfying: Packed with meat, potatoes, and cheese, this casserole is a fulfilling meal all on its own.
  • Perfect for Sharing: Great for gatherings, it’s easy to make in large quantities and guaranteed to be a hit.
  • Versatile: Serve it as a main dish or a side; it’s flexible and sure to please a variety of tastes.

Ingredients:

  • 1 lb ground beef
  • 6 slices bacon, cooked and crumbled
  • 1 medium onion, chopped
  • 3 cloves garlic, minced
  • 1 (10.75 oz) can condensed cheddar cheese soup
  • 1 cup milk
  • 2 cups shredded cheddar cheese, divided
  • 1 (16 oz) package frozen tater tots
  • Salt and pepper to taste
  • Chopped pickles (optional, for garnish)
  • Ketchup and mustard (optional, for serving)

Instructions:

Brown the Beef:
In a skillet, brown the ground beef over medium heat; drain off any excess grease.

Sauté Aromatics:
Add the chopped onion and minced garlic to the skillet with the beef; cook until the onions are tender and translucent.

Mix the Sauce:
In a separate bowl, whisk together the condensed cheddar cheese soup and milk until smooth. Stir in the cooked beef, crumbled bacon, and 1 cup of the shredded cheddar cheese.

Layer the Ingredients:
In a slow cooker, layer half of the frozen tater tots at the bottom. Pour the beef and cheese mixture over the tater tots evenly. Top with the remaining tater tots.

Cook:
Sprinkle the remaining cup of cheddar cheese over the top. Set the slow cooker to low and cook for 4-5 hours, until the casserole is bubbly and the tots are crispy.

Serve:
Serve hot, garnished with chopped pickles if desired. Offer ketchup and mustard on the side for those who like a little extra flavor.

Storage Options:

  • Refrigerator: Keep leftovers in an airtight container for up to 3 days.
  • Freezer: Freeze portions in sealed containers for up to 1 month. Reheat in the oven to maintain the texture of the tater tots.

Tips:

  • Crispier Tots: For extra crispy tater tots, you can pre-bake them before adding to the casserole.
  • Add Vegetables: Mix in some peas, carrots, or corn with the beef for added nutrition and color.
  • Cheese Varieties: Experiment with different types of cheese for different flavors, such as pepper jack for a bit of spice.

This Cheesy Bacon Tater Tot Casserole is not just delicious; it’s a versatile and easy-to-make dish that’s perfect for any occasion where comfort food is called for. Enjoy the melty cheese, the hearty beef, and the crisp tater tots that come together to make this dish a guaranteed favorite.

Spinach Stuffed Pastries

0

Dive into the world of flaky, golden, and utterly delicious Spinach Stuffed Pastries, a treat that effortlessly transitions from a simple appetizer to a satisfying main course or a light meal. Imagine biting into a crisp puff pastry shell, discovering a lush filling of fresh spinach blended with creamy ricotta and Parmesan cheeses. These pastries not only tantalize the taste buds with their delightful textures and flavors but also offer a versatile option suitable for any dining occasion.

These pastries embody the ideal blend of simplicity and elegance. The use of puff pastry ensures a light and airy crust, while the savory filling of spinach and cheeses provides a rich and comforting flavor profile. Easy to prepare yet impressive in presentation, Spinach Stuffed Pastries are perfect for everything from casual get-togethers to more formal gatherings. They’re a fantastic way to introduce vegetables in a delectable and inviting form, making them a hit among all age groups.

Why You’ll Love This Recipe:

  • Elegantly Simple: The combination of simple ingredients wrapped in puff pastry makes for a sophisticated yet easy-to-make dish.
  • Versatile Serving Options: These pastries are ideal as appetizers, snacks, or even light meals, fitting seamlessly into any meal plan.
  • Crowd-Pleaser: Perfect for parties or family meals, they’re designed to delight guests and satisfy diverse tastes.

Ingredients:

  • 2 sheets of puff pastry, thawed
  • 2 cups of fresh spinach, chopped
  • 1 cup of ricotta cheese
  • 1/2 cup of grated Parmesan cheese
  • 1 egg, beaten (for egg wash)
  • 1 teaspoon garlic powder
  • Salt and pepper to taste
  • 1 tablespoon olive oil

Instructions:

Preheat Oven:
Preheat your oven to 400°F (200°C) and line a baking sheet with parchment paper.

Prepare the Filling:
In a large skillet, heat the olive oil over medium heat. Add the chopped spinach and cook until wilted, about 2-3 minutes. Remove from heat and let it cool slightly. In a medium bowl, combine the cooked spinach, ricotta cheese, Parmesan cheese, garlic powder, salt, and pepper. Mix well.

Assemble the Pastries:
Roll out the puff pastry sheets on a lightly floured surface. Cut each sheet into 4 squares (you should have 8 squares total). Place a spoonful of the spinach and cheese mixture in the center of each square. Fold the pastry over to form a rectangle or triangle and press the edges with a fork to seal.

Apply Egg Wash:
Brush the tops of the pastries with the beaten egg for a golden finish.

Bake:
Bake in the preheated oven for 15-20 minutes, or until the pastries are puffed and golden brown.

Serve:
Let the pastries cool slightly before serving. Enjoy these Spinach Stuffed Pastries warm or at room temperature.

Storage Options:

  • Refrigerator: Store any leftovers in an airtight container for up to 3 days. Reheat in the oven to maintain the pastry’s crispiness.
  • Freezer: Freeze the unbaked pastries on a baking sheet, then transfer to a freezer bag. Bake straight from frozen, adding a few extra minutes to the cooking time.

Tips:

  • Variety in Fillings: Experiment with different fillings like mushrooms, feta, or artichokes to tailor the pastries to your taste.
  • Making Ahead: Assemble the pastries ahead of time and refrigerate overnight, ready to bake fresh when needed.
  • Serving Suggestions: Pair with a light salad or soup for a complete meal, or serve as part of a brunch spread.

These Spinach Stuffed Pastries promise a delightful dining experience, combining the classic flavors of spinach and cheese with the irresistible texture of puff pastry. Perfect for any occasion, they’re sure to become a cherished addition to your culinary repertoire.

Chocolate Chip Cheesecake Bars

0

These Chocolate Chip Cheesecake Bars offer a decadent twist on your typical dessert bar, blending a rich, creamy cheesecake layer with a chewy chocolate chip cookie base. Made with keto-friendly ingredients, this dessert not only satisfies your sweet tooth but also fits into a low-carb lifestyle. The combination of almond flour and monkfruit sweeteners provides a delicious alternative without sacrificing taste. Perfect for parties, family gatherings, or as a special treat to enjoy with your coffee, these cheesecake bars are bound to be a hit!

Why You’ll Love This Recipe:

  • Low Carb and Keto Friendly: Uses almond flour and monkfruit sweeteners, making it suitable for those following a ketogenic diet.
  • Decadent Layers: Features a satisfying texture with layers of cookie and cheesecake.
  • Easy to Make: Simple steps and common ingredients used in low-carb baking.

Ingredients:

Chocolate Chip Cookie Layer:

  • 1 1/2 cups almond flour
  • 1/2 teaspoon baking soda
  • 1/4 teaspoon baking powder
  • 1/2 teaspoon salt
  • 6 tablespoons butter
  • 3/4 cup packed golden monkfruit sweetener
  • 1 1/2 teaspoons vanilla extract
  • 1 large egg
  • 1 cup Lily’s chocolate chips

Cheesecake Layer:

  • 8 ounces cream cheese
  • 1/3 cup confectioners monkfruit sweetener
  • 1 teaspoon vanilla extract
  • 1 egg yolk

Instructions:

Prepare the Cookie Layer:

    • Preheat your oven to 350 degrees F (175 degrees C).
    • In a small bowl, mix the almond flour, baking soda, baking powder, and salt.
    • In a stand mixer, cream together the butter, golden monkfruit sweetener, and vanilla extract until creamy.
    • Add the egg and beat on low speed. Gradually add the almond flour mixture until well combined.
    • Stir in the chocolate chips. Place the dough in the refrigerator to chill while you prepare the cheesecake layer.

    Prepare the Cheesecake Layer:

      • In a separate bowl, combine the cream cheese, confectioners monkfruit sweetener, vanilla extract, and egg yolk.
      • Beat with an electric mixer until creamy.

      Assemble the Bars:

        • Line an 8×8 inch baking dish with parchment paper.
        • Press three-quarters of the cookie dough evenly into the bottom of the pan.
        • Spread the cheesecake mixture over the cookie dough base.
        • Break the remaining cookie dough into small chunks and scatter them over the cheesecake layer.

        Bake:

          • Bake in the preheated oven for 30-35 minutes, or until the cheesecake layer is set and no longer jiggles when the pan is lightly shaken.

          Cool and Serve:

            • Let the bars cool completely in the pan before lifting out the parchment paper to cut into squares.

            Storage Options:

            • Refrigerator: Store the bars in an airtight container in the refrigerator for up to 5 days.
            • Freezer: Freeze the bars for up to a month for best taste and texture. Thaw in the refrigerator before serving.

            Tips:

            • Chocolate Chips: Ensure you use sugar-free chocolate chips to keep this recipe keto-friendly.
            • Smooth Cheesecake: Make sure your cream cheese is at room temperature to avoid lumps in your cheesecake layer.
            • Serving Suggestion: Serve chilled for a firmer texture and to enhance the flavors.

            Enjoy your baking adventure with these Chocolate Chip Cheesecake Bars, a treat that promises the ultimate indulgence for any dessert lover looking to maintain a low-carb diet.

            Creamy Cajun Chicken Soup

            0

            This Creamy Cajun Chicken Soup is a comforting, spicy delight that’s perfect for chilly evenings or anytime you crave a hearty meal. Infused with the bold flavors of Cajun seasoning and a hint of hot sauce, this soup combines tender vegetables and succulent chicken in a creamy, flavorful broth. Whether you’re looking to warm up or simply enjoy a delicious and satisfying meal, this soup is sure to hit the spot.

            Why You’ll Love This Recipe:

            • Flavorful and Spicy: Packed with Cajun spices and a dash of hot sauce for a delightful kick.
            • Comforting and Hearty: Filled with chicken and vegetables, making it a wholesome meal.
            • Creamy Texture: The addition of heavy cream and cream cheese gives this soup a luxurious, smooth consistency.

            Ingredients:

            • 1 tablespoon butter or olive oil
            • 1 tablespoon minced garlic
            • 1 cup chopped onion
            • 1 cup chopped carrots
            • 1 1/2 cups chopped celery
            • 1 1/2 cups chopped bell pepper (any color or a mix)
            • 1 1/2 pounds chicken breast
            • 2 tablespoons Old Bay or Cajun seasoning
            • 2 teaspoons hot sauce
            • 1 (14 ounce) can fire-roasted tomatoes, drained
            • 3 cups chicken broth
            • 1/4 cup heavy cream
            • 8 ounces cream cheese, softened

            Instructions:

            1. Saute Vegetables: In a large pot or Dutch oven, heat the butter or olive oil over medium heat. Add garlic, onion, celery, bell pepper, and carrots. Saute for 3-4 minutes until the vegetables are tender.
            2. Cook Chicken: Add the chicken breasts to the pot. Sprinkle with Cajun seasoning and hot sauce. Add the drained fire-roasted tomatoes and chicken broth. Bring the mixture to a simmer, then cover the pot and reduce the heat to medium-low.
            3. Simmer: Let the soup cook for about 30 minutes, stirring occasionally. Once the chicken is tender and cooked through, remove it from the pot and shred it with forks.
            4. Add Cream and Cheese: While the chicken is being shredded, add the heavy cream and softened cream cheese to the pot. Whisk until the cream cheese is completely incorporated and the soup is smooth.
            5. Combine and Serve: Return the shredded chicken to the pot. Stir well to combine all the ingredients. Serve the soup hot.

            Optional Toppings:

            • Sliced green onions
            • Shredded sharp cheddar cheese
            • Additional hot sauce

            Storage Options:

            • Refrigerator: Store any leftovers in an airtight container in the refrigerator for up to 3 days.
            • Freezer: Freeze in airtight containers for up to 3 months. Thaw in the refrigerator overnight before reheating on the stove.

            Tips:

            • Adjust Spice Levels: Customize the amount of Cajun seasoning and hot sauce based on your preference for spice.
            • Vegetable Variations: Feel free to add other vegetables like spinach or potatoes for more texture and flavor.
            • Serving Suggestion: Serve this creamy soup with a side of crusty bread for dipping.

            This Creamy Cajun Chicken Soup is not only delicious but also a comforting meal that’s perfect for feeding a crowd or enjoying a cozy night in. Enjoy the rich flavors and creamy texture of this delightful soup!

            Steak Doneness Guide: Finding Your Perfect Sizzle

            0

            When it comes to cooking steak, opinions can be as fiery as the grill itself. I’ve experienced this firsthand in a spirited debate with my sister over steak doneness. I’m convinced I’ve achieved the perfect medium-rare, while she contends it’s undercooked—nearly raw. This culinary disagreement made me ponder: What exactly defines medium-rare? Steak doneness preferences can spark intense discussions around the dinner table, often dividing diners. If you’ve ever found yourself in a similar debate, here’s a guide to help you navigate the subtle differences in steak doneness and arm you with the knowledge to settle any disputes.

            Understanding Steak Doneness Levels

            Grasping the various doneness levels is crucial to mastering the art of steak cooking. Here’s a detailed overview:

            1. Rare
              A rare steak is quickly seared on the outside but remains cool and predominantly red in the center, reaching an internal temperature of 120°F to 125°F. It’s tender, moist, and has a bold taste that can seem almost primal to some, while others may find it too underdone.
            2. Medium-Rare
              Often considered the ideal by steak aficionados, medium-rare steak boasts a warm, red center with an internal temperature of 130°F to 135°F. It strikes a delightful balance between tenderness and flavor, having a well-browned exterior while keeping the inside soft and juicy. This level of doneness is where I claim victory in my culinary clash with my sister.
            3. Medium
              For those who prefer less red, medium offers a warm pink center with temperatures between 140°F to 145°F. It’s firmer than medium-rare yet retains a good deal of juiciness and flavor, making it a popular middle ground.
            4. Medium-Well
              Cooked to an internal temperature of 150°F to 155°F, medium-well steaks have a slight pinkness at the center. They appeal to those desiring less moisture and a more solid texture, though some steak purists might consider this level approaching overdone.
            5. Well-Done
              For a well-done steak, expect no pink at all with temperatures reaching 160°F and above. It’s fully browned throughout, sacrificing juiciness and tenderness for perceived safety. This doneness is often preferred by those cautious of any red in their meat.

            Tools and Techniques for Precise Steak Doneness

            While personal taste influences steak preferences, achieving consistency is crucial. Here are some tools and methods to ensure you hit your doneness target every time:

            1. Meat Thermometer: The most accurate way to determine doneness is by using a thermometer. Aim for 130°F for a perfect medium-rare before removing your steak from the heat, keeping in mind that it will continue to cook slightly while resting.
            2. Touch Test: This old chef’s trick involves comparing the firmness of the steak to the fleshy part of your palm below your thumb when touching different fingers together. This method estimates the steak’s feel at various doneness levels.
            3. Resting the Steak: Always let your steak rest for 5 to 10 minutes after cooking. This step is essential as it allows the juices to redistribute, ensuring a more tender, flavorful steak.

            Navigating Steak Doneness Debates

            Misunderstandings about steak doneness can often be resolved with clear communication and understanding that perceptions of ‘perfect’ can vary widely:

            1. Clearly State Your Preference: When ordering or cooking, specify your preferred doneness clearly. Descriptive phrases like “a warm red center” can provide clearer guidance than just “medium-rare.”
            2. Visual Aids: Utilize pictures or a doneness chart when explaining your preferences to others, which can help bridge different understandings.
            3. Keep Practicing: Mastery comes with practice. Experiment with different cooking times and temperatures to familiarize yourself with how steaks cook.

            Resolving the Medium-Rare vs. Raw Debate

            The key distinction between medium-rare and undercooked lies in the temperature and texture. A medium-rare steak should be warm with a vibrant red center, whereas an undercooked steak might still feel cool inside. If your steak hits the right internal temperature and rests properly, you can confidently claim it’s medium-rare.

            Final Thoughts: Embrace Different Tastes

            Steak doneness is deeply personal, and achieving a consensus may sometimes mean agreeing to disagree. The essence lies in understanding and respecting diverse preferences and honing your skills to cater to them. Whether it’s reaching a compromise with my sister or cooking multiple steaks to different doneness levels, the goal is to enjoy the journey of culinary mastery.

            So, gear up for your next grill session with this knowledge, and remember, the perfect steak is the one that satisfies your taste the most. Happy grilling!

            Nutty Pistachio Delight Bread

            0

            Embark on a culinary journey with Nutty Pistachio Delight Bread, a dessert that combines the simplicity of a cake mix with the rich, nutty flavors of pistachio. This bread is not just a treat for the palate but also a visual delight, thanks to its vibrant green hue and festive toppings. Perfect for any occasion, from casual gatherings to holiday celebrations, this pistachio bread will impress your guests and satisfy your cravings for something sweet and unique.

            Why You’ll Love This Recipe:

            • Easy Preparation: Utilizes a golden cake mix for simplicity and consistency.
            • Rich Pistachio Flavor: Enhanced with the addition of pistachio pudding and chopped nuts.
            • Visually Appealing: The optional green food coloring and festive sprinkles make it a showstopper.

            Ingredients:

            • 1 (15.25 oz) box of golden cake mix
            • 3 (3.4 oz each) boxes of instant pistachio pudding
            • 1 cup of hot water
            • 1/2 cup of vegetable oil
            • 4 room temperature eggs
            • 1/4 cup of finely chopped pistachios
            • 2-4 drops of green food coloring (optional)
            • A sprinkle of red and green for a festive touch (optional)

            Instructions:

            1. Preheat your oven to 350 degrees F (175 degrees C). This step ensures that your bread will bake evenly and develop a perfect crust.
            2. Prepare your loaf pans by greasing them thoroughly. This prevents the bread from sticking and helps in easy removal after baking.
            3. Mix the batter: In a large mixing bowl, combine the golden cake mix, instant pistachio pudding mix, hot water, vegetable oil, and eggs. For a more vibrant color, add the green food coloring at this stage. Whisk together until the batter is smooth and homogenous.
            4. Add texture and character: Stir in the finely chopped pistachios to incorporate a delightful crunch and enhance the nutty flavor of your bread.
            5. Transfer to loaf pans: Pour the batter into the prepared loaf pans. If using, sprinkle the top with red and green decorations for a festive look.
            6. Bake for 40-45 minutes: Place in the preheated oven and bake until a toothpick inserted into the center comes out clean, indicating that the bread is perfectly baked.
            7. Cool and enjoy: Allow the bread to cool in the pans for a while before transferring them to a wire rack. This patience is crucial as it prevents the loaves from breaking apart.
            8. Slice and savor: Once cooled, slice the bread and enjoy the rich, flavorful experience of your homemade Nutty Pistachio Delight Bread.

            Storage Options:

            • Room Temperature: Keep in an airtight container for up to 3 days.
            • Refrigerator: For longer storage, refrigerate for up to a week.
            • Freezer: Wrap tightly and freeze for up to 3 months. Thaw and reheat gently before serving.

            Tips:

            • Uniform Baking: Ensure your oven is properly calibrated for the best results.
            • Enhance Flavors: Toasting the chopped pistachios lightly before adding them to the batter can enhance their flavor.
            • Serving Suggestions: Serve with a dollop of whipped cream or a drizzle of honey for extra decadence.

            This Nutty Pistachio Delight Bread is more than just a treat; it’s a testament to how a few simple ingredients can be transformed into something extraordinarily delicious and visually appealing.