DUMP AND BAKE MEATBALL CASSEROLE

0

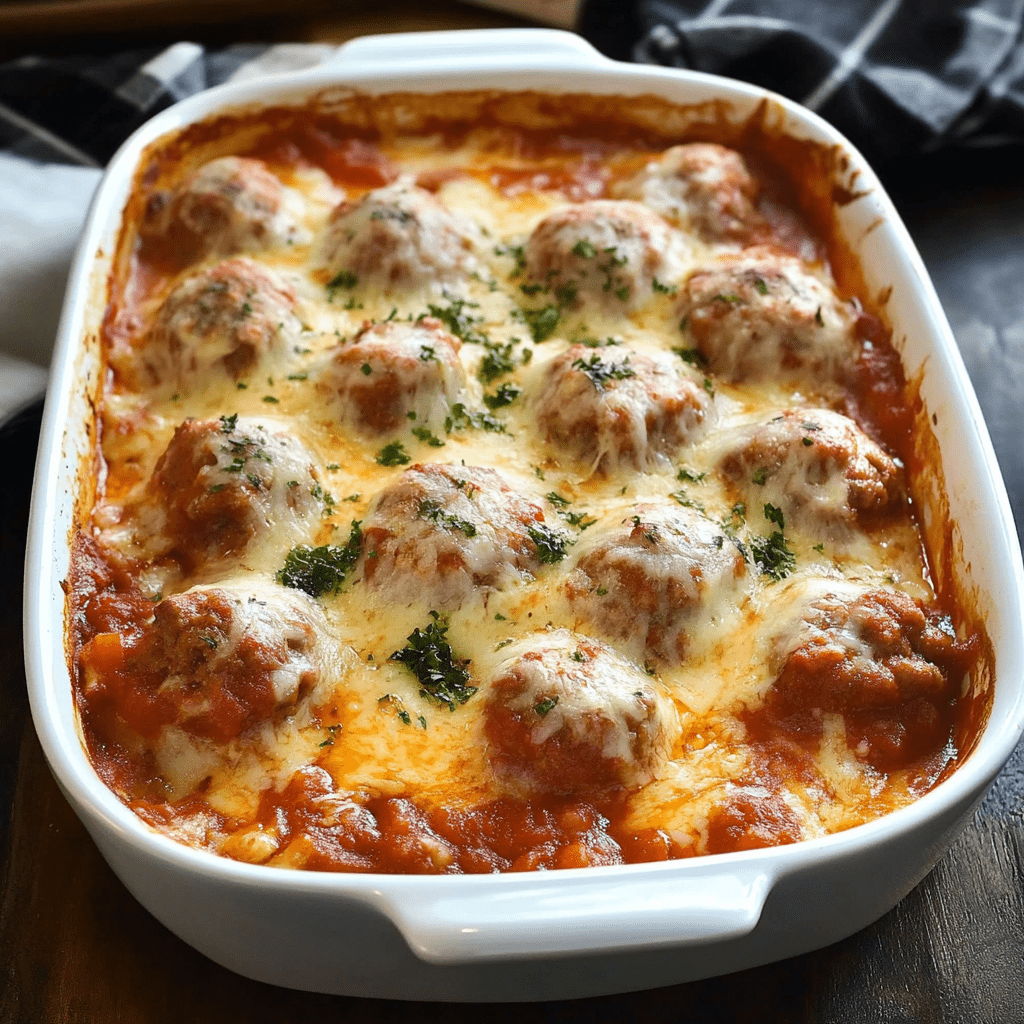
Savor the simplicity and heartiness of this One-Pan Meatball Pasta Bake, a perfect dish for busy weeknights. Combining rotini pasta with marinara sauce, succulent meatballs, and gooey mozzarella cheese, this recipe offers a deliciously comforting meal that’s sure to please the whole family. Plus, it’s baked all in one dish for minimal cleanup!

Why You’ll Love This Recipe:

  • Easy Preparation: Everything cooks in one dish, saving you time and effort.
  • Customizable: Add your favorite veggies or change up the cheeses for a new twist each time.
  • Family Favorite: This hearty dish is loved by kids and adults alike, making it a staple for family dinners.
  • Great for Leftovers: It reheats well for lunches or dinners throughout the week.

Ingredients:

  • 1 package (16 oz.) uncooked Barilla rotini pasta
  • 1 (25-ounce) jar of marinara sauce
  • 3 cups of water
  • 1 package (14 oz.) fully cooked miniature meatballs (cocktail size), thawed if frozen
  • 2 cups grated Kraft or Italian blend mozzarella cheese
  • Optional: Parmesan cheese and chopped fresh herbs (such as basil, oregano, and parsley) for garnish

Instructions:

Preheat and Prepare:

  1. Preheat your oven to 425°F (220°C). Select a large baking dish for the meal.

Assemble the Dish:

  1. In the baking dish, combine the uncooked rotini pasta, marinara sauce, water, and meatballs. Stir well to ensure the pasta is evenly coated and ingredients are distributed throughout the dish.
  2. Cover the dish tightly with aluminum foil to prevent moisture from escaping and to ensure the pasta cooks evenly.

Bake:

  1. Place the covered dish in the preheated oven and bake for 30 minutes. This initial bake helps to cook the pasta and infuse the flavors.

Add Cheese and Finish Baking:

  1. After 30 minutes, remove the dish from the oven. Carefully uncover and give everything a good stir to mix any unabsorbed sauce.
  2. Sprinkle the mozzarella cheese evenly over the top of the pasta. Return the dish to the oven, uncovered, and bake for an additional 10 minutes, or until the cheese is melted and bubbly and the pasta is tender.

Garnish and Serve:

  1. Once baked, remove from the oven. If desired, sprinkle with freshly grated Parmesan cheese and chopped fresh herbs for added flavor and a touch of color.
  2. Allow the dish to cool slightly before serving to let the pasta set up, making it easier to serve.

Storage and Reheating:

  • Refrigerate: Store leftovers in an airtight container in the refrigerator for up to 3 days.
  • Reheat: Warm servings in the microwave or in the oven until heated through. Add a splash of water if the pasta seems dry upon reheating.

Tips:

  • For Extra Flavor: Consider adding a layer of ricotta cheese before the mozzarella for a creamy texture.
  • Vegetables: Feel free to incorporate vegetables like spinach, mushrooms, or bell peppers to add nutrition and flavor.

Enjoy your One-Pan Meatball Pasta Bake as a stress-free, delicious meal that brings everyone to the table with smiles. Perfect for a cozy family dinner or a casual gathering with friends!

Heavenly Angel Food Cake Cookies

0

Embrace a lighter, airier take on cookies with these Heavenly Angel Food Cake Cookies, which blend the simplicity of angel food cake with the convenience and charm of cookies. Made with just a few ingredients including non-fat Greek yogurt, these treats offer a guilt-free indulgence that’s perfect for satisfying sweet cravings without the heaviness of traditional cookies.

Why You’ll Love This Recipe:

  • Light and Fluffy: Thanks to the angel food cake mix, these cookies have a wonderfully airy texture that’s different from typical cookies.
  • Quick and Easy: With minimal ingredients and preparation time, you can whip up a batch of these cookies in no time.
  • Healthier Option: Using non-fat Greek yogurt adds protein and reduces the fat content, making these cookies a healthier choice.
  • Versatile: Perfect for parties, gatherings, or a simple treat with a cup of tea or coffee.

Ingredients:

  • 2 cups non-fat Greek yogurt
  • 1 box angel food cake mix
  • 1 teaspoon vanilla extract
  • Sprinkles (optional, for garnish)

Instructions:

Preheat and Prepare:

  1. Preheat your oven to 350°F (175°C). Line a baking sheet with parchment paper to ensure easy removal of the cookies and quick cleanup.

Make the Cookie Batter:

  1. In a large mixing bowl, combine the non-fat Greek yogurt, angel food cake mix, and vanilla extract. Stir until the mixture is smooth and well incorporated.

Portion and Decorate:

  1. Using a spoon or a cookie scoop, drop portions of the batter onto the prepared baking sheet, spacing them apart to allow for spreading.
  2. If using, sprinkle the tops of the cookies with colorful sprinkles for a festive and fun touch.

Bake:

  1. Bake in the preheated oven for about 10 minutes, or until the cookies are lightly golden brown and set.

Cool and Serve:

  1. Remove the cookies from the oven and allow them to cool on the baking sheet for a few minutes. This step helps them set properly.
  2. Transfer the cookies to a wire rack to cool completely.

Storage Options:

  • Room Temperature: Store the cooled cookies in an airtight container at room temperature for up to 3 days.
  • Refrigerator: For longer storage, keep them in the refrigerator for up to a week.

Tips:

  • Mixing the Batter: Ensure the batter is smooth to avoid lumps in your cookies.
  • Serving Suggestion: Pair these light cookies with fresh fruit or a dollop of whipped cream for a delightful dessert.

Enjoy these Heavenly Angel Food Cake Cookies as a splendidly light treat that can be easily customized with your favorite toppings or enjoyed in their simple, classic form. Whether for a special occasion or a casual sweet tooth craving, these cookies are sure to please.

Sausage Hashbrown Bites

0

Delve into the savory world of Sausage Hashbrown Bites, a delightful and easy-to-make appetizer or breakfast option. These mini muffin-sized treats combine the hearty flavors of ground sausage, crispy hashbrowns, melty cheddar cheese, and fresh vegetables, all held together by a light, eggy binding. Perfect for gatherings, potlucks, or a family-friendly breakfast, these bites are sure to be a hit!

Why You’ll Love This Recipe:

  • Versatile: Great for breakfast, brunch, or as appetizers at your next party.
  • Customizable: Easily adaptable with different types of sausage or added ingredients like mushrooms or spinach.
  • Kid-Friendly: A hit with kids and adults alike, thanks to their manageable, bite-sized form.
  • Make-Ahead: Perfect for preparing ahead of time and heating up for a quick and satisfying snack or meal.

Ingredients:

  • 1 pound of ground sausage (choose your favorite type)
  • 2 cups of frozen hashbrowns, thawed
  • 1 cup of shredded cheddar cheese
  • 1/2 cup of diced red bell pepper
  • 1/4 cup of diced onion
  • 1/4 cup of chopped fresh parsley
  • 4 large eggs
  • Salt and pepper to taste
  • Cooking spray

Instructions:

Preheat and Prepare:

  1. Preheat your oven to 375°F (190°C). Grease a mini muffin tin with cooking spray to prevent sticking.

Cook the Sausage:

  1. In a skillet over medium heat, cook the ground sausage until browned and crumbly. Drain the sausage on paper towels to remove excess grease.

Mix the Ingredients:

  1. In a large mixing bowl, combine the browned sausage, thawed hashbrowns, shredded cheddar cheese, diced red bell pepper, diced onion, and chopped parsley. Mix until everything is evenly distributed.

Prepare the Egg Mixture:

  1. In a separate bowl, beat the eggs and season with salt and pepper. Pour the beaten eggs over the sausage and hashbrown mixture, stirring until well combined.

Assemble the Bites:

  1. Spoon the mixture into each cup of the prepared mini muffin tin, pressing down lightly to pack the ingredients into each cup.

Bake:

  1. Bake in the preheated oven for 20-25 minutes, or until the tops are golden brown and the bites are set.

Cool and Serve:

  1. Allow the bites to cool in the pan for a few minutes. Use a knife or spoon to gently loosen them from the edges of the muffin cups.
  2. Serve warm and enjoy the delightful combination of flavors and textures.

Storage Options:

  • Refrigerator: Store leftovers in an airtight container in the refrigerator for up to 3 days.
  • Freezer: Freeze the baked bites for up to a month. Reheat in the oven or microwave when ready to serve.

Tips:

  • Adding Veggies: Feel free to add other vegetables like spinach or mushrooms for extra nutrition and flavor.
  • Serving Suggestions: Serve with sour cream or your favorite dipping sauce for added zest.

These Sausage Hashbrown Bites are not only delicious but also a fun and easy way to enjoy a classic flavor combination. Perfect for any occasion, they are sure to become a new favorite!

Cheesesteak Tortellini

0

Dive into the hearty and flavorful world of Cheesesteak Tortellini, where classic Philly cheesesteak meets Italian pasta in a dish brimming with rich tastes and textures. This recipe features tender beef sirloin, creamy provolone cheese, and cheese-filled tortellini, all simmered in a savory broth that transforms into a luxurious sauce. It’s the perfect fusion meal for those craving comfort food with a unique twist.

Why You’ll Love This Recipe:

  • Rich and Flavorful: The combination of beef, cheese, and aromatic seasonings creates a deeply satisfying dish.
  • Comforting Yet Unique: This dish blends the comfort of a cheesesteak with the heartiness of tortellini pasta.
  • One-Pot Meal: Cooked primarily in a slow cooker, this recipe offers the ease of a one-pot meal with minimal cleanup.
  • Crowd-Pleaser: Ideal for family dinners or gatherings, this dish is sure to impress with its flavorful profile and filling nature.

Ingredients:

  • 1 lb beef sirloin, thinly sliced
  • 1 green bell pepper, sliced (optional)
  • 1 onion, sliced
  • 3 cloves garlic, minced
  • 4 cups beef broth
  • 1 tbsp Worcestershire sauce
  • 1 tsp salt
  • 1/2 tsp black pepper
  • 1/2 tsp dried thyme
  • 2 packages (9 oz each) cheese tortellini, refrigerated
  • 8 oz provolone cheese, shredded
  • 1/2 cup heavy cream

Instructions:

Step 1: Sear the Beef

  • Heat the skillet: Begin by heating a large skillet over medium-high heat. Add the beef and sear until browned on all sides, which locks in flavors and adds a caramelized texture.
  • Transfer to slow cooker: Once browned, transfer the beef to your slow cooker.

Step 2: Add the Vegetables and Seasonings

  • Layer the ingredients: Add the sliced green bell pepper, onion, and minced garlic over the beef in the slow cooker.
  • Add liquids and season: Pour in the beef broth and Worcestershire sauce. Sprinkle in the salt, black pepper, and dried thyme, then stir to mix well.

Step 3: Slow Cook

  • Cook: Cover the slow cooker and set it to LOW for 6-7 hours or HIGH for 3-4 hours, allowing the beef to become tender and the flavors to meld.

Step 4: Add the Tortellini

  • Add pasta: About 30 minutes before serving, add the cheese tortellini, ensuring they are submerged in the liquid. Continue cooking until the tortellini are tender.

Step 5: Finish with Cheese and Cream

  • Add cheese and cream: Stir in the shredded provolone cheese and heavy cream until the cheese is melted and the sauce is creamy.
  • Thicken sauce: Allow the sauce to thicken slightly for about 5-10 minutes.

Step 6: Serve

  • Garnish and serve: Ladle the Cheesesteak Tortellini into bowls and serve hot. The dish combines the creamy, cheesy sauce with tender beef and pasta for a truly indulgent meal.

Storage Options:

  • Refrigerator: Store leftovers in an airtight container for up to 3 days.
  • Freezer: Freeze in airtight containers for up to 1 month. Thaw in the refrigerator before reheating.

Tips:

  • Cheese Variations: Try different types of cheese such as mozzarella or Asiago for a different flavor profile.
  • Adding Vegetables: For a more nutritious twist, incorporate spinach or mushrooms during the last hour of cooking.

Enjoy this luscious Cheesesteak Tortellini, where every spoonful is packed with comforting flavors and textures, making it a delightful meal that marries the essence of two culinary favorites.

White Chocolate Raspberry Cheesecake

0

Delve into the elegant and irresistible White Chocolate Raspberry Cheesecake, a dessert that perfectly marries the richness of white chocolate with the tartness of fresh raspberries. This recipe features a buttery graham cracker crust, a creamy white chocolate filling, and a vibrant raspberry sauce, making it an exquisite treat for any occasion.

Why You’ll Love This Recipe:

  • Luxurious Flavor: The combination of smooth white chocolate and tangy raspberry sauce offers a sophisticated flavor profile.
  • Creamy Texture: The cheesecake is incredibly creamy and smooth, melting in your mouth with every bite.
  • Visually Stunning: With its beautiful swirls of raspberry sauce and garnishes of whipped cream and fresh berries, this cheesecake is as lovely to look at as it is to eat.
  • Perfect for Special Occasions: Whether celebrating a birthday, holiday, or just a special family dinner, this cheesecake makes a memorable dessert.

Ingredients:

For the Crust:

  • 1 1/2 cups graham cracker crumbs
  • 1/4 cup granulated sugar
  • 1/3 cup unsalted butter, melted

For the Filling:

  • 1 cup white chocolate chips
  • 3 (8 ounce) packages cream cheese, softened
  • 1/2 cup granulated sugar
  • 1 teaspoon vanilla extract
  • 3 large eggs
  • 1 cup sour cream

For the Raspberry Sauce:

  • 2 cups fresh raspberries
  • 1/2 cup granulated sugar
  • 1 teaspoon cornstarch
  • 1/4 cup water

For Decoration:

  • Fresh raspberries
  • Whipped cream
  • Mint leaves (optional)

Instructions:

Preparing the Crust:

  1. Preheat your oven to 350 degrees Fahrenheit (175 degrees Celsius).
  2. In a bowl, mix graham cracker crumbs, sugar, and melted butter. Press the mixture firmly into the bottom of a 9-inch springform pan. Set aside.

Making the Filling:

  1. Melt white chocolate chips in a microwave-safe bowl, stirring every 30 seconds until smooth. Set aside to cool slightly.
  2. In a large mixing bowl, beat cream cheese, sugar, and vanilla extract until smooth and creamy.
  3. Mix in the eggs one at a time, ensuring each is fully incorporated before adding the next.
  4. Stir in sour cream and melted white chocolate until the mixture is homogeneous. Pour over the prepared crust.

Preparing the Raspberry Sauce:

  1. Combine raspberries, sugar, cornstarch, and water in a saucepan over medium heat. Cook until the mixture is thickened, about 5-7 minutes. Strain the sauce to remove seeds.

Baking:

  1. Pour half of the cheesecake filling over the crust. Spoon half of the raspberry sauce over the filling.
  2. Pour the remaining filling on top and then swirl the remaining raspberry sauce over the top with a knife.
  3. Bake in the preheated oven for about 50 minutes. The center should be slightly wobbly.
  4. Turn off the oven and let the cheesecake sit in the oven with the door closed for 1 hour.

Cooling and Decorating:

  1. Remove the cheesecake from the oven and cool to room temperature. Chill in the refrigerator for at least 4 hours or overnight.
  2. Before serving, decorate with whipped cream, fresh raspberries, and mint leaves if desired.

Storage Options:

  • Refrigerator: Store the cheesecake in the refrigerator, covered, for up to 5 days.
  • Freezer: Wrap the cheesecake tightly and freeze for up to 2 months. Thaw in the refrigerator overnight before serving.

Tips:

  • Smooth Filling: Ensure all filling ingredients are at room temperature to achieve a smooth, lump-free texture.
  • Baking: Don’t open the oven door while baking as the sudden temperature change can cause cracks.

Indulge in the divine flavors of this White Chocolate Raspberry Cheesecake, a truly gourmet dessert that will enchant your taste buds and add a touch of elegance to any dining experience.

Parmesan Crusted Chicken

0

Savor the delectable taste of Parmesan Crusted Chicken, an easy-to-prepare dish that offers a wonderful blend of creamy and savory flavors. This recipe features chicken breasts topped with a rich coating of either mayonnaise or Greek yogurt mixed with Parmesan cheese and spices, baked to golden perfection. It’s a versatile dish that can be adapted to fit a healthier profile or indulge in a creamier texture, making it perfect for family dinners or special occasions.

Why You’ll Love This Recipe:

  • Flavorful and Moist: The mayonnaise or Greek yogurt creates a moist, flavorful crust that keeps the chicken juicy and delicious.
  • Easy Preparation: With minimal prep and simple ingredients, this dish is incredibly straightforward to make.
  • Customizable: Choose between mayonnaise for richness or Greek yogurt for a lighter fare, adjusting spices to your preference.
  • Perfect for Any Occasion: Whether it’s a weeknight dinner or a gathering with friends, this chicken dish is sure to impress.

Ingredients:

  • 4 boneless, skinless chicken breasts (ensure they are fully thawed if previously frozen)
  • 1 cup mayonnaise or Greek yogurt (depending on preference)
  • 1/2 cup Parmesan cheese, freshly grated preferred
  • 1 teaspoon seasoning salt (adjust to taste)
  • 1/2 teaspoon black pepper, freshly ground for better flavor
  • 1/2 teaspoon garlic powder

Instructions:

Preheat the Oven:

  • Heat your oven to 375°F (190°C).

Mix the Topping:

  • In a mixing bowl, combine the mayonnaise or Greek yogurt, Parmesan cheese, seasoning salt, black pepper, and garlic powder. Stir until the mixture is smooth and well combined.

Prepare the Chicken:

  • Place the chicken breasts in a baking dish. Spread the mayonnaise or yogurt mixture evenly over each chicken breast, ensuring to cover them generously.

Bake:

  • Transfer the baking dish to the preheated oven. Bake for about 45 minutes, or until the chicken is thoroughly cooked and the topping is golden and crusty. The chicken should reach an internal temperature of 165°F (74°C).

Rest and Serve:

  • Remove the chicken from the oven and let it rest for a few minutes before serving to allow the juices to redistribute.

Storage Options:

  • Refrigerator: Store leftovers in an airtight container for up to 3 days.
  • Freezer: Freeze individual portions in freezer-safe containers for up to 2 months. Thaw in the refrigerator overnight before reheating.

Tips:

  • Ensure Even Cooking: Pound the chicken breasts to an even thickness before topping with the mixture to ensure they cook evenly.
  • Serving Suggestions: Serve with a side of steamed vegetables, a light salad, or over a bed of pasta or rice to complete the meal.
  • For a Crispier Topping: Broil the chicken for the last few minutes of cooking to achieve a more golden and crispy topping.

Enjoy your delicious Parmesan Crusted Chicken, a simple yet satisfying dish that’s bound to become a new favorite in your recipe collection!

Garlic Mozzarella Biscuit Bombs

0

Experience the delightful combination of garlic, cheese, and buttery biscuits with these Garlic Mozzarella Biscuit Bombs. This simple, yet incredibly tasty recipe transforms ordinary buttermilk biscuits into a mouth-watering treat filled with gooey mozzarella cheese, making it a perfect snack for gatherings, parties, or as a comforting side dish.

Why You’ll Love This Recipe:

  • Quick and Easy: Using pre-made biscuit dough cuts down preparation time significantly, allowing you to whip up these treats with minimal effort.
  • Cheesy Goodness: Each biscuit bomb is stuffed with melty mozzarella cheese, offering a delicious surprise with each bite.
  • Garlicky Flavor: The combination of fresh garlic and parsley in the butter glaze adds a burst of flavor that enhances the biscuits beautifully.
  • Versatile: Serve these as an appetizer, snack, or alongside your favorite pasta dish or soup.

Ingredients:

  • One 8-count package of Pillsbury Grands buttermilk biscuits
  • Four sticks of mozzarella string cheese, each cut into eight equal parts
  • Four tablespoons of unsalted butter, melted
  • One tablespoon of finely minced garlic
  • Two tablespoons of finely chopped parsley
  • A pinch of fine sea salt

Instructions:

Preheat the Oven:

  • Start by preheating your oven to 400°F (204°C) to ensure it reaches the proper temperature for baking.

Prepare the Dough:

  • Open the package of biscuits and separate each biscuit. Divide each biscuit in half and use a rolling pin or your hands to flatten each piece to about a quarter inch thick, maintaining a roughly rounded shape.

Combine the Seasonings:

  • In a small mixing bowl, combine the melted butter, minced garlic, chopped parsley, and sea salt. This mixture will serve as both a flavor enhancer and a glaze for the biscuits.

Assemble the Biscuits:

  • Place two pieces of the sliced mozzarella cheese in the center of each flattened biscuit piece. Fold the dough over the cheese, pinching the edges together to seal and form a sealed ball. Place each ball seam side down on a lightly colored baking sheet to prevent overcooking the bottoms.

Bake:

  • Brush each biscuit bomb generously with the garlic butter mixture. Place the baking sheet in the oven and bake for 8-10 minutes, or until the biscuits are golden brown on top.

Final Glaze and Serve:

  • As soon as you remove the biscuits from the oven, brush them with the remaining garlic butter mixture for added flavor and a glossy appearance. Serve warm to enjoy the gooey mozzarella filling at its best.

Storage Options:

  • Room Temperature: Best enjoyed fresh, but can be kept at room temperature for a few hours.
  • Refrigerator: Store in an airtight container for up to 2 days and reheat in the oven or microwave until warm.

Tips:

  • Sealing the Dough: Ensure that the dough is completely sealed around the cheese to prevent it from leaking out during baking.
  • Serving Suggestions: These biscuit bombs can be served with marinara sauce for dipping or alongside a salad for a light meal.
  • Variations: Add some chopped pepperoni or cooked sausage inside with the cheese for an extra flavor twist.

Enjoy your delicious Garlic Mozzarella Biscuit Bombs, a guaranteed hit for any occasion that calls for a cheesy, garlicky treat!

Strawberry Cream Pie

0

Dive into the delightful and refreshing flavors of this Strawberry Cream Pie, a perfect dessert for warm weather gatherings. This recipe features a buttery homemade crust, a light and fluffy cream cheese filling, and a vibrant strawberry glaze topped with fresh berries. It’s an elegant dessert that balances sweetness and tartness beautifully.

Why You’ll Love This Recipe:

  • Fresh and Fruity: The use of fresh strawberries not only provides a bright, natural flavor but also makes this pie visually appealing.
  • Creamy Texture: The combination of whipped cream and cream cheese creates a luxuriously smooth filling that complements the crisp pie crust.
  • Versatile: This pie is perfect for any occasion, from summer picnics to formal dinners.
  • Make-Ahead Friendly: Prepare this pie ahead of time and let it set in the fridge, making it a convenient option for entertaining.

Ingredients:

For the Crust:

  • 1 1/4 cups all-purpose flour
  • 1/4 teaspoon salt
  • 1/2 cup unsalted butter, chilled and diced
  • 3-5 tablespoons ice water

For the Cream Filling:

  • 1 cup heavy cream
  • 1/2 cup powdered sugar
  • 1 teaspoon vanilla extract
  • 8 ounces cream cheese, softened

For the Strawberry Glaze:

  • 4 cups fresh strawberries, hulled and halved
  • 1 cup granulated sugar
  • 2 tablespoons cornstarch
  • 1/2 cup water
  • 1 teaspoon lemon juice

For Garnish:

  • Whipped cream

Equipment:

  • 9-inch pie dish
  • Medium saucepan
  • Electric mixer
  • Rolling pin

Instructions:

Prepare the Pie Crust:

  1. In a mixing bowl, combine the flour and salt. Cut in the chilled butter until the mixture resembles coarse crumbs.
  2. Gradually add ice water, stirring until the dough forms a ball. Wrap in plastic wrap and refrigerate for at least 30 minutes.
  3. Roll out the dough on a floured surface to fit a 9-inch pie dish. Place the crust in the dish, trim the excess, and crimp the edges. Prick the bottom with a fork to prevent bubbling.
  4. Bake in a preheated oven at 425°F (220°C) for 12-15 minutes until golden. Let cool.

Make the Cream Filling:

  1. In a bowl, using an electric mixer, beat the heavy cream with powdered sugar and vanilla extract until stiff peaks form.
  2. In another bowl, whip the cream cheese until smooth. Gently fold the whipped cream into the cream cheese.
  3. Spread this mixture evenly into the cooled crust.

Prepare the Strawberry Glaze:

  1. In a medium saucepan, combine half the strawberries, granulated sugar, cornstarch, water, and lemon juice. Cook over medium heat, stirring frequently, until the mixture thickens and becomes clear.
  2. Remove from heat and cool slightly. Stir in the remaining strawberries.

Assemble the Pie:

  1. Pour the glazed strawberry mixture over the cream filling, arranging some of the strawberry halves for a decorative top layer.

Chill and Serve:

  1. Refrigerate the pie until set, about 3-4 hours.
  2. Serve each slice with a dollop of whipped cream.

Storage Options:

  • Refrigerator: Keep the pie refrigerated and consume within 3 days for best freshness and texture.
  • Freezer: It is not recommended to freeze this pie as the filling and glaze may separate upon thawing.

Tips:

  • Crust Tip: Keep the dough chilled while working with it to ensure a flakier crust.
  • Filling Tip: Ensure all ingredients for the filling are at room temperature to achieve a smoother texture.
  • Glaze Tip: Allow the cooked glaze to cool slightly before adding the raw strawberries to prevent them from overcooking and losing their texture.

Enjoy your beautiful and tasty Strawberry Cream Pie, a dessert that’s sure to please both the eye and the palate!

Banana Cream Cheese Bread

0

Indulge in the deliciously moist and flavorful Banana Cream Cheese Bread, a delightful twist on the classic banana bread. This recipe features a luscious cream cheese layer nestled between rich banana batter, offering a perfect blend of sweetness and tangy cream cheese in every slice. It’s ideal for a cozy breakfast, a midday snack, or even as a dessert.

Why You’ll Love This Recipe:

  • Moist and Flavorful: The combination of ripe bananas and sour cream ensures that this bread stays exceptionally moist and flavorful.
  • Cream Cheese Surprise: The layer of cream cheese adds a creamy texture and a tangy contrast to the sweet banana flavor.
  • Simple Ingredients: Made with pantry staples, this bread is easy to whip up without a need for any fancy ingredients.
  • Versatile: Serve it warm for breakfast, pack it for a snack, or dress it up with a dollop of whipped cream for a decadent dessert.

Ingredients:

  • 1 1/2 cups all-purpose flour
  • 1 teaspoon baking soda
  • 1/2 teaspoon salt
  • 1/4 teaspoon ground cinnamon
  • 1/2 cup unsalted butter, softened
  • 1 cup granulated sugar
  • 2 large eggs
  • 1 teaspoon vanilla extract
  • 3 ripe bananas, mashed
  • 1/4 cup sour cream
  • 4 ounces cream cheese, softened

Instructions:

Preheat Oven:

  • Preheat your oven to 350°F (175°C). Grease a 9×5-inch loaf pan and set aside.

Mix Dry Ingredients:

  • In a medium bowl, whisk together the flour, baking soda, salt, and cinnamon. Set aside.

Cream Butter and Sugar:

  • In a large bowl, using an electric mixer, cream the softened butter and sugar until light and fluffy.
  • Beat in the eggs one at a time, then mix in the vanilla extract until well combined.

Combine Wet Ingredients:

  • Add the mashed bananas and sour cream to the butter mixture. Stir until well blended.

Prepare Cream Cheese Layer:

  • In a separate bowl, beat the softened cream cheese until smooth and creamy. Set aside.

Assemble the Bread:

  • Pour half of the banana batter into the prepared loaf pan.
  • Gently spread the cream cheese layer evenly over the batter.
  • Carefully top with the remaining banana batter, smoothing out the top.

Bake:

  • Place in the oven and bake for 60-70 minutes, or until a toothpick inserted into the center comes out clean.

Cool and Serve:

  • Allow the bread to cool in the pan for about 10 minutes, then transfer to a wire rack to cool completely.

Storage Options:

  • Room Temperature: Keep covered in plastic wrap or in an airtight container for up to 3 days.
  • Refrigerate: For longer storage, refrigerate for up to 1 week.
  • Freeze: Wrap tightly with aluminum foil or plastic freezer wrap, and freeze for up to 3 months.

Tips:

  • Ensure Ingredients are at Room Temperature: This helps to mix the batter more evenly and achieve a smoother texture.
  • Do Not Overmix: Mix the ingredients just until combined to keep the bread tender.
  • Check for Doneness: Oven temperatures can vary, so start checking the bread at 60 minutes to prevent overbaking.

This Banana Cream Cheese Bread promises to be a new favorite, perfect for those who love banana bread but are looking for something a little extra. Its creamy, tangy layer makes every slice a special treat!

Beef and Cheese Stuffed Pasta Shells

0

Savor the richness of Beef and Cheese Stuffed Pasta Shells, a comforting and hearty meal perfect for any day of the week. This dish features large pasta shells filled with a delicious blend of lean ground beef, creamy ricotta, and melted cheeses, topped with a flavorful tomato basil sauce. It’s a crowd-pleaser that’s sure to satisfy both kids and adults alike.

Why You’ll Love This Recipe:

  • Rich and Flavorful: The combination of seasoned beef, three types of cheese, and aromatic herbs makes each bite incredibly tasty.
  • Perfect for Gatherings: These stuffed shells are ideal for family dinners or hosting friends, as they can be prepared ahead of time and baked just before serving.
  • Customizable: Easily adapt the filling by adding vegetables or different spices to suit your taste preferences.
  • Visually Appealing: The stuffed shells make a beautiful presentation, perfect for special occasions or casual dining.

Ingredients:

  • 20 large pasta shells
  • 1 lb lean ground beef
  • 1 cup ricotta cheese
  • 1 ½ cups shredded mozzarella cheese, divided
  • ½ cup grated Pecorino Romano cheese
  • 1 large egg, beaten
  • 2 ½ cups tomato basil sauce
  • 1 tsp dried oregano
  • 2 cloves garlic, minced
  • Salt and black pepper to taste
  • Fresh parsley, chopped (for garnish)

Instructions:

Preheat Oven:

  • Heat your oven to 375°F (190°C).

Cook Pasta:

  • Boil the pasta shells in salted water until al dente. Drain and set aside to cool.

Prepare Filling:

  • In a skillet over medium heat, brown the ground beef. Once browned, add the minced garlic and dried oregano, cooking until fragrant. Remove from heat and allow to cool slightly.

Mix the Filling:

  • In a large mixing bowl, combine the cooled beef, ricotta cheese, 1 cup of shredded mozzarella, Pecorino Romano cheese, beaten egg, salt, and black pepper. Mix thoroughly until the ingredients are well combined.

Stuff and Assemble:

  • Spread 1 cup of tomato basil sauce in the bottom of a 9×13 inch baking dish.
  • Fill each cooked pasta shell with the beef and cheese mixture and arrange them in the dish.
  • Pour the remaining 1 ½ cups of tomato basil sauce over the stuffed shells.
  • Sprinkle the remaining ½ cup of shredded mozzarella cheese on top.

Bake:

  • Cover the dish with aluminum foil and bake for 25 minutes.
  • Remove the foil and continue baking for an additional 10 minutes, or until the cheese is golden and bubbly.

Serve:

  • Garnish with freshly chopped parsley before serving.

Storage Options:

  • Refrigerator: Store leftovers in an airtight container in the refrigerator for up to 3 days.
  • Freezer: Freeze the prepared but unbaked stuffed shells for up to 2 months. Bake from frozen, adding extra time as necessary.

Tips:

  • Pasta Preparation: To prevent the shells from sticking together after boiling, toss them with a little olive oil before filling.
  • Cheese Selection: For a richer flavor, consider using full-fat ricotta or adding a blend of Italian cheeses.
  • Serving Suggestion: Serve these stuffed shells with a side of garlic bread and a crisp green salad for a complete meal.

Enjoy crafting this delightful dish of Beef and Cheese Stuffed Pasta Shells, which promises to bring comfort and joy to your table with its rich flavors and satisfying textures.