Pecan Cream Pie

0

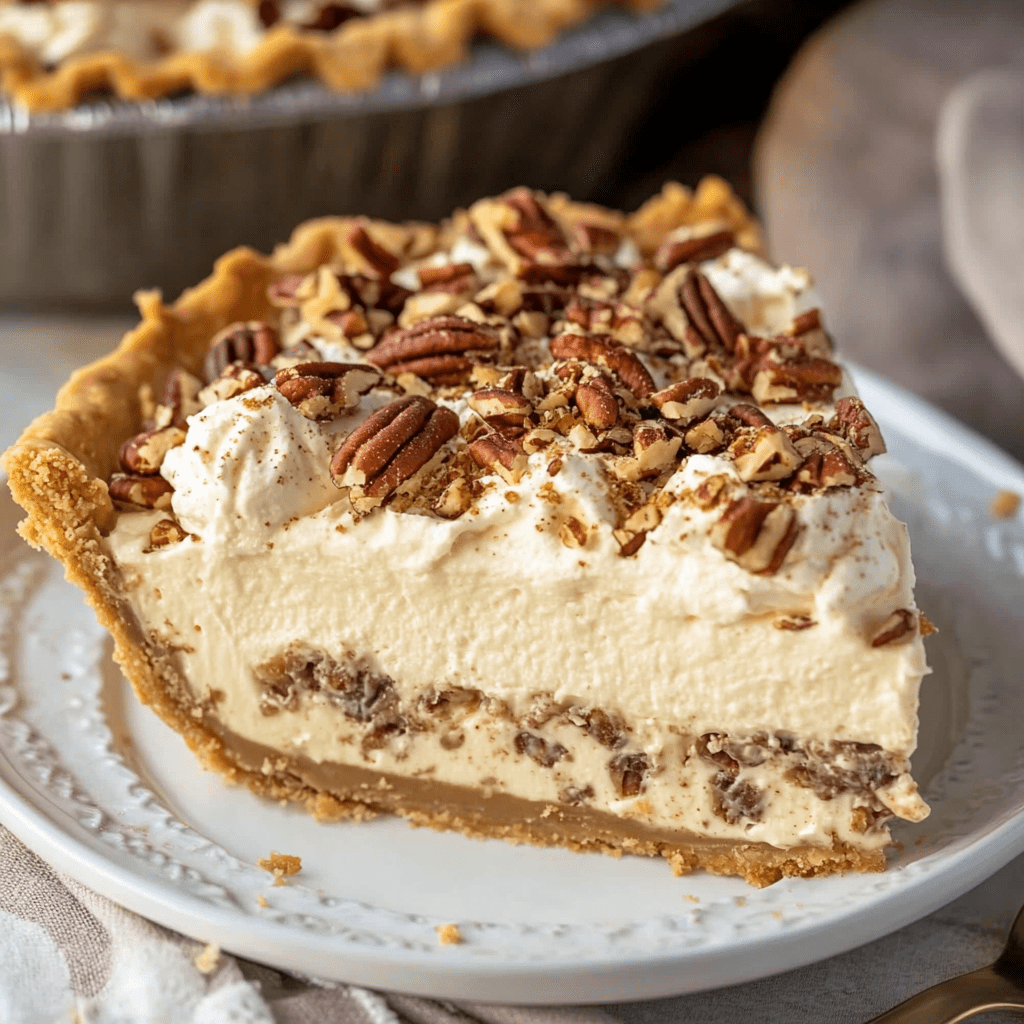
Celebrate the sweet essence of the South with this Pecan Cream Pie, an indulgent dessert featuring a buttery crust, rich pecan filling, and a luxurious whipped cream topping. This pie combines traditional flavors and textures to create a delightful treat perfect for any gathering or special occasion.

Why You’ll Love This Recipe:

  • Classic Flavor: The rich, nutty flavor of pecans is perfectly balanced with the sweetness of the syrup and sugar, making each bite satisfying.
  • Homemade Pie Crust: Nothing beats a flaky, buttery homemade crust that adds the perfect base to the lush filling.
  • Versatility: This pie is ideal for holidays, family gatherings, or as a special treat to brighten any day.
  • Elegant Presentation: Topped with homemade whipped cream, this pie not only tastes delicious but also looks impressive on any dessert table.

Ingredients:

For the Pie Crust:

  • 1 1/4 cups all-purpose flour
  • 1/2 cup unsalted butter, cold and cut into small cubes
  • 1/4 cup granulated sugar
  • 1/4 teaspoon salt
  • 2-3 tablespoons ice water

For the Pecan Filling:

  • 1 cup pecan halves
  • 3 large eggs
  • 1 cup light corn syrup
  • 1/2 cup granulated sugar
  • 1/4 cup unsalted butter, melted
  • 1 teaspoon vanilla extract
  • 1/4 teaspoon salt

For the Whipped Cream Topping:

  • 1 cup heavy cream
  • 2 tablespoons powdered sugar
  • 1/2 teaspoon vanilla extract

Instructions:

Prepare the Pie Crust:

  1. In a food processor, pulse together the flour, sugar, and salt.
  2. Add the cold, cubed butter and pulse until the mixture resembles coarse crumbs.
  3. Gradually add ice water, one tablespoon at a time, pulsing until the dough just comes together.
  4. Form the dough into a disk, wrap in plastic, and refrigerate for at least 30 minutes.

Prebake the Crust:

  1. Preheat your oven to 375°F (190°C).
  2. Roll out the chilled dough on a floured surface to fit into a 9-inch pie dish. Trim and crimp the edges.
  3. Line the crust with parchment paper, fill with pie weights or dried beans, and bake for 15 minutes. Remove the weights and parchment and bake for another 5-7 minutes until golden. Let cool.

Prepare the Pecan Filling:

  1. Arrange pecan halves in the cooled prebaked crust.
  2. In a bowl, whisk together eggs, corn syrup, sugar, melted butter, vanilla extract, and salt until smooth.
  3. Pour the filling over the pecans.

Bake the Pie:

  1. Reduce the oven temperature to 350°F (175°C).
  2. Bake for 40-45 minutes, or until the filling is set and slightly puffed. Cool on a wire rack.

Prepare the Whipped Cream Topping:

  1. In a bowl, whip the heavy cream with powdered sugar and vanilla extract until stiff peaks form.

Serve:

  1. Once the pie has cooled, slice and serve each piece with a dollop of whipped cream on top.

Storage Options:

  • Refrigerator: Store the pie in the refrigerator for up to 4 days. Cover loosely with foil or plastic wrap.
  • Freezer: Freeze the pie without the whipped cream for up to 2 months. Thaw in the refrigerator overnight and top with fresh whipped cream before serving.

Tips:

  • Pie Crust: For an extra flaky crust, chill the rolled-out dough in the pie dish before filling and baking.
  • Filling: To prevent the pecans from burning, tent the pie with aluminum foil if the top darkens too quickly during baking.
  • Serving: For a festive touch, sprinkle some toasted pecan pieces or drizzle caramel sauce over the whipped cream.

Enjoy the delightful flavors and textures of this Pecan Cream Pie, a recipe that’s sure to become a cherished addition to your dessert repertoire.

Ultimate Chocolate Brownies

0

Step into chocolate heaven with these Ultimate Chocolate Brownies, designed to deliver the richest, most indulgent chocolate experience. Featuring a combination of melted dark chocolate and butter, these brownies are dense, fudgy, and perfect for any chocolate enthusiast. This recipe simplifies the baking process, ensuring that even beginners can create delicious treats that taste professionally made.

Why You’ll Love This Recipe:

  • Deep Chocolate Flavor: The use of dark chocolate enriches these brownies with a profound chocolate taste that’s both bold and satisfying.
  • Fudgy Texture: The perfect ratio of flour to chocolate keeps these brownies moist and fudgy, with just the right amount of chewiness.
  • Simple Ingredients: Made with common pantry staples, these brownies are easy to whip up on a whim.
  • Versatile and Customizable: Add nuts, chocolate chips, or a drizzle of caramel to elevate them to your personal preference.

Ingredients:

  • Melted butter (for greasing)
  • 200 g dark chocolate, chopped
  • 100 g unsalted butter
  • 3 large eggs
  • 150 g granulated sugar
  • 50 g brown sugar
  • 70 g all-purpose flour
  • 30 g cocoa powder

Ingredient Tips:

  • Chocolate: Choose a high-quality dark chocolate for the best flavor and melting properties. A cocoa content of 60-70% is ideal for that deep, rich taste.
  • Butter: Using unsalted butter allows you to control the amount of salt in the recipe, balancing the sweetness.

Instructions:

Step 1: Prep the Pan

  • Brush the inside of an 8-inch square baking pan with melted butter. Line the pan with parchment paper, letting the edges overhang for easy removal of the brownies once baked.

Step 2: Melt Chocolate and Butter

  • In a heatproof bowl, combine the dark chocolate and unsalted butter. Melt over a pan of simmering water (double boiler method), stirring occasionally until smooth. Remove from heat and let cool slightly.

Step 3: Whisk Eggs and Sugars

  • In a separate large bowl, beat the eggs with the granulated sugar and brown sugar until smooth. For a more refined texture, place the bowl over a pot of boiling water and continue to mix until the sugar begins to dissolve.

Step 4: Combine Chocolate with Egg Mixture

  • Gradually pour the melted chocolate mixture into the egg and sugar mixture, stirring continuously until fully incorporated.

Step 5: Mix in Dry Ingredients

  • Sift together the all-purpose flour and cocoa powder. Fold into the chocolate mixture gently to avoid deflating the mixture, until no dry streaks remain.

Step 6: Bake

  • Pour the batter into the prepared pan, smoothing the top with a spatula. Bake in a preheated oven at 170°C (338°F) for about 25 minutes, or until the top is set and a toothpick inserted into the center emerges with a few moist crumbs attached.

Step 7: Cool and Serve

  • Allow the brownies to cool in the pan for at least 10 minutes before lifting out using the overhanging parchment paper. Cut into squares and serve.

Storage Options:

  • Room Temperature: Store the brownies in an airtight container at room temperature for up to 4 days.
  • Refrigerate: For a firmer texture, refrigerate for up to 1 week.
  • Freeze: Freeze brownies for up to 3 months in airtight containers. Thaw at room temperature before serving.

Tips:

  • For a special touch, sprinkle sea salt over the brownies before baking to enhance the chocolate flavor.
  • Pair with a glass of cold milk or a cup of hot coffee for a perfect snack or dessert.

These Ultimate Chocolate Brownies are not only a treat to eat but also a joy to make, bringing simplicity and decadence into your kitchen with each batch. Enjoy the rich, chocolatey goodness in every bite!

Baked Sausage and Pepper Jack Wontons

0

Baked Sausage and Pepper Jack Wontons are crispy, savory bites filled with a delightful blend of ground sausage, Pepper Jack cheese, and fresh vegetables. These appetizers are perfect for parties or as a delicious snack any time of day.

Why You’ll Love This Recipe:

  • Crispy and Flavorful: The wonton wrappers bake to a golden perfection, providing a crunchy contrast to the creamy, cheesy filling.
  • Easy to Make: Simple steps ensure that anyone can whip up these wontons in no time.
  • Versatile: Serve them with your favorite dipping sauces for a customizable flavor experience.
  • Perfect Party Food: These wontons are great for entertaining guests or enjoying as a quick snack.

Ingredients:

  • 1/2 pound ground sausage
  • 1 cup shredded Pepper Jack cheese
  • 24 wonton wrappers
  • 1/4 cup chopped green onions
  • 1/4 cup finely chopped red bell pepper
  • 1 teaspoon garlic powder
  • 1 teaspoon onion powder
  • Salt and pepper to taste
  • 1 egg, beaten (for sealing wontons)
  • Cooking spray

Instructions:

Step 1: Preheat the Oven

  • Preheat your oven to 400°F (200°C). Line a baking sheet with parchment paper.

Step 2: Cook the Sausage

  • In a medium skillet, cook the ground sausage over medium heat until fully browned and cooked through. Drain any excess grease and let the sausage cool slightly.

Step 3: Prepare the Filling

  • In a mixing bowl, combine the cooked sausage, shredded Pepper Jack cheese, chopped green onions, red bell pepper, garlic powder, onion powder, salt, and pepper. Mix until evenly distributed.

Step 4: Assemble the Wontons

  • Place a wonton wrapper on a clean surface. Spoon about 1 tablespoon of the sausage mixture into the center of the wrapper.
  • Lightly brush the edges of the wonton wrapper with beaten egg. Fold the wrapper over to form a triangle or pouch, pressing the edges tightly to seal. Repeat with the remaining wrappers and filling.

Step 5: Bake to Golden Perfection

  • Arrange the filled wontons on the prepared baking sheet, ensuring they are not touching each other.
  • Lightly spray the tops of the wontons with cooking spray to help them crisp up.
  • Bake in the preheated oven for 12-15 minutes, or until the wontons are golden brown and crispy.

Step 6: Serve and Enjoy

  • Allow the wontons to cool slightly before serving. Serve them warm with your favorite dipping sauces such as marinara, ranch, or sriracha mayo.

Storage Tips:

  • These wontons are best served fresh and crispy. If you have leftovers, store them in an airtight container in the refrigerator for up to 2 days. Reheat in the oven to maintain their crispiness.

Tips:

  • Customize the filling by adding different cheeses or adjusting the spices to your taste preference.
  • Experiment with different dipping sauces to find your favorite pairing with these delicious wontons.

Enjoy your Baked Sausage and Pepper Jack Wontons! If you have any more recipes or need further assistance, feel free to ask.

Beef and Cheese Dip

0

Beef and Cheese Dip is a savory, hearty dish perfect for gatherings or game day snacks. It features ground beef, black beans, diced tomatoes with green chiles, and creamy Velveeta cheese, all blended together for a deliciously comforting dip.

Why You’ll Love This Recipe:

  • Easy Preparation: Simple steps make this dip quick to prepare and perfect for serving a crowd.
  • Rich and Creamy: The creamy Velveeta cheese sauce coats the beef and beans, creating a satisfying texture.
  • Flavorful Ingredients: Spices like chili powder and cumin add depth, while jalapeños and cilantro provide a fresh, spicy kick.
  • Versatile Serving: Enjoy with tortilla chips for dipping or as a topping for nachos.

Ingredients:

  • 1 lb ground beef
  • 1 onion, finely chopped
  • 2 cloves garlic, minced
  • 1 can (15 oz) black beans, drained and rinsed
  • 1 can (10 oz) diced tomatoes with green chiles, undrained
  • 1 teaspoon chili powder
  • 1/2 teaspoon cumin
  • Salt and pepper to taste
  • 1 lb Velveeta cheese, cut into cubes
  • 1/2 cup milk
  • 1/4 cup chopped fresh cilantro
  • 1 jalapeño, sliced
  • Tortilla chips, for serving

Instructions:

Cook the Beef:

  1. In a large skillet over medium heat, cook the ground beef until browned. Drain any excess grease.
  2. Add the chopped onion and garlic to the skillet and cook until softened, about 5 minutes.

Add Flavors and Beans:

  1. Stir in the black beans, diced tomatoes with green chiles, chili powder, and cumin. Season with salt and pepper.
  2. Cook the mixture for about 5-7 minutes until everything is heated through and well combined.

Make the Cheese Sauce:

  1. In a saucepan, combine the cubed Velveeta and milk. Cook over low heat, stirring constantly, until the cheese has melted and the sauce is smooth.

Combine and Simmer:

  1. Add the melted cheese to the beef and bean mixture. Stir until everything is well coated with cheese.
  2. Let the dip simmer for an additional 2-3 minutes, stirring occasionally to prevent sticking.

Garnish and Serve:

  1. Remove the dip from heat and transfer to a serving dish.
  2. Garnish with chopped cilantro and sliced jalapeños.
  3. Serve hot with tortilla chips for dipping.

Storage Options:

  • Store any leftover dip in an airtight container in the refrigerator for up to 3 days. Reheat gently on the stovetop or in the microwave before serving.

Tips:

  • Customize the spice level by adjusting the amount of jalapeño or adding hot sauce.
  • Substitute ground turkey or chicken for a leaner option.
  • Add a dollop of sour cream or guacamole as additional toppings for extra flavor.

Enjoy your Beef and Cheese Dip! If you have any more recipes or need further assistance, feel free to ask.

Texas Sheet Cake with Chocolate Frosting and Pecans

0

Texas Sheet Cake is a classic dessert known for its rich chocolate flavor and easy preparation. This recipe yields a large, decadent cake topped with a luscious chocolate frosting and toasted pecans.

Why You’ll Love This Recipe:

  • Rich Chocolate Flavor: The combination of cocoa powder and buttermilk creates a deeply chocolatey cake.
  • Simple Preparation: Made in a large sheet pan, this cake is easy to bake and perfect for feeding a crowd.
  • Delicious Frosting: The warm chocolate frosting poured over the warm cake creates a smooth and fudgy topping.
  • Crunchy Pecan Topping: Toasted pecans add a delightful crunch and nutty flavor, complementing the chocolate perfectly.

Ingredients:

For the Cake:

  • 2 cups all-purpose flour
  • 2 cups granulated sugar
  • 1/4 teaspoon salt
  • 1/2 cup buttermilk
  • 2 large eggs
  • 1 teaspoon vanilla extract
  • 1 teaspoon baking soda
  • 1 cup unsalted butter
  • 1/3 cup unsweetened cocoa powder
  • 1 cup water

For the Frosting:

  • 1/2 cup unsalted butter
  • 1/3 cup milk
  • 1/4 cup unsweetened cocoa powder
  • 3 1/2 cups powdered sugar, sifted
  • 1 teaspoon vanilla extract

For the Pecan Topping:

  • 1/2 cup pecans, toasted and halved

Instructions:

Prepare the Cake:

  1. Preheat your oven to 350°F (175°C). Grease a large sheet pan (about 18×13 inches) and set aside.
  2. In a large bowl, whisk together flour, sugar, and salt.
  3. In another bowl, mix buttermilk, eggs, vanilla extract, and baking soda.
  4. In a saucepan over medium heat, melt the butter. Add cocoa powder and water, stirring until the mixture boils. Remove from heat and pour over the dry ingredients, mixing until well combined.
  5. Add the buttermilk mixture to the batter and stir until smooth. Pour into the prepared sheet pan.
  6. Bake for 20-22 minutes or until a toothpick inserted into the center comes out clean. Allow to cool slightly.

Make the Frosting:

  1. In a saucepan, combine butter, milk, and cocoa powder. Heat until the butter melts and the mixture starts to boil.
  2. Remove from heat and immediately stir in powdered sugar and vanilla extract until smooth.
  3. Pour the warm frosting over the slightly cooled cake, spreading it out evenly.

Add the Pecan Topping:

  • Sprinkle the toasted pecan halves evenly over the frosted cake while it’s still warm. The warmth of the frosting will help the pecans adhere and set into the cake.

Serve:

  • Allow the cake to fully cool and the frosting to set before cutting into squares. This cake is best served at room temperature or slightly chilled.

Storage Options:

  • Store leftover cake in an airtight container at room temperature for up to 3 days, or in the refrigerator for longer storage.

Tips:

  • For extra richness, you can add a pinch of cinnamon or espresso powder to the cake batter.
  • Ensure the pecans are toasted just until fragrant to enhance their flavor without burning them.

Enjoy baking and savoring this delicious Texas Sheet Cake with Chocolate Frosting and Pecans! Let me know if there’s anything else you’d like to explore or if you have more recipes in mind!

Cinnamon Rolls with Cream Cheese Icing

0

These Cinnamon Rolls with Cream Cheese Icing are a decadent treat, perfect for breakfast or a sweet indulgence. Soft, fluffy rolls swirled with cinnamon sugar and topped with a rich cream cheese icing, they are sure to become a favorite for any occasion.

Why You’ll Love This Recipe:

  • Soft and Fluffy Dough: Made with a buttery dough that rises beautifully, resulting in tender cinnamon rolls.
  • Irresistible Cinnamon Filling: A blend of brown sugar and cinnamon creates a sweet and spicy swirl inside each roll.
  • Cream Cheese Icing: Rich and creamy icing made with cream cheese, butter, powdered sugar, and vanilla adds the perfect finishing touch.
  • Homemade Goodness: Enjoy the aroma of freshly baked cinnamon rolls straight from your oven, bringing warmth and comfort to your kitchen.

Ingredients:

Dough:

  • 2 and 3/4 cups (344g) all-purpose flour (spooned & leveled)
  • 1/4 cup (50g) granulated sugar
  • 1/2 teaspoon salt
  • 3/4 cup (180ml) whole milk
  • 3 tablespoons (43g) unsalted butter
  • 1 standard packet (2 and 1/4 teaspoons) instant yeast
  • 1 large egg, at room temperature

Filling:

  • 3 tablespoons (43g) unsalted butter, softened
  • 1/3 cup (67g) packed light or dark brown sugar
  • 1 tablespoon ground cinnamon

Cream Cheese Icing:

  • 4 ounces (113g) full-fat block cream cheese, softened to room temperature
  • 2 tablespoons (28g) unsalted butter, softened to room temperature
  • 2/3 cup (80g) confectioners’ sugar
  • 1 teaspoon pure vanilla extract

Instructions:

Make the Dough:

  1. In a large bowl, whisk together the flour, granulated sugar, and salt. Set aside.
  2. In a heatproof bowl, combine the milk and butter. Microwave or heat on the stove until the mixture is warm to the touch (about 110°F/43°C), and the butter has melted. Stir in the instant yeast until dissolved.
  3. Pour the milk mixture into the dry ingredients. Add the egg. Stir with a sturdy spatula or use a stand mixer with a paddle attachment on medium speed until a soft dough forms.
  4. Transfer the dough to a lightly floured surface. Knead for 3-5 minutes until smooth, adding more flour if necessary. Place the dough in a lightly greased bowl, cover loosely, and let rest for 10 minutes.

Fill the Rolls:

  1. After resting, roll the dough out into a 14×8-inch (36×20-cm) rectangle. Spread softened butter over the dough.
  2. In a small bowl, mix together brown sugar and cinnamon. Sprinkle evenly over the buttered dough.
  3. Roll up the dough tightly into a 14-inch log. Cut into 10-12 even rolls and place them in a lightly greased 9- or 10-inch round cake pan, pie dish, or square baking pan.

Rise:

  1. Cover the pan with aluminum foil, plastic wrap, or a clean kitchen towel. Allow the rolls to rise in a warm place for 60-90 minutes or until doubled in size.

Bake the Rolls:

  1. Preheat the oven to 375°F (190°C). Bake the rolls for 24-27 minutes, or until lightly browned. If the tops brown too quickly, tent loosely with foil. The internal temperature should reach 195–200°F (91–93°C).
  2. Remove from the oven and place on a wire rack to cool slightly.

Make the Cream Cheese Icing:

  1. In a medium bowl, beat the softened cream cheese on high speed until smooth. Add the softened butter and beat until combined.
  2. Gradually add the confectioners’ sugar and vanilla, beating until smooth and creamy.

Serve:

  1. Spread the warm rolls with cream cheese icing using a knife or icing spatula. Serve immediately and enjoy the deliciousness!

Storage Options:

  • Store leftover rolls tightly covered at room temperature for up to 2 days, or in the refrigerator for up to 5 days.

Tips:

  • For a quicker rise, place the covered rolls in a slightly warmed oven or near a warm stovetop.
  • Customize with chopped nuts or raisins in the filling for added texture and flavor.
  • Reheat leftover rolls briefly in the microwave or toaster oven before serving for a warm, fresh taste.

Enjoy baking and savoring these homemade Cinnamon Rolls with Cream Cheese Icing! If you have any more questions or need further assistance, feel free to ask.

Caramelitas

0

Caramelitas are irresistible dessert bars that combine a buttery oatmeal cookie-like base with layers of gooey caramel, chocolate chips, and optional nuts. Baked to golden perfection, they are a delightful treat for any occasion, blending sweet flavors and satisfying textures in every bite.

Why You’ll Love This Recipe:

  • Decadent Layers: From the chewy oatmeal crust to the rich caramel and chocolate layers, each bite offers a symphony of flavors and textures.
  • Easy Preparation: Simple ingredients and straightforward steps make these bars accessible for baking enthusiasts of all levels.
  • Perfect for Sharing: Ideal for potlucks, parties, or family gatherings, Caramelitas are sure to impress with their homemade charm and deliciousness.
  • Versatile: Customize with your favorite nuts or even a sprinkle of sea salt for a gourmet touch.

Ingredients:

  • 1 cup (2 sticks) unsalted butter, melted
  • 2 cups old-fashioned rolled oats
  • 2 cups all-purpose flour
  • 1 1/2 cups packed brown sugar
  • 1 teaspoon baking soda
  • 1/2 teaspoon salt
  • 1 teaspoon vanilla extract
  • 1 cup semisweet chocolate chips
  • 1 cup caramel sauce (store-bought or homemade)
  • 1/4 cup chopped nuts, such as pecans or walnuts (optional)

Instructions:

Step 1: Prepare and Preheat

  1. Preheat your oven to 350°F (175°C). Grease a 9×13-inch baking pan with butter or cooking spray.

Step 2: Mix the Base

  1. In a large mixing bowl, combine the melted butter, rolled oats, flour, brown sugar, baking soda, salt, and vanilla extract. Mix until the mixture resembles coarse crumbs.

Step 3: Form the Crust

  1. Press half of the oat mixture evenly into the bottom of the prepared baking pan to form a firm crust.

Step 4: Bake the Crust

  1. Bake the crust in the preheated oven for about 10 minutes, or until lightly golden.

Step 5: Layer the Fillings

  1. Remove the crust from the oven. Sprinkle the chocolate chips and chopped nuts (if using) evenly over the hot crust.
  2. Pour the caramel sauce evenly over the chocolate chips and nuts.

Step 6: Add the Topping

  1. Crumble the remaining oat mixture evenly over the top as a crumbly topping.

Step 7: Bake Until Golden

  1. Return the pan to the oven and bake for an additional 15-20 minutes, or until the edges are golden brown and the caramel is bubbling.

Step 8: Cool and Serve

  1. Allow the Caramelitas to cool completely in the pan on a wire rack. Once cooled, cut into squares using a sharp knife.

Storage Options:

  • Room Temperature: Store Caramelitas in an airtight container at room temperature for up to 5 days.
  • Refrigerator: For longer storage, refrigerate in an airtight container for up to 2 weeks.
  • Freezer: Wrap tightly in plastic wrap and store in a freezer-safe container for up to 3 months. Thaw in the refrigerator before serving.

Tips:

  • For easier cutting, chill Caramelitas in the refrigerator for about 30 minutes before slicing.
  • Drizzle additional caramel sauce over each serving for an extra decadent touch.
  • Experiment with different types of nuts or add a sprinkle of sea salt over the caramel layer for a gourmet twist.

Enjoy baking and indulging in these delicious Caramelitas! Let me know if you have any more recipe requests or questions.

Wonton Soup

0

Wonton Soup features delicate wontons filled with seasoned ground pork, swimming in a clear, flavorful broth infused with ginger, soy sauce, sesame oil, and garlic. This dish offers a comforting and satisfying meal, perfect for warming up on chilly days or enjoying as a light and flavorful appetizer.

Why You’ll Love This Recipe:

  • Flavorful Wonton Filling: Ground pork seasoned with soy sauce, sesame oil, and ginger creates savory wontons bursting with delicious flavors.
  • Clear and Intense Broth: Chicken broth enriched with ginger, soy sauce, and sesame oil provides a comforting and aromatic base for the wontons.
  • Quick and Easy Preparation: Simple steps for making and cooking wontons, combined with a straightforward broth preparation, make this soup accessible for home cooks.
  • Versatile Dish: Serve as a comforting main meal or as a delightful starter for a larger Asian-inspired feast.

Ingredients:

  • 30 Wonton Wrappers

Wonton Filling:

  • 8 ounces ground pork
  • 2 green onions, finely chopped
  • 1 tablespoon soy sauce
  • 1 teaspoon sesame oil
  • 1 teaspoon freshly grated ginger
  • 1 ½ teaspoons cornstarch

Broth:

  • 8 cups chicken broth
  • 2 whole garlic cloves
  • 2 slices ginger, approximately 1/4-inch thick
  • 2 tablespoons soy sauce
  • 1 teaspoon sesame oil
  • 2 green onions, sliced

Instructions:

Wontons:

  1. In a large bowl, combine ground pork, finely chopped green onions, soy sauce, sesame oil, grated ginger, and cornstarch. Mix well until evenly combined.
  2. Place one teaspoon of the pork filling in the center of a wonton wrapper. Wet the edges of the wrapper with water.
  3. Fold the wonton wrapper over the filling to create a triangle, pressing out any air around the filling. Wet the two longer ends of the triangle and bring them together, pressing to seal.
  4. Dip the bottom of the wonton in flour to prevent sticking and place it on a parchment-lined tray. Repeat with the remaining wonton wrappers and filling.

Soup:

  1. In a large pot, bring chicken broth, whole garlic cloves, ginger slices, soy sauce, and sesame oil to a boil over medium-high heat.
  2. Reduce heat to low and simmer for 10 minutes to allow the flavors to meld.
  3. Remove the garlic cloves and ginger slices from the broth and discard them.
  4. Carefully add the prepared wontons to the simmering broth. Cook for 4-6 minutes, or until the wontons float to the surface and the pork filling is cooked through.
  5. Serve the savory Wonton Soup hot, garnished with sliced green onions for an extra burst of freshness.

Storage Options:

  • Refrigerator: Store leftover soup in an airtight container in the refrigerator for up to 3-4 days.
  • Freezer: Freeze cooled soup in freezer-safe containers for up to 2 months. Thaw overnight in the refrigerator before reheating.

Tips:

  • Ensure the wontons are sealed tightly to prevent them from opening during cooking.
  • Customize the broth by adding chili oil or a dash of rice vinegar for added depth of flavor.
  • Serve with a side of steamed vegetables or a simple green salad for a balanced meal.

Creamy Slow Cooker Beef Pasta

0

Creamy Slow Cooker Beef Pasta is a comforting dish that combines tender beef stew meat with a rich, creamy mushroom sauce and pasta. This recipe is perfect for a hearty, satisfying meal that cooks slowly to enhance flavors and tenderize the meat.

Why You’ll Love This Recipe:

  • Tender Beef: Slow cooking ensures the beef stew meat becomes tender and flavorful, infused with the creamy mushroom sauce.
  • Creamy Mushroom Sauce: The combination of cream of mushroom soup, beef broth, and heavy cream creates a rich and luxurious sauce that coats the pasta perfectly.
  • Easy Preparation: Simply combine ingredients in the slow cooker and let it cook low and slow, making it ideal for busy days.
  • Family-Friendly: A crowd-pleasing dish that everyone will enjoy, especially with the added Parmesan cheese for extra richness.

Ingredients:

  • 1 pound beef stew meat, cut into bite-sized pieces
  • 1 small onion, diced
  • 4 cloves garlic, minced
  • 1 can cream of mushroom soup (10.5 oz)
  • 1 cup beef broth
  • 1 cup heavy cream
  • 1 teaspoon dried basil
  • 1 teaspoon dried oregano
  • Salt and pepper, to taste
  • 8 ounces pasta (penne or your favorite shape)
  • 1 cup grated Parmesan cheese
  • Fresh parsley, chopped (optional, for garnish)

Ingredient Tips:

  • Beef Stew Meat: Ensure the pieces are cut into bite-sized pieces for even cooking and tender results.
  • Cream of Mushroom Soup: Choose a quality soup for the best flavor. You can use low-sodium or homemade mushroom soup as well.
  • Pasta: Use your favorite pasta shape such as penne or farfalle. Cook until al dente for the best texture.

Instructions:

Step 1: Prepare the Beef Base

  • In a slow cooker, combine beef stew meat, diced onion, and minced garlic.

Step 2: Mix the Sauce

  • In a separate bowl, whisk together cream of mushroom soup, beef broth, heavy cream, dried basil, and dried oregano until smooth. Pour this creamy mixture over the beef in the slow cooker, stirring to coat evenly.

Step 3: Cook Low and Slow

  • Cover the slow cooker and cook on low for 6-8 hours, or until the beef is tender and cooked through.

Step 4: Cook the Pasta

  • About 30 minutes before serving, cook pasta according to package instructions until al dente. Drain and set aside.

Step 5: Combine and Season

  • Stir cooked pasta into the slow cooker with the beef and sauce mixture. Add grated Parmesan cheese and season with salt and pepper to taste. Mix well to ensure the pasta is coated evenly.

Step 6: Finish Cooking

  • Let the pasta cook in the slow cooker for an additional 10-15 minutes to absorb the sauce and meld flavors together.

Step 7: Serve

  • Dish up the creamy beef pasta hot, garnished with fresh parsley for a pop of color and added freshness if desired.

Storage Options:

  • Refrigerator: Store leftovers in an airtight container in the refrigerator for up to 3-4 days.
  • Freezer: Freeze cooled portions in a freezer-safe container for up to 2 months. Thaw overnight in the refrigerator before reheating.

Tips:

  • Customize with additional herbs or vegetables like mushrooms or spinach for added flavor and nutrition.
  • Serve with a side of garlic bread or a green salad for a complete meal.
  • Double the recipe for larger gatherings or to have leftovers for future meals.

Enjoy preparing and savoring this Creamy Slow Cooker Beef Pasta! If you have any more recipes or need further assistance, feel free to ask.

Slow Cooker Cheesy Mozzarella Chicken

0

Slow Cooker Cheesy Mozzarella Chicken is a comforting and flavorful dish that combines tender chicken breasts slow-cooked in marinara sauce and topped with a generous layer of melted mozzarella and Parmesan cheeses. This easy-to-make recipe is perfect for busy days when you want a delicious meal ready with minimal effort.

Why You’ll Love This Recipe:

  • Flavorful and Tender Chicken: Slow cooking ensures the chicken breasts are juicy and infused with the rich flavors of marinara sauce and Italian seasoning.
  • Cheesy and Creamy: The melted mozzarella and Parmesan cheeses create a gooey and satisfying topping that pairs perfectly with the savory chicken.
  • Simple Preparation: Just a few ingredients and steps are needed to create this impressive dish in your slow cooker.
  • Versatile Serving Options: Serve over pasta, rice, or with a side of vegetables for a complete meal.

Ingredients:

  • 4 boneless, skinless chicken breasts
  • 2 teaspoons garlic powder
  • Salt and pepper to taste
  • 1 cup chicken broth
  • 1 cup marinara sauce
  • 2 teaspoons Italian seasoning
  • 1 cup shredded mozzarella cheese
  • 1/4 cup freshly grated Parmesan cheese
  • 1 tablespoon chopped fresh basil for garnish

Ingredient Tips:

  • Chicken Breasts: Choose medium-sized chicken breasts for even cooking. Alternatively, chicken thighs can be used for a juicier option.
  • Marinara Sauce: Opt for a low-sugar, high-quality marinara sauce or use homemade for the best flavor.
  • Cheese: Use freshly shredded mozzarella for optimal melting. Pre-shredded cheese may contain anti-caking agents that affect melting.
  • Italian Seasoning: If you don’t have Italian seasoning, mix equal parts dried oregano, basil, and thyme.

Instructions:

Step 1: Season the Chicken

  • Season the chicken breasts with garlic powder, salt, and pepper. Ensure even coverage by massaging the seasoning into the chicken.

Step 2: Prepare the Slow Cooker

  • Place the seasoned chicken breasts in a single layer at the bottom of your slow cooker.

Step 3: Mix the Sauce

  • In a medium bowl, whisk together chicken broth, marinara sauce, and Italian seasoning. Pour the sauce evenly over the chicken in the slow cooker.

Step 4: Slow Cook the Chicken

  • Cover the slow cooker and cook on low for 6 hours or on high for 3 hours until the chicken is tender and cooked through.

Step 5: Add the Cheese

  • About 30 minutes before the cooking time is up, sprinkle mozzarella and Parmesan cheeses over the chicken. Cover and let the cheese melt and become bubbly.

Step 6: Garnish and Serve

  • Once the cheese is melted, turn off the slow cooker and let the dish rest for a few minutes. Garnish with chopped fresh basil for added flavor and color.

Step 7: Enjoy!

  • Serve the cheesy mozzarella chicken hot, alongside your favorite side dishes like pasta, rice, or vegetables.

Storage Options:

  • Refrigerator: Store any leftovers in an airtight container in the refrigerator for up to 3-4 days.
  • Freezer: Allow the dish to cool completely before freezing in a freezer-safe container for up to 2 months. Thaw overnight in the refrigerator before reheating.

Tips:

  • Customize with additional vegetables like bell peppers or spinach for extra flavor and nutrients.
  • Serve over cooked pasta or with crusty bread to soak up the delicious sauce.
  • Double the recipe for larger gatherings or to have leftovers for future meals.

Enjoy making and sharing this Slow Cooker Cheesy Mozzarella Chicken! If you have any more recipes or need further assistance, feel free to ask.