Ground Beef Chow Mein Casserole

0

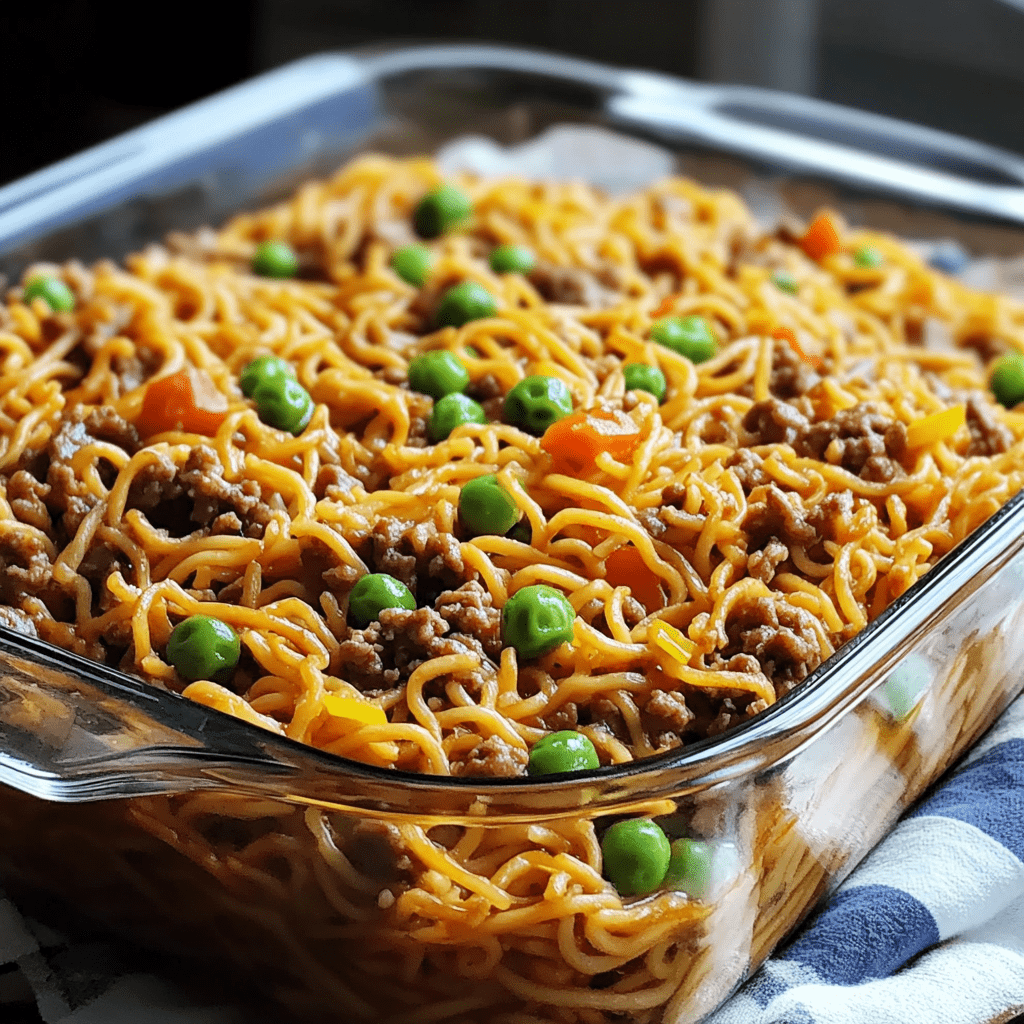
Ground Beef Chow Mein Casserole is a hearty dish that combines savory ground beef, a variety of vegetables, noodles, and a flavorful sauce, all baked to perfection with a cheesy topping. This comforting casserole is perfect for family dinners or gatherings, offering a delicious blend of textures and flavors in every bite.

Why You’ll Love This Recipe:

  • Flavorful and Versatile: Packed with a mix of vegetables, tender beef, and noodles, all coated in a savory sauce.
  • Easy to Make: Simple steps make this casserole accessible for any home cook.
  • Perfect for Sharing: Ideal for feeding a crowd or meal prepping for the week ahead.
  • Customizable: Adjust the vegetables and spices to suit your taste preferences or dietary needs.
  • Freezer-Friendly: Prepare ahead and freeze for a convenient meal option.

Ingredients:

  • 1 pound ground beef
  • 1 medium onion, diced
  • 2 cloves garlic, minced
  • 1 tablespoon ginger, freshly grated
  • 1 cup celery, chopped
  • 1 cup carrots, julienned
  • 3 cups cabbage, thinly sliced
  • 8 ounces mushrooms, sliced
  • 8 ounces cooked Chow Mein noodles or cooked spaghetti
  • 3 tablespoons soy sauce
  • 1 tablespoon oyster sauce (optional)
  • 1 teaspoon sesame oil
  • 2 tablespoons vegetable oil
  • 1 cup beef broth
  • 1 tablespoon cornstarch
  • 1 cup cheddar cheese, grated (optional)
  • Salt and pepper to taste
  • Green onions or chives, chopped (for garnish)

Instructions:

Preparation:

  1. Preheat your oven to 350°F (175°C). Grease a 9×13-inch baking dish with cooking spray or a little oil and set aside.

Cooking:

  1. In a large skillet, heat the vegetable oil over medium heat. Add the ground beef and cook until browned, breaking it up with a spatula as it cooks. Drain any excess fat if necessary.
  2. Stir in the diced onions, minced garlic, and grated ginger. Cook for 2-3 minutes until the onions are translucent and fragrant.
  3. Add the chopped celery and julienned carrots, cooking for another 3-4 minutes until they start to soften. Add the sliced cabbage and mushrooms, cooking until all the vegetables are tender-crisp.

Prepare the Sauce:

  1. In a small bowl, whisk together the beef broth, soy sauce, oyster sauce (if using), sesame oil, and cornstarch until smooth. Pour this sauce over the cooked beef and vegetables, stirring well to combine. Bring the mixture to a simmer and cook until the sauce thickens slightly, about 2-3 minutes.

Combine and Bake:

  1. Add the cooked noodles to the skillet with the beef and vegetable mixture, tossing gently to ensure everything is well combined and coated with the sauce.
  2. Transfer the entire mixture into the prepared baking dish. If using cheese, top evenly with the grated cheddar cheese.
  3. Bake in the preheated oven for 20-25 minutes, or until the cheese is bubbly and begins to brown.

Garnish and Serve:

  1. Remove from the oven and let cool for a few minutes. Garnish with chopped green onions or chives before serving for a fresh burst of flavor.

Storage Options:

  • Refrigerator: Store leftovers in an airtight container in the refrigerator for up to 3-4 days.
  • Freezer: Allow the casserole to cool completely, then freeze in portions in freezer-safe containers or bags for up to 3 months. Thaw overnight in the refrigerator before reheating.

Tips:

  • Customize the vegetables to suit your preferences or what you have on hand.
  • For a spicier dish, add red pepper flakes or hot sauce to taste.
  • Use gluten-free soy sauce, oyster sauce, and noodles to make this recipe gluten-free.

Enjoy preparing and sharing this delicious Ground Beef Chow Mein Casserole! If you have more recipes or need further assistance, feel free to ask.

Salted Caramel Bites

0

Salted Caramel Bites are a delightful treat featuring oyster crackers coated in a rich caramel sauce with a hint of vanilla and finished with a sprinkle of kosher salt. These bite-sized snacks are perfect for satisfying sweet and salty cravings, whether enjoyed as a dessert or a tasty snack.

Why You’ll Love This Recipe:

  • Quick and Easy: With just a few simple ingredients and straightforward steps, you can create a delicious treat in no time.
  • Addictive Flavor: The combination of buttery caramel, vanilla, and a touch of salt creates a perfect balance of sweetness and saltiness that’s hard to resist.
  • Versatile Snack: Enjoy these bites on their own, or use them to top ice cream, yogurt, or even as a crunchy addition to a dessert platter.
  • Great for Sharing: Ideal for parties, gatherings, or as homemade gifts, these bites are sure to impress with their homemade caramel goodness.
  • Kid-Friendly: Children and adults alike will love the crispy texture and rich caramel flavor of these addictive treats.

Ingredients:

  • 4 cups oyster crackers
  • 3/4 cup butter
  • 3/4 cup brown sugar
  • 2 teaspoons vanilla paste or extract
  • 1 teaspoon kosher salt

Instructions:

Preparation:

  1. Preheat your oven to 350 degrees Fahrenheit (175 degrees Celsius). Line a baking sheet with parchment paper or aluminum foil and lightly spray with non-stick cooking spray.
  2. Spread the oyster crackers evenly in a single layer on the prepared baking sheet.

Make the Caramel Sauce:

  1. In a large pan over medium heat, melt the butter. Add the brown sugar and vanilla paste or extract. Stir continuously until the brown sugar is fully dissolved and the mixture is smooth.
  2. Increase the heat to bring the mixture to a boil. Stir constantly for about 3-4 minutes until the mixture becomes bubbly and slightly lighter in color. The caramel sauce will thicken and develop a rich aroma.
  3. Remove the pan from the heat and quickly pour the caramel sauce over the oyster crackers on the baking sheet. Use a rubber spatula to gently mix and coat all of the crackers evenly with the caramel sauce.

Bake:

  1. Sprinkle the kosher salt evenly over the top of the caramel-coated crackers.
  2. Bake in the preheated oven for 8-10 minutes, watching closely to prevent burning. The crackers should become slightly toasted and the caramel should bubble.

Cool and Serve:

  1. Remove from the oven and let the Salted Caramel Bites cool completely on the baking sheet. The caramel will harden as it cools.
  2. Once cooled and hardened, break apart any clusters of crackers if desired and transfer to an airtight container for storage.

Storage Options:

  • Store the Salted Caramel Bites in an airtight container at room temperature for up to one week.
  • If kept in a cool, dry place, they will maintain their crispiness and delicious flavor.

Tips:

  • For extra flavor, you can sprinkle additional kosher salt over the caramel-coated crackers right after baking.

Enjoy making and sharing these irresistible Salted Caramel Bites! If you have more recipes or need further assistance, feel free to ask.

Spaghetti & Spinach with Sun-Dried Tomato Cream Sauce

0

Spaghetti & Spinach with Sun-Dried Tomato Cream Sauce combines the robust flavors of sun-dried tomatoes and spinach in a creamy, Parmesan-infused sauce, creating a comforting and satisfying pasta dish. This recipe is perfect for a quick weeknight meal or a cozy dinner with friends and family.

Why You’ll Love This Recipe:

  • Rich and Flavorful Sauce: The creamy sauce made with sun-dried tomatoes, Parmesan cheese, and sour cream offers a rich and indulgent flavor that pairs perfectly with pasta.
  • Nutrient-Packed Spinach: Fresh baby spinach adds a boost of nutrients and vibrant color to the dish, complementing the savory elements of the sauce.
  • Easy Preparation: With simple steps and readily available ingredients, this dish comes together quickly, making it ideal for busy days when you crave a homemade meal without the fuss.
  • Customizable: Adjust the spice level with crushed red pepper flakes and personalize it with additional garnishes like extra Parmesan cheese or fresh herbs.
  • Family-Friendly: Loved by both kids and adults, this pasta dish is sure to become a favorite for its delicious flavors and comforting appeal.

Ingredients:

  • Fresh Baby Spinach: 5 ounces, roughly chopped
  • Sun-Dried Tomatoes in Oil: ½ cup, slivered, plus 1 tablespoon of the oil from the jar for cooking
  • Onion: ½ cup, thinly sliced
  • Garlic: 3 cloves, finely minced
  • Crushed Red Pepper Flakes: ¼ teaspoon
  • Salt: ¼ teaspoon
  • Ground Black Pepper: ¼ teaspoon
  • Low-Sodium Broth (vegetable or chicken): 1 cup
  • Sour Cream: ½ cup
  • Grated Parmesan Cheese: ¼ cup
  • Unsalted Butter: 1 tablespoon
  • Whole-Wheat Spaghetti: 8 ounces, cooked al dente according to package instructions

Instructions:

Prepare the Pasta and Spinach:
Start by boiling a large pot of water. Once boiling, add the whole-wheat spaghetti and cook according to the package instructions for al dente texture.

Place the chopped baby spinach in a large colander. When the pasta is done, drain it over the spinach to wilt it naturally with the steam and hot water.

Make the Sauce:
In a large skillet, heat the tablespoon of oil reserved from the sun-dried tomatoes over medium heat.

Sauté the sliced onions and sun-dried tomatoes for about 3 minutes until the onions are soft. Add the minced garlic, crushed red pepper flakes, salt, and black pepper, and cook for another minute, stirring frequently.

Pour in the broth and increase the heat to medium-high, letting the mixture simmer and reduce by about half, which usually takes around 2 minutes.

Combine Ingredients:
Reduce the heat to low and stir in the sour cream, Parmesan cheese, and butter until the mixture is smooth and the cheese has melted.

Add the drained spaghetti and wilted spinach back into the skillet. Toss everything together to ensure the pasta and spinach are evenly coated with the creamy sauce.

Final Touches:
Adjust the seasoning as needed, adding more salt or pepper according to your taste preferences.

Serve the pasta hot, garnished with additional Parmesan cheese if desired.

Tips:

  • For added protein, you can incorporate grilled chicken or shrimp into the dish.
  • Make sure to use low-sodium broth to control the saltiness of the sauce.
  • This dish reheats well, making it a great option for leftovers the next day.

Storage Options:
Store any leftover pasta in an airtight container in the refrigerator for up to 3 days. Reheat gently in the microwave or on the stove with a splash of broth to maintain the creamy texture.


This format provides detailed instructions and tips to ensure a successful preparation of Spaghetti & Spinach with Sun-Dried Tomato Cream Sauce. Enjoy your meal! If you have more recipes or need further assistance, feel free to ask.

Biscuit Breakfast Casserole

0

Biscuit Breakfast Casserole is a hearty and comforting dish that combines fluffy biscuits with eggs, cheese, and bacon for a satisfying breakfast or brunch option. This easy-to-make casserole is perfect for feeding a crowd or preparing ahead for busy mornings.

Why You’ll Love This Recipe:

  • Quick and Easy: Using refrigerated biscuits cuts down on prep time, making this casserole ideal for busy mornings or lazy weekends.
  • Versatile: You can customize this dish with your favorite breakfast ingredients like bacon, cheese, and optional toppings such as green onions, hot sauce, or salsa.
  • Family-Friendly: Loved by both kids and adults, this casserole is a crowd-pleaser that can be enjoyed as a complete meal on its own.
  • Make-Ahead Option: Prepare the casserole the night before and bake it in the morning for a convenient breakfast solution.
  • Great for Potlucks: This dish travels well and can be easily reheated, making it a perfect choice for brunch gatherings or potluck meals.

Ingredients:

  • 1 can (16.3 oz) refrigerated biscuits
  • 6 large eggs
  • 1 cup shredded cheddar cheese
  • 1/2 cup milk
  • 6-8 strips of cooked bacon, crumbled
  • Salt and pepper to taste

Optional toppings:

  • Chopped green onions
  • Hot sauce
  • Salsa

Instructions:

Preheat and Prepare:
Preheat your oven to 350°F (175°C) and grease a 9×13-inch baking dish.

Prepare the Biscuits:
Separate the refrigerated biscuits and cut them into quarters. Place them evenly in the greased baking dish.

Mix the Egg Mixture:
In a mixing bowl, whisk together the eggs, milk, salt, and pepper until well combined. Pour this mixture evenly over the biscuit pieces in the baking dish.

Add Cheese and Bacon:
Sprinkle the shredded cheddar cheese evenly over the top of the egg and biscuit mixture. Scatter the crumbled bacon over the cheese.

Bake:
Bake in the preheated oven for 25-30 minutes, or until the eggs are set and the top is golden brown.

Cool and Serve:
Let the casserole cool for a few minutes before serving. Garnish with optional toppings like chopped green onions, hot sauce, or salsa according to your preference.

Tips:

  • Ensure the biscuits are evenly distributed in the baking dish for even cooking.
  • Experiment with different cheeses or add vegetables like diced bell peppers or spinach for extra flavor and nutrients.
  • Leftovers can be refrigerated and reheated in the oven or microwave for a quick breakfast option during the week.

Storage Options:
Store any leftover casserole covered in the refrigerator for up to 3 days. Reheat slices in the oven or microwave until warmed through before serving.


This format provides clear instructions and additional tips to ensure a successful Biscuit Breakfast Casserole every time. Enjoy your meal! If you have more recipes or need further assistance, feel free to ask.

Spinach and Cheese Quiche

0

Spinach and Cheese Quiche is a versatile dish that blends the freshness of spinach with creamy eggs and savory cheese, baked to perfection in a flaky crust-free pie dish. This recipe is ideal for breakfast, brunch, or a light dinner, offering a satisfying meal that’s both nutritious and delicious.

Why You’ll Love This Recipe:

  • Nutrient-Rich and Flavorful: Packed with fresh baby spinach, eggs, and cheese, this quiche provides a hearty dose of nutrients and a burst of flavors in every bite.
  • Customizable: Easily adaptable to your taste preferences, you can add ingredients like diced ham or mushrooms for extra texture and flavor.
  • Easy Preparation: Simple steps from sautéing vegetables to whisking the egg mixture make this quiche a breeze to prepare, even for novice cooks.
  • Perfect for Any Occasion: Whether served hot out of the oven or at room temperature, this quiche is suitable for any mealtime, from brunch gatherings to quick weekday dinners.
  • Make-Ahead Option: Prepare the quiche ahead of time and reheat slices for a quick, satisfying meal throughout the week.

Ingredients:

  • 1 tablespoon olive oil
  • 1/2 onion, finely chopped
  • 2 cloves garlic, minced
  • 5 cups baby spinach
  • 5 large eggs
  • 1/2 cup milk of your choice
  • 1/4 teaspoon ground nutmeg
  • 1/4 cup your choice of shredded cheese
  • Salt and freshly ground black pepper, to taste

Optional add-ins:

  • 2/3 cup cooked, diced ham
  • 3/4 cup sliced mushrooms

Instructions:

Preheat and Prepare:
Start by heating your oven to 375°F (190°C). Grease a 9-inch pie dish with a little olive oil or non-stick spray.

Cook the Vegetables:
Heat the olive oil in a large skillet over medium heat. Add the chopped onion and minced garlic, cooking until they become soft and fragrant. If using mushrooms, add them here and sauté until they’re nicely browned.

Wilt the Spinach:
Add the spinach to the skillet and stir until it wilts, which should take just a couple of minutes. If you’re including ham, toss it in to warm it up.

Mix the Base:
In a large mixing bowl, whisk together the eggs, milk, nutmeg, salt, and pepper. Add the cooked vegetable mixture from the skillet into the egg mixture and stir to combine everything evenly.

Assemble and Bake:
Pour the quiche mixture into the prepared pie dish. Sprinkle the shredded cheese evenly on top. Bake in the preheated oven for 25-30 minutes, or until the quiche is set in the center and the edges are golden brown.

Cool and Serve:
Allow the quiche to cool for a few minutes before slicing. This makes it easier to cut and serve.

Tips:

  • Ensure the spinach is well-drained after wilting to prevent excess moisture in the quiche.
  • Experiment with different cheeses such as cheddar, Swiss, or feta for varied flavors.
  • Serve with a side salad or fresh fruit for a complete meal.

Storage Options:
Leftover quiche can be refrigerated for up to 3 days. Reheat slices in the oven or microwave before serving.


This format provides comprehensive details and tips to ensure a successful outcome when making Spinach and Cheese Quiche. Enjoy your cooking! If you have more recipes or need further assistance, feel free to ask.

Apple Charlotte

0

Apple Charlotte is a beloved dessert that marries the comforting flavors of tender, spiced apples with layers of golden, buttery bread. This classic dish is both rustic and elegant, perfect for showcasing seasonal apples in a delightful, easy-to-make treat.

Why You’ll Love This Recipe:

  • Deliciously Comforting: The combination of warm, cinnamon-spiced apples nestled between layers of crisp, buttered bread creates a comforting dessert that feels like a warm hug on a chilly evening.
  • Perfect Textures: The contrast between the soft, juicy apples and the crispy, golden bread crusts is simply irresistible, offering a satisfying bite in every spoonful.
  • Versatile and Elegant: Whether served as a dessert or a sweet brunch dish, Apple Charlotte effortlessly transitions from casual family dinners to more formal gatherings, impressing guests with its rustic charm and delightful flavors.
  • Easy Preparation: With simple ingredients and straightforward assembly, this recipe allows you to effortlessly create a stunning dessert that looks as impressive as it tastes.
  • Seasonal Appeal: Highlighting the natural sweetness of seasonal apples, this dessert celebrates fresh, locally sourced ingredients, making it a perfect choice for autumn gatherings or cozy winter nights.

Ingredients:
For the Filling:

  • 6 large apples, peeled, cored, and sliced
  • 1/2 cup granulated sugar
  • 1 teaspoon ground cinnamon
  • 1/4 teaspoon nutmeg
  • Juice of 1 lemon

For the Crust:

  • 10 slices white bread, crusts removed
  • 3/4 cup unsalted butter, melted
  • Additional sugar and cinnamon for dusting

Instructions:

Prepare the Apples:
In a large saucepan over medium heat, combine the sliced apples with sugar, cinnamon, nutmeg, and lemon juice. Cook until the apples are just tender, about 10 minutes, stirring occasionally. Set aside to cool.

Prepare the Bread:
Brush each slice of bread generously with melted butter. Line the bottom and sides of a round baking dish with the bread, ensuring that there are no gaps. You may need to cut some slices to fit.

Assemble the Charlotte:
Spoon the cooked apple mixture into the bread-lined baking dish. Cover the top with more slices of buttered bread, and press down lightly to seal the edges.

Bake:
Preheat the oven to 375°F (190°C). Place the Charlotte in the oven and bake for 30-35 minutes, or until the bread is golden and crisp.

Serve:
Let the Charlotte cool slightly before unmolding. Dust with a mixture of sugar and cinnamon. Serve warm, ideally with a dollop of whipped cream or vanilla ice cream.

Tips:

  • Use firm apples that hold their shape when cooked, such as Granny Smith or Honeycrisp.
  • Adjust the sweetness to your liking by adding more or less sugar to the apple filling.
  • For a more decadent twist, drizzle caramel sauce over the warm Charlotte before serving.

Storage Options:
Apple Charlotte is best enjoyed fresh on the day it’s made. However, you can store leftovers covered in the refrigerator for up to 2 days. Reheat gently in the oven to maintain the crispness of the bread.

Natural Remedies for Common Skin Conditions

0

Skin imperfections like age spots, moles, skin tags, warts, and blackheads are quite common and can cause discomfort or self-consciousness. While it’s always wise to consult a healthcare professional for any skin abnormalities, natural remedies have been used for centuries and can offer effective solutions.

Addressing Age Spots and Uneven Skin Tone

Age spots, also known as liver spots or solar lentigines, often appear as we age due to prolonged sun exposure or hormonal changes. Preventing them starts with daily sun protection—using sunscreen with a high SPF, wearing protective clothing, and avoiding direct sunlight during peak hours. However, if age spots have already formed, natural treatments can help lighten them:

  • Aloe Vera: Known for its soothing properties, aloe vera also contains aloin, which has been shown to lighten dark spots. Apply aloe vera gel generously to affected areas before bed and rinse off in the morning.
  • Apple Cider Vinegar: Its acetic acid content makes it a popular remedy for dark spots. Dilute it with water and apply to dark spots using a cotton ball. Leave it on for a few minutes before rinsing off.
  • Orchid Extracts: These are valued for their ability to improve skin tone and reduce dark spots. Use serums, masks, or creams infused with orchid extracts directly on affected areas.
  • Green Tea Extract: Rich in antioxidants, green tea extract can help lighten dark spots and prevent further pigmentation. Apply a cream or serum containing green tea extract regularly.
  • Black Tea: Some studies suggest black tea may also help reduce dark spots. Brew black tea, let it cool, and apply it to your skin with a cotton ball daily for several weeks.

Before using any natural remedy, perform a patch test to ensure you don’t have any adverse reactions.

Removing Skin Tags Naturally

Skin tags are small, harmless growths that often appear where skin rubs against skin or clothing, such as the neck, armpits, and groin. While they are benign, they can be bothersome. Natural remedies can sometimes help in their removal:

  • Tea Tree Oil: Known for its antibacterial properties, tea tree oil can be effective. Dilute it with a carrier oil like coconut or olive oil and apply to the skin tag. Cover with a bandage and leave overnight. Repeat until the skin tag falls off.
  • At-Home Freezing Kits: Available over-the-counter, these kits use cryogenic materials to freeze off skin tags. Follow instructions carefully to avoid damaging surrounding skin.

Treating Warts Naturally

Warts are caused by the human papillomavirus (HPV) and can appear anywhere on the body. While usually harmless, they can be unsightly and uncomfortable. Natural remedies can help in their gradual removal:

  • Apple Cider Vinegar: Its acidic nature can break down wart tissue over time. Soak a cotton ball in apple cider vinegar, apply to the wart, and cover with a bandage overnight. Repeat daily until the wart disappears.
  • Bee Propolis: This resinous substance produced by bees has antiviral properties that can aid in wart removal. Apply directly to the wart and cover overnight until the wart is gone.

Conclusion

Natural remedies provide gentle alternatives for managing common skin issues like age spots, moles, skin tags, warts, and blackheads. While these treatments can be effective, it’s essential to use them cautiously and seek medical advice when needed. By incorporating these natural remedies into your skincare routine with patience and consistency, you can address minor skin imperfections and support overall skin health in a holistic manner.

Slow Cooker Chicken and Stuffing

0

Enjoy the comforting flavors of Slow Cooker Chicken and Stuffing, a delicious dish where tender chicken breasts are infused with savory flavors and paired with fluffy, herb-seasoned stuffing. This easy-to-make recipe is perfect for a cozy family dinner or when you want a satisfying meal with minimal effort.

Why You’ll Love This Recipe:

  • Convenient One-Pot Meal: Everything cooks together in the slow cooker, making cleanup a breeze while allowing the flavors to meld beautifully.
  • Tender and Flavorful Chicken: Slow cooking ensures the chicken remains juicy and tender, infused with the savory broth and mushroom soup.
  • Classic Comfort Food: The combination of creamy mushroom soup and herb-seasoned stuffing creates a comforting dish that’s reminiscent of holiday dinners.

Ingredients:

  • 4 Boneless, Skinless Chicken Breasts
  • Salt and Pepper to Taste
  • ½ Cup No-Sodium Chicken Broth
  • 1 10.75-Ounce Can Cream of Mushroom Soup
  • 1 6-Ounce Box Stuffing Mix
  • ¼ Cup Water

Step-by-Step Instructions:

  1. Prepare the Chicken:
    Season the chicken breasts generously with salt and pepper. Evenly arrange them in a single layer at the bottom of your slow cooker to ensure even cooking.
  2. Add the Broth:
    Pour the chicken broth over the chicken breasts, ensuring they are partially submerged. The broth adds moisture and begins to infuse the chicken with flavor as it cooks.
  3. Mix the Stuffing:
    In a large mixing bowl, combine the cream of mushroom soup, stuffing mix, and water. Stir well until everything is thoroughly mixed. The soup and water moisten the stuffing mix, ensuring it cooks up fluffy and absorbs all the flavorful juices from the chicken.
  4. Assemble the Dish:
    Spread the stuffing mixture evenly over the chicken breasts in the slow cooker. As the dish cooks, the stuffing will soak up the savory juices, creating a deliciously moist and flavorful accompaniment to the tender chicken.
  5. Cook the Meal:
    Cover the slow cooker with the lid and cook on high for 4 hours, or on low for 6-7 hours for even more tender chicken. The slow cooking process allows the flavors to meld beautifully, resulting in a comforting and satisfying meal.
  6. Serve and Enjoy:
    Once cooked, the chicken should be tender and easy to shred or cut with a fork. Serve the chicken and stuffing together, garnished with fresh herbs if desired. Pair with steamed vegetables or a crisp salad for a complete and hearty meal.

Tips:

  • Ensure the chicken breasts are similar in size for even cooking.
  • Customize the stuffing mix with your favorite herbs or add-ins for extra flavor.
  • Leftovers can be stored in an airtight container in the refrigerator for up to 3 days.

Storage Options:

  • Store any leftover chicken and stuffing in separate airtight containers in the refrigerator.
  • Reheat gently in the microwave or oven until warmed through before serving.

Serving Suggestions:

  • Serve with a side of cranberry sauce for a classic Thanksgiving-inspired meal.
  • Pair with roasted vegetables or a green salad for a well-rounded dinner.

Sausage Green Bean Potato Casserole

0

Savor the comforting flavors of Sausage Green Bean Potato Casserole, a hearty dish that combines smoky sausage, tender green beans, and creamy potatoes, all baked to perfection with savory seasonings. This casserole is a complete meal in one dish, ideal for cozy family dinners or potluck gatherings.

Why You’ll Love This Recipe:

  • Hearty and Satisfying: This casserole is packed with hearty ingredients like smoky sausage, tender potatoes, and crisp green beans, making it a satisfying and filling meal.
  • Easy Preparation: With simple steps and readily available ingredients, this recipe is easy to prepare, making it perfect for busy weeknights or when entertaining guests.
  • Flavorful and Versatile: The combination of savory sausage, creamy potatoes, and aromatic garlic and onions creates a flavorful dish that’s versatile enough for any occasion.

Ingredients:

  • 1.5 pounds of sliced kielbasa or smoked sausage
  • Two 15-ounce cans of green beans, well-drained
  • 2 pounds of baby creamer potatoes, cleansed and halved
  • 1 cup of chopped onions
  • 1/8 cup of vegetable oil
  • 1/4 cup of butter
  • 3 cloves of minced garlic
  • 1 teaspoon of garlic powder
  • 1 teaspoon of pepper
  • Optional: 1 teaspoon Slap Ya Mama seasoning

Instructions:

  1. Preheat the Oven:
    Preheat your oven to 400°F (200°C) and grease a 9×13-inch casserole dish.
  2. Prepare the Potatoes:
    Wash and halve the creamer potatoes. Place them in a gallon-sized sealable bag. Add the vegetable oil, Slap Ya Mama seasoning (if using), garlic powder, and pepper. Seal the bag and shake to coat the potatoes evenly.
  3. Cook the Sausage:
    In a large skillet, heat the vegetable oil over medium heat. Add the sliced sausage and cook until browned on all sides. Remove from the skillet, cool slightly, and add to the bag with the potatoes.
  4. Sauté the Onions and Garlic:
    In the same skillet, melt the butter over medium heat. Add the chopped onions and minced garlic. Sauté until the onions are soft and fragrant, about 5-7 minutes. Allow to cool slightly, then add to the bag with the sausage and potatoes.
  5. Add the Green Beans:
    Add the well-drained green beans to the bag, seal, and gently shake to mix all ingredients together.
  6. Transfer to Baking Dish:
    Pour the contents of the bag into the greased casserole dish. Spread everything out evenly.
  7. Bake the Casserole:
    Cover the casserole dish with aluminum foil and bake in the preheated oven for about 40 minutes, or until the potatoes are tender when pierced with a fork.
  8. Serve and Enjoy:
    Allow the casserole to cool slightly before serving. Enjoy this hearty dish with your favorite sides or as a standalone meal.

Tips:

  • Customize the seasoning to your taste preferences by adjusting the amount of garlic, pepper, or adding different herbs.
  • For a crispy topping, remove the foil during the last 10 minutes of baking.
  • This casserole reheats well, making it a great option for leftovers.

Serving Suggestions:

  • Serve alongside a fresh salad or crusty bread for a complete meal.
  • Pair with a glass of white wine or your favorite beverage for a delightful dining experience.

Italian Christmas Cookies

0

Indulge in the timeless delight of Classic Sugar Cookies. These tender treats are a beloved staple in any baker’s repertoire, offering a perfect balance of buttery richness, subtle vanilla and almond flavors, and a satisfyingly soft texture. Whether you’re baking for a holiday gathering, special occasion, or simply to enjoy with a cup of tea, these cookies are sure to bring joy with every bite.

Why You’ll Love This Recipe:

  1. Buttery and Tender Texture: These sugar cookies are exceptionally soft and tender, thanks to the perfect ratio of butter and flour. Each bite melts in your mouth, leaving a delightful buttery flavor that’s hard to resist.
  2. Delicate Flavor Profile: Enhanced with vanilla and almond extracts, these cookies offer a nuanced flavor that is both comforting and familiar. The combination of these extracts adds depth without overwhelming the classic sugar cookie taste.
  3. Versatile and Easy to Customize: Whether you prefer them plain or adorned with a glaze and sprinkles, these cookies are versatile. They can be decorated to suit any occasion, making them perfect for holidays, birthdays, or any time you want to add a touch of sweetness to your day.
  4. Family-Favorite Recipe: Loved by all ages, these cookies are a hit at gatherings and make a wonderful gift. Their simplicity and universal appeal make them a go-to recipe whenever you crave a homemade treat.

Ingredients:

  • 2 cups all-purpose flour
  • 1/2 cup granulated sugar
  • 1/2 cup unsalted butter, softened
  • 2 large eggs
  • 1 teaspoon vanilla extract
  • 1/2 teaspoon almond extract
  • 2 teaspoons baking powder
  • 1/4 teaspoon salt
  • 1 cup powdered sugar
  • 2-3 tablespoons milk
  • Sprinkles for decoration

Instructions

1. Preheat and Prepare

Preheat your oven to 350°F (175°C) and line a baking sheet with parchment paper. This step ensures the cookies bake evenly and don’t stick to the pan.

2. Cream the Butter and Sugar

In a large mixing bowl, cream together the softened butter and granulated sugar using an electric mixer or stand mixer on medium speed. Mix for about 2-3 minutes, or until the mixture is light and fluffy. This step is crucial as it incorporates air into the dough, which helps the cookies rise and gives them a tender texture.

3. Add the Eggs and Extracts

Beat in the eggs, one at a time, ensuring each egg is fully incorporated before adding the next. Stir in the vanilla and almond extracts. These flavorings give the cookies their signature taste—warm, sweet, and slightly nutty.

4. Combine Dry Ingredients

In a separate bowl, whisk together the flour, baking powder, and salt. Gradually add the dry ingredients to the wet ingredients, mixing on low speed until just combined. Avoid overmixing the dough, as this can make the cookies tough.

5. Shape and Bake

Roll the dough into 1-inch balls and place them 2 inches apart on the prepared baking sheet. Gently flatten each ball with your hand or the back of a spoon. Bake for 10-12 minutes, or until the edges are just starting to turn golden. You don’t want to overbake these cookies; they should remain soft and tender. Cool on the baking sheet for 5 minutes, then transfer to a wire rack to cool completely.

6. Glaze and Decorate

While the cookies cool, prepare the glaze. In a small bowl, whisk together the powdered sugar and 2-3 tablespoons of milk until smooth. The glaze should be thick but pourable. Dip the top of each cooled cookie into the glaze, allowing any excess to drip off. Immediately sprinkle with your choice of sprinkles. Let the glaze set for about 30 minutes before serving or storing.

Serving Suggestions

Festive Platter: Arrange these cookies on a holiday-themed platter for a beautiful presentation at parties or gatherings.

Gifting: Package them in decorative tins or boxes with a festive ribbon for a delightful homemade gift.

Pair with Beverages: Serve with hot cocoa, coffee, or a glass of milk for a classic and cozy treat.

Tips:

  • Ensure the butter is softened but not melted for the best texture in your cookies.
  • For a richer flavor, you can use almond milk instead of regular milk in the glaze.
  • Customize your cookies with different colors of sprinkles or add edible glitter for a festive touch.

Storage Options:

  • These cookies can be stored in an airtight container at room temperature for up to 5 days.
  • To freeze, place the cookies in a single layer in a freezer-safe container with parchment paper between layers. They can be frozen for up to 1 month. Thaw at room temperature before serving.

Enjoy these Classic Sugar Cookies as a delightful treat that’s sure to bring smiles and warm memories to your kitchen!